
:max_bytes(150000):strip_icc():format(webp)/preaknessstakes-5c804f1b46e0fb00019b8ee0.jpg)
"Youtube's Prime Moments Celebrations Beyond VidCon"
Youtube’s Prime Moments: Celebrations Beyond VidCon
Beyond VidCon - A Guide to the Most Important YouTube Events

Richard Bennett
Dec 30, 2022• Proven solutions
Want to meet your favorite creators? Or, do you want to become a better creator yourself? There are huge conventions you can go to where you can both indulge in fandom and work on your skills. Here are the 7 largest and most well-known:
- VidCon (US/Europe/Australia)
- PlayList Live (US)
- Beautycon (US/UK)
- YouTube Fanfest (Various international locations)
- RTX (US/UK/Australia)
- Amplify Live (Australia)
- Summer in the City (UK)
The Most Important YouTube Events
Want to be a youtube creator too? Go and get Wondershare Filmora, the video editing software for all creators.


1. VidCon
VidCon US: June (Anaheim, California)
VidCon Europe (Amsterdam): March/April
VidCon Australia: August/September
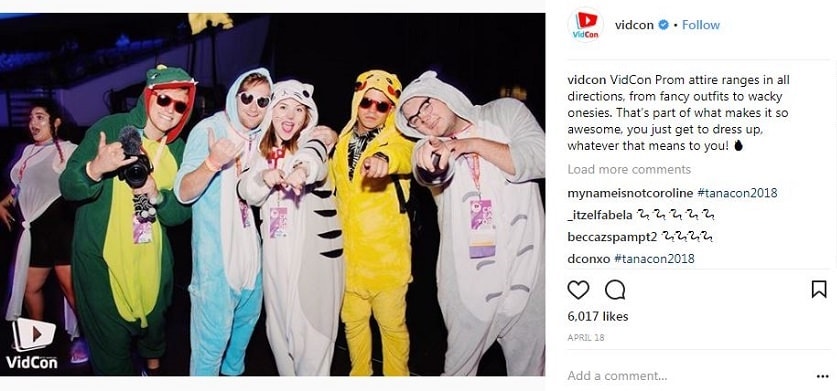
In 2017 over 30,000 YouTube enthusiasts – from fans to A-list creators – attended VidCon US, and that was thousands of more people than attended in 2016. It’s hard to imagine that this event – the biggest convention for YouTube and online video – will do anything but grow over the next few years.
VidCon was founded by the Vlogbrothers in 2010 as a place for internet friends to meet in real life.
Passes:
There are three different types of passes for VidCon – the Community Track, the Creator Track, and the Industry Track.
The Community Track is for anyone who loves YouTube and wants a chance to see their favorite creators and meet other fans. Pricing ranges from $100 to $180, depending on how early you buy your ticket.
The Creator Track gets you to access to all the same events as the Community badges (except for the Meet & Greet Lottery*), plus even more panels and workshops that will help you become a better creator. Pricing ranges from $150 to $250 depending on how early you buy your ticket.
The Industry Track is for anyone working in online video or video-adjacent industries, like advertising, branding, or talent management. There are panels on online marketing and working with influencers. Pricing ranges from $550 to $850, depending on when you buy your ticket.
*The Meet and Greet Lottery is a chance for anyone attending with a Community or Industry pass to meet their favorite creator. You rank the 15 creators you’d most like to meet according to how much you want to meet them. A computerized system will determine who gets into which Meet & Greet.
You have a two-week window (usually the first half of May) to submit your choices.
2. PlayList Live
Orlando, Florida: April/May
Tri-State (Secaucus, New Jersey): September
Washington DC: September
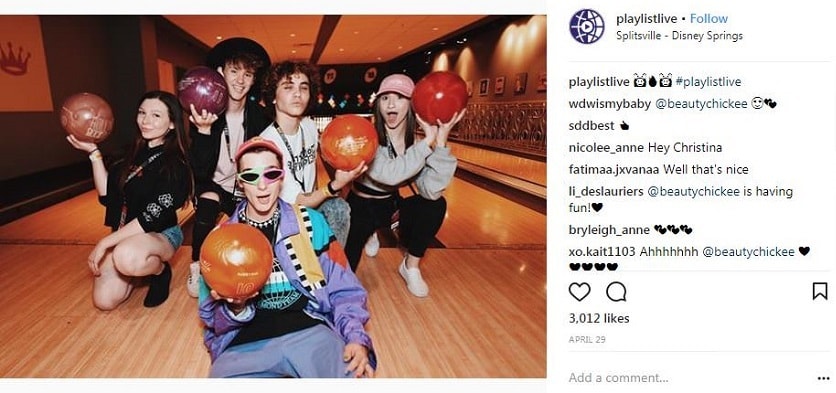
Playlist Live is a YouTube event for creators and their supporters that has a particular focus on music. Where VidCon is advertised using images of sunshine, crowded convention halls, and speakers, Playlist Live is advertised with images of city skylines, concerts, and fireworks.
Playlist Live prides itself on having ‘non-stop interactive activities.’ These include chances to meet your favorite creators on the Saturday and Sunday of the event. Which meetups you get to attend are determined by first-come-first-serve online signup.
Passes:
Pricing may vary depending on which event you are attending and how early you purchase your ticket. The following ranges are an estimate. Not all pass types are available for all events.
The Standard Pass ($75 - $130) is the basic pass for fans of the online video who want to meet their favorite creators, play games, and have a great time.
The Standard Pass + Merch ($100-$155) gets you into the same events as the standard pass plus a t-shirt and a wristband.
The Standard Deluxe ($120 - $205) comes with a hoodie, sunglasses, and a commemorative ticket.
The Parent Pass/Parent + Merch/Parent Deluxe ($75-$200) is for parents who want to chaperone their kids around Playlist Live and includes access to everything the Standard Pass can access.
The Insight Pass ($150-$205) is for anyone who wants to learn more about being a digital creator. You get Standard access as well as workshops and panels for successful creators and industry professionals designed to help you on your path.
The Insight + Merch/Insight Deluxe Passes ($175-$280) you get the same access as an Insight Pass plus goodies like shirts, wristbands, commemorative tickets, and sunglasses.
The Premium Pass ($250-$404) grants you standard access plus early access for meetup registration and a special VIP meetup.
There is also business Passes with Merch and Deluxe (Business Deluxe can cost up to $330) options for people working in marketing, publicity, production, etc. These passes include access to an extra day of business and industry-specific programming.
3. Beautycon Festivals
Los Angeles: July
New York: April
London, UK: November
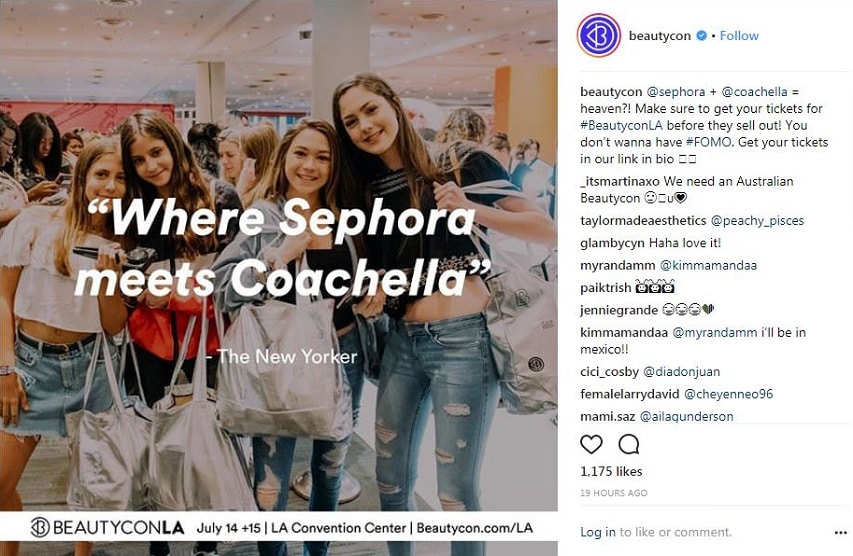
Beautycon is an event meant to highlight innovators in the fields of Beauty, Makeup, and Lifestyle. They bring together online creators, fans, celebrities, and brands for two-day festivals full of fun, panel discussions, shopping, and free samples.
In 2017, 30,000 people attended Beautycon festivals internationally.
Passes:
Two-Day General Admission ($69) gets you in for the whole weekend, and you’ll also get a fabric wristband and other goodies.
You can also get a One-Day General Admission to pass for $49.
The Two-Day Hauler pass ($199) gets you in the doors 2 hours before the General Admission passes, plus a VIP swag bag.
General Admission and Hauler passes do not include access to programmed meetups.
Two-Day All Access passes ($999) include early entry as well as reserved seating in the front row at the Min Stage, photo opportunities in the Halo Room, a tour of the Creator Gifting Suite, custom merch, credit at the Beautycon Shop online, plus everything from the General and Hauler packs.
The final type of pass, the Two-Day Beauty Insider ($1999) pass, has everything the All-Access pass has plus a 2-night stay at a hotel downtown (for the LA festival).
4. YouTube FanFest
These events are customized to the wherever festival is visiting, so you’re always sure to see the big and rising YouTube stars from your region. Generally, these events include performances and activities as well as a Meet & Greet.
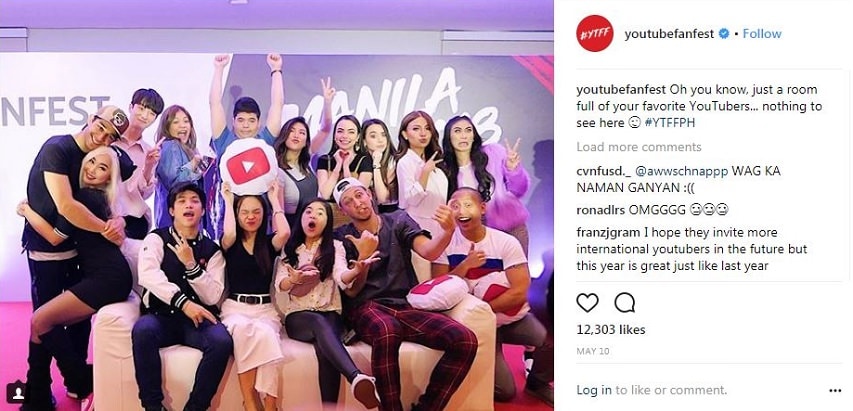
There is not a steady annual schedule for FanFests, but it has visited these cities in the past: Manila, Mumbai, Seoul, Toronto, Sao Paulo, Jakarta, Tokyo, Jeddah, Bangkok, Ho Chi Minh City, Hong Kong, and Washington, DC.
5. RTX
Austin, Texas: August
London: September
Sydney, Australia: February
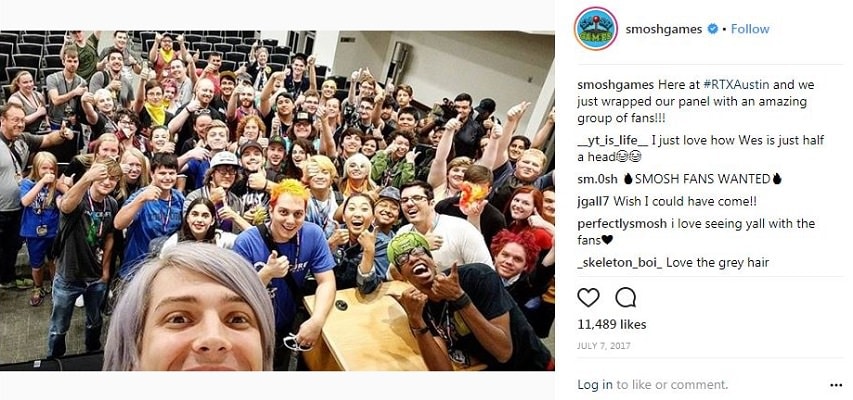
Brought to you by the creators behind Rooster Teeth, RTX is a celebration of internet culture and gaming. It includes exhibitors, live events, panels, and activities targeting gamers. Partners include Twitch and multiple gaming companies.
Passes:
It costs $50 for a Friday or Sunday pass, and $55 for just Saturday. You’ll get an attendee bag and lanyard with your pass.
The Weekend pass costs $110, and you get access to all 3 days plus the bag/lanyard and 1 autograph code.
A Weekend Plus ($335) pass gets you everything the Weekend pass gets you plus 2 autograph codes, early access to the Expo hall on Friday, lounge access, and reserved seating at the stage.
The Platinum pass is the most expensive at $729, and it includes everything the Weekend Plus pass does plus a priority line for panels, priority seating, and an exclusive party.
6. Amplify Live
Sydney, Australia: April
Melbourne, Australia: April
These events showcase the biggest social medial talent and musical acts in Australia and New Zealand. In 2017 the headliners of the Cool for Summer tour were Lindsey Stirling, Dan & Phil, and Nash Grier.
Tickets for the Cool for Summer tour cost $65 or $75 AUD depending on how early you buy them.
For VIP access, you can buy a Deluxe pass for $125-$150 AUD.
Meet and Greet tickets must be purchased separately from your event ticket.
Silver Meet and Greet, $80 AUD: access to the ‘Cool for Summer Celebrity Zone’ featuring non-headliner talent.
Gold Meet and Greet, $189 AUD: access to the ‘Cool for Summer Celebrity Zone’ plus a guaranteed meeting with one of the headliners (you choose which when you purchase).
Platinum Meet & Greet, $450 AUD: meet all the headliners and get access to an exclusive VIP area, merch pack, and special entry.
7. Summer in the City
London, UK: August
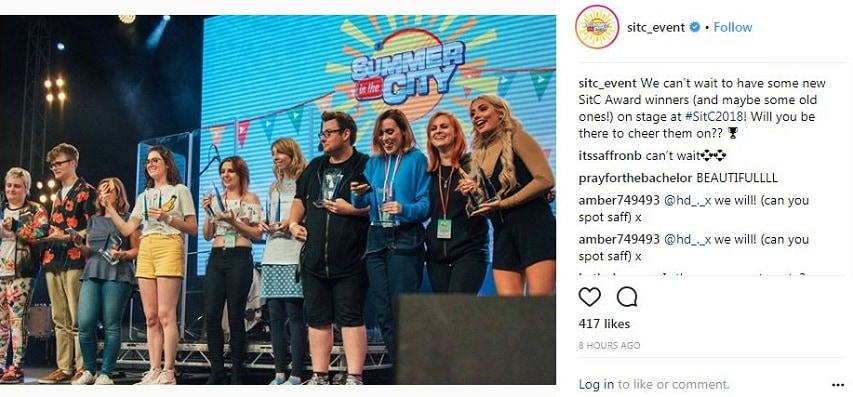
This is the largest online video festival in the UK. It features discussion panels, workshops, and live performances targeted at creators, fans of online video, and industry professionals. YouTubers might hang out on the show floor meeting fans, and there are also Meet and Greet sessions for top creators. All ticket holders can submit online ballots for a chance at Meet and Greet access.
Summer in the City even has its own awards show, SitC, to honor the best in online content. Previous winners include Dodie, Tomska, Jack & Dean, and Nathan Zed.
There is one day of Summer in the City called ‘Creator Day’ (generally on Friday), which features educational workshops for creators and industry professionals.
Passes:
If you buy your tickets during early bird pricing, the prices will look like this:
Saturday OR Sunday: £30.00
Saturday AND Sunday: £45.00
Creator Day: £30.00
Creator Day + Weekend: £60.00
Industry Ticket: £100.00
Have you ever attended an offline YouTube event? Which one, and how did you like it?
Richard Bennett
Richard Bennett is a writer and a lover of all things video.
Follow @Richard Bennett
Richard Bennett
Dec 30, 2022• Proven solutions
Want to meet your favorite creators? Or, do you want to become a better creator yourself? There are huge conventions you can go to where you can both indulge in fandom and work on your skills. Here are the 7 largest and most well-known:
- VidCon (US/Europe/Australia)
- PlayList Live (US)
- Beautycon (US/UK)
- YouTube Fanfest (Various international locations)
- RTX (US/UK/Australia)
- Amplify Live (Australia)
- Summer in the City (UK)
The Most Important YouTube Events
Want to be a youtube creator too? Go and get Wondershare Filmora, the video editing software for all creators.
1. VidCon
VidCon US: June (Anaheim, California)
VidCon Europe (Amsterdam): March/April
VidCon Australia: August/September
In 2017 over 30,000 YouTube enthusiasts – from fans to A-list creators – attended VidCon US, and that was thousands of more people than attended in 2016. It’s hard to imagine that this event – the biggest convention for YouTube and online video – will do anything but grow over the next few years.
VidCon was founded by the Vlogbrothers in 2010 as a place for internet friends to meet in real life.
Passes:
There are three different types of passes for VidCon – the Community Track, the Creator Track, and the Industry Track.
The Community Track is for anyone who loves YouTube and wants a chance to see their favorite creators and meet other fans. Pricing ranges from $100 to $180, depending on how early you buy your ticket.
The Creator Track gets you to access to all the same events as the Community badges (except for the Meet & Greet Lottery*), plus even more panels and workshops that will help you become a better creator. Pricing ranges from $150 to $250 depending on how early you buy your ticket.
The Industry Track is for anyone working in online video or video-adjacent industries, like advertising, branding, or talent management. There are panels on online marketing and working with influencers. Pricing ranges from $550 to $850, depending on when you buy your ticket.
*The Meet and Greet Lottery is a chance for anyone attending with a Community or Industry pass to meet their favorite creator. You rank the 15 creators you’d most like to meet according to how much you want to meet them. A computerized system will determine who gets into which Meet & Greet.
You have a two-week window (usually the first half of May) to submit your choices.
2. PlayList Live
Orlando, Florida: April/May
Tri-State (Secaucus, New Jersey): September
Washington DC: September
Playlist Live is a YouTube event for creators and their supporters that has a particular focus on music. Where VidCon is advertised using images of sunshine, crowded convention halls, and speakers, Playlist Live is advertised with images of city skylines, concerts, and fireworks.
Playlist Live prides itself on having ‘non-stop interactive activities.’ These include chances to meet your favorite creators on the Saturday and Sunday of the event. Which meetups you get to attend are determined by first-come-first-serve online signup.
Passes:
Pricing may vary depending on which event you are attending and how early you purchase your ticket. The following ranges are an estimate. Not all pass types are available for all events.
The Standard Pass ($75 - $130) is the basic pass for fans of the online video who want to meet their favorite creators, play games, and have a great time.
The Standard Pass + Merch ($100-$155) gets you into the same events as the standard pass plus a t-shirt and a wristband.
The Standard Deluxe ($120 - $205) comes with a hoodie, sunglasses, and a commemorative ticket.
The Parent Pass/Parent + Merch/Parent Deluxe ($75-$200) is for parents who want to chaperone their kids around Playlist Live and includes access to everything the Standard Pass can access.
The Insight Pass ($150-$205) is for anyone who wants to learn more about being a digital creator. You get Standard access as well as workshops and panels for successful creators and industry professionals designed to help you on your path.
The Insight + Merch/Insight Deluxe Passes ($175-$280) you get the same access as an Insight Pass plus goodies like shirts, wristbands, commemorative tickets, and sunglasses.
The Premium Pass ($250-$404) grants you standard access plus early access for meetup registration and a special VIP meetup.
There is also business Passes with Merch and Deluxe (Business Deluxe can cost up to $330) options for people working in marketing, publicity, production, etc. These passes include access to an extra day of business and industry-specific programming.
3. Beautycon Festivals
Los Angeles: July
New York: April
London, UK: November
Beautycon is an event meant to highlight innovators in the fields of Beauty, Makeup, and Lifestyle. They bring together online creators, fans, celebrities, and brands for two-day festivals full of fun, panel discussions, shopping, and free samples.
In 2017, 30,000 people attended Beautycon festivals internationally.
Passes:
Two-Day General Admission ($69) gets you in for the whole weekend, and you’ll also get a fabric wristband and other goodies.
You can also get a One-Day General Admission to pass for $49.
The Two-Day Hauler pass ($199) gets you in the doors 2 hours before the General Admission passes, plus a VIP swag bag.
General Admission and Hauler passes do not include access to programmed meetups.
Two-Day All Access passes ($999) include early entry as well as reserved seating in the front row at the Min Stage, photo opportunities in the Halo Room, a tour of the Creator Gifting Suite, custom merch, credit at the Beautycon Shop online, plus everything from the General and Hauler packs.
The final type of pass, the Two-Day Beauty Insider ($1999) pass, has everything the All-Access pass has plus a 2-night stay at a hotel downtown (for the LA festival).
4. YouTube FanFest
These events are customized to the wherever festival is visiting, so you’re always sure to see the big and rising YouTube stars from your region. Generally, these events include performances and activities as well as a Meet & Greet.
There is not a steady annual schedule for FanFests, but it has visited these cities in the past: Manila, Mumbai, Seoul, Toronto, Sao Paulo, Jakarta, Tokyo, Jeddah, Bangkok, Ho Chi Minh City, Hong Kong, and Washington, DC.
5. RTX
Austin, Texas: August
London: September
Sydney, Australia: February
Brought to you by the creators behind Rooster Teeth, RTX is a celebration of internet culture and gaming. It includes exhibitors, live events, panels, and activities targeting gamers. Partners include Twitch and multiple gaming companies.
Passes:
It costs $50 for a Friday or Sunday pass, and $55 for just Saturday. You’ll get an attendee bag and lanyard with your pass.
The Weekend pass costs $110, and you get access to all 3 days plus the bag/lanyard and 1 autograph code.
A Weekend Plus ($335) pass gets you everything the Weekend pass gets you plus 2 autograph codes, early access to the Expo hall on Friday, lounge access, and reserved seating at the stage.
The Platinum pass is the most expensive at $729, and it includes everything the Weekend Plus pass does plus a priority line for panels, priority seating, and an exclusive party.
6. Amplify Live
Sydney, Australia: April
Melbourne, Australia: April
These events showcase the biggest social medial talent and musical acts in Australia and New Zealand. In 2017 the headliners of the Cool for Summer tour were Lindsey Stirling, Dan & Phil, and Nash Grier.
Tickets for the Cool for Summer tour cost $65 or $75 AUD depending on how early you buy them.
For VIP access, you can buy a Deluxe pass for $125-$150 AUD.
Meet and Greet tickets must be purchased separately from your event ticket.
Silver Meet and Greet, $80 AUD: access to the ‘Cool for Summer Celebrity Zone’ featuring non-headliner talent.
Gold Meet and Greet, $189 AUD: access to the ‘Cool for Summer Celebrity Zone’ plus a guaranteed meeting with one of the headliners (you choose which when you purchase).
Platinum Meet & Greet, $450 AUD: meet all the headliners and get access to an exclusive VIP area, merch pack, and special entry.
7. Summer in the City
London, UK: August
This is the largest online video festival in the UK. It features discussion panels, workshops, and live performances targeted at creators, fans of online video, and industry professionals. YouTubers might hang out on the show floor meeting fans, and there are also Meet and Greet sessions for top creators. All ticket holders can submit online ballots for a chance at Meet and Greet access.
Summer in the City even has its own awards show, SitC, to honor the best in online content. Previous winners include Dodie, Tomska, Jack & Dean, and Nathan Zed.
There is one day of Summer in the City called ‘Creator Day’ (generally on Friday), which features educational workshops for creators and industry professionals.
Passes:
If you buy your tickets during early bird pricing, the prices will look like this:
Saturday OR Sunday: £30.00
Saturday AND Sunday: £45.00
Creator Day: £30.00
Creator Day + Weekend: £60.00
Industry Ticket: £100.00
Have you ever attended an offline YouTube event? Which one, and how did you like it?
Richard Bennett
Richard Bennett is a writer and a lover of all things video.
Follow @Richard Bennett
Bringing Text to Life: A Guide to Dynamic Animation Methods
How to Create Animated Bouncing Text

Liza Brown
Mar 27, 2024• Proven solutions
Earlier, you learned how to have a bounce text effect in Adobe After Effects . However, because AE is a complex application and has a steep learning curve, this section explains the two alternative ways to get the same effect on your existing video footage.
Method 1: How to Create Bouncing Text in Filmora Video Editor?
When talking about Wondershare Filmora , the application is populated with several presets for texts and titles, animations, effects, filters, and much more.
These pre-built templates not only make your task easier, they also save your decent amount of time that you would spend while working with After Effects or any other similar app that requires you to build things from scratch.
You can follow the instructions given below to add animated bounce text to any of your video footages with Filmora:
Step 1: Add a Footage to Timeline
Launch Wondershare Filmora on your Windows or Mac PC. By default, the aspect ratio of the project is set to 16:9. Click anywhere inside the Media window at the upper-left section, and select and import footage you want to add bounce text to.
Step 2: Insert Text and Add Bounce Effect
Click Titles from the standard toolbar at the top, and click and drag your preferred title template from the Library to the timeline. In case you don’t want any specific animation or style on the title, you can use the default title.
In the timeline, double-click the title you just added, use the upper-left section to edit the text, go to the Animation tab from the left pane, scroll down the list, and double-click the Up Down 1 or Up Down 2 preset to apply the bounce effect to the credits. Click OK to save the changes and to get back to the main window.

Step 3: Add Shake Filters
Go to Effects from the standard toolbar, expand the Filters category from the left pane, and click Shake. From the Library window, click and drag your preferred shake filter to the timeline. Here, I will choose Mild.

You can customize the default effect by double-clicking the shake filter in the timeline, using the sliders in the upper-left area of the interface to make necessary adjustments, and then clicking OK to save the changes and to get back to the previous interface.

Step 4: Export the Final Output
Click EXPORT from the top of the interface, go to the Local tab in the Export box, choose your preferred output format from the list in the left, make required customizations from the right pane, and click EXPORT from the bottom-right corner to export the video.

Now, you can add the bouncing text video and the background video to the timeline, and then place the bouncing text video above the background video track.
Double click the text track, go to the Chroma Key effect, select the Color Picker tool, and click anywhere in the Preview window to get things right. Finally, export the entire project to your preferred output format as explained in Step 4.
As explained before, Wondeshare Filmora makes the entire process of creating and adding bounce text effect pretty simple. With all the pre-build templates, and the versatility of the options that can be used to customize those presets, you can come up with the effects that are usually obtained when you start generating them from the scratch.
Method 2: Generate Animated Bouncing Texts Online
If you don’t want any heavy and resource-intensive app on your PC merely for some special text effects, you can try any of the online solutions instead. The benefit of using any such web app is that all the processing is done on site’s server, and it is only a web browser and an Internet connection that you need to have at your side.
Some most trusted websites to generate bounce text are listed below:
1. ENGFTO
Website: https://engfto.com/index/create%5Fanimated%5Fbouncing%5Ftext/0-26

You can follow the instructions given below to use Engfto to generate bouncing text for your footages:
Step 1: Get to the Animated Bouncing Text Page
Launch your favorite web browser, and go to the link given above to get to the Engfto’s animated bouncing text page.
Step 2: Customize Text and Preferences
Modify the values in the fields under the SIZE AREA and TEXT sections to customize the text area, the text itself, its size, and font. Next, adjust the values in the fields under the EFFECT PARAMETERS section to get the required bounce effect. Also, use the fields under the BACKGROUND section to either change the background color, or pick a background image from your PC.
Step 3: Obtain the Animated Text
Click the SAVE GIF ANIMATION button from the lower section of the page to download the animated text to your PC.
2. Loading.io
The instructions given below explain how to use Loading.io to get animated bounce text effect for your footages:
Step 1: Get to the Loading.io Webpage
Launch your favorite web browser and go to https://loading.io/animation/text/ .
Step 2: Customize the Text and Choose Animation Effect

Use the options available on the webpage to type your text, and change its font, color, background, transparency level etc. Select Bounce (or any of its variants) from the Animation drop-down list, and adjust the speed using the Speed slider.
Step 3: Obtain the Text
Click your preferred option from next to the Download As section to download the animated text to your PC.
Note: Regardless of the web solution you choose to generate and obtain animated bounce text, you will still need a post-production tool to add the downloaded text to your footage.
Conclusion
Generating bounce text effect is much simpler when you use Wondershare Filmora or any of the online solutions as explained in Method 2. While the former gives you more flexibility when it comes to customizations, the latter doesn’t require any app to be installed on your PC. In addition, many times the web apps offer their services for free, and therefore they are preferred by the novice users who are not much into post-production processes.
Liza Brown
Liza Brown is a writer and a lover of all things video.
Follow @Liza Brown
Liza Brown
Mar 27, 2024• Proven solutions
Earlier, you learned how to have a bounce text effect in Adobe After Effects . However, because AE is a complex application and has a steep learning curve, this section explains the two alternative ways to get the same effect on your existing video footage.
Method 1: How to Create Bouncing Text in Filmora Video Editor?
When talking about Wondershare Filmora , the application is populated with several presets for texts and titles, animations, effects, filters, and much more.
These pre-built templates not only make your task easier, they also save your decent amount of time that you would spend while working with After Effects or any other similar app that requires you to build things from scratch.
You can follow the instructions given below to add animated bounce text to any of your video footages with Filmora:
Step 1: Add a Footage to Timeline
Launch Wondershare Filmora on your Windows or Mac PC. By default, the aspect ratio of the project is set to 16:9. Click anywhere inside the Media window at the upper-left section, and select and import footage you want to add bounce text to.
Step 2: Insert Text and Add Bounce Effect
Click Titles from the standard toolbar at the top, and click and drag your preferred title template from the Library to the timeline. In case you don’t want any specific animation or style on the title, you can use the default title.
In the timeline, double-click the title you just added, use the upper-left section to edit the text, go to the Animation tab from the left pane, scroll down the list, and double-click the Up Down 1 or Up Down 2 preset to apply the bounce effect to the credits. Click OK to save the changes and to get back to the main window.
Step 3: Add Shake Filters
Go to Effects from the standard toolbar, expand the Filters category from the left pane, and click Shake. From the Library window, click and drag your preferred shake filter to the timeline. Here, I will choose Mild.
You can customize the default effect by double-clicking the shake filter in the timeline, using the sliders in the upper-left area of the interface to make necessary adjustments, and then clicking OK to save the changes and to get back to the previous interface.
Step 4: Export the Final Output
Click EXPORT from the top of the interface, go to the Local tab in the Export box, choose your preferred output format from the list in the left, make required customizations from the right pane, and click EXPORT from the bottom-right corner to export the video.
Now, you can add the bouncing text video and the background video to the timeline, and then place the bouncing text video above the background video track.
Double click the text track, go to the Chroma Key effect, select the Color Picker tool, and click anywhere in the Preview window to get things right. Finally, export the entire project to your preferred output format as explained in Step 4.
As explained before, Wondeshare Filmora makes the entire process of creating and adding bounce text effect pretty simple. With all the pre-build templates, and the versatility of the options that can be used to customize those presets, you can come up with the effects that are usually obtained when you start generating them from the scratch.
Method 2: Generate Animated Bouncing Texts Online
If you don’t want any heavy and resource-intensive app on your PC merely for some special text effects, you can try any of the online solutions instead. The benefit of using any such web app is that all the processing is done on site’s server, and it is only a web browser and an Internet connection that you need to have at your side.
Some most trusted websites to generate bounce text are listed below:
1. ENGFTO
Website: https://engfto.com/index/create%5Fanimated%5Fbouncing%5Ftext/0-26
You can follow the instructions given below to use Engfto to generate bouncing text for your footages:
Step 1: Get to the Animated Bouncing Text Page
Launch your favorite web browser, and go to the link given above to get to the Engfto’s animated bouncing text page.
Step 2: Customize Text and Preferences
Modify the values in the fields under the SIZE AREA and TEXT sections to customize the text area, the text itself, its size, and font. Next, adjust the values in the fields under the EFFECT PARAMETERS section to get the required bounce effect. Also, use the fields under the BACKGROUND section to either change the background color, or pick a background image from your PC.
Step 3: Obtain the Animated Text
Click the SAVE GIF ANIMATION button from the lower section of the page to download the animated text to your PC.
2. Loading.io
The instructions given below explain how to use Loading.io to get animated bounce text effect for your footages:
Step 1: Get to the Loading.io Webpage
Launch your favorite web browser and go to https://loading.io/animation/text/ .
Step 2: Customize the Text and Choose Animation Effect
Use the options available on the webpage to type your text, and change its font, color, background, transparency level etc. Select Bounce (or any of its variants) from the Animation drop-down list, and adjust the speed using the Speed slider.
Step 3: Obtain the Text
Click your preferred option from next to the Download As section to download the animated text to your PC.
Note: Regardless of the web solution you choose to generate and obtain animated bounce text, you will still need a post-production tool to add the downloaded text to your footage.
Conclusion
Generating bounce text effect is much simpler when you use Wondershare Filmora or any of the online solutions as explained in Method 2. While the former gives you more flexibility when it comes to customizations, the latter doesn’t require any app to be installed on your PC. In addition, many times the web apps offer their services for free, and therefore they are preferred by the novice users who are not much into post-production processes.
Liza Brown
Liza Brown is a writer and a lover of all things video.
Follow @Liza Brown
Also read:
- [Updated] Effortless YouTube Income Computations
- In 2024, Boosting Profitability in the World of Youtube Shorts
- [Updated] Cutting-Edge Icons and Logos From 6 Innovative Websites
- [Updated] Charting 8 Most Swiftly Increasing Video Platforms
- End-Screen Design Made Easy with Our Templates & Tutorials for 2024
- [New] Becoming a Director Top Film Tips & Tricks on YouTube
- How to Use YouTube Enhancements to Improve Video Quality
- Elevate YouTube Content Advanced Editing Using WM Maker
- Monetizing Vlogs A Step-by-Step Blueprint
- [Updated] Elevate Your Soundbites Insights for YouTube Short Tunes
- Efficiently Upload and Render YouTube Videos with Precision
- 2024 Approved Enhance Your Shorts Fresh and Original Thumbnails with Minimal Effort
- [New] Channel Marketing Making a Trailer that Sells More
- 2024 Approved 10-Second Teasers Explained
- Plating Perfection 30 Unique and Appealing Recipe Channels
- A Filmmaker's Guide Seamless Editing & Uploading 360-Degree Footage for YouTube
- [New] Compreenhensive Guide for YouTube Short Video Creators
- A Deep Dive Into The Fundamentals of YouTube Shorts for 2024
- Eliminate YouTube Short Headaches with These Tips
- 2024 Approved Enabling/Disabling YouTube Video Comments
- Leading Resource Hubs for YouTube Intro Files
- Uninterrupted Access to 9 Premium Christmas Films Enjoyment at Zero Cost
- [Updated] Cutting-Edge Techniques for Resolving YouTube Short Issues
- Young Entrepreneur's Guide Buying Profitable YouTube Sites
- Elevate Your Short-Form Content Top 10 Edits for iOS/Android
- [Updated] A Producer's Roadmap Pioneering High-Quality ASMR Content
- How to Add Timestamps YouTube Video?
- [Updated] Crafting Content Dimensions for App Aggregates
- Two-Pronged Approach to Perfecting Your YouTube Video Introduction
- In 2024, Discover The 10 Best Yoga Platforms For Enhanced Fitness
- [Updated] Audio Purging Techniques for Streaming Success
- In 2024, 15 Favorite Online Anime Video Platforms
- Premier Composer of Media Experience
- Regulatory Stance on Recording YouTube Video Content
- All About Virtual Idols and Their Rise
- Profit in the Space-Time Continuum The Art of Creating Earning-Rich Content
- In 2024, Fake Android Location without Rooting For Your Itel A05s | Dr.fone
- In 2024, How To Remove Passcode From iPhone 14 Pro? Complete Guide
- Updated 2024 Approved Say Goodbye to Stock Photo Fees Free Alternatives
- [New] 2024 Approved Crafting Vivid Visuals for Spotify Video Ads
- FRP Hijacker by Hagard Download and Bypass your Vivo S18 FRP Locks
- How To Unlock Stolen Apple iPhone 12 In Different Conditionsin
- [New] Mastering Mass Message Deletion on Discord
- Best Mobile and Desktop MKV Software
- [New] Hot Tips for Business Indispensable Items You Can't Afford To Miss for 2024
- In 2024, The Magnificent Art of Pokemon Go Streaming On Lava Yuva 2 Pro? | Dr.fone
- New In 2024, 11 Apps To Speed Up A Video On iPhone
- S Top Free Video Hosting Options for Online Publishers
- Excel 2000 Stuck at Opening File 0 - Resolve Performance Issues | Stellar
- Updated In 2024, Adding Dynamic Motion Blur to Your Videos with Final Cut Pro
- [Updated] Top 5 Emulation Suites to Experience Sony's PS1 Library for 2024
- How to fix videos not playing with my Motorola Edge 40 Pro?
- New How to Make a Wonderful Video Slideshow with Your Travel Photos for 2024
- [New] 2024 Approved The 8 Best Zombie Games
- Spoofing Life360 How to Do it on Oppo Reno 11 Pro 5G? | Dr.fone
- [New] Backpedaling Through Imagery An Insider's Guide to Finding Originals in Instagram for 2024
- 7 Ways to Unlock a Locked Vivo Y100 Phone
- Title: "Youtube's Prime Moments Celebrations Beyond VidCon"
- Author: Brian
- Created at : 2024-05-25 13:29:54
- Updated at : 2024-05-26 13:29:54
- Link: https://youtube-video-recordings.techidaily.com/youtubes-prime-moments-celebrations-beyond-vidcon/
- License: This work is licensed under CC BY-NC-SA 4.0.
