
:max_bytes(150000):strip_icc()/icooker-tv-safety-straps-xxyy-577acfff3df78cb62c554ad1.jpg)
YouTube Video Editing 101 & Alternative Sources
YouTube Video Editing 101 & Alternative Sources
Do you want to convert video clips into intriguing movies? If yes, then you should download and install an advanced movie maker on your computer and creatively compile your video clips and photos. Movie Makers have multiple features such as transition overlays, timeline narration, audio options, and animations. This guide is about YouTube movie makers and how you can get started with this application.
What Is YouTube Movie Maker?
YouTube Movie Maker is a video editing program. It enables video editors to create videos for their YouTube channel. Furthermore, you can upload and manage your videos on YouTube using this software. You can perform all these tasks with a single interface. Creating videos using YouTube movie makers is entertaining as it includes interesting tools to express creative instinct. Furthermore, the moviemaker YouTube uploading process is also simpler than ever. Here are some features of YouTube movie maker:
1. Video Creation
YouTube movie maker is a simple-to-use video editing tool with wide-ranging features. You can add multiple images, video clips, audio, and icons and align them on the timeline. Beginners can use Movie Wizard to understand the platform interface and develop video editing skills.

3. Publishing
This tool has standard and special features. Using YouTube movie maker, you can upload videos on your YouTube channel and attract more audience with your content. This video editing tool makes it easy for YouTube content creators to publish their content on the platform. Furthermore, you can save the content on your computer and publish it later on.
3. Boost Productivity
Video editors such as YouTube movie maker improve productivity for video editors. With convenient features and tools, content creators can create more videos with efficiency and increase their content reach.
YouTube Movie Maker Tutorial
YouTube Movie Maker download process is simple. To download and install the application follow these steps:
Step 1: Visit MakeYouTubeVideo.com and choose the download option.
Step 2: This tool is compatible with every Windows version, so you don’t have to worry about compatibility.

Step 3: While downloading the application you need to evaluate the plans.
Step 4: The Platinum version of YouTube Movie Maker will cost $399. With this plan, you will get high-quality transition effects and audio materials.
Step 5: After choosing the plan, you have to enter the payment options and download the tool.
Step 6: A setup file will download to your computer.
Step 7: You need to open that file and run the installation process.
Here are some tips to use YouTube Movie Maker:
Step 1: When you open the application a clear interface will appear with easy-to-use options.

Step 2: From the left panel, you can browse through your computer storage and import content
Step 3: Also, you can drag and drop the media on your workspace.

Step 4: Align the content on different channels and add music.
Step 5: Once you align the content as required, you can publish the video on YouTube from the button on the bottom right.
4 Best Alternatives for YouTube Movie Maker
A plethora of video editing tools are available on the internet. Whether you are a marketing manager or a film producer, you would need a movie marker to boost your productivity and become a professional video content creator. If you want an alternate option for YouTube movie maker, you can check this list:
1. Wondershare Filmora
Filmora is one of the best video editing tools out there. Other than Filmora, Wondershare also offers Filmora (a video editing tool for mobile), and FilmStock with wide-ranging video effects and unique soundtracks. Filmora offers a simple and intuitive interface with lots of exciting overlays, filters, transitions, and motion elements. Since Filmora has a dedicated films tock, users can easily download royalty-free music and video clips. Some basic features of Filmora are:
- Noise removal
- Speed control
- GIF support
- 4K editing support
- Frame by frame preview
- Color tuning

For Win 7 or later (64-bit)
For macOS 10.12 or later
Only a few video editing tools offer 4K and GIF support, and Filmora is one of them. Filmora enables video editors to include engaging titles on their videos. This video editor offers a super easy and flexible interface to video editors so they can drag and drop relevant clips, select interesting music, and choose a striking theme.
The interface is clean, uncluttered, and organized with easy-to-access features. It includes basic as well as advanced features to enhance video quality and add outstanding effects. There are vast numbers of effects and transitions to make your video smooth and engaging. Color matching and motion tracker tools will completely change your video quality.
2. Nero Video
Nero Video is a cheap yet effective tool for YouTubers. This tool comes with a wide array of effects and tricks to create outstanding content. This tool is perfect for beginners because of its simple editing tools. Nero Video offers the finest functionalities and speed to video editors so they can create more engaging content and publish it on their YouTube channel. Some features of Nero Video are:
- Keyframe animation tools
- Movie templates
- Wide range of templates
- 4K support

4. InVideo
InVideo is different than other platforms as content creators can create interesting videos on the cloud using this tool. This means that you don’t have to download InVideo software. Instead, you can just log into your account and start editing. Furthermore, the tool is stocked with many frames, stickers, features, tricks, and transitions. This software is suitable for beginner as well as professional users. With more than 4000 templates, anyone can create a video on this platform. InVideo doesn’t irritate its users with a watermark, even if you are using the free version of this application. Here are some features of using the InVideo editing tool:
- No watermark
- More than 4000 templates
- More than 8Mn and iStock videos and images
- Intelligent frames
- Automate voice-overs
- Multiple layers
- Power transitions

5. Clipchamp Create
Clipchamp Create is a free video editing tool with wide-ranging transitional effects, and an export option without a watermark. Watermarks only appear when you use stock videos and images in your video. Premium and Business plans are available in this software that offer access to a vast stock library. Using stock library, you can download and add high-resolution images and videos to your project. The tool is incredibly handy as it offers you unique options webcam recorder, video converter, and video compressor. Clipchamp also offers the following features:
- Camera recorder
- Stock library
- Text to speech
- Brand kit
- Trimming videos

Closing Word
Now that you have notable information about the YouTube movie maker tool, you can easily download and install it on your computer. Many YouTube content creators find this application basic. If you want a more advanced tool, you can check the list of alternative movie makers and download the one that offers the best features.
3. Publishing
This tool has standard and special features. Using YouTube movie maker, you can upload videos on your YouTube channel and attract more audience with your content. This video editing tool makes it easy for YouTube content creators to publish their content on the platform. Furthermore, you can save the content on your computer and publish it later on.
3. Boost Productivity
Video editors such as YouTube movie maker improve productivity for video editors. With convenient features and tools, content creators can create more videos with efficiency and increase their content reach.
YouTube Movie Maker Tutorial
YouTube Movie Maker download process is simple. To download and install the application follow these steps:
Step 1: Visit MakeYouTubeVideo.com and choose the download option.
Step 2: This tool is compatible with every Windows version, so you don’t have to worry about compatibility.
Step 3: While downloading the application you need to evaluate the plans.
Step 4: The Platinum version of YouTube Movie Maker will cost $399. With this plan, you will get high-quality transition effects and audio materials.
Step 5: After choosing the plan, you have to enter the payment options and download the tool.
Step 6: A setup file will download to your computer.
Step 7: You need to open that file and run the installation process.
Here are some tips to use YouTube Movie Maker:
Step 1: When you open the application a clear interface will appear with easy-to-use options.
Step 2: From the left panel, you can browse through your computer storage and import content
Step 3: Also, you can drag and drop the media on your workspace.
Step 4: Align the content on different channels and add music.
Step 5: Once you align the content as required, you can publish the video on YouTube from the button on the bottom right.
4 Best Alternatives for YouTube Movie Maker
A plethora of video editing tools are available on the internet. Whether you are a marketing manager or a film producer, you would need a movie marker to boost your productivity and become a professional video content creator. If you want an alternate option for YouTube movie maker, you can check this list:
1. Wondershare Filmora
Filmora is one of the best video editing tools out there. Other than Filmora, Wondershare also offers Filmora (a video editing tool for mobile), and FilmStock with wide-ranging video effects and unique soundtracks. Filmora offers a simple and intuitive interface with lots of exciting overlays, filters, transitions, and motion elements. Since Filmora has a dedicated films tock, users can easily download royalty-free music and video clips. Some basic features of Filmora are:
- Noise removal
- Speed control
- GIF support
- 4K editing support
- Frame by frame preview
- Color tuning
For Win 7 or later (64-bit)
For macOS 10.12 or later
Only a few video editing tools offer 4K and GIF support, and Filmora is one of them. Filmora enables video editors to include engaging titles on their videos. This video editor offers a super easy and flexible interface to video editors so they can drag and drop relevant clips, select interesting music, and choose a striking theme.
The interface is clean, uncluttered, and organized with easy-to-access features. It includes basic as well as advanced features to enhance video quality and add outstanding effects. There are vast numbers of effects and transitions to make your video smooth and engaging. Color matching and motion tracker tools will completely change your video quality.
2. Nero Video
Nero Video is a cheap yet effective tool for YouTubers. This tool comes with a wide array of effects and tricks to create outstanding content. This tool is perfect for beginners because of its simple editing tools. Nero Video offers the finest functionalities and speed to video editors so they can create more engaging content and publish it on their YouTube channel. Some features of Nero Video are:
- Keyframe animation tools
- Movie templates
- Wide range of templates
- 4K support
4. InVideo
InVideo is different than other platforms as content creators can create interesting videos on the cloud using this tool. This means that you don’t have to download InVideo software. Instead, you can just log into your account and start editing. Furthermore, the tool is stocked with many frames, stickers, features, tricks, and transitions. This software is suitable for beginner as well as professional users. With more than 4000 templates, anyone can create a video on this platform. InVideo doesn’t irritate its users with a watermark, even if you are using the free version of this application. Here are some features of using the InVideo editing tool:
- No watermark
- More than 4000 templates
- More than 8Mn and iStock videos and images
- Intelligent frames
- Automate voice-overs
- Multiple layers
- Power transitions
5. Clipchamp Create
Clipchamp Create is a free video editing tool with wide-ranging transitional effects, and an export option without a watermark. Watermarks only appear when you use stock videos and images in your video. Premium and Business plans are available in this software that offer access to a vast stock library. Using stock library, you can download and add high-resolution images and videos to your project. The tool is incredibly handy as it offers you unique options webcam recorder, video converter, and video compressor. Clipchamp also offers the following features:
- Camera recorder
- Stock library
- Text to speech
- Brand kit
- Trimming videos
Closing Word
Now that you have notable information about the YouTube movie maker tool, you can easily download and install it on your computer. Many YouTube content creators find this application basic. If you want a more advanced tool, you can check the list of alternative movie makers and download the one that offers the best features.
Navigating to Your YouTube Comments Easily
How to Find Your Comments on YouTube?

Richard Bennett
Mar 27, 2024• Proven solutions
Have you ever felt worried about any YouTube comment that you published long ago, and later you realized that it was a mistake? Or, do you want to know what comments did you post and when? If so, YouTube offers a simple way of finding your past remarks, and making any changes to them if need be.
That said, the following sections teach you how to find your YouTube comments on a desktop or laptop computer, and also on a mobile device if you are a gadget freak.
- Part 1: How to Find Comments You’ve Posted on YouTube?
- Part 2: How to Find All YouTube Comments Your Channel Has Received?
- Part 3: How to Find Someone’s YouTube Comments by User Name?
- Part 4: How to Edit and Reply to YouTube Comments?
- Part 5: How to Moderate YouTube Comments?
- Part 6: Tips for Writing Good YouTube Comments
Part 1: How to Find All the Comments You’ve Posted on YouTube?
YouTube allows you to post comments on any video only if you are signed in to your Google account while browsing the streaming platform. Because of this, the portal is able to keep a record of your activities, thus enabling you to track all your comments, and take necessary action such as deleting or modifying them as required.
You can learn how to find all the comments you have posted on YouTube while using your preferred device by following the instructions given below:
1. Find Your YouTube Comments on a Desktop or Laptop Computer
Step 1: Sign In to Your YouTube Account
Launch your favorite web browser, go to the YouTube page, click SIGN IN from the top-right corner, and follow the on-screen instructions to enter your credentials and sign in to your Google/YouTube account.
Step 2: Get to the History Page
Click the Menu button from the top-left corner of the page, and then click History from the categories available in the navigation bar in the left.

Step 3: Access/View Your Past Comments
Click Comments from the right of the History page to view all the comments that you have posted earlier.

2. Find Your YouTube Comments on an iPhone
Unfortunately, at the time of this writing, the YouTube app for iOS doesn’t have the feature to view your comments history. However, there is a workaround where you can use a web browser on your smartphone to get this done. The process that is given below explains how to view your past YouTube comments on an iPhone:
Step 1: Sign In to Your YouTube Account on an Internet Browser
Launch your favorite web browser on your iPhone (Safari, the default one, is used here for illustration), go to https://m.youtube.com , tap the profile icon from the top-right corner, tap Sign in from the menu that appears, and follow the on-screen instructions to use your Google account credentials to sign in to YouTube.
Step 2: Access the Desktop Version of YouTube
Tap the More Options icon from the top-left corner of the browser, and then tap Request Desktop Website from the menu that appears to access the desktop version of YouTube on your iPhone.

Step 3: View Your Past YouTube Comments
Tap the Menu icon from the top-left corner of the YouTube page, and tap History from the menu that appears. On the History page, tap Comments from the right pane to view/access your YouTube comments that you posted in the past.

3. Find Your YouTube Comments on an Android Smartphone
As it is with iOS, the YouTube app for Android doesn’t allow you to view your comments history either. However, the workaround of using a web browser works pretty well on Android smartphones too, but with a few tweaks. The process of doing so is given below:
Step 1: Use a Web Browser to Sign In to Your YouTube Account
Launch Google Chrome on your Android smartphone (you can use any other web browser of your choice), and go to https://m.youtube.com . Notice how the interface automatically changes to the desktop version. Note: If the desktop version of the website isn’t visible, you can tap the More button (with three vertical dots) from the top-right corner of the browser, and check the Desktop site box.
Next, tap SIGN IN from the top-right corner of the YouTube page, enter your Google account credentials in the box available on the Sign in screen, enter your password when prompted, and sign in to your YouTube account.
Step 2: Choose a Web Browser (for Confirmation)
When the confirmation box pops up at the bottom, choose your preferred web browser, and tap the frequency of its usage for accessing YouTube. For instance, choose Chrome and Just once to use Google Chrome to access YouTube only for this session.
Step 3: View/Access Your Past YouTube Comments
Once you are signed in to your account, tap the Menu icon from the top-left corner of the YouTube page, and tap History from the menu that appears. When the History page opens up, tap Comments from the right pane to view and/or access your past YouTube comments.
Part 2: How to Find All YouTube Comments Your Channel Has Received?
If you own a YouTube channel and have posted several videos there, it is likely that you also have received a decent number of comments. Usually, these remarks are pretty helpful as they tell you how to improve your production quality, and what your audience prefers to watch in the future. Therefore, it is imperative to learn how to find all the comments that your YouTube channel has received, and the process given below explains exactly that:
1. Find Your Channel’s YouTube Comments on a Desktop or Laptop Computer
You can use your favorite web browser on a PC to easily find all the comments that the videos on your YouTube channel have received as long as you are signed in to your Google account. The step-by-step instructions on how this can be done are given below:
Step 1: Go to the Your videos Page
Open your favorite Internet browser, go to https://www.youtube.com , and sign in to your YouTube account as explained in the previous sections. Next, click the Menu icon from the top-left corner of the YouTube homepage, and click Your videos from the menu that appears.

Step 2: View the Comments
Make sure that the Uploads tab is selected on the Channel content window, and check the number under the Comments column of each video to see how many comments that particular film has received. You can click the number for any video to view its comments.

Step 3: Hide or Hold a Comment for Approval
Click the More icon from the right of the comment you want to moderate, and click Hide user from channel or Always approve comments from this user to hide the comments from the selected user or keep their comments on hold until you review and approve them respectively.

Note: To view all comments received on your YouTube channel, go to the Comments tab under YouTube Studio, and you will find all Channel comments & mentions.
2. Find Your Channel’s YouTube Comments on a Mobile App
This process is comparatively simpler than the previous one as all that you need to do is download the YT Studio app, and access a central location where all the comments for all the videos can be viewed. The process is given below:
Step 1: Obtain a Mobile App
Go to App Store or Google Play Store, and search and download the YT Studio app on your iPhone or Android smartphone (iPhone X is used here for illustration).
Step 2: View/Access All the Comments
Launch the YT Studio app, and sign in to your YouTube account. Tap the Menu icon from the top-left corner of the interface, and tap Comments from the menu to view all the published comments for all the videos that you have received on your YouTube channel.
Step 3: Hide Users and View Held Comments
Tap the More button from the right of an inappropriate comment, and tap Hide user from channel from the menu that comes up. In addition, you can tap the More button next to Published from the top, and tap Held for review from the box that pops up to view the comments that are waiting for your approval.
Note: Unfortunately, you cannot hold the comments for approval using the YT Studio app. As a workaround, you can follow the procedure given earlier to access the desktop version of YouTube on your smartphone, and then use the method explained in the previous section to get this done. However, it is recommended that you do all such sensitive tasks on a laptop or desktop computer to avoid any errors.
Part 3: Find Someone’s YouTube Comments by User Name
If any of your YouTube videos has thousands of comments and you need to find a particular one from a specific user, checking each remark manually would be an extremely time-consuming and tedious task. Therefore, it is a good idea to let an efficient application do the job for you.
One program, a Google Chrome extension called YCS – YouTube Comment Search to be precise, can help you with this. All you are required to do is, install the extension, go to the video, and search the comment by the name of the user. The step-by-step instructions on how this can be done are given below:
Step 1: Install YCS – YouTube Comment Search
Launch Google Chrome on your desktop or laptop computer, search for YCS – YouTube Comment Search, click Add to Chrome, and click Add extension on the notification box that pops up to install the YCS – YouTube Comment Search extension on your instance of Google Chrome.
Step 2: Load All Comments
Go to your or any other’s YouTube video, and click Load All from the top-right corner of the YouTube Comment Search panel that is present under the description box to allow YCS to scan all the comments the video has received.

Step 3: Search Comments from a Particular User
Choose Comments from the search type drop-down list, enter the name of the user in question in the Search box, and click Search to fetch all their comments on the video.

Part 4: How to Edit and Reply to YouTube Comments?
Editing an existing YouTube comment that you have posted earlier, or replying to the one published by someone else is simple. The process is given below:
Step 1: Edit an Existing Comment
Use any of the methods explained above to locate your YouTube comment that you want to edit. Next, click the More icon from the right of the comment, click Edit from the menu, make the required changes to the text, and click SAVE.
Step 2: Reply to a Comment
Locate the comment that you want to reply to, click REPLY from under the comment, type your text in the available field, and click REPLY.

Part 5: How to Moderate YouTube Comments?
If you publish videos on YouTube that may put some impact on people’s lifestyle, you are likely to face criticism quite often. Therefore, you might want to moderate all your comments before they become visible to the audience so as not to spread negativity among the mass. Fortunately, YouTube helps you get this done easily, and the instructions that teach you the process are given below:
Step 1: Get to Your Channel’s Settings Box
Sign in to your YouTube account, click the Menu icon from the top-left corner of the homepage, and click Your videos from the menu that appears.
From the bottom of the navigation bar on the left of the YouTube Studio page, click Settings to open the channel’s Settings box.
Step 2: Moderate YouTube Comments
Go to the Community category from the left pane, and go to the Defaults tab from the right. Next, choose Hide all comments for review from the Comments on your new videos drop-down list, and click SAVE from the bottom-right corner of the box to moderate all YouTube comments that your new videos receive from this point onward.

Part 6: Tips for Writing Good YouTube Comments
While posting a comment on a YouTube video, it is imperative to keep a few things in mind. Some important tips that might come in handy in this regard are suggested below:
- Make your comment as relevant to the video as you possibly can
- Avoid using harsh language or slangs to maintain decency
- Be genuine while leaving feedback. However, make sure to choose polite words while typing a comment
- In case you want to add some suggestions, make sure to be humble
- Ignore the replies with inappropriate content
FAQs About YouTube Comments
Q1) Why can’t I see the comments I posted?
A: If you cannot see your comments, this could be because the owner or moderator has configured the channel or the video to hold all the comments for review before they are visible on YouTube.
In such a case, you are advised to wait for the authorized person to approve your remark before it is published. Another possibility is that the moderator/owner has added you to the ‘hidden users’ list due to some reason. Even in this case, your comment won’t be visible until you are removed from that list.
Q2) I have enabled ‘Notify me’ about comments and other activity on my channel or videos, but can’t see the comments on my video. Why?
A: You won’t be able to view the unpublished comments or those from the users you have added to the ‘hidden’ list. To fix this problem, you may want to disable moderation from your channel or the videos, and also unhide the users. The processes of both these configurations are explained in detail in the above sections.
Richard Bennett
Richard Bennett is a writer and a lover of all things video.
Follow @Richard Bennett
Richard Bennett
Mar 27, 2024• Proven solutions
Have you ever felt worried about any YouTube comment that you published long ago, and later you realized that it was a mistake? Or, do you want to know what comments did you post and when? If so, YouTube offers a simple way of finding your past remarks, and making any changes to them if need be.
That said, the following sections teach you how to find your YouTube comments on a desktop or laptop computer, and also on a mobile device if you are a gadget freak.
- Part 1: How to Find Comments You’ve Posted on YouTube?
- Part 2: How to Find All YouTube Comments Your Channel Has Received?
- Part 3: How to Find Someone’s YouTube Comments by User Name?
- Part 4: How to Edit and Reply to YouTube Comments?
- Part 5: How to Moderate YouTube Comments?
- Part 6: Tips for Writing Good YouTube Comments
Part 1: How to Find All the Comments You’ve Posted on YouTube?
YouTube allows you to post comments on any video only if you are signed in to your Google account while browsing the streaming platform. Because of this, the portal is able to keep a record of your activities, thus enabling you to track all your comments, and take necessary action such as deleting or modifying them as required.
You can learn how to find all the comments you have posted on YouTube while using your preferred device by following the instructions given below:
1. Find Your YouTube Comments on a Desktop or Laptop Computer
Step 1: Sign In to Your YouTube Account
Launch your favorite web browser, go to the YouTube page, click SIGN IN from the top-right corner, and follow the on-screen instructions to enter your credentials and sign in to your Google/YouTube account.
Step 2: Get to the History Page
Click the Menu button from the top-left corner of the page, and then click History from the categories available in the navigation bar in the left.
Step 3: Access/View Your Past Comments
Click Comments from the right of the History page to view all the comments that you have posted earlier.
2. Find Your YouTube Comments on an iPhone
Unfortunately, at the time of this writing, the YouTube app for iOS doesn’t have the feature to view your comments history. However, there is a workaround where you can use a web browser on your smartphone to get this done. The process that is given below explains how to view your past YouTube comments on an iPhone:
Step 1: Sign In to Your YouTube Account on an Internet Browser
Launch your favorite web browser on your iPhone (Safari, the default one, is used here for illustration), go to https://m.youtube.com , tap the profile icon from the top-right corner, tap Sign in from the menu that appears, and follow the on-screen instructions to use your Google account credentials to sign in to YouTube.
Step 2: Access the Desktop Version of YouTube
Tap the More Options icon from the top-left corner of the browser, and then tap Request Desktop Website from the menu that appears to access the desktop version of YouTube on your iPhone.
Step 3: View Your Past YouTube Comments
Tap the Menu icon from the top-left corner of the YouTube page, and tap History from the menu that appears. On the History page, tap Comments from the right pane to view/access your YouTube comments that you posted in the past.
3. Find Your YouTube Comments on an Android Smartphone
As it is with iOS, the YouTube app for Android doesn’t allow you to view your comments history either. However, the workaround of using a web browser works pretty well on Android smartphones too, but with a few tweaks. The process of doing so is given below:
Step 1: Use a Web Browser to Sign In to Your YouTube Account
Launch Google Chrome on your Android smartphone (you can use any other web browser of your choice), and go to https://m.youtube.com . Notice how the interface automatically changes to the desktop version. Note: If the desktop version of the website isn’t visible, you can tap the More button (with three vertical dots) from the top-right corner of the browser, and check the Desktop site box.
Next, tap SIGN IN from the top-right corner of the YouTube page, enter your Google account credentials in the box available on the Sign in screen, enter your password when prompted, and sign in to your YouTube account.
Step 2: Choose a Web Browser (for Confirmation)
When the confirmation box pops up at the bottom, choose your preferred web browser, and tap the frequency of its usage for accessing YouTube. For instance, choose Chrome and Just once to use Google Chrome to access YouTube only for this session.
Step 3: View/Access Your Past YouTube Comments
Once you are signed in to your account, tap the Menu icon from the top-left corner of the YouTube page, and tap History from the menu that appears. When the History page opens up, tap Comments from the right pane to view and/or access your past YouTube comments.
Part 2: How to Find All YouTube Comments Your Channel Has Received?
If you own a YouTube channel and have posted several videos there, it is likely that you also have received a decent number of comments. Usually, these remarks are pretty helpful as they tell you how to improve your production quality, and what your audience prefers to watch in the future. Therefore, it is imperative to learn how to find all the comments that your YouTube channel has received, and the process given below explains exactly that:
1. Find Your Channel’s YouTube Comments on a Desktop or Laptop Computer
You can use your favorite web browser on a PC to easily find all the comments that the videos on your YouTube channel have received as long as you are signed in to your Google account. The step-by-step instructions on how this can be done are given below:
Step 1: Go to the Your videos Page
Open your favorite Internet browser, go to https://www.youtube.com , and sign in to your YouTube account as explained in the previous sections. Next, click the Menu icon from the top-left corner of the YouTube homepage, and click Your videos from the menu that appears.
Step 2: View the Comments
Make sure that the Uploads tab is selected on the Channel content window, and check the number under the Comments column of each video to see how many comments that particular film has received. You can click the number for any video to view its comments.
Step 3: Hide or Hold a Comment for Approval
Click the More icon from the right of the comment you want to moderate, and click Hide user from channel or Always approve comments from this user to hide the comments from the selected user or keep their comments on hold until you review and approve them respectively.
Note: To view all comments received on your YouTube channel, go to the Comments tab under YouTube Studio, and you will find all Channel comments & mentions.
2. Find Your Channel’s YouTube Comments on a Mobile App
This process is comparatively simpler than the previous one as all that you need to do is download the YT Studio app, and access a central location where all the comments for all the videos can be viewed. The process is given below:
Step 1: Obtain a Mobile App
Go to App Store or Google Play Store, and search and download the YT Studio app on your iPhone or Android smartphone (iPhone X is used here for illustration).
Step 2: View/Access All the Comments
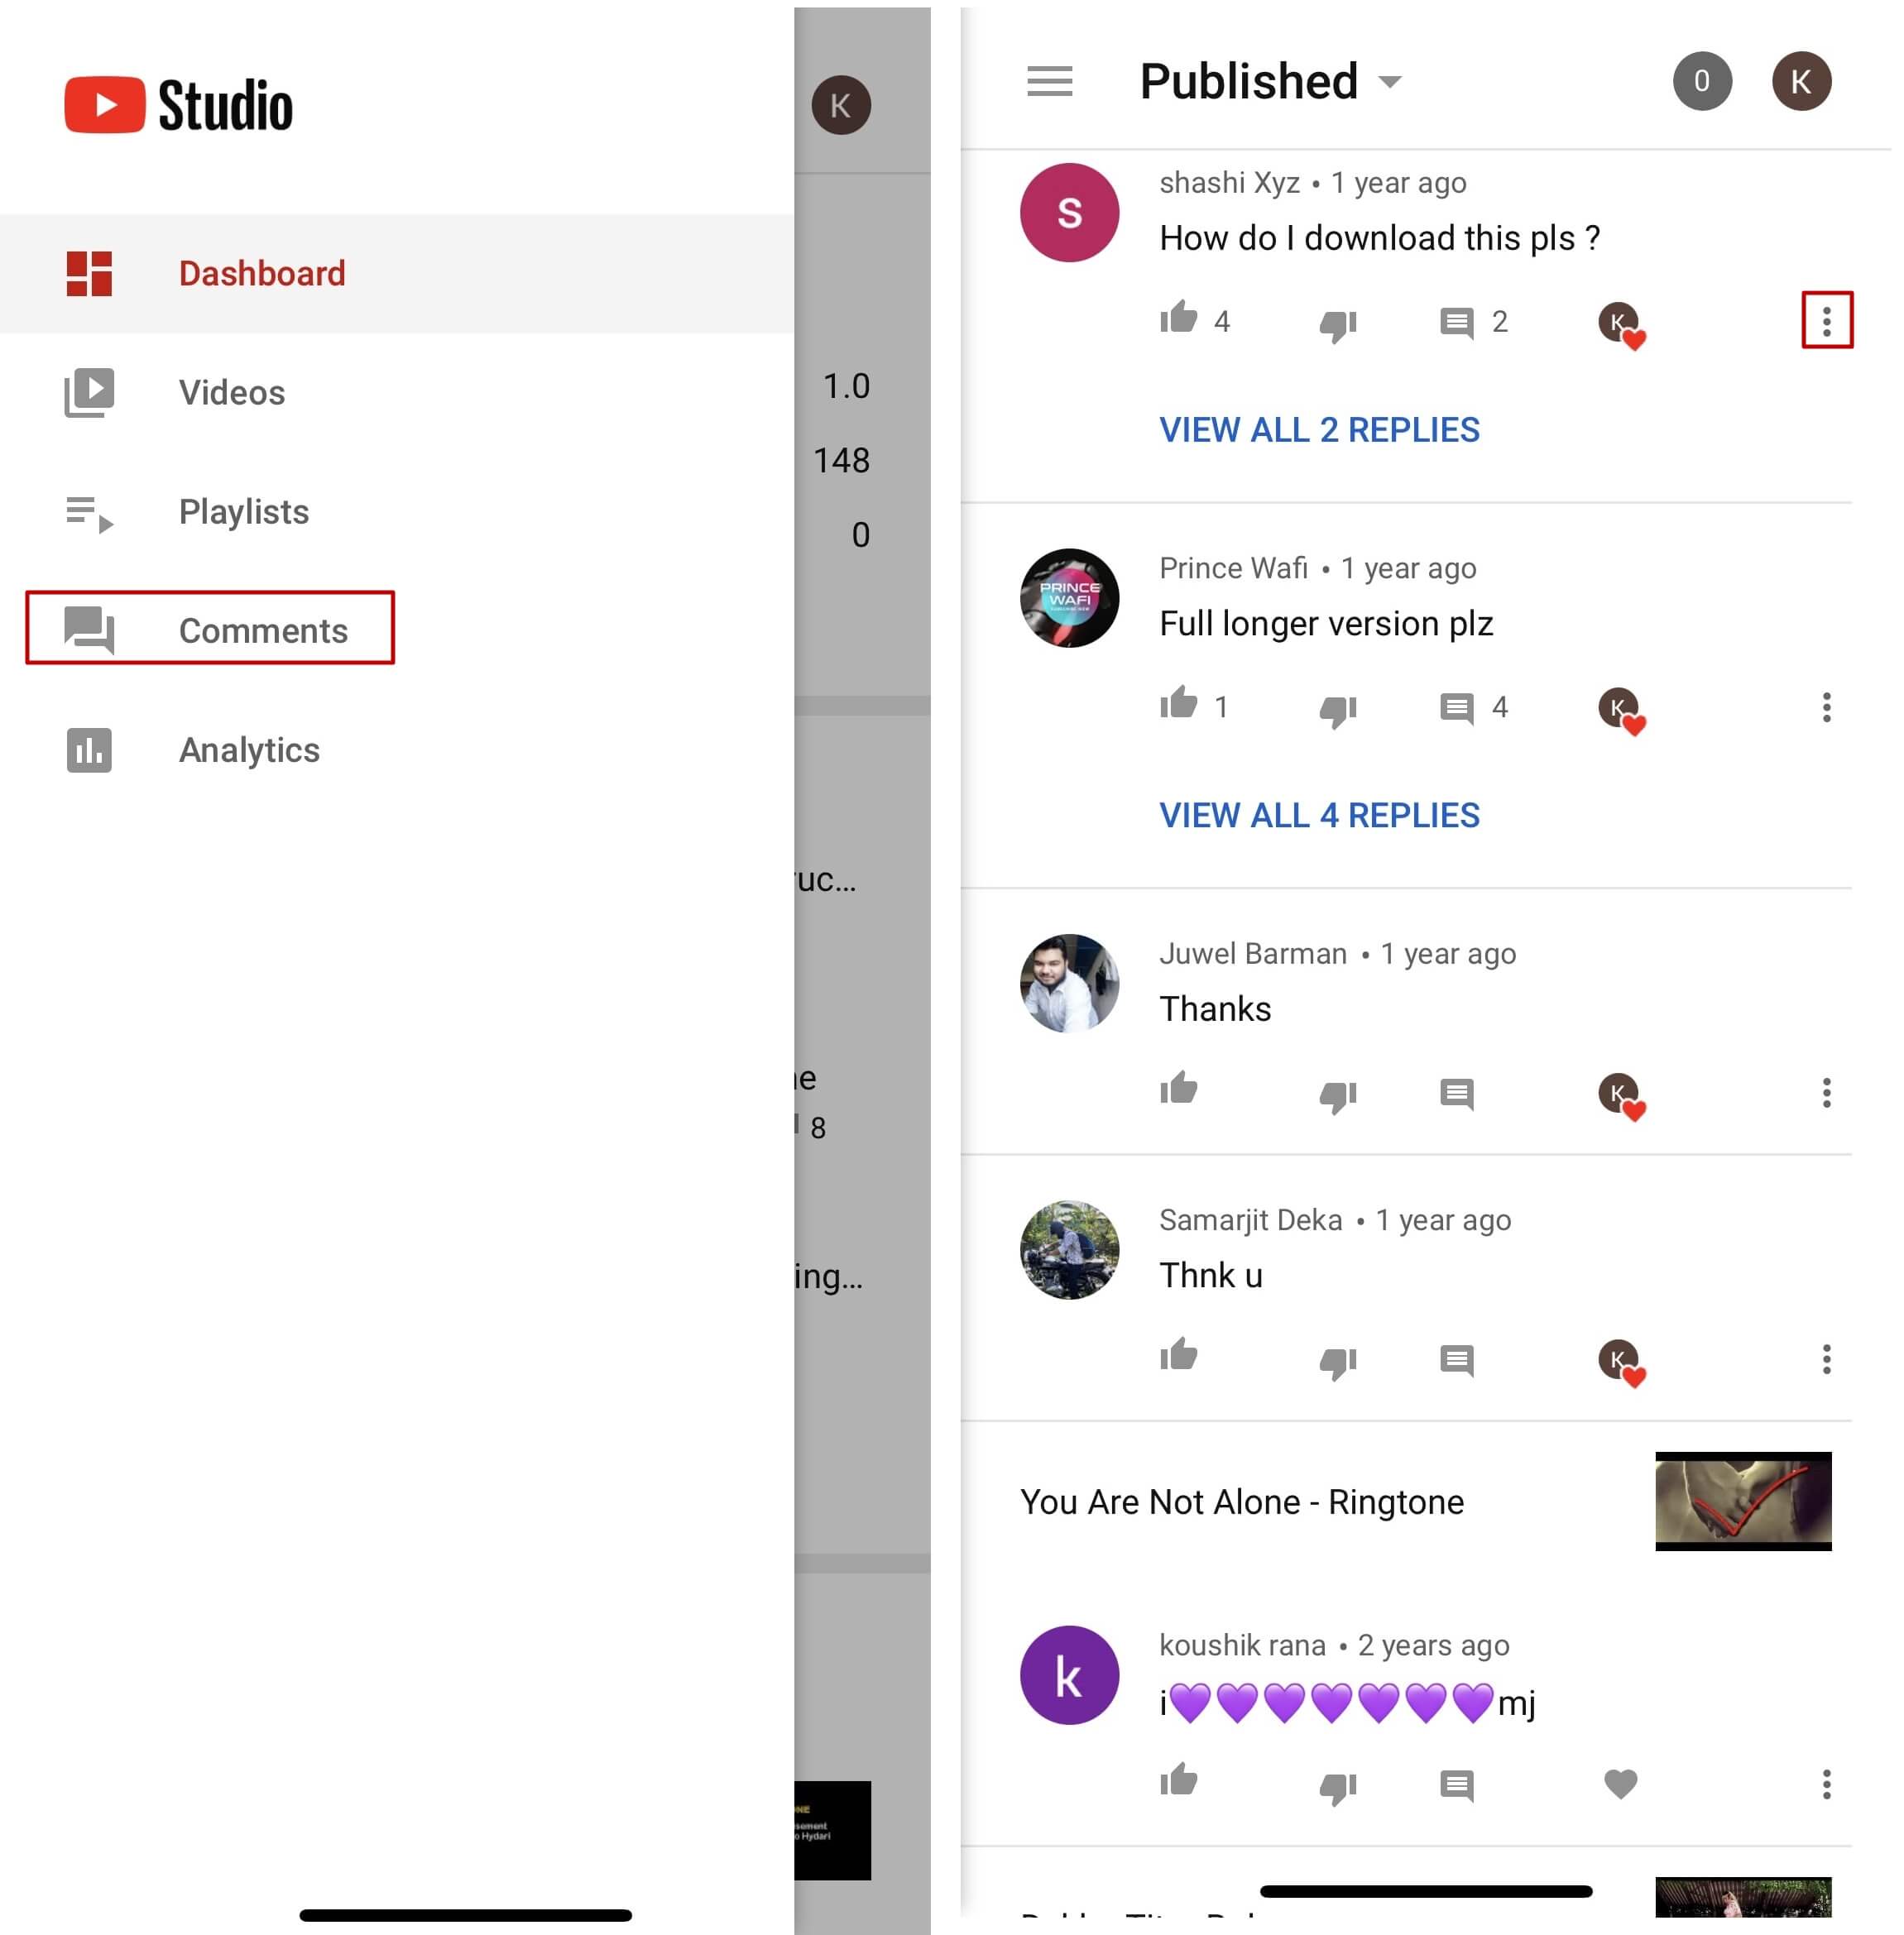
Launch the YT Studio app, and sign in to your YouTube account. Tap the Menu icon from the top-left corner of the interface, and tap Comments from the menu to view all the published comments for all the videos that you have received on your YouTube channel.
Step 3: Hide Users and View Held Comments
Tap the More button from the right of an inappropriate comment, and tap Hide user from channel from the menu that comes up. In addition, you can tap the More button next to Published from the top, and tap Held for review from the box that pops up to view the comments that are waiting for your approval.
Note: Unfortunately, you cannot hold the comments for approval using the YT Studio app. As a workaround, you can follow the procedure given earlier to access the desktop version of YouTube on your smartphone, and then use the method explained in the previous section to get this done. However, it is recommended that you do all such sensitive tasks on a laptop or desktop computer to avoid any errors.
Part 3: Find Someone’s YouTube Comments by User Name
If any of your YouTube videos has thousands of comments and you need to find a particular one from a specific user, checking each remark manually would be an extremely time-consuming and tedious task. Therefore, it is a good idea to let an efficient application do the job for you.
One program, a Google Chrome extension called YCS – YouTube Comment Search to be precise, can help you with this. All you are required to do is, install the extension, go to the video, and search the comment by the name of the user. The step-by-step instructions on how this can be done are given below:
Step 1: Install YCS – YouTube Comment Search
Launch Google Chrome on your desktop or laptop computer, search for YCS – YouTube Comment Search, click Add to Chrome, and click Add extension on the notification box that pops up to install the YCS – YouTube Comment Search extension on your instance of Google Chrome.
Step 2: Load All Comments
Go to your or any other’s YouTube video, and click Load All from the top-right corner of the YouTube Comment Search panel that is present under the description box to allow YCS to scan all the comments the video has received.
Step 3: Search Comments from a Particular User
Choose Comments from the search type drop-down list, enter the name of the user in question in the Search box, and click Search to fetch all their comments on the video.
Part 4: How to Edit and Reply to YouTube Comments?
Editing an existing YouTube comment that you have posted earlier, or replying to the one published by someone else is simple. The process is given below:
Step 1: Edit an Existing Comment
Use any of the methods explained above to locate your YouTube comment that you want to edit. Next, click the More icon from the right of the comment, click Edit from the menu, make the required changes to the text, and click SAVE.
Step 2: Reply to a Comment
Locate the comment that you want to reply to, click REPLY from under the comment, type your text in the available field, and click REPLY.
Part 5: How to Moderate YouTube Comments?
If you publish videos on YouTube that may put some impact on people’s lifestyle, you are likely to face criticism quite often. Therefore, you might want to moderate all your comments before they become visible to the audience so as not to spread negativity among the mass. Fortunately, YouTube helps you get this done easily, and the instructions that teach you the process are given below:
Step 1: Get to Your Channel’s Settings Box
Sign in to your YouTube account, click the Menu icon from the top-left corner of the homepage, and click Your videos from the menu that appears.
From the bottom of the navigation bar on the left of the YouTube Studio page, click Settings to open the channel’s Settings box.
Step 2: Moderate YouTube Comments
Go to the Community category from the left pane, and go to the Defaults tab from the right. Next, choose Hide all comments for review from the Comments on your new videos drop-down list, and click SAVE from the bottom-right corner of the box to moderate all YouTube comments that your new videos receive from this point onward.
Part 6: Tips for Writing Good YouTube Comments
While posting a comment on a YouTube video, it is imperative to keep a few things in mind. Some important tips that might come in handy in this regard are suggested below:
- Make your comment as relevant to the video as you possibly can
- Avoid using harsh language or slangs to maintain decency
- Be genuine while leaving feedback. However, make sure to choose polite words while typing a comment
- In case you want to add some suggestions, make sure to be humble
- Ignore the replies with inappropriate content
FAQs About YouTube Comments
Q1) Why can’t I see the comments I posted?
A: If you cannot see your comments, this could be because the owner or moderator has configured the channel or the video to hold all the comments for review before they are visible on YouTube.
In such a case, you are advised to wait for the authorized person to approve your remark before it is published. Another possibility is that the moderator/owner has added you to the ‘hidden users’ list due to some reason. Even in this case, your comment won’t be visible until you are removed from that list.
Q2) I have enabled ‘Notify me’ about comments and other activity on my channel or videos, but can’t see the comments on my video. Why?
A: You won’t be able to view the unpublished comments or those from the users you have added to the ‘hidden’ list. To fix this problem, you may want to disable moderation from your channel or the videos, and also unhide the users. The processes of both these configurations are explained in detail in the above sections.
Richard Bennett
Richard Bennett is a writer and a lover of all things video.
Follow @Richard Bennett
Richard Bennett
Mar 27, 2024• Proven solutions
Have you ever felt worried about any YouTube comment that you published long ago, and later you realized that it was a mistake? Or, do you want to know what comments did you post and when? If so, YouTube offers a simple way of finding your past remarks, and making any changes to them if need be.
That said, the following sections teach you how to find your YouTube comments on a desktop or laptop computer, and also on a mobile device if you are a gadget freak.
- Part 1: How to Find Comments You’ve Posted on YouTube?
- Part 2: How to Find All YouTube Comments Your Channel Has Received?
- Part 3: How to Find Someone’s YouTube Comments by User Name?
- Part 4: How to Edit and Reply to YouTube Comments?
- Part 5: How to Moderate YouTube Comments?
- Part 6: Tips for Writing Good YouTube Comments
Part 1: How to Find All the Comments You’ve Posted on YouTube?
YouTube allows you to post comments on any video only if you are signed in to your Google account while browsing the streaming platform. Because of this, the portal is able to keep a record of your activities, thus enabling you to track all your comments, and take necessary action such as deleting or modifying them as required.
You can learn how to find all the comments you have posted on YouTube while using your preferred device by following the instructions given below:
1. Find Your YouTube Comments on a Desktop or Laptop Computer
Step 1: Sign In to Your YouTube Account
Launch your favorite web browser, go to the YouTube page, click SIGN IN from the top-right corner, and follow the on-screen instructions to enter your credentials and sign in to your Google/YouTube account.
Step 2: Get to the History Page
Click the Menu button from the top-left corner of the page, and then click History from the categories available in the navigation bar in the left.
Step 3: Access/View Your Past Comments
Click Comments from the right of the History page to view all the comments that you have posted earlier.
2. Find Your YouTube Comments on an iPhone
Unfortunately, at the time of this writing, the YouTube app for iOS doesn’t have the feature to view your comments history. However, there is a workaround where you can use a web browser on your smartphone to get this done. The process that is given below explains how to view your past YouTube comments on an iPhone:
Step 1: Sign In to Your YouTube Account on an Internet Browser
Launch your favorite web browser on your iPhone (Safari, the default one, is used here for illustration), go to https://m.youtube.com , tap the profile icon from the top-right corner, tap Sign in from the menu that appears, and follow the on-screen instructions to use your Google account credentials to sign in to YouTube.
Step 2: Access the Desktop Version of YouTube
Tap the More Options icon from the top-left corner of the browser, and then tap Request Desktop Website from the menu that appears to access the desktop version of YouTube on your iPhone.
Step 3: View Your Past YouTube Comments
Tap the Menu icon from the top-left corner of the YouTube page, and tap History from the menu that appears. On the History page, tap Comments from the right pane to view/access your YouTube comments that you posted in the past.
3. Find Your YouTube Comments on an Android Smartphone
As it is with iOS, the YouTube app for Android doesn’t allow you to view your comments history either. However, the workaround of using a web browser works pretty well on Android smartphones too, but with a few tweaks. The process of doing so is given below:
Step 1: Use a Web Browser to Sign In to Your YouTube Account
Launch Google Chrome on your Android smartphone (you can use any other web browser of your choice), and go to https://m.youtube.com . Notice how the interface automatically changes to the desktop version. Note: If the desktop version of the website isn’t visible, you can tap the More button (with three vertical dots) from the top-right corner of the browser, and check the Desktop site box.
Next, tap SIGN IN from the top-right corner of the YouTube page, enter your Google account credentials in the box available on the Sign in screen, enter your password when prompted, and sign in to your YouTube account.
Step 2: Choose a Web Browser (for Confirmation)
When the confirmation box pops up at the bottom, choose your preferred web browser, and tap the frequency of its usage for accessing YouTube. For instance, choose Chrome and Just once to use Google Chrome to access YouTube only for this session.
Step 3: View/Access Your Past YouTube Comments
Once you are signed in to your account, tap the Menu icon from the top-left corner of the YouTube page, and tap History from the menu that appears. When the History page opens up, tap Comments from the right pane to view and/or access your past YouTube comments.
Part 2: How to Find All YouTube Comments Your Channel Has Received?
If you own a YouTube channel and have posted several videos there, it is likely that you also have received a decent number of comments. Usually, these remarks are pretty helpful as they tell you how to improve your production quality, and what your audience prefers to watch in the future. Therefore, it is imperative to learn how to find all the comments that your YouTube channel has received, and the process given below explains exactly that:
1. Find Your Channel’s YouTube Comments on a Desktop or Laptop Computer
You can use your favorite web browser on a PC to easily find all the comments that the videos on your YouTube channel have received as long as you are signed in to your Google account. The step-by-step instructions on how this can be done are given below:
Step 1: Go to the Your videos Page
Open your favorite Internet browser, go to https://www.youtube.com , and sign in to your YouTube account as explained in the previous sections. Next, click the Menu icon from the top-left corner of the YouTube homepage, and click Your videos from the menu that appears.
Step 2: View the Comments
Make sure that the Uploads tab is selected on the Channel content window, and check the number under the Comments column of each video to see how many comments that particular film has received. You can click the number for any video to view its comments.
Step 3: Hide or Hold a Comment for Approval
Click the More icon from the right of the comment you want to moderate, and click Hide user from channel or Always approve comments from this user to hide the comments from the selected user or keep their comments on hold until you review and approve them respectively.
Note: To view all comments received on your YouTube channel, go to the Comments tab under YouTube Studio, and you will find all Channel comments & mentions.
2. Find Your Channel’s YouTube Comments on a Mobile App
This process is comparatively simpler than the previous one as all that you need to do is download the YT Studio app, and access a central location where all the comments for all the videos can be viewed. The process is given below:
Step 1: Obtain a Mobile App
Go to App Store or Google Play Store, and search and download the YT Studio app on your iPhone or Android smartphone (iPhone X is used here for illustration).
Step 2: View/Access All the Comments
Launch the YT Studio app, and sign in to your YouTube account. Tap the Menu icon from the top-left corner of the interface, and tap Comments from the menu to view all the published comments for all the videos that you have received on your YouTube channel.
Step 3: Hide Users and View Held Comments
Tap the More button from the right of an inappropriate comment, and tap Hide user from channel from the menu that comes up. In addition, you can tap the More button next to Published from the top, and tap Held for review from the box that pops up to view the comments that are waiting for your approval.
Note: Unfortunately, you cannot hold the comments for approval using the YT Studio app. As a workaround, you can follow the procedure given earlier to access the desktop version of YouTube on your smartphone, and then use the method explained in the previous section to get this done. However, it is recommended that you do all such sensitive tasks on a laptop or desktop computer to avoid any errors.
Part 3: Find Someone’s YouTube Comments by User Name
If any of your YouTube videos has thousands of comments and you need to find a particular one from a specific user, checking each remark manually would be an extremely time-consuming and tedious task. Therefore, it is a good idea to let an efficient application do the job for you.
One program, a Google Chrome extension called YCS – YouTube Comment Search to be precise, can help you with this. All you are required to do is, install the extension, go to the video, and search the comment by the name of the user. The step-by-step instructions on how this can be done are given below:
Step 1: Install YCS – YouTube Comment Search
Launch Google Chrome on your desktop or laptop computer, search for YCS – YouTube Comment Search, click Add to Chrome, and click Add extension on the notification box that pops up to install the YCS – YouTube Comment Search extension on your instance of Google Chrome.
Step 2: Load All Comments
Go to your or any other’s YouTube video, and click Load All from the top-right corner of the YouTube Comment Search panel that is present under the description box to allow YCS to scan all the comments the video has received.
Step 3: Search Comments from a Particular User
Choose Comments from the search type drop-down list, enter the name of the user in question in the Search box, and click Search to fetch all their comments on the video.
Part 4: How to Edit and Reply to YouTube Comments?
Editing an existing YouTube comment that you have posted earlier, or replying to the one published by someone else is simple. The process is given below:
Step 1: Edit an Existing Comment
Use any of the methods explained above to locate your YouTube comment that you want to edit. Next, click the More icon from the right of the comment, click Edit from the menu, make the required changes to the text, and click SAVE.
Step 2: Reply to a Comment
Locate the comment that you want to reply to, click REPLY from under the comment, type your text in the available field, and click REPLY.
Part 5: How to Moderate YouTube Comments?
If you publish videos on YouTube that may put some impact on people’s lifestyle, you are likely to face criticism quite often. Therefore, you might want to moderate all your comments before they become visible to the audience so as not to spread negativity among the mass. Fortunately, YouTube helps you get this done easily, and the instructions that teach you the process are given below:
Step 1: Get to Your Channel’s Settings Box
Sign in to your YouTube account, click the Menu icon from the top-left corner of the homepage, and click Your videos from the menu that appears.
From the bottom of the navigation bar on the left of the YouTube Studio page, click Settings to open the channel’s Settings box.
Step 2: Moderate YouTube Comments
Go to the Community category from the left pane, and go to the Defaults tab from the right. Next, choose Hide all comments for review from the Comments on your new videos drop-down list, and click SAVE from the bottom-right corner of the box to moderate all YouTube comments that your new videos receive from this point onward.
Part 6: Tips for Writing Good YouTube Comments
While posting a comment on a YouTube video, it is imperative to keep a few things in mind. Some important tips that might come in handy in this regard are suggested below:
- Make your comment as relevant to the video as you possibly can
- Avoid using harsh language or slangs to maintain decency
- Be genuine while leaving feedback. However, make sure to choose polite words while typing a comment
- In case you want to add some suggestions, make sure to be humble
- Ignore the replies with inappropriate content
FAQs About YouTube Comments
Q1) Why can’t I see the comments I posted?
A: If you cannot see your comments, this could be because the owner or moderator has configured the channel or the video to hold all the comments for review before they are visible on YouTube.
In such a case, you are advised to wait for the authorized person to approve your remark before it is published. Another possibility is that the moderator/owner has added you to the ‘hidden users’ list due to some reason. Even in this case, your comment won’t be visible until you are removed from that list.
Q2) I have enabled ‘Notify me’ about comments and other activity on my channel or videos, but can’t see the comments on my video. Why?
A: You won’t be able to view the unpublished comments or those from the users you have added to the ‘hidden’ list. To fix this problem, you may want to disable moderation from your channel or the videos, and also unhide the users. The processes of both these configurations are explained in detail in the above sections.
Richard Bennett
Richard Bennett is a writer and a lover of all things video.
Follow @Richard Bennett
Also read:
- Elevate Your Shots Vlogger's Guide to the 9 Finest Camera Gadgets for 2024
- In 2024, Enriched Viewing Experience with These Free Downloader Apps for YouTubes
- In 2024, Cut Beyond Youtube Unveiling the Top 5 Video Editor Options
- The Complete YouTube Editor's Toolkit for Post-Publish Adjustments
- Deciding on the Best Videography Camera Type DSLR or Mirrorless, In 2024
- In 2024, 11 FREE YouTube Video Rippers to Download YouTube Videos
- In 2024, Boost Engagement with Tailored Templates for Video Info
- Decoding the Secrets of YouTube's Content Hub
- Your Pathway to Personalized YouTube Music Selections
- 2024 Approved Best Free Video Cutting Apps Your Go-To List
- Dissecting TSeries' Profit Generation Through YouTube Videos for 2024
- In 2024, 3-Step Guide to Ascertain Google's Profitable Potential YouTube Analysis
- [New] Creating Accessibility Your Guide to an Intuitive YouTube Signup
- [Updated] A Deep Dive Into YouTube Mastery Using Sony Vegas Software
- Defeat Synthetic Followers for True Popularity Peak for 2024
- Which Platform Triumphs in Revenue Generation? Dailymotion Vs YouTube
- 2024 Approved Elevate Your Ears 10 Pro Tips for Excellent Sound Quality
- 2024 Approved Complete Unpacking The World of Virtual Idols
- Jumpstart to Partner Elevation Secure 10K Views in Minutes
- Insta-Popularity on Youtube Jake Paul’s Story Unfolded
- Revamping YouTube Videos with Smart Post-Upload Techniques
- [Updated] Crafting Captivating Content The Power of Hashtagging in Gaming YT
- Stunning Video Capture Best YouTube Cameras Reviewed
- Tailoring Titles and Tags for Top YouTube Performance
- 2024 Approved Ensuring Earning Potential on YouTubers
- [New] Dissecting TSeries Profits From YouTube Platforms
- In 2024, Directly Uploading YouTube Vids to Multiple Social Sites, Focusing on FB
- In 2024, Ethical Approaches to Achieve One Million YouTube Subscribers
- Elite Video Influencers for 2024
- [New] Deciphering Hidden Content on YouTube An Ordered Walkthrough
- In 2024, How to Unlock Infinix Smart 8 Pattern Lock if Forgotten? 6 Ways
- In 2024, Broadcast Bunkers for Facebook's 2023
- In 2024, Get Adobe Premiere Pro CS6 for Mac at No Cost 2023 Update
- Is your Meizu 21 Pro working too slow? Heres how you can hard reset it | Dr.fone
- Updated Free & Paid Time-Lapse Video Editors A Comparative Analysis for 2024
- In 2024, Screen Recorder Pro for Windows 10
- Full Guide to Bypass Infinix Hot 30 5G FRP
- In 2024, Top 15 Apps To Hack WiFi Password On Vivo V30 Lite 5G
- In 2024, Top 7 Phone Number Locators To Track Motorola Moto E13 Location | Dr.fone
- 6 Fixes to Unfortunately WhatsApp has stopped Error Popups On Motorola Edge 2023 | Dr.fone
- Audiovisual Excellence Zooming Into Exceptional Podcast Recordings for 2024
- Peepsnap Evaluation Review - Screen Recorders for 2024
- Updated The Essential List 8 Premier Music Production Software Options for Mac OS and Windows
- Resonating Titans An Auditory Journey Through Monstrous Realms for 2024
- In 2024, CatchEmAll Celebrate National Pokémon Day with Virtual Location On Realme 12 5G | Dr.fone
- New 2024 Approved Uncover Linguistic Groan Phenomenon
- The Best iSpoofer Alternative to Try On Tecno Pova 5 | Dr.fone
- 11 Best Location Changers for Vivo S17 | Dr.fone
- Prevent Cross-Site Tracking on Xiaomi Redmi Note 12 Pro+ 5G and Browser | Dr.fone
- In 2024, Innovation in Action? Reviewing Vidma's New Screen Recording Features
- Different Methods for Resetting Oppo Reno 11 Pro 5G Phones with Screen Locked and Not | Dr.fone
- [New] In 2024, Effortless Sound Capture Top 5 Techniques for Web Streaming
- In 2024, Effortless Post Scheduling Our List of Top 8 Apps, iOS/Android-Compatible
- Updated 2024 Approved Basic Video Editing Software A Beginners Guide
- [Updated] Crafting Your Windows Photos Masterpiece Adding Filters, Musical Elements
- How to remove Google FRP Lock on Samsung Galaxy A54 5G
- Sever Disconnect From Discord
- 2024 Approved Get the Scoop on VN Video Editor for PC
- In 2024, 8 Safe and Effective Methods to Unlock Your Apple iPhone SE (2022) Without a Passcode
- Title: YouTube Video Editing 101 & Alternative Sources
- Author: Brian
- Created at : 2024-05-25 13:29:20
- Updated at : 2024-05-26 13:29:20
- Link: https://youtube-video-recordings.techidaily.com/youtube-video-editing-101-and-alternative-sources/
- License: This work is licensed under CC BY-NC-SA 4.0.
