
:max_bytes(150000):strip_icc():format(webp)/copilot-b197f8dd690845d5bf8ebbc082c89c20.jpg)
"YouTube Video Aspect Ratio Guide Optimal Upload Sizes"
YouTube Video Aspect Ratio Guide: Optimal Upload Sizes
YouTube Video Dimensions/Size: Guide for Upload Settings

Richard Bennett
Mar 27, 2024• Proven solutions
Every social media offers a distinct range of dimensions and settings for their publication. So does YouTube.
It’s acutely important to be aware of your setting choices and choosing the right video, thumbnail and screen dimensions of a YouTube video to elevate the user experience.
Merely watching the videos on YouTube is much easier but being able to upload a video there using the right size matters a lot more than one thinks of.
But how can one master it all by himself? Here we are to guide you all along the way! So sit back and relax and enjoy your first-rated content!
You will Learn :
- The right YouTube video size for you
- Important guidelines for YouTube Video dimensions
- What’s the best YouTube video size for you?
- What is the right aspect ratio for YouTube videos
- The correct video image and YouTube screen size
- FAQs about Youtube upload settings
- Basic terminologies that you should know
The Best Video Editor for Successful YouTubers - Wondershare Filmora
As a easy-to-use video editor, Filmora is really perfect for successful YouTubers. Filmora not only allows you to cut, crop, rotate, reverse videos, but also offers your advanced features like PIP, Green Screen, or audio mixing. What’s more, you can find lots of effects for Fashion, gaming, education, tutorial, sports, etc.
Check below video to know more and download now to have a try for free.


The right YouTube video size for you
| Resolution | Equivalent Name | Quality |
|---|---|---|
| 3840×2160 | 2160p | 4K |
| 2560×1440 | 1440p | 2K |
| 1920×1080 | 1080p | Highest YouTube HD video resolution |
| 1280×720 | 720p | Least YouTube HD video resolution |
| 854×480 | 480p | Standard definition |
| 640×360 | 360p | Conventional website resolution |
| 426×240 | 240p | Least YouTube video size available |
Important guidelines for YouTube Video dimensions
| Maximum acceptable size of a YouTube video | 426 x 420p |
|---|---|
| Minimum acceptable size of a YouTube video | 3840 x 2160p |
| The right aspect ratio of a YouTube video | 16:9 |
| Maximum size of a YouTube file | 128GB |
| The maximum length of a YouTube video | 12 hours |
| Compatible YouTube video formats | avi mov mp4 (best video format for YouTube) 3GPP webM flv mpeg mpegps wmv |
In order to grasp all of the aforementioned configurations thoroughly, a pictorial depiction is a must. So here it is to give you a vivid vision.
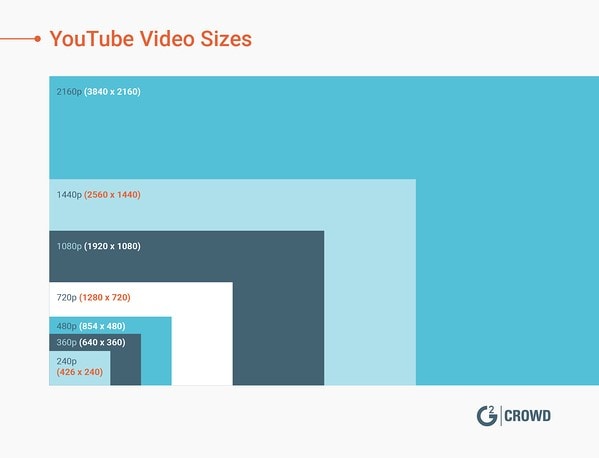
Image from learn.g2
What’s the best YouTube video size for you?
It is recommended by professionals to use the YouTube video dimensions 1080p, or 1920 x 1080.
These ones are the ideal because it will not only facilitate the video with a professional and elite look but also consumes relatively much less data. Moreover, if you use a phone for recording your videos then using the quality higher than the ones mentioned above will cost you with ample memory.
If you are a newbie to the world of YouTube and want to up the device’s storage game then 720p would still do wonders.
What is the video aspect ratio?
This term refers to the proportion of your video. In other words, the video aspect ratio can be defined as the width or breadth (of an image or screen) with respect to its height. Such a ratio can be expressed or represented in the form of “width x height.
That means an aspect ratio of 4x3 refers to an image that is 4 unit wide and 3 units high. Similarly, it can also be expressed with a colon in between the units such as 4:3 or 16:9.
The aspect ratio of a video merely refers to the relationship among the width and height respectively and not the actual physical size of the image.
The most common aspect ratios used in the video are depicted below for sound understanding:
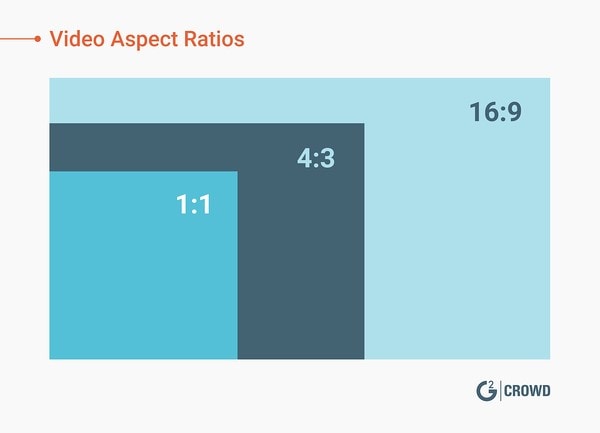
Image from learn.g2
The aspect ratio is the proportion of your video. This image displays the three most common aspect ratios.
Aspect ratio refers to the ratio of height and width although dimensions refer to two separate measurements of height and width rather than a ratio with “pixel” as its unit.
Standard aspect ratios
Below are the most common aspect ratios used for the video. There may be certain amendments to the ones mentioned below but the following formats are used mostly by the film and video makers.
Let’s review the quick breakdown of the available aspect ratio options that you can opt accordingly:
| Aspect ratio | Application |
|---|---|
| 1:1 or 1x1 | This aspect ratio will mostly be seen in the Instagram video. This 1:1 ratio gives a video a perfect square shape. |
| 4:3 or 4x3 | This aspect ratio was mostly seen few ages ago in almost the amidst 20th century on the TV. This was used to be a standard television format back then. So if you are a 90’s kid or an adult then you must be familiar with this format while watching your favorite old schooled sitcoms! |
| 16:9 or 16x9 | The format was enhanced to 16:9 aspect ratio for more HD quality and better viewing experience. This format is widely being used in televisions, theatres, DVD or high definition professional videos. |
| 21:9 or 21x9 | For more than merely an HD video quality and astonishing user experience, the formats have been upgraded to 21:9 aspect ratio. This is dominantly being used in the cinema for movie theatre releases. |
The right aspect ratio for YouTube videos
YouTube recommends using an aspect ratio of 16:9 according to the video player that YouTube uses. You are also given an option to upload your videos vertically but this will amend the aspect ratio respectively.
When you upload a video with an aspect ratio other than the one mention formerly then YouTube will automatically place the black bars on the sides. This is done to display the best quality video with the right resolution otherwise it will be displayed as distorted or cropped.
A vertical ratio with may be 4:3 video aspect ratio will be displayed like the image given below:
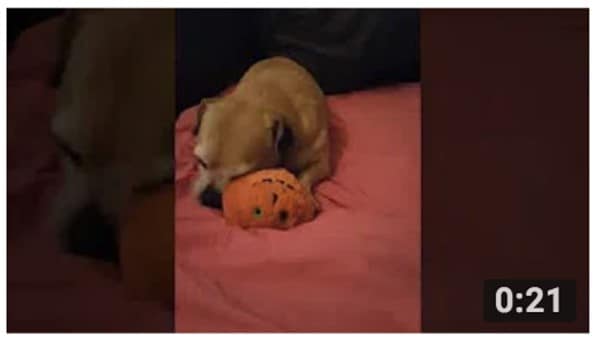
Image from learn.g2
The correct video image and YouTube screen size
Videos are undoubtedly the most important asset of YouTube but we cannot ignore the significance of the optimal images there! Using the right channel images will enhance the user experience and will ultimately level up your game!
The appealing and attractive cover photos, banners, thumbnails, channel icons possess equal importance as the video itself.
So don’t forget to tune your images! Just grab a cup of coffee and see how your views increase exponentially by this simple yet most important change!
Just skim through the checklist given below and you will be ready to nail it!
1. Perfect size for your YouTube profile photo
The profile photo of YouTube, often called a YouTube channel icon, is preferably a facial picture when is run by an individual and a respective logo if run by a brand or a business.
The suggested YouTube screen size of your YouTube profile picture or channel icon is 800 x800 pixels.
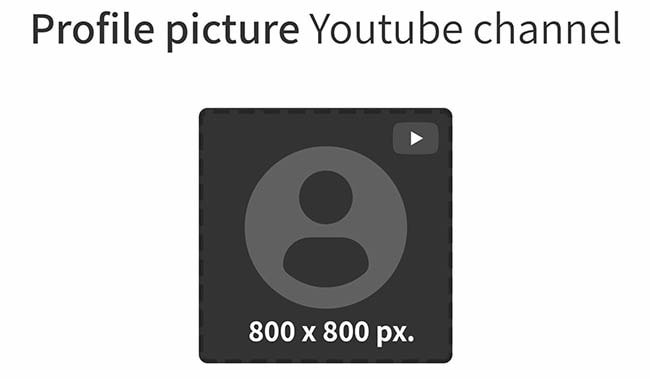
Image from metricool
2. Perfect size for your YouTube thumbnail photo
What is YouTube thumbnail?
A thumbnail photo is the picture of one of the frames of your video that you select to let the viewers see the quick glace or snapshot of your video while they browse YouTube.
You can choose any of the snapshots, technically known as a thumbnail, right after uploading your video on your channel. Either you can let YouTube choose any thumbnail or you choose your own.
Why is it important?
Choosing the appropriate thumbnail is one of the most important factors you cannot neglect. In order to gain views the most on your videos, a wise selection of a perfect YouTube video thumbnail dimensions will attract the viewers. Hence this will can uplift your views to a drastic extent.
A quick tip for the perfect YouTube thumbnail
Take a look at the popular you tubers and see what strategies they use when uploading their thumbnails. Usually, the video content is not as appealing as the thumbnail itself. That’s what you need to understand! Just see by yourself how large text and striking images will do wonders!
YouTube video thumbnail dimension for a perfect thumbnail image
The preferred YouTube screen size of your thumbnail image is 1280 x 720 pixels.
Similar to the YouTube video, the aspect ratio of your thumbnail is 16:9.
For even more clear understanding, look into this illustration:
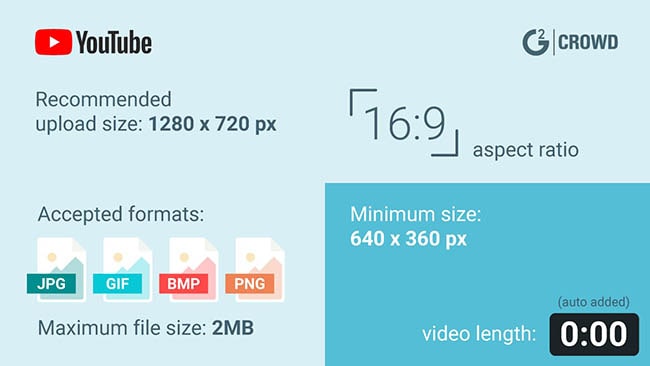
Image from learn.g2
3. Perfect size for your YouTube banner
YouTube offers two main areas for image display of your channel. One is an icon image while other is what YouTube calls “Channel Art”. This is the same as Facebook’s cover photo. People often call it “YouTube banner”. It is a header image displayed at the top of your channel.
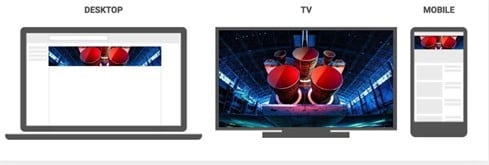
For each kind of display (mobile, desktop, and TV), channel art (or banner) dimension changes accordingly.
Either your cover photo or your YouTube banner is displayed at the top of the channel so it’s highly significant to consider what you are depicting about your channel through these images.
Hence, this being said or realized, selecting the appropriate banner resolution should be among your topmost priorities.
The recommended banner dimensions of a YouTube video as suggested by YouTube are 2560 x 1440 pixels. But the dimensions may slightly vary with the variation in the devices being used by the users.
| Displays | Banner image Dimensions |
|---|---|
| Video display | 2560 x 1440 pixels |
| Desktop display | 2560 x 423 pixels |
| Tablet display | 1855 x 423 pixels |
| Television | 2560 x 1440 pixels |
For a thorough understanding, refer to the image below:
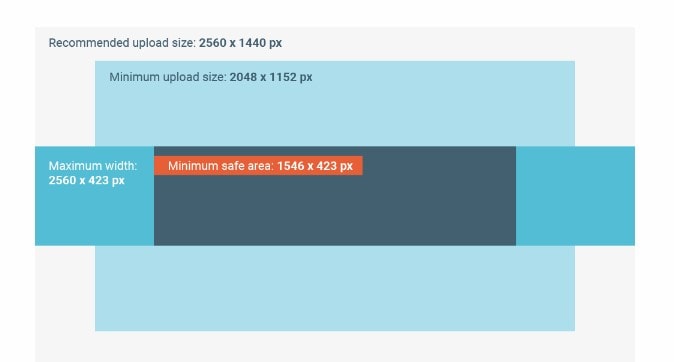
Image from learn.g2
The right cover photo size on TV
The image displayed when accessing YouTube from TV will appear and be uploaded full or maximized. So a wise image size must be opted. So the accurate resolution would be 2560 x 1440 pixels which will cover the entire background of your channel.
The right cover photo size on desktop displays
The image size may vary to some extent as per the browser you are accessing with or the desktop itself. But generally, the suggested cover photo size for desktop displays is 2560 x 423 pixels.
The right cover photo size on Tablet displays
As per the recommendation for uploading the image while specifically considering the table display is 1855 x 423 pixels. This will cover the area appropriately.
FAQs about Youtube upload settings

What is the maximum YouTube upload limit of size?
The allowed maximum video file size for uploading is 128GB at present.
What is the maximum YouTube upload limit of length?
The allowed maximum video length today for uploading is 12 hours.
How the default upload setting is reset on YouTube?
Step 1: Sign In to your YouTube account using a browser.
Step 2: By clicking your profile icon on the top right corner of the pane, you’ll see the YouTube Studio option. Click on it.
Step 3: Go on settings option where a pop-up window will appear.
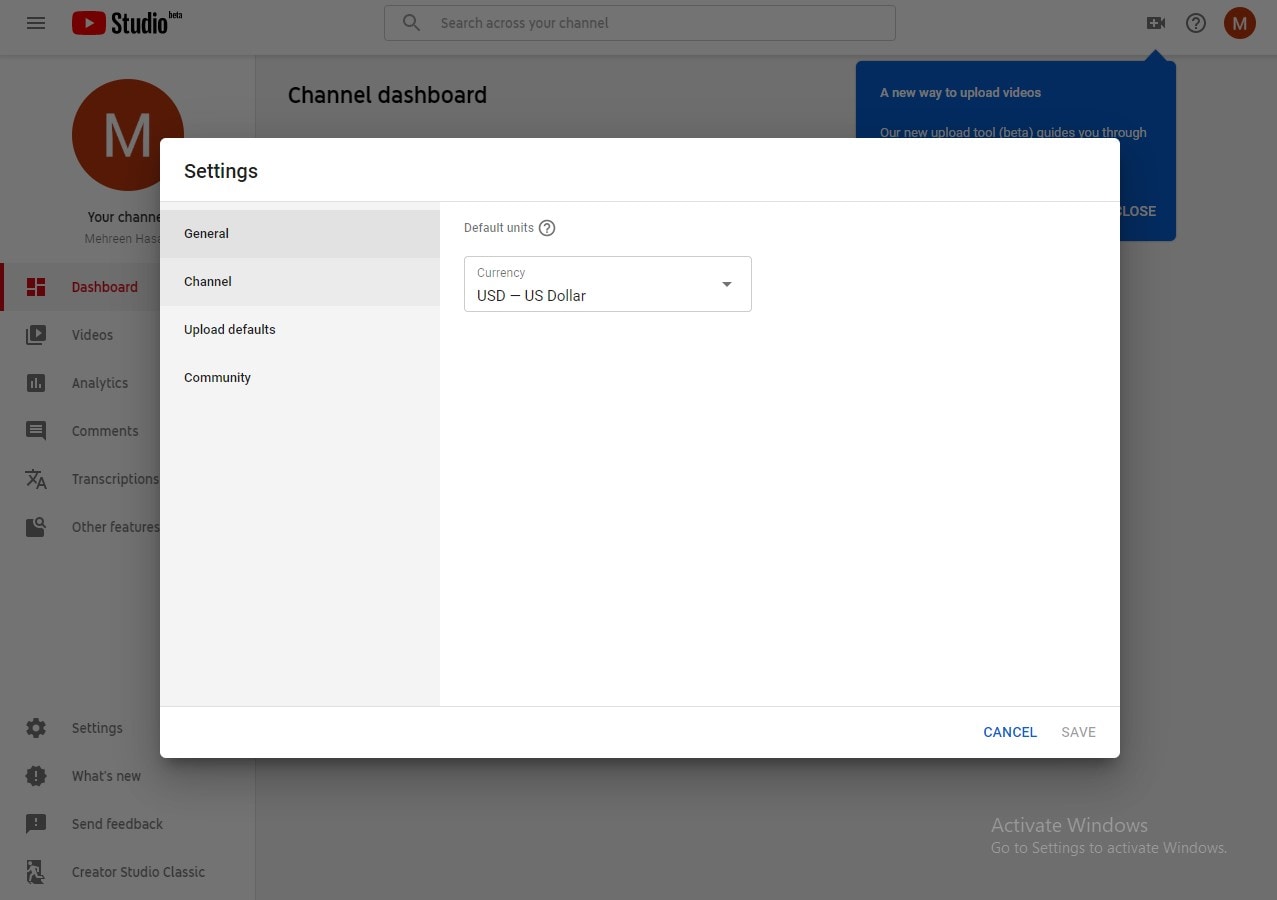
Step 4: Look for upload defaults and change the configurations on 2 tabs.
Step 5: Click on save button.
How is YouTube video uploaded using the mobile application?
Step 1: Sign in to your YouTube channel using your mobile phone.
Step 2: Tap on the video camera icon to upload a video. Grant access to your photo gallery and camera is asked by the app while uploading for the first time.
Step 3: You may “Go Live” or simply drag an already made video file to upload.
Step 4: Click “Next”.
Step 5: Enter the video name, select visibility level and then click upload.
How is YouTube video uploaded using a web browser?
Step 1: Sign in to your YouTube account in a web browser.
Step 2: Click on the video icon appearing on the top of the pane.
Step 3: Click on upload video in the drop-down.
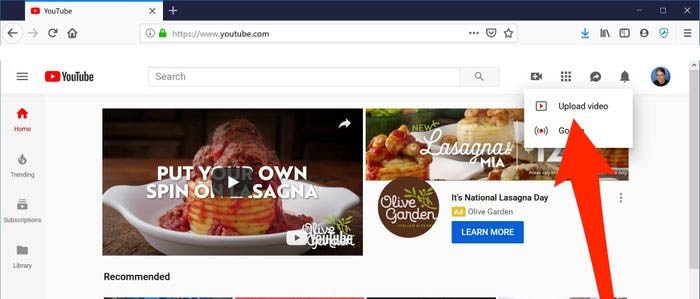
Step 4: You will be redirected to the video upload page. Click “public” under “Select files to upload” option and choose visibility level (public, private or scheduled).
Step 5: Click on a large arrow for video file selection or simply drag the file onto the page.
Step 6: You may enter miscellaneous information related to the video while the video is being uploaded.
Step 7: Click on publish and you are done!
Read More to Get : Best Video Websites Like YouTube >>
Basic terminologies that you should know
Video Format
A file format is a way that is standard for the storage of information in the encoded form within the computer file. It entails how exactly the bits are used while encoding the information in a digital storage medium.
So, a video file format is basically a type of file format in order to store the digital data of a video in the computer system. Mostly, video is often stored using the lossy compression in order to reduce the file size.
Frame Rate
“Frame rate” essentially entails the frequency (rate) at which the simultaneous images display on the screen. These images or called “frames”. Frame rate is expressed in “frames per second or FPS”. The unit or term is applicable for film, cameras, motion capture, video, and computer graphics. This is also known as “frame frequency”, expressed in the unit “hertz”
Resolution
Resolution is a measure to entail the clarity and sharpness of an image and most often used as a metric to judge the quality of cameras, monitors, printers, etc.
It basically refers to the number of different pixels in each dimension which can be viewed in any display device.
File Size
File size refers to the space that a file occupies in a storage medium, like hard drive or USB. The measure of file sizes can be expressed in bytes (B), kilobytes (KB), megabytes (MB), gigabytes (GB), terabytes (TB), and so on.
As shown in the picture below, the files listed in the Windows Explorer assorted as per the file with the largest size first. The file with the name “family-safety.jpg” occupies the largest size of 47 KB and the smallest one with 32 KB size.
Codec
Codec is a device or maybe a computer program that is used to encode or decode a stream of digital data or signal. A codec is a short form of “coder-decoder”.
The basic function of a coder is to encode the stream of data or signal for storage or transmission, usually in an encrypted form.
While, a decoder decodes the encoded (possibly encrypted) data, which is merely a reverse process of a coder. The application of codec are in streaming media, videoconferencing, and video editing applications.
Aspect ratio:
This term refers to the proportion of your video. In other words, the video aspect ratio can be defined as the width or breadth (of an image or screen) with respect to its height. Such a ratio can be expressed or represented in the form of “width x height.
That means an aspect ratio of 4x3 refers to an image that is 4 units wide and 3 units high. Similarly, it can also be expressed with a colon in between the units such as 4:3 or 16:9.
Need a YouTube support?
If you need any support, guidance or may face any queries related to anything regarding your YouTube channel, here’s the link of YouTube support .
Final Verdict
Hopefully, with this detailed guide, you are now ready to make a wise decision regarding customizing your videos and channel as per viewers likeliness. So get ready to see your channel grow drastically!
Richard Bennett
Richard Bennett is a writer and a lover of all things video.
Follow @Richard Bennett
Richard Bennett
Mar 27, 2024• Proven solutions
Every social media offers a distinct range of dimensions and settings for their publication. So does YouTube.
It’s acutely important to be aware of your setting choices and choosing the right video, thumbnail and screen dimensions of a YouTube video to elevate the user experience.
Merely watching the videos on YouTube is much easier but being able to upload a video there using the right size matters a lot more than one thinks of.
But how can one master it all by himself? Here we are to guide you all along the way! So sit back and relax and enjoy your first-rated content!
You will Learn :
- The right YouTube video size for you
- Important guidelines for YouTube Video dimensions
- What’s the best YouTube video size for you?
- What is the right aspect ratio for YouTube videos
- The correct video image and YouTube screen size
- FAQs about Youtube upload settings
- Basic terminologies that you should know
The Best Video Editor for Successful YouTubers - Wondershare Filmora
As a easy-to-use video editor, Filmora is really perfect for successful YouTubers. Filmora not only allows you to cut, crop, rotate, reverse videos, but also offers your advanced features like PIP, Green Screen, or audio mixing. What’s more, you can find lots of effects for Fashion, gaming, education, tutorial, sports, etc.
Check below video to know more and download now to have a try for free.
The right YouTube video size for you
| Resolution | Equivalent Name | Quality |
|---|---|---|
| 3840×2160 | 2160p | 4K |
| 2560×1440 | 1440p | 2K |
| 1920×1080 | 1080p | Highest YouTube HD video resolution |
| 1280×720 | 720p | Least YouTube HD video resolution |
| 854×480 | 480p | Standard definition |
| 640×360 | 360p | Conventional website resolution |
| 426×240 | 240p | Least YouTube video size available |
Important guidelines for YouTube Video dimensions
| Maximum acceptable size of a YouTube video | 426 x 420p |
|---|---|
| Minimum acceptable size of a YouTube video | 3840 x 2160p |
| The right aspect ratio of a YouTube video | 16:9 |
| Maximum size of a YouTube file | 128GB |
| The maximum length of a YouTube video | 12 hours |
| Compatible YouTube video formats | avi mov mp4 (best video format for YouTube) 3GPP webM flv mpeg mpegps wmv |
In order to grasp all of the aforementioned configurations thoroughly, a pictorial depiction is a must. So here it is to give you a vivid vision.
Image from learn.g2
What’s the best YouTube video size for you?
It is recommended by professionals to use the YouTube video dimensions 1080p, or 1920 x 1080.
These ones are the ideal because it will not only facilitate the video with a professional and elite look but also consumes relatively much less data. Moreover, if you use a phone for recording your videos then using the quality higher than the ones mentioned above will cost you with ample memory.
If you are a newbie to the world of YouTube and want to up the device’s storage game then 720p would still do wonders.
What is the video aspect ratio?
This term refers to the proportion of your video. In other words, the video aspect ratio can be defined as the width or breadth (of an image or screen) with respect to its height. Such a ratio can be expressed or represented in the form of “width x height.
That means an aspect ratio of 4x3 refers to an image that is 4 unit wide and 3 units high. Similarly, it can also be expressed with a colon in between the units such as 4:3 or 16:9.
The aspect ratio of a video merely refers to the relationship among the width and height respectively and not the actual physical size of the image.
The most common aspect ratios used in the video are depicted below for sound understanding:
Image from learn.g2
The aspect ratio is the proportion of your video. This image displays the three most common aspect ratios.
Aspect ratio refers to the ratio of height and width although dimensions refer to two separate measurements of height and width rather than a ratio with “pixel” as its unit.
Standard aspect ratios
Below are the most common aspect ratios used for the video. There may be certain amendments to the ones mentioned below but the following formats are used mostly by the film and video makers.
Let’s review the quick breakdown of the available aspect ratio options that you can opt accordingly:
| Aspect ratio | Application |
|---|---|
| 1:1 or 1x1 | This aspect ratio will mostly be seen in the Instagram video. This 1:1 ratio gives a video a perfect square shape. |
| 4:3 or 4x3 | This aspect ratio was mostly seen few ages ago in almost the amidst 20th century on the TV. This was used to be a standard television format back then. So if you are a 90’s kid or an adult then you must be familiar with this format while watching your favorite old schooled sitcoms! |
| 16:9 or 16x9 | The format was enhanced to 16:9 aspect ratio for more HD quality and better viewing experience. This format is widely being used in televisions, theatres, DVD or high definition professional videos. |
| 21:9 or 21x9 | For more than merely an HD video quality and astonishing user experience, the formats have been upgraded to 21:9 aspect ratio. This is dominantly being used in the cinema for movie theatre releases. |
The right aspect ratio for YouTube videos
YouTube recommends using an aspect ratio of 16:9 according to the video player that YouTube uses. You are also given an option to upload your videos vertically but this will amend the aspect ratio respectively.
When you upload a video with an aspect ratio other than the one mention formerly then YouTube will automatically place the black bars on the sides. This is done to display the best quality video with the right resolution otherwise it will be displayed as distorted or cropped.
A vertical ratio with may be 4:3 video aspect ratio will be displayed like the image given below:
Image from learn.g2
The correct video image and YouTube screen size
Videos are undoubtedly the most important asset of YouTube but we cannot ignore the significance of the optimal images there! Using the right channel images will enhance the user experience and will ultimately level up your game!
The appealing and attractive cover photos, banners, thumbnails, channel icons possess equal importance as the video itself.
So don’t forget to tune your images! Just grab a cup of coffee and see how your views increase exponentially by this simple yet most important change!
Just skim through the checklist given below and you will be ready to nail it!
1. Perfect size for your YouTube profile photo
The profile photo of YouTube, often called a YouTube channel icon, is preferably a facial picture when is run by an individual and a respective logo if run by a brand or a business.
The suggested YouTube screen size of your YouTube profile picture or channel icon is 800 x800 pixels.
Image from metricool
2. Perfect size for your YouTube thumbnail photo
What is YouTube thumbnail?
A thumbnail photo is the picture of one of the frames of your video that you select to let the viewers see the quick glace or snapshot of your video while they browse YouTube.
You can choose any of the snapshots, technically known as a thumbnail, right after uploading your video on your channel. Either you can let YouTube choose any thumbnail or you choose your own.
Why is it important?
Choosing the appropriate thumbnail is one of the most important factors you cannot neglect. In order to gain views the most on your videos, a wise selection of a perfect YouTube video thumbnail dimensions will attract the viewers. Hence this will can uplift your views to a drastic extent.
A quick tip for the perfect YouTube thumbnail
Take a look at the popular you tubers and see what strategies they use when uploading their thumbnails. Usually, the video content is not as appealing as the thumbnail itself. That’s what you need to understand! Just see by yourself how large text and striking images will do wonders!
YouTube video thumbnail dimension for a perfect thumbnail image
The preferred YouTube screen size of your thumbnail image is 1280 x 720 pixels.
Similar to the YouTube video, the aspect ratio of your thumbnail is 16:9.
For even more clear understanding, look into this illustration:
Image from learn.g2
3. Perfect size for your YouTube banner
YouTube offers two main areas for image display of your channel. One is an icon image while other is what YouTube calls “Channel Art”. This is the same as Facebook’s cover photo. People often call it “YouTube banner”. It is a header image displayed at the top of your channel.
For each kind of display (mobile, desktop, and TV), channel art (or banner) dimension changes accordingly.
Either your cover photo or your YouTube banner is displayed at the top of the channel so it’s highly significant to consider what you are depicting about your channel through these images.
Hence, this being said or realized, selecting the appropriate banner resolution should be among your topmost priorities.
The recommended banner dimensions of a YouTube video as suggested by YouTube are 2560 x 1440 pixels. But the dimensions may slightly vary with the variation in the devices being used by the users.
| Displays | Banner image Dimensions |
|---|---|
| Video display | 2560 x 1440 pixels |
| Desktop display | 2560 x 423 pixels |
| Tablet display | 1855 x 423 pixels |
| Television | 2560 x 1440 pixels |
For a thorough understanding, refer to the image below:
Image from learn.g2
The right cover photo size on TV
The image displayed when accessing YouTube from TV will appear and be uploaded full or maximized. So a wise image size must be opted. So the accurate resolution would be 2560 x 1440 pixels which will cover the entire background of your channel.
The right cover photo size on desktop displays
The image size may vary to some extent as per the browser you are accessing with or the desktop itself. But generally, the suggested cover photo size for desktop displays is 2560 x 423 pixels.
The right cover photo size on Tablet displays
As per the recommendation for uploading the image while specifically considering the table display is 1855 x 423 pixels. This will cover the area appropriately.
FAQs about Youtube upload settings
What is the maximum YouTube upload limit of size?
The allowed maximum video file size for uploading is 128GB at present.
What is the maximum YouTube upload limit of length?
The allowed maximum video length today for uploading is 12 hours.
How the default upload setting is reset on YouTube?
Step 1: Sign In to your YouTube account using a browser.
Step 2: By clicking your profile icon on the top right corner of the pane, you’ll see the YouTube Studio option. Click on it.
Step 3: Go on settings option where a pop-up window will appear.
Step 4: Look for upload defaults and change the configurations on 2 tabs.
Step 5: Click on save button.
How is YouTube video uploaded using the mobile application?
Step 1: Sign in to your YouTube channel using your mobile phone.
Step 2: Tap on the video camera icon to upload a video. Grant access to your photo gallery and camera is asked by the app while uploading for the first time.
Step 3: You may “Go Live” or simply drag an already made video file to upload.
Step 4: Click “Next”.
Step 5: Enter the video name, select visibility level and then click upload.
How is YouTube video uploaded using a web browser?
Step 1: Sign in to your YouTube account in a web browser.
Step 2: Click on the video icon appearing on the top of the pane.
Step 3: Click on upload video in the drop-down.
Step 4: You will be redirected to the video upload page. Click “public” under “Select files to upload” option and choose visibility level (public, private or scheduled).
Step 5: Click on a large arrow for video file selection or simply drag the file onto the page.
Step 6: You may enter miscellaneous information related to the video while the video is being uploaded.
Step 7: Click on publish and you are done!
Read More to Get : Best Video Websites Like YouTube >>
Basic terminologies that you should know
Video Format
A file format is a way that is standard for the storage of information in the encoded form within the computer file. It entails how exactly the bits are used while encoding the information in a digital storage medium.
So, a video file format is basically a type of file format in order to store the digital data of a video in the computer system. Mostly, video is often stored using the lossy compression in order to reduce the file size.
Frame Rate
“Frame rate” essentially entails the frequency (rate) at which the simultaneous images display on the screen. These images or called “frames”. Frame rate is expressed in “frames per second or FPS”. The unit or term is applicable for film, cameras, motion capture, video, and computer graphics. This is also known as “frame frequency”, expressed in the unit “hertz”
Resolution
Resolution is a measure to entail the clarity and sharpness of an image and most often used as a metric to judge the quality of cameras, monitors, printers, etc.
It basically refers to the number of different pixels in each dimension which can be viewed in any display device.
File Size
File size refers to the space that a file occupies in a storage medium, like hard drive or USB. The measure of file sizes can be expressed in bytes (B), kilobytes (KB), megabytes (MB), gigabytes (GB), terabytes (TB), and so on.
As shown in the picture below, the files listed in the Windows Explorer assorted as per the file with the largest size first. The file with the name “family-safety.jpg” occupies the largest size of 47 KB and the smallest one with 32 KB size.
Codec
Codec is a device or maybe a computer program that is used to encode or decode a stream of digital data or signal. A codec is a short form of “coder-decoder”.
The basic function of a coder is to encode the stream of data or signal for storage or transmission, usually in an encrypted form.
While, a decoder decodes the encoded (possibly encrypted) data, which is merely a reverse process of a coder. The application of codec are in streaming media, videoconferencing, and video editing applications.
Aspect ratio:
This term refers to the proportion of your video. In other words, the video aspect ratio can be defined as the width or breadth (of an image or screen) with respect to its height. Such a ratio can be expressed or represented in the form of “width x height.
That means an aspect ratio of 4x3 refers to an image that is 4 units wide and 3 units high. Similarly, it can also be expressed with a colon in between the units such as 4:3 or 16:9.
Need a YouTube support?
If you need any support, guidance or may face any queries related to anything regarding your YouTube channel, here’s the link of YouTube support .
Final Verdict
Hopefully, with this detailed guide, you are now ready to make a wise decision regarding customizing your videos and channel as per viewers likeliness. So get ready to see your channel grow drastically!
Richard Bennett
Richard Bennett is a writer and a lover of all things video.
Follow @Richard Bennett
Deciphering the Language of YouTube Thumbnails Effectiveness
The Ultimate Guide to YouTube Thumbnails that Get Views
Richard Bennett
Oct 26, 2023• Proven solutions
Search for any topic on YouTube and you’ll find thousands of videos. How do you decide which of them to watch? Thumbnails play a major role in what viewers decide to click on. They’re often more important than video titles.
Viewers click on thumbnails that both standout and feel relevant to their search. Your task when it comes to creating YouTube thumbnails is to make something that does both of those things while also maintaining your personal style.
- How to Make a YouTube Thumbnail
- How to Upload a YouTube Thumbnail
- YouTube Thumbnail Makers
- How to Make Thumbnails that Get Clicks (Without Clickbait!)
- Animated YouTube Thumbnails
Part 1: How to Make a YouTube Thumbnail
In order to create a custom video thumbnail, you’ll need a program to put it together in. You can use an image editing program like Photoshop if you have one, but if you don’t you can check out these free thumbnail makers.
Here are some examples of popular thumbnail styles.

1. The Classic Thumbnail (Photo or Screenshot)
A photo that shows what happens in your video – whether that means the finished ‘look’ from your makeup tutorial or you posing in front of the landmark you shot your travel vlog in front of – is a great way to let viewers know what to expect. While curiosity can be a big motive behind clicking on a video thumbnail (or anything online), when people have searched for a specific topic they want to be convinced that your video has what they’re looking for.
#1. Choose Your Photo
To start off, either choose a still frame from your video or take a photograph while you’re still set up from your video. A separate photograph is usually a better idea because your video editor might not be able to export a high-quality snapshot, and also because you’re able to choose your facial expression.
Aim to make this shot a close-up or medium close-up and make sure you’re either in the center of the screen or off to one side, as per the ‘rule of thirds’. Many cameras allow you to bring an optional grid up onto your viewfinder. This will divide your screen into three equal segments both vertically and horizontally. Try to make sure your eyes line up with the top line, and if you’re going to be off to one side then make sure you’re on one of the vertical lines. This will ensure your image is visually appealing.
If you want to add text later, it’s a good idea to be off to one side.
Including your face is important for most types of YouTube videos. People are attracted to eye contact and are more likely to click on thumbnails that feature a face. Gamers might choose to use a picture of a video game character instead and it will have the same effect.
Some situations where it isn’t essential to include your face include tech reviews, where viewers will be more interested in seeing the product, and cooking videos where people are looking to be tempted by a yummy food pic.
#2. Add Text and/or Images
This part isn’t essential – in some cases, a photo is enough – but a lot of the thumbnails for the videos ranked highest in YouTube’s search results include either a couple of words of text, a simple graphic (i.e. an emoji), or both.
In some cases you might use text to make it clear what type of video you’ve made, i.e. ‘review’ or ‘tutorial’. It’s best to keep any text you use brief, but you could get a bit more descriptive and write something like ‘fall makeup tutorial’. Three words is probably the most you can get away with. Remember that your text will be shrunk down with the rest of your image; you need to make it big enough to read easily once it’s shrunk, and that means you don’t have a ton of room for text.
You should also avoid fonts that are harder to read. Fonts with a lot of curves can be harder to read, and you want to make sure you choose a color that stands out from your background. Yellow might work against black, but it probably won’t work against the beige wall of your sunny bedroom. Sans serif fonts tend to be best.
Another tactic used in successful thumbnails is to add small graphics, like emojis or small images (i.e. pumpkins for a Halloween video), which are related to your video’s content. As with text, you don’t want to overload your thumbnail with images, but they’re a great way to add something eye-catching that’s a bit different from competing thumbnails.
2. The Emotional Laser (Background + Face Reacting)
One increasingly popular style of YouTube thumbnail is what we’re going to call the ‘Emotional Laser’. It’s bright (like, blindingly bright), it communicates a clear feeling, and it creates high expectations for how exciting the video’s content is going to be.
The three main elements of the Emotional Laser thumbnail are a background (usually bright), your face on the right wearing an over-pronounced expression, and either the thing your expression is in reaction to (i.e. food, a product, the topic of your video in text) or reinforcement of your emotion (i.e an emoji or question marks) on the left.
#1. Ham It Up (Take Your Reaction Photo)
Take a high-quality photograph of yourself conveying strong emotion. Generally, you want to look extremely excited, disgusted, angry, or shocked depending on the theme of the video.
If there’s an object you want to include in your thumbnail, like a product you’ll be talking about, then it’s a good idea to hold it for this photo. Hold it to one side of your head, turn towards it slightly (but not so much that the camera can only see the side of your face) and put on the expression that’s supposed to be a reaction to the object.
It can be a good idea to take this photo in front of a solid color so you can remove the background easily with chroma key.
#2. Choose Your Background
Your background might be scenery, a solid color, or even the room you filmed the video in. Light or bright colors are popular. Make sure there’s nothing that will distract from your expression. If your background is a room, or anything else where there could be things like pictures hanging, you may want to add a blur effect in the next step.
#3. Put It Together
In your thumbnail maker or a program like Photoshop, you’ll need to put your photo and your background together. This will work differently depending on what program you use. If your program has a chroma key tool and your reaction photo was taken against a solid color then you can make that solid color transparent.
What if I don’t have a separate background? If you don’t have a background you want to use, but you still want your reaction to stand out the same way it would if you did, then you can use your photo editor’s blur tool to turn the normal background of your photo into something you can pop-out from.
#4. Add Extras (Text, Emojis, etc.)
If instead of an object you plan to fill the other side of your thumbnail with text, question marks, emojis, or some other graphic element then now is the time to add it.
Part 2: How to Upload a YouTube Thumbnail
When you upload a new video to YouTube, you will see a Custom thumbnail option under Video thumbnails after your upload is complete.
If you want to add a custom thumbnail to a video that’s already up, that’s easy too.
- Go to your Video Manager in the Creator Studio.
- Find the video you want to change the thumbnail for and click Edit next to it.
- Click Custom thumbnail on the right of the preview screen.
- Upload your thumbnail and click Save changes.
Remember when you’re uploading custom thumbnails that you need to use a .JPG, .GIF, .BMP, or .PNG image with an aspect ratio of 16:9 and that your file size has to be under 2MB.
YouTube recommends that thumbnail images have a resolution of 1280x720px, and you cannot upload an image with a width of less than 640 pixels.
Make sure that all of your thumbnails adhere to YouTube’s Community guidelines. Anything sexually suggestive, violent, or otherwise graphic could result in your video being age-restricted.
Part 3: YouTube Thumbnail Makers
You don’t have to go out and buy a photo editor like Photoshop to make custom video thumbnails (although it’s a good thing to use if you already have it). Here are two free online programs you can use instead:
Canva is an intuitive option with templates for Thumbnails, Channel Art, and other social media graphics. There are stock photos and graphics provided, but not all of them are free (paid options cost $1 each). Canva’s templates do tend to include paid resources, so you may want to use them mostly for their layouts or as inspiration and replace everything they provide with your own images.
Generally, using Canva is as easy as dragging and dropping things where you want them. You’ll be able to set the dimensions for your project so the image you export is a perfect size. Adding text and changing the size, font, or color is easy too.
Adobe Spark also has templates for channel art, and it’s also very easy to use. The first time you use it helpful notes will pop up to guide you through the process. Using templates is especially simple because you just click on the elements in the pre-made thumbnail and replace them with your own photos/text.
You can make changes to the colors in your Spark thumbnail easily by selecting a new color scheme or filter. You can even toggle through layouts easily. When you choose a new layout, Spark will rearrange all the pieces of your current thumbnail to align with the new layout so you can quickly see what it looks like instead of having to rebuild.
Click to check more YouTube thumbnail makers
Part 4: How to Make Thumbnails That Get Clicks (Without Clickbait!)
Here are the top 10 best practices for creating effective YouTube thumbnails:
#1. Show What Your Video Is About
Being mysterious and clickbaity can get you views, if you’re already big. For small YouTubers, it pays off to be clear about your video’s topic. You want people to click who want to watch the actual content of your video. Even if you manage to get some clicks by being mysterious, you’ll probably end up with low viewer retention because people are clicking away when they realize your video isn’t what they were looking for. That will make YouTube’s algorithm rank your video lower, and then even fewer people will find it.
If your video is a product review, show the product in the thumbnail and maybe even write ‘review’ on it. If your video is a makeup tutorial, show your face with the finished makeup and maybe even include pictures of the products you used. People want to know what they’re clicking on before they click.
#2. Use a Consistent Layout
As you grow, you’ll want people to be able to see one of your thumbnails and instantly know it’s yours. Building a recognizable brand is about consistency. Try to stick with one basic layout for all of your videos. You can still customize every individual thumbnail by using different facial expressions and different graphics, but try to use similar backgrounds, fonts, and general layouts (i.e. you to the right of the thumbnails, text to the left) over and over.
#3. Use Your Face
Why should people want to watch your videos? If the answer is ‘because I can teach them to create delicious food’ or ‘because they want to learn about the latest iPhone’ then your thumbnail should include that food or that iPhone.
If part of the reason people want to watch your videos is you – your personality and your sense of humor – then you should be in your thumbnail.
Viewers who are on YouTube because they like seeing a creator’s personality like to feel the presence of that personality in the video thumbnail, and eye contact naturally draws attention and clicks.
#4. Add Small Graphics
Adding small graphics, like emojis or hearts, to your thumbnail can help you stand out in a couple different ways. First, if they’re being compared to thumbnails that are just screenshots from the video, your thumbnails will look a lot more polished. Second, they’ll add a splash of color which can draw eyes to your video in a search where other thumbnails are not using those same colors.
#5. Your Text Should Be Huge
Your thumbnail will end up being a fraction of the size it is while you’re creating it in your thumbnail maker, and that means that any text you use will end up being shrunk down. You could probably type a six-word sentence in a size 18 font and have it look fine while you’re making your thumbnail, but after you upload it there’s no way people will be able to read it at a glance.
Aim for a huge font size, and 3 words or less (so your thumbnail doesn’t end up looking crowded).
#6. Check Out The Competition
Type your video’s title or topic into the search engine on YouTube and look at the thumbnails for the videos that come up. These are your competition. You want to make a thumbnail that is similar enough to what comes up that viewers know it’s on the same topic, but different enough that it stands out.
Generally, if most of the thumbnails have the same layout, you’ll want to mimic that layout. Where you can break from the crowd is in the colors, fonts, and graphics you use.
Part 5: Animated YouTube Thumbnails
Whether or not you upload a custom thumbnail to YouTube, YouTube’s A.I will choose what it thinks are the 3 juiciest seconds of your video (you cannot choose for yourself) and play them as a GIF-like animation when people mouseover your video thumbnails.
As of now, this only works in the Google Chrome desktop browser. Videos have to be at least 30 seconds long to get moving thumbnails.
Alright, now that you know everything about YouTube thumbnails, go make one! Tell us in the comments what you’re going to do to make your video thumbnails stand out.
Touch Up YouTube Videos with Effects & Elements in Filmora
As one of the most widely used video editing software in YouTube video editing, Filmora provides lots of templates and effects with an intuitive interface. Download the free trial version and get started now.
Richard Bennett
Richard Bennett is a writer and a lover of all things video.
Follow @Richard Bennett
Richard Bennett
Oct 26, 2023• Proven solutions
Search for any topic on YouTube and you’ll find thousands of videos. How do you decide which of them to watch? Thumbnails play a major role in what viewers decide to click on. They’re often more important than video titles.
Viewers click on thumbnails that both standout and feel relevant to their search. Your task when it comes to creating YouTube thumbnails is to make something that does both of those things while also maintaining your personal style.
- How to Make a YouTube Thumbnail
- How to Upload a YouTube Thumbnail
- YouTube Thumbnail Makers
- How to Make Thumbnails that Get Clicks (Without Clickbait!)
- Animated YouTube Thumbnails
Part 1: How to Make a YouTube Thumbnail
In order to create a custom video thumbnail, you’ll need a program to put it together in. You can use an image editing program like Photoshop if you have one, but if you don’t you can check out these free thumbnail makers.
Here are some examples of popular thumbnail styles.
1. The Classic Thumbnail (Photo or Screenshot)
A photo that shows what happens in your video – whether that means the finished ‘look’ from your makeup tutorial or you posing in front of the landmark you shot your travel vlog in front of – is a great way to let viewers know what to expect. While curiosity can be a big motive behind clicking on a video thumbnail (or anything online), when people have searched for a specific topic they want to be convinced that your video has what they’re looking for.
#1. Choose Your Photo
To start off, either choose a still frame from your video or take a photograph while you’re still set up from your video. A separate photograph is usually a better idea because your video editor might not be able to export a high-quality snapshot, and also because you’re able to choose your facial expression.
Aim to make this shot a close-up or medium close-up and make sure you’re either in the center of the screen or off to one side, as per the ‘rule of thirds’. Many cameras allow you to bring an optional grid up onto your viewfinder. This will divide your screen into three equal segments both vertically and horizontally. Try to make sure your eyes line up with the top line, and if you’re going to be off to one side then make sure you’re on one of the vertical lines. This will ensure your image is visually appealing.
If you want to add text later, it’s a good idea to be off to one side.
Including your face is important for most types of YouTube videos. People are attracted to eye contact and are more likely to click on thumbnails that feature a face. Gamers might choose to use a picture of a video game character instead and it will have the same effect.
Some situations where it isn’t essential to include your face include tech reviews, where viewers will be more interested in seeing the product, and cooking videos where people are looking to be tempted by a yummy food pic.
#2. Add Text and/or Images
This part isn’t essential – in some cases, a photo is enough – but a lot of the thumbnails for the videos ranked highest in YouTube’s search results include either a couple of words of text, a simple graphic (i.e. an emoji), or both.
In some cases you might use text to make it clear what type of video you’ve made, i.e. ‘review’ or ‘tutorial’. It’s best to keep any text you use brief, but you could get a bit more descriptive and write something like ‘fall makeup tutorial’. Three words is probably the most you can get away with. Remember that your text will be shrunk down with the rest of your image; you need to make it big enough to read easily once it’s shrunk, and that means you don’t have a ton of room for text.
You should also avoid fonts that are harder to read. Fonts with a lot of curves can be harder to read, and you want to make sure you choose a color that stands out from your background. Yellow might work against black, but it probably won’t work against the beige wall of your sunny bedroom. Sans serif fonts tend to be best.
Another tactic used in successful thumbnails is to add small graphics, like emojis or small images (i.e. pumpkins for a Halloween video), which are related to your video’s content. As with text, you don’t want to overload your thumbnail with images, but they’re a great way to add something eye-catching that’s a bit different from competing thumbnails.
2. The Emotional Laser (Background + Face Reacting)
One increasingly popular style of YouTube thumbnail is what we’re going to call the ‘Emotional Laser’. It’s bright (like, blindingly bright), it communicates a clear feeling, and it creates high expectations for how exciting the video’s content is going to be.
The three main elements of the Emotional Laser thumbnail are a background (usually bright), your face on the right wearing an over-pronounced expression, and either the thing your expression is in reaction to (i.e. food, a product, the topic of your video in text) or reinforcement of your emotion (i.e an emoji or question marks) on the left.
#1. Ham It Up (Take Your Reaction Photo)
Take a high-quality photograph of yourself conveying strong emotion. Generally, you want to look extremely excited, disgusted, angry, or shocked depending on the theme of the video.
If there’s an object you want to include in your thumbnail, like a product you’ll be talking about, then it’s a good idea to hold it for this photo. Hold it to one side of your head, turn towards it slightly (but not so much that the camera can only see the side of your face) and put on the expression that’s supposed to be a reaction to the object.
It can be a good idea to take this photo in front of a solid color so you can remove the background easily with chroma key.
#2. Choose Your Background
Your background might be scenery, a solid color, or even the room you filmed the video in. Light or bright colors are popular. Make sure there’s nothing that will distract from your expression. If your background is a room, or anything else where there could be things like pictures hanging, you may want to add a blur effect in the next step.
#3. Put It Together
In your thumbnail maker or a program like Photoshop, you’ll need to put your photo and your background together. This will work differently depending on what program you use. If your program has a chroma key tool and your reaction photo was taken against a solid color then you can make that solid color transparent.
What if I don’t have a separate background? If you don’t have a background you want to use, but you still want your reaction to stand out the same way it would if you did, then you can use your photo editor’s blur tool to turn the normal background of your photo into something you can pop-out from.
#4. Add Extras (Text, Emojis, etc.)
If instead of an object you plan to fill the other side of your thumbnail with text, question marks, emojis, or some other graphic element then now is the time to add it.
Part 2: How to Upload a YouTube Thumbnail
When you upload a new video to YouTube, you will see a Custom thumbnail option under Video thumbnails after your upload is complete.
If you want to add a custom thumbnail to a video that’s already up, that’s easy too.
- Go to your Video Manager in the Creator Studio.
- Find the video you want to change the thumbnail for and click Edit next to it.
- Click Custom thumbnail on the right of the preview screen.
- Upload your thumbnail and click Save changes.
Remember when you’re uploading custom thumbnails that you need to use a .JPG, .GIF, .BMP, or .PNG image with an aspect ratio of 16:9 and that your file size has to be under 2MB.
YouTube recommends that thumbnail images have a resolution of 1280x720px, and you cannot upload an image with a width of less than 640 pixels.
Make sure that all of your thumbnails adhere to YouTube’s Community guidelines. Anything sexually suggestive, violent, or otherwise graphic could result in your video being age-restricted.
Part 3: YouTube Thumbnail Makers
You don’t have to go out and buy a photo editor like Photoshop to make custom video thumbnails (although it’s a good thing to use if you already have it). Here are two free online programs you can use instead:
Canva is an intuitive option with templates for Thumbnails, Channel Art, and other social media graphics. There are stock photos and graphics provided, but not all of them are free (paid options cost $1 each). Canva’s templates do tend to include paid resources, so you may want to use them mostly for their layouts or as inspiration and replace everything they provide with your own images.
Generally, using Canva is as easy as dragging and dropping things where you want them. You’ll be able to set the dimensions for your project so the image you export is a perfect size. Adding text and changing the size, font, or color is easy too.
Adobe Spark also has templates for channel art, and it’s also very easy to use. The first time you use it helpful notes will pop up to guide you through the process. Using templates is especially simple because you just click on the elements in the pre-made thumbnail and replace them with your own photos/text.
You can make changes to the colors in your Spark thumbnail easily by selecting a new color scheme or filter. You can even toggle through layouts easily. When you choose a new layout, Spark will rearrange all the pieces of your current thumbnail to align with the new layout so you can quickly see what it looks like instead of having to rebuild.
Click to check more YouTube thumbnail makers
Part 4: How to Make Thumbnails That Get Clicks (Without Clickbait!)
Here are the top 10 best practices for creating effective YouTube thumbnails:
#1. Show What Your Video Is About
Being mysterious and clickbaity can get you views, if you’re already big. For small YouTubers, it pays off to be clear about your video’s topic. You want people to click who want to watch the actual content of your video. Even if you manage to get some clicks by being mysterious, you’ll probably end up with low viewer retention because people are clicking away when they realize your video isn’t what they were looking for. That will make YouTube’s algorithm rank your video lower, and then even fewer people will find it.
If your video is a product review, show the product in the thumbnail and maybe even write ‘review’ on it. If your video is a makeup tutorial, show your face with the finished makeup and maybe even include pictures of the products you used. People want to know what they’re clicking on before they click.
#2. Use a Consistent Layout
As you grow, you’ll want people to be able to see one of your thumbnails and instantly know it’s yours. Building a recognizable brand is about consistency. Try to stick with one basic layout for all of your videos. You can still customize every individual thumbnail by using different facial expressions and different graphics, but try to use similar backgrounds, fonts, and general layouts (i.e. you to the right of the thumbnails, text to the left) over and over.
#3. Use Your Face
Why should people want to watch your videos? If the answer is ‘because I can teach them to create delicious food’ or ‘because they want to learn about the latest iPhone’ then your thumbnail should include that food or that iPhone.
If part of the reason people want to watch your videos is you – your personality and your sense of humor – then you should be in your thumbnail.
Viewers who are on YouTube because they like seeing a creator’s personality like to feel the presence of that personality in the video thumbnail, and eye contact naturally draws attention and clicks.
#4. Add Small Graphics
Adding small graphics, like emojis or hearts, to your thumbnail can help you stand out in a couple different ways. First, if they’re being compared to thumbnails that are just screenshots from the video, your thumbnails will look a lot more polished. Second, they’ll add a splash of color which can draw eyes to your video in a search where other thumbnails are not using those same colors.
#5. Your Text Should Be Huge
Your thumbnail will end up being a fraction of the size it is while you’re creating it in your thumbnail maker, and that means that any text you use will end up being shrunk down. You could probably type a six-word sentence in a size 18 font and have it look fine while you’re making your thumbnail, but after you upload it there’s no way people will be able to read it at a glance.
Aim for a huge font size, and 3 words or less (so your thumbnail doesn’t end up looking crowded).
#6. Check Out The Competition
Type your video’s title or topic into the search engine on YouTube and look at the thumbnails for the videos that come up. These are your competition. You want to make a thumbnail that is similar enough to what comes up that viewers know it’s on the same topic, but different enough that it stands out.
Generally, if most of the thumbnails have the same layout, you’ll want to mimic that layout. Where you can break from the crowd is in the colors, fonts, and graphics you use.
Part 5: Animated YouTube Thumbnails
Whether or not you upload a custom thumbnail to YouTube, YouTube’s A.I will choose what it thinks are the 3 juiciest seconds of your video (you cannot choose for yourself) and play them as a GIF-like animation when people mouseover your video thumbnails.
As of now, this only works in the Google Chrome desktop browser. Videos have to be at least 30 seconds long to get moving thumbnails.
Alright, now that you know everything about YouTube thumbnails, go make one! Tell us in the comments what you’re going to do to make your video thumbnails stand out.
Touch Up YouTube Videos with Effects & Elements in Filmora
As one of the most widely used video editing software in YouTube video editing, Filmora provides lots of templates and effects with an intuitive interface. Download the free trial version and get started now.
Richard Bennett
Richard Bennett is a writer and a lover of all things video.
Follow @Richard Bennett
Also read:
- [Updated] Enhancing Profits Creating Compelling Video Trailers
- Digital Influencers Galore Leading 10 by Subs for 2024
- [Updated] Cut Down, Catch More The Best URL Reducers for YouTube
- Culinary Crescendo High-Impact Food Network Monikers for 2024
- [New] Effortless Fusion of YouTube Audio with iMovie Masterpieces
- 2024 Approved Dismantle Bots, Elevate YouTube Watch Time
- Top Choices Best Livestream Equip & Tech for Youtubers
- Channel Cross-Promotion The Art of Collaborative Co-Stars for 2024
- Beyond Mainstream A List of 6 Exclusive Icon & Logo Providers
- 2024 Approved 15 Inspiring YouTube Guides for Aspiring Singers and Instrumentalists
- Engaging Stories, Expanding Audiences Top Three Methods
- Crafting a Revenue-Generating Online Presence
- Clear Up Audio in YouTube A Step-by-Step Guide
- Tips and Tricks for Creating Engaging Collab Videos on YouTube
- [Updated] Boost Your Reach The Quintessential Five Tactics for YouTube Success
- [Updated] Earning Through Online Beauty Networks
- Unlocking the Potential of Valorant Thumbnails for Online Success
- In 2024, Essential Travel Vloggers The Ultimate 10 List
- Updated Silent Screen Surgeons Techniques for Audio Nullification in Online Films and Gigs
- [New] Correcting Accidental 'Youself' Reappearances on Social Media
- 2024 Approved Cutting Ties with Instagram Navigating a Permanent Exit Strategy
- 6 Ways to Change Spotify Location On Your Infinix Hot 40 Pro | Dr.fone
- Updated 2024 Approved Fast and Furious Top 8 Lightweight Video Editing Solutions
- The Artist's Ascent A Guide to Professional Growth in Graphic Design
- Updated S Most Popular Video Editing Apps for iPhone and iPad
- Enabling Successful Video Sharing in Messenger for iOS and Android Users
- In 2024, How to Remove the Activation Lock On your iPad and iPhone SE (2022) without Apple Account
- [Updated] 5 Key Strategies for Professional-Looking Screenshots
- Title: "YouTube Video Aspect Ratio Guide Optimal Upload Sizes"
- Author: Brian
- Created at : 2024-05-25 13:29:18
- Updated at : 2024-05-26 13:29:18
- Link: https://youtube-video-recordings.techidaily.com/youtube-video-aspect-ratio-guide-optimal-upload-sizes/
- License: This work is licensed under CC BY-NC-SA 4.0.
