
:max_bytes(150000):strip_icc()/DolphinwebbrowserfromMoboTap-a1801c64ac094dfdb045aa47915e934c.jpg)
"YouTube-to-IGTV Conversion Pro Tips Revealed"
YouTube-to-IGTV Conversion: Pro Tips Revealed
How to Convert YouTube to IGTV Videos? [3 Ways]

Shanoon Cox
Mar 27, 2024• Proven solutions
Publishing video content on social media platforms like Instagram or IGTV can help influencers and brands reach new customers. The only trouble is that both Instagram and IGTV have very precise video upload requirements, so each video you want to share on your IGTV channel must be saved in MP4 file format and in a 9:16 aspect ratio.
YouTube videos, on the other hand, are mostly horizontally oriented. If you attempt to upload a YouTube video to IGTV and wondering how to achieve it, just keep reading. Because in this article, we are going to show you how you can convert a horizontal YouTube video into IGTV vertical one in 3 different ways.
- Part 1: Re-post YouTube Video to IGTV with Filmora
- Part 2: Use YouTube to IGTV Online Converter
- Part 3: Convert YouTube Video to IGTV with FXP
Part 1: Convert YouTube Videos to IGTV Vertical Videos with Filmora


If you don’t already have the original file of the video you’d like to upload to your IGTV channel, you can download a video from YouTube , but keep in mind that you can’t use any content without permission from its owner.
Once you have the file, you can create a new project in Filmora and then after the project loads you should click on the File menu and select the Project Settings option. Pick one of the 9:16 video resolution options provided by the editor and click OK to confirm the changes.

Click on the Import button to add a YouTube video to your project and then place it on the timeline. Your video will be displayed in the Preview Panel, and you’ll be able to see that the video is positioned at the center of the panel and that its top and bottom are black.
Go to the Effects tab and click on the Background Blur submenu if you want to blur the empty areas of the frame. Add the Basic Blur effect to the timeline and drag one of its sides to position it over the entire video.

In case you are working with a video that already has a 16:9 aspect ratio, you can create a project that has the same aspect ratio, and then just use the Rotate slider in the Transform menu, to change turn a landscape video into a portrait video. The scaling tool is helpful to enlarge the frames in a vertical aspect ratio.

Filmora lets you create vertical videos in just a few quick steps, which makes it a perfect choice for influencers and marketers who want to share video content on YouTube and IGTV.
Latest News: In Filmora V10.5 and later versions, there is a new feature called Auto-Reframe. This feature allows users to convert one video for different social media platforms based on the aspect ratio changing, and its features of detecting the moving object. Click the Analyze button, and Filmora will convert this 16:9 YouTube video to vertical 9:16 IGTV video automatically. And I can adjust frames to follow Yasmine’s movement to fine-tune the result.

You can watch the video below to find out more information about the Auto-Reframe tool.
Part 2: Use Kapwing to Convert YouTube to IGTV Online
YouTubers who already have lots of videos on their channel can use online video editing platforms, like Kapwing to edit the content they want to post on IGTV. This online video editor offers a number of video editing tools that let you polish your videos before posting them on social media.
Click on the Resize tool and simply copy and paste the URL of a YouTube into the appropriate bar and the platform will automatically import a video and display it on the screen once the content is finally fetched.

Pick the Story (Snap/Insta) or IGTV 9:16 option and then proceed to choose the background color for your IGTV video, increase or decrease the zoom level or change the position of the video. Click on the Create button when ready and wait for Kapwing to process your video. All videos you create with the free version of this online video editor are going to be watermarked and you have to pay a six-dollar fee for each watermark-free video you edit with Kapwing or you can opt for a $20 monthly subscription fee that enables you to export an unlimited amount of videos without watermarks each month.

A growing number of IGTV users choose to rotate their videos, instead of resizing them, so if you already have a YouTube video with a 16:9 aspect ratio you can just rotate it and get a video with a 9:16 aspect ratio. Click on the Rotate option and then rotate it 90 degrees clockwise or counterclockwise and click on the Create button. If you opt for this method of creating a vertical video for IGTV, your video will remain the same size, but the viewers will have to hold their phones horizontally in order to view it properly.
You may also like: How to Convert MKV to MP4 without Losing Quality [Free Converters Provided] >>
Part 3: Changing the Aspect Ratio of a YouTube Video with Final Cut Pro
Editing videos with professional video editing software products like Final Cut Pro or Premiere Pro requires a certain amount of skill. There is more than just one way to change the aspect ratio of a video in Final Cut Pro, but probably the best one is to set the project resolution to 2160X3840 or any other lower resolution that matches the 9:16 aspect ratio. During the video editing process, you will have to resize all of the footage you want to include in the final version of the video. Planning your shots and composing them differently than you would compose horizontally oriented shots can potentially save you a little time on resizing and repositioning the video clips you’re working with.
If you’ve already exported a video and uploaded it to your YouTube channel, you can open that video in Final Cut Pro and just rotate it using the Transform tools. However, the viewers will have to hold their phones in a horizontal position while watching the video if you choose this method of creating a 9:16 aspect ratio in Final Cut Pro.
Conclusion
Posting YouTube videos on your IGTV channel is still a somewhat complicated process because you can’t share posts directly from one platform to the other. Moreover, you can’t upload videos that last more than ten minutes to IGTV, unless you have a verified account. Even so, the IGTV platform can help you extend the reach of your videos and increase the revenue you’re generating from the content you’re sharing on social media. Do you know another way of changing a YouTube video’s aspect ratio before re-posting it on IGTV? Leave a comment and let us know.
You may also like: YouTube to WAV File: 4 Best Free Convert Solutions >>
Shanoon Cox
Shanoon Cox is a writer and a lover of all things video.
Follow @Shanoon Cox
Shanoon Cox
Mar 27, 2024• Proven solutions
Publishing video content on social media platforms like Instagram or IGTV can help influencers and brands reach new customers. The only trouble is that both Instagram and IGTV have very precise video upload requirements, so each video you want to share on your IGTV channel must be saved in MP4 file format and in a 9:16 aspect ratio.
YouTube videos, on the other hand, are mostly horizontally oriented. If you attempt to upload a YouTube video to IGTV and wondering how to achieve it, just keep reading. Because in this article, we are going to show you how you can convert a horizontal YouTube video into IGTV vertical one in 3 different ways.
- Part 1: Re-post YouTube Video to IGTV with Filmora
- Part 2: Use YouTube to IGTV Online Converter
- Part 3: Convert YouTube Video to IGTV with FXP
Part 1: Convert YouTube Videos to IGTV Vertical Videos with Filmora
If you don’t already have the original file of the video you’d like to upload to your IGTV channel, you can download a video from YouTube , but keep in mind that you can’t use any content without permission from its owner.
Once you have the file, you can create a new project in Filmora and then after the project loads you should click on the File menu and select the Project Settings option. Pick one of the 9:16 video resolution options provided by the editor and click OK to confirm the changes.
Click on the Import button to add a YouTube video to your project and then place it on the timeline. Your video will be displayed in the Preview Panel, and you’ll be able to see that the video is positioned at the center of the panel and that its top and bottom are black.
Go to the Effects tab and click on the Background Blur submenu if you want to blur the empty areas of the frame. Add the Basic Blur effect to the timeline and drag one of its sides to position it over the entire video.
In case you are working with a video that already has a 16:9 aspect ratio, you can create a project that has the same aspect ratio, and then just use the Rotate slider in the Transform menu, to change turn a landscape video into a portrait video. The scaling tool is helpful to enlarge the frames in a vertical aspect ratio.
Filmora lets you create vertical videos in just a few quick steps, which makes it a perfect choice for influencers and marketers who want to share video content on YouTube and IGTV.
Latest News: In Filmora V10.5 and later versions, there is a new feature called Auto-Reframe. This feature allows users to convert one video for different social media platforms based on the aspect ratio changing, and its features of detecting the moving object. Click the Analyze button, and Filmora will convert this 16:9 YouTube video to vertical 9:16 IGTV video automatically. And I can adjust frames to follow Yasmine’s movement to fine-tune the result.
You can watch the video below to find out more information about the Auto-Reframe tool.
Part 2: Use Kapwing to Convert YouTube to IGTV Online
YouTubers who already have lots of videos on their channel can use online video editing platforms, like Kapwing to edit the content they want to post on IGTV. This online video editor offers a number of video editing tools that let you polish your videos before posting them on social media.
Click on the Resize tool and simply copy and paste the URL of a YouTube into the appropriate bar and the platform will automatically import a video and display it on the screen once the content is finally fetched.
Pick the Story (Snap/Insta) or IGTV 9:16 option and then proceed to choose the background color for your IGTV video, increase or decrease the zoom level or change the position of the video. Click on the Create button when ready and wait for Kapwing to process your video. All videos you create with the free version of this online video editor are going to be watermarked and you have to pay a six-dollar fee for each watermark-free video you edit with Kapwing or you can opt for a $20 monthly subscription fee that enables you to export an unlimited amount of videos without watermarks each month.
A growing number of IGTV users choose to rotate their videos, instead of resizing them, so if you already have a YouTube video with a 16:9 aspect ratio you can just rotate it and get a video with a 9:16 aspect ratio. Click on the Rotate option and then rotate it 90 degrees clockwise or counterclockwise and click on the Create button. If you opt for this method of creating a vertical video for IGTV, your video will remain the same size, but the viewers will have to hold their phones horizontally in order to view it properly.
You may also like: How to Convert MKV to MP4 without Losing Quality [Free Converters Provided] >>
Part 3: Changing the Aspect Ratio of a YouTube Video with Final Cut Pro
Editing videos with professional video editing software products like Final Cut Pro or Premiere Pro requires a certain amount of skill. There is more than just one way to change the aspect ratio of a video in Final Cut Pro, but probably the best one is to set the project resolution to 2160X3840 or any other lower resolution that matches the 9:16 aspect ratio. During the video editing process, you will have to resize all of the footage you want to include in the final version of the video. Planning your shots and composing them differently than you would compose horizontally oriented shots can potentially save you a little time on resizing and repositioning the video clips you’re working with.
If you’ve already exported a video and uploaded it to your YouTube channel, you can open that video in Final Cut Pro and just rotate it using the Transform tools. However, the viewers will have to hold their phones in a horizontal position while watching the video if you choose this method of creating a 9:16 aspect ratio in Final Cut Pro.
Conclusion
Posting YouTube videos on your IGTV channel is still a somewhat complicated process because you can’t share posts directly from one platform to the other. Moreover, you can’t upload videos that last more than ten minutes to IGTV, unless you have a verified account. Even so, the IGTV platform can help you extend the reach of your videos and increase the revenue you’re generating from the content you’re sharing on social media. Do you know another way of changing a YouTube video’s aspect ratio before re-posting it on IGTV? Leave a comment and let us know.
You may also like: YouTube to WAV File: 4 Best Free Convert Solutions >>
Shanoon Cox
Shanoon Cox is a writer and a lover of all things video.
Follow @Shanoon Cox
The Art of Crafting Video Trailers to Elevate Sales
How to Create a YouTube Channel Trailer to Increase Revenue

Richard Bennett
Mar 27, 2024• Proven solutions
Many YouTube content creators assume that no one checks out their channel trailer . Some may not even know about the concept of a trailer, while others are not sure how to create one. We will explain the concept of a YouTube channel trailer, how to make a great trailer, and how to get more subscribers and views through a quality trailer on your YouTube channel.
- Part1: What is a YouTube Channel Trailer
- Part2: How to Add YouTube Trailer to Channel
- Part3: Best YouTube Trailer Maker
- Part4: 5 Tips for Creating a Great Trailer
Part 1: What is a YouTube Channel Trailer?
Think of a channel trailer as an introduction to a movie or television show. You can choose to show the trailer to anyone who is not subscribe to your channel, when they land on your channel page.
The objective of a trailer is to hook the audience, promote your personality and content, and convince them it will be worth their time to check out some of your videos. And you must do all these things within 30 to 45 seconds !
Most content creators can benefit from creating a channel trailer. Unless you are a famous personality through a sports/acting/television/singing career, people who land on your channel may have no idea who you are. A proper trailer gives them an introduction to your personality and content.
Part 2: How to Add YouTube Trailer to Channel
After you know how to create a YouTube trail, why not add your new created trailer to YouTube channel right now. Here is the right steps.
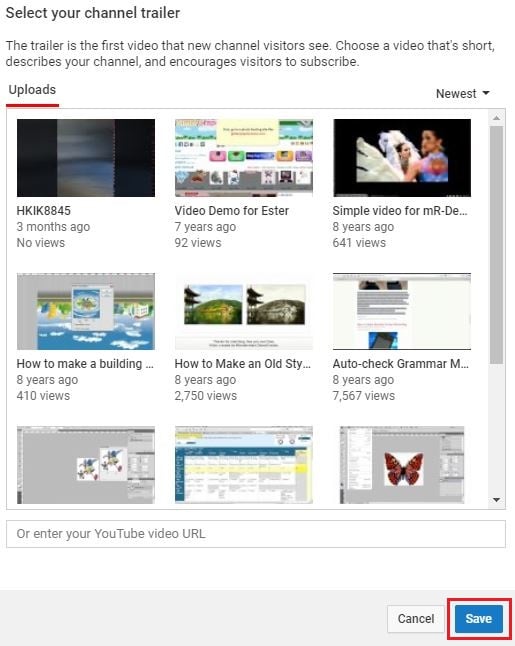
Step 1: Go to channel
Log in your YouTube account. Then click your users icon to find My channel. At the top right corner, click CUSTOMIZE CHANNEL and then choose For new visitors.
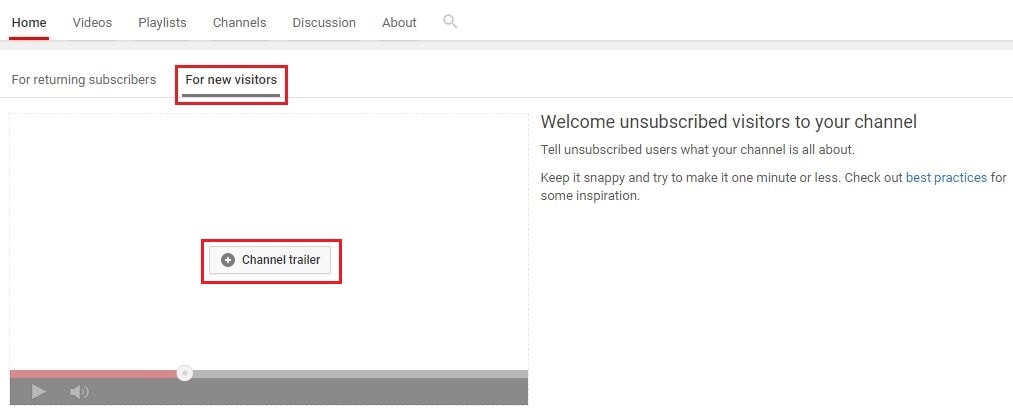
Step 2: Add trailer to YouTube
After clicking plus icon in the middle to add your amazing trailer, a playlist window will appear. Now select the trailer you want to use. Click Save. Then you will see a trailer is added. You can also change trailer or remove trailer.
Part 3: Best Channel YouTube Trailer Maker
1. Wondershare Filmora
Searching for a free and powerful video editing tool that you can use on both Windows and Mac computers? Wondershare Filmora may be the ideal program for you. It is very easy to use, even for beginners who do not have that much editing experience.
Features:
- It is free and very easy to add captions to the trailer video.
- There are many interesting options for adding video effects within the program.
- It features a modern interface that is intuitive and easy to operate. All the important controls and settings are easily accessible through the menus and submenus.
- The program operates smoothly, even on older machines.
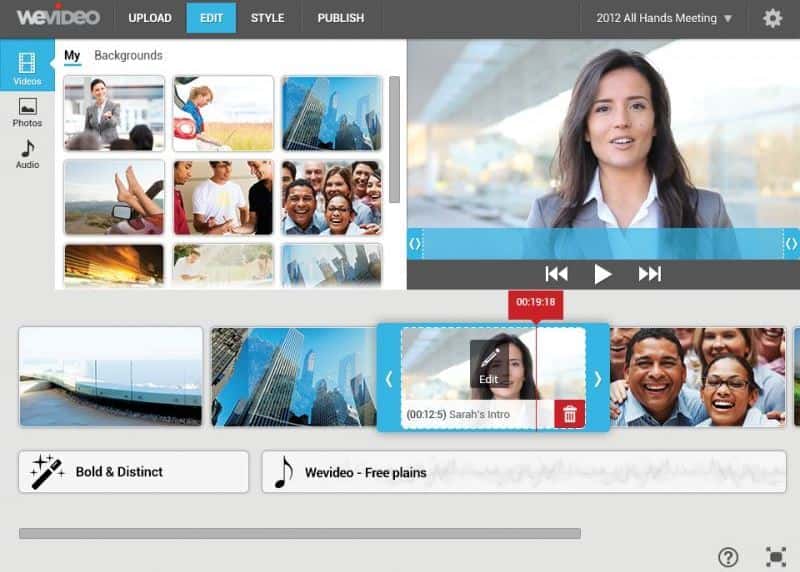
2. WeVideo
Hoping to edit content while you are on the go? By using a less powerful laptop, library computer or a friend’s device, you could edit your trailer within a couple hours. WeVideo is an online video editor that makes it so easy to edit videos in up to 4K resolution.
Features:
- The program is fast and very easy to use. It does not even require any downloads.
- As it is an online program, there are no compatibility issues with Windows, Mac or even Chromebook devices.
- It is possible to mix and match up to 600 different formats for graphics, audio, video and other effects.
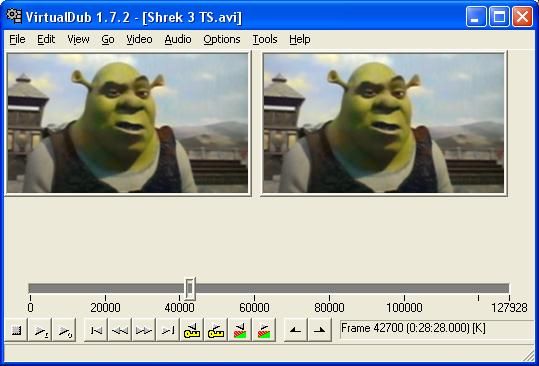
3. Virtual Dub
If you are seeking something that is open source and free, you may be interested in Virtual Dub. It is a completely free and open source program that you can use for quick capturing, encoding and editing video.
While it is not going to give you the same power and options as some of the other editors, it is a very simple tool that can be effective for specific use cases. If you are just hoping to record, encode and quickly put together a 30 second YouTube trailer, it is the ideal program.
Features:
- Offers the ability to capture videos on Windows, Mac and Linux computers.
- Works best with AVI files, but it is possible to use other video formats such as MKV and MP4 as well.
- It is possible to create video using a series of image files - or merge image files into existing video content.
Part 4: 5 Tips for Creating a Great Trailer
1. Let Viewers Know What is Coming
People appreciate routine. You can mention how many times a week you create content and the days when you publish. You can also have a brief overview of the type of videos you make, which will tell a new viewer what to expect if they subscribe to your channel!
2. Keep It Short
YouTube trailers that are more than a minute long will not succeed. People have a very short attention span. They want to be hooked immediately. 30 to 45 seconds is the sweet spot, with 30 seconds preferable! It may sound overwhelming to condense everything about your channel into 30 seconds, but that is where a great video script can help! However, sometimes both short videos and long videos work.
3. Use Some Fun Annotations
YouTube is great for having unique and helpful graphics on the screen while your video is playing. Having some fun and useful annotations, such as the days you make videos or a subscribe icon, during the intro video can be very helpful to new viewers. They also help to boost viewer engagement with your content!

4. Assume You Have New Viewers
Do not create a YouTube channel trailer with inside jokes or comments. This trailer is for people who know nothing about you or your channel. You are trying to hook them into your content, not provide a few laughs to existing subscribers.
5. Update Your Trailer Regularly
As a content creator, you may find that your brand changes every six months to a year. Maybe you change up your look, type of content, frequency of uploads or other parts of the channel. Ensure you are updating your trailer each time you make significant changes to your channel!
Conclusion
Creating a channel trailer for your YouTube page is a wonderful way to introduce a new audience to your content. They learn about you and the topics that you are passionate about. It convinces them to watch one of your videos and subscribe to your channel. And by using one of the YouTube Trailer Maker software options above, you will be creating quality trailers for your channel in no time!
Richard Bennett
Richard Bennett is a writer and a lover of all things video.
Follow @Richard Bennett
Richard Bennett
Mar 27, 2024• Proven solutions
Many YouTube content creators assume that no one checks out their channel trailer . Some may not even know about the concept of a trailer, while others are not sure how to create one. We will explain the concept of a YouTube channel trailer, how to make a great trailer, and how to get more subscribers and views through a quality trailer on your YouTube channel.
- Part1: What is a YouTube Channel Trailer
- Part2: How to Add YouTube Trailer to Channel
- Part3: Best YouTube Trailer Maker
- Part4: 5 Tips for Creating a Great Trailer
Part 1: What is a YouTube Channel Trailer?
Think of a channel trailer as an introduction to a movie or television show. You can choose to show the trailer to anyone who is not subscribe to your channel, when they land on your channel page.
The objective of a trailer is to hook the audience, promote your personality and content, and convince them it will be worth their time to check out some of your videos. And you must do all these things within 30 to 45 seconds !
Most content creators can benefit from creating a channel trailer. Unless you are a famous personality through a sports/acting/television/singing career, people who land on your channel may have no idea who you are. A proper trailer gives them an introduction to your personality and content.
Part 2: How to Add YouTube Trailer to Channel
After you know how to create a YouTube trail, why not add your new created trailer to YouTube channel right now. Here is the right steps.
Step 1: Go to channel
Log in your YouTube account. Then click your users icon to find My channel. At the top right corner, click CUSTOMIZE CHANNEL and then choose For new visitors.
Step 2: Add trailer to YouTube
After clicking plus icon in the middle to add your amazing trailer, a playlist window will appear. Now select the trailer you want to use. Click Save. Then you will see a trailer is added. You can also change trailer or remove trailer.
Part 3: Best Channel YouTube Trailer Maker
1. Wondershare Filmora
Searching for a free and powerful video editing tool that you can use on both Windows and Mac computers? Wondershare Filmora may be the ideal program for you. It is very easy to use, even for beginners who do not have that much editing experience.
Features:
- It is free and very easy to add captions to the trailer video.
- There are many interesting options for adding video effects within the program.
- It features a modern interface that is intuitive and easy to operate. All the important controls and settings are easily accessible through the menus and submenus.
- The program operates smoothly, even on older machines.
2. WeVideo
Hoping to edit content while you are on the go? By using a less powerful laptop, library computer or a friend’s device, you could edit your trailer within a couple hours. WeVideo is an online video editor that makes it so easy to edit videos in up to 4K resolution.
Features:
- The program is fast and very easy to use. It does not even require any downloads.
- As it is an online program, there are no compatibility issues with Windows, Mac or even Chromebook devices.
- It is possible to mix and match up to 600 different formats for graphics, audio, video and other effects.
3. Virtual Dub
If you are seeking something that is open source and free, you may be interested in Virtual Dub. It is a completely free and open source program that you can use for quick capturing, encoding and editing video.
While it is not going to give you the same power and options as some of the other editors, it is a very simple tool that can be effective for specific use cases. If you are just hoping to record, encode and quickly put together a 30 second YouTube trailer, it is the ideal program.
Features:
- Offers the ability to capture videos on Windows, Mac and Linux computers.
- Works best with AVI files, but it is possible to use other video formats such as MKV and MP4 as well.
- It is possible to create video using a series of image files - or merge image files into existing video content.
Part 4: 5 Tips for Creating a Great Trailer
1. Let Viewers Know What is Coming
People appreciate routine. You can mention how many times a week you create content and the days when you publish. You can also have a brief overview of the type of videos you make, which will tell a new viewer what to expect if they subscribe to your channel!
2. Keep It Short
YouTube trailers that are more than a minute long will not succeed. People have a very short attention span. They want to be hooked immediately. 30 to 45 seconds is the sweet spot, with 30 seconds preferable! It may sound overwhelming to condense everything about your channel into 30 seconds, but that is where a great video script can help! However, sometimes both short videos and long videos work.
3. Use Some Fun Annotations
YouTube is great for having unique and helpful graphics on the screen while your video is playing. Having some fun and useful annotations, such as the days you make videos or a subscribe icon, during the intro video can be very helpful to new viewers. They also help to boost viewer engagement with your content!
4. Assume You Have New Viewers
Do not create a YouTube channel trailer with inside jokes or comments. This trailer is for people who know nothing about you or your channel. You are trying to hook them into your content, not provide a few laughs to existing subscribers.
5. Update Your Trailer Regularly
As a content creator, you may find that your brand changes every six months to a year. Maybe you change up your look, type of content, frequency of uploads or other parts of the channel. Ensure you are updating your trailer each time you make significant changes to your channel!
Conclusion
Creating a channel trailer for your YouTube page is a wonderful way to introduce a new audience to your content. They learn about you and the topics that you are passionate about. It convinces them to watch one of your videos and subscribe to your channel. And by using one of the YouTube Trailer Maker software options above, you will be creating quality trailers for your channel in no time!
Richard Bennett
Richard Bennett is a writer and a lover of all things video.
Follow @Richard Bennett
Also read:
- Elevating Your Vlog with Proper Tripod Angles
- In 2024, 15 Favorite Online Anime Video Platforms
- [Updated] Accelerate YouTube Visibility - Select Top 8 Rank Watchers
- [New] Elevating Video Marketing with YouTube Thumbnails
- In 2024, Assessing Your Video Streaming Needs To Subscribe or Not to Subscribe?
- Elevating Shorts Visibility A Thumbnail Transformation Journey
- Transform Your Content Creation with the Top 12 Vlogger Cams
- 2024 Approved Effective Use of AdSense on YouTube to Boost Channel Income
- In 2024, Data-Driven Decision Making in Your YouTube Shorts Strategy
- In 2024, A Comprehensive Walkthrough Creating Channel Banners
- Crafting Success Leading Business Channels for Professionals
- [Updated] Beginner's Guide Capturing YouTube Videos as Screencasts Without Payment
- [Updated] Boosting Views with Captivating Intros Filmed in iMovie
- [Updated] Boosting Income Through Effective Video Marketing
- Directly Infuse YouTube Music Into Any iMovie Project
- Key Strategies for Adding Timestamps in YouTube Content
- Love in Full View Discovering Youtube & Vimeo's Top 7 Wedding Movies
- [New] Creating a Stellar Game Channels Look A Step-By-Step Approach
- Affordable YouTube Intro Designs and Templates for 2024
- Dissecting Revenue Allocation for Shortform Content Makers
- Crafting Viral Videos on YouTube A Strategic Plan for 2024
- YouTube's Elite Hits Breaking the 100M View Barrier by 2024
- 2024 Approved Crafting a Winning Strategy YouTube Keyword Mastery Explained
- 2024 Approved Achieve Professional-Level YouTube Transcription Without Spending
- Unlock Video Potential Green Screen Meets YT Strategy
- [Updated] Editor's Dream Machine Top Portable Video Edits Tools
- [Updated] Building Sustainable Cities Innovation in Environmental Design
- Harmonize Your Hours Synchronized Video Playback Across Platforms
- [New] Cultivating a Community Building Followers on YouTube Without Spending
- [Updated] FB Video-to-MP3 Transform Your Shares Into Music Beats for 2024
- 3 Solutions to Hard Reset Nokia C02 Phone Using PC | Dr.fone
- [Updated] In 2024, Analyzing Team Chat Platforms Is Slack Superior to Discord in Performance?
- New Audiovisual Archive Top 10 Digital Destinations for Sound Track Download
- How To Unbrick a Dead Honor Magic 5 | Dr.fone
- [New] 2024 Approved Here's What You Don't Know About Instagram Story Viewer
- 2024 Approved 10 Best Free Video Hosting Services for Personal and Professional Use
- Top Picks The Ultimate Selection of 4K Monitors for MacOS
- How To Upgrade or Downgrade Apple iPhone 13 Pro Without Data Loss? | Dr.fone
- Strategizing Gamers Speech Modification Unveiling the Superior Choices
- [Updated] 20 Visionary Metaverse Projects with Educational Value
- [New] Chromebook Screen Capture Simplified Into Four Methods
- Remove Device Supervision From your Apple iPhone SE
- 2024 Approved FaceTime Audibility Capturing Clear Audio Calls
- New 2024 Approved In-Depth Analysis of the Nero WaveShaper Toolkit
- In 2024, Top-Ranked Internet MP3 Trimmer & Merger Tool
- In 2024, How to Unlock Vivo G2 Phone Password Without Factory Reset?
- In 2024, Crafting Engaging Podcast Imagery with Tools
- [New] Exploring FB Video Aspect Proportions for 2024
- 2024 Approved Essential Guide Fetching Twitter Videos Directly From Mobile
- Pattern Locks Are Unsafe Secure Your Realme 11X 5G Phone Now with These Tips
- [New] In 2024, Voice Logger Essentials The Best Speech Apps for Mac Devices
- [Updated] Top 15 Capture Apps for Win10 Users for 2024
- Updated 2024 Approved The Art of Video Storytelling Elevate Your Clips Into Engaging Movies
- [Updated] 2024 Approved Crafting Instagram Magic with Professional Edits
- Farm Fanatics’ Forecast Future of Virtual Harvesting
- [New] Hassle-Free Techniques for IGTV on Stories for 2024
- In 2024, Android's Premier Tools for Fast-Fixing Vid
- Title: "YouTube-to-IGTV Conversion Pro Tips Revealed"
- Author: Brian
- Created at : 2024-05-25 13:29:15
- Updated at : 2024-05-26 13:29:15
- Link: https://youtube-video-recordings.techidaily.com/youtube-to-igtv-conversion-pro-tips-revealed/
- License: This work is licensed under CC BY-NC-SA 4.0.
