"YouTube Artistry Designing Channels' Visual Assets (Banners/Icons)"
YouTube Artistry: Designing Channels’ Visual Assets (Banners/Icons)
YouTube Channel Art: How to Make Banners, Icons, and Thumbnails?

Shanoon Cox
Oct 26, 2023• Proven solutions
YouTube channel art refers to your banner, icon, and watermark along with the thumbnails of your videos. Creating custom channel art is a great way to express yourself and communicate the tone of your videos.
YouTube supports JPG, GIF, BMP, and PNG files for channel art, although they do not allow animated GIFs.
Part 1: Top Sites for YouTube Channel Art
You can make your channel art in Photoshop, or another photo editing program, but there are also some excellent tools online which you can access for free. Here are two of the best:
Canva.com
Canva has templates for YouTube banners as well as a variety of stock images. You can also upload and edit your own images on Canva. It is a free service, but they do have some premium features which cost $1 each. Canva has a desktop version and an iPad app.
PicMonkey.com
PicMonkey lets you import images from your computer or social media accounts, edit them, and use them in templates for YouTube banners or other kinds of social media graphics. It’s free to use, but you can only access their more advanced editing tools if you buy a paid subscription for either $4.99 a month, or $2.75 a month for a year.
Part 2: Banners
Your banner is the header for your channel page. Its dimensions are 2560 x 1440 px.
Not all of your banner will be visible on all devices. The full 2560 x 1440 px image will only be seen by viewers watching on tv screens.
Only 1546 x 423 px of your banner will be visible on computers, and this ‘safe area’ can vary for different tablets and smartphones depending on the width of their screens. Make sure any important text or logos are placed in a central location so everybody can see them.
Also, keep in mind that your icon will hover over the top left corner of your banner and that your social media icons will be located in the bottom right corner.
The file size of your banner cannot be over 4MB.
Part 3: Icons
Your icon is the avatar you use when leaving and replying to comments on YouTube. It also hovers over your banner on your channel page.
By default, your icon will be the picture associated with your Google account.
If you upload a new icon, it will render down to 98 x 98 px. So, any square image larger than 98 x 98 px will work. However, YouTube recommends you use one as large as 800 x 800 px. This will give you a sharper, higher quality, image.
Part 4: Thumbnails
Thumbnails are the images that represent your videos on your channel page and in search results.
You can browse through your video and choose a still frame you want to use as your video’s thumbnail. Or, you can upload a custom image.
Custom thumbnails should have an aspect ratio of 16:9, the same as YouTube’s video player. The files should be under 2MB and have a resolution of 1280 x 720.
To upload a custom thumbnail, select the custom thumbnail option under Video Thumbnails at the end of the video uploading process. You can also change the thumbnails of your existing videos to custom ones through Video Manager.
Remember that your thumbnail will be rendered down to a much smaller size. If you use text, like the title of your video, then you should make it really big so that it is easy to read when it gets shrunk down.
Part 5: Watermarks
A watermark is a small, usually 50 x 50 px image displayed in the bottom right corner of your video.
Watermarks protect your videos by making them harder for others to steal and take credit for.
Ideally, your watermark will be a transparent version of your logo. Try not to use more than three colors – you do not want your watermark to distract your viewers.
If you add a branding watermark through YouTube then that watermark will also double as a subscribe link.
Here is how you can add a branding watermark through YouTube:
- On YouTube, go to your Creator Studio and select Branding under the Channel menu.
- Click the blue add a watermark button on the Branding page.
- An upload of a watermark window will pop up. Select your image file and click Save.
- Choose between having a start time for your watermark, making it appear only at the end of your videos, or having it there for the entire length of your videos. The popular choice is to have it visible through the entire video.
- Click Update. Your watermark will be applied to all of your videos.
If you want to find a video editing solution that empowers your imagination and creativity yet takes less effort, please try this robust and user-friendly video editing software Filmora, which is equipped with its own footage stock Wondershare Filmstock and will definitely enhance your productivity and helps you to make money by making videos much easier.


Shanoon Cox
Shanoon Cox is a writer and a lover of all things video.
Follow @Shanoon Cox
Shanoon Cox
Oct 26, 2023• Proven solutions
YouTube channel art refers to your banner, icon, and watermark along with the thumbnails of your videos. Creating custom channel art is a great way to express yourself and communicate the tone of your videos.
YouTube supports JPG, GIF, BMP, and PNG files for channel art, although they do not allow animated GIFs.
Part 1: Top Sites for YouTube Channel Art
You can make your channel art in Photoshop, or another photo editing program, but there are also some excellent tools online which you can access for free. Here are two of the best:
Canva.com
Canva has templates for YouTube banners as well as a variety of stock images. You can also upload and edit your own images on Canva. It is a free service, but they do have some premium features which cost $1 each. Canva has a desktop version and an iPad app.
PicMonkey.com
PicMonkey lets you import images from your computer or social media accounts, edit them, and use them in templates for YouTube banners or other kinds of social media graphics. It’s free to use, but you can only access their more advanced editing tools if you buy a paid subscription for either $4.99 a month, or $2.75 a month for a year.
Part 2: Banners
Your banner is the header for your channel page. Its dimensions are 2560 x 1440 px.
Not all of your banner will be visible on all devices. The full 2560 x 1440 px image will only be seen by viewers watching on tv screens.
Only 1546 x 423 px of your banner will be visible on computers, and this ‘safe area’ can vary for different tablets and smartphones depending on the width of their screens. Make sure any important text or logos are placed in a central location so everybody can see them.
Also, keep in mind that your icon will hover over the top left corner of your banner and that your social media icons will be located in the bottom right corner.
The file size of your banner cannot be over 4MB.
Part 3: Icons
Your icon is the avatar you use when leaving and replying to comments on YouTube. It also hovers over your banner on your channel page.
By default, your icon will be the picture associated with your Google account.
If you upload a new icon, it will render down to 98 x 98 px. So, any square image larger than 98 x 98 px will work. However, YouTube recommends you use one as large as 800 x 800 px. This will give you a sharper, higher quality, image.
Part 4: Thumbnails
Thumbnails are the images that represent your videos on your channel page and in search results.
You can browse through your video and choose a still frame you want to use as your video’s thumbnail. Or, you can upload a custom image.
Custom thumbnails should have an aspect ratio of 16:9, the same as YouTube’s video player. The files should be under 2MB and have a resolution of 1280 x 720.
To upload a custom thumbnail, select the custom thumbnail option under Video Thumbnails at the end of the video uploading process. You can also change the thumbnails of your existing videos to custom ones through Video Manager.
Remember that your thumbnail will be rendered down to a much smaller size. If you use text, like the title of your video, then you should make it really big so that it is easy to read when it gets shrunk down.
Part 5: Watermarks
A watermark is a small, usually 50 x 50 px image displayed in the bottom right corner of your video.
Watermarks protect your videos by making them harder for others to steal and take credit for.
Ideally, your watermark will be a transparent version of your logo. Try not to use more than three colors – you do not want your watermark to distract your viewers.
If you add a branding watermark through YouTube then that watermark will also double as a subscribe link.
Here is how you can add a branding watermark through YouTube:
- On YouTube, go to your Creator Studio and select Branding under the Channel menu.
- Click the blue add a watermark button on the Branding page.
- An upload of a watermark window will pop up. Select your image file and click Save.
- Choose between having a start time for your watermark, making it appear only at the end of your videos, or having it there for the entire length of your videos. The popular choice is to have it visible through the entire video.
- Click Update. Your watermark will be applied to all of your videos.
If you want to find a video editing solution that empowers your imagination and creativity yet takes less effort, please try this robust and user-friendly video editing software Filmora, which is equipped with its own footage stock Wondershare Filmstock and will definitely enhance your productivity and helps you to make money by making videos much easier.
Shanoon Cox
Shanoon Cox is a writer and a lover of all things video.
Follow @Shanoon Cox
Efficiently Add YouTube Playlists to Your Website Interface
YouTube is an excellent resource for entertainment, education, and general information, but did you know you can also display a YouTube playlist on your website?
Embedding a YouTube playlist will allow you to showcase a collection of videos on a topic or theme on your website. It’s also a great way to keep your visitors engaged on your site for more extended periods.
To help you with the process, we’ll explore different step-by-step methods to embed a YouTube playlist on a website to add interactivity to your site.
So, if you’re ready to get started, read on!
How To Embed a YouTube Playlist on a Website
If you want to embed and display a YouTube playlist on your website, we’ll give you a complete rundown of the three methods you can try to get this done. But, of course, each method has its pros and cons, so you’ll need to decide which is right for you.
Here’s how to embed a YouTube playlist on a Website:
Embedding a YouTube Playlist on Website Using WordPress Plugin
The plugin is the simplest way to add a YouTube Playlist to your WordPress website. This will help you get this done in no time without having to write any code for the process.
With plugins like YouTube Feed Pro by Smash Balloon , you can extend your website’s functionality and create, customize, or embed a YouTube playlist with just a few clicks of a mouse.
To embed and add a YouTube playlist on your website page/post, do the following steps in sequence:
Step1 Launch a browser on your PC and head to your WordPress website’s login page. Sign in to your dashboard using your username and password.
Step2 Click the “Plugins” option from the left-hand side menu on the WordPress dashboard. Now, click “Add New” and use the search option to find and install the YouTube Feed Pro plugin. Afterward, click the “Activate” option to enable the plugin.
Step3 Click the “YouTube Feed” option from the left menu and open “All Feeds.” On the next page, click “Add New” at the top left of the screen.

You will now be asked what type of feed you want to create. Select “Playlist” and click “Next.”

Step4 You need to create your YouTube API Key , copy it, and paste it into the pop-up. Click “Add” to connect your YouTube account to the plugin.
Step5 Select the Playlist you want to display on your WordPress website and take its ID. Paste that in the next pop-up window and click “Next” to continue the process.

Your YouTube playlist will be connected to your WordPress website. To further customize it, select the template you want and click “Next.” You can also configure the Feed Layout and Color Scheme.

Step6 Once you are done with customization, click the “Embed” option on the top-right side of the screen, and a pop-up window will appear. Next, click “Add to a Page,” and a list of pages on your website will be displayed.
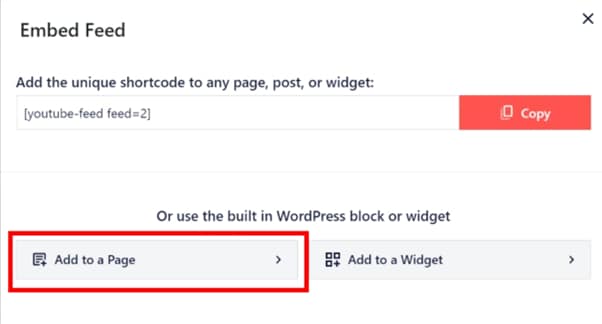
Choose your page and click “Add” at the bottom of the pop-up window. You’ll be directed to a new page where you can embed the feed. Click the “Plus” icon at the top-left of the screen, search for YouTube Feed and choose the Feeds for YouTube block to embed and add your playlist.
That’s about it! You’ve successfully embedded a YouTube playlist on your WordPress website.
Embedding a YouTube Playlist on a Website Using oEmbed Code
Another method to embed a YouTube playlist on your WordPress website is to use oEmbed Code. This method requires basic CSS, HTML, or Java knowledge; otherwise, you won’t be able to customize your playlist.
Moreover, this method is too complicated for beginners, and you will miss the customer support provided by WordPress plugin developers in case of any mishaps.
To use the oEmbed Code method, do the following steps:
Step1 In the first step, head to your YouTube account and access the Playlist you want to embed. Next, click the three dots below it and copy its URL.
Step2 Now, login to your WordPress dashboard and open the post or page editor where you want to add the playlist.
Step3 Paste the URL directly in the editor and click “Update” to save the changes.
WordPress will grab your playlist from YouTube and automatically show it in your post using oEmbed. The outcome is a single video with a menu that your viewers can click to see other videos in the playlist.