
:max_bytes(150000):strip_icc():format(webp)/GettyImages-151812569-ff7311e1de18461da9f8698205953384.jpg)
Your Guide to the Finest YouTube Subtitles Extractor
Your Guide to the Finest YouTube Subtitles Extractor
If you’ve tried to add subtitles to videos on YouTube before, you may have noticed it’s a bit of a pain. Usually, you have to copy the translation and paste it into your clips, which is time-consuming and requires an advanced level of skill.
Therefore, to help you understand YouTube videos and take notes from their content, we’ve brought a complete review of the best YouTube subtitle extractors that will automatically get the required SRT file in no time. In addition, we’ll also provide a bonus tip to edit your subtitles using Filmora.
So, let’s get into the details of each of these tools one by one.
- Wondershare UniConverter
- DVDVideoSoft Free YouTube Subtitles Downloader
- 4K Video Downloader
- ByClick Downloader
10 Free YouTube Subtitle Extractors & Downloaders
We’ve rounded up a list of 10 YouTube subtitle extractors and downloader services to simplify your life and enable you to get the SRT files.
These tools are simple to use and can help you save a lot of time and effort. However, keep in mind that with these software programs, you can only download videos with subtitles automatically generated by YouTube.
![]()
Note: if you want to create subtitles, you can also use the Speech to text function.
Online Free Youtube Subtitle Extractor
You can use one of the following subtitle extractor tools if you only need the SRT file:
1. DownSub
DownSub is an online tool that can help you extract subtitles for your favorite YouTube movies or shows. The tool is entirely free and easy to use. Simply paste the link to the video you want to get subtitles for, click download, and DownSub will do the rest.

Some of the key features of DownSub are as follows:
- Download subtitles from YouTube in multiple languages
- Supports multiple formats, including SRT, TXT, and VTT
- Extracts directly from YouTube, Viki, VIU, and more
2. Checksub
Checksub is a handy tool for extracting subtitles for your YouTube video. To use the tool, create your account on the website, drag and drop your file or upload the URL, and wait for Checksub to extract the SRT file.

Here are some of the cool features of the Checksub tool:
- Adds subtitles and translates or dubs your videos
- Ability to edit subtitles
- Supports over 190 languages
- Adds automatic voiceover in a foreign language
3. EasySub
EasySub is another simple and fast-to-use tool that can help you extract YouTube subtitles in no time without installing any software or extensions. Moreover, it supports multiple file formats, such as VTT, SRT, ass, and TXT.

The following are some key features of EasySub:
- Free to use
- Simple and easy to use
- Automatic transcription
- Uses an advanced AI algorithm
- Multi-language support
4. SaveSubs
SaveSubs is a browser-based Youtube subtitles downloader that does not require its users to install any software or touch any code. Just paste the YouTube video link with subtitles, click “Download,” and you can download the file instantly on your device.

Below are a few key features of the SaveSubs tool:
- Download subtitles in multiple formats, such as VTT, SRT, and TXT
- Clear and simple UI
- Supports editable subtitles
- Comes with a social sharing feature
5. YouSubtitles
With its massive subtitle database, YouSubtitles stands out from other online tools. This tool has an easy-to-use UI and can help you get your required file effortlessly. Furthermore, you can even select the translated version of the file after the download.

Here’s why YouSubtitles is one of the best YouTube subtitles extractor online:
- Free to use
- Huge subtitle database
- Supports multiple formats and languages
6. DVDVideoSoft
Another trusted source for YouTube subtitle extraction is DVDVideoSoft. With this tool, you can quickly get the required SRT file by providing the URL of the content. Moreover, you can also use it to download music and videos from Youtube.

Some key features of DVDVideoSoft are as follows:
- Can set the language, interval, and timestamp for the subtitles
- Supports YouTube to MP3 converter and YouTube downloader
- Free to use
- Perfect for downloading subtitles from a particular segment of a video
Youtube Subtitle Downloader Software
Youtube’s automatic subtitles are sometimes inaccurate while using an online tool. Therefore, we recommend you use dedicated software to make adjustments to the content. Some of these programs are as follows:
1. Wondershare UniConverter
Wondershare UniConverter is an easy-to-use software for Windows and Mac that can help you create, add, and generate subtitles for your favorite Youtube videos in just a few clicks.
Price:
- Quarter: $29.99
- Annual: $39.99
- 2-year: $55.99
- Perpetual (one-time): $79.99

Key Features:
Here are some of the things UniConverter can do:
- Auto-generates subtitles from videos in over 100 languages
- Supports multiple video and audio formats
- Customizable subtitle styles
- Comes with a visual subtitle timeline for real-time preview
- Converts TXT to SRT format
- Ability to download the YouTube video on your device
2. DVDVideoSoft Free YouTube Subtitles Downloader
Another customizable and powerful software for downloading YouTube SRT is the DVDVideoSoft Free YouTube Downloader. With this tool, you can get subtitles in multiple languages for any video on YouTube with closed captions.
Price: Free

Key Features:
Here are some key features of the DVDVideoSoft Free YouTube Subtitles Downloader:
- Supports TXT and SRT file formats
- Available for Windows
- Ability to extract subtitles from certain intervals
- Available as a browser-based tool
3. 4K Video Downloader
With the 4K Video Downloader user-friendly GUI, you can download videos from YouTube, Facebook, and many other video sites in high definition. It is also possible to extract YouTube video subtitles in over 50 languages.

Price: Free
Key Features:
Below are the key features of the 4K Video Downloader software:
- Download the video in 4K
- Supports over 50 languages for YouTube subtitles extraction
- Can download an entire playlist
4. ByClick Downloader
ByClick Downloader is another great option to quickly download YouTube videos with subtitles in any format you want. Not only that, you can convert files into MP3, MP4, FLV, AVI, WMV,3GP, WAV, and WEBM formats with just a few clicks!

Price: Free
Key Features:
Key features of the ByClick Downloader are as follows:
- Downloads videos from over 50 different sources
- Excellent user interface
- Quickly downloads YouTube subtitles.
- Supports multiple formats
Bonus Tips: Easily Edit Your Subtitle With Filmora
Since most of the above tools only extract or download the YouTube subtitles and do not offer editing features, we recommend using Wondershare Filmora , where you can quickly apply changes to your SRT file.
Free Download For Win 7 or later(64-bit)
Free Download For macOS 10.14 or later
Filmora is a powerful video editing software that lets you create and edit clips like a pro. With its easy-to-use UI and wide range of features, you can also create and edit subtitles for your YouTube video using different parameters, animations, text styles, templates, and colors.

Here’s how you can add and edit subtitles on your videos using Filmora:
Step 1 Open the Filmora software on your laptop or desktop and click the “Create New Project” option in the main interface. Select the “Click here to import media” option and upload your YouTube video. Alternatively, you can drag and drop your file.

Step 2 Drag the YouTube video, drop it in the timeline, and click the “Play” icon. Listen to the voiceover on your video footage and press the “M” key to add a marker. Next, click “Titles” from the toolbar and open the “Subtitles” tab from the left menu. Double-click the subtitle to download and preview it.
Step 3 Drag the downloaded subtitle template and drop it in the timeline. Now, adjust it in your video along with the marker point. Double-click the subtitle template in the timeline and type the text from the video voiceover.
You can also add color or template and adjust the text space to make them more visible on your video clip.

Step 4 Click the “Advanced” option, delete the preset text, and set the one you’ve just typed. Next, head to the “Animation” tab to apply any animation effect and click “OK.” Finally, repeat the steps to add subtitles to the whole video.
Conclusion
In this article, we’ve provided a detailed review of the ten best YouTube subtitle extractors and downloaders to help you automatically extract SRT files without much effort.
We’ve also recommended the Filmora software for quickly downloading and editing YouTube subtitles to make them more engaging and clear using various templates, styles, and animations.
Hopefully, you’ve found this article helpful and can now get the SRT files for your favorite YouTube video in a matter of minutes.
- Wondershare UniConverter
- DVDVideoSoft Free YouTube Subtitles Downloader
- 4K Video Downloader
- ByClick Downloader
- Bonus Tips: Easily Edit Your Subtitle With Filmora
10 Free YouTube Subtitle Extractors & Downloaders
We’ve rounded up a list of 10 YouTube subtitle extractors and downloader services to simplify your life and enable you to get the SRT files.
These tools are simple to use and can help you save a lot of time and effort. However, keep in mind that with these software programs, you can only download videos with subtitles automatically generated by YouTube.
![]()
Note: if you want to create subtitles, you can also use the Speech to text function.
Online Free Youtube Subtitle Extractor
You can use one of the following subtitle extractor tools if you only need the SRT file:
1. DownSub
DownSub is an online tool that can help you extract subtitles for your favorite YouTube movies or shows. The tool is entirely free and easy to use. Simply paste the link to the video you want to get subtitles for, click download, and DownSub will do the rest.
Some of the key features of DownSub are as follows:
- Download subtitles from YouTube in multiple languages
- Supports multiple formats, including SRT, TXT, and VTT
- Extracts directly from YouTube, Viki, VIU, and more
2. Checksub
Checksub is a handy tool for extracting subtitles for your YouTube video. To use the tool, create your account on the website, drag and drop your file or upload the URL, and wait for Checksub to extract the SRT file.
Here are some of the cool features of the Checksub tool:
- Adds subtitles and translates or dubs your videos
- Ability to edit subtitles
- Supports over 190 languages
- Adds automatic voiceover in a foreign language
3. EasySub
EasySub is another simple and fast-to-use tool that can help you extract YouTube subtitles in no time without installing any software or extensions. Moreover, it supports multiple file formats, such as VTT, SRT, ass, and TXT.
The following are some key features of EasySub:
- Free to use
- Simple and easy to use
- Automatic transcription
- Uses an advanced AI algorithm
- Multi-language support
4. SaveSubs
SaveSubs is a browser-based Youtube subtitles downloader that does not require its users to install any software or touch any code. Just paste the YouTube video link with subtitles, click “Download,” and you can download the file instantly on your device.
Below are a few key features of the SaveSubs tool:
- Download subtitles in multiple formats, such as VTT, SRT, and TXT
- Clear and simple UI
- Supports editable subtitles
- Comes with a social sharing feature
5. YouSubtitles
With its massive subtitle database, YouSubtitles stands out from other online tools. This tool has an easy-to-use UI and can help you get your required file effortlessly. Furthermore, you can even select the translated version of the file after the download.
Here’s why YouSubtitles is one of the best YouTube subtitles extractor online:
- Free to use
- Huge subtitle database
- Supports multiple formats and languages
6. DVDVideoSoft
Another trusted source for YouTube subtitle extraction is DVDVideoSoft. With this tool, you can quickly get the required SRT file by providing the URL of the content. Moreover, you can also use it to download music and videos from Youtube.
Some key features of DVDVideoSoft are as follows:
- Can set the language, interval, and timestamp for the subtitles
- Supports YouTube to MP3 converter and YouTube downloader
- Free to use
- Perfect for downloading subtitles from a particular segment of a video
Youtube Subtitle Downloader Software
Youtube’s automatic subtitles are sometimes inaccurate while using an online tool. Therefore, we recommend you use dedicated software to make adjustments to the content. Some of these programs are as follows:
1. Wondershare UniConverter
Wondershare UniConverter is an easy-to-use software for Windows and Mac that can help you create, add, and generate subtitles for your favorite Youtube videos in just a few clicks.
Price:
- Quarter: $29.99
- Annual: $39.99
- 2-year: $55.99
- Perpetual (one-time): $79.99
Key Features:
Here are some of the things UniConverter can do:
- Auto-generates subtitles from videos in over 100 languages
- Supports multiple video and audio formats
- Customizable subtitle styles
- Comes with a visual subtitle timeline for real-time preview
- Converts TXT to SRT format
- Ability to download the YouTube video on your device
2. DVDVideoSoft Free YouTube Subtitles Downloader
Another customizable and powerful software for downloading YouTube SRT is the DVDVideoSoft Free YouTube Downloader. With this tool, you can get subtitles in multiple languages for any video on YouTube with closed captions.
Price: Free
Key Features:
Here are some key features of the DVDVideoSoft Free YouTube Subtitles Downloader:
- Supports TXT and SRT file formats
- Available for Windows
- Ability to extract subtitles from certain intervals
- Available as a browser-based tool
3. 4K Video Downloader
With the 4K Video Downloader user-friendly GUI, you can download videos from YouTube, Facebook, and many other video sites in high definition. It is also possible to extract YouTube video subtitles in over 50 languages.
Price: Free
Key Features:
Below are the key features of the 4K Video Downloader software:
- Download the video in 4K
- Supports over 50 languages for YouTube subtitles extraction
- Can download an entire playlist
4. ByClick Downloader
ByClick Downloader is another great option to quickly download YouTube videos with subtitles in any format you want. Not only that, you can convert files into MP3, MP4, FLV, AVI, WMV,3GP, WAV, and WEBM formats with just a few clicks!
Price: Free
Key Features:
Key features of the ByClick Downloader are as follows:
- Downloads videos from over 50 different sources
- Excellent user interface
- Quickly downloads YouTube subtitles.
- Supports multiple formats
Bonus Tips: Easily Edit Your Subtitle With Filmora
Since most of the above tools only extract or download the YouTube subtitles and do not offer editing features, we recommend using Wondershare Filmora , where you can quickly apply changes to your SRT file.
Free Download For Win 7 or later(64-bit)
Free Download For macOS 10.14 or later
Filmora is a powerful video editing software that lets you create and edit clips like a pro. With its easy-to-use UI and wide range of features, you can also create and edit subtitles for your YouTube video using different parameters, animations, text styles, templates, and colors.
Here’s how you can add and edit subtitles on your videos using Filmora:
Step 1 Open the Filmora software on your laptop or desktop and click the “Create New Project” option in the main interface. Select the “Click here to import media” option and upload your YouTube video. Alternatively, you can drag and drop your file.
Step 2 Drag the YouTube video, drop it in the timeline, and click the “Play” icon. Listen to the voiceover on your video footage and press the “M” key to add a marker. Next, click “Titles” from the toolbar and open the “Subtitles” tab from the left menu. Double-click the subtitle to download and preview it.
Step 3 Drag the downloaded subtitle template and drop it in the timeline. Now, adjust it in your video along with the marker point. Double-click the subtitle template in the timeline and type the text from the video voiceover.
You can also add color or template and adjust the text space to make them more visible on your video clip.
Step 4 Click the “Advanced” option, delete the preset text, and set the one you’ve just typed. Next, head to the “Animation” tab to apply any animation effect and click “OK.” Finally, repeat the steps to add subtitles to the whole video.
Conclusion
In this article, we’ve provided a detailed review of the ten best YouTube subtitle extractors and downloaders to help you automatically extract SRT files without much effort.
We’ve also recommended the Filmora software for quickly downloading and editing YouTube subtitles to make them more engaging and clear using various templates, styles, and animations.
Hopefully, you’ve found this article helpful and can now get the SRT files for your favorite YouTube video in a matter of minutes.
The Ultimate YouTube Broadcast Handbook
The Ultimate Guide to YouTube Live Streaming

Richard Bennett
Mar 27, 2024• Proven solutions
Live streaming on YouTube is a great way to get more engagement from your audience, even if you do not have a huge following. As long as you have some reliable subscribers leaving comments on your videos you should be able to schedule a live stream and know it will have an audience. People feel a personal connection with their favorite vloggers so if you give your subscribers a chance to interact with you in real time they will probably plan to join in. The key to a good live streaming is to respond to comments and questions from people who are watching. Besides watching the live chat of your video you can create a hashtag for your stream and monitor it on twitter.
Table of Contents
- Why Livestream?
- Type of Content to Livestream
- What You Need to Livestream On YouTube
- 4 Ways to Setup Your Livestream On YouTube
- 8 Tips to Improve Your Livestream on YouTube
- How to Grow As A Livestreamer on YouTube
Why Livestream?
You have grown your audience, and now you want to take your channel to the next level and diversify your content.
Whether you are vlogging, gaming, or running tutorials on YouTube, there is potential to host a live broadcast. It’s not limited to any genre, you simply need to create content that people are interested in watching.
Before we get started into the How, let’s start with a few reasons Why you should be live streaming your content.
Connect and engage with your audience
When a viewer leaves a comment during a livestream you will be able to see it right away and respond. Having an instantaneous conversation with a viewer while they are watching your video will encourage more engagement and establish a ber relationship with your viewers — and you will know that these viewers are not bots.
Increase watch time and session watch time on your channel
If you are making YouTube videos on average 10 minutes long, and the viewer only watches half of it, that’s only 5 minutes of watch time, which is fine… But if you are live streaming for 45 minutes, and you are able to hold the viewer’s attention, you can surpass what your regular videos can do.
Make videos faster
As a YouTuber, you are always striving to be more efficient. Live streaming allows you to do that as you can set up and go. The content you end up creating during the duration of your livestream can then also be condensed into a highlight reel or a recap.
With a bit of planning before you go live, you can create a week’s worth of content in one go, instead of having multiple schedules for livestream content and your standard publishing videos.
Type of Content to Livestream
Live streaming has a lot of value, but what type of content should you be streaming?
Here are a few popular ideas for content that will attract viewers to your livestream:
Q&A session
Unboxing
Game or challenge
Sneak preview or review
Live events (just make sure the Internet can support it)
A demo or a tutorial
A live commentary or (if you are a gamer) Let’s Play video
What You Need to Livestream On YouTube
A Plan or Outline
It’s good to know what your livestream is going to be about before you start. Is there a key message you want to hit, an action you want your viewers to take, or a structure you want to follow.
Just because it’s live, doesn’t mean it all has to be improvised. If you go in without a plan, you might end up feeling flustered or getting stressed out. Allow for spontaneous comments or events to take you off your initial plan, but always return to your outline so you know how to wrap up your livestream when you have to.
Stable Internet Connection
You cannot conduct a quality livestream, if your Internet is bad. When evaluating your internet connection for live streaming on YouTube, look at the Upload speed. Depending on the quality of your video, these are the minimum upload speed rates your Internet will need to perform:
480p = 1.5 mbps
720p = 3 mbps
1080 = 5 mbps
In addition, be aware of external causes that may be slowing down your internet such as someone else using it, a poorly performing router, or a damaged cable.
Camera
If you have a smartphone or a laptop with a webcam built in, that is the best camera for you to get started live streaming. It’s good to have a milestone and work towards a more advanced camera, but until then, don’t feel discouraged because you don’t have expensive gear. If you have a smartphone, a laptop, or a basic webcam, that’s perfectly fine.
Microphone
You don’t need a great microphone for live streaming, you only need a good one. If you do want to spend several hundred to a thousand dollars for a professional studio microphone, nobody will stop you, but know this, a mic that is easy to use is as important as the audio quality as you develop a consistent live streaming schedule.
Streaming Software (For Higher Quality Streams)
Once upon a time, to livestream on YouTube, you needed additional software to capture content from desktop, camera, microphone, etc, called encoding software — but not anymore.
Those encoding software, such as OBS , Wirecast , and VMix , are required if you are producing content that requires a high frame rate such as gaming, but not mandatory if you are simply vlogging or running a tutorial.
If you are using Chrome, you canstream live on YouTube without using an encoder .
A Capture Card (For Higher Quality Streams)
You will need a capture card when you are capturing footage from a different PC or console. If you are a gamer and you are using one PC to stream and one PC to play your game, then you should consider getting a capture card.
4 Ways to Setup Your Livestream On YouTube
There are 4 main ways you can start live streaming on YouTube. The one that works best for you depends on the content you are going to be streaming.
1. Camera/Go Live (Chrome Browser)
By accessing www.youtube.com/webcam on the Google Chrome browser, you can start streaming immediately through your connected webcam. This way is best for a simple Q&A or letting your viewers know your thoughts in a timely situation. This method does not require an encoder.
There are 3 ways to access livestream this way:
1. Click here to connect to your YouTube channel
2. You can access it from the top menu on YouTube

3. You can access it by clicking Camera under the Live Streaming tab in your Creator Studio
2. Google Hangouts On Air (Quick)
Another way to livestream without an encoding software is by using the Google Hangouts On Air feature.
This is great if you want the feel of your livestream to be similar to a board meeting, where you can invite people, split screen, and share screen to illustrate your point.
Here’s how you can access this Google Hangouts On Air:
Step 1: Go to Events under the Live Streaming tab in your Creator Studio
Step 2: Click New Live Event button on the top right corner
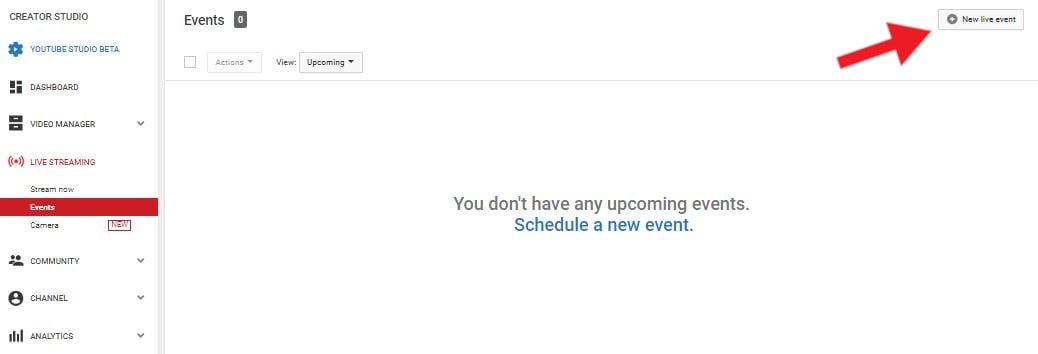
Step 3: Enter the event’s Info and Setting page. Fill out the details of your Livestream, and under Type, select Quick (using Google Hangouts On Air).
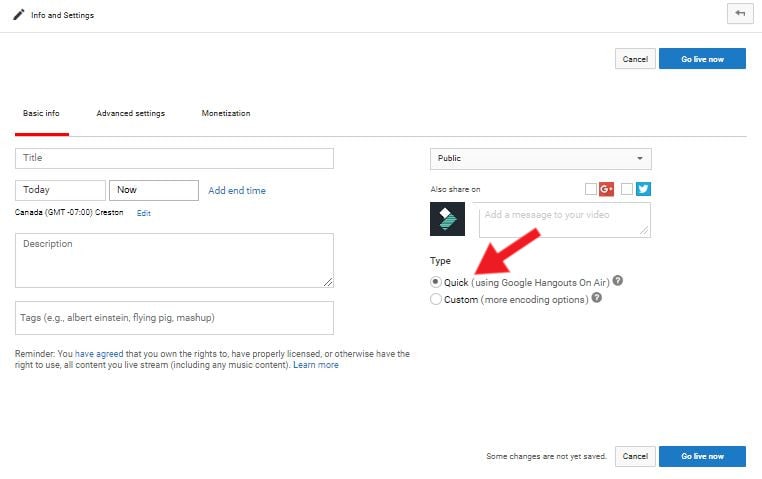
Step 4: You can schedule your livestream or Go Live immediately by clicking one of the blue buttons on the left-hand side.
3. Mobile
Live streaming via your mobile device gives you a lot more freedom to maneuver. You can walk around and give your viewers a tour — but remember to stay within the WiFi or LTE range. That means you still won’t be able to livestream well inside an elevator.
Here’s how you can livestream on mobile:
Step 1: Access the YouTube app and make sure you are signed in to the account you want to livestream from.
Step 2: At the top, click on the camera icon
Step 3: Click on Go Live
Pro Tip: When live streaming, always hold your smartphone horizontally. This allows your video to be oriented as a landscape, instead of a portrait.
4. Custom Encoder
The fourth way of live streaming on YouTube is with encoding software. This is the recommended method if video quality is essential, such as gaming videos.
Step 1: Download and install an encoding software. In this example, we’ll be using OBS .
Step 2: Open OBS
Step 3: Go to YouTube Creator Studio and enter the Stream Now page
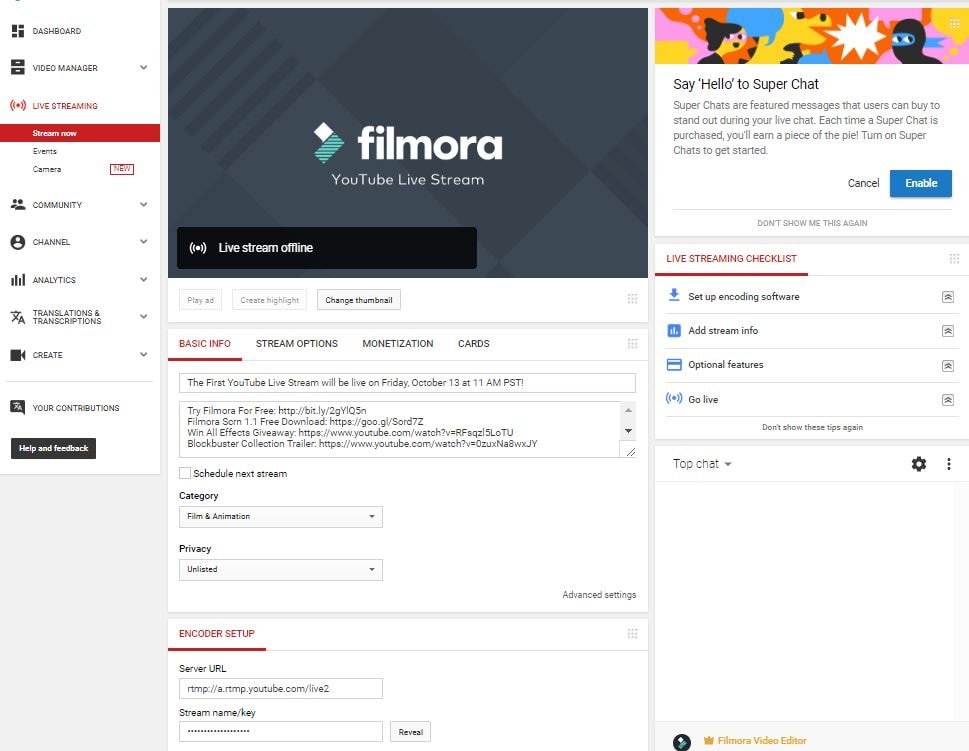
Step 4: Under Encoder Setup, copy Stream name/key (Warning: DO NOT share this key with anyone)
Step 5: Return to OBS and enter the Setting menu on the lower right-hand side of the application
Step 6: Click into the Stream tab
a) Under Stream Type, select Streaming Services
b) Under Service, select YouTube/YouTube Gaming
c) Under Server, select Primary YouTube ingest server
d) In Stream Key box, paste the Stream Key you copied from YouTube
e) Click Apply and then OK
Step 7: Plug in your webcam
Step 8: In the main OBS dashboard, under the Sources menu, click the + icon and add Video Capture Device. You should now see visuals from your Webcam.
Step 9: Select the Resolution you want for your video and click OK
Step 10: Return to your YouTube Streaming Page and fill out the details of your livestream
Step 11: Go back to OBS and click Start Streaming
Step 12: See on YouTube Streaming Page at the top that you are Live. You are officially streaming. Once You are finished streaming, return to OBS and click Stop Streaming to end the stream.
8 Tips to Improve Your Livestream on YouTube
Do Speed Test
Before you start your livestream, do a speed test of your Internet. Check out from here.
Have Good Lighting
Be aware of your surroundings when you are about to livestream. You don’t need the top-notch lighting kit, you can simply sit beside a window and allow natural lights to illuminate your stream.
Shoot A Live Test (Unlisted)
Have a technical rehearsal by doing a livestream test, then rewatching it, and evaluating the quality of the audio and visual.
You don’t have to worry about your audience logging in and seeing your test if you set the Privacy of the stream to Unlisted.
Look at the Lens, Not the Screen
If you are streaming with the selfie camera on your smartphone or using your camera’s viewfinder to make sure you are in the frame, remember that you need to be looking at the lens — not the image of yourself.
Eye contact is important in building trust, and if you are looking at yourself, it will appear as if you are looking past your viewers instead of at them.
Show It To Your Viewers
Whatever you are talking about, if you can, show it to your viewers. YouTube is a visual medium, and that means your viewers can become disinterested if there’s nothing visual holding their attention.
In the beginning, you probably won’t have a multi-camera setup, so you cannot cut away from your livestream. However, you can share the screen and you can bring physical objects into a frame.
If you are talking about your dog, show her on camera. If you’re presenting something with a lot of steps, create a Powerpoint slideshow.
Consider what visuals or props you can add to your livestream to enhance your performance.
Find A Way to Make it Evergreen
Evergreen content refers to content that is relevant for a great length of time. Talking about an event isn’t evergreen, because the event will soon pass and become old news. However, giving some tips for how to plan an event would be evergreen content.
Since your livestream will be saved on YouTube and your viewers can replay and watch it. They’re more likely to enjoy it if the content is relevant and interesting.
It Doesn’t Have to Be Long
A livestream doesn’t need to be 40 minutes long. It only needs to be long enough for you to get your story across — and if you want to answer some questions and engage with your audience. As soon as your story is over, even if it’s only 5 minutes, that’s okay. Don’t stress about the length of your stream, it’s not an endurance competition.
Allow Yourself to Make Mistakes
Another thing you shouldn’t worry about at all is making mistakes. When you are doing livestreams pretend you are engaging with someone in real life. In real life, you aren’t able to edit out your mistakes, whether it’s a word mispronounced or coffee spilling. Roll with it and laugh it off.
How to Grow As A Livestreamer on YouTube
Let People Know When You Are Streaming
Give people enough time to schedule it in, don’t spring it on them in the last minute. Share it on social media, your website, and any other means.
Create a Streaming Link 2 Days Before
Share your livestream link via social media to remind everyone to tune in when you go live. Looking for your link? It should look something like this: <www.youtube.com/user/\[channelname\]/live>
Reach Out To the Communities Most Interested
If you are going to be live streaming about a specific topic, such as photography, you should reach out to those who are interested in the topic. Highlight what aspect of photography you are going to be streaming and attract new viewers to your content.
Be Aware of Time Difference
If you have an international audience, find time to livestream where you can get the optimal amount of viewers.
You can find the location of your main demographic in your YouTube analytics .
Create a Channel Trailer to Promote Livestream
Make a video and host it as your channel trailer, that way anyone who lands on your YouTube page will see the promo for your livestream.
Promote Through Feature Content and Channel
YouTube has a feature that enables you to use your existing content to promote your upcoming livestream.
Here’s how to set it up:
Key Takeaways
- Live streaming will help you make more videos, engage with your audience, and grow your channel.
- You don’t need expensive equipment to livestream on YouTube, you only need a webcam and a microphone.
- YouTube has made live streaming as easy as a few clicks, no additional software needed unless you are gaming.
- Always do a test run of your livestream to ensure the internet, audio, and visual are all working properly.
- Create content and reach out to communities to promote your livestream.
Have you encountered any obstacles when setting up your livestream on YouTube? Let us know in the comments below, we are happy to help!
Richard Bennett
Richard Bennett is a writer and a lover of all things video.
Follow @Richard Bennett
Richard Bennett
Mar 27, 2024• Proven solutions
Live streaming on YouTube is a great way to get more engagement from your audience, even if you do not have a huge following. As long as you have some reliable subscribers leaving comments on your videos you should be able to schedule a live stream and know it will have an audience. People feel a personal connection with their favorite vloggers so if you give your subscribers a chance to interact with you in real time they will probably plan to join in. The key to a good live streaming is to respond to comments and questions from people who are watching. Besides watching the live chat of your video you can create a hashtag for your stream and monitor it on twitter.
Table of Contents
- Why Livestream?
- Type of Content to Livestream
- What You Need to Livestream On YouTube
- 4 Ways to Setup Your Livestream On YouTube
- 8 Tips to Improve Your Livestream on YouTube
- How to Grow As A Livestreamer on YouTube
Why Livestream?
You have grown your audience, and now you want to take your channel to the next level and diversify your content.
Whether you are vlogging, gaming, or running tutorials on YouTube, there is potential to host a live broadcast. It’s not limited to any genre, you simply need to create content that people are interested in watching.
Before we get started into the How, let’s start with a few reasons Why you should be live streaming your content.
Connect and engage with your audience
When a viewer leaves a comment during a livestream you will be able to see it right away and respond. Having an instantaneous conversation with a viewer while they are watching your video will encourage more engagement and establish a ber relationship with your viewers — and you will know that these viewers are not bots.
Increase watch time and session watch time on your channel
If you are making YouTube videos on average 10 minutes long, and the viewer only watches half of it, that’s only 5 minutes of watch time, which is fine… But if you are live streaming for 45 minutes, and you are able to hold the viewer’s attention, you can surpass what your regular videos can do.
Make videos faster
As a YouTuber, you are always striving to be more efficient. Live streaming allows you to do that as you can set up and go. The content you end up creating during the duration of your livestream can then also be condensed into a highlight reel or a recap.
With a bit of planning before you go live, you can create a week’s worth of content in one go, instead of having multiple schedules for livestream content and your standard publishing videos.
Type of Content to Livestream
Live streaming has a lot of value, but what type of content should you be streaming?
Here are a few popular ideas for content that will attract viewers to your livestream:
Q&A session
Unboxing
Game or challenge
Sneak preview or review
Live events (just make sure the Internet can support it)
A demo or a tutorial
A live commentary or (if you are a gamer) Let’s Play video
What You Need to Livestream On YouTube
A Plan or Outline
It’s good to know what your livestream is going to be about before you start. Is there a key message you want to hit, an action you want your viewers to take, or a structure you want to follow.
Just because it’s live, doesn’t mean it all has to be improvised. If you go in without a plan, you might end up feeling flustered or getting stressed out. Allow for spontaneous comments or events to take you off your initial plan, but always return to your outline so you know how to wrap up your livestream when you have to.
Stable Internet Connection
You cannot conduct a quality livestream, if your Internet is bad. When evaluating your internet connection for live streaming on YouTube, look at the Upload speed. Depending on the quality of your video, these are the minimum upload speed rates your Internet will need to perform:
480p = 1.5 mbps
720p = 3 mbps
1080 = 5 mbps
In addition, be aware of external causes that may be slowing down your internet such as someone else using it, a poorly performing router, or a damaged cable.
Camera
If you have a smartphone or a laptop with a webcam built in, that is the best camera for you to get started live streaming. It’s good to have a milestone and work towards a more advanced camera, but until then, don’t feel discouraged because you don’t have expensive gear. If you have a smartphone, a laptop, or a basic webcam, that’s perfectly fine.
Microphone
You don’t need a great microphone for live streaming, you only need a good one. If you do want to spend several hundred to a thousand dollars for a professional studio microphone, nobody will stop you, but know this, a mic that is easy to use is as important as the audio quality as you develop a consistent live streaming schedule.
Streaming Software (For Higher Quality Streams)
Once upon a time, to livestream on YouTube, you needed additional software to capture content from desktop, camera, microphone, etc, called encoding software — but not anymore.
Those encoding software, such as OBS , Wirecast , and VMix , are required if you are producing content that requires a high frame rate such as gaming, but not mandatory if you are simply vlogging or running a tutorial.
If you are using Chrome, you canstream live on YouTube without using an encoder .
A Capture Card (For Higher Quality Streams)
You will need a capture card when you are capturing footage from a different PC or console. If you are a gamer and you are using one PC to stream and one PC to play your game, then you should consider getting a capture card.
4 Ways to Setup Your Livestream On YouTube
There are 4 main ways you can start live streaming on YouTube. The one that works best for you depends on the content you are going to be streaming.
1. Camera/Go Live (Chrome Browser)
By accessing www.youtube.com/webcam on the Google Chrome browser, you can start streaming immediately through your connected webcam. This way is best for a simple Q&A or letting your viewers know your thoughts in a timely situation. This method does not require an encoder.
There are 3 ways to access livestream this way:
1. Click here to connect to your YouTube channel
2. You can access it from the top menu on YouTube
3. You can access it by clicking Camera under the Live Streaming tab in your Creator Studio
2. Google Hangouts On Air (Quick)
Another way to livestream without an encoding software is by using the Google Hangouts On Air feature.
This is great if you want the feel of your livestream to be similar to a board meeting, where you can invite people, split screen, and share screen to illustrate your point.
Here’s how you can access this Google Hangouts On Air:
Step 1: Go to Events under the Live Streaming tab in your Creator Studio
Step 2: Click New Live Event button on the top right corner
Step 3: Enter the event’s Info and Setting page. Fill out the details of your Livestream, and under Type, select Quick (using Google Hangouts On Air).
Step 4: You can schedule your livestream or Go Live immediately by clicking one of the blue buttons on the left-hand side.
3. Mobile
Live streaming via your mobile device gives you a lot more freedom to maneuver. You can walk around and give your viewers a tour — but remember to stay within the WiFi or LTE range. That means you still won’t be able to livestream well inside an elevator.
Here’s how you can livestream on mobile:
Step 1: Access the YouTube app and make sure you are signed in to the account you want to livestream from.
Step 2: At the top, click on the camera icon
Step 3: Click on Go Live
Pro Tip: When live streaming, always hold your smartphone horizontally. This allows your video to be oriented as a landscape, instead of a portrait.
4. Custom Encoder
The fourth way of live streaming on YouTube is with encoding software. This is the recommended method if video quality is essential, such as gaming videos.
Step 1: Download and install an encoding software. In this example, we’ll be using OBS .
Step 2: Open OBS
Step 3: Go to YouTube Creator Studio and enter the Stream Now page
Step 4: Under Encoder Setup, copy Stream name/key (Warning: DO NOT share this key with anyone)
Step 5: Return to OBS and enter the Setting menu on the lower right-hand side of the application
Step 6: Click into the Stream tab
a) Under Stream Type, select Streaming Services
b) Under Service, select YouTube/YouTube Gaming
c) Under Server, select Primary YouTube ingest server
d) In Stream Key box, paste the Stream Key you copied from YouTube
e) Click Apply and then OK
Step 7: Plug in your webcam
Step 8: In the main OBS dashboard, under the Sources menu, click the + icon and add Video Capture Device. You should now see visuals from your Webcam.
Step 9: Select the Resolution you want for your video and click OK
Step 10: Return to your YouTube Streaming Page and fill out the details of your livestream
Step 11: Go back to OBS and click Start Streaming
Step 12: See on YouTube Streaming Page at the top that you are Live. You are officially streaming. Once You are finished streaming, return to OBS and click Stop Streaming to end the stream.
8 Tips to Improve Your Livestream on YouTube
Do Speed Test
Before you start your livestream, do a speed test of your Internet. Check out from here.
Have Good Lighting
Be aware of your surroundings when you are about to livestream. You don’t need the top-notch lighting kit, you can simply sit beside a window and allow natural lights to illuminate your stream.
Shoot A Live Test (Unlisted)
Have a technical rehearsal by doing a livestream test, then rewatching it, and evaluating the quality of the audio and visual.
You don’t have to worry about your audience logging in and seeing your test if you set the Privacy of the stream to Unlisted.
Look at the Lens, Not the Screen
If you are streaming with the selfie camera on your smartphone or using your camera’s viewfinder to make sure you are in the frame, remember that you need to be looking at the lens — not the image of yourself.
Eye contact is important in building trust, and if you are looking at yourself, it will appear as if you are looking past your viewers instead of at them.
Show It To Your Viewers
Whatever you are talking about, if you can, show it to your viewers. YouTube is a visual medium, and that means your viewers can become disinterested if there’s nothing visual holding their attention.
In the beginning, you probably won’t have a multi-camera setup, so you cannot cut away from your livestream. However, you can share the screen and you can bring physical objects into a frame.
If you are talking about your dog, show her on camera. If you’re presenting something with a lot of steps, create a Powerpoint slideshow.
Consider what visuals or props you can add to your livestream to enhance your performance.
Find A Way to Make it Evergreen
Evergreen content refers to content that is relevant for a great length of time. Talking about an event isn’t evergreen, because the event will soon pass and become old news. However, giving some tips for how to plan an event would be evergreen content.
Since your livestream will be saved on YouTube and your viewers can replay and watch it. They’re more likely to enjoy it if the content is relevant and interesting.
It Doesn’t Have to Be Long
A livestream doesn’t need to be 40 minutes long. It only needs to be long enough for you to get your story across — and if you want to answer some questions and engage with your audience. As soon as your story is over, even if it’s only 5 minutes, that’s okay. Don’t stress about the length of your stream, it’s not an endurance competition.
Allow Yourself to Make Mistakes
Another thing you shouldn’t worry about at all is making mistakes. When you are doing livestreams pretend you are engaging with someone in real life. In real life, you aren’t able to edit out your mistakes, whether it’s a word mispronounced or coffee spilling. Roll with it and laugh it off.
How to Grow As A Livestreamer on YouTube
Let People Know When You Are Streaming
Give people enough time to schedule it in, don’t spring it on them in the last minute. Share it on social media, your website, and any other means.
Create a Streaming Link 2 Days Before
Share your livestream link via social media to remind everyone to tune in when you go live. Looking for your link? It should look something like this: <www.youtube.com/user/\[channelname\]/live>
Reach Out To the Communities Most Interested
If you are going to be live streaming about a specific topic, such as photography, you should reach out to those who are interested in the topic. Highlight what aspect of photography you are going to be streaming and attract new viewers to your content.
Be Aware of Time Difference
If you have an international audience, find time to livestream where you can get the optimal amount of viewers.
You can find the location of your main demographic in your YouTube analytics .
Create a Channel Trailer to Promote Livestream
Make a video and host it as your channel trailer, that way anyone who lands on your YouTube page will see the promo for your livestream.
Promote Through Feature Content and Channel
YouTube has a feature that enables you to use your existing content to promote your upcoming livestream.
Here’s how to set it up:
Key Takeaways
- Live streaming will help you make more videos, engage with your audience, and grow your channel.
- You don’t need expensive equipment to livestream on YouTube, you only need a webcam and a microphone.
- YouTube has made live streaming as easy as a few clicks, no additional software needed unless you are gaming.
- Always do a test run of your livestream to ensure the internet, audio, and visual are all working properly.
- Create content and reach out to communities to promote your livestream.
Have you encountered any obstacles when setting up your livestream on YouTube? Let us know in the comments below, we are happy to help!
Richard Bennett
Richard Bennett is a writer and a lover of all things video.
Follow @Richard Bennett
Also read:
- Conceptualists Engineering Marvel Online Worlds
- In 2024, Beauty's Buzz YouTube Gurus Predicted
- Download and Relive A Compreran Review of Top YouTube Playlist Extractors for 2024
- [Updated] Discovering & Perfecting Your Individual Style
- In 2024, Editor’s Elite Gadgets Best Machines for Screen Magic
- [New] Achieving Pristine Video Quality on YouTube
- In 2024, Elevate Your YouTube Presence The Art of SEO Optimization
- Essential Insights for Integrating Hashtags Into Game-Focused YT Content
- [New] Curtail Unexpected YouTube Recommendations
- 2024 Approved 20+ Hashes to Skyrocket Your Short Film's Popularity
- Leverage YouTube's CP2024 The Ultimate Guidebook
- Chasing Profit on Platforms YouTube Partner Application Steps for 2024
- [Updated] Best 7 DSLR Cameras for Vlogging
- 15 Premium, Free Music Websites Every Videographer Needs
- Earnings in the Age of Streaming How YouTube Pays Creators for 2024
- [New] Channel Your Inner DJ Discover These Innovative 20 Music Sources on YouTube
- In 2024, Charting Your Way to Frequent Payments From YouTube
- A Cascade of Curiosity Concurrent Video Watching Made Easy for 2024
- VR's Best Immersion Top Ten Titles
- Social Media Synergy Cross-Promoting Your YouTube Content
- Avoiding the Common Path The Route to Unique Streamer Identities for 2024
- From Zero to Hero Steps to Construct Your Channel's Backlinks
- Trustworthy Tactics Growing Your YouTube Channel by a Million Steps
- 2024 Approved Early-Stage YouTube Wisdom Sidestep These 8 Common Mistakes
- In 2024, Conquering the Digital Landscape Leveraging Multi-Platform Streaming
- [New] Channel Success Strategies A Comprehensive Guide to Spotlighting
- [Updated] Breaking Down YouTube TV Must Know Aspects for Consumers
- 2024 Approved Collaborative Titling Framework Across Platforms
- In 2024, Banner Bliss Savor Your Complimentary Set of Designs
- Thriving Despite YouTube's Rigorous Copyright Strike System
- In 2024, Full Tutorial to Bypass Your Itel Face Lock?
- In 2024, Universal Unlock Pattern for Infinix Hot 30i
- Updated How to Create YouTube Intro Animation Like a Pro
- New 2024 Approved VN Video Editor Pro Apk A Game-Changer for Mobile Video Editing?
- Most Innovative Voice-Altering Mobile Apps
- 2024 Approved Nostalgic Gaming Empathetic 3DS on Android Devices
- [New] In 2024, Download & Installation 101 Your Pathway to Mastering EZ Grabber
- [Updated] In 2024, Playground of Champions Celebrating Top 10 Epic Game Sagas
- [New] 2024 Approved Making an Informed Decision on ITop's Utility?
- How To Transfer Data From iPhone 11 Pro Max To Other iPhone 13 devices? | Dr.fone
- Boost Creativity on TikTok - Top 10 Free Edits for Mac Users
- How to Uncover Hidden Facebook Vids (Updated Guide) for 2024
- Find Out About MAGIX Vegas Pro Pricing Plan and Features to See How the Software Can Help You with Your Video Editing Tasks for 2024
- Ultimate Free Viewer Cam Parties
- How To Fix Unresponsive Phone Touchscreen Of Motorola Moto G23 | Dr.fone
- Updated In 2024, Top 5 Best Video Editing Apps for iPhone
- The Magnificent Art of Pokemon Go Streaming On Lava Yuva 3 Pro? | Dr.fone
- How to Mirror Samsung Galaxy A54 5G to Mac? | Dr.fone
- In 2024, 9 Best Phone Monitoring Apps for Realme 11X 5G | Dr.fone
- Updated 2024 Approved Stop Motion in the Cloud Era A Comprehensive Software Roundup
- In 2024, How to get the dragon scale and evolution-enabled pokemon On Apple iPhone 11 Pro Max? | Dr.fone
- New 2024 Approved How to Create Vintage Film Effect 1920S
- Get the Glamour Swipes - Masterful Tinder Profile Secrets Revealed
- New From Pixels to Proportions Mastering Aspect Ratio Calculation for 2024
- Updated Reimagining Auditory Experiences with These Industry Standards
- How to restore wiped music on Magic 6
- How to Stop Google Chrome from Tracking Your Location On Vivo X100 Pro? | Dr.fone
- Title: Your Guide to the Finest YouTube Subtitles Extractor
- Author: Brian
- Created at : 2024-05-25 13:27:41
- Updated at : 2024-05-26 13:27:41
- Link: https://youtube-video-recordings.techidaily.com/your-guide-to-the-finest-youtube-subtitles-extractor/
- License: This work is licensed under CC BY-NC-SA 4.0.
