
:max_bytes(150000):strip_icc()/Asset12x-73a1cf0f4a4f4716bcc0caa1176844e6.png)
Where the Magic of Video Editing Begins on YouTube
Where the Magic of Video Editing Begins on YouTube
Where Is Youtube Video Manager? [All You Need to Know]

Richard Bennett
Mar 27, 2024• Proven solutions
If you are a YouTuber and uploads video to your channel then you must need to see the statistics and analytics of your uploads. Sometimes you might want to alter some of the settings in the video that you already have uploaded.
So if you are looking for ways how to manage your videos and your YouTube overall then look no further. The solution lies in the YouTube studio. This is where all your video and their settings can be managed whether using a desktop PC or any smartphone.
So if you are wondering the sole purpose of YouTube studio and how to manage your productions using video manager then stay with us!
You will Learn :
- How YouTube Studio Can Manage Your Uploads?
- What Does A Video Manager Do?
- How to Find Video Manager on YouTube?
- How To Access Video Manager On YouTube Using A Desktop PC?
- How To Access YouTube Manager In YouTube Using Mobile Phones?
- How to Access YouTube Manager on YouTube Using An iPad?
Best Video Editing Software for YouTubers
Making a video with Filmora is simple, as this movie maker enables its users to import virtually any type of footage in just a couple of clicks.
There are one hundred tracks available so you can combine audio and video files effortlessly or add visual effects to them.
Filmora also offers full support for 4K videos,fgxcsd which means that you can use it to edit footage captured with GoPro and other action cameras.
In addition to huge effects and transitions libraries, the Filmora also features a rich selection of royalty-free music and audio effects that you can use to create soundtracks for all of your videos.
Filmora is free to download now. And due to its small Installation package, it’s easy and quick to install.


How YouTube Studio Can Manage Your Uploads?
The primary purpose of the YouTube studio is to manage your YouTube channel overall.
Accessing YouTube studio will let you see the statistics regarding how many people have viewed your videos, replies of any of the comment you made on your videos, and much more. This is where you can access one of the most significant options of Video Manger where you can completely customize the video setting accordingly any time after the uploading of your YouTube video.
What Does A Video Manager Do?
In the YouTube studio option, you will find another great tab of a video manager which will let you edit your productions, add, edit or delete annotation or even caption and perform zillions of similar related options to personalize and manage your video accordingly even after your video has been uploaded.
This gives one a huge margin to change the initial settings of the uploaded video if they came across any error or lacking in the video.
But you may wonder how to actually access the video manager in your YouTube channel to avail such a vast variety of options to customize your video setting and making it into a masterpiece to gain views to a greater extent by viewing, analyzing and improvising the analytics of your productions.
How to Find Video Manager on YouTube?
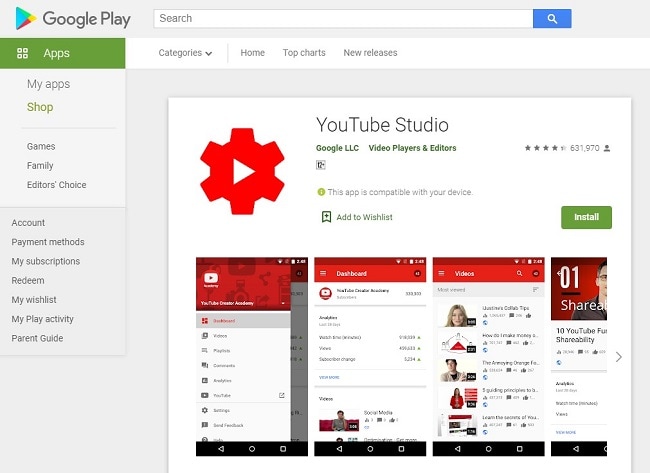
You can go access video manager on your desktop application of YouTube. Although you might need to download YouTube studio if you are looking for a video manager YouTube app. YouTube studio has abundant options in it, including a video manager. So once you download this application in your smartphone, be it iPhone or Android, you can have complete access to all the management features under the video manager option.
Read More to Get : How to Reverse Search a Video >>
How To Access Video Manager On YouTube Using A Desktop PC?
If you need to modify and organize your productions from a single place or just need customization in a particular video to adjust its setting then you can do it with a single click.
Video manager gives you full liberty to tweak the settings of your uploads, making use of tools for video optimization or making bulk update alterations.
So, without further ado, let’s dig into the step by step guide to how to get to YouTube video manager using desktop PC.
Step 1: Sign in to your YouTube account by entering your correct credentials.
Step 2: You will be redirected to the homepage of your YouTube channel.
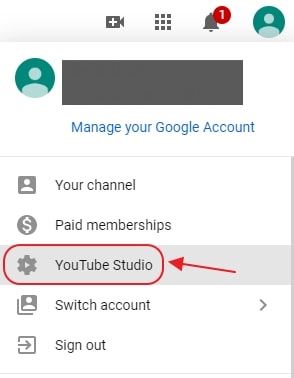
Step 3: At the top right corner of your YouTube main page, there will be your channel profile icon having a circular shape.

Step 4: Click on that icon.
Step 5: You will be served with abundant options in the dropdown, but you need to click on the YouTube studio (beta) option.
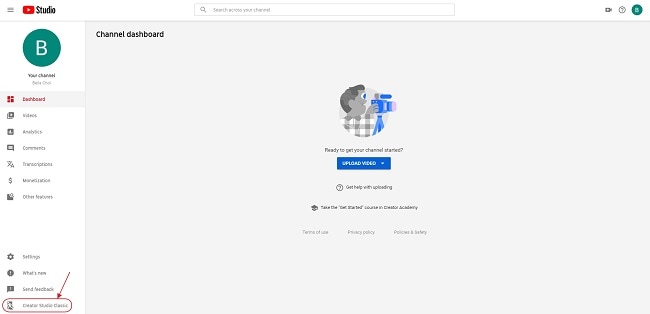
Step 6: This will redirect you to your channel’s dashboard where you will be facilitated with multiple options related to your video uploads, a complete and wholesome package to organize, monitor, improvise and manage your videos in general.
Step 7: At the left pane of the dashboard, you will see Creator Studio Classic at the bottom.
Step 8: Click on Creator Studio Classic.
Step 9: This will redirect you to creator studio. At the left on the window will be a bar full of multiple options where you will see the video manager option right there.
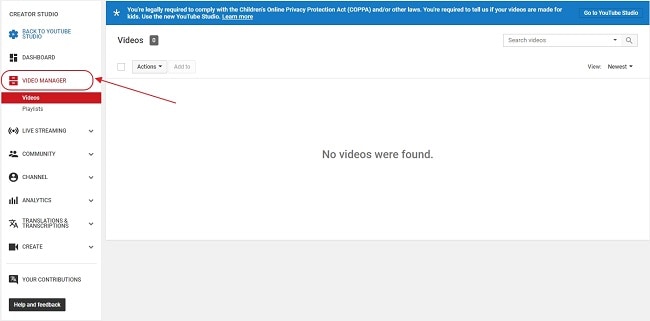
Step 10: Click on the video manager to manage.
Step 11: This will open a drop-down which gives you two options. One of managing your videos and others to organize your playlist or make any modifications as per your likeliness.
Voila! You are here in video manager, having full liberty to make any alteration to the metadata of your YouTube uploads. You are now a single click away to change the video title, its stale or non-captivating caption, adjust comment setting and literally everything right according to your choice.
How To Access YouTube Manager In YouTube Using Mobile Phones?
If you are used to operating your YouTube channel through smartphones like iPhone or any android phone or manage your account activities using a tablet then the process to manage your account remains quite the same.
You don’t need to stress out is you are using a mobile application of YouTube. You can still have complete authority to manage your videos using YouTube video manager mobile, YouTube studio applications.
YouTube studio application is an official tool dedicated to content creator introduced by Google for YouTube. This gives immense ease for the mobile users, either android or iPhone, to manage their videos and update the metadata of their upload by merely using this one application.
All thanks to Google to launch such an amazing and wholesome product, considering the ample number of content creators who use mobile phones to create and manage their productions.
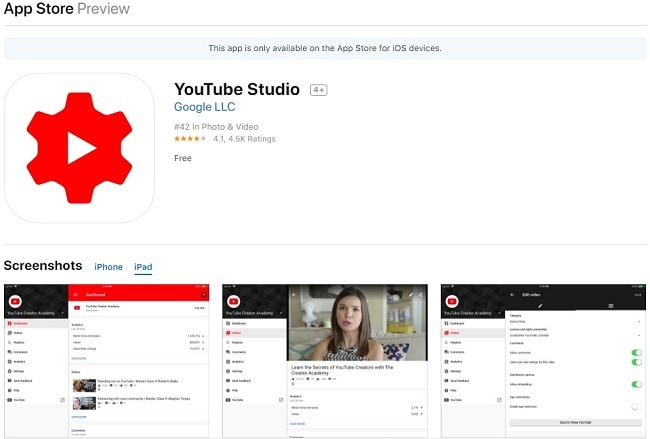
YouTube Studio Application Link for iOS
You can download this video manager YouTube application, named as YouTube studio, on your iPhone by clicking the link given here . You can download this YouTube video manager iPhone application on apple store which is absolutely free of cost.
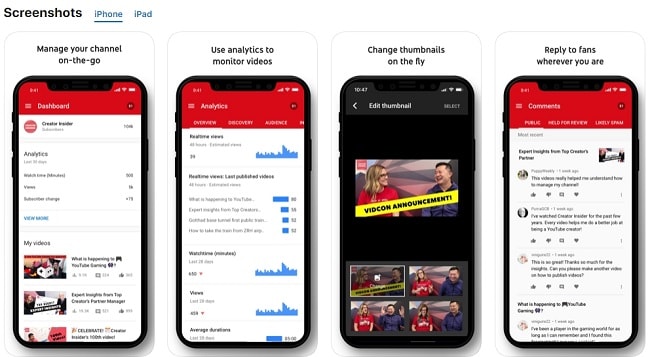
Downloading this tool will make the managing process of your YouTube channel quite easier and faster. Numerous list of options ranging from monitoring latest stats, create or update your productions’ thumbnail images to changing profile picture, reply to your comments, get notifications or organize your playlist on the go and stay connected from literally anywhere.
Features:
- Organize playlist
- Respond to the comments and also moderate them
- Get notified about important events and activities on your channel
- Update video settings like personalizing thumbnail pictures, adding a description, updating titles and monetization.
- Create and modify your profile images.
- Seek for help content using voice
How To Access YouTube Manager In YouTube Using Android?
Similar to the approach we used in for iPhone users, you can download YouTube studio application on google store by clicking on the link given here .
This application is available free on the internet.
If you are an android user and looking for an application that can manage your YouTube channel with an abundance of options, then The official application developed by Google, YouTube Studio is the answer to your question “how to get to YouTube video manager”. It is a powerful tool to give you all the controls to manage and efficiently organize your YouTube channel with great ease and speed.
Features:
- Filter and get an update with the response on the comments
- Monitor video performance and channel activity using user-friendly analytics
- Manage and organize playlist
- Update video settings like schedule dates, personalizing thumbnail pictures, adding description, updating titles and monetization settings.
How to Access YouTube Manager on YouTube Using An iPad?
You can enjoy all the same features as facilitated in the YouTube Studio app for iOS and Android users. All you need is to download this application by clicking on the link given here .
You may find this tool a little overwhelming at the fresh start. There are multiple options given to the users and given full control and independence to manage the video settings as per your requirement for improvisation purposes.
This may take some time to get yourself familiar with this tool. The more you explore deep into it, the more quickly you will get hold onto it.
Worry not! These experiments won’t do any harm to productions, but only make you expertise in a while.
To learn the fundamentals of YouTube Studio application and video manager, you can refer to this site .
Conclusion
The use of YouTube had outgrown to an extent that it has now become a professional career for many which once used to a merely an entertainment platform and get nothing in return for creating content.
But now with the shift of trend, YouTube is taken seriously as a professional domain to earn through the productions or spread awareness and joy to others through one’s creative content. For your content to make an impact, your channel needs thorough management and organization to view your content’s quality by seeing the stats and manage accordingly.
This is now possible to achieve all this within the snap of fingers with great ease offered by this great tool, Video Manager. With this, you can edit and customize your video’s metadata and improvise your video settings to elevate your channel to the next level.
Richard Bennett
Richard Bennett is a writer and a lover of all things video.
Follow @Richard Bennett
Richard Bennett
Mar 27, 2024• Proven solutions
If you are a YouTuber and uploads video to your channel then you must need to see the statistics and analytics of your uploads. Sometimes you might want to alter some of the settings in the video that you already have uploaded.
So if you are looking for ways how to manage your videos and your YouTube overall then look no further. The solution lies in the YouTube studio. This is where all your video and their settings can be managed whether using a desktop PC or any smartphone.
So if you are wondering the sole purpose of YouTube studio and how to manage your productions using video manager then stay with us!
You will Learn :
- How YouTube Studio Can Manage Your Uploads?
- What Does A Video Manager Do?
- How to Find Video Manager on YouTube?
- How To Access Video Manager On YouTube Using A Desktop PC?
- How To Access YouTube Manager In YouTube Using Mobile Phones?
- How to Access YouTube Manager on YouTube Using An iPad?
Best Video Editing Software for YouTubers
Making a video with Filmora is simple, as this movie maker enables its users to import virtually any type of footage in just a couple of clicks.
There are one hundred tracks available so you can combine audio and video files effortlessly or add visual effects to them.
Filmora also offers full support for 4K videos,fgxcsd which means that you can use it to edit footage captured with GoPro and other action cameras.
In addition to huge effects and transitions libraries, the Filmora also features a rich selection of royalty-free music and audio effects that you can use to create soundtracks for all of your videos.
Filmora is free to download now. And due to its small Installation package, it’s easy and quick to install.
How YouTube Studio Can Manage Your Uploads?
The primary purpose of the YouTube studio is to manage your YouTube channel overall.
Accessing YouTube studio will let you see the statistics regarding how many people have viewed your videos, replies of any of the comment you made on your videos, and much more. This is where you can access one of the most significant options of Video Manger where you can completely customize the video setting accordingly any time after the uploading of your YouTube video.
What Does A Video Manager Do?
In the YouTube studio option, you will find another great tab of a video manager which will let you edit your productions, add, edit or delete annotation or even caption and perform zillions of similar related options to personalize and manage your video accordingly even after your video has been uploaded.
This gives one a huge margin to change the initial settings of the uploaded video if they came across any error or lacking in the video.
But you may wonder how to actually access the video manager in your YouTube channel to avail such a vast variety of options to customize your video setting and making it into a masterpiece to gain views to a greater extent by viewing, analyzing and improvising the analytics of your productions.
How to Find Video Manager on YouTube?
You can go access video manager on your desktop application of YouTube. Although you might need to download YouTube studio if you are looking for a video manager YouTube app. YouTube studio has abundant options in it, including a video manager. So once you download this application in your smartphone, be it iPhone or Android, you can have complete access to all the management features under the video manager option.
Read More to Get : How to Reverse Search a Video >>
How To Access Video Manager On YouTube Using A Desktop PC?
If you need to modify and organize your productions from a single place or just need customization in a particular video to adjust its setting then you can do it with a single click.
Video manager gives you full liberty to tweak the settings of your uploads, making use of tools for video optimization or making bulk update alterations.
So, without further ado, let’s dig into the step by step guide to how to get to YouTube video manager using desktop PC.
Step 1: Sign in to your YouTube account by entering your correct credentials.
Step 2: You will be redirected to the homepage of your YouTube channel.
Step 3: At the top right corner of your YouTube main page, there will be your channel profile icon having a circular shape.
Step 4: Click on that icon.
Step 5: You will be served with abundant options in the dropdown, but you need to click on the YouTube studio (beta) option.
Step 6: This will redirect you to your channel’s dashboard where you will be facilitated with multiple options related to your video uploads, a complete and wholesome package to organize, monitor, improvise and manage your videos in general.
Step 7: At the left pane of the dashboard, you will see Creator Studio Classic at the bottom.
Step 8: Click on Creator Studio Classic.
Step 9: This will redirect you to creator studio. At the left on the window will be a bar full of multiple options where you will see the video manager option right there.
Step 10: Click on the video manager to manage.
Step 11: This will open a drop-down which gives you two options. One of managing your videos and others to organize your playlist or make any modifications as per your likeliness.
Voila! You are here in video manager, having full liberty to make any alteration to the metadata of your YouTube uploads. You are now a single click away to change the video title, its stale or non-captivating caption, adjust comment setting and literally everything right according to your choice.
How To Access YouTube Manager In YouTube Using Mobile Phones?
If you are used to operating your YouTube channel through smartphones like iPhone or any android phone or manage your account activities using a tablet then the process to manage your account remains quite the same.
You don’t need to stress out is you are using a mobile application of YouTube. You can still have complete authority to manage your videos using YouTube video manager mobile, YouTube studio applications.
YouTube studio application is an official tool dedicated to content creator introduced by Google for YouTube. This gives immense ease for the mobile users, either android or iPhone, to manage their videos and update the metadata of their upload by merely using this one application.
All thanks to Google to launch such an amazing and wholesome product, considering the ample number of content creators who use mobile phones to create and manage their productions.
YouTube Studio Application Link for iOS
You can download this video manager YouTube application, named as YouTube studio, on your iPhone by clicking the link given here . You can download this YouTube video manager iPhone application on apple store which is absolutely free of cost.
Downloading this tool will make the managing process of your YouTube channel quite easier and faster. Numerous list of options ranging from monitoring latest stats, create or update your productions’ thumbnail images to changing profile picture, reply to your comments, get notifications or organize your playlist on the go and stay connected from literally anywhere.
Features:
- Organize playlist
- Respond to the comments and also moderate them
- Get notified about important events and activities on your channel
- Update video settings like personalizing thumbnail pictures, adding a description, updating titles and monetization.
- Create and modify your profile images.
- Seek for help content using voice
How To Access YouTube Manager In YouTube Using Android?
Similar to the approach we used in for iPhone users, you can download YouTube studio application on google store by clicking on the link given here .
This application is available free on the internet.
If you are an android user and looking for an application that can manage your YouTube channel with an abundance of options, then The official application developed by Google, YouTube Studio is the answer to your question “how to get to YouTube video manager”. It is a powerful tool to give you all the controls to manage and efficiently organize your YouTube channel with great ease and speed.
Features:
- Filter and get an update with the response on the comments
- Monitor video performance and channel activity using user-friendly analytics
- Manage and organize playlist
- Update video settings like schedule dates, personalizing thumbnail pictures, adding description, updating titles and monetization settings.
How to Access YouTube Manager on YouTube Using An iPad?
You can enjoy all the same features as facilitated in the YouTube Studio app for iOS and Android users. All you need is to download this application by clicking on the link given here .
You may find this tool a little overwhelming at the fresh start. There are multiple options given to the users and given full control and independence to manage the video settings as per your requirement for improvisation purposes.
This may take some time to get yourself familiar with this tool. The more you explore deep into it, the more quickly you will get hold onto it.
Worry not! These experiments won’t do any harm to productions, but only make you expertise in a while.
To learn the fundamentals of YouTube Studio application and video manager, you can refer to this site .
Conclusion
The use of YouTube had outgrown to an extent that it has now become a professional career for many which once used to a merely an entertainment platform and get nothing in return for creating content.
But now with the shift of trend, YouTube is taken seriously as a professional domain to earn through the productions or spread awareness and joy to others through one’s creative content. For your content to make an impact, your channel needs thorough management and organization to view your content’s quality by seeing the stats and manage accordingly.
This is now possible to achieve all this within the snap of fingers with great ease offered by this great tool, Video Manager. With this, you can edit and customize your video’s metadata and improvise your video settings to elevate your channel to the next level.
Richard Bennett
Richard Bennett is a writer and a lover of all things video.
Follow @Richard Bennett
Amplify Audience on Both Platforms: Youtube + Twitch Strategy
Youtube Video Maker - Wondershare Filmora
Provide abundant video effects - A creative video editor
Powerful color correction and grading
Detailed tutorials provided by the official channel
As the world has progressed, a great deal has changed, and it has transformed into a digital hub. People have started to use different platforms to entertain themselves, watch their favorite content online, gaming, music, sports, or any other form of entertainment.
Cross-platform streaming is a concept people have started to follow especially when it comes to gaming. The audience has a wide variety of choices when it comes to viewing live content online.
YouTube and Twitch are two major platforms streamers use to publish their content online for their targeted audience. They need to stream their content on YouTube and Twitch simultaneously as it engages a wider range of audiences worldwide, and newer streamers can benefit from it.
In this article
Part 1: How Can You Stream on Twitch and YouTube at the Same Time?
Part 2: How to Multi-stream using Streamlabs Prime
Part 3: Bonus Tips | Enlarge your Live Stream Performance!
Part 1: How Can You Stream on Twitch and YouTube at the Same Time?
To stream simultaneously on multiple platforms, a certain program or application is required to provide you with the required tools to enable you to broadcast your content. Several programs provide the option to stream to multiple websites at the same time e.g., Restream, Streamlabs Prime, and MelonApp.
Restream
Restream.io is a service that provides you with the option to broadcast your content to more than 30 different platforms including Twitch and YouTube. When you log in, you can choose the channels you wish to broadcast on and restream will issue a unique key for you.

After you have selected your desired selection, go to your broadcasting software, and choose Restream.io as your preferred service and insert your unique key provided by Restream.
Restream will let you use their services for free provided you use it with their watermark. It is recommended for newer users but if you wish to remove the watermark and go ad-free you will have to upgrade your plan.
Below is a step-by-step guide to help you stream using Restream.io
Step 1: Sign up or log in
The first step is to sign up on Restream. It will require you to choose a unique username, password and enter a valid email address.
Step 2: Choose your desired Platforms
From the list of different platforms, choose the ones you wish to stream to and add your channels by authorizing with the required credentials. Restream has an option of more than 30 platforms including YouTube, Twitch, Facebook, Twitter, and LinkedIn.

Step 3: Choose your subscription plan
Choose your desired plan that caters to your needs. Keep in mind that Restream is 100% free but free accounts do not come with recording or storage and will show a Restream watermark.

You can remove this watermark by upgrading your subscription plan to a Professional one from the dashboard.
Step 4: Choose the final streaming platforms
Connect all your channels so you can stream from a single platform. Click the platform icon and connect your preferred accounts with Restream.
Step 5: Tweak the settings according to your preference
Set up for streaming preferences and settings along with your streaming software. You can broadcast directly from your browser, multiple members from different locations, from your mobile phone, or even your GoPro. More available streaming features can be found on the Restream Help Center.

Restream also offers a wide range of services including the option to stream pre-recorded videos on Twitch at a preselected time and date. However, there is a caveat that you will not be able to multi-stream after you get an affiliate status on your Twitch channel.
Part 2: How to Multi-stream using Streamlabs Prime
Streamlabs Prime is the premium version of Streamlabs. It provides you with a range of 40+ apps that can also improve the quality of your streams and allow you to multi-stream. It is one of the best streaming software in the game currently.
Many content creators use Streamlabs to simultaneously run their streams on YouTube along with Twitch to grasp a wider range of audiences and get more views. One of the best things about Streamlabs is that you can connect to the broadcast services directly from the program without entering any stream key.
Streamlabs has included the option to Multi Stream on different platforms within its OBS client. Below are the steps required to set you up for streaming on YouTube and Twitch at the same time.
Step 1: Open the settings of your desired client
Click on the gear icon to open the settings on the bottom left of the client, click on the Stream tab where you will see the three main platforms for streaming.
Step 2: Add your preferred platforms
Add YouTube and Twitch by pressing the connect button; you can also add other services as well with the Add Destination feature.

Your stream will automatically be broadcast to all selected platforms when you go live. Although, you will be required to use the premium service of Streamlabs to ensure you can Multistream to different platforms at the same time.

Melon is a web-based service that lets you live-stream onto different platforms at the same time such as YouTube, Twitch, Facebook, and LinkedIn in just a matter of a few clicks. No downloads are required and there are umpteen options of customizations to personalize your feed according to your preference.
You can earn through donations from your live stream and are provided with the best customer support 24/7. Everything is hosted on a cloud-based setup and you can stream and record in 1080p.
Below are the steps to guide you on how to stream using the MelonApp.
Step 1: Login or Sign up
Login or Signup with your credentials into Melon and allow the required permissions i.e., microphone and camera.

Step 2: Choose your subscription plan
Choose your premium plan to avail of multi-streaming along with high-quality broadcasting, unlimited streaming, and tons of customization.

Step 3: Choose your desired platforms
Choose and connect the platforms you want to stream to from the Settings in the top right corner. If you have to reselect, simply click x, and reconnect to a different service.
Step 4: Finalize your preferences
Click on ‘Go Live’ and select the platforms for the current stream you wish to broadcast. Selected platforms will be highlighted.

Step 5: Go live
In the end, click next, put in the title of your stream and its description and you are all set to broadcast your content.
Part 3: Bonus Tips | Enlarge your Live Stream Performance
Now that you know how to stream on Twitch and YouTube, here are some tips to improve your live streams!
Tip # 1: Enhance Your Content
You can enhance your content in multiple ways to grasp a wider audience and get your message all around the globe.
Tip # 2: Introduce Graphics and Transitions
You can use interesting gifs, screens, intros, and outros for your streams. Announcing your streams beforehand can also help build up hype and make people anticipate your feed.
Tip # 3: Work More on Post Production
People stream different content on these streaming platforms including gaming, podcasts, educational and entertainment videos. Editing your content to near perfection is one of the most major aspects of a successful broadcast.
Tip # 4: Use Editing Tools to Make Your Videos Interesting
You can use different editing tools such as Wondershare Filmora which is a great video editing software that allows you to edit, trim, cut, add sounds and apply tons of effects to your content no matter what type or genre it is.
Tip # 5: Add Certain Effects to Appear Professional
You can also introduce motion tracking, keyframing, and use other powerful features, and that too for free using Wondershare Filmora. However, if you wish to go a step further you can always opt for their premium version and transcend into a world of endless options and opportunities to edit and enhance your content.
Tip # 6: Promote Your Content Using Social Media
Multi-streaming helps build up a wider community of fans as it is targeting different sets of people and you can also earn from your streams using advertisements and introducing click-on banners for brand endorsements.
Some platforms also let you promote and manage your merchandise, so it is always a good opportunity for these streaming clients and platforms.
Conclusion
Now you can also monetize your streams and broadcast on different platforms such as YouTube and Twitch at the same time. This will boost your reach and views in a very positive way. You can also tweak your content by editing it and inserting sound effects, gifs, and much more to make it more interesting and catchier.
And by multi-streaming on YouTube and Twitch, you will have a greater chance of being found by gaming sponsors and your growth will not be tied just to a single platform. You can also promote your streams on other social media platforms and your handles as well.
Pre-recorded videos are also a great way to present your content with perfection without any chances of being prone to any potential online mishaps.
As the world has progressed, a great deal has changed, and it has transformed into a digital hub. People have started to use different platforms to entertain themselves, watch their favorite content online, gaming, music, sports, or any other form of entertainment.
Cross-platform streaming is a concept people have started to follow especially when it comes to gaming. The audience has a wide variety of choices when it comes to viewing live content online.
YouTube and Twitch are two major platforms streamers use to publish their content online for their targeted audience. They need to stream their content on YouTube and Twitch simultaneously as it engages a wider range of audiences worldwide, and newer streamers can benefit from it.
In this article
Part 1: How Can You Stream on Twitch and YouTube at the Same Time?
Part 2: How to Multi-stream using Streamlabs Prime
Part 3: Bonus Tips | Enlarge your Live Stream Performance!
Part 1: How Can You Stream on Twitch and YouTube at the Same Time?
To stream simultaneously on multiple platforms, a certain program or application is required to provide you with the required tools to enable you to broadcast your content. Several programs provide the option to stream to multiple websites at the same time e.g., Restream, Streamlabs Prime, and MelonApp.
Restream
Restream.io is a service that provides you with the option to broadcast your content to more than 30 different platforms including Twitch and YouTube. When you log in, you can choose the channels you wish to broadcast on and restream will issue a unique key for you.
After you have selected your desired selection, go to your broadcasting software, and choose Restream.io as your preferred service and insert your unique key provided by Restream.
Restream will let you use their services for free provided you use it with their watermark. It is recommended for newer users but if you wish to remove the watermark and go ad-free you will have to upgrade your plan.
Below is a step-by-step guide to help you stream using Restream.io
Step 1: Sign up or log in
The first step is to sign up on Restream. It will require you to choose a unique username, password and enter a valid email address.
Step 2: Choose your desired Platforms
From the list of different platforms, choose the ones you wish to stream to and add your channels by authorizing with the required credentials. Restream has an option of more than 30 platforms including YouTube, Twitch, Facebook, Twitter, and LinkedIn.
Step 3: Choose your subscription plan
Choose your desired plan that caters to your needs. Keep in mind that Restream is 100% free but free accounts do not come with recording or storage and will show a Restream watermark.
You can remove this watermark by upgrading your subscription plan to a Professional one from the dashboard.
Step 4: Choose the final streaming platforms
Connect all your channels so you can stream from a single platform. Click the platform icon and connect your preferred accounts with Restream.
Step 5: Tweak the settings according to your preference
Set up for streaming preferences and settings along with your streaming software. You can broadcast directly from your browser, multiple members from different locations, from your mobile phone, or even your GoPro. More available streaming features can be found on the Restream Help Center.
Restream also offers a wide range of services including the option to stream pre-recorded videos on Twitch at a preselected time and date. However, there is a caveat that you will not be able to multi-stream after you get an affiliate status on your Twitch channel.
Part 2: How to Multi-stream using Streamlabs Prime
Streamlabs Prime is the premium version of Streamlabs. It provides you with a range of 40+ apps that can also improve the quality of your streams and allow you to multi-stream. It is one of the best streaming software in the game currently.
Many content creators use Streamlabs to simultaneously run their streams on YouTube along with Twitch to grasp a wider range of audiences and get more views. One of the best things about Streamlabs is that you can connect to the broadcast services directly from the program without entering any stream key.
Streamlabs has included the option to Multi Stream on different platforms within its OBS client. Below are the steps required to set you up for streaming on YouTube and Twitch at the same time.
Step 1: Open the settings of your desired client
Click on the gear icon to open the settings on the bottom left of the client, click on the Stream tab where you will see the three main platforms for streaming.
Step 2: Add your preferred platforms
Add YouTube and Twitch by pressing the connect button; you can also add other services as well with the Add Destination feature.
Your stream will automatically be broadcast to all selected platforms when you go live. Although, you will be required to use the premium service of Streamlabs to ensure you can Multistream to different platforms at the same time.
Melon is a web-based service that lets you live-stream onto different platforms at the same time such as YouTube, Twitch, Facebook, and LinkedIn in just a matter of a few clicks. No downloads are required and there are umpteen options of customizations to personalize your feed according to your preference.
You can earn through donations from your live stream and are provided with the best customer support 24/7. Everything is hosted on a cloud-based setup and you can stream and record in 1080p.
Below are the steps to guide you on how to stream using the MelonApp.
Step 1: Login or Sign up
Login or Signup with your credentials into Melon and allow the required permissions i.e., microphone and camera.
Step 2: Choose your subscription plan
Choose your premium plan to avail of multi-streaming along with high-quality broadcasting, unlimited streaming, and tons of customization.
Step 3: Choose your desired platforms
Choose and connect the platforms you want to stream to from the Settings in the top right corner. If you have to reselect, simply click x, and reconnect to a different service.
Step 4: Finalize your preferences
Click on ‘Go Live’ and select the platforms for the current stream you wish to broadcast. Selected platforms will be highlighted.
Step 5: Go live
In the end, click next, put in the title of your stream and its description and you are all set to broadcast your content.
Part 3: Bonus Tips | Enlarge your Live Stream Performance
Now that you know how to stream on Twitch and YouTube, here are some tips to improve your live streams!
Tip # 1: Enhance Your Content
You can enhance your content in multiple ways to grasp a wider audience and get your message all around the globe.
Tip # 2: Introduce Graphics and Transitions
You can use interesting gifs, screens, intros, and outros for your streams. Announcing your streams beforehand can also help build up hype and make people anticipate your feed.
Tip # 3: Work More on Post Production
People stream different content on these streaming platforms including gaming, podcasts, educational and entertainment videos. Editing your content to near perfection is one of the most major aspects of a successful broadcast.
Tip # 4: Use Editing Tools to Make Your Videos Interesting
You can use different editing tools such as Wondershare Filmora which is a great video editing software that allows you to edit, trim, cut, add sounds and apply tons of effects to your content no matter what type or genre it is.
Tip # 5: Add Certain Effects to Appear Professional
You can also introduce motion tracking, keyframing, and use other powerful features, and that too for free using Wondershare Filmora. However, if you wish to go a step further you can always opt for their premium version and transcend into a world of endless options and opportunities to edit and enhance your content.
Tip # 6: Promote Your Content Using Social Media
Multi-streaming helps build up a wider community of fans as it is targeting different sets of people and you can also earn from your streams using advertisements and introducing click-on banners for brand endorsements.
Some platforms also let you promote and manage your merchandise, so it is always a good opportunity for these streaming clients and platforms.
Conclusion
Now you can also monetize your streams and broadcast on different platforms such as YouTube and Twitch at the same time. This will boost your reach and views in a very positive way. You can also tweak your content by editing it and inserting sound effects, gifs, and much more to make it more interesting and catchier.
And by multi-streaming on YouTube and Twitch, you will have a greater chance of being found by gaming sponsors and your growth will not be tied just to a single platform. You can also promote your streams on other social media platforms and your handles as well.
Pre-recorded videos are also a great way to present your content with perfection without any chances of being prone to any potential online mishaps.
Also read:
- In 2024, Drive More Viewers to Your Videos Top Growth Hacks
- The Shorter Path Cutting Video Duration on YouTube
- 2024 Approved Elevate Your Vlogs with Epic YouTube Reactions – Discover 3 Pro Tips
- In 2024, Directly Uploading YouTube Vids to Multiple Social Sites, Focusing on FB
- 2024 Approved Ensuring Authenticity as You Aspire for One Million Video Watches
- In 2024, A Complete Guide to Utilizing YouTube’s AdSense for Success
- Essential YouTube End Screen Templates for Content Makers for 2024
- 2024 Approved Editing Engine Room
- 9 Powerful YouTube Video Downloader for Android
- Breaking Down T-Series Income Mechanism on YouTube
- Channel Cash Flow Management for YouTubers for 2024
- Subtitled, Uninterrupted Access to 9 Festive Holiday Movies - Free
- [Updated] Essential Tips for WireCast Live Streaming to Youtube
- Solving ZERO Video View Mysteries on YouTube
- Charting the Course to Prodigy Status for Ajey (CarryMinati)
- Experience a Bundle of 9 Whole-Film Christmas Treasures for Free
- In 2024, Elevate Your Content with These Top 5 YouTube Marketing Methods
- 2024 Approved A Step-by-Step Guide to Forming Effective YouTube Partner Relationships
- 2024 Approved Boosting Bank Balance Crafting Commercial Video Content
- [Updated] Essential Tips and Tricks for Creating Killer Short Videos on YT
- Best Webcams Unveiled A YouTube Livestreamer's Handbook for 2024
- Discovering Your Customized YouTube Playlist for 2024
- [Updated] A Beginner's Guide to Making Attractive Video Thumbnails for Social Media Platforms
- Bridging the Audience Gap Successful Multi-Streaming Approaches on Youtube & Twitch for 2024
- In 2024, Cutting-Edge Techniques for YouTube Thumbnails, Made for macOS
- Unleashing Video Potential Effective SEO Strategies for YouTube
- Turning Your YouTube Shorts Into Earnings What You Need & How Much?
- [Updated] Android Audio Archive A Curated List of Top 6 Free Music Downloading Apps
- [Updated] Analytics Unlocked Your Step-by-Step YouTube Guide
- Maximize Views with These Top-Rated Keyword Analysis Tools
- [New] Elevating Engagement Strategic Use of Youtube Titles
- In 2024, Building Your Own YouTube Auto-Subscribe URL
- Charting the Course for Your Niche in the YouTube World
- 2024 Approved Enchanting Music Visuals Using the Lyric Video Maker Toolkit
- 3 Solutions to Find Your Motorola Moto G14 Current Location of a Mobile Number | Dr.fone
- [Updated] SplitCam Probe - In Video Tech's Top Spot for 2024
- Fixing Foneazy MockGo Not Working On Honor 90 Pro | Dr.fone
- Hassle-Free Ways to Remove FRP Lock on Infinix Note 30 VIP Racing Edition Phones with/without a PC
- New Digitalize Your DVDs A Beginners Guide to Video Conversion for 2024
- In 2024, 8 Best Apps for Screen Mirroring Poco M6 5G PC | Dr.fone
- [Updated] Breaking Free From TikTok's Hidden Bans A Roadmap for 2024
- [New] How to Ensure Your Virtual Meetings Are Documented
- Exclusive Insider's Pick Best Open World Games
- Bringing Clarity to Online Meetings Free & Paid Zoom Transcribing Pros
- [Updated] In 2024, The Definitive Guide to Live Tweeting with Reactions
- Title: Where the Magic of Video Editing Begins on YouTube
- Author: Brian
- Created at : 2024-05-25 13:27:07
- Updated at : 2024-05-26 13:27:07
- Link: https://youtube-video-recordings.techidaily.com/where-the-magic-of-video-editing-begins-on-youtube/
- License: This work is licensed under CC BY-NC-SA 4.0.
