
![[Updated] Essential Tips for Crafting YouTube Image Marketing](https://thmb.techidaily.com/53c515418786e92ebed3c6206ea33f7c074dbdb116bb5f52f889c6937a269f05.jpg)
[Updated] Essential Tips for Crafting YouTube Image Marketing
Essential Tips for Crafting YouTube Image Marketing
How to Make YouTube Banners and Thumbnails 
Richard Bennett
Mar 27, 2024• Proven solutions
The art on your YouTube channel – banners, thumbnails, icons, and watermarks – will help to determine how viewers feel about your vlog. If your art does not look like it all goes together then people will get a sloppy, amateurish, impression of your channel. However, if your different pieces of channel art all seem to complement each other and match the tone and theme of your channel then it will help viewers to have a pleasant browsing experience. They will get the impression that you take your YouTube channel seriously and that they can trust you as a source of information, comedy, or general entertainment.
How to Make YouTube Banners and Thumbnails
YouTube Banners and Thumbnails are two of the most important pieces of channel art you will need. This article will explain the best practices for both, and suggest sites where you will be able to build your own banners and thumbnails for free.
1. YouTube Banners
Quick Tips:
- The image you upload for your YouTube banner should be 2560 x 1440px (pixels).
- The ‘safe area’ for text, logos, and other important visual information (like faces) is 1546 x 423px.
Your banner is probably the first thing that comes to mind when you think about channel art. Banners are the headers that rest at the tops of channel pages on YouTube. Your banner should be 2560 x 1440 px, although not all of it will always be visible. On a desktop computer or mobile device only a 1546 x 423 px ‘safe area’ will be visible. When viewed on a TV screen your entire image will be visible. YouTube does support PNG, but if your PNG file does not upload properly (as has been the case for some YouTubers) then changing your file type to JPEG might help.
YouTube Banners are extremely important to the success of your channel. If you do not have a banner then it looks like you do not really care about your vlog. If you have a basic banner that is not at all personalized then it certainly looks like you care, but it might also look like you are new to YouTube.
The best banners are customized to reflect the kind of experience you want viewers to have on your channel. The banner of a comedic YouTube channel might use bright colors, where the banner for a gaming channel will probably use darker colors similar to the ones that are in the games the vlogger plays. Connecting your banner to the theme of your channel is part of how you define the style of your vlog. It is the difference between being a Beauty Guru and a general YouTuber who gives makeup tips sometimes.
Including a photo of yourself, or your logo if you have one, is a great way to personalize your banner.
2. YouTube Thumbnails
Quick Tips:
- Search for your video’s topic to see the thumbnails your thumbnail will be competing against.
- Make any text huge so people can read it on their smartphone screens.
- Emojis, colored boarders, and graphics are all potential ways to stand out.
Thumbnails are often ignored by newer YouTubers. YouTube selects a thumbnail for every one of your videos and it is always a still image from that video. You can choose which frame you want to use and a lot of people feel like that is good enough. When you create a custom thumbnail, however, you get to not only choose your image but insert a title.
If you are choosing the images you are using for thumbnails you can make sure they are always similar frames. This will help people identify your videos quickly in searches. Using titles in your thumbnails will also help searchers identify your videos, if you always use the same title style. Another benefit of titles is that they capture the attention of people looking for your specific topic. Remember when building your thumbnails that they will appear smaller on YouTube than they probably are while you edit them. On mobile devices, they will look even smaller. So, if you are going to use text in your thumbnail, make sure it is huge.
One thumbnail taboo that you should never break is using an image that has nothing to do with your video. Using an image of a cute cat for a vlog post that has nothing to do with cats is misleading and will anger viewers. You may draw in a lot of viewers who want to see a cat video, but they will leave right away when they do not see a cat and they will never watch anything by you again.
3.Where To Create Banners and Thumbnails
There are sites online that will allow you to edit images and use them in templates for YouTube banners. You can also use these services to edit your thumbnails. Two of the most popular, free, online photo editors are PicMonkey.com and Canva.com.

Canva has templates you can use to create YouTube banners, as well as a variety of stock images you can use in combination with your own when creating channel art. It is free to edit images on Canva, but they do have some premium features which cost $1 each to access. This service has both a desktop version and an iPad app.

PicMonkey lets you import images from your computer or social media accounts, edit them, and use them in templates for YouTube banners or other kinds of social media graphics. PicMonkey is free to use, but you can only access their more advanced editing tools if you buy a paid subscription. Monthly subscriptions are $4.99 per month, and yearly subscriptions are $2.75 per month.

Richard Bennett
Richard Bennett is a writer and a lover of all things video.
Follow @Richard Bennett
Richard Bennett
Mar 27, 2024• Proven solutions
The art on your YouTube channel – banners, thumbnails, icons, and watermarks – will help to determine how viewers feel about your vlog. If your art does not look like it all goes together then people will get a sloppy, amateurish, impression of your channel. However, if your different pieces of channel art all seem to complement each other and match the tone and theme of your channel then it will help viewers to have a pleasant browsing experience. They will get the impression that you take your YouTube channel seriously and that they can trust you as a source of information, comedy, or general entertainment.
How to Make YouTube Banners and Thumbnails
YouTube Banners and Thumbnails are two of the most important pieces of channel art you will need. This article will explain the best practices for both, and suggest sites where you will be able to build your own banners and thumbnails for free.
1. YouTube Banners
Quick Tips:
- The image you upload for your YouTube banner should be 2560 x 1440px (pixels).
- The ‘safe area’ for text, logos, and other important visual information (like faces) is 1546 x 423px.
Your banner is probably the first thing that comes to mind when you think about channel art. Banners are the headers that rest at the tops of channel pages on YouTube. Your banner should be 2560 x 1440 px, although not all of it will always be visible. On a desktop computer or mobile device only a 1546 x 423 px ‘safe area’ will be visible. When viewed on a TV screen your entire image will be visible. YouTube does support PNG, but if your PNG file does not upload properly (as has been the case for some YouTubers) then changing your file type to JPEG might help.
YouTube Banners are extremely important to the success of your channel. If you do not have a banner then it looks like you do not really care about your vlog. If you have a basic banner that is not at all personalized then it certainly looks like you care, but it might also look like you are new to YouTube.
The best banners are customized to reflect the kind of experience you want viewers to have on your channel. The banner of a comedic YouTube channel might use bright colors, where the banner for a gaming channel will probably use darker colors similar to the ones that are in the games the vlogger plays. Connecting your banner to the theme of your channel is part of how you define the style of your vlog. It is the difference between being a Beauty Guru and a general YouTuber who gives makeup tips sometimes.
Including a photo of yourself, or your logo if you have one, is a great way to personalize your banner.
2. YouTube Thumbnails
Quick Tips:
- Search for your video’s topic to see the thumbnails your thumbnail will be competing against.
- Make any text huge so people can read it on their smartphone screens.
- Emojis, colored boarders, and graphics are all potential ways to stand out.
Thumbnails are often ignored by newer YouTubers. YouTube selects a thumbnail for every one of your videos and it is always a still image from that video. You can choose which frame you want to use and a lot of people feel like that is good enough. When you create a custom thumbnail, however, you get to not only choose your image but insert a title.
If you are choosing the images you are using for thumbnails you can make sure they are always similar frames. This will help people identify your videos quickly in searches. Using titles in your thumbnails will also help searchers identify your videos, if you always use the same title style. Another benefit of titles is that they capture the attention of people looking for your specific topic. Remember when building your thumbnails that they will appear smaller on YouTube than they probably are while you edit them. On mobile devices, they will look even smaller. So, if you are going to use text in your thumbnail, make sure it is huge.
One thumbnail taboo that you should never break is using an image that has nothing to do with your video. Using an image of a cute cat for a vlog post that has nothing to do with cats is misleading and will anger viewers. You may draw in a lot of viewers who want to see a cat video, but they will leave right away when they do not see a cat and they will never watch anything by you again.
3.Where To Create Banners and Thumbnails
There are sites online that will allow you to edit images and use them in templates for YouTube banners. You can also use these services to edit your thumbnails. Two of the most popular, free, online photo editors are PicMonkey.com and Canva.com.
Canva has templates you can use to create YouTube banners, as well as a variety of stock images you can use in combination with your own when creating channel art. It is free to edit images on Canva, but they do have some premium features which cost $1 each to access. This service has both a desktop version and an iPad app.
PicMonkey lets you import images from your computer or social media accounts, edit them, and use them in templates for YouTube banners or other kinds of social media graphics. PicMonkey is free to use, but you can only access their more advanced editing tools if you buy a paid subscription. Monthly subscriptions are $4.99 per month, and yearly subscriptions are $2.75 per month.
Richard Bennett
Richard Bennett is a writer and a lover of all things video.
Follow @Richard Bennett
Calm Cursor: 3 Pathways to Mellow Watching Videos on YouTube (57 Chars)
YouTube Slow: How to Slow Down YouTube Videos [3 Ways]
Richard Bennett
Mar 27, 2024• Proven solutions
Have you ever wanted to learn something from a YouTube video, but found that the video is too fast? If you are wondering how to slow down YouTube videos, then you’re in the right place. Well, there are different ways to slow down YouTube videos and in this article, we will show you how to slow down the YouTube videos with 3 most effective ways: slow down the YouTube videos by changing playback video speed at playback, slow down YouTube video using YouTube’s Video Editor tools or change YouTube video speed to slow down or speed up with Wondershare Filmora video editor .
- Part 1: How to Play YouTube Videos in Slow Motion
- Part 2: Add Slow Motion with Wondershare Filmora (originally Wondershare Video Editor)
- Part 3: Add Slow Motion with YouTube Video Editor
Part 1: YouTube Slow Down: How to Play YouTube Videos in Slow Motion
While, you can now change the speed of any YouTube videos easily and watch YouTube videos in slow motion in a few steps. Below is how to slow down YouTube Videos:
- Open the video in YouTube
- Click the Settings icon on the bottom right and then you will see Autoplay, Annotations, Speed, Subtitles, and Quality options. By default, the speed is set to Normal. Click Speed and open the speed change options. The speed options are in multiples.
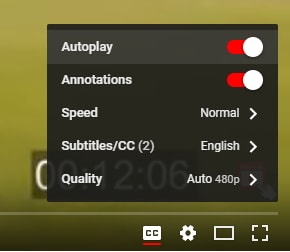
- Choose the target video speed from 0.25x, 0.5x, 0.75x to slow down the play back speed of the YouTube video. You can also select 1.25x, 1.5x, 1.75x or 2x to fast forward this YouTube video depending on how fast or slow you want the playback of the YouTube video to be.
- That’s it how to make a YouTube video slow down by changing the playback speed. If you selected 0.5X, you will see the playback speed is half of the original speed. You can now see the YouTube video is played back in a slower speed.
You May Also Like: Take good use of YouTube’s Enhancements feature to improve your video quality.
Besides, watching YouTube videos in slow motion, you can also make a slow motion video and upload to YouTube. The Flash from Zootopia is so impressive and you can see a lot of memes and gifs online about this funny cute sloth. In the following part, we will show you how to make a slow motion YouTube video like the sloth Flash in two ways by adding slow motion effects.
Part 2: Add Slow Motion to YT Videos with Wondershare Filmora video editor [3 Steps]Wondershare Filmora is an easy-to-use yet powerful video editing tool to which let beginners edit their YouTube videos in minutes. It includes every classic video editing functions including adjust playback speed, trim, crop, rotate, split as well as many special editing features like Jump Cut, Mosaic Blur and Tilt Shift. Now let’s see how to add slow motion with this video editing software.


Step 1. Import Video Footage to Filmora Video Editor
First of all, you need to import all your video footage for YouTube videos to Filmora. If you want to slow down a video downloaded from online, like youtube, please make sure there is copyright issue for you to use the video before processing. In case that you want to download YouTube with free youtube downloader, you can try Wondershare Free Youtube Downloader and Video DownloadHelper (Firefox Add-on).
After downloading YouTube videos on hard disk, you can now import it to this YouTube video editor. The downloaded YouTube videos is usually in FLV format, and Filmora has a wide range of support for video formats, which includes FLV as well. You can either click “Import” on the primary windows and select YouTube FLV video file from your computer, or simply drag and drop YouTube FLV file to the User’s Album. Next, drag YouTube video from User’s Album to Timeline for editing.

Step 2. One click to add slow motion to YouTube video
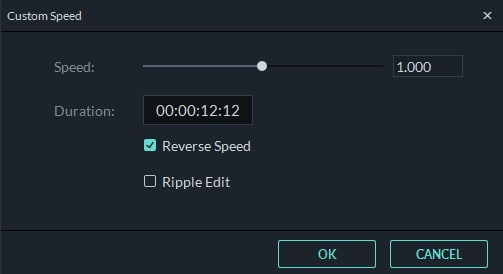
On the Timeline, click on the added YouTube video and select Speed and Duration to open up the video custom speed window. You will see the Speed option, Duration, Reverse Speed and Ripple Edit options. and the speed number indicates fast or slow motion. To slow down the YouTube video, drag the speed slider to left and you get a slow down version of the YouTube video. You can slow down the YouTube video in 0.01x. Click the OK button to save the slow motion settings and then click the Play button in the preview windows to have a look at the new YouTube slow down video. You can also change the duration of the YouTube video to change the YouTube video speed. For example, if you want to slow down a 30-second YouTube video to half speed, you can just enter the duration to 60 seconds to get a slow down motion effect.
With Filmora youtube video editor, you can also add the slow motion effects to some certain clips of the video footage. What you need to do is use the split feature to split the video first. Learn more details about How to Cut / Split / Trim Videos without Quality Loss
Step 3. Export slow down YouTube video
You could continue editing YouTube videos. When all done, click “Export” to save the result. You can save YouTube video in any popular formats on the computer by clicking “Format”. If you want to play YouTube video on iPod, iPhone, iPad, click “Device” and select your device. You can also share the YouTube video up to YouTube or Vimeo directly or burn YouTube video to DVD.

See, with Filmora video editor you can slow down YouTube videos with ease, what’s more, you can also apply reverse effects to play Youtube videos backwards. Download and try this YouTube Slow motion effect and you will master how to slow down YouTube videos.
Related:How to Make Slow/Fast Motion Videos
Part 3: Slow down YouTube videos with Slow Motion in YouTube Video Editor
Updated: From 20th September 2017 users will no longer be able to use the complimentary editing suite. Check the best YouTube video editor alternatives from this complete guide.
If you’ve ever been annoyed by the speed of your user-generated videos on YouTube, try out its own video editor. As YouTube has added a new “slow motion” tool to its YouTube Editor, it does pretty much exactly what it sounds like. Here is a simple guide on how to add slow motion with it.
Step 1: Get Access to YouTube Video Editor. You can either go directly to the URL, which is https://www.youtube.com/editor , or click “Upload”>”Edit” to the Video Editor tab.
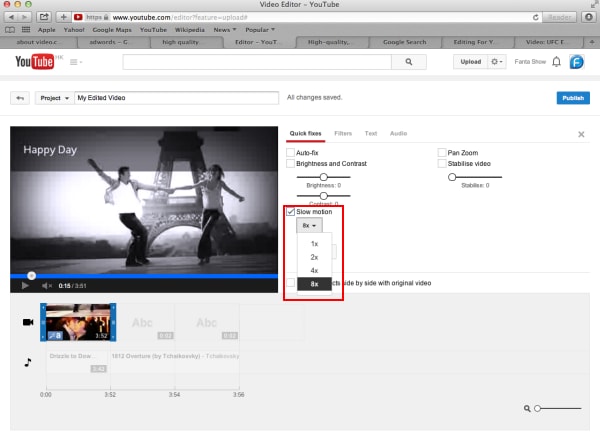
Step 2: Drag your video on the timeline and double click it. In the pop up window, you will see the “Slow Motion” option. Enable it and then select how slow you want the video to be. This applies the effect to the entire video that you’ve selected.
If you just want to slow down parts of the video, go back to the main editing tab, clip it from the original video using the slicing tool and add the slow-motion effect to that clip only. You can then arrange the different clips you have in the editor to create your final video.
Step 3: Tick the option “Preview effects side-by-side” with original video and then you can see how the original video plays compared to the one you’ve slowed down. If you’re happy with the result, hit “Done” to save the settings.
Conclusion
Above are the 3 ways that you can watch a YouTube video in slow motion, and slow down YouTube videos. You can directly change the playback speed of the YouTube video on Youtube, or download the YouTube video first and then slow down the speed of the YouTube video with some video editing software for YouTube like Filmora. No matter which way you prefer, we hope these information can help you slow down youtube videos.
Richard Bennett
Richard Bennett is a writer and a lover of all things video.
Follow @Richard Bennett
Richard Bennett
Mar 27, 2024• Proven solutions
Have you ever wanted to learn something from a YouTube video, but found that the video is too fast? If you are wondering how to slow down YouTube videos, then you’re in the right place. Well, there are different ways to slow down YouTube videos and in this article, we will show you how to slow down the YouTube videos with 3 most effective ways: slow down the YouTube videos by changing playback video speed at playback, slow down YouTube video using YouTube’s Video Editor tools or change YouTube video speed to slow down or speed up with Wondershare Filmora video editor .
- Part 1: How to Play YouTube Videos in Slow Motion
- Part 2: Add Slow Motion with Wondershare Filmora (originally Wondershare Video Editor)
- Part 3: Add Slow Motion with YouTube Video Editor
Part 1: YouTube Slow Down: How to Play YouTube Videos in Slow Motion
While, you can now change the speed of any YouTube videos easily and watch YouTube videos in slow motion in a few steps. Below is how to slow down YouTube Videos:
- Open the video in YouTube
- Click the Settings icon on the bottom right and then you will see Autoplay, Annotations, Speed, Subtitles, and Quality options. By default, the speed is set to Normal. Click Speed and open the speed change options. The speed options are in multiples.
- Choose the target video speed from 0.25x, 0.5x, 0.75x to slow down the play back speed of the YouTube video. You can also select 1.25x, 1.5x, 1.75x or 2x to fast forward this YouTube video depending on how fast or slow you want the playback of the YouTube video to be.
- That’s it how to make a YouTube video slow down by changing the playback speed. If you selected 0.5X, you will see the playback speed is half of the original speed. You can now see the YouTube video is played back in a slower speed.
You May Also Like: Take good use of YouTube’s Enhancements feature to improve your video quality.
Besides, watching YouTube videos in slow motion, you can also make a slow motion video and upload to YouTube. The Flash from Zootopia is so impressive and you can see a lot of memes and gifs online about this funny cute sloth. In the following part, we will show you how to make a slow motion YouTube video like the sloth Flash in two ways by adding slow motion effects.
Part 2: Add Slow Motion to YT Videos with Wondershare Filmora video editor [3 Steps]Wondershare Filmora is an easy-to-use yet powerful video editing tool to which let beginners edit their YouTube videos in minutes. It includes every classic video editing functions including adjust playback speed, trim, crop, rotate, split as well as many special editing features like Jump Cut, Mosaic Blur and Tilt Shift. Now let’s see how to add slow motion with this video editing software.
Step 1. Import Video Footage to Filmora Video Editor
First of all, you need to import all your video footage for YouTube videos to Filmora. If you want to slow down a video downloaded from online, like youtube, please make sure there is copyright issue for you to use the video before processing. In case that you want to download YouTube with free youtube downloader, you can try Wondershare Free Youtube Downloader and Video DownloadHelper (Firefox Add-on).
After downloading YouTube videos on hard disk, you can now import it to this YouTube video editor. The downloaded YouTube videos is usually in FLV format, and Filmora has a wide range of support for video formats, which includes FLV as well. You can either click “Import” on the primary windows and select YouTube FLV video file from your computer, or simply drag and drop YouTube FLV file to the User’s Album. Next, drag YouTube video from User’s Album to Timeline for editing.
Step 2. One click to add slow motion to YouTube video
On the Timeline, click on the added YouTube video and select Speed and Duration to open up the video custom speed window. You will see the Speed option, Duration, Reverse Speed and Ripple Edit options. and the speed number indicates fast or slow motion. To slow down the YouTube video, drag the speed slider to left and you get a slow down version of the YouTube video. You can slow down the YouTube video in 0.01x. Click the OK button to save the slow motion settings and then click the Play button in the preview windows to have a look at the new YouTube slow down video. You can also change the duration of the YouTube video to change the YouTube video speed. For example, if you want to slow down a 30-second YouTube video to half speed, you can just enter the duration to 60 seconds to get a slow down motion effect.
With Filmora youtube video editor, you can also add the slow motion effects to some certain clips of the video footage. What you need to do is use the split feature to split the video first. Learn more details about How to Cut / Split / Trim Videos without Quality Loss
Step 3. Export slow down YouTube video
You could continue editing YouTube videos. When all done, click “Export” to save the result. You can save YouTube video in any popular formats on the computer by clicking “Format”. If you want to play YouTube video on iPod, iPhone, iPad, click “Device” and select your device. You can also share the YouTube video up to YouTube or Vimeo directly or burn YouTube video to DVD.
See, with Filmora video editor you can slow down YouTube videos with ease, what’s more, you can also apply reverse effects to play Youtube videos backwards. Download and try this YouTube Slow motion effect and you will master how to slow down YouTube videos.
Related:How to Make Slow/Fast Motion Videos
Part 3: Slow down YouTube videos with Slow Motion in YouTube Video Editor
Updated: From 20th September 2017 users will no longer be able to use the complimentary editing suite. Check the best YouTube video editor alternatives from this complete guide.
If you’ve ever been annoyed by the speed of your user-generated videos on YouTube, try out its own video editor. As YouTube has added a new “slow motion” tool to its YouTube Editor, it does pretty much exactly what it sounds like. Here is a simple guide on how to add slow motion with it.
Step 1: Get Access to YouTube Video Editor. You can either go directly to the URL, which is https://www.youtube.com/editor , or click “Upload”>”Edit” to the Video Editor tab.
Step 2: Drag your video on the timeline and double click it. In the pop up window, you will see the “Slow Motion” option. Enable it and then select how slow you want the video to be. This applies the effect to the entire video that you’ve selected.
If you just want to slow down parts of the video, go back to the main editing tab, clip it from the original video using the slicing tool and add the slow-motion effect to that clip only. You can then arrange the different clips you have in the editor to create your final video.
Step 3: Tick the option “Preview effects side-by-side” with original video and then you can see how the original video plays compared to the one you’ve slowed down. If you’re happy with the result, hit “Done” to save the settings.
Conclusion
Above are the 3 ways that you can watch a YouTube video in slow motion, and slow down YouTube videos. You can directly change the playback speed of the YouTube video on Youtube, or download the YouTube video first and then slow down the speed of the YouTube video with some video editing software for YouTube like Filmora. No matter which way you prefer, we hope these information can help you slow down youtube videos.
Richard Bennett
Richard Bennett is a writer and a lover of all things video.
Follow @Richard Bennett
Also read:
- Quick Growth on YouTube Mastering the Art of Video Outros
- Enabling Autoplay YouTube Without Alerts
- [New] Break Free From YouTube with These Best 27 Video Streamers
- 2024 Approved Enhancing Clarity & Comprehensibility Adding On-Screen Captions in Video Projects
- In 2024, Access Royalty-Free Beats for Your Vlog & More
- Virtual Persona Journey in Online Entertainment Sphere
- [Updated] A Beginner's Guide to YouTube SEO Keywords
- 2024 Approved Affordable Gear for Aspiring Content Creators
- In 2024, Dominating Search Results Essential YouTube SEO Tricks
- [Updated] A Beginner's Blueprint Setting Up on YouTube
- Cutting-Edge Techniques for Powerful YouTube Thumbnail Designs for 2024
- [New] Cut Expenses, Create Wow - Download High-Quality Templates for Videos
- [Updated] Elevate Your Content with Insightful Channel Descriptions
- In 2024, Boost or Dial Down YouTube Audio with Devices
- Amplify Earnings Monetize YouTube on the Go with Effective Techniques for 2024
- Elevating Your Video's Status on YouTube
- Unraveling Online Video Discussions
- Achieve Financial Success with YouTube Ad Profit Techniques for 2024
- [New] Dual-Watch Dynamics Navigating YouTube in Parallel
- In 2024, Comprehensive Tips for Monitoring Subscriber Engagement
- The Game Changer Implementing Custom Gaming Banners
- Explore the World of Tiny Screens Top 6 Online Tools for Free & Complimentary YouTube Short Downloads
- [New] Does Buying YouTube Likes Help Boost Your Channel?
- Boosting Video Management Creating an Effective YouTube Watch Later List for 2024
- In 2024, Building Your ASMR Empire Key Concepts and Best Practices
- Creating Hilarious Reactions Mastering YouTube Tricks (3 Methods) for 2024
- Eco-Effective Marketing Green Screens & CTA Boosting for 2024
- [New] Crafting Content for Success A Step-by-Step Channel Guide
- 2024 Approved Essential List 7 Cost-Free Video Tags Extractors on YouTube
- Making Your Own YouTube Beginnings & Endings Cheaply
- [New] Beginner's Tutorial Setting Up Your YouTube Presence
- Charting the Course for YouTube Music Uploads
- The Rewind Revolution Novel Strategies for YouTube Viewers
- Deciding on a Personal Social Media Platform TikTok or YouTubes' Shorts?
- [Updated] Effortless Guide to Designing YouTube Follow Links
- Top 10 YouTubers by Massive Subscriber Base
- [New] Designing Your Musical Journey YouTube Playlist Construction Tips Web/App
- Ranking the Most Reliable YouTube Mp3 Converters
- [Updated] Eluding YouTube Ban Protective Measures
- [New] Achieve Video Excellence Learn the Studio Editor Way
- In 2024, Enable/Disable Comments A YouTube Instructional
- Effortless iDevice Integration for Video Sharing Platforms for 2024
- Strategies to Remove YouTube Trailers and Clips
- Crafting the Next Big Thing Your Guide to YouTube's Best Video Types
- Latest way to get Shiny Meltan Box in Pokémon Go Mystery Box On Honor X50 | Dr.fone
- New Audacity for Windows A Complete Guide to Recording System Audio
- [Updated] In 2024, Navigating Facebook to Play YouTube Videos Without Interruption
- Updated Auditory Enhancement for KineMaster A Comprehensive Guide
- Change Location on Yik Yak For your Honor Magic 5 Pro to Enjoy More Fun | Dr.fone
- Fix App Not Available in Your Country Play Store Problem on Xiaomi Redmi Note 12 5G | Dr.fone
- [Updated] In 2024, Crafting Captivating IG Stories With YouTube Content
- In 2024, Top 4 Ways to Trace Samsung Galaxy A54 5G Location | Dr.fone
- Effective Ways To Fix Checkra1n Error 31 From Apple iPhone 15
- Gaming Intro Makers Compared Top 10 Free and Paid Options
- New The Best of Both Worlds Top 10 Desktop and Online Video Trimmers for 2024
- [New] 2024 Approved Top 5 MMA Games for Virtual Fight Enthusiasts
- Can I view AVCHD .mts files on Galaxy S24 Ultra?
- Solutions to Spy on Oppo Reno 11 5G with and without jailbreak | Dr.fone
- In 2024, Best Vocal Trackers Essential Software for Seamless Sound Capture
- 2024 Approved 2023 | How to Share A Tiktok Video on Twitter?
- 2024 Approved Techniques for Separating Soundtracks From Visual Media in Adobe Premiere Pro
- New 10 Best Online Music Makers Free&Paid for 2024
- In 2024, How to Fix Locked Apple ID from iPhone 15 Pro Max
- 2024 Approved Mastering Discord Steaming Guide for PC & Android
- [New] In 2024, Facebook's Viral Content Wave - Leading Videos of 2023
- Title: [Updated] Essential Tips for Crafting YouTube Image Marketing
- Author: Brian
- Created at : 2024-06-26 00:20:19
- Updated at : 2024-06-27 00:20:19
- Link: https://youtube-video-recordings.techidaily.com/updated-essential-tips-for-crafting-youtube-image-marketing/
- License: This work is licensed under CC BY-NC-SA 4.0.
