
!["[Updated] Enliven YouTube Images A Burst of Neon Flair"](https://www.lifewire.com/thmb/PvRxfdcrx9sspuFtMoGeh6TdK8c=/400x300/filters:no_upscale():max_bytes(150000):strip_icc()/Screenshot2024-02-13at9.50.30AM-1b8b8f8ed26f41bc9bf019e65c3a20ce.png)
"[Updated] Enliven YouTube Images A Burst of Neon Flair"
Enliven YouTube Images: A Burst of Neon Flair
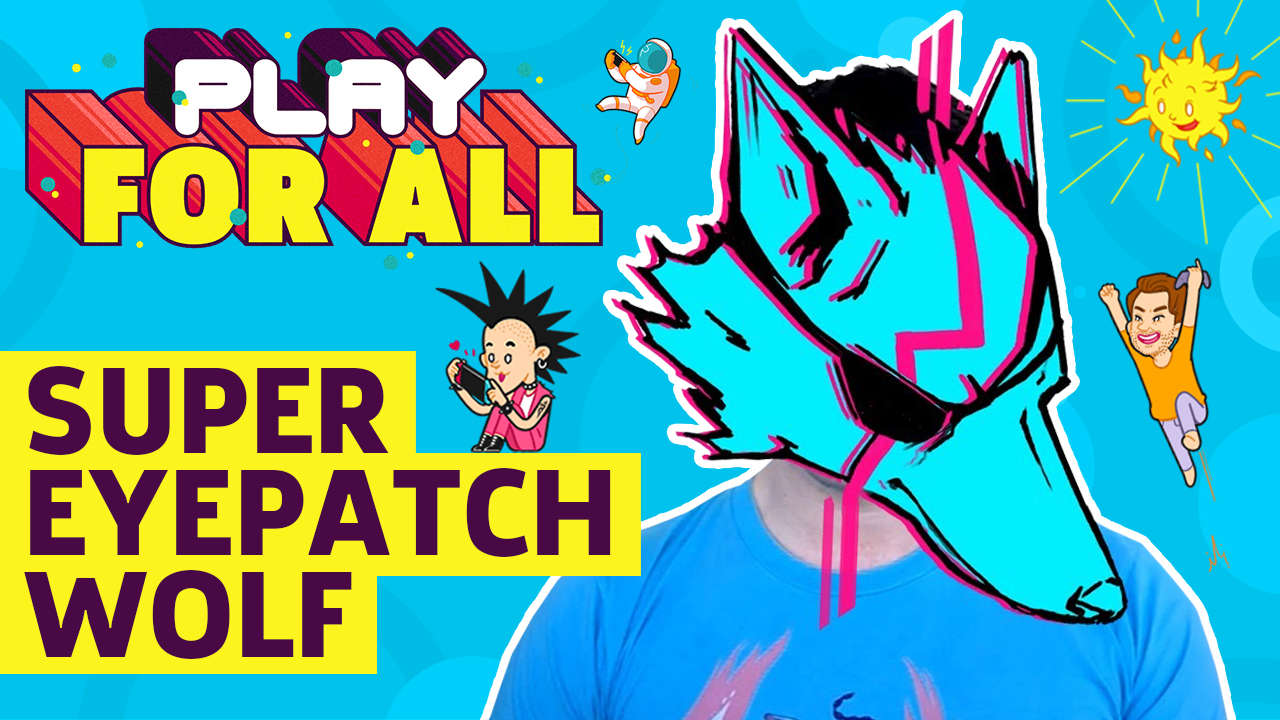
Your YouTube video, or any other clip published on any forum, gets a larger number of hits if it has an attractive thumbnail. And, the fact is, a thumbnail becomes 10x more attractive when the main character that the image has have a neon border around it.
With that said, in the following sections, you will learn a couple of methods on how to add a YouTube thumbnail border around the main characters and/or objects that are significant to the clip.
In this article
01 Add Glowing Neon Border to YouTube Thumbnail with Filmora
02 Add a Glowing Neon Border in YouTube Thumbnail with Canva
03 Outline a Person in a YouTube Thumbnail with Photoshop
Part 1: How to Add Neon Border to YouTube Thumbnail for Free with Filmora
Being one of the most versatile and intuitive post-production tools available in the market today, Wondershare Filmora X allows you to add a neon border to a YouTube thumbnail quite conveniently. You can learn how to get this done on Windows or Mac by following the steps given below.
For Win 7 or later (64-bit)
For macOS 10.12 or later
Step 1: Define Project Settings and Add Image to the Timeline
Launch Wondershare Filmora X on your PC (a MacBook Pro M1 is used here), ensure that the project aspect ratio is set to 16:9 (Widescreen) on the splash screen, and click New Project. On the main interface, click the Preview quality and display settings icon from the upper-right area of the Timeline, click Change Project Aspect Ratio, click to select 1280 x 720 (HD) from the Resolution menu of the Project Settings box, and click OK to save the custom project settings.

Then select My Media from the menu bar if not already selected, click Project Media from the navigation pane, and click Import from the Media box to select and import the image of the main character or object that you want to use in the thumbnail.

Now, drag the image from the Media box to the Timeline at the bottom.

Step 2: Clear Image Background, Add Border, and Add Custom Background
Go to Effects from the menu bar, click to select the Default tab and then AI Portrait from the navigation pane, and click and drag the Human Segmentation preset from the right box, and place it over the image track in the Timeline.

Double-click the image layer, scroll down the upper-left box to the Video Effects section, and use the Edge Thickness and Edge Feather sliders to adjust the character’s edges to make them as realistic as possible. Click OK when done.

Next, click and drag the Human Border preset over the image track in the Timeline, and follow the same procedure to customize the border. This will give the character a neon border effect.

Now, use the method explained earlier to import a custom image for the background, and drag and place it under the previous track in the Timeline.

If you are running the latest version of Filmora, you will find there are some neon light effects available under AI Portrait as well.

Step 3: Add Titles to Thumbnail
Go to Titles from the menu bar, click to select the Default tab and then Lower 3rds from the navigation pane, and click and drag your preferred lower-third preset from the right window to a separate layer in the Timeline. Double-click the lower-third layer, and use the available options in the upper-left window to change the text, its color, etc., and drag the textbox to place it to your preferred position on the image as well. Click OK to save the changes.
Next, click to select Titles from the navigation pane, and drag your preferred title from the right window to the upper-most track in the Timeline. Now use the method explained earlier to edit the text, its color, position, etc. to make it look professional.

For more tips and tricks for creating YouTube thumbnail, you can check this You Tube thumbnail creating guide.
Step 4: Get the Neon Border Thumbnail
Click the Snapshot (Camera) icon from the upper-right area of the Timeline, go to My Media from the menu bar, right-click the thumbnail of the screenshot you captured, and click Reveal in Finder (on Mac) or Reveal in Explorer (on Windows) to get to the folder the YouTube thumbnail border is saved in.

Part 2: How to Add a Glowing Neon Border in Your YouTube Thumbnail with Canva
Canva is another intuitive editing program that works on the web interface rather than having you download and install an app on your PC. You can add a neon border for YouTube thumbnails using Canva by following the instructions given below:
Step 1: Define Project Settings and Add a Background
After signing in to your Canva account, click Create a design from the top-right corner of the page, click Custom size from the bottom, define 1280 and 720 in the Width and Height fields on the box that appears respectively, and click Create new design.

Now, click to select Background from the navigation bar on the left (if the Background tool is not visible, click More and then choose Background from the expanded list), and click to select a background from the images available in the center pane.

Step 2: Upload an Image and Add Effects
Click Uploads from the navigation bar, click the More icon from the right of the Upload media button present at the top of the center pane, choose your preferred method to upload the image (with the transparent background) that you want to use, upload the image, and drag it from the center pane to the Canvas.
Note: You can use any of the tools available online to remove the background from your image for free.

To add a YouTube thumbnail border, make sure that the image that you added to the Canvas is selected, click the Duplicate icon from the upper-right area, and use the scaling handles of the copy of the image to increase its size a bit. Reposition the image back to its original location as well.
Then, click Edit image from the upper-left corner of the Canvas, click Duotone from the Edit image pane at the center, if need be, click See all, choose your preferred duotone effect to apply on the image, choose your preferred highlight and shadow colors from the box that appears next, and click Back from the top of the pane.

Next, click See all next to the Adjust section from the center pane, and drag the Blur slider to the right to increase the blur effect on the image.

Step 3: Position the Layers
While keeping the duplicate image selected, click the Position button from the upper-right area of the Canvas, and click Background to send the second image behind the first one to get the neon border effect for the photo.

Part 3: How to Outline a Person in a YouTube Thumbnail with Photoshop
Because YouTube thumbnails are nothing but static images, creating YouTube thumbnail border with Adobe Photoshop is comparatively easier. The process of doing this is given below:
Step 1: Define Document Preferences and Import an Image
Launch Adobe Photoshop on your PC, click Create new, and on the New Document customization box, define the width and height values to 1280 and 720 pixels respectively. Select Transparent from the Background Contents menu as well if not already selected. Click Create from the bottom to create a new Photoshop document with the specified document settings. Next, open the folder that contains the source image, drag the photo to Photoshop, and press Enter to place the photo.

Step 2: Remove Background from the Image
Make sure that the image layer is selected in the Layers panel on the right, go to Select from the menu bar at the top, and click Subject. From the bottom of the Layers panel, click the Add a mask icon to get rid of the background, leaving only the human on the Canvas.

Step 3: Add a Custom Background and an Outline Around the Subject
Use the method explained earlier to import a background image of your choice to Photoshop. Drag the background image layer to the bottom in the Layers panel. Double-click the masked layer, click to select Stroke from the left pane of the Layer Style box, and use the options available on the right to manage the size, color, position, etc. of the stroke that has been added around the human subject. Click OK when done, and then export the image normally to use it as a YouTube thumbnail border.

Summary
It is important to know that the default resolution of a YouTube thumbnail is 1280 x 720 pixels that is usually written and referred to as 720p. While adding a YouTube thumbnail border, it is also imperative to have a good sense of color combination and fonts. Furthermore, a decent tool like Wondershare Filmora X must be used to add an appealing neon border around the main subject in the thumbnail image easily and quickly.
02 Add a Glowing Neon Border in YouTube Thumbnail with Canva
03 Outline a Person in a YouTube Thumbnail with Photoshop
Part 1: How to Add Neon Border to YouTube Thumbnail for Free with Filmora
Being one of the most versatile and intuitive post-production tools available in the market today, Wondershare Filmora X allows you to add a neon border to a YouTube thumbnail quite conveniently. You can learn how to get this done on Windows or Mac by following the steps given below.
For Win 7 or later (64-bit)
For macOS 10.12 or later
Step 1: Define Project Settings and Add Image to the Timeline
Launch Wondershare Filmora X on your PC (a MacBook Pro M1 is used here), ensure that the project aspect ratio is set to 16:9 (Widescreen) on the splash screen, and click New Project. On the main interface, click the Preview quality and display settings icon from the upper-right area of the Timeline, click Change Project Aspect Ratio, click to select 1280 x 720 (HD) from the Resolution menu of the Project Settings box, and click OK to save the custom project settings.
Then select My Media from the menu bar if not already selected, click Project Media from the navigation pane, and click Import from the Media box to select and import the image of the main character or object that you want to use in the thumbnail.
Now, drag the image from the Media box to the Timeline at the bottom.
Step 2: Clear Image Background, Add Border, and Add Custom Background
Go to Effects from the menu bar, click to select the Default tab and then AI Portrait from the navigation pane, and click and drag the Human Segmentation preset from the right box, and place it over the image track in the Timeline.
Double-click the image layer, scroll down the upper-left box to the Video Effects section, and use the Edge Thickness and Edge Feather sliders to adjust the character’s edges to make them as realistic as possible. Click OK when done.
Next, click and drag the Human Border preset over the image track in the Timeline, and follow the same procedure to customize the border. This will give the character a neon border effect.
Now, use the method explained earlier to import a custom image for the background, and drag and place it under the previous track in the Timeline.
If you are running the latest version of Filmora, you will find there are some neon light effects available under AI Portrait as well.
Step 3: Add Titles to Thumbnail
Go to Titles from the menu bar, click to select the Default tab and then Lower 3rds from the navigation pane, and click and drag your preferred lower-third preset from the right window to a separate layer in the Timeline. Double-click the lower-third layer, and use the available options in the upper-left window to change the text, its color, etc., and drag the textbox to place it to your preferred position on the image as well. Click OK to save the changes.
Next, click to select Titles from the navigation pane, and drag your preferred title from the right window to the upper-most track in the Timeline. Now use the method explained earlier to edit the text, its color, position, etc. to make it look professional.
For more tips and tricks for creating YouTube thumbnail, you can check this You Tube thumbnail creating guide.
Step 4: Get the Neon Border Thumbnail
Click the Snapshot (Camera) icon from the upper-right area of the Timeline, go to My Media from the menu bar, right-click the thumbnail of the screenshot you captured, and click Reveal in Finder (on Mac) or Reveal in Explorer (on Windows) to get to the folder the YouTube thumbnail border is saved in.
Part 2: How to Add a Glowing Neon Border in Your YouTube Thumbnail with Canva
Canva is another intuitive editing program that works on the web interface rather than having you download and install an app on your PC. You can add a neon border for YouTube thumbnails using Canva by following the instructions given below:
Step 1: Define Project Settings and Add a Background
After signing in to your Canva account, click Create a design from the top-right corner of the page, click Custom size from the bottom, define 1280 and 720 in the Width and Height fields on the box that appears respectively, and click Create new design.
Now, click to select Background from the navigation bar on the left (if the Background tool is not visible, click More and then choose Background from the expanded list), and click to select a background from the images available in the center pane.
Step 2: Upload an Image and Add Effects
Click Uploads from the navigation bar, click the More icon from the right of the Upload media button present at the top of the center pane, choose your preferred method to upload the image (with the transparent background) that you want to use, upload the image, and drag it from the center pane to the Canvas.
Note: You can use any of the tools available online to remove the background from your image for free.
To add a YouTube thumbnail border, make sure that the image that you added to the Canvas is selected, click the Duplicate icon from the upper-right area, and use the scaling handles of the copy of the image to increase its size a bit. Reposition the image back to its original location as well.
Then, click Edit image from the upper-left corner of the Canvas, click Duotone from the Edit image pane at the center, if need be, click See all, choose your preferred duotone effect to apply on the image, choose your preferred highlight and shadow colors from the box that appears next, and click Back from the top of the pane.
Next, click See all next to the Adjust section from the center pane, and drag the Blur slider to the right to increase the blur effect on the image.
Step 3: Position the Layers
While keeping the duplicate image selected, click the Position button from the upper-right area of the Canvas, and click Background to send the second image behind the first one to get the neon border effect for the photo.
Part 3: How to Outline a Person in a YouTube Thumbnail with Photoshop
Because YouTube thumbnails are nothing but static images, creating YouTube thumbnail border with Adobe Photoshop is comparatively easier. The process of doing this is given below:
Step 1: Define Document Preferences and Import an Image
Launch Adobe Photoshop on your PC, click Create new, and on the New Document customization box, define the width and height values to 1280 and 720 pixels respectively. Select Transparent from the Background Contents menu as well if not already selected. Click Create from the bottom to create a new Photoshop document with the specified document settings. Next, open the folder that contains the source image, drag the photo to Photoshop, and press Enter to place the photo.
Step 2: Remove Background from the Image
Make sure that the image layer is selected in the Layers panel on the right, go to Select from the menu bar at the top, and click Subject. From the bottom of the Layers panel, click the Add a mask icon to get rid of the background, leaving only the human on the Canvas.
Step 3: Add a Custom Background and an Outline Around the Subject
Use the method explained earlier to import a background image of your choice to Photoshop. Drag the background image layer to the bottom in the Layers panel. Double-click the masked layer, click to select Stroke from the left pane of the Layer Style box, and use the options available on the right to manage the size, color, position, etc. of the stroke that has been added around the human subject. Click OK when done, and then export the image normally to use it as a YouTube thumbnail border.
Summary
It is important to know that the default resolution of a YouTube thumbnail is 1280 x 720 pixels that is usually written and referred to as 720p. While adding a YouTube thumbnail border, it is also imperative to have a good sense of color combination and fonts. Furthermore, a decent tool like Wondershare Filmora X must be used to add an appealing neon border around the main subject in the thumbnail image easily and quickly.
Your Daily Dose of Anime Magic From 15 Top Web Sources
Versatile YouTube Video Editor - Filmora
An easy yet powerful editor
Numerous effects to choose from
Detailed tutorials provided by the official channel
If you are looking for an anime channel on YouTube to spice your day, you are at the right place. This article will list anime channel arts ranging from well-executed fight scenes to cute catgirls and more. Therefore, if you are an anime enthusiast or lover of anime, get ready as we bring to you the best YouTube channel to watch anime as well as the worst, giving you reasons why the show isn’t a time-waster.
Having so much to watch on YouTube, it’s so hard to know where to start from vlogs, anime reviews, AMV’s, and cosplay. YouTube has a lot to offer. So that you do not get lost, we have put together the best YouTube anime channels to watch in 2022.
In this article
01 15 Best YouTube Channels to Watch Anime for Free
02 Where to Watch Anime Legally?
03 Create Animated Videos with Excellent Video Editor
Part 1: 15 Best YouTube Channels to Watch Anime for Free
1. Glass Reflection
Total subscribers: 582K
95,702,270 views
Glass Reflection brings us a series of anime reviews. He critically analyzes a wide range and varieties of anime, both of ether of the current and older generation. His outstanding features is the level of quality videos he produces; each video is unique in its selection of anime, choice of music, and genre specification
2. Gigguk
Total subscribers: 3.16M
497,899,579 views
Gigguk features a diverse collection of anime ranging from but not limited to AMVs, reaction videos, abridged skits, and rants. Gigguk can crack you up, moving you to tears, depending on the video.
3.Anime Explore
Total subscribers: 119K
23,196,155 views
Anime Explore, formerly called Black Anime Network, is an anime channel that combines both anime reviews and AMV’s fun aspects. This channel is full of visually stunning Music Videos of Anime interchanged with the best anime from various genres. Each video is unique in its anime selection, genre specification, and music choice.
4.Super Eyepatch Wolf
Total subscribers: 1.27M
126,377,549 views
Super Eyepatch Wolf is the most eloquent and insightful YouTubers known for his easy-to-follow and worded with care and commentary. As an illustrator, he uses a creative medium to create artistic anime for his fans.
5.AnimeUnity
Total subscribers: 460K
20,301,571 views
AnimeUnity provides awesome AMV and widely diverse music videos and character-driven songs. What makes this channel stand out is the level of creativity in each video, and the emotional impact is guaranteed.
6.The Anime Man
Total subscribers: 3.12M
496,411,239 views
The Anime Man conducts interviews with series creators and leads his own Q&A series called #AnswerMeSenpai. He covers anime music, teaches Japanese 101, and takes on challenges.
7.FUNimation
Total subscribers: 3.65M
1,352,016,338 views
FUNimation brings you anime news series and film to your screen. It offers a preview of upcoming anime series, special interviews with the directors, all the gossips and updates on anime.
8.TeamFourStar
Total subscribers: 3.72M
1,674,687,023 views
TeamFourStar is an anime YouTube channel well known for its skit and prodigy. It does more than just DBZ episodes and ventures into musical parodies and fantasy - a hilarious anime channel.
9. DouchebagChocolat
Total subscribers: 384K
68,846,068 views
DouchebagChocolat is referred to as an anime reviewer channel with pretty in-depth analysis on a variety of famous anime. Despite his inclusion of side commentary and memes, his reviews are critically analyzed and a lovely spot on.
10. Mother’s Basement
Total subscribers: 1.22M
226,841,843 views
Mother’s Basement, also known as Geoff Thew, focuses on going frame by frame to show the brilliance of anime’s greatest hits, scenes, video games, infrastructure, and subsequent failure or success of an anime OP or series.
11. BobSamurai
Total subscribers: 70K
7,461,027 views
BobSamurai also focuses on anime reviews meant for people who would instead enjoy a clear-cut review with to-the-point analysis. He is rather logical and straight in his study putting aside jokes and memes.
12. akidearest
Total subscribers: 2.9M
449,740,063 views
Akidearest is one of the most famous Japanese female anime YouTuber with over 2 million subscribers. She does her skits and travel segments and also covers video games, manga, cosplay, etc. most times, she collaborates with her boyfriend and YouTuber The Anime Man.
13. Iwasaka Miyuki
Total subscribers: 75.1K
5,755,732 views
YouTuber Iwasaka Miyuki uses anime in cosplay in a pretty challenging way. If you’re new to the hobby to immerse yourself in the characters and stories with cosplay completely, we suggest that you check out Iwasaka Miyuki YouTuber for step-by-step tutorials in wigs, makeup, and all cosplay
14. Digibro
Total subscribers: 311K
39,676,317 views
Digibro, now called YGG Studios on YouTube, gives in-depth analyses of video games, anime, and films. His anime videos come packed with info about the production crew, the concept of story-telling, and comparative plotlines.
15. Youlazybum
Total subscribers: 309K
163,665,724 views
Youlazybum has a music video for all types of animation with a phenomenal editing and music style ranging from RWBY, Overwatch to Porter Robinson’s renowned music video called ‘Shelter. Though Youlazybum might fall under the category of your ordinary animation music video, the most distinctive quality about this channel is that the content spans a wide span of animation across the world.
Part 2: Where to Watch Anime Legally?
Watching anime is one of the best things to make your day, and in this article, I will give you a list of channels, excluding YouTube, where you can watch anime legally.
1. Netflix
Netflix became the most popular video streaming platform across the world. It offers online streaming services in different countries after you subscribe to their plans and enjoy unlimited streaming of anime videos.
2. Amazon Prime Video
Amazon Prime Video is also one better way to legally watch varieties of animated videos launched in the United States and only available to Amazon Prime subscribers.
3. Crunchyroll
Crunchyroll is an online anime streaming website in Japan which comes in both free and premium plans where you can watch varieties of animations. For those outside Japan and would love to watch anime with subtitles, Crunchyroll is the best option for you.
Part 3: Create Animated Videos with Excellent Video Editor
Filmora from Wondershare comes as one of the most suitable and quick video editing software for amateur artists and professionals. It assists both Mac and Windows operating systems with 2D/3D animation, keyframes, export/share options to various social media platforms, Filmstock effects store, and 4k editing, consisting of basic and advanced editing tools for anime videos. You can call the Wondershare Filmora a perfect editor for making animated videos on YouTube .
Here is a step-by-step guide to creating anime videos on YouTube using Filmora.
Wondershare Filmora
Get started easily with Filmora’s powerful performance, intuitive interface, and countless effects!
Try It Free Try It Free Try It Free Learn More >

Step 1: Prepare a Script
The first step would be to write a script for the animation story you want to tell.
Step 2: Create a Flowchart
Described like a flowchart the sequence of pre-visualization or images of movie shots to understand how exactly the feel, look, and camera angles of the story.

Step 3: Record the Background Voiceover
Record the Voiceover you want to use in the animation.
Step 4: Edit and Develop Animation
Start the creation process of the animation paper by adding necessary edits to your animations and including the audio mix.
Step 5: Save and Export the Final Video
Do all final edits. After that, if you are satisfied with the result available in the Preview pane, save your video by instantly tapping on Export. More so, there are various loss of offline sharing options for you to showcase your animation video to the world.
Conclusion
Thus, finding the best YouTube channel to watch anime during your free or boring time is one of the best feelings as it helps you stay happy and overcome boredom. Filmora has proven to be one of the best tools for creating animated videos for YouTube channels. More so, this article analyses other platforms to watch animation videos aside from YouTube.
If you are looking for an anime channel on YouTube to spice your day, you are at the right place. This article will list anime channel arts ranging from well-executed fight scenes to cute catgirls and more. Therefore, if you are an anime enthusiast or lover of anime, get ready as we bring to you the best YouTube channel to watch anime as well as the worst, giving you reasons why the show isn’t a time-waster.
Having so much to watch on YouTube, it’s so hard to know where to start from vlogs, anime reviews, AMV’s, and cosplay. YouTube has a lot to offer. So that you do not get lost, we have put together the best YouTube anime channels to watch in 2022.
In this article
01 15 Best YouTube Channels to Watch Anime for Free
02 Where to Watch Anime Legally?
03 Create Animated Videos with Excellent Video Editor
Part 1: 15 Best YouTube Channels to Watch Anime for Free
1. Glass Reflection
Total subscribers: 582K
95,702,270 views
Glass Reflection brings us a series of anime reviews. He critically analyzes a wide range and varieties of anime, both of ether of the current and older generation. His outstanding features is the level of quality videos he produces; each video is unique in its selection of anime, choice of music, and genre specification
2. Gigguk
Total subscribers: 3.16M
497,899,579 views
Gigguk features a diverse collection of anime ranging from but not limited to AMVs, reaction videos, abridged skits, and rants. Gigguk can crack you up, moving you to tears, depending on the video.
3.Anime Explore
Total subscribers: 119K
23,196,155 views
Anime Explore, formerly called Black Anime Network, is an anime channel that combines both anime reviews and AMV’s fun aspects. This channel is full of visually stunning Music Videos of Anime interchanged with the best anime from various genres. Each video is unique in its anime selection, genre specification, and music choice.
4.Super Eyepatch Wolf
Total subscribers: 1.27M
126,377,549 views
Super Eyepatch Wolf is the most eloquent and insightful YouTubers known for his easy-to-follow and worded with care and commentary. As an illustrator, he uses a creative medium to create artistic anime for his fans.
5.AnimeUnity
Total subscribers: 460K
20,301,571 views
AnimeUnity provides awesome AMV and widely diverse music videos and character-driven songs. What makes this channel stand out is the level of creativity in each video, and the emotional impact is guaranteed.
6.The Anime Man
Total subscribers: 3.12M
496,411,239 views
The Anime Man conducts interviews with series creators and leads his own Q&A series called #AnswerMeSenpai. He covers anime music, teaches Japanese 101, and takes on challenges.
7.FUNimation
Total subscribers: 3.65M
1,352,016,338 views
FUNimation brings you anime news series and film to your screen. It offers a preview of upcoming anime series, special interviews with the directors, all the gossips and updates on anime.
8.TeamFourStar
Total subscribers: 3.72M
1,674,687,023 views
TeamFourStar is an anime YouTube channel well known for its skit and prodigy. It does more than just DBZ episodes and ventures into musical parodies and fantasy - a hilarious anime channel.
9. DouchebagChocolat
Total subscribers: 384K
68,846,068 views
DouchebagChocolat is referred to as an anime reviewer channel with pretty in-depth analysis on a variety of famous anime. Despite his inclusion of side commentary and memes, his reviews are critically analyzed and a lovely spot on.
10. Mother’s Basement
Total subscribers: 1.22M
226,841,843 views
Mother’s Basement, also known as Geoff Thew, focuses on going frame by frame to show the brilliance of anime’s greatest hits, scenes, video games, infrastructure, and subsequent failure or success of an anime OP or series.
11. BobSamurai
Total subscribers: 70K
7,461,027 views
BobSamurai also focuses on anime reviews meant for people who would instead enjoy a clear-cut review with to-the-point analysis. He is rather logical and straight in his study putting aside jokes and memes.
12. akidearest
Total subscribers: 2.9M
449,740,063 views
Akidearest is one of the most famous Japanese female anime YouTuber with over 2 million subscribers. She does her skits and travel segments and also covers video games, manga, cosplay, etc. most times, she collaborates with her boyfriend and YouTuber The Anime Man.
13. Iwasaka Miyuki
Total subscribers: 75.1K
5,755,732 views
YouTuber Iwasaka Miyuki uses anime in cosplay in a pretty challenging way. If you’re new to the hobby to immerse yourself in the characters and stories with cosplay completely, we suggest that you check out Iwasaka Miyuki YouTuber for step-by-step tutorials in wigs, makeup, and all cosplay
14. Digibro
Total subscribers: 311K
39,676,317 views
Digibro, now called YGG Studios on YouTube, gives in-depth analyses of video games, anime, and films. His anime videos come packed with info about the production crew, the concept of story-telling, and comparative plotlines.
15. Youlazybum
Total subscribers: 309K
163,665,724 views
Youlazybum has a music video for all types of animation with a phenomenal editing and music style ranging from RWBY, Overwatch to Porter Robinson’s renowned music video called ‘Shelter. Though Youlazybum might fall under the category of your ordinary animation music video, the most distinctive quality about this channel is that the content spans a wide span of animation across the world.
Part 2: Where to Watch Anime Legally?
Watching anime is one of the best things to make your day, and in this article, I will give you a list of channels, excluding YouTube, where you can watch anime legally.
1. Netflix
Netflix became the most popular video streaming platform across the world. It offers online streaming services in different countries after you subscribe to their plans and enjoy unlimited streaming of anime videos.
2. Amazon Prime Video
Amazon Prime Video is also one better way to legally watch varieties of animated videos launched in the United States and only available to Amazon Prime subscribers.
3. Crunchyroll
Crunchyroll is an online anime streaming website in Japan which comes in both free and premium plans where you can watch varieties of animations. For those outside Japan and would love to watch anime with subtitles, Crunchyroll is the best option for you.
Part 3: Create Animated Videos with Excellent Video Editor
Filmora from Wondershare comes as one of the most suitable and quick video editing software for amateur artists and professionals. It assists both Mac and Windows operating systems with 2D/3D animation, keyframes, export/share options to various social media platforms, Filmstock effects store, and 4k editing, consisting of basic and advanced editing tools for anime videos. You can call the Wondershare Filmora a perfect editor for making animated videos on YouTube .
Here is a step-by-step guide to creating anime videos on YouTube using Filmora.
Wondershare Filmora
Get started easily with Filmora’s powerful performance, intuitive interface, and countless effects!
Try It Free Try It Free Try It Free Learn More >
Step 1: Prepare a Script
The first step would be to write a script for the animation story you want to tell.
Step 2: Create a Flowchart
Described like a flowchart the sequence of pre-visualization or images of movie shots to understand how exactly the feel, look, and camera angles of the story.
Step 3: Record the Background Voiceover
Record the Voiceover you want to use in the animation.
Step 4: Edit and Develop Animation
Start the creation process of the animation paper by adding necessary edits to your animations and including the audio mix.
Step 5: Save and Export the Final Video
Do all final edits. After that, if you are satisfied with the result available in the Preview pane, save your video by instantly tapping on Export. More so, there are various loss of offline sharing options for you to showcase your animation video to the world.
Conclusion
Thus, finding the best YouTube channel to watch anime during your free or boring time is one of the best feelings as it helps you stay happy and overcome boredom. Filmora has proven to be one of the best tools for creating animated videos for YouTube channels. More so, this article analyses other platforms to watch animation videos aside from YouTube.
Also read:
- [New] Epic YouTube's Ultimate Magic & Trick Editing Showstoppers
- [Updated] Creating Profit on YouTube The Ultimate List of Top Business Channels
- Crafting Kingdom The Path to YouTube Mastery
- [Updated] Charting the Course for Profitable Youtube Videos
- Seamless Playback Tips & Tricks for Infinite Youtube Views
- Simply Saver Top Mobile Apps for Downloading YouTube Series & Songs
- Mastering the Download of Your YouTube Playlist Today
- [Updated] 10 Best Intro Maker Apps for iPhone and Android
- Craft Your Story Aspect Ratios for Powerful YT Thumbnails
- Elevate Presence by Broadcasting on YouTube + Twitch for 2024
- Pioneering Success with Effective YouTube AdSense Tactics
- Charting Your Path to YouTube Affiliate Status with 10K Vistas Goal
- 2024 Approved 5 Tips to Get More Views with YouTube Optimization [Free Checklist]
- UniquePC Vision Editing with Flawless Sound
- Mastering YouTube Shorts Key Facts
- Average Gain for YouTubers per Ad Exposure, In 2024
- Enhancing Video Success Top 8 YT Thumbnail Strategies for 2024
- [New] Elevating Your Channels' Profits with Impactful and Effective Trailers
- [Updated] Efficient Ad Elimination Select 7 Android AdBlockers
- [Updated] Crafting YouTube Entrance Videos with the Top Tools
- Elevate Your Channel Hit the 10,000 View Mark Fast!
- [New] Channel King & Queen Academy YouTube Excellence
- [Updated] Deciding the Optimal Social Media Platform TikTok Vs. YouTube Shorts
- Speedy Video Processing for YouTube Tricks to Render & Upload Fast
- In 2024, Cashing In on Content The Carminati Effect (AJay)
- Decoding YouTube Shorts All You Need to Understand
- Creating on the Side Balancing Employment with YouTube for 2024
- Build Your Wealth on YouTube A Guide to Creating Content Without Ads
- In 2024, Best Free Downloader Turn YouTube Audio Into Premium MP3s
- YouTube Gold Secrets 5 Proven Marketing Strategies Revealed
- Audiovisual Improvement Voice Changing Apps Reviewed
- The Ultimate Guide to Engaging Viewers and Boosting Traffic on YouTube
- In 2024, Enjoy YouTube Music Anytime with These 23 Essential, No-Cost Audio Extractors
- In 2024, Curious About Sub4sub? Begin With This Comprehensive Guide
- Transformative Strategies for Broadcast Excellence WireCast on YouTube
- [Updated] Aural Adventures Discovering the Top 15 Instructional Music Videos
- In 2024, Elite Collective Photo, Music + Visual Creation Fusion
- Best Video Editing Software Like Sony Vegas for PC
- [Updated] 2024 Approved Steps to Record Your Gameplay on a Nintendo Switch
- In 2024, 3 Methods to Mirror Motorola Razr 40 to Roku | Dr.fone
- In 2024, Detailed guide of ispoofer for pogo installation On Realme Narzo 60 5G | Dr.fone
- In 2024, Life360 Learn How Everything Works On OnePlus Nord N30 5G | Dr.fone
- [New] Elevate Efficiency Discover the Top 8 Social Media Schedulers for 2024
- Capturing Live Streams on FB Top Techniques Revealed
- [New] Capture More Than Memories Adding Fun Filters to Snaps
- [New] Peering Into Popularity Instagram Analytics for You for 2024
- Updated In 2024, The Ultimate List of WhatsApp Status Video Creation Tools Free & Paid
- New 2024 Approved Create Stunning Intros with These Top 10 PC Software
- Title: "[Updated] Enliven YouTube Images A Burst of Neon Flair"
- Author: Brian
- Created at : 2024-05-25 13:24:20
- Updated at : 2024-05-26 13:24:20
- Link: https://youtube-video-recordings.techidaily.com/updated-enliven-youtube-images-a-burst-of-neon-flair/
- License: This work is licensed under CC BY-NC-SA 4.0.
