
![[Updated] Elite Gaming Setup Essentials Revealed](https://www.lifewire.com/thmb/HkQrnB6Inkx8Rh4KIo-rh5RAck0=/400x300/filters:no_upscale():max_bytes(150000):strip_icc():format(webp)/computerkeyboard-5c070d3ec9e77c0001b19701.jpg)
[Updated] Elite Gaming Setup Essentials Revealed
Elite Gaming Setup Essentials Revealed
YouTube Equipment for Gaming Channels - Best Gaming Gears

Richard Bennett
Mar 27, 2024• Proven solutions
You love gaming, you have a lot of know-how to pass on, and you have a magnetic personality: you are ready to become a great YouTube gaming commentator. All you need is gaming gear. We have already listed some of the best YouTube video shooting equipment lists for starting recording videos, here we will run through some of the best YouTube equipment for gaming channels, sorted into categories for game recording, audio, and video (facecam).
YouTube Equipment You Should Have for Gaming Channels [Gaming Gears]
1. Game Recording [Capture Card & Game Recording Software]

Game recording software, or hardware, is what you will use to capture your in-game footage. The worst thing you can do is try to point a camera at the screen of your computer or television; recording your screen directly is a must. What kind of game capture gear you need will depend on what kind of game you are playing.
For recording games on your computer screen, you may only need software, and there are a few quality game recording software out there for free. One popular option among YouTube gamers is called OBS , or ‘Open Broadcaster Software’. OBS is free to download from Obsproject.com. The thing that makes it great for gamers is it can be used for live streaming to YouTube, or other sharing sites like Twitch.tv (which has a focus on gaming videos).
For those who want to record the gameplay with ease and edit the recorded gameplay footage with the same tool, we recommend you to try Filmora , which is a 2-in-1 gameplay recording software and video editor on both Windows and Mac.
The advantages of using Filmora to record YouTube Gameplay video:
- Record 4K gameplay and high-space game
- Record gameplay and webcam at the same time
- Mark the important moment with the Marker feature when playing the game
- Basic video editing tools provide trimming, cutting, and merging features as well as annotation effects


If you are going to be making videos more related to consol games then you may need to invest in a Capture device. One of the best is the Elgato Game Capture HD60 featured above. It captures video directly onto either your Mac or PC, while a lot of the other top capture devices only work with a PC. It can record in 1080p with 60fps, and you can even live stream. The Elgato HD60 is compatible with PS4, Xbox One, Xbox 360, and the Wii U.
2. Audio Recording Devices
Your audio recording is extremely important. The thing that will set you apart from other people posting gaming commentary is your personality, and that will only come across if your videos have clear audio. It does not do you much good to be hilarious in a fuzzy commentary track.
A lot of YouTube gamers, especially gamers who are just starting to make videos, go with the Zalman ZM-Mic1 which can be used in combination with headphones. The Zalman might pick up background sounds, like mouse clicks, which is not ideal. However, it will give you significantly better audio than recording directly from your computer, and at under $10 it will not be a purchase you regret. The Zalman is a great starter-mic, especially if you download the free audio editing program Audacity and use it to clean up the little imperfections in your recording. Audacity can be downloaded at Audacityteam.org.
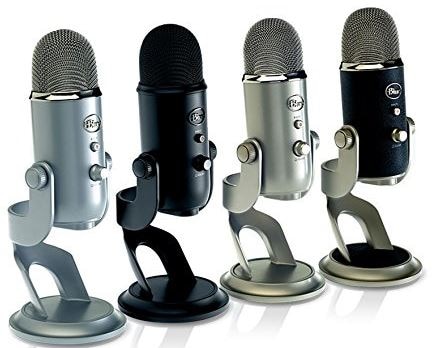
If you are looking for more control over your recording then you should consider the Blue Yeti Mic, which is featured above. This standalone mic is also used by a lot of vloggers and YouTube gamers. It has volume control and even a mute button. It plugs right into the USB drive of your computer using a ten-foot cable, which means you can take it pretty far from your computer. The Blue Yeti USB mic costs about $130.
Check our best list of audio recording devices: Best Microphones for YouTubers
3. Video Recording Devices

If you are going to add a facecam into your videos then it should be high quality, but it does not need to be a top-of-the-line 4K recording. Rather than buying a $1000 DSLR for reaction shots, you should go with a reliable webcam. Before you make a decision about what kind of webcam to get consider how often you will be using your facecam. Not all gaming videos need one. If you play a lot of survival horror games then your reactions will be a key element in your videos, but if you are not playing games that will cause you to have amusing reactions then a facecam will not really add anything to a viewer’s experience.
You may also like: how to use DSLR as a webcam
If your facecam is going to be an important element in your channel then you should expect to spend around $100 on your webcam. The above image is the Logitech C920, which is one of the best at this price point. It performs well in low light, has a good auto-focus feature, and the quality of its video recordings is quite high.
If you are only going to use a facecam occasionally then consider the Genius WideCam F100, which can be found online for around $30. Its 1080p HD recordings are not as smooth as they should be, but it performs very well at 720p and that is all you should need.
Check more options for the Best webcams for YouTuber
Conclusion
Once you have these gaming recording devices, you can now go to record a gameplay and upload it to YouTube. Before you move on, do check these 10 tips for shooting professional YouTube videos . In case you need to trim and edit the recorded gameplay video and present the most exciting moments, you can use some of the best video editing software for YouTube . Here, we recommend you try the Filmora video editor to achieve your goal.
Why choose Filmora to edit recorded YouTube gameplay videos?
- Intuitive interface for saving time
- Trim Video and Audio Quickly
- Record commentary and voiceover with ease or add royalty-free music sound from the Music Library
- 300+ stylish video effects built-in and more in Filmora Effect Store
- Upload to YouTube directly
In case you didn’t know Filmora before, here is a video tutorial for beginners about Filmora video editor, check and download it to edit your YouTube today.
Richard Bennett
Richard Bennett is a writer and a lover of all things video.
Follow @Richard Bennett
Richard Bennett
Mar 27, 2024• Proven solutions
You love gaming, you have a lot of know-how to pass on, and you have a magnetic personality: you are ready to become a great YouTube gaming commentator. All you need is gaming gear. We have already listed some of the best YouTube video shooting equipment lists for starting recording videos, here we will run through some of the best YouTube equipment for gaming channels, sorted into categories for game recording, audio, and video (facecam).
YouTube Equipment You Should Have for Gaming Channels [Gaming Gears]
1. Game Recording [Capture Card & Game Recording Software]
Game recording software, or hardware, is what you will use to capture your in-game footage. The worst thing you can do is try to point a camera at the screen of your computer or television; recording your screen directly is a must. What kind of game capture gear you need will depend on what kind of game you are playing.
For recording games on your computer screen, you may only need software, and there are a few quality game recording software out there for free. One popular option among YouTube gamers is called OBS , or ‘Open Broadcaster Software’. OBS is free to download from Obsproject.com. The thing that makes it great for gamers is it can be used for live streaming to YouTube, or other sharing sites like Twitch.tv (which has a focus on gaming videos).
For those who want to record the gameplay with ease and edit the recorded gameplay footage with the same tool, we recommend you to try Filmora , which is a 2-in-1 gameplay recording software and video editor on both Windows and Mac.
The advantages of using Filmora to record YouTube Gameplay video:
- Record 4K gameplay and high-space game
- Record gameplay and webcam at the same time
- Mark the important moment with the Marker feature when playing the game
- Basic video editing tools provide trimming, cutting, and merging features as well as annotation effects
If you are going to be making videos more related to consol games then you may need to invest in a Capture device. One of the best is the Elgato Game Capture HD60 featured above. It captures video directly onto either your Mac or PC, while a lot of the other top capture devices only work with a PC. It can record in 1080p with 60fps, and you can even live stream. The Elgato HD60 is compatible with PS4, Xbox One, Xbox 360, and the Wii U.
2. Audio Recording Devices
Your audio recording is extremely important. The thing that will set you apart from other people posting gaming commentary is your personality, and that will only come across if your videos have clear audio. It does not do you much good to be hilarious in a fuzzy commentary track.
A lot of YouTube gamers, especially gamers who are just starting to make videos, go with the Zalman ZM-Mic1 which can be used in combination with headphones. The Zalman might pick up background sounds, like mouse clicks, which is not ideal. However, it will give you significantly better audio than recording directly from your computer, and at under $10 it will not be a purchase you regret. The Zalman is a great starter-mic, especially if you download the free audio editing program Audacity and use it to clean up the little imperfections in your recording. Audacity can be downloaded at Audacityteam.org.
If you are looking for more control over your recording then you should consider the Blue Yeti Mic, which is featured above. This standalone mic is also used by a lot of vloggers and YouTube gamers. It has volume control and even a mute button. It plugs right into the USB drive of your computer using a ten-foot cable, which means you can take it pretty far from your computer. The Blue Yeti USB mic costs about $130.
Check our best list of audio recording devices: Best Microphones for YouTubers
3. Video Recording Devices
If you are going to add a facecam into your videos then it should be high quality, but it does not need to be a top-of-the-line 4K recording. Rather than buying a $1000 DSLR for reaction shots, you should go with a reliable webcam. Before you make a decision about what kind of webcam to get consider how often you will be using your facecam. Not all gaming videos need one. If you play a lot of survival horror games then your reactions will be a key element in your videos, but if you are not playing games that will cause you to have amusing reactions then a facecam will not really add anything to a viewer’s experience.
You may also like: how to use DSLR as a webcam
If your facecam is going to be an important element in your channel then you should expect to spend around $100 on your webcam. The above image is the Logitech C920, which is one of the best at this price point. It performs well in low light, has a good auto-focus feature, and the quality of its video recordings is quite high.
If you are only going to use a facecam occasionally then consider the Genius WideCam F100, which can be found online for around $30. Its 1080p HD recordings are not as smooth as they should be, but it performs very well at 720p and that is all you should need.
Check more options for the Best webcams for YouTuber
Conclusion
Once you have these gaming recording devices, you can now go to record a gameplay and upload it to YouTube. Before you move on, do check these 10 tips for shooting professional YouTube videos . In case you need to trim and edit the recorded gameplay video and present the most exciting moments, you can use some of the best video editing software for YouTube . Here, we recommend you try the Filmora video editor to achieve your goal.
Why choose Filmora to edit recorded YouTube gameplay videos?
- Intuitive interface for saving time
- Trim Video and Audio Quickly
- Record commentary and voiceover with ease or add royalty-free music sound from the Music Library
- 300+ stylish video effects built-in and more in Filmora Effect Store
- Upload to YouTube directly
In case you didn’t know Filmora before, here is a video tutorial for beginners about Filmora video editor, check and download it to edit your YouTube today.
Richard Bennett
Richard Bennett is a writer and a lover of all things video.
Follow @Richard Bennett
Antique Cinematography in the Digital Realm
How to Create Vintage Videos: A Comprehensive Tutorial
Richard Bennett
Mar 27, 2024• Proven solutions
“Every accomplishment starts with a decision to try.” – A Vintage Thought

Vintage videos are ultimately the retro videos you have ever imagined. The look is highly inspirational in itself. The vintage effect in photography and videos results in a must-see look that everyone wants to capture all day long. The meaning of vintage is ‘the time when something of quality was produced.’ When something is called retro, it means old, recognized, and essential. Vintage also resembles love apart from videos and photos. All in all, it’s a positive and result-oriented thing to carry on in your videos. And this is what we want to mention in this post relating to the creation of vintage videos.
Here are some vintage-style video ideas for you to have a look at.
- Part 1: What to Consider When Shooting a Vintage Video?
- Part 2: How to Create a Stunning Vintage Video?
- Part 3: Tips to Make Your Vintage Videos Stand Out
What to Consider When Shooting a Vintage Video?
Vintage videos are kind of old school vibes and must be shooting accordingly by keeping in mind the following points. These are a sort of expert tips given by photographers based on their practical experience. First of all, you have to understand that a video can be made vintage, but you can’t change the actual environment of shooting. Some editing always involves there in every project out there. Still, the tips given below will help you a lot in creating a retro look.
Use Vintage Lenses
The very first helpful tip is to use a vintage lens. They allow chromatic aberration by distorting colors around the frame. Furthermore, you can find various kinds of lenses in terms of a vintage effect.
Decrease Contrast
Do the correct color grading by reducing the contrast a little bit. You must not level the retro videos in black or white or like-new videos. You can simply add a contrasting effect and then reduce it to have that vintage look.
Keep it a little soft
If you have ever noticed, the vintage videos are a little soft and look like degraded with time. It’s a result of decreased sharpness in the camera’s menu settings. You can even add a slight blur to the final video or simply use recognized software made for video editing .
Brighten up the black levels
Lots of black points in the video are not ideal for a vintage effect. The suitable approach is to bring up black levels and make it dark gray instead of inky black. This look can be achieved either by levels effect or curves effect in your editing software.
Reduce Saturation levels
Bringing down the saturation levels is another tip to create a vintage effect. The old videos are also absent in bright colors. Don’t go too crazy about reduction as 20%-30% saturation level is more than enough.
How to Create a Stunning Vintage Video?
What you need to get started as both beginner and professional is Wondershare Filmora Video Editor. It is a highly recommended software to create vintage videos. The intuitive user interface and lots of editing functions are helpful for a video editor. It has both primary as well as advanced editing programs to check. It has various advanced color tuning tools to promote the making of original videos. It features tint, temperature, Vignette, 3D Luts, Lights, and so on.
Steps for the vintage effect to videos on Wondershare Filmora Video Editor
Step 1: Upload video & make specific changes

The very step is to add the video by clicking the + icon. We have added the three sample videos from the library of Wondershare Filmora itself. Adjust them in the timeline as per your requirements.
After doing all the essential editing functions, click on the Effects tab given at the upper-left corner. Simply type the word Old in the Search tab.
The Old Video filter will immediately appear in the list of filters. Tap the “+” icon in Old Video filter to add to the timeline. Drag its ends right or left to adjust the duration.
Step 2: Apply White & Black Filters

The second step is to apply the Black & White filters. Go to the Effects tab and explore five Black & White filters available. Each of these filters is quite different and must be applied accordingly. Check the aesthetic of your video clip before any filter application to retro videos.
Step 3: Add the Sun Kissed or Sepia Tone Rise Filters to the video clip

There are various other categories of filters you can apply, such as Retro, Sun Kissed, and Sepia Tone, etc. The features of Filmora also present several subcategories such as Faux Film or Shake.

On the other hand, the subcategory of Sepia Tone features Sun-Kissed & Rise Filters to stimulate sepia-tinted texture and recreate the old visual style. The Sun Kissed filter presents brown and red colors to give that warm image atmosphere.
Step 4: Desaturate Video Clip

Now, you need to desaturate the video clip with Ash & Willow filters. We have typed Ash in the Search bar, and you can see the filter below. These filters are essential to desaturate the video with preset contrast, brightness, or exposure values.

Then, we have combined the black & white filter with an overlay of Film Reel Horizontal. It will help you sell the effect and make the video look more authentic. However, the only application of Black & White or Ash & Willow filters is not going to make any creative thing in terms of vintage videos. You have to mix overlays with features such as Random Dust or Film Reel Horizontal.
Step 5: Apply Black & White and Old Film Color Correction Presets to the video
You can also access the Advanced color correction Tab of Filmora from the Color button. It also features Preset and Adjusts Tabs to desaturate footage. The Preset presents a variety of options, including Black & White and Old Film. You just need to right-click the particular preset and select the Apply option.

Tips to Make Your Vintage Videos Stand Out
Following the helpful tips would assist you in creating awesome retro videos.
- You can use various vintage apps such as Retro VHS, RTRO Camera, 8mm, Camcorder, VSCO, etc. Or, despite using these limited apps, you can directly use our preferred video editing software called Wondershare Filmora.
- If you use a specific vintage camera, keep it on low highlights and low contrasts. Use color grading, as we have discussed above. They help to provide the ultimate old-school effect.
- Always keep low saturation settings for shooting vintage videos. Take control over Saturation, Hue, and Luminance of video.
- Add overlays and respective filters to recreate a required vintage look. You must add things that dust, scratch, and grain the heck out from the video that you have created.
- Lower the frame rate or FPS to create an excellent vintage look. You can make it to 18 or 14 FPS depending upon the aesthetic requirements.
- Keep an eye on black and white filters you have used. It’s because more of a black and white can ruin the actual vintage experience.
Conclusion
So, this is an ultimate tutorial on the creation of vintage videos. We Hope you have admired the steps and our recommended video editing software. Vintage means grand, and thus you should make it amazing as well. It is the reason we have stated all facts regarding the vintage effect in our post above. Wondering how to add such effect in FCPX? check this article:How to Create a Vignette in Final Cut Pro X?
Surely give a read and thank us later!
Richard Bennett
Richard Bennett is a writer and a lover of all things video.
Follow @Richard Bennett
Richard Bennett
Mar 27, 2024• Proven solutions
“Every accomplishment starts with a decision to try.” – A Vintage Thought
Vintage videos are ultimately the retro videos you have ever imagined. The look is highly inspirational in itself. The vintage effect in photography and videos results in a must-see look that everyone wants to capture all day long. The meaning of vintage is ‘the time when something of quality was produced.’ When something is called retro, it means old, recognized, and essential. Vintage also resembles love apart from videos and photos. All in all, it’s a positive and result-oriented thing to carry on in your videos. And this is what we want to mention in this post relating to the creation of vintage videos.
Here are some vintage-style video ideas for you to have a look at.
- Part 1: What to Consider When Shooting a Vintage Video?
- Part 2: How to Create a Stunning Vintage Video?
- Part 3: Tips to Make Your Vintage Videos Stand Out
What to Consider When Shooting a Vintage Video?
Vintage videos are kind of old school vibes and must be shooting accordingly by keeping in mind the following points. These are a sort of expert tips given by photographers based on their practical experience. First of all, you have to understand that a video can be made vintage, but you can’t change the actual environment of shooting. Some editing always involves there in every project out there. Still, the tips given below will help you a lot in creating a retro look.
Use Vintage Lenses
The very first helpful tip is to use a vintage lens. They allow chromatic aberration by distorting colors around the frame. Furthermore, you can find various kinds of lenses in terms of a vintage effect.
Decrease Contrast
Do the correct color grading by reducing the contrast a little bit. You must not level the retro videos in black or white or like-new videos. You can simply add a contrasting effect and then reduce it to have that vintage look.
Keep it a little soft
If you have ever noticed, the vintage videos are a little soft and look like degraded with time. It’s a result of decreased sharpness in the camera’s menu settings. You can even add a slight blur to the final video or simply use recognized software made for video editing .
Brighten up the black levels
Lots of black points in the video are not ideal for a vintage effect. The suitable approach is to bring up black levels and make it dark gray instead of inky black. This look can be achieved either by levels effect or curves effect in your editing software.
Reduce Saturation levels
Bringing down the saturation levels is another tip to create a vintage effect. The old videos are also absent in bright colors. Don’t go too crazy about reduction as 20%-30% saturation level is more than enough.
How to Create a Stunning Vintage Video?
What you need to get started as both beginner and professional is Wondershare Filmora Video Editor. It is a highly recommended software to create vintage videos. The intuitive user interface and lots of editing functions are helpful for a video editor. It has both primary as well as advanced editing programs to check. It has various advanced color tuning tools to promote the making of original videos. It features tint, temperature, Vignette, 3D Luts, Lights, and so on.
Steps for the vintage effect to videos on Wondershare Filmora Video Editor
Step 1: Upload video & make specific changes
The very step is to add the video by clicking the + icon. We have added the three sample videos from the library of Wondershare Filmora itself. Adjust them in the timeline as per your requirements.
After doing all the essential editing functions, click on the Effects tab given at the upper-left corner. Simply type the word Old in the Search tab.
The Old Video filter will immediately appear in the list of filters. Tap the “+” icon in Old Video filter to add to the timeline. Drag its ends right or left to adjust the duration.
Step 2: Apply White & Black Filters
The second step is to apply the Black & White filters. Go to the Effects tab and explore five Black & White filters available. Each of these filters is quite different and must be applied accordingly. Check the aesthetic of your video clip before any filter application to retro videos.
Step 3: Add the Sun Kissed or Sepia Tone Rise Filters to the video clip
There are various other categories of filters you can apply, such as Retro, Sun Kissed, and Sepia Tone, etc. The features of Filmora also present several subcategories such as Faux Film or Shake.
On the other hand, the subcategory of Sepia Tone features Sun-Kissed & Rise Filters to stimulate sepia-tinted texture and recreate the old visual style. The Sun Kissed filter presents brown and red colors to give that warm image atmosphere.
Step 4: Desaturate Video Clip
Now, you need to desaturate the video clip with Ash & Willow filters. We have typed Ash in the Search bar, and you can see the filter below. These filters are essential to desaturate the video with preset contrast, brightness, or exposure values.
Then, we have combined the black & white filter with an overlay of Film Reel Horizontal. It will help you sell the effect and make the video look more authentic. However, the only application of Black & White or Ash & Willow filters is not going to make any creative thing in terms of vintage videos. You have to mix overlays with features such as Random Dust or Film Reel Horizontal.
Step 5: Apply Black & White and Old Film Color Correction Presets to the video
You can also access the Advanced color correction Tab of Filmora from the Color button. It also features Preset and Adjusts Tabs to desaturate footage. The Preset presents a variety of options, including Black & White and Old Film. You just need to right-click the particular preset and select the Apply option.
Tips to Make Your Vintage Videos Stand Out
Following the helpful tips would assist you in creating awesome retro videos.
- You can use various vintage apps such as Retro VHS, RTRO Camera, 8mm, Camcorder, VSCO, etc. Or, despite using these limited apps, you can directly use our preferred video editing software called Wondershare Filmora.
- If you use a specific vintage camera, keep it on low highlights and low contrasts. Use color grading, as we have discussed above. They help to provide the ultimate old-school effect.
- Always keep low saturation settings for shooting vintage videos. Take control over Saturation, Hue, and Luminance of video.
- Add overlays and respective filters to recreate a required vintage look. You must add things that dust, scratch, and grain the heck out from the video that you have created.
- Lower the frame rate or FPS to create an excellent vintage look. You can make it to 18 or 14 FPS depending upon the aesthetic requirements.
- Keep an eye on black and white filters you have used. It’s because more of a black and white can ruin the actual vintage experience.
Conclusion
So, this is an ultimate tutorial on the creation of vintage videos. We Hope you have admired the steps and our recommended video editing software. Vintage means grand, and thus you should make it amazing as well. It is the reason we have stated all facts regarding the vintage effect in our post above. Wondering how to add such effect in FCPX? check this article:How to Create a Vignette in Final Cut Pro X?
Surely give a read and thank us later!
Richard Bennett
Richard Bennett is a writer and a lover of all things video.
Follow @Richard Bennett
Also read:
- Mastering Morning Tweets Essential Rules & Prohibitions
- From Novice to Pro Building a High-Quality Unboxing Series
- The Evolution of YouTube Shorts Popularity Metrics
- Virtual Persona Journey in Online Entertainment Sphere
- Crafting Professional Content on YouTube via Enhancements
- [New] Crafting Spectacular Unboxing Content Step-by-Step
- 2024 Approved Elevate Your Video Game YouTube Production Mastery
- The Editor's Codex Innovations in Youtube Video Formatting
- The Uncharted Territory of YouTube's Unlisted Content
- [New] 2024 | How to Make a YouTube Intro Video?
- Top Tunes on TV YouTube's Prime Music Groups
- 2024 Approved Celebrating Clickers Channel & Buttons Incentives
- [Updated] Enhance Your Online Presence with These 50 Complimentary Banners
- Drive Engagement Crafting an Animated Subscribe Button in Filmora's Step-by-Step Guide
- Finding Equilibrium Between Professional Life and YouTubing
- Elevate Your Channel's Standing with These Tactics
- Optimize Your YouTube Content for Maximum Viewership and Engagement
- How User-Generated Feedback Influences Video Ranks
- [Updated] Best Soundshapers for Content Makers on YouTube
- Event-Ready Top DJ Templates Download Guide for 2024
- A Deep-Dive Into Digital Platform Wealth Dailymotion & YouTube Comparison
- Unlinking From YouTube Shorts - The Complete Process
- Premium 7 Cameras Boosting Vlogging Creativity & Viewership
- [New] Essential Guide for Prime Webcams in YouTube Live Broadcasts
- 2024 Approved Boost Your View Count Explore These 12 Effective YouTube Strategies
- [Updated] Blitz Broadcasting Channel Your Playlist Swiftly
- In 2024, Decoding YouTube's Best Video Editing Practices
- In 2024, Crafting an Efficient YouTube Subscription Path
- Best Study Partners in History Top 10 Youtubers & Channels
- 2024 Approved Convert Spotify Playlist To YouTube 5 Best Tools
- In 2024, Designing a YouTube Subscription Shortcut URL
- The Ultimate Method for Discovering Hidden Vids
- In 2024, Building a Professional Online Brand as a Game Vlogger
- Coordinating a Course Through Combined YouTube Watches for 2024
- Cultivating Connection, Not Compulsion in Subscriptions
- In 2024, Best Practices for YouTube Thumbnail Dimensions
- Tracking YouTube's Signature Interactions
- [Updated] Creating Custom Subscribe URLs for Online Content
- Affordable Advertising Streamlining Channel-Sponsorship Partnerships
- 2024 Approved Educational Synergy Enhancing Learning with YouTube Videos
- Rapid Ascendancy on YouTube Top Videos Shattering the 100MM Barrier
- In 2024, Eliminating Odd Shades A Step-by-Step Guide to Flawless Greenscreens
- In 2024, Crafting Captivating Thumbnails A Digital Marketer's Guidebook
- In 2024, Channel Name Inspiration Strategies for Success
- Essential Screen Recording Software List for Vloggers
- [New] Bring Your Spotify Mixes Online 5 Top Playlist Conversion Apps for YouTube
- [Updated] Beginner's Guide Capturing YouTube Videos as Screencasts Without Payment
- Thinking About Changing Your Netflix Region Without a VPN On Poco X6? | Dr.fone
- 2024 Approved Exclusive List of Premium Screen-Free Gaming on Android Devices
- [New] In 2024, Free MP4 Screen Capture Toolkit Released
- Updated The Ultimate Guide to Make a Text Collage for 2024
- In 2024, Top 10 Telegram Spy Tools On Vivo Y200 for Parents | Dr.fone
- [New] Discovering Nitro in Discord Its Significance and Access Methods
- 2024 Approved Countdown Creation in OBS Step-by-Step Guide
- Does Airplane Mode Turn off GPS Location On Xiaomi Redmi Note 13 Pro 5G? | Dr.fone
- How to Fix Android App Not Installed Error on Vivo V30 Lite 5G Quickly? | Dr.fone
- [Updated] In 2024, Unlock Your Viewing Pleasure with Budget-Friendly Recording Tools
- [Updated] In 2024, Securely Snapshot Streaming Top 6 Techniques for Netflix on Mac
- [New] Stop OBS From Skipping Audio for 2024
- Authentication Error Occurred on Motorola Moto E13? Here Are 10 Proven Fixes | Dr.fone
- In 2024, How to Bypass Android Lock Screen Using Emergency Call On Oppo A38?
- In 2024, Rookie Capture Assessment Overview
- [New] Street Saga Best Gaming Matches to GTA V
- In 2024, 3 Ways to Unlock Your Apple iPhone 12 for Free
- 2024 Approved Scour the Soundscape of Laughter and Whimsy
- Unlocking Made Easy The Best 10 Apps for Unlocking Your Vivo Y36 Device
- Quickly Remove Google FRP Lock on Find N3 Flip
- How To Bypass iCloud By Checkra1n Even On Apple iPhone 15 Pro Max If Youve Tried Everything
- Aerial Autonomy Groups for 2024
- In 2024, Apply Spiral Depth Enhancement to Images PSX
- Selecting the Best HDR Cameras Simplified
- 5 Ways to Track Motorola Edge 2023 without App | Dr.fone
- New Best 12 Sports Streaming Sites (Free & Paid)
- The Insider’s Handbook for Instagram's Audio Emoji Placement for 2024
- New MKV Video Editing Made Easy Top Mac Trimmers 2023
- [Updated] The Ultimate List 11 Premium Sound Recording Tools for 2024
- New 2024 Approved The Complete Guide to Converting GIF to SVG With Ease
- Top Voice Harmonizing Tools to Enhance Live Performances Online for 2024
- How to Change Your Location on Apple iPhone 7 | Dr.fone
- Unlock Your Device iCloud DNS Bypass Explained and Tested, Plus Easy Alternatives On Apple iPhone SE
- Ideal Approaches to Mobile Content Preservation for 2024
- Can I view AVCHD .mts files on Xiaomi 13T Pro?
- Top 5 Online Video Converter for Instagram 2024
- How to Fix the Soft Bricked ZTE Axon 40 Lite? | Dr.fone
- New Locating High-Quality Sounds of Onomatopoeic Klaps
- Updated Best Video Editing Apps with Built-In Music Libraries for 2024
- [Updated] In 2024, Twists That Tell Stories Crafting Captivating Visual Narratives on Instagram Platforms
- [Updated] In 2024, Synchronize Your Video with Instagram's Aesthetics
- 2 Ways to Transfer Text Messages from Lava Storm 5G to iPhone 15/14/13/12/11/X/8/ | Dr.fone
- Title: [Updated] Elite Gaming Setup Essentials Revealed
- Author: Brian
- Created at : 2024-05-25 13:23:07
- Updated at : 2024-05-26 13:23:07
- Link: https://youtube-video-recordings.techidaily.com/updated-elite-gaming-setup-essentials-revealed/
- License: This work is licensed under CC BY-NC-SA 4.0.
