
![[Updated] Eliminate Background Noise From Online Video Content](https://www.lifewire.com/thmb/zj201Axi8jseO3Un9DsFf_rT4l8=/400x300/filters:no_upscale():max_bytes(150000):strip_icc()/how-to-use-guest-mode-with-google-assistant-5112591-9-199dfa150c3a4f2cbaff3e8d93b358ef.jpg)
[Updated] Eliminate Background Noise From Online Video Content
Eliminate Background Noise From Online Video Content
How To Remove Background Noise from Your Youtube Video

Richard Bennett
Mar 27, 2024• Proven solutions
There are few things more annoying to viewers on YouTube than background noise. It is distracting and makes it difficult to engage with the content of a video. If there is noticeable background noise in a video, even a small noise like the faint hum of a computer fan, then it will increase the chances of viewers clicking away. The good news is that these kinds of noises are fairly easy to get rid of.
In order to remove background noise from your video clip, you will first need to create an MP3 of your audio. Then you will be able to take out the unwanted noise in a free program called Audacity and reintroduce your corrected audio into your Filmora project. This article will walk you through the audio editing process.

How To Remove Background Noise from Your Youtube Video
Background Noise Removal


Open up Filmora, import your clip, and drag it into the timeline. Then, play your clip and listen for background noise. If you hear a noise that you wish to remove move on to the first step of background noise removal .
1. Creating An MP3
If you do not already have it you will need to download VLC Media Player from videoLAN.org. VLC is a completely free media player that can play almost any type of file, is great for converting files, and can even be used as a screen recorder. If you consume a lot of media online then chances are you already have VLC. You could also use is Free Video to MP3 Converter by DVDVideoSoft.
If you choose to use VLC, open it up and select Convert/Save under Media. Select your video in the Open Media window that pops up. After you click Convert/Save you will be able to choose your format, in this case, MP3, under Save as type.
2. Removing Background Noise in Audacity
You can download Audacity for free at Audacityteam.org.
Once you have Audacity use it to open your MP3. Then, find a section of your audio that is silent aside from your background noise and highlight it by clicking and dragging. The idea is to point out to the program exactly what sound is a problem for you so it knows what to remove. If you have trouble finding a significant stretch of background noise that does not also include dialogue remember to record a pause before or after the content of your video next time you film.
With your section of background noise highlighted, go to Effect and then Noise Reduction. Then, click on Get Noise Profile. After that, you will select your entire audio timeline before going back to Noise Reduction under Effect. This time click on OK (the default settings are the best in most situations so you do not need to worry about changing them).
Audacity will remove everything that sounds like the sound profile, eliminating your background noise. Sometimes this method will also dull your dialogue, which can be fixed by selecting your entire track and then going to Effect and Amplify. Increasing amplification will fix any muffling of your audio.
3. Syncing in Filmora
Export your corrected MP3 from Audacity and import it into Filmora. Then, drag it into your music track. Syncing your audio should not be difficult, but you can always use your original audio to help you line it up properly if you need to. Just look for a significant spike in your audio waves in both your MP3 and the original audio and make sure they are right on top of each other.
Then, since you no longer need your original audio, you can delete it. Right-click on your clip and select Audio Detach. Once your audio is on its own track just select it and click delete.
Covering Background Noise
Sometimes background noise is so minor that you do not want to bother going through the process of removing it. In these situations, it may be easier to cover up your background noise than to remove it. This is as simple as dragging a song into the music track of your timeline and adjusting its volume so it is not loud enough to draw attention away from your dialogue. Chances are you want to add background music anyways and this is not even an extra step.
Richard Bennett
Richard Bennett is a writer and a lover of all things video.
Follow @Richard Bennett
Richard Bennett
Mar 27, 2024• Proven solutions
There are few things more annoying to viewers on YouTube than background noise. It is distracting and makes it difficult to engage with the content of a video. If there is noticeable background noise in a video, even a small noise like the faint hum of a computer fan, then it will increase the chances of viewers clicking away. The good news is that these kinds of noises are fairly easy to get rid of.
In order to remove background noise from your video clip, you will first need to create an MP3 of your audio. Then you will be able to take out the unwanted noise in a free program called Audacity and reintroduce your corrected audio into your Filmora project. This article will walk you through the audio editing process.
How To Remove Background Noise from Your Youtube Video
Background Noise Removal
Open up Filmora, import your clip, and drag it into the timeline. Then, play your clip and listen for background noise. If you hear a noise that you wish to remove move on to the first step of background noise removal .
1. Creating An MP3
If you do not already have it you will need to download VLC Media Player from videoLAN.org. VLC is a completely free media player that can play almost any type of file, is great for converting files, and can even be used as a screen recorder. If you consume a lot of media online then chances are you already have VLC. You could also use is Free Video to MP3 Converter by DVDVideoSoft.
If you choose to use VLC, open it up and select Convert/Save under Media. Select your video in the Open Media window that pops up. After you click Convert/Save you will be able to choose your format, in this case, MP3, under Save as type.
2. Removing Background Noise in Audacity
You can download Audacity for free at Audacityteam.org.
Once you have Audacity use it to open your MP3. Then, find a section of your audio that is silent aside from your background noise and highlight it by clicking and dragging. The idea is to point out to the program exactly what sound is a problem for you so it knows what to remove. If you have trouble finding a significant stretch of background noise that does not also include dialogue remember to record a pause before or after the content of your video next time you film.
With your section of background noise highlighted, go to Effect and then Noise Reduction. Then, click on Get Noise Profile. After that, you will select your entire audio timeline before going back to Noise Reduction under Effect. This time click on OK (the default settings are the best in most situations so you do not need to worry about changing them).
Audacity will remove everything that sounds like the sound profile, eliminating your background noise. Sometimes this method will also dull your dialogue, which can be fixed by selecting your entire track and then going to Effect and Amplify. Increasing amplification will fix any muffling of your audio.
3. Syncing in Filmora
Export your corrected MP3 from Audacity and import it into Filmora. Then, drag it into your music track. Syncing your audio should not be difficult, but you can always use your original audio to help you line it up properly if you need to. Just look for a significant spike in your audio waves in both your MP3 and the original audio and make sure they are right on top of each other.
Then, since you no longer need your original audio, you can delete it. Right-click on your clip and select Audio Detach. Once your audio is on its own track just select it and click delete.
Covering Background Noise
Sometimes background noise is so minor that you do not want to bother going through the process of removing it. In these situations, it may be easier to cover up your background noise than to remove it. This is as simple as dragging a song into the music track of your timeline and adjusting its volume so it is not loud enough to draw attention away from your dialogue. Chances are you want to add background music anyways and this is not even an extra step.
Richard Bennett
Richard Bennett is a writer and a lover of all things video.
Follow @Richard Bennett
The Ultimate Guide to Boosting YouTube Engagement
How to Optimize YouTube Tags/Title/Description for More Views
Richard Bennett
Mar 27, 2024• Proven solutions
Making awesome video content is just the first hurdle to overcome. Getting people to watch them is the next and a much bigger obstacle in your path. Just as a blogger must work hard to get people to read their blog, so a YouTuber needs to find ways to get more views on their videos.
For any piece of content on the internet, discoverability is key to exposure. After all, nobody will watch your video or read your blog if they can’t find it, right? A blogger would do this by lacing their content with SEO - search engine optimization. But how can a YouTuber do the same? The answer lies in something known as YouTube tags optimization. In this article, we will let you know how to add, edit and optimize YouTube tags easily for more views, and some tips on YouTube title and description.
Quick Jump Menu
- What are YouTube tags and why they are so important
- How to come up with YouTube tags and optimize them
- How to Tag YouTube and Add Title, Description
- How to Improve YouTube video Metadata: Tags, Title, Description
- Tips for Tagging YouTube and Writing Title, Description
Before we get started, I want to recommend the best video editing software for YouTubers - Wondershare Filmora , an easy to use while powerful video editor that allows you not only to cut, split, crop, resize, reverse your videos, but also offers you multiple video effects specially designed for Fashion, Beauty, Gaming, Travel, Education, etc. Check the video to know more fantastic features:
Download Mac Version ](https://tools.techidaily.com/wondershare/filmora/download/ )
Part 1: What are YouTube tags and why they are so important
YouTube tags are used when you upload a video on YouTube. You need to specify the type of video. In other words, you need to describe your video with keywords. But you might think about why you need to add these words. YouTube can’t figure out what my videos are about? Unfortunately, YouTube can’t though its algorithm is much more advanced than before.
You must know the competition between videos is furious since 500 hours of video per minute are uploaded on YouTube . In this case, it is important to let the YouTube algorithm know your video by adding related tags to have a higher ranking. So the better tags we choose, the higher chance to rank in the top 1, which means you will get more views!
Using YouTube meta tags wisely can broaden your reach and help new people discover your content. However, don’t be tempted to insert irrelevant tags just because you know they are high traffic. You will be found out and penalized as a result. Just as you did with your description, research your keywords, place the most important ones first and use as many as you can.
What are the three YouTube tag types?
YouTube has three different types of tags and each of them has a specific purpose. The tags are-
Specific – The specific tag types are keywords-oriented. These keywords specifically pertain to the content of your video. In this tag type, the particular video is highlighted with the keyword tags. Often while typing the keywords in your mind, YouTube suggests phrases and keywords according to the content of your video. You may apply the suggestions and also add more general or common versions of the same keywords.
Compound – The compound tags are usually using more than two words. Many a time it is seen that users prefer tagging the complete title of the video. If you are using your video title as the compound tag, ensure that you do not include the prepositions like or, as, and, etc. This is because YouTube allows just 500 characters in the title and ignore the prepositions. It is always advised to use all the 500 characters YouTube has allowed without wasting the characters on prepositions as it will automatically be ignored.
Generic – The generic tags are the ones that describe the entire video in one or two words. These tags are used in all the videos of yours. These tags are used across your channel for all the videos you post. It is important to have such general constant tags.
Part 2: How to add YouTube tags and optimize them
The more relevant tags you add, the better it is. The best part is YouTube doesn’t restrict the number of tags but adding all is not possible and adding something irrelevant doesn’t make sense. So, your YouTube video tags must be the smart ones for more views. Educated tagging is what is required.
1. Brand-Specific Tags Addition - Every business wants their brand name to show up in the search results on YouTube and Google. Self-referencing your video or tagging your brand name in a number of variations is a smart way of letting others know your brand.
2. Using YouTube Auto Suggest – Play with the search option on YouTube and check out the YouTube suggestions when you search. Try to recognize the common videos that pop up while searching for something important and relevant to yours. Try searching for random keywords according to your YouTube search experience.
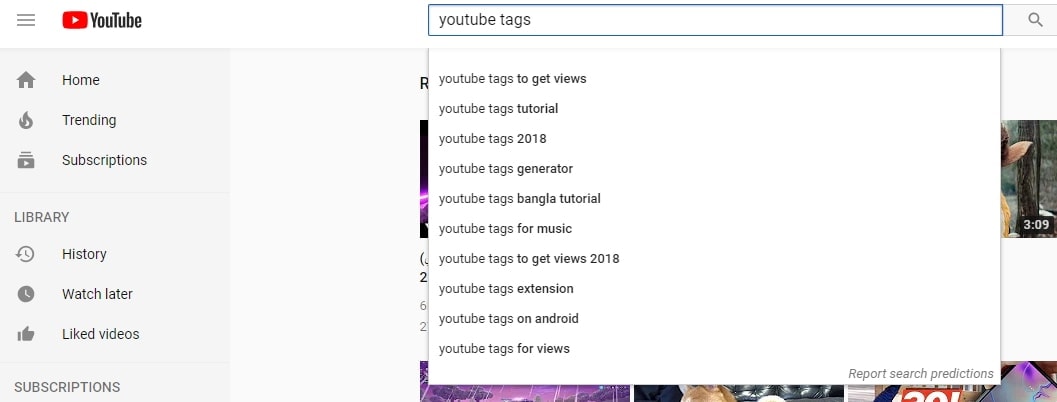
3. Use the YouTube Keyword Search Tool – Lastly, you may use the YouTube keyword suggestion tool. It helps you to extract the relevant keywords from the videos of your competitors and create suggestions according to the basic term provided by you.
4. Use Specific Tags - After using tools, you need to narrow down your tags specifically, like tags “learn 3D paper cutting”. The search volume may not be huge, but these kinds of tags can let YouTube know your video very well. Give it a try!
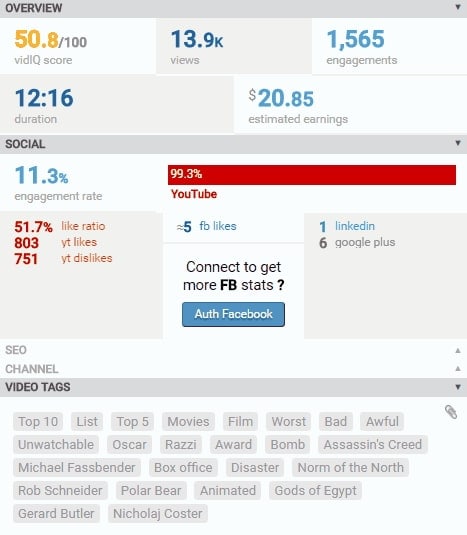
5. Check competitor’s Tags - When you check tags from other brands, it is not suggested to copy them all. What you need to do is find what you are missing and try to cover that area. However, only third-party tools can help you do that. In the market, VidIQ is highly used. It has a free version. Most of all data including tags can be found for higher views.
YouTube Tags Bonus Tips
Here you can learn some tips when optimizing tags. You can use singular and plural tags. Sometimes remember to add some misspelling tags because users tend to mistype some words, so it’s better to cover this kind of tag. You can get more information on misspelled words . More tips are listed below.
- Build on what you learned in your keyword research and use high traffic keywords as tags
- Use as many tags as possible, but without being spammy
- Build related playlists using particular tags
- Be generic; ‘big’, ‘funny’ and ‘sweet’ are fine, but ‘luscious’, ‘delightful’ and ‘splendid’ don’t make the best tags
- Put the most important tags first
- Mix single word tags with ‘long tail’ tags, e.g. ‘how to’
Part 3: How to Tag YouTube and Add Title, Description
For a New Video
- Step 1. The first thing you need to do is to sign in to your YouTube account .
- Step 2. Then click the Upload button that’s found on the top right corner of the window.

- Step 3. Then select the video that you want to upload. You will be asked to add a title, description, and tags.
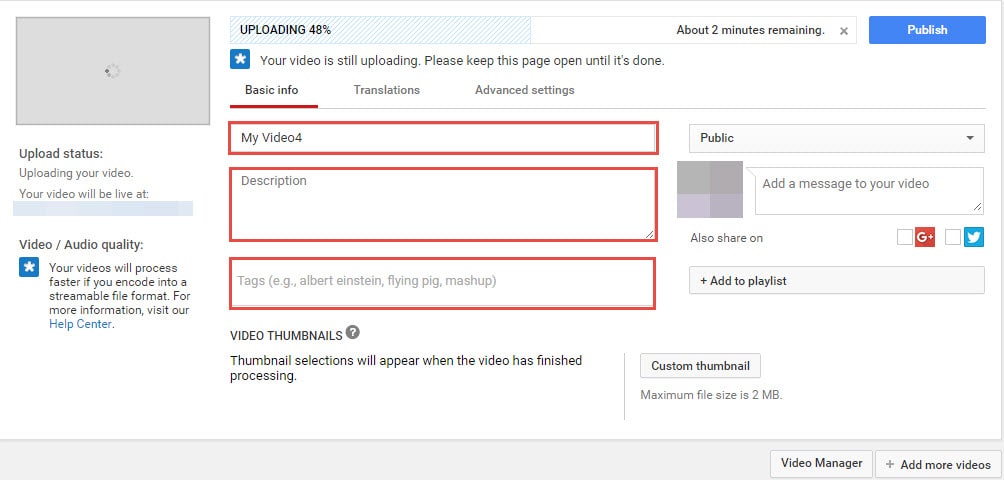
- Step 4. After uploading, you can still edit the YouTube title, description, and tags.
For a Published Video
There are times when you want to change the title, description or tag of an already published video. The good news is that YouTube allows you to re-edit them whenever you want to.
- Step 1. Log into your YouTube account
- Step 2. Click the account name found at the top right-hand corner of the screen. Then you will have a dropdown menu. Select Video Manager to show a list of your uploaded videos.

- Step 3. Click the Edit button that’s found right next to the video that you want to modify. In the Video Information, you can now change the title, description or any of the tags. Click on the Save Changes button when you are done.
Part 4: How to Improve YouTube Video Title and Description
Metadata on YouTube is where both the viewers and the platform itself can find out what your video is all about. It helps people search for your video, helps YouTube to categorize it correctly and, when done well, can broaden the reach of your content. YouTube meta consists of three main parts: tags, title and description. Here’s how you can use each of these three elements to create powerful metadata for your video:
1. Title
YouTube titles play a big part in the ranking factors for search. That means you’ve got to think about what the people most likely to want to see your video will type into the search bar, as well as the words that accurately describe your video.
For example, if you have a clip of your cat Fluffy climbing a tree, calling your video ‘Fluffy climbs a tree’ is not the best idea. Nobody knows who Fluffy is; it could be your rabbit, dog, daughter or feather duster for all the YouTube community knows, and nobody is going to be searching for it.
A better title would be ‘cat climbs a tree, but you could even improve on that. How about ‘funny cat climbs a tree’, which would capture all those people looking for funny cat videos. Or, even better, ‘funny Persian cat climbs a tree’, also capturing those people who adore Persian cats.
You can see how building awesome YouTube titles can happen organically like this, but it’s also worth doing your homework too. We have collected a handful of YouTube Keyword tools for you to improve your YouTube meta, so check out the suggestions and work forwards from there.
Best practices
- Research your keywords and include high traffic keywords at the start of the title
- Keep titles under 70 characters
- Branding, episode number, and other non-essential info should be at the end of the title
- Review your YouTube titles from time to time and update with new keywords as search trends change
- Avoid clickbait titles or misleading titles as this will affect your view time and subsequently your ranking in search
2. Description
Your description is a much longer piece of YouTube meta, so you can really go to town with your YouTube keywords here. You’ve got up to 5,000 characters to fill in, and we strongly advise that you aim to use every single one. This really is a golden opportunity, not only to get people motivated to watch all of your video, but also to be indexed correctly through well researched YouTube keywords.
You may have noticed that, on the search page itself, only a small part of the description actually shows up; 120 characters of it to be precise. This doesn’t affect indexing, but it does mean you have to plan your YouTube description carefully to really hook people into clicking through from just the first sentence or two.
Best practices
- Make the first sentence or two compelling and captivating to get people to click
- Research the best YouTube keywords to use to ensure your video is correctly indexed
- At the end of your YouTube description, include a call to action to direct viewers on what to do next (subscribe, click through to the website, look at a product, watch more videos, etc.)
- If your video is long, consider placing time codes in your description to help users jump to their areas of interest
- Add links to products showcased, your social channels, or website as you wish
- Don’t forget to credit any music you’ve used here
Part 5: Tips for Tagging YouTube and Writing Title, Description
So, now we’ve got the basics down, let’s move on to some top tips for getting your metadata just right:
- 1. Do not spam
Irrelevant keywords will not do you any favors in the long run. Using a popular search term such as ‘funny cat’ when actually it’s a video of you unboxing your product will simply irritate your viewers. You’ll get more views, but for shorter durations, and that will hurt not only your ranking but also your reputation. The people you want to draw in with your YouTube meta should be those who are genuinely interested in your videos, as these are the people who will share, comment and interact with you.
- 2. Don’t put tags in the description
YouTube has given you a place to put your tags, and that’s not in the description area of your meta. Placing tags in the description area is known as tag stuffing and can lead to videos being removed or penalized.
- 3. Update regularly
YouTube meta is not a static thing. Trends change, search statistics fluctuate, and the needs of your viewers alter as time goes on. For this reason, you should look to update your meta from time to time, at least once every six months or so. Re-research your keywords and optimize for today’s trending search terms.
You May Also Like: YouTube SEO Complete Guide
Conclusion
Take some time to perfect your meta on YouTube and see how many more views it helps you get. Let us know if you have any other tips for developing powerful metadata, and how optimizing your meta has worked for you!
Download Mac Version ](https://tools.techidaily.com/wondershare/filmora/download/ )
Richard Bennett
Richard Bennett is a writer and a lover of all things video.
Follow @Richard Bennett
Richard Bennett
Mar 27, 2024• Proven solutions
Making awesome video content is just the first hurdle to overcome. Getting people to watch them is the next and a much bigger obstacle in your path. Just as a blogger must work hard to get people to read their blog, so a YouTuber needs to find ways to get more views on their videos.
For any piece of content on the internet, discoverability is key to exposure. After all, nobody will watch your video or read your blog if they can’t find it, right? A blogger would do this by lacing their content with SEO - search engine optimization. But how can a YouTuber do the same? The answer lies in something known as YouTube tags optimization. In this article, we will let you know how to add, edit and optimize YouTube tags easily for more views, and some tips on YouTube title and description.
Quick Jump Menu
- What are YouTube tags and why they are so important
- How to come up with YouTube tags and optimize them
- How to Tag YouTube and Add Title, Description
- How to Improve YouTube video Metadata: Tags, Title, Description
- Tips for Tagging YouTube and Writing Title, Description
Before we get started, I want to recommend the best video editing software for YouTubers - Wondershare Filmora , an easy to use while powerful video editor that allows you not only to cut, split, crop, resize, reverse your videos, but also offers you multiple video effects specially designed for Fashion, Beauty, Gaming, Travel, Education, etc. Check the video to know more fantastic features:
Download Mac Version ](https://tools.techidaily.com/wondershare/filmora/download/ )
Part 1: What are YouTube tags and why they are so important
YouTube tags are used when you upload a video on YouTube. You need to specify the type of video. In other words, you need to describe your video with keywords. But you might think about why you need to add these words. YouTube can’t figure out what my videos are about? Unfortunately, YouTube can’t though its algorithm is much more advanced than before.
You must know the competition between videos is furious since 500 hours of video per minute are uploaded on YouTube . In this case, it is important to let the YouTube algorithm know your video by adding related tags to have a higher ranking. So the better tags we choose, the higher chance to rank in the top 1, which means you will get more views!
Using YouTube meta tags wisely can broaden your reach and help new people discover your content. However, don’t be tempted to insert irrelevant tags just because you know they are high traffic. You will be found out and penalized as a result. Just as you did with your description, research your keywords, place the most important ones first and use as many as you can.
What are the three YouTube tag types?
YouTube has three different types of tags and each of them has a specific purpose. The tags are-
Specific – The specific tag types are keywords-oriented. These keywords specifically pertain to the content of your video. In this tag type, the particular video is highlighted with the keyword tags. Often while typing the keywords in your mind, YouTube suggests phrases and keywords according to the content of your video. You may apply the suggestions and also add more general or common versions of the same keywords.
Compound – The compound tags are usually using more than two words. Many a time it is seen that users prefer tagging the complete title of the video. If you are using your video title as the compound tag, ensure that you do not include the prepositions like or, as, and, etc. This is because YouTube allows just 500 characters in the title and ignore the prepositions. It is always advised to use all the 500 characters YouTube has allowed without wasting the characters on prepositions as it will automatically be ignored.
Generic – The generic tags are the ones that describe the entire video in one or two words. These tags are used in all the videos of yours. These tags are used across your channel for all the videos you post. It is important to have such general constant tags.
Part 2: How to add YouTube tags and optimize them
The more relevant tags you add, the better it is. The best part is YouTube doesn’t restrict the number of tags but adding all is not possible and adding something irrelevant doesn’t make sense. So, your YouTube video tags must be the smart ones for more views. Educated tagging is what is required.
1. Brand-Specific Tags Addition - Every business wants their brand name to show up in the search results on YouTube and Google. Self-referencing your video or tagging your brand name in a number of variations is a smart way of letting others know your brand.
2. Using YouTube Auto Suggest – Play with the search option on YouTube and check out the YouTube suggestions when you search. Try to recognize the common videos that pop up while searching for something important and relevant to yours. Try searching for random keywords according to your YouTube search experience.
3. Use the YouTube Keyword Search Tool – Lastly, you may use the YouTube keyword suggestion tool. It helps you to extract the relevant keywords from the videos of your competitors and create suggestions according to the basic term provided by you.
4. Use Specific Tags - After using tools, you need to narrow down your tags specifically, like tags “learn 3D paper cutting”. The search volume may not be huge, but these kinds of tags can let YouTube know your video very well. Give it a try!
5. Check competitor’s Tags - When you check tags from other brands, it is not suggested to copy them all. What you need to do is find what you are missing and try to cover that area. However, only third-party tools can help you do that. In the market, VidIQ is highly used. It has a free version. Most of all data including tags can be found for higher views.
YouTube Tags Bonus Tips
Here you can learn some tips when optimizing tags. You can use singular and plural tags. Sometimes remember to add some misspelling tags because users tend to mistype some words, so it’s better to cover this kind of tag. You can get more information on misspelled words . More tips are listed below.
- Build on what you learned in your keyword research and use high traffic keywords as tags
- Use as many tags as possible, but without being spammy
- Build related playlists using particular tags
- Be generic; ‘big’, ‘funny’ and ‘sweet’ are fine, but ‘luscious’, ‘delightful’ and ‘splendid’ don’t make the best tags
- Put the most important tags first
- Mix single word tags with ‘long tail’ tags, e.g. ‘how to’
Part 3: How to Tag YouTube and Add Title, Description
For a New Video
- Step 1. The first thing you need to do is to sign in to your YouTube account .
- Step 2. Then click the Upload button that’s found on the top right corner of the window.
- Step 3. Then select the video that you want to upload. You will be asked to add a title, description, and tags.
- Step 4. After uploading, you can still edit the YouTube title, description, and tags.
For a Published Video
There are times when you want to change the title, description or tag of an already published video. The good news is that YouTube allows you to re-edit them whenever you want to.
- Step 1. Log into your YouTube account
- Step 2. Click the account name found at the top right-hand corner of the screen. Then you will have a dropdown menu. Select Video Manager to show a list of your uploaded videos.
- Step 3. Click the Edit button that’s found right next to the video that you want to modify. In the Video Information, you can now change the title, description or any of the tags. Click on the Save Changes button when you are done.
Part 4: How to Improve YouTube Video Title and Description
Metadata on YouTube is where both the viewers and the platform itself can find out what your video is all about. It helps people search for your video, helps YouTube to categorize it correctly and, when done well, can broaden the reach of your content. YouTube meta consists of three main parts: tags, title and description. Here’s how you can use each of these three elements to create powerful metadata for your video:
1. Title
YouTube titles play a big part in the ranking factors for search. That means you’ve got to think about what the people most likely to want to see your video will type into the search bar, as well as the words that accurately describe your video.
For example, if you have a clip of your cat Fluffy climbing a tree, calling your video ‘Fluffy climbs a tree’ is not the best idea. Nobody knows who Fluffy is; it could be your rabbit, dog, daughter or feather duster for all the YouTube community knows, and nobody is going to be searching for it.
A better title would be ‘cat climbs a tree, but you could even improve on that. How about ‘funny cat climbs a tree’, which would capture all those people looking for funny cat videos. Or, even better, ‘funny Persian cat climbs a tree’, also capturing those people who adore Persian cats.
You can see how building awesome YouTube titles can happen organically like this, but it’s also worth doing your homework too. We have collected a handful of YouTube Keyword tools for you to improve your YouTube meta, so check out the suggestions and work forwards from there.
Best practices
- Research your keywords and include high traffic keywords at the start of the title
- Keep titles under 70 characters
- Branding, episode number, and other non-essential info should be at the end of the title
- Review your YouTube titles from time to time and update with new keywords as search trends change
- Avoid clickbait titles or misleading titles as this will affect your view time and subsequently your ranking in search
2. Description
Your description is a much longer piece of YouTube meta, so you can really go to town with your YouTube keywords here. You’ve got up to 5,000 characters to fill in, and we strongly advise that you aim to use every single one. This really is a golden opportunity, not only to get people motivated to watch all of your video, but also to be indexed correctly through well researched YouTube keywords.
You may have noticed that, on the search page itself, only a small part of the description actually shows up; 120 characters of it to be precise. This doesn’t affect indexing, but it does mean you have to plan your YouTube description carefully to really hook people into clicking through from just the first sentence or two.
Best practices
- Make the first sentence or two compelling and captivating to get people to click
- Research the best YouTube keywords to use to ensure your video is correctly indexed
- At the end of your YouTube description, include a call to action to direct viewers on what to do next (subscribe, click through to the website, look at a product, watch more videos, etc.)
- If your video is long, consider placing time codes in your description to help users jump to their areas of interest
- Add links to products showcased, your social channels, or website as you wish
- Don’t forget to credit any music you’ve used here
Part 5: Tips for Tagging YouTube and Writing Title, Description
So, now we’ve got the basics down, let’s move on to some top tips for getting your metadata just right:
- 1. Do not spam
Irrelevant keywords will not do you any favors in the long run. Using a popular search term such as ‘funny cat’ when actually it’s a video of you unboxing your product will simply irritate your viewers. You’ll get more views, but for shorter durations, and that will hurt not only your ranking but also your reputation. The people you want to draw in with your YouTube meta should be those who are genuinely interested in your videos, as these are the people who will share, comment and interact with you.
- 2. Don’t put tags in the description
YouTube has given you a place to put your tags, and that’s not in the description area of your meta. Placing tags in the description area is known as tag stuffing and can lead to videos being removed or penalized.
- 3. Update regularly
YouTube meta is not a static thing. Trends change, search statistics fluctuate, and the needs of your viewers alter as time goes on. For this reason, you should look to update your meta from time to time, at least once every six months or so. Re-research your keywords and optimize for today’s trending search terms.
You May Also Like: YouTube SEO Complete Guide
Conclusion
Take some time to perfect your meta on YouTube and see how many more views it helps you get. Let us know if you have any other tips for developing powerful metadata, and how optimizing your meta has worked for you!
Download Mac Version ](https://tools.techidaily.com/wondershare/filmora/download/ )
Richard Bennett
Richard Bennett is a writer and a lover of all things video.
Follow @Richard Bennett
Also read:
- 1 Ranked YouTube to Text Online Service for 2024
- Navigating YouTube Shorts Thumbnail Losses
- In 2024, Breakdown of YouTube's Monetization Update
- [Updated] Curate Your Learning Best 15 Science YT Experts
- Smooth Integration of Timestamps Into Desktop/Mobile YouTube Videos
- CarryMinati The YouTube Money Trail of Ajey Nagar for 2024
- Cut the Cord with YouTube-MP3 Conversion Tools for 2024
- Optimal Lens Selection for Smooth Vlogging Experience
- Cutting-Edge Tips for Professional YouTube Content Creation for 2024
- 2024 Approved Everything You Need to Know About the YouTube Shorts Fund
- 2024 Approved Adding YouTube Captions/Subtitles Made Simple and Fast
- Masters of Digital Avengers Realms
- Deciphering Your Pathway to YouTube's Maker Land for 2024
- Early Bird's Youtube Strategies for Channel and Revenue
- 2024 Approved Dive Into Digital Green Magic Top 4 YouTube Sources for No-Cost Background Workshops
- A Step-by-Step Guide to YouTube Image Branding for 2024
- __Purchasing Options__ Choosing Premium Vs. Standard Fixtures and Whether They Are Integrated or Retrofit Options Can Alter Costs.
- [New] Direct to Device Converting YouTube Tracks for iDevices
- [New] Compreenhensive Guide for YouTube Short Video Creators
- In 2024, Alternative Film Choices Ranked #7-1
- Stream-to-Script Service
- Building a YouTube Subscription Direct Link
- [New] Elevate Your Channel's Reach Proven Techniques for Multistreaming on YouTube and Twitch
- [Updated] Breaking Tubes Unveiling Top 10 Viewed Tweets on Twitter
- 3D Animation Software Roundup Top Picks for Every Budget for 2024
- [Updated] Unlocking Online Potential Essential FB Advice for Businesses
- Here are Some Pro Tips for Pokemon Go PvP Battles On Nubia Z50 Ultra | Dr.fone
- [New] In 2024, IShowU Audio Capture Download and Review
- ScreenMaster Review The Latest in Tech Capture for 2024
- How to Screen Mirroring Nokia C210 to PC? | Dr.fone
- Ultimate Image Transformation with Polarr Editor's Power
- Updated Stream Anything The Ultimate Chromecast Video Playback Guide
- [Updated] 2024 Approved Top 15 Easy-to-Use Free Screen Capturing Software on Windows/Mac
- In 2024, How To Activate and Use Life360 Ghost Mode On Vivo V29e | Dr.fone
- The Ultimate Guide to Embedding YouTube Videos in Insta Stories for 2024
- Elevate Your Snaps Mastering Snapchat Zoom Features
- Does Samsung support MOV videos ?
- How does the stardust trade cost In pokemon go On Nokia C210? | Dr.fone
- Windows 11 Microphone Use for High-Quality Recordings
- New KineMaster Soundscape Techniques for Music Insertion
- New In 2024, The Animators Toolkit A Detailed List of the Best Cartoon Sounds Available Online
- Live Feed Perfection Top Free Screen Capture Apps Reviewed
- How to Factory Reset Realme C51 without Losing Data | Dr.fone
- Updated 4 Solutions to Add White Border to Video on Mobile and Desktop
- Updated 2024 Approved Unshaken Learn to Stabilize Your Videos Like a Pr
- Title: [Updated] Eliminate Background Noise From Online Video Content
- Author: Brian
- Created at : 2024-05-25 13:23:01
- Updated at : 2024-05-26 13:23:01
- Link: https://youtube-video-recordings.techidaily.com/updated-eliminate-background-noise-from-online-video-content/
- License: This work is licensed under CC BY-NC-SA 4.0.
