
!["[Updated] Dissecting YouTube Revenue How Much Do You Earning From AdSense per KV?"](https://www.lifewire.com/thmb/eyPEW_zh-5Xw0J7hoJ-kChdCQ1M=/360x240/filters:no_upscale():max_bytes(150000):strip_icc():format(webp)/001_how-to-transfer-data-from-ps4-to-ps5-3392eb400af3482fabad65cabb2a1a91.jpg)
"[Updated] Dissecting YouTube Revenue How Much Do You Earning From AdSense per KV?"
Dissecting YouTube Revenue: How Much Do You Earning From AdSense per KV?
YouTubers are fantastic people who create content and make a living out of it. But have you ever thought about how much YouTube pays or what YouTube AdSense earnings are?
If you aren’t sure about the YouTube payment situation or how much AdSense pay for views, you will learn this below. Whether you’re planning to create a channel or already have one, learning how much you can expect YouTube to pay will help you in the longer run.
Be it AdSense pay on 1,000 views or AdSense pay per click; this blog features information you may appreciate.
- Type of Content
- Keywords
- User Location
- Time Requires to Get Views
- Video Duration
- Your Niche or Industry
Part 1: How Much Does AdSense Pay Per 1,000 Views

As a content creator, you might be tempted to know how much you can expect to earn through AdSense. Since it’s a free and simple way to make extra bucks, showing ads with the content you produce for online platforms, it’s essential to know how much it pays for views.
Pay Per 1,000 Views by AdSense
For 1,000 views, expect AdSense to pay around $8-$20. However, your total earnings will depend on factors such as your content type, users’ location, and setting of ads in Google AdSense, so it can pay on thousand views.
More so, AdSense opts for Revenue Per 1,000 impressions or (RPM) to showcase the amount you would get for 1,000 impressions. Remember, this RPM doesn’t include the actual amount you’ve earned. But it focuses on dividing your earnings by page views and impressions, then multiplying those by 1,000.
You can also refer to the formula for better understanding.
Formula:
RPM = (Estimated earnings / Number of page views) * 1000
From this formula provided by Google official, we can easily know that
Estimated earnings = (RPM * Number of page views) / 1000
To understand it further, see the example below.
Suppose you’ve earned around $0.10 from 20 page views; your page RPM would be $6.00 in simpler terms.
($0.10 / 25) * 1000 = $6.00
Also, if RPM is $4.00 from 45,000 ad impressions, your estimated earnings would be equal $180.00
($4.00 * 45,000) / 1000 = $180.00
AdSense Pay Per View
Lastly, if you’re looking for an exact answer regarding how much it pays per view, know that it varies and is based on different factors, such as niche or audience demographic.
But you can expect something between $8 to $12 on 1,000 views after monetizing your YouTube channel with your Google AdSense account.
Part 2: How Much Does AdSense Pay Per Click?

After understanding AdSense’s way to pay for 1,000 views, formula, or pay per view, here’s what you need to know about AdSense’s payment on per click policy.
On Average, you can expect AdSense to pay something around $0.20 to $15 on a click. Talking about estimated earnings or one click, it depends on the cost-per-click in the niche, including the publisher’s earnings and competition among rival advertisers.
And if you’re wondering, cost-per-click is when a user clicks on your ad, and you earn money for it. However, advertisers always decide the cost-per-click for ads. In this case, some advertisers don’t hesitate to pay extra, depending on what they intend to advertise.
Part 3: AdSense Earnings Per Thousand Pageviews Examples
From pay per 1,000 views to pay per click, understanding the AdSense payment policy is essential if you’re up to monetize your YouTube channel.
Since there’re YouTube AdSense requirements, such as audience demographic, niche, or content, learning about which niche is the lucrative one will also help you decide your next move.
Let’s take a look at the following examples for better understanding:
- For example, if arts and entertainment is your niche, you can expect to earn $5.62 after accumulating 1,000 pageviews.
- Creators who create content on vehicles can earn around $9.20 on every 1,000 pageviews.
- If you’re into beauty and fitness, expect to earn up to $13.01 on 1,000 pageviews.
- For real estate, health, home, and garden niches, you can earn $14.50, $17.40, and $23.35 on every 1,000 pageviews.
Remember, people from North America can make the most of these earnings. But worry not if you are based outside North America. Because Google AdSense revenue calculator can help you find the average pageviews on monthly basis.
Part 4: Earnings from AdSense: Factors to Consider
After learning how much you can earn in different niches, it’s equally important to focus on the following factors, so you can qualify and start earning from AdSense with ease.
1) Type of Content
To monetize your videos for AdSense, ensure that you own the rights to use visuals and audio elements of your video. And focus on creating all elements of your video yourself.
For YouTube, you can try creating tutorials, do-it-yourself videos, original short films, original music videos, home videos, travel vlogs, or even daily-life vlogs.
While creating content for YouTube, remember advertisers consider placing ads on more advertiser-friendly content.
As a blogger, you must provide unique but quality content to exceed AdSense’s eligibility criteria. Having unique content helps Google understand what your website is about. It’s even better if your website provides a one-of-its-kind experience and users visit it again.
Be it a vlog or blog, please ensure that it’s original and not a copy from other sources. This way, you can elevate your credibility on the respective platforms. For a great user experience, opt for intuitive navigation.

And to up your content game, you can even use the calculator to determine the value of your content and estimated revenue from AdSense.
2) Keywords
Keywords are phrases and words that describe your service or product. The ones you choose will help show your ads to users.
Therefore, go for the relevant yet high-quality keywords and add them to your ad campaigns. This strategy will put your ad in front of potential buyers.
3) User Location
Remember, AdSense follows geo-targeting strategy, so it can place ads on different pages. These ads are based on a user’s language, region, and IP address.
Put simply, ads serving to a user from Algeria may differ from the ads for a user from Georgia.
4) Time Requires to Get Views
There’s no fixed time frame; however, you can focus on search volume, audience, and competition to start getting the desired number of views.
The first 60 minutes are crucial after you post a video. Then, the next 24 hours and the first 48 hours are equally important because YouTube gives an unnatural boost to it. It helps YouTube observe responses, such as how viewers interacted with the video and what kinds of viewers were interested in it.
Remember, if a video fails to get any views in a couple of days, it won’t likely perform and will consider “dead” on the platform.
More so, if a video performs better slightly, it’ll start to reach its full potential in the next 3 to 6 months, according to the views it receives per day. Oftentimes, videos took up to a year to perform well.
And if your video starts to perform better and faster in those 3-6 months, it’ll likely do better in the longer run.
5) Video Duration
Focus on the length of your video, as it determines how many ads can be shown in it. This part also influences your earning potential. When your video is longer in length, it’ll increase its worth.
However, you must find the right balance between video duration, quality, and the number of videos on your channel, so you can continue to earn without hindrance.
6) Your Niche or Industry
Niche is another essential factor to opt for AdSense earnings. Some of the profitable topics are:
- Business
- Investment
- Health
- Insurance
- Online Marketing
You can choose the area that interest you the most and start people educating about it.
For example, people tend to think about investing their money to multiply it. You can create videos on investment-related topics, tips and tricks to get maximum views.
Part 5: Pros and Cons of Earning Money from Google AdSense
At this point, you’re familiar with almost all aspects of generating money using Google AdSense. And considering the factors, it seems like a task you can perform.
Before you try earning money via AdSense, consider the following pros and cons.
Pros
- Google AdSense doesn’t charge an extra fee. It’s a totally free service that can help you earn dollars.
- Don’t know how to make ads? Don’t worry; Google will do it for you.
- It enables you to use one account to monetize multiple websites.
- As a passive income, it doesn’t require additional effort.
Cons
- Making the first $100 is a must to get paid further.
- With AdSense, you won’t be allowed to use another ad network.
- A policy breach could make you lose your account.
- You need a lot of traffic to make some serious money.
- Adding several ads can annoy your viewers.
Final Words
Monetizing your YouTube channel for AdSense is great for having a steady passive income. But, it’s a time-consuming process and has a set of advantages and disadvantages.
If you already have a YouTube channel and a certain number of views, you can take it further using the provided information. However, focus on factors such as user demographic, content type, and quality to achieve long-term success.
Free Download For Win 7 or later(64-bit)
Free Download For macOS 10.14 or later
Part 1: How Much Does AdSense Pay Per 1,000 Views
As a content creator, you might be tempted to know how much you can expect to earn through AdSense. Since it’s a free and simple way to make extra bucks, showing ads with the content you produce for online platforms, it’s essential to know how much it pays for views.
Pay Per 1,000 Views by AdSense
For 1,000 views, expect AdSense to pay around $8-$20. However, your total earnings will depend on factors such as your content type, users’ location, and setting of ads in Google AdSense, so it can pay on thousand views.
More so, AdSense opts for Revenue Per 1,000 impressions or (RPM) to showcase the amount you would get for 1,000 impressions. Remember, this RPM doesn’t include the actual amount you’ve earned. But it focuses on dividing your earnings by page views and impressions, then multiplying those by 1,000.
You can also refer to the formula for better understanding.
Formula:
RPM = (Estimated earnings / Number of page views) * 1000
From this formula provided by Google official, we can easily know that
Estimated earnings = (RPM * Number of page views) / 1000
To understand it further, see the example below.
Suppose you’ve earned around $0.10 from 20 page views; your page RPM would be $6.00 in simpler terms.
($0.10 / 25) * 1000 = $6.00
Also, if RPM is $4.00 from 45,000 ad impressions, your estimated earnings would be equal $180.00
($4.00 * 45,000) / 1000 = $180.00
AdSense Pay Per View
Lastly, if you’re looking for an exact answer regarding how much it pays per view, know that it varies and is based on different factors, such as niche or audience demographic.
But you can expect something between $8 to $12 on 1,000 views after monetizing your YouTube channel with your Google AdSense account.
Part 2: How Much Does AdSense Pay Per Click?
After understanding AdSense’s way to pay for 1,000 views, formula, or pay per view, here’s what you need to know about AdSense’s payment on per click policy.
On Average, you can expect AdSense to pay something around $0.20 to $15 on a click. Talking about estimated earnings or one click, it depends on the cost-per-click in the niche, including the publisher’s earnings and competition among rival advertisers.
And if you’re wondering, cost-per-click is when a user clicks on your ad, and you earn money for it. However, advertisers always decide the cost-per-click for ads. In this case, some advertisers don’t hesitate to pay extra, depending on what they intend to advertise.
Part 3: AdSense Earnings Per Thousand Pageviews Examples
From pay per 1,000 views to pay per click, understanding the AdSense payment policy is essential if you’re up to monetize your YouTube channel.
Since there’re YouTube AdSense requirements, such as audience demographic, niche, or content, learning about which niche is the lucrative one will also help you decide your next move.
Let’s take a look at the following examples for better understanding:
- For example, if arts and entertainment is your niche, you can expect to earn $5.62 after accumulating 1,000 pageviews.
- Creators who create content on vehicles can earn around $9.20 on every 1,000 pageviews.
- If you’re into beauty and fitness, expect to earn up to $13.01 on 1,000 pageviews.
- For real estate, health, home, and garden niches, you can earn $14.50, $17.40, and $23.35 on every 1,000 pageviews.
Remember, people from North America can make the most of these earnings. But worry not if you are based outside North America. Because Google AdSense revenue calculator can help you find the average pageviews on monthly basis.
Part 4: Earnings from AdSense: Factors to Consider
After learning how much you can earn in different niches, it’s equally important to focus on the following factors, so you can qualify and start earning from AdSense with ease.
1) Type of Content
To monetize your videos for AdSense, ensure that you own the rights to use visuals and audio elements of your video. And focus on creating all elements of your video yourself.
For YouTube, you can try creating tutorials, do-it-yourself videos, original short films, original music videos, home videos, travel vlogs, or even daily-life vlogs.
While creating content for YouTube, remember advertisers consider placing ads on more advertiser-friendly content.
As a blogger, you must provide unique but quality content to exceed AdSense’s eligibility criteria. Having unique content helps Google understand what your website is about. It’s even better if your website provides a one-of-its-kind experience and users visit it again.
Be it a vlog or blog, please ensure that it’s original and not a copy from other sources. This way, you can elevate your credibility on the respective platforms. For a great user experience, opt for intuitive navigation.
And to up your content game, you can even use the calculator to determine the value of your content and estimated revenue from AdSense.
2) Keywords
Keywords are phrases and words that describe your service or product. The ones you choose will help show your ads to users.
Therefore, go for the relevant yet high-quality keywords and add them to your ad campaigns. This strategy will put your ad in front of potential buyers.
3) User Location
Remember, AdSense follows geo-targeting strategy, so it can place ads on different pages. These ads are based on a user’s language, region, and IP address.
Put simply, ads serving to a user from Algeria may differ from the ads for a user from Georgia.
4) Time Requires to Get Views
There’s no fixed time frame; however, you can focus on search volume, audience, and competition to start getting the desired number of views.
The first 60 minutes are crucial after you post a video. Then, the next 24 hours and the first 48 hours are equally important because YouTube gives an unnatural boost to it. It helps YouTube observe responses, such as how viewers interacted with the video and what kinds of viewers were interested in it.
Remember, if a video fails to get any views in a couple of days, it won’t likely perform and will consider “dead” on the platform.
More so, if a video performs better slightly, it’ll start to reach its full potential in the next 3 to 6 months, according to the views it receives per day. Oftentimes, videos took up to a year to perform well.
And if your video starts to perform better and faster in those 3-6 months, it’ll likely do better in the longer run.
5) Video Duration
Focus on the length of your video, as it determines how many ads can be shown in it. This part also influences your earning potential. When your video is longer in length, it’ll increase its worth.
However, you must find the right balance between video duration, quality, and the number of videos on your channel, so you can continue to earn without hindrance.
6) Your Niche or Industry
Niche is another essential factor to opt for AdSense earnings. Some of the profitable topics are:
- Business
- Investment
- Health
- Insurance
- Online Marketing
You can choose the area that interest you the most and start people educating about it.
For example, people tend to think about investing their money to multiply it. You can create videos on investment-related topics, tips and tricks to get maximum views.
Part 5: Pros and Cons of Earning Money from Google AdSense
At this point, you’re familiar with almost all aspects of generating money using Google AdSense. And considering the factors, it seems like a task you can perform.
Before you try earning money via AdSense, consider the following pros and cons.
Pros
- Google AdSense doesn’t charge an extra fee. It’s a totally free service that can help you earn dollars.
- Don’t know how to make ads? Don’t worry; Google will do it for you.
- It enables you to use one account to monetize multiple websites.
- As a passive income, it doesn’t require additional effort.
Cons
- Making the first $100 is a must to get paid further.
- With AdSense, you won’t be allowed to use another ad network.
- A policy breach could make you lose your account.
- You need a lot of traffic to make some serious money.
- Adding several ads can annoy your viewers.
Final Words
Monetizing your YouTube channel for AdSense is great for having a steady passive income. But, it’s a time-consuming process and has a set of advantages and disadvantages.
If you already have a YouTube channel and a certain number of views, you can take it further using the provided information. However, focus on factors such as user demographic, content type, and quality to achieve long-term success.
Free Download For Win 7 or later(64-bit)
Free Download For macOS 10.14 or later
Mastering 4K Uploads: Key Tips for YouTube Success
Create High-Quality Video - Wondershare Filmora
An easy and powerful YouTube video editor
Numerous video and audio effects to choose from
Detailed tutorials provided by the official channel
Many people have a strong desire to make videos. Whether you make videos for a living or as a pastime, it doesn’t matter. When you make a fantastic film that you’re pleased with, you want to show it off to your friends and family. YouTube, the most popular site for sharing videos on various themes, is one of the most incredible places to start.
YouTube is fantastic for sharing videos, but it can be harsh on artists due to the high bar for content and video quality. If you want to succeed as a YouTuber, you must create videos that are informative and high-resolution. This is critical since your viewers may wish to watch your movies on a computer screen or a 4K smart TV.
If you’ve decided to make videos in 4K resolution, you’ll find information on recommended encoding settings, how to upload a video to YouTube, potential problems, and more below.
In this article
01 What Is The Distinction Between Various Resolutions?
02 Why Would You Want To Upload A 4k Video?
03 What Is The Best Way To Upload A 4k Video To Youtube?
04 Tips On How To Make Sure The Video You’re Uploading Is Of High Quality
What Is The Distinction Between Various Resolutions?
The number of pixels on a screen is referred to as resolution. Low resolution indicates fewer pixels and typically less space, whereas high resolution means more pixels and generally greater space and detail. You probably have a poor resolution if you’re using a standard laptop or an old screen.
When watching a video on a larger screen, the resolution significantly impacts your viewing experience. Whether it’s a live stream or an on-demand movie, the correct resolution is crucial to reaching a wider audience, and this is where iPhones and iPads appear to have an advantage. Let’s take a closer look at each of these resolution types and their associated pixel sizes.
1. SD RESOLUTION (STANDARD DEFINITION)
Previously, resolutions were separated into SD (Standard Definition) and HD (High Definition) categories. SD was defined as a video with a resolution of less than 720p. However, as television and computer monitor display resolutions improved over time, a video was less likely to be shot in Standard Definition.
The following are the most common standard video resolutions:
- 640 × 360 pixels (or 360p)
- 640 × 480 pixels (or 480p)
2. RESOLUTION: 720P HD (HIGH DEFINITION)
The lowest video resolution is 720p, which is commonly referred to as ‘HD.’ 720p (1280 x 720 pixels) is a resolution recognized for modest web content, even though most videos require at least 1080p. Because most computer monitors are now in HD, the recommended practice for web and streaming is to choose a resolution higher than 720p.
The resolution of HD videos is usually: 1280 x 720 pixels (or 720p)
3. 1080P FULL HD RESOLUTION
1080p resolutions, also known as ‘Full HD,’ have become the industry standard for a clear HD video that doesn’t take up a lot of storage space. It’s also worth noting that this is the standard screen resolution for all smartphones.
The resolution of full HD videos is usually: 1920 x 1080 pixels (or 1080p)
4. 2K RESOLUTION WITH QHD (QUAD HIGH DEFINITION)
Quad HD resolution, or QHD for short, is widely found on high-end smartphones and gaming monitors. The resolution of 1440p is four times that of HD Ready (or 720p HD). Many high-end smartphones have a Quad HD+ resolution (296 x 1440 pixels), which is ideal for 1440p. Another common screen resolution is 2K, which allows for larger displays and reframing without sacrificing quality or image editing.
The resolution of QHD and 2K videos is:
- 2560 x 1440 pixels in QHD (or 1440p)
- 2048 x 1080 pixels in 2K (or 1080p)
5. 4K (OR UHD/ULTRA-HIGH-DEFINITION) RESOLUTION
This sort of resolution, often known as 4Kor UHD (Ultra High Definition), has a pixel size of 3840 x 2160 pixels. It has a similar appearance to 2K, but it provides video artists more room to edit and zoom in. For vivid color, graphics, or dramatic viewing, both 2K and 4K resolutions are available. Unless you wish to tweak colors or trim in closer, there aren’t enough visible distinctions between 2K and 4K. So, it matters when you want to change a certain detail, but it doesn’t matter when someone else is looking at it.
The resolution of 4K videos is: 3840 x 2160 (or 2160p / simply 4K) is a resolution of 3840 x 2160 pixels.
Why Would You Want To Upload A 4k Video?
YouTube is the second-largest social media site, with approximately 1.9 billion monthly active users. YouTube is where you want to be to access this large audience and promote your brand, with one billion hours of video watched every day on the platform.
However, for your target audience to watch your videos, you must ensure excellent video quality. Poorly shot or edited films may alienate your viewers, especially when there are billions of other videos to choose from on the site.
- 4k is the most satisfactory resolution for uploading to YouTube. Although not every viewer can watch videos in 4k, it ensures that your visitors get the best possible experience.
- Traditional Full HD (1920 x 1080) TVs feature four times as many pixels as 4K TVs. Because of the higher pixel density, the picture quality of 4K TVs is more colorful and detailed, even on TV displays of the same size. This distinction is most noticeable on large-screen televisions.
- Even if you recorded in 1080p and upscaled to 4K, you should post in 4K to YouTube for the finest image quality. Recording in 1080p, editing in 1080p, exporting in 4k, and YouTube viewing is sharper in 1080p.
- With 4K, you get stunning visuals with a resolution of 38402160, which is four times that of Full-HD. That’s why visuals appear crisp and lifelike, even on large-screen TVs rather than pixelated. Down-converted 4K to Full-HD photographs have superior quality and resolution than images shot in Full-HD from the start.
What Is The Best Way To Upload A 4k Video To Youtube?
The YouTube upload process is not complicated, but it does need several steps. You can finally post your video once it has been prepared and converted to MP4 format.
Follow the steps below to post your video to YouTube:
1. Go to YouTube.com in your browser.
2. Log in to your account and click the “Create” symbol, which looks like a camera with a plus sign, in the right corner of the menu bar.
3. Select “Upload video” from the drop-down menu.
4. Drag and drop your video file into the upload box, or select your file from the “Select File” menu and click “Open.”
5. Make a note of the title and description while YouTube is processing your video.

6. Select a video thumbnail from the options or upload your own and select your “Audience” from the drop-down menu. To manage age restriction settings.
7. Select “More Options” to add searchable keywords to your video, manage subtitles and comments, and more.
8. Select if you want to add promotions to your video by clicking “Next.”
9. Finally, click “Next” and wait for the video to be processed entirely before publishing it.
10. You can also automatically set it to publish at a later date.
Tips On How To Make Sure The Video You’re Uploading Is Of High Quality
The following are five tips for amateur and top newbie YouTubers who want to improve their videos.
1. Cut Your Video Into Clips And Organize It
While it may appear to be the simplest solution to perform an entire video at once, this might make the process tedious or even damage your video if you are interrupted or make a speech error. Smaller video segments are easier to edit and blend into a single, well-formatted video.
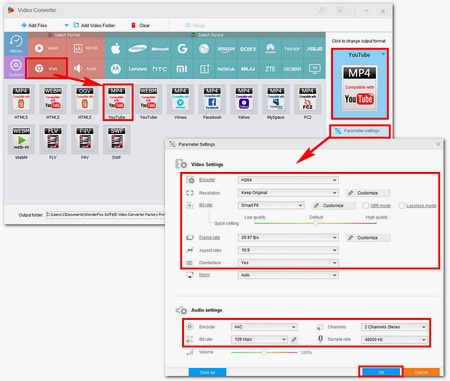
2. Youtube Video Export
You can also modify your videos in various formats to your heart’s content before exporting them to YouTube and publishing them. Although uploading and exporting may take some time, the quality of your video will significantly increase, and the time and work you put in will be evident.
3. Change Up Your Shots
Rather than keeping your camera fixed, try varied angles while shooting. This may not work for all of your videos, but it is critical to keep your viewers engaged while they watch them, especially if you want them to stay until the finish and come back for more. Unless you’re talking about anything incredibly essential, sitting and listening to someone talk for more than 10 minutes without the camera moving will quickly become dull or old.
4. Transitions And Effects
When editing a video with numerous parts, the use of effects and transitions can considerably impact the overall quality of the video. Filmora is far more sophisticated than Windows Movie Maker and iMovie on Mac. It also allows you to create a professional-looking YouTube video with hundreds of presets such as filters, overlays, components, transitions, and blending several layers of effects and audio to enhance your YouTube tale.
Wondershare Filmii is one of the greatest choices for Windows for beginners who wish to create video footage with templates automatically. Smart video templates, trendy filters and overlays, fun stickers and motion components, and, most importantly, advanced editing capabilities are all available.
For Win 7 or later (64-bit)
For macOS 10.12 or later
Conclusion
● This is pretty much everything we’ve gathered to assist you in uploading 4K videos to YouTube. Do not become worried. Your 4K video will be in low resolution when you first publish it. This is due to YouTube’s high-resolution processing requiring time. It could take a few hours for your video to be available in 4K mode.
● The duration, format, frame rate, and resolution of your video all affect the processing time for high-definition videos. If you don’t want your video to be seen unless it has a high-quality option, upload it as unlisted and then publish it once 4K resolution is available.
Many people have a strong desire to make videos. Whether you make videos for a living or as a pastime, it doesn’t matter. When you make a fantastic film that you’re pleased with, you want to show it off to your friends and family. YouTube, the most popular site for sharing videos on various themes, is one of the most incredible places to start.
YouTube is fantastic for sharing videos, but it can be harsh on artists due to the high bar for content and video quality. If you want to succeed as a YouTuber, you must create videos that are informative and high-resolution. This is critical since your viewers may wish to watch your movies on a computer screen or a 4K smart TV.
If you’ve decided to make videos in 4K resolution, you’ll find information on recommended encoding settings, how to upload a video to YouTube, potential problems, and more below.
In this article
01 What Is The Distinction Between Various Resolutions?
02 Why Would You Want To Upload A 4k Video?
03 What Is The Best Way To Upload A 4k Video To Youtube?
04 Tips On How To Make Sure The Video You’re Uploading Is Of High Quality
What Is The Distinction Between Various Resolutions?
The number of pixels on a screen is referred to as resolution. Low resolution indicates fewer pixels and typically less space, whereas high resolution means more pixels and generally greater space and detail. You probably have a poor resolution if you’re using a standard laptop or an old screen.
When watching a video on a larger screen, the resolution significantly impacts your viewing experience. Whether it’s a live stream or an on-demand movie, the correct resolution is crucial to reaching a wider audience, and this is where iPhones and iPads appear to have an advantage. Let’s take a closer look at each of these resolution types and their associated pixel sizes.
1. SD RESOLUTION (STANDARD DEFINITION)
Previously, resolutions were separated into SD (Standard Definition) and HD (High Definition) categories. SD was defined as a video with a resolution of less than 720p. However, as television and computer monitor display resolutions improved over time, a video was less likely to be shot in Standard Definition.
The following are the most common standard video resolutions:
- 640 × 360 pixels (or 360p)
- 640 × 480 pixels (or 480p)
2. RESOLUTION: 720P HD (HIGH DEFINITION)
The lowest video resolution is 720p, which is commonly referred to as ‘HD.’ 720p (1280 x 720 pixels) is a resolution recognized for modest web content, even though most videos require at least 1080p. Because most computer monitors are now in HD, the recommended practice for web and streaming is to choose a resolution higher than 720p.
The resolution of HD videos is usually: 1280 x 720 pixels (or 720p)
3. 1080P FULL HD RESOLUTION
1080p resolutions, also known as ‘Full HD,’ have become the industry standard for a clear HD video that doesn’t take up a lot of storage space. It’s also worth noting that this is the standard screen resolution for all smartphones.
The resolution of full HD videos is usually: 1920 x 1080 pixels (or 1080p)
4. 2K RESOLUTION WITH QHD (QUAD HIGH DEFINITION)
Quad HD resolution, or QHD for short, is widely found on high-end smartphones and gaming monitors. The resolution of 1440p is four times that of HD Ready (or 720p HD). Many high-end smartphones have a Quad HD+ resolution (296 x 1440 pixels), which is ideal for 1440p. Another common screen resolution is 2K, which allows for larger displays and reframing without sacrificing quality or image editing.
The resolution of QHD and 2K videos is:
- 2560 x 1440 pixels in QHD (or 1440p)
- 2048 x 1080 pixels in 2K (or 1080p)
5. 4K (OR UHD/ULTRA-HIGH-DEFINITION) RESOLUTION
This sort of resolution, often known as 4Kor UHD (Ultra High Definition), has a pixel size of 3840 x 2160 pixels. It has a similar appearance to 2K, but it provides video artists more room to edit and zoom in. For vivid color, graphics, or dramatic viewing, both 2K and 4K resolutions are available. Unless you wish to tweak colors or trim in closer, there aren’t enough visible distinctions between 2K and 4K. So, it matters when you want to change a certain detail, but it doesn’t matter when someone else is looking at it.
The resolution of 4K videos is: 3840 x 2160 (or 2160p / simply 4K) is a resolution of 3840 x 2160 pixels.
Why Would You Want To Upload A 4k Video?
YouTube is the second-largest social media site, with approximately 1.9 billion monthly active users. YouTube is where you want to be to access this large audience and promote your brand, with one billion hours of video watched every day on the platform.
However, for your target audience to watch your videos, you must ensure excellent video quality. Poorly shot or edited films may alienate your viewers, especially when there are billions of other videos to choose from on the site.
- 4k is the most satisfactory resolution for uploading to YouTube. Although not every viewer can watch videos in 4k, it ensures that your visitors get the best possible experience.
- Traditional Full HD (1920 x 1080) TVs feature four times as many pixels as 4K TVs. Because of the higher pixel density, the picture quality of 4K TVs is more colorful and detailed, even on TV displays of the same size. This distinction is most noticeable on large-screen televisions.
- Even if you recorded in 1080p and upscaled to 4K, you should post in 4K to YouTube for the finest image quality. Recording in 1080p, editing in 1080p, exporting in 4k, and YouTube viewing is sharper in 1080p.
- With 4K, you get stunning visuals with a resolution of 38402160, which is four times that of Full-HD. That’s why visuals appear crisp and lifelike, even on large-screen TVs rather than pixelated. Down-converted 4K to Full-HD photographs have superior quality and resolution than images shot in Full-HD from the start.
What Is The Best Way To Upload A 4k Video To Youtube?
The YouTube upload process is not complicated, but it does need several steps. You can finally post your video once it has been prepared and converted to MP4 format.
Follow the steps below to post your video to YouTube:
1. Go to YouTube.com in your browser.
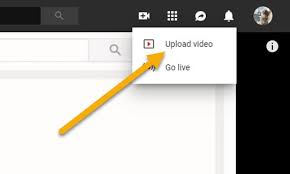
2. Log in to your account and click the “Create” symbol, which looks like a camera with a plus sign, in the right corner of the menu bar.
3. Select “Upload video” from the drop-down menu.
4. Drag and drop your video file into the upload box, or select your file from the “Select File” menu and click “Open.”
5. Make a note of the title and description while YouTube is processing your video.
6. Select a video thumbnail from the options or upload your own and select your “Audience” from the drop-down menu. To manage age restriction settings.
7. Select “More Options” to add searchable keywords to your video, manage subtitles and comments, and more.
8. Select if you want to add promotions to your video by clicking “Next.”
9. Finally, click “Next” and wait for the video to be processed entirely before publishing it.
10. You can also automatically set it to publish at a later date.
Tips On How To Make Sure The Video You’re Uploading Is Of High Quality
The following are five tips for amateur and top newbie YouTubers who want to improve their videos.
1. Cut Your Video Into Clips And Organize It
While it may appear to be the simplest solution to perform an entire video at once, this might make the process tedious or even damage your video if you are interrupted or make a speech error. Smaller video segments are easier to edit and blend into a single, well-formatted video.
2. Youtube Video Export
You can also modify your videos in various formats to your heart’s content before exporting them to YouTube and publishing them. Although uploading and exporting may take some time, the quality of your video will significantly increase, and the time and work you put in will be evident.
3. Change Up Your Shots
Rather than keeping your camera fixed, try varied angles while shooting. This may not work for all of your videos, but it is critical to keep your viewers engaged while they watch them, especially if you want them to stay until the finish and come back for more. Unless you’re talking about anything incredibly essential, sitting and listening to someone talk for more than 10 minutes without the camera moving will quickly become dull or old.
4. Transitions And Effects
When editing a video with numerous parts, the use of effects and transitions can considerably impact the overall quality of the video. Filmora is far more sophisticated than Windows Movie Maker and iMovie on Mac. It also allows you to create a professional-looking YouTube video with hundreds of presets such as filters, overlays, components, transitions, and blending several layers of effects and audio to enhance your YouTube tale.
Wondershare Filmii is one of the greatest choices for Windows for beginners who wish to create video footage with templates automatically. Smart video templates, trendy filters and overlays, fun stickers and motion components, and, most importantly, advanced editing capabilities are all available.
For Win 7 or later (64-bit)
For macOS 10.12 or later
Conclusion
● This is pretty much everything we’ve gathered to assist you in uploading 4K videos to YouTube. Do not become worried. Your 4K video will be in low resolution when you first publish it. This is due to YouTube’s high-resolution processing requiring time. It could take a few hours for your video to be available in 4K mode.
● The duration, format, frame rate, and resolution of your video all affect the processing time for high-definition videos. If you don’t want your video to be seen unless it has a high-quality option, upload it as unlisted and then publish it once 4K resolution is available.
Many people have a strong desire to make videos. Whether you make videos for a living or as a pastime, it doesn’t matter. When you make a fantastic film that you’re pleased with, you want to show it off to your friends and family. YouTube, the most popular site for sharing videos on various themes, is one of the most incredible places to start.
YouTube is fantastic for sharing videos, but it can be harsh on artists due to the high bar for content and video quality. If you want to succeed as a YouTuber, you must create videos that are informative and high-resolution. This is critical since your viewers may wish to watch your movies on a computer screen or a 4K smart TV.
If you’ve decided to make videos in 4K resolution, you’ll find information on recommended encoding settings, how to upload a video to YouTube, potential problems, and more below.
In this article
01 What Is The Distinction Between Various Resolutions?
02 Why Would You Want To Upload A 4k Video?
03 What Is The Best Way To Upload A 4k Video To Youtube?
04 Tips On How To Make Sure The Video You’re Uploading Is Of High Quality
What Is The Distinction Between Various Resolutions?
The number of pixels on a screen is referred to as resolution. Low resolution indicates fewer pixels and typically less space, whereas high resolution means more pixels and generally greater space and detail. You probably have a poor resolution if you’re using a standard laptop or an old screen.
When watching a video on a larger screen, the resolution significantly impacts your viewing experience. Whether it’s a live stream or an on-demand movie, the correct resolution is crucial to reaching a wider audience, and this is where iPhones and iPads appear to have an advantage. Let’s take a closer look at each of these resolution types and their associated pixel sizes.
1. SD RESOLUTION (STANDARD DEFINITION)
Previously, resolutions were separated into SD (Standard Definition) and HD (High Definition) categories. SD was defined as a video with a resolution of less than 720p. However, as television and computer monitor display resolutions improved over time, a video was less likely to be shot in Standard Definition.
The following are the most common standard video resolutions:
- 640 × 360 pixels (or 360p)
- 640 × 480 pixels (or 480p)
2. RESOLUTION: 720P HD (HIGH DEFINITION)
The lowest video resolution is 720p, which is commonly referred to as ‘HD.’ 720p (1280 x 720 pixels) is a resolution recognized for modest web content, even though most videos require at least 1080p. Because most computer monitors are now in HD, the recommended practice for web and streaming is to choose a resolution higher than 720p.
The resolution of HD videos is usually: 1280 x 720 pixels (or 720p)
3. 1080P FULL HD RESOLUTION
1080p resolutions, also known as ‘Full HD,’ have become the industry standard for a clear HD video that doesn’t take up a lot of storage space. It’s also worth noting that this is the standard screen resolution for all smartphones.
The resolution of full HD videos is usually: 1920 x 1080 pixels (or 1080p)
4. 2K RESOLUTION WITH QHD (QUAD HIGH DEFINITION)
Quad HD resolution, or QHD for short, is widely found on high-end smartphones and gaming monitors. The resolution of 1440p is four times that of HD Ready (or 720p HD). Many high-end smartphones have a Quad HD+ resolution (296 x 1440 pixels), which is ideal for 1440p. Another common screen resolution is 2K, which allows for larger displays and reframing without sacrificing quality or image editing.
The resolution of QHD and 2K videos is:
- 2560 x 1440 pixels in QHD (or 1440p)
- 2048 x 1080 pixels in 2K (or 1080p)
5. 4K (OR UHD/ULTRA-HIGH-DEFINITION) RESOLUTION
This sort of resolution, often known as 4Kor UHD (Ultra High Definition), has a pixel size of 3840 x 2160 pixels. It has a similar appearance to 2K, but it provides video artists more room to edit and zoom in. For vivid color, graphics, or dramatic viewing, both 2K and 4K resolutions are available. Unless you wish to tweak colors or trim in closer, there aren’t enough visible distinctions between 2K and 4K. So, it matters when you want to change a certain detail, but it doesn’t matter when someone else is looking at it.
The resolution of 4K videos is: 3840 x 2160 (or 2160p / simply 4K) is a resolution of 3840 x 2160 pixels.
Why Would You Want To Upload A 4k Video?
YouTube is the second-largest social media site, with approximately 1.9 billion monthly active users. YouTube is where you want to be to access this large audience and promote your brand, with one billion hours of video watched every day on the platform.
However, for your target audience to watch your videos, you must ensure excellent video quality. Poorly shot or edited films may alienate your viewers, especially when there are billions of other videos to choose from on the site.
- 4k is the most satisfactory resolution for uploading to YouTube. Although not every viewer can watch videos in 4k, it ensures that your visitors get the best possible experience.
- Traditional Full HD (1920 x 1080) TVs feature four times as many pixels as 4K TVs. Because of the higher pixel density, the picture quality of 4K TVs is more colorful and detailed, even on TV displays of the same size. This distinction is most noticeable on large-screen televisions.
- Even if you recorded in 1080p and upscaled to 4K, you should post in 4K to YouTube for the finest image quality. Recording in 1080p, editing in 1080p, exporting in 4k, and YouTube viewing is sharper in 1080p.
- With 4K, you get stunning visuals with a resolution of 38402160, which is four times that of Full-HD. That’s why visuals appear crisp and lifelike, even on large-screen TVs rather than pixelated. Down-converted 4K to Full-HD photographs have superior quality and resolution than images shot in Full-HD from the start.
What Is The Best Way To Upload A 4k Video To Youtube?
The YouTube upload process is not complicated, but it does need several steps. You can finally post your video once it has been prepared and converted to MP4 format.
Follow the steps below to post your video to YouTube:
1. Go to YouTube.com in your browser.
2. Log in to your account and click the “Create” symbol, which looks like a camera with a plus sign, in the right corner of the menu bar.
3. Select “Upload video” from the drop-down menu.
4. Drag and drop your video file into the upload box, or select your file from the “Select File” menu and click “Open.”
5. Make a note of the title and description while YouTube is processing your video.
6. Select a video thumbnail from the options or upload your own and select your “Audience” from the drop-down menu. To manage age restriction settings.
7. Select “More Options” to add searchable keywords to your video, manage subtitles and comments, and more.
8. Select if you want to add promotions to your video by clicking “Next.”
9. Finally, click “Next” and wait for the video to be processed entirely before publishing it.
10. You can also automatically set it to publish at a later date.
Tips On How To Make Sure The Video You’re Uploading Is Of High Quality
The following are five tips for amateur and top newbie YouTubers who want to improve their videos.
1. Cut Your Video Into Clips And Organize It
While it may appear to be the simplest solution to perform an entire video at once, this might make the process tedious or even damage your video if you are interrupted or make a speech error. Smaller video segments are easier to edit and blend into a single, well-formatted video.
2. Youtube Video Export
You can also modify your videos in various formats to your heart’s content before exporting them to YouTube and publishing them. Although uploading and exporting may take some time, the quality of your video will significantly increase, and the time and work you put in will be evident.
3. Change Up Your Shots
Rather than keeping your camera fixed, try varied angles while shooting. This may not work for all of your videos, but it is critical to keep your viewers engaged while they watch them, especially if you want them to stay until the finish and come back for more. Unless you’re talking about anything incredibly essential, sitting and listening to someone talk for more than 10 minutes without the camera moving will quickly become dull or old.
4. Transitions And Effects
When editing a video with numerous parts, the use of effects and transitions can considerably impact the overall quality of the video. Filmora is far more sophisticated than Windows Movie Maker and iMovie on Mac. It also allows you to create a professional-looking YouTube video with hundreds of presets such as filters, overlays, components, transitions, and blending several layers of effects and audio to enhance your YouTube tale.
Wondershare Filmii is one of the greatest choices for Windows for beginners who wish to create video footage with templates automatically. Smart video templates, trendy filters and overlays, fun stickers and motion components, and, most importantly, advanced editing capabilities are all available.
For Win 7 or later (64-bit)
For macOS 10.12 or later
Conclusion
● This is pretty much everything we’ve gathered to assist you in uploading 4K videos to YouTube. Do not become worried. Your 4K video will be in low resolution when you first publish it. This is due to YouTube’s high-resolution processing requiring time. It could take a few hours for your video to be available in 4K mode.
● The duration, format, frame rate, and resolution of your video all affect the processing time for high-definition videos. If you don’t want your video to be seen unless it has a high-quality option, upload it as unlisted and then publish it once 4K resolution is available.
Also read:
- 2024 Approved Access Exclusive Video Artwork – Free, Flawless, and Fast
- [New] Elevate Your Channel's Popularity with 12 Key Growth Techniques
- In 2024, Create Effective YouTube Advertisements on a Budget
- Elite Edits The Best Video Editors Ranked for 2024
- Maximize Impact with These 11 Economical YouTube Naming Tools
- Your First Steps in Online Broadcasting via OBS
- Ultimate Non-Popular Films Viewing List
- [Updated] Elevating Your Content's Reach Without Breaching Laws
- Unparalleled Selection of Budget Stock Media Sites
- 2024 Approved How to Create a YouTube Music Playlist
- 2024 Approved Cutting-Edge Video Edits Without Spending Navigate Through The 8 Tools
- In 2024, Boost Your Game Presence A Comprehensible Guide to FreeGame Hashtags
- Essential Screen Recording Software List for Vloggers
- [Updated] Crafting Captivating Video Narratives for YouTube Success
- [New] Create Identity A Quick Walkthrough of Customizing Your YouTube Url
- Embedding YouTube Playlists with Minimal Complexity and Maximum Impact
- Leverage Tags A Step-by-Step YouTube Tactical Guide
- Amplify Impact Through Effective Video Marketing on YouTube's Top 5 Moves
- In 2024, Elevate Your Content Top Reasons and Solutions for Gaining Video Views
- [New] Elevate Your Channel Techniques for Logo Insertion in Videos
- Streaming Services Showdown Vimeo Versus YouTube
- Discover the 10 YT Channels with Swift Ascendancy and Intellect
- Per-View Payment Potential for Online Content Creators
- [New] Crafting Link-Driven Success A Backlink Blueprint for Channels
- Direct YouTube Tunes to MP3s Online & Offline Options
- Personalize Your YouTube Movie's Length
- Editorial Spellbinding Secrets Revealed
- 2024 Approved Designing a Memorable YouTube Sign-Off
- 2024 Approved Crafting Quality Videos A Guide to Apple Device Screen Recording
- Understanding YouTube Post-Upload Process
- A Step-by-Step Journey Through High-Impact YouTube Banner Designs for 2024
- Enrich Your Presentations - Include YouTube Videos in Slate for 2024
- Enhancing YouTube Thumbnails Neon Borders - Top 3 Methods for 2024
- In 2024, Bewitching Blend YouTube Edition of Top Magic Tricks
- 2024 Approved Bridging Platforms Uploading From Twitch to YouTube
- In 2024, Choreographing Climactic Crescendos
- 2024 Approved Crafting Your Own YouTube Subscribe Shortcut
- Epicurean Epiphanies Filming Feast Creation
- Substitute Filmmaking Gems at #7 Spot
- In 2024, Dismantle That Dominating Green Distortion in Mac-Based Videos
- Maximizing Youtube Shorts Earnings Essentials and Profit Prospects
- The Ultimate Roadmap to Understanding View Counts & Money Made
- [Updated] A Step-by-Step Approach to Mastering Free YouTube Video Transcription
- [Updated] Elite Recording Devices for Livestream Producers
- Amplify Your Content Best Practices in Collaborative YouTube Outros
- 5 Highest-Rated VR Gear for UAVs for 2024
- How To Easily Unlock ZTE Screen?
- In 2024, Disabled iPhone SE How to Unlock a Disabled iPhone SE?
- [New] Mastering Social Media Top 10 Ingenious IGTV Methods for Brands for 2024
- New In 2024, The Elite Selection Best-Selling Mac Audio Editing Tools, Ranked
- In 2024, 6 Proven Ways to Unlock Samsung Galaxy S23 FE Phone When You Forget the Password
- Factory Reset on iPhone 14 Pro | Dr.fone
- 2024 Approved 8 Free Instagram to MP4 Converters You Can Try [Online/Windows/Mac]
- Investment-Worthy ASMR Sound for Every Fan
- [New] In 2024, Getting Started Audacity's Guide to Microphone Use on Mac
- New Make Movies for Free Top Online Video Creation Tools
- Title: "[Updated] Dissecting YouTube Revenue How Much Do You Earning From AdSense per KV?"
- Author: Brian
- Created at : 2024-05-25 13:20:06
- Updated at : 2024-05-26 13:20:06
- Link: https://youtube-video-recordings.techidaily.com/updated-dissecting-youtube-revenue-how-much-do-you-earning-from-adsense-per-kv/
- License: This work is licensed under CC BY-NC-SA 4.0.
