![[Updated] Disciplined Device Use Effective Ways to Remove Youtube Channels](https://thmb.techidaily.com/fa134e33a19af2a6d89131747e3b5172ee7c3295829397bcf7ff50f7e4bad5d7.png)
"[Updated] Disciplined Device Use Effective Ways to Remove Youtube Channels"
Disciplined Device Use: Effective Ways to Remove Youtube Channels
How to Block YouTube Channels on Computer and Mobile Phones

Richard Bennett
Mar 27, 2024• Proven solutions
Anyone spending any time online recently might have come across something they regard as deplorable. YouTube consumes more than half of the internet’s users with its whopping 2 billion active monthly users. For all that might seem good on the humongous video sharing platform some of the most divisive of all human interactions happen on YouTube.
Now the question arises on how you can safeguard yourself and your family from the bad and inadequate content and how to block YouTube channels that create the toxic material.
In this article, we’ll go through how you can block YouTube channels and content creators that you consider will have bad effects on your mental health. You will learn:
- Part 1: How to block YouTube channels on a computer (Mac & Windows)
- Part 2: How to block YouTube channels on Mobile Phones (Android & iPhone)
- Part 3: How to block content on YouTube Kids
Part 1: How to block YouTube channels on a computer (Mac & Windows)
Blocking will prevent the user from trolling and bullying you or your channel subscribers. This will effectively prevent them to comment and interact with your video content. However, there is no way for you to prevent the bullies from watching your content you can at least prevent them from damaging your reputation, badmouthing, and inciting your active subscribers.
The process of blocking YouTube channels on a computer system is fairly simple and will only require a minute if you know the name of the user you want to block. Follow the steps below:
- 1. Log in to your YouTube account and look out for the account you want to block.
- 2. When you’re in the account head over to the About section. You can find it in the toolbar beneath the channel art or banner.
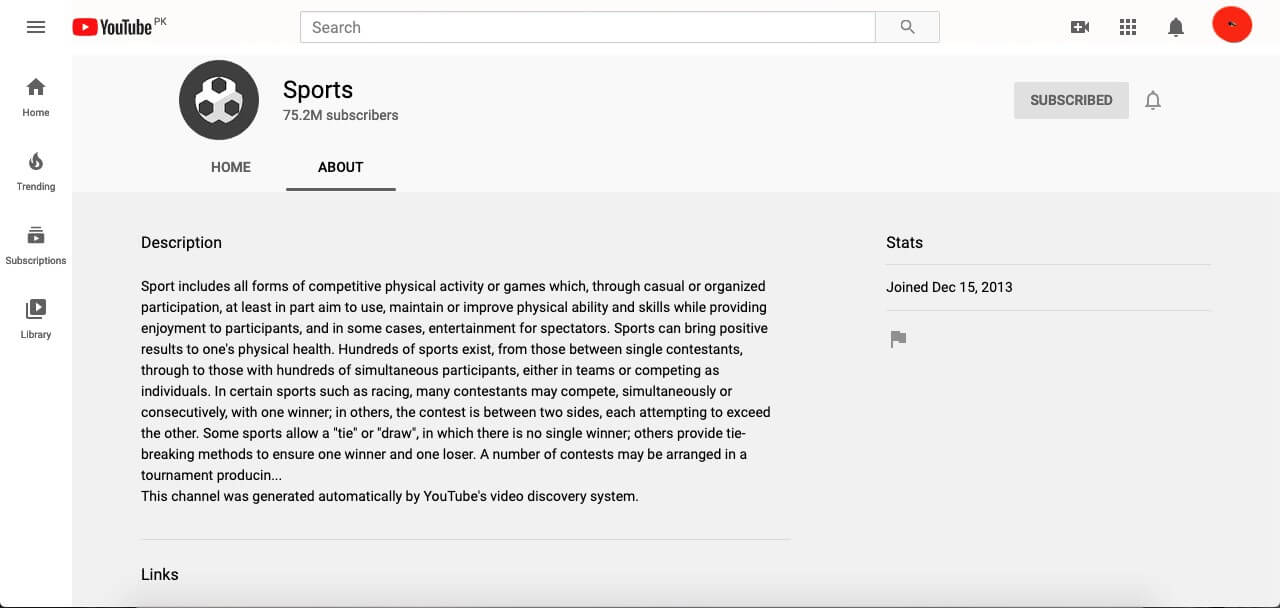
- 3. On the right-hand side right under the Stats, you will find a flag icon. Press the icon and it will show a drop-down menu, select Block user.
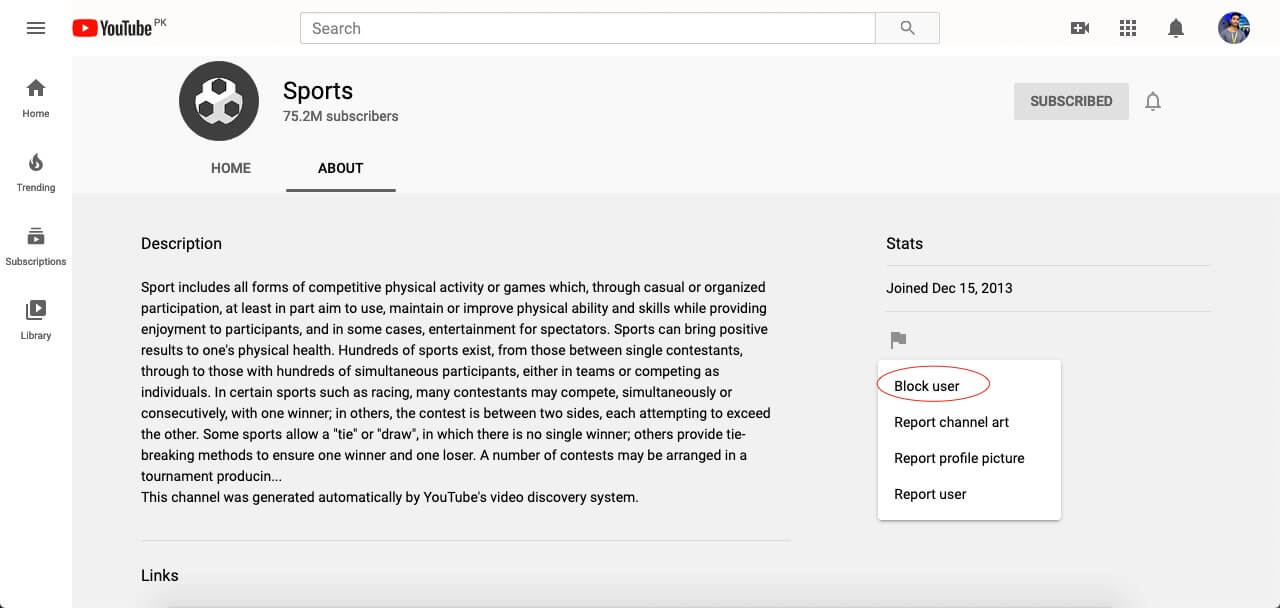
- 4. You will be prompted to confirm your selection, click Submit to confirm.

Part 2: How to block YouTube channels on Mobile Phones (Android & iPhone)
One can also block YouTube channels on mobile devices in the same manner as you would do it on the desktop computer. It will do the same effect and prevent bullying users from interacting with your content.
- 1. Sign in to your YouTube account on either YouTube’s Android or iPhone app.
- 2. Look around for the account or user you want to block.
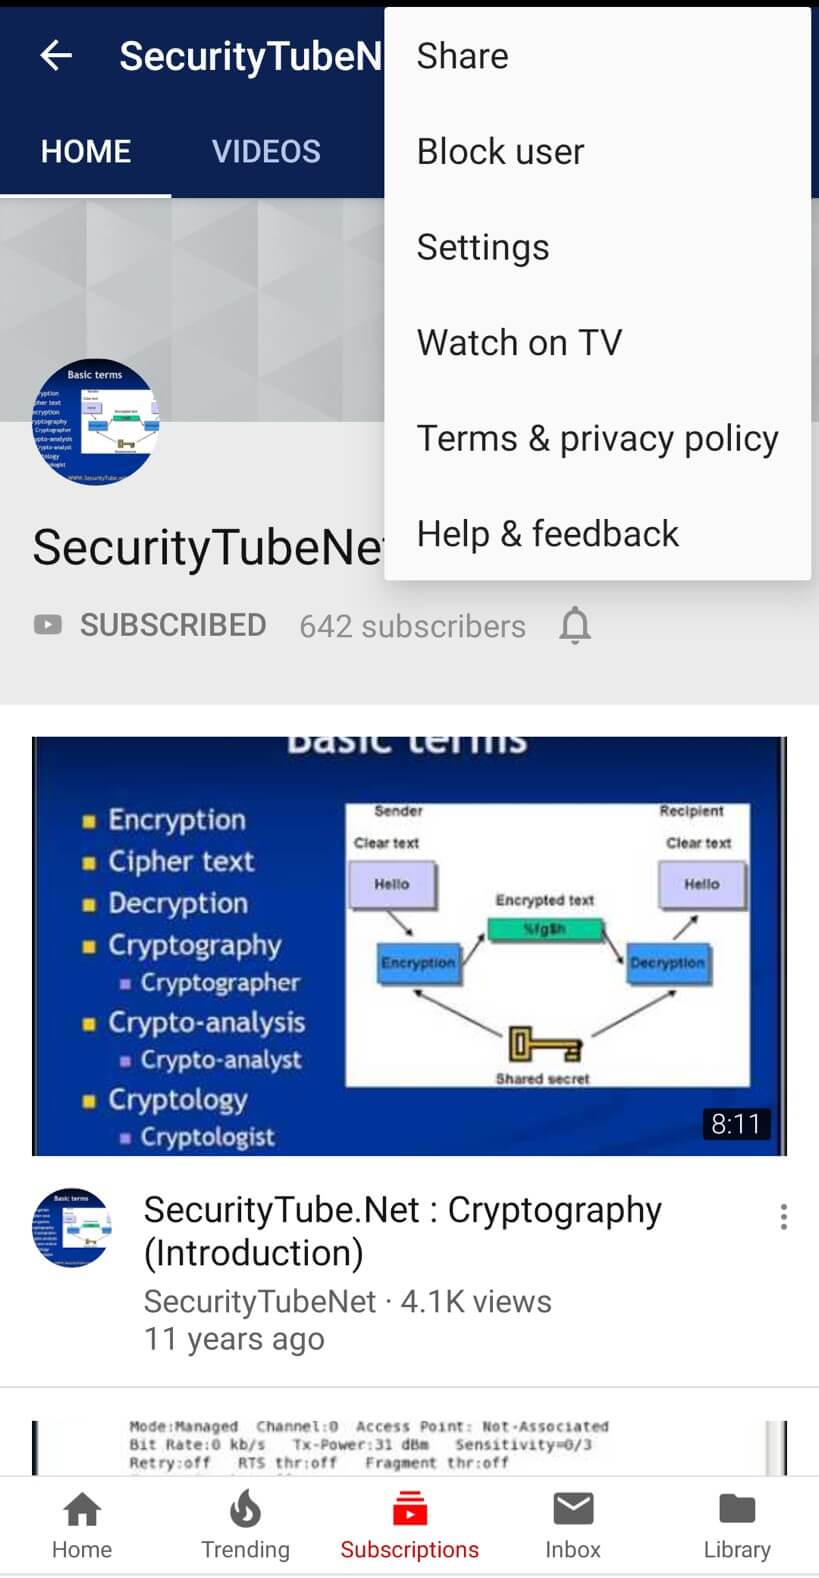
- 3. Open a particular account that you intend to block and go to their main account page.

- 4. When you’re on the account page, open the menu at the top-right corner of the screen and tap Block user.

Part 3: Block content on YouTube kids
YouTube Kids is the alternative version of YouTube’s video service dedicated and designed for kids. It’s entirely for children with all the content curated for kids’ education, family-friendly videos, and channels surrounding kid’s liking. The interface features colorful large images, and icons with five categories to explore from.
The app filters all the content allowing only safe content and parental control to watch their children’s online activity. The app prevents commenting and any kind of cyber bullying-related issues. YouTube Kids need to be set up by an adult with singing into the app with their Google credentials. Parents can sign in and block channels or videos they don’t see fit for their children. Let us see how to block YouTube channels on YouTube kids.
- 1. Open the YouTube Kids app and tap on I’m a parent to set up the app.

- 2. Sign in with your preferred Google account.

- 3. Here you’ll see a button Send Parental Consent Email, press it.
- 4. You’ll get an activation code on your email address.
- 5. Come back to the application and enter the code.
Now as you’re signed in as a parent you can block channels and specific content.
I. Block on Home screen
- 1. On the Home screen press the dotted menu next to the video

- 2. In the menu list, you will see Block this video, tap it.
- 3. You’ll be asked to enter the numbers written on the screen or a custom passcode.

II. Block from Watch Page
- 1. On the Watch Page tap the dotted More option at the top right corner of the video.

- 2. Press the Block option.
- 3. A dialog box will appear with two options, Block this video for blocking only this particular video or Block this channel to block the entire channel associated with the video.

- 4. Select any of the two options and then press Block again.
- 5. Enter the numbers you calculate from the presented numbers or a custom passcode.

Conclusion
Every minute more than 300 hours of video content is uploaded on to the YouTube databases while 5 billion videos are watched every day. This only shows the metrics a content creator and a user have to deal with. Content creators need to protect themselves from the unending trolls and scams that hit every other channel and affect its userbase. While kids and sensitive portions of the human population have to maintain a safe distance from damaging and provoking content that circulates on the platform. To safeguard both ends of the platform I made this guide to streamline the process of how to block YouTube channels and videos from affecting your happy life.
Richard Bennett
Richard Bennett is a writer and a lover of all things video.
Follow @Richard Bennett
Richard Bennett
Mar 27, 2024• Proven solutions
Anyone spending any time online recently might have come across something they regard as deplorable. YouTube consumes more than half of the internet’s users with its whopping 2 billion active monthly users. For all that might seem good on the humongous video sharing platform some of the most divisive of all human interactions happen on YouTube.
Now the question arises on how you can safeguard yourself and your family from the bad and inadequate content and how to block YouTube channels that create the toxic material.
In this article, we’ll go through how you can block YouTube channels and content creators that you consider will have bad effects on your mental health. You will learn:
- Part 1: How to block YouTube channels on a computer (Mac & Windows)
- Part 2: How to block YouTube channels on Mobile Phones (Android & iPhone)
- Part 3: How to block content on YouTube Kids
Part 1: How to block YouTube channels on a computer (Mac & Windows)
Blocking will prevent the user from trolling and bullying you or your channel subscribers. This will effectively prevent them to comment and interact with your video content. However, there is no way for you to prevent the bullies from watching your content you can at least prevent them from damaging your reputation, badmouthing, and inciting your active subscribers.
The process of blocking YouTube channels on a computer system is fairly simple and will only require a minute if you know the name of the user you want to block. Follow the steps below:
- 1. Log in to your YouTube account and look out for the account you want to block.
- 2. When you’re in the account head over to the About section. You can find it in the toolbar beneath the channel art or banner.
- 3. On the right-hand side right under the Stats, you will find a flag icon. Press the icon and it will show a drop-down menu, select Block user.
- 4. You will be prompted to confirm your selection, click Submit to confirm.
Part 2: How to block YouTube channels on Mobile Phones (Android & iPhone)
One can also block YouTube channels on mobile devices in the same manner as you would do it on the desktop computer. It will do the same effect and prevent bullying users from interacting with your content.
- 1. Sign in to your YouTube account on either YouTube’s Android or iPhone app.
- 2. Look around for the account or user you want to block.
- 3. Open a particular account that you intend to block and go to their main account page.
- 4. When you’re on the account page, open the menu at the top-right corner of the screen and tap Block user.
Part 3: Block content on YouTube kids
YouTube Kids is the alternative version of YouTube’s video service dedicated and designed for kids. It’s entirely for children with all the content curated for kids’ education, family-friendly videos, and channels surrounding kid’s liking. The interface features colorful large images, and icons with five categories to explore from.
The app filters all the content allowing only safe content and parental control to watch their children’s online activity. The app prevents commenting and any kind of cyber bullying-related issues. YouTube Kids need to be set up by an adult with singing into the app with their Google credentials. Parents can sign in and block channels or videos they don’t see fit for their children. Let us see how to block YouTube channels on YouTube kids.
- 1. Open the YouTube Kids app and tap on I’m a parent to set up the app.
- 2. Sign in with your preferred Google account.
- 3. Here you’ll see a button Send Parental Consent Email, press it.
- 4. You’ll get an activation code on your email address.
- 5. Come back to the application and enter the code.
Now as you’re signed in as a parent you can block channels and specific content.
I. Block on Home screen
- 1. On the Home screen press the dotted menu next to the video
- 2. In the menu list, you will see Block this video, tap it.
- 3. You’ll be asked to enter the numbers written on the screen or a custom passcode.
II. Block from Watch Page
- 1. On the Watch Page tap the dotted More option at the top right corner of the video.
- 2. Press the Block option.
- 3. A dialog box will appear with two options, Block this video for blocking only this particular video or Block this channel to block the entire channel associated with the video.
- 4. Select any of the two options and then press Block again.
- 5. Enter the numbers you calculate from the presented numbers or a custom passcode.
Conclusion
Every minute more than 300 hours of video content is uploaded on to the YouTube databases while 5 billion videos are watched every day. This only shows the metrics a content creator and a user have to deal with. Content creators need to protect themselves from the unending trolls and scams that hit every other channel and affect its userbase. While kids and sensitive portions of the human population have to maintain a safe distance from damaging and provoking content that circulates on the platform. To safeguard both ends of the platform I made this guide to streamline the process of how to block YouTube channels and videos from affecting your happy life.
Richard Bennett
Richard Bennett is a writer and a lover of all things video.
Follow @Richard Bennett
Mastering Zero-Cost Online Seminars: YouTube Edition
How to Host a Webinar on YouTube for Free

Max Wales
Mar 27, 2024• Proven solutions
Promoting products, offering educational content or in-depth tutorials on virtually any subject through webinars will enable you to reach new audiences and offer your services on a worldwide market. There are thousands of webinar software products and online platforms, but most of them are quite expensive and they require you to have a considerable amount of experience with the process of setting up and recording webinars.
An alternative solution is available if your budget is tight, but you’d still like to produce a great webinar. We are going to take you through all the steps you’ll need to take if you’d like to host a webinar for free and help you spread the word about the products and services you’re offering.
![]()

The All-in-One Screen Recorder & Video Editor
- Record desktop screen, voiceover, and webcam simultaneously
- Edit recorded clips quickly with a wide range of professional tools
- Built-in plentiful templates and effects
- Export to MP4, MOV, MKV, GIF and multiple formats
For Win 7 or later (64-bit)
For macOS 10.12 or later
 Secure Download
Hosting a Webinar for Free
The world’s largest video sharing platform also features broadcasting options that enable its users to schedule events and thus host webinars free of charge. Previously known as the Google Hangouts on Air, the YouTube Live feature is fairly simple to set up, but before you start your first webinar you will need to choose a landing page and a chatbox. If you already have a website you can simply copy and paste the embed link and create a landing page for your webinar, or you can use landing pages software products such as LeadPages or Unbounce if you don’t have your own online domain. For setting up chatboxes for your webinars we recommend using Chatroll or RumbleTalk platforms, although you’ll have to pay a fee if you choose to chat with your audience using these computer programs. So here’s how you can host your first webinar on YouTube for free.
Step 1. Create a YouTube Event
If you don’t already have an account on YouTube, you’ll have to create one before you can schedule your first live event. After making sure that you are logged in to your YouTube account head over to the Creator Studio, and click on the Live Streaming tab. Select the New Live Event option and proceed to insert the basic information about the event such as the title, date when the event should take place, tags or a short description of the webinar you’re planning.
The Advanced Settings tab will enable you the access to options that will allow you to assign the license and the owner of the webinar. You can also choose the language, set the location or select the category of the event.
Step 2. Copy the Embed Code and Paste it To Your Webinar’s Landing Page
When you adjust all the settings for your upcoming event, you should click on the Share button. This action will grant you access to the video’s embed link, so you can just copy it to your website, or to the landing page you’ve created with the appropriate software.
Step 3. Add the Chatbox to The Webinar’s Landing Page
Communicating with the audience during the webinar is important, and for that reason, embedding the chatbox link on the webinar’s landing page is a crucial step that will allow you to interact with the participants of your webinar. Chatbox platforms for live events such as Chatroll or RumbleTalk offer amazing features, but they cannot be used for free, which means that you’ll have to invest a certain amount of money in order to include a chatbox in your webinar.
Step 4. Publish the Webinar’s Landing Page and Get the URL
Making the event public a week or a few days before it takes place will provide you with enough time to promote it. Include the webinar’s landing page URL in the promotional social media posts and make sure to send out invites for your webinar to your friends and colleagues. Email marketing methods can help you get a larger number of attendees, which is the reason why investing time in the promotion of your webinar can prove to be extremely beneficial.
Step 5. Start your Webinar
Hit the Go Live Now button, when you are ready to start your first webinar and enjoy sharing your skills and knowledge with your audience. Even though YouTube offers a simple way to host webinars for free, it lacks the advanced options that enable you to use the prerecorded footage, keep track of the webinar’s analytics or create virtual whiteboards and polls.
Read More to Get : 10 Best Free Video Hosting Sites for Private/Business Online
Max Wales
Max Wales is a writer and a lover of all things video.
Follow @Max Wales
Max Wales
Mar 27, 2024• Proven solutions
Promoting products, offering educational content or in-depth tutorials on virtually any subject through webinars will enable you to reach new audiences and offer your services on a worldwide market. There are thousands of webinar software products and online platforms, but most of them are quite expensive and they require you to have a considerable amount of experience with the process of setting up and recording webinars.
An alternative solution is available if your budget is tight, but you’d still like to produce a great webinar. We are going to take you through all the steps you’ll need to take if you’d like to host a webinar for free and help you spread the word about the products and services you’re offering.
![]()
The All-in-One Screen Recorder & Video Editor
- Record desktop screen, voiceover, and webcam simultaneously
- Edit recorded clips quickly with a wide range of professional tools
- Built-in plentiful templates and effects
- Export to MP4, MOV, MKV, GIF and multiple formats
For Win 7 or later (64-bit)
For macOS 10.12 or later
Secure Download
Hosting a Webinar for Free
The world’s largest video sharing platform also features broadcasting options that enable its users to schedule events and thus host webinars free of charge. Previously known as the Google Hangouts on Air, the YouTube Live feature is fairly simple to set up, but before you start your first webinar you will need to choose a landing page and a chatbox. If you already have a website you can simply copy and paste the embed link and create a landing page for your webinar, or you can use landing pages software products such as LeadPages or Unbounce if you don’t have your own online domain. For setting up chatboxes for your webinars we recommend using Chatroll or RumbleTalk platforms, although you’ll have to pay a fee if you choose to chat with your audience using these computer programs. So here’s how you can host your first webinar on YouTube for free.
Step 1. Create a YouTube Event
If you don’t already have an account on YouTube, you’ll have to create one before you can schedule your first live event. After making sure that you are logged in to your YouTube account head over to the Creator Studio, and click on the Live Streaming tab. Select the New Live Event option and proceed to insert the basic information about the event such as the title, date when the event should take place, tags or a short description of the webinar you’re planning.
The Advanced Settings tab will enable you the access to options that will allow you to assign the license and the owner of the webinar. You can also choose the language, set the location or select the category of the event.
Step 2. Copy the Embed Code and Paste it To Your Webinar’s Landing Page
When you adjust all the settings for your upcoming event, you should click on the Share button. This action will grant you access to the video’s embed link, so you can just copy it to your website, or to the landing page you’ve created with the appropriate software.
Step 3. Add the Chatbox to The Webinar’s Landing Page
Communicating with the audience during the webinar is important, and for that reason, embedding the chatbox link on the webinar’s landing page is a crucial step that will allow you to interact with the participants of your webinar. Chatbox platforms for live events such as Chatroll or RumbleTalk offer amazing features, but they cannot be used for free, which means that you’ll have to invest a certain amount of money in order to include a chatbox in your webinar.
Step 4. Publish the Webinar’s Landing Page and Get the URL
Making the event public a week or a few days before it takes place will provide you with enough time to promote it. Include the webinar’s landing page URL in the promotional social media posts and make sure to send out invites for your webinar to your friends and colleagues. Email marketing methods can help you get a larger number of attendees, which is the reason why investing time in the promotion of your webinar can prove to be extremely beneficial.
Step 5. Start your Webinar
Hit the Go Live Now button, when you are ready to start your first webinar and enjoy sharing your skills and knowledge with your audience. Even though YouTube offers a simple way to host webinars for free, it lacks the advanced options that enable you to use the prerecorded footage, keep track of the webinar’s analytics or create virtual whiteboards and polls.
Read More to Get : 10 Best Free Video Hosting Sites for Private/Business Online
Max Wales
Max Wales is a writer and a lover of all things video.
Follow @Max Wales
Also read:
- [New] Deciphering YouTube Shorts A Comprehensive Overview
- [Updated] 2024 Approved Unleashing Your Creative Spark Stylistic Self-Discovery [High CTR]
- [Updated] Crafted Collections of IG Pics
- 2024 Approved Essential Steps to Apply a Creative Commons Copyright
- 2024 Approved How To Access and Watch Nonstop NBA Live Stream Free Online
- 免費且快速 MOV到MP3線上轉檔解碼器 - Movavi
- Can I Browse Through All My Contact's Shared Videos & Photos, In 2024
- Does Tecno Camon 20 Premier 5G Have Find My Friends? | Dr.fone
- In 2024, Discover the Best 11 No-Fee Name Crafting for Channels
- In 2024, How To Fix iPhone 6 Plus Unavailable Issue With Ease | Dr.fone
- Slice the Baguette Lengthwise, but Not All the Way Through – Leave About an Inch of Bread Intact at One End to Hold It Together.
- The Ultimate List of Engaging History Content on YouTube
- Unlock Global Access: How to Region-Free Watch Your Favorite DVDs on Any Player or PC
- Title: [Updated] Disciplined Device Use Effective Ways to Remove Youtube Channels
- Author: Brian
- Created at : 2024-09-28 17:34:54
- Updated at : 2024-10-01 17:03:07
- Link: https://youtube-video-recordings.techidaily.com/updated-disciplined-device-use-effective-ways-to-remove-youtube-channels/
- License: This work is licensed under CC BY-NC-SA 4.0.