
![[Updated] Cutting Costs without Compromising on YouTube Intros Quality](https://www.lifewire.com/thmb/K0DwKelWej40GlQ5GG81_hN0-Nk=/400x300/filters:no_upscale():max_bytes(150000):strip_icc()/GettyImages-607477463-04c14d0af0554e4dbc78475df1409e5e.jpg)
[Updated] Cutting Costs without Compromising on YouTube Intros Quality
Cutting Costs without Compromising on YouTube Intros Quality
How to Make a Cool Intro for YouTube? [+Free Templates]

Richard Bennett
Mar 27, 2024• Proven solutions
For a professional presence on YouTube intro is a must. It is for the same reason that how to make an intro is one of the most popular topic now.
It is the impression that will make sure that the users are attracted. The video’s success greatly depends upon the intro as it will allow the users to get the idea.
The good news is that YouTube intro making is not a complex process due to some software and websites offering the services, which we will discuss in this article.
You will learn :
- What Is YouTube Intro?
- Why You Need a YouTube Intro?
- How to Make Your Own Perfect YouTube Intro Easily?
- Key Takeaways to Create Great Attractive YouTube Intro
- Popular YouTube Intro Styles and Templates
Wondershare Filmstock Gaming Video Editing Skils ](https://filmstock.wondershare.com/creative-theme-game?source%5Fchannel=seo%5Farticle?spm=rs.filmora%5Fweb )
What Is YouTube Intro?
YouTube Intro is a short clip at the start of the video that introduces the maker as well as the topic under discussion. It can be rightfully called as the trademark of your channel. The intro tells the user who you really are. This is the only part of the video that is brief and allows the users to get the first impact of you.
There are thousands of software programs and websites that allow you to get breathtaking animated intros. You can use any of the intro templates to make your first impression the best of all. The user will get to know more about you and will also subscribe to your channel.
There are certain creators that divide the intro into different sections.
Making an intro has never been as easy as it is now. Kudos to the programs that are available online as well as offline.
Why You Need a YouTube Intro?
There are many reasons for which you need YouTube intro. Some reasons are mentioned as under for you better understanding.
- It will get you the relevant traffic
The intro will let the users know what your channel is all about. It will, in turn, get you the best and the most relevant leads. If you are running eCommerce business then the intro will get you into the limelight that you deserve.
- It makes a difference
It simply means that you will see a change in traffic as well as in the overall growth of your channel. You will also see the difference in the working of the channel. A good intro will bring in the relevant audience and this, in turn, will make sure that you get new ideas to make your channel stand out.
- Recognition
An intro makes sure that you get the recognition that you desire. It will also make sure that you get the best and the most advanced outcome that is related to your business. Getting recognition is like a dream come true for the vloggers.
It will make sure that the revenue bases, as well as the sales, are increased. The potential customers will only subscribe to your services and channel if your intro is relevant. Also, you need to keep it short and highly targeted.
How to Make Your Own Perfect YouTube Intro Using Filmora?
With the best and the most advanced techniques, Filmora is a program that will let you create the intro which is just awesome. The program is easy to use and will also make sure that you get to know its features in great detail. The interface, as well as the format support, is awesome.
You need not be a tech-savvy person to operate the program as it is self-explanatory. Fimora has been highly regarded as one of the best programs. It is all because of the viability that it provides to its users.
Features of the program
- The program supports a wide range of formats. You can export as well as import files in a wide range of formats.
- The user interface is intuitive and easy to understand. The graphical properties will make sure that you understand the working of it easily.
- There are more than 300 effects on the program that will make sure to get you the specialized experience you want to have with your channel.
- The intro can be directly uploaded to YouTube and there is no need to export and upload separately.
- The tech specialties of the program are highly in line with the current trends. Apart from intro making, there is a wide range of functions that the program can perform.


The Process to create your own YouTube intro by Filmora?
If you want to make intro using Filmora then it is advised to follow the steps as under to get the best outcome.
Step 1: Click on import or import media files on the main interface to make sure that the intro material is imported to the program.

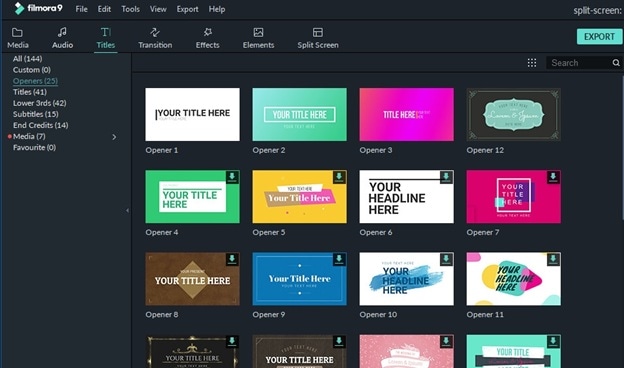
Step 2: Head over to “Title” and you can add them to you YouTube intro with ease:
Step 3: To add opener you need to head to “Opener” under Titles and right-click the one you want to select. Click apply and it will be added to the timeline.
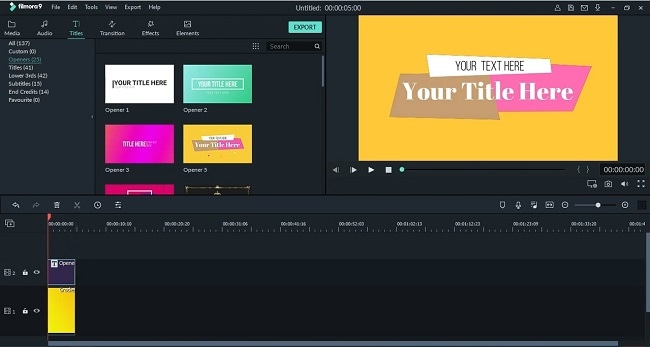
Step 4: You can also change the duration of the title effects. Drag its edge on the timeline you can also click the clock icon and enter new duration.
Step 5: Under the style tab you can change the font, text type, and other settings.

Step 6: To edit the intro, even more, click the “Advanced” button to access the advanced editing panel. Add text boxes, shapes and other effects from here.
Step 7: Under “Effects” you can access the filters and overlays to add to your project.
Step 8: The default length of the filter is 5 seconds that can be extended by dragging its corners on to the timeline.
Step 9: Under the audio heading you can change the volume of the sound of your intro to the level you want.
Step 10: You can also stabilize the video by right-clicking it in the timeline and then going to properties. You will see the stabilization editing panel.
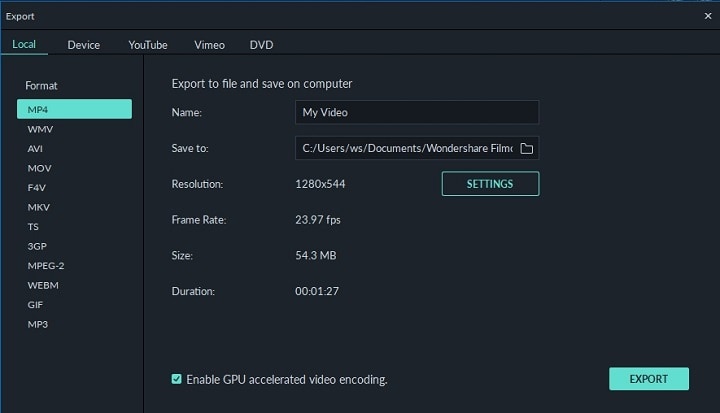
Step 11: Once the editing has been done you just need to click Export on the toolbar. Under the window that appears you can export the intro with respect to device, format, and can also burn it onto the DVD. If you want you can also directly upload the intro to YouTube and other social media platforms.
It’s very easy right? Download Filmora and make a click-driven intro now!
Key Takeaways to Create Great Attractive YouTube Intro
There are certain sections that will make sure that you get the best YouTube intro of all time. It is also important as the intro is regarded as the face of your channel. It will allow you to get the attention for your channel. Some important points are as under.
1. It must be to the point
If you want to impress your audience then remember that you only have 10 – 20 seconds. The longer the intro the bore it is. It must be highly relevant and must make sure that the users get the point of your channel. It will let you thrive a lot.
If for any reason there is an element of confusion within your intro it will never do well. If you want to know how to make an intro for YouTube then it is advised to keep reading on. This article will surely help you a lot.
2. Short means Sweet
The point is that your intro should be to the point. It means that you must never prolong your intro for any reason. Again here comes the element of relevancy.
It means that you must keep your intro as short as possible as it allows you to capture the audience in a far better manner. A short intro will make sure that you are getting the attention that you need when it comes to your channel. So it will boost your channel traffic a lot.
3. It must be in line with your channel theme
Again it is critical that your intro is relevant to your channel. It means that the intro made should represent your channel’s content instead of anything else. It will make sure that you get the best and most relevant audience.
This will once again boost your channel as well as traffic surge will also occur. You will get the best outcome that will make it possible for you to channel the traffic wherever you want. This, in turn, will also boost your channel revenue in case of monetization.
4. Awesome Music
It is the most important part that will impact your YouTube intro. Good music will make sure that you get the best outcome and the users are attracted. There are many YouTube channels that were only recognized as their music was awesome.
5. Clean Visuals
HD and the high quality intro is the key to your channel’s success. It is highly regarded as the best way to attract people. You must spend time to make sure that it looks great and to the point. This is one of the ways to make sure that your intro looks good and awesome.
6. Technically Sound
It is again important to note that technically the intro that has been made is sound and is to the point. From transitions to fade and from animations to PIP there are a lot of details that should be taken care of. It will make sure that you get the intro that is highly professional and specialized.
Popular YouTube Intro Styles and Templates
If you think making a intro yourself is too complex and time-consuming, I also find some popular YouTube intro templates for you. Some of the coolest YouTube intro styles are as follows.
1. Logo and URL Style
This is one of the most common and frequently used YouTube intro style. There are many templates that are associated with it. Some of these are mentioned as under. These effects are mostly used if you are running a tech channel but the use is not limited to this alone.
- Logo & URL Liquid effect Intro Video Template
- Logo Focus Intro Video Template
- Unveiling Logo & URL Intro Video Template
- Logo Sketch Intro Video Template
- Logo Art Intro Video Template
2. Promotional Style
For promotion, there are tons of intros that are available online and anyone can be used. The content creation with such templates is easy. It is because there are many changes that can be done to promote your channel. The best part of these templates is that they are highly customizable.
These templates can also be used to create art for the outros as well that will further solidify the channel. Promoting products at the start and end of the YouTube channel is simply an awesome and fun factor. Some of the coolest templates that can be used in this regard are as follows.
- YouTube Promo Kit by Pixrate
- Broadcast Package by Motionbear
- Typo Opener by BLAQMATRIX
- Promo Intro by 7 Roads
- Upbeat Opener by MBR effects
3. Gaming Intro Styles
It is s well-known fact that the gaming industry is booming. There are literally hundreds of gaming channels on YouTube that are working just awesome. The kiddos are earning are a lot with the channel and the future is also bright.
To get the best gaming intro you need to focus on the outcome on the gaming brand you are trying to promote. Some of the coolest gaming channel intros that could be used to get the work done are as follows.
Conclusion
This article has taught you well how to make an intro with ease and perfection. The different templates are available online which can be used to make awesome YouTube intros. The best software that you can find on the market is the Wondershare Filmora which makes the process a lot easier.
The program is known for the awesome workability as well as viability kudos to the developers of this awesome software. It is also recommended sharing this article on social media such as Facebook and Twitter so that the others can also benefit from it. It will also help others in creating awesome YouTube tutorials.
Richard Bennett
Richard Bennett is a writer and a lover of all things video.
Follow @Richard Bennett
Richard Bennett
Mar 27, 2024• Proven solutions
For a professional presence on YouTube intro is a must. It is for the same reason that how to make an intro is one of the most popular topic now.
It is the impression that will make sure that the users are attracted. The video’s success greatly depends upon the intro as it will allow the users to get the idea.
The good news is that YouTube intro making is not a complex process due to some software and websites offering the services, which we will discuss in this article.
You will learn :
- What Is YouTube Intro?
- Why You Need a YouTube Intro?
- How to Make Your Own Perfect YouTube Intro Easily?
- Key Takeaways to Create Great Attractive YouTube Intro
- Popular YouTube Intro Styles and Templates
Wondershare Filmstock Gaming Video Editing Skils ](https://filmstock.wondershare.com/creative-theme-game?source%5Fchannel=seo%5Farticle?spm=rs.filmora%5Fweb )
What Is YouTube Intro?
YouTube Intro is a short clip at the start of the video that introduces the maker as well as the topic under discussion. It can be rightfully called as the trademark of your channel. The intro tells the user who you really are. This is the only part of the video that is brief and allows the users to get the first impact of you.
There are thousands of software programs and websites that allow you to get breathtaking animated intros. You can use any of the intro templates to make your first impression the best of all. The user will get to know more about you and will also subscribe to your channel.
There are certain creators that divide the intro into different sections.
Making an intro has never been as easy as it is now. Kudos to the programs that are available online as well as offline.
Why You Need a YouTube Intro?
There are many reasons for which you need YouTube intro. Some reasons are mentioned as under for you better understanding.
- It will get you the relevant traffic
The intro will let the users know what your channel is all about. It will, in turn, get you the best and the most relevant leads. If you are running eCommerce business then the intro will get you into the limelight that you deserve.
- It makes a difference
It simply means that you will see a change in traffic as well as in the overall growth of your channel. You will also see the difference in the working of the channel. A good intro will bring in the relevant audience and this, in turn, will make sure that you get new ideas to make your channel stand out.
- Recognition
An intro makes sure that you get the recognition that you desire. It will also make sure that you get the best and the most advanced outcome that is related to your business. Getting recognition is like a dream come true for the vloggers.
It will make sure that the revenue bases, as well as the sales, are increased. The potential customers will only subscribe to your services and channel if your intro is relevant. Also, you need to keep it short and highly targeted.
How to Make Your Own Perfect YouTube Intro Using Filmora?
With the best and the most advanced techniques, Filmora is a program that will let you create the intro which is just awesome. The program is easy to use and will also make sure that you get to know its features in great detail. The interface, as well as the format support, is awesome.
You need not be a tech-savvy person to operate the program as it is self-explanatory. Fimora has been highly regarded as one of the best programs. It is all because of the viability that it provides to its users.
Features of the program
- The program supports a wide range of formats. You can export as well as import files in a wide range of formats.
- The user interface is intuitive and easy to understand. The graphical properties will make sure that you understand the working of it easily.
- There are more than 300 effects on the program that will make sure to get you the specialized experience you want to have with your channel.
- The intro can be directly uploaded to YouTube and there is no need to export and upload separately.
- The tech specialties of the program are highly in line with the current trends. Apart from intro making, there is a wide range of functions that the program can perform.
The Process to create your own YouTube intro by Filmora?
If you want to make intro using Filmora then it is advised to follow the steps as under to get the best outcome.
Step 1: Click on import or import media files on the main interface to make sure that the intro material is imported to the program.
Step 2: Head over to “Title” and you can add them to you YouTube intro with ease:
Step 3: To add opener you need to head to “Opener” under Titles and right-click the one you want to select. Click apply and it will be added to the timeline.
Step 4: You can also change the duration of the title effects. Drag its edge on the timeline you can also click the clock icon and enter new duration.
Step 5: Under the style tab you can change the font, text type, and other settings.
Step 6: To edit the intro, even more, click the “Advanced” button to access the advanced editing panel. Add text boxes, shapes and other effects from here.
Step 7: Under “Effects” you can access the filters and overlays to add to your project.
Step 8: The default length of the filter is 5 seconds that can be extended by dragging its corners on to the timeline.
Step 9: Under the audio heading you can change the volume of the sound of your intro to the level you want.
Step 10: You can also stabilize the video by right-clicking it in the timeline and then going to properties. You will see the stabilization editing panel.
Step 11: Once the editing has been done you just need to click Export on the toolbar. Under the window that appears you can export the intro with respect to device, format, and can also burn it onto the DVD. If you want you can also directly upload the intro to YouTube and other social media platforms.
It’s very easy right? Download Filmora and make a click-driven intro now!
Key Takeaways to Create Great Attractive YouTube Intro
There are certain sections that will make sure that you get the best YouTube intro of all time. It is also important as the intro is regarded as the face of your channel. It will allow you to get the attention for your channel. Some important points are as under.
1. It must be to the point
If you want to impress your audience then remember that you only have 10 – 20 seconds. The longer the intro the bore it is. It must be highly relevant and must make sure that the users get the point of your channel. It will let you thrive a lot.
If for any reason there is an element of confusion within your intro it will never do well. If you want to know how to make an intro for YouTube then it is advised to keep reading on. This article will surely help you a lot.
2. Short means Sweet
The point is that your intro should be to the point. It means that you must never prolong your intro for any reason. Again here comes the element of relevancy.
It means that you must keep your intro as short as possible as it allows you to capture the audience in a far better manner. A short intro will make sure that you are getting the attention that you need when it comes to your channel. So it will boost your channel traffic a lot.
3. It must be in line with your channel theme
Again it is critical that your intro is relevant to your channel. It means that the intro made should represent your channel’s content instead of anything else. It will make sure that you get the best and most relevant audience.
This will once again boost your channel as well as traffic surge will also occur. You will get the best outcome that will make it possible for you to channel the traffic wherever you want. This, in turn, will also boost your channel revenue in case of monetization.
4. Awesome Music
It is the most important part that will impact your YouTube intro. Good music will make sure that you get the best outcome and the users are attracted. There are many YouTube channels that were only recognized as their music was awesome.
5. Clean Visuals
HD and the high quality intro is the key to your channel’s success. It is highly regarded as the best way to attract people. You must spend time to make sure that it looks great and to the point. This is one of the ways to make sure that your intro looks good and awesome.
6. Technically Sound
It is again important to note that technically the intro that has been made is sound and is to the point. From transitions to fade and from animations to PIP there are a lot of details that should be taken care of. It will make sure that you get the intro that is highly professional and specialized.
Popular YouTube Intro Styles and Templates
If you think making a intro yourself is too complex and time-consuming, I also find some popular YouTube intro templates for you. Some of the coolest YouTube intro styles are as follows.
1. Logo and URL Style
This is one of the most common and frequently used YouTube intro style. There are many templates that are associated with it. Some of these are mentioned as under. These effects are mostly used if you are running a tech channel but the use is not limited to this alone.
- Logo & URL Liquid effect Intro Video Template
- Logo Focus Intro Video Template
- Unveiling Logo & URL Intro Video Template
- Logo Sketch Intro Video Template
- Logo Art Intro Video Template
2. Promotional Style
For promotion, there are tons of intros that are available online and anyone can be used. The content creation with such templates is easy. It is because there are many changes that can be done to promote your channel. The best part of these templates is that they are highly customizable.
These templates can also be used to create art for the outros as well that will further solidify the channel. Promoting products at the start and end of the YouTube channel is simply an awesome and fun factor. Some of the coolest templates that can be used in this regard are as follows.
- YouTube Promo Kit by Pixrate
- Broadcast Package by Motionbear
- Typo Opener by BLAQMATRIX
- Promo Intro by 7 Roads
- Upbeat Opener by MBR effects
3. Gaming Intro Styles
It is s well-known fact that the gaming industry is booming. There are literally hundreds of gaming channels on YouTube that are working just awesome. The kiddos are earning are a lot with the channel and the future is also bright.
To get the best gaming intro you need to focus on the outcome on the gaming brand you are trying to promote. Some of the coolest gaming channel intros that could be used to get the work done are as follows.
Conclusion
This article has taught you well how to make an intro with ease and perfection. The different templates are available online which can be used to make awesome YouTube intros. The best software that you can find on the market is the Wondershare Filmora which makes the process a lot easier.
The program is known for the awesome workability as well as viability kudos to the developers of this awesome software. It is also recommended sharing this article on social media such as Facebook and Twitter so that the others can also benefit from it. It will also help others in creating awesome YouTube tutorials.
Richard Bennett
Richard Bennett is a writer and a lover of all things video.
Follow @Richard Bennett
Streamlining the Editing Process: Elevating Your YouTube Content with PC
How to Edit Videos for YouTube on PC
Richard Bennett
Mar 27, 2024• Proven solutions
To create a successful YouTube video, you need to shoot the video and edit it on Windows or Mac. (You can find the whole processing of making a YouTube video if needed.) If you have always wanted to make your own videos and upload to YouTube to share, but you don’t know the best way to go about, then you shouldn’t miss this article. In the following part, I’ll share with you some best tools that you will need to edit YouTube videos and at the end of it, I’ll show you the detailed steps of how to edit YouTube videos with the video editor Filmora on computer.
- Part 1: Tools you need to edit YouTube videos on PC
- Part 2: Editing Videos for YouTube on PC [Detailed Steps]
Best Tools for Editing YouTube Videos on PC
Before editing, you need to choose a good enough video editor for YouTube video which can combine your footage clips seamlessly and export in high quality. To be honest, there are so many video editing software for YouTube available on the market and quite a number of tools used for editing YouTube videos on PC, some are paid while others are available for free. To save your time in picking the best one, we’ve listed some of the best tools for you to Edit YouTube videos.
Top 3 Recommended Video Editor Tools for Editing YouTube Videos on PC
The following are some of the most versatile video editor tools currently available for editing videos on PC
1. Wondershare Filmora – Best Video Editor for Beginners to Edit YouTube Videos
Filmora is an intuitive video editor with a wide range of advanced tools and video effects. We listed Filmora at the first spot because it is recommended by many users and reviewers as the best video editor for beginners and also provides sophisticated features.
Download Mac Version ](https://tools.techidaily.com/wondershare/filmora/download/ )
Filmora is a simpler way for those who are serous with editing YouTube videos on PC and Mac and you don’t have to install any other editing tools. As an all in one video editor, Filmora gives you the power to edit audios and videos, record PC screen, edit audio and add custom colors and voice over with a lot of ease. The following are some of the specific benefits and features you will be entitled to when you use Wondershare Filmora to edit YouTube videos on PC and Mac. You can download the trial version to have a try and share with me about your opinion .
Why choose Wondershare Filmora
- Ability to record the screen of your PC together with the voice
- Edit all your audios with audio mixers and equalizers
- Has wonderful filters, overlays, and text effects
- Has a color turning tool to allow you correct white balances and much more
- Let you to upload videos directly to YouTube, Vimeo and Facebook
You may also like:How to Edit YouTube Videos on iPhone >>
2. Window Movie Maker –
Windows Movie Maker is a totally free video editor available for Windows7/8 users, so if you’re a YouTube beginner without no budget for video editing software, you can start with it. It is easy and intuitive to use, though it lacks some of the advanced functionalities needed for professional video editing. After being skilled in video editing, you may need some alternatives to Windows Movie Maker, in this case, check our picks of thebest free video editing software for Windows.

Windows Movie Maker Interface
3. Adobe Premiere Pro –
This is one of the professional video editors available for PC and it is not a free tool. It comes with advanced features and functionalities needed for professional video editing and for you to use it you will have to pay with about $19.99 - $74.99 per month.

Screenshot from Adobe Premiere Pro CC Release Video
Professional Screen Recorder Tools for YouTube Videos
If you are making a tutorial video, a software how-to video or a gameplay video on YouTube, you may also need a screen recording software to record what happening on your computer and show it with your viewers. In this case, we’ve picked some screen recording tools that you may need. Some of them both feature the video editing tools and screen recording tools.
1. Filmora scrn – A high quality screen recorder with editing features.
 -
- 
2. ScreenFlow –ScreenFlow has a free version you could use for high quality screen captures, but for you to get the most from it, you will have to upgrade to the paid versions.
For more information on screen recorders for Windows, kindly check our picks about best screen recorder for YouTub. .
Note: Filmora now also feature a more powerful recording features, so you can now record screen and audio and edit video in one place.
Professional Audio Editors for YouTube Videos Editing
1. Audacity
Audacity has an intuitive user interface, featuring a simple design without unnecessary features to clog things up. Its footprint is relatively small and it can run on PC nonstop. The only thing you won’t like about it is that you will only be able to get as far as bedroom recording with it.
2. WavePad
This audio editor has a fully customizable user interface that will work both for beginners as well as professionals. It is easy to use and will suffice most of your needs as far as editing YouTube videos on PC is concerned.
For more information about audio editing tools and tips, check out How to Add Audio to Video .
Professional Color Grading Tools for YouTube Videos
To adjust the brightness, white balance, tone or apply 3D LUT effects to your video, you can complete all of these in Filmora or use the following color correction software.
Adobe SpeedGrade
When you use this together with Premiere Pro, you will have the fastest color grading experience in the world. The only caveats to using it are that the tracking is not the best and the workflow when using it on Windows is not that streamlined either.
Looking for more professional color grading tools? Check Best Color Grading & Correction Software>>
Part 2: Editing videos for YouTube on PC [Detailed Steps]
Irrespective of the editing software you use, following the steps outlined below will make it is easy for you to edit videos for YouTube on PC. Assuming you already have made your mind on the editing software of choice, use the following steps to edit and export your completed work. To better demonstrate the steps of YouTube video editing, I’ll use Filmra9 video editor to edit YouTube Video.
1.Split or combine your video clips
Most of the editing programs you use will have a timeline view of your work where you can easily cut or drop your shots. Each of the shots taken is actually a separate file which you will have to combine with others to make the video. The split feature in Filmora can cut footage into parts and then you can move it to desired position or just delete the unnecessary part. You can choose any part of the video quickly with the Quick Trim feature in preview. Besides, Filmora supports almost all popular video and photo formats, so there will be no obstacle when you want to combine footage shot with different devices. You can add photos to video or audio to video.

To combine several footages into one, just place all clips in the video track in order. Form the timeline view, move the shots around, cut, trim or shorten them as you desire. You can also add transitions between shots so that your final production may have a professional look.
2. Crop, Rotate, Pan & Zoom
You can rotate the video at any angle at any direction and change the scale of video footage or other transform. If you want viewers to focus on some part of the frame, you can use try the Pan & Zoom feature.

Learn more about How to Zoom in Video After It’s Recorded or Saved?
3.Add texts, Music and other effects

Once the individual shots have been edited into a single video, it is now time for you to add the special effects. This is the time to add stuff such as texts, music and other special effect you may want to see on the video. If you are worried about doing this, just know that you don’t have to be a pro editor to do all these since most of the program will guide you through on how to add all the special effects.
4.Save and export
After you have done with adding all the special effects, choose the file format for saving your video then export it. YouTube accepts major file formats and these include MP4, AVI or WMA hence you will be okay when you use any of them.

Filmora also allows you to upload videos to YouTube platform directly since it will choose the format and frame rate or codec which suit best.
These are the basic steps you will use when you want to edit YouTube videos on PC. Just remember to use the right widescreen format and also render your files in either 1080i or 720p high definition.
YouTuber Jamie Keet from Teacher’s Tech channel has made a tutorial about how to edit videos on Filmora. This video is detailed and let us know if you think it is helpful in the comment below.
Richard Bennett
Richard Bennett is a writer and a lover of all things video.
Follow @Richard Bennett
Richard Bennett
Mar 27, 2024• Proven solutions
To create a successful YouTube video, you need to shoot the video and edit it on Windows or Mac. (You can find the whole processing of making a YouTube video if needed.) If you have always wanted to make your own videos and upload to YouTube to share, but you don’t know the best way to go about, then you shouldn’t miss this article. In the following part, I’ll share with you some best tools that you will need to edit YouTube videos and at the end of it, I’ll show you the detailed steps of how to edit YouTube videos with the video editor Filmora on computer.
- Part 1: Tools you need to edit YouTube videos on PC
- Part 2: Editing Videos for YouTube on PC [Detailed Steps]
Best Tools for Editing YouTube Videos on PC
Before editing, you need to choose a good enough video editor for YouTube video which can combine your footage clips seamlessly and export in high quality. To be honest, there are so many video editing software for YouTube available on the market and quite a number of tools used for editing YouTube videos on PC, some are paid while others are available for free. To save your time in picking the best one, we’ve listed some of the best tools for you to Edit YouTube videos.
Top 3 Recommended Video Editor Tools for Editing YouTube Videos on PC
The following are some of the most versatile video editor tools currently available for editing videos on PC
1. Wondershare Filmora – Best Video Editor for Beginners to Edit YouTube Videos
Filmora is an intuitive video editor with a wide range of advanced tools and video effects. We listed Filmora at the first spot because it is recommended by many users and reviewers as the best video editor for beginners and also provides sophisticated features.
Download Mac Version ](https://tools.techidaily.com/wondershare/filmora/download/ )
Filmora is a simpler way for those who are serous with editing YouTube videos on PC and Mac and you don’t have to install any other editing tools. As an all in one video editor, Filmora gives you the power to edit audios and videos, record PC screen, edit audio and add custom colors and voice over with a lot of ease. The following are some of the specific benefits and features you will be entitled to when you use Wondershare Filmora to edit YouTube videos on PC and Mac. You can download the trial version to have a try and share with me about your opinion .
Why choose Wondershare Filmora
- Ability to record the screen of your PC together with the voice
- Edit all your audios with audio mixers and equalizers
- Has wonderful filters, overlays, and text effects
- Has a color turning tool to allow you correct white balances and much more
- Let you to upload videos directly to YouTube, Vimeo and Facebook
You may also like:How to Edit YouTube Videos on iPhone >>
2. Window Movie Maker –
Windows Movie Maker is a totally free video editor available for Windows7/8 users, so if you’re a YouTube beginner without no budget for video editing software, you can start with it. It is easy and intuitive to use, though it lacks some of the advanced functionalities needed for professional video editing. After being skilled in video editing, you may need some alternatives to Windows Movie Maker, in this case, check our picks of thebest free video editing software for Windows.
Windows Movie Maker Interface
3. Adobe Premiere Pro –
This is one of the professional video editors available for PC and it is not a free tool. It comes with advanced features and functionalities needed for professional video editing and for you to use it you will have to pay with about $19.99 - $74.99 per month.
Screenshot from Adobe Premiere Pro CC Release Video
Professional Screen Recorder Tools for YouTube Videos
If you are making a tutorial video, a software how-to video or a gameplay video on YouTube, you may also need a screen recording software to record what happening on your computer and show it with your viewers. In this case, we’ve picked some screen recording tools that you may need. Some of them both feature the video editing tools and screen recording tools.
1. Filmora scrn – A high quality screen recorder with editing features.
-
2. ScreenFlow –ScreenFlow has a free version you could use for high quality screen captures, but for you to get the most from it, you will have to upgrade to the paid versions.
For more information on screen recorders for Windows, kindly check our picks about best screen recorder for YouTub. .
Note: Filmora now also feature a more powerful recording features, so you can now record screen and audio and edit video in one place.
Professional Audio Editors for YouTube Videos Editing
1. Audacity
Audacity has an intuitive user interface, featuring a simple design without unnecessary features to clog things up. Its footprint is relatively small and it can run on PC nonstop. The only thing you won’t like about it is that you will only be able to get as far as bedroom recording with it.
2. WavePad
This audio editor has a fully customizable user interface that will work both for beginners as well as professionals. It is easy to use and will suffice most of your needs as far as editing YouTube videos on PC is concerned.
For more information about audio editing tools and tips, check out How to Add Audio to Video .
Professional Color Grading Tools for YouTube Videos
To adjust the brightness, white balance, tone or apply 3D LUT effects to your video, you can complete all of these in Filmora or use the following color correction software.
Adobe SpeedGrade
When you use this together with Premiere Pro, you will have the fastest color grading experience in the world. The only caveats to using it are that the tracking is not the best and the workflow when using it on Windows is not that streamlined either.
Looking for more professional color grading tools? Check Best Color Grading & Correction Software>>
Part 2: Editing videos for YouTube on PC [Detailed Steps]
Irrespective of the editing software you use, following the steps outlined below will make it is easy for you to edit videos for YouTube on PC. Assuming you already have made your mind on the editing software of choice, use the following steps to edit and export your completed work. To better demonstrate the steps of YouTube video editing, I’ll use Filmra9 video editor to edit YouTube Video.
1.Split or combine your video clips
Most of the editing programs you use will have a timeline view of your work where you can easily cut or drop your shots. Each of the shots taken is actually a separate file which you will have to combine with others to make the video. The split feature in Filmora can cut footage into parts and then you can move it to desired position or just delete the unnecessary part. You can choose any part of the video quickly with the Quick Trim feature in preview. Besides, Filmora supports almost all popular video and photo formats, so there will be no obstacle when you want to combine footage shot with different devices. You can add photos to video or audio to video.
To combine several footages into one, just place all clips in the video track in order. Form the timeline view, move the shots around, cut, trim or shorten them as you desire. You can also add transitions between shots so that your final production may have a professional look.
2. Crop, Rotate, Pan & Zoom
You can rotate the video at any angle at any direction and change the scale of video footage or other transform. If you want viewers to focus on some part of the frame, you can use try the Pan & Zoom feature.
Learn more about How to Zoom in Video After It’s Recorded or Saved?
3.Add texts, Music and other effects
Once the individual shots have been edited into a single video, it is now time for you to add the special effects. This is the time to add stuff such as texts, music and other special effect you may want to see on the video. If you are worried about doing this, just know that you don’t have to be a pro editor to do all these since most of the program will guide you through on how to add all the special effects.
4.Save and export
After you have done with adding all the special effects, choose the file format for saving your video then export it. YouTube accepts major file formats and these include MP4, AVI or WMA hence you will be okay when you use any of them.
Filmora also allows you to upload videos to YouTube platform directly since it will choose the format and frame rate or codec which suit best.
These are the basic steps you will use when you want to edit YouTube videos on PC. Just remember to use the right widescreen format and also render your files in either 1080i or 720p high definition.
YouTuber Jamie Keet from Teacher’s Tech channel has made a tutorial about how to edit videos on Filmora. This video is detailed and let us know if you think it is helpful in the comment below.
Richard Bennett
Richard Bennett is a writer and a lover of all things video.
Follow @Richard Bennett
Also read:
- 2024 Approved Behind-the-Scenes Insights Deciphering What 'Unlisted' Means for YouTube Users
- [New] Amplifying Your Brand The FameBit Approach to YouTube Affiliates
- [New] Channel Growth Blueprint Selecting Between Studio and Latest Beta
- Cross-Platform Strategies to Boost YouTube Presence
- 8 Mistakes People Should Avoid as a New YouTuber
- [New] Channel Boosting Mastery Unveiling the Best 5 Video Marketing Strategies
- Transformative Strategies for Broadcast Excellence WireCast on YouTube
- [Updated] Cultivate Creativity YouTube's Top Inspirational Videos
- Boosting Viewership Responsibly Strategies That Work
- Elevating Content Strategy with Effective YouTube Partnerships for 2024
- Viral Video Vanguard Top Ten in One Hour, One Day on YT
- Revel in the Power of Leading Video Rank Tracker Tools
- Choosing the Right Format – Boosting Your YouTube Videos’ Performance
- [Updated] Create Captivating Sports Videography
- The Cheapest Way Designing Successful YouTube Ad Campaigns
- Captivating Clips Keywords That Ignite Viral Shorts on YouTube for 2024
- [Updated] Enhancing Viewership with Informative YouTube Video Captions
- [Updated] Deciphers for Digital Content Creators YouTube's Keyword Techniques
- Navigating Legal Pathways for Gaining a Million YouTube Views
- Explore the World of Tiny Screens Top 6 Online Tools for Free & Complimentary YouTube Short Downloads
- ASMR Recommendations for Android Users for 2024
- [New] Audience Accessibility Enhancement Adding Subtitles and Closed Captions on YouTube
- 2024 Approved Backwards Viewing A New Lens for Analyzing YouTube Content
- YouTube Ad Elimination Techniques for Chrome & Safari Users
- Leveraging View Counts for Financial Freedom Online
- The Art of Viewing Several Youtube Videos Concurrently
- Effortless Guide for Turning YouTube Shorts Into Mp4 Videos
- Navigating YouTube Gaming Live Stream Basics
- 2024 Approved Boost Traffic with Effective Tools for YouTube Videos
- [Updated] A Treasury of Thought-Provoking YouTube Content
- The Ultimate Guide to Inserting Timestamps in YouTube URLs
- Audio Visual Transcript Maker for 2024
- Channel Your Inner Narrative Impactful Life Stories YT
- 2024 Approved Elevate Your YouTube Presence with These 8 Free Courses
- [Updated] Cross-Platform Content Excellence The Full Guide on Linked YouTube + TikTok Accounts
- YouTube Masterclass Advanced Techniques for Video Commentary Embedding
- What to Expect From an Investment in YouTube Premium
- [Updated] Digital Artisans Gathering Haven
- [New] Infographic - 8 Ways to Make Money on YouTube for Beginners
- [Updated] Essential, Inexpensive Vlogging Tools Listed
- In 2024, Crafting Captivating Thumbnails A Comprehensive Guide for YouTube Creators
- Unraveling Mukbang The Art of Feast-Filled Vlogs
- Leveraging Video Features Annotations & Cards
- The Rookie's Guide to YouTube Entrepreneurship and Earnings
- Essential Tips for Successful YouTube Broadcasts for 2024
- [New] Decoding YouTube Stats Efficiency with Social Blade's Advanced Analysis
- [New] Channel Transformation via Musical Additions
- [Updated] Channel Upgrade Plans Standard Studio or Beta Revolution
- YouTube Vs. DailyMention Identifying Key Variations
- How to Remove Forgotten PIN Of Your Honor 70 Lite 5G
- In 2024, A Perfect Guide To Remove or Disable Google Smart Lock On Infinix Hot 40 Pro
- Which is the Best Fake GPS Joystick App On Xiaomi Mix Fold 3? | Dr.fone
- Guide to Mirror Your Tecno Camon 20 Premier 5G to Other Android devices | Dr.fone
- All Must-Knows to Use Fake GPS GO Location Spoofer On Lava Yuva 3 Pro | Dr.fone
- [New] How to Change Name in Google Meet, In 2024
- [New] 2024 Approved Navigating Facebook to Play YouTube Videos Without Interruption
- In 2024, How to Share/Fake Location on WhatsApp for Oppo Find X7 Ultra | Dr.fone
- New 2024 Approved Best Video Cutting Software for Windows and Web
- New In 2024, The Best Free Video Splitting Solutions Reviewed
- 2024 Approved What Is an AI Presentation Maker? | Wondershare Virbo Glossary
- In 2024, Expert Strategies for Clear Communication on Google Meet
- [Updated] In 2024, Invite and Guest at TikTok Lives Easily
- Hard Reset Motorola Moto G24 in 3 Efficient Ways | Dr.fone
- How to Fix It Tecno Pova 5 Wont Turn On | Dr.fone
- [New] 2024 Approved WhatsApp Video Integration for Twitter Content
- [Updated] Strategies to Speedy Up Vimeo Videos for 2024
- 2024 Approved Step Up Your Game on TikTok Top 50 Trending Tags
- In 2024, 3 Facts You Need to Know about Screen Mirroring Honor X50 GT | Dr.fone
- [Updated] 2024 Approved Bridging Gaps Online Effective Techniques for Screenshare on FB
- New In 2024, Unleash Your Creativity MP4 Video Editing Tips and Tricks for Mac and Windows
- 2024 Approved Building a Brand Through Effective Live Streaming Practices
- How to Use Snapchat to Send a Snap with Cartoon Face Lens
- [Updated] Stylish Shots Top Trending Instagram Filters for 2024
- Proven Techniques for Swiftly Locating Your Desired Discord Server for 2024
- [Updated] In 2024, Retaining Snaps Effortlessly with Android/Mac Technology
- New 2024 Approved Best Free AVI Video Combining Tools No Watermarks or Trials
- Free Dailymotion Video Conversion without Registration for 2024
- How To Bypass the Required Apple Store Verification For iPhone 12
- 7 Solutions to Fix Error Code 963 on Google Play Of Google Pixel 8 | Dr.fone
- 2024 Approved Optimizing Screen Recording on iPhone/iPad
- [New] In-Depth Insight on Selecting Superior Valheim Seeds for 2024
- Title: [Updated] Cutting Costs without Compromising on YouTube Intros Quality
- Author: Brian
- Created at : 2024-05-25 13:17:37
- Updated at : 2024-05-26 13:17:37
- Link: https://youtube-video-recordings.techidaily.com/updated-cutting-costs-without-compromising-on-youtube-intros-quality/
- License: This work is licensed under CC BY-NC-SA 4.0.
