
!["[Updated] Cooking Chronicles Video Production Insights"](https://www.lifewire.com/thmb/Un1YEqbiCg7tvkvdPUwFi2fhkms=/400x300/filters:no_upscale():max_bytes(150000):strip_icc()/pairquesttophone-5ea84b24d0684dab893fe33c5a25b5fa.png)
"[Updated] Cooking Chronicles Video Production Insights"
Cooking Chronicles: Video Production Insights
How to Make a Cooking Video in Steps - an Ultimate Guide

Richard Bennett
Mar 27, 2024• Proven solutions
Cooking and food-oriented videos are among the most outreaching and popular categories of content to publish online, notably, on YouTube, Facebook, or Instagram. So if you are a cooking aficionado, you have excellent potential to gain positive attention and a loyal audience. But to create engaging videos, you’d need a lot more than excellent culinary skills. This article aims to enlighten aspiring food and recipe vloggers about the essentials of video making straight out of the oven, to create enriched content that’s professional, neat, and viral-worthy.
- Part 1: What to Prepare Before Making a Recipe Video?
- Part 2: Make a Cooking Video with Filmora: a Step-by-Step Guide
- Part 3: Tips to Make Your Cooking Videos Stand Out
- Part 4: How to Promote Your Cooking Channel on YouTube?
What to Prepare Before Making a Recipe Video
While you would know best about the prep work needed for the recipes, the prep work for making a video starts with a plan. What goes into the plan?
Brainstorm this equation - Main Content + Duration + Light + Sound + Camera + Camera Angle, Shots & Transition.
The main content is how you picture the finished video. Ask yourself - Do you want an intro gig? Are you going to talk in the video or show only hands and the cooking with a piece of background music? How do you wish to present the ingredients? Would there be additional tips? At what platform are you going to publish your content? How long should be your clippings? Consider all these questions to chalk out a basic framework of your video
The camera is a pivotal element. Whether it is a smartphone or a hi-fidelity digital camera, it is worthwhile to familiarise the best positions and light orientations and the capacity of the device to produce the best quality picture.
How is your sound going to be like? If you are going to talk in the video, it is recommended that you use a microphone. Or else, you can also use background sound. But to mix sound with the video, you’d need an excellent sound editing tool.
Finally, comes the editing and finishing part. Eventually, you’ll need purposive video-editing software to help you work out the video transitions, sound, and visual effects.Choose a toolkit that is easy to learn and that you can get comfortable with so that the job of video editing doesn’t take the focus away from the main task of cooking.

Now, once you have all the essential ingredients to create your video, start practicing. Remember that it is the most natural thing for the first videos to appear amateurish or inept. And that is part of the plan. Don’t be disheartened and keep going.
Make a Cooking Video with Filmora: a Step-by-Step Guide
As one of the easiest-to-use video editing tools, the full-featured Filmora is the right choice considering it can fit most of your needs. Moreover, you’d be delighted to know that the software also has a series of features and functions and even tutorial videos dedicated to cooking videos.


Step 1: Filming the Video
Whether you are going to present a traditional cook-with-me style video or feature the contemporary “jump-cut” style focusing on speedy short videos, you need to prepare all the equipment and ingredients to suit the frame by frame shots. Consider spills, drops, overcooking, etc. as part of the process, so keep adequate substitutes to continue with your project unwaveringly. If you are using a phone, keep it fully charged up. And have a plan beforehand about what you should do when you get an urgent call while shooting. Also, consider doing a site investigation of the shooting spot for any fragile items, pointy corners, slippery areas, curious pets, etc. to avoid trips and falls in the middle of the filming, especially when working with a cameraman who’s following your movement. If you are using a tripod, and floor-standing lights, remember to secure the equipment with plenty of adhesive tapes, lest they bump into an expensive trip or fall.
Step 2: mport Your Video In Filmora
You need to sync the device that you used to film the video with the computer that has Filmora installed. It may be a phone or a camcorder. Once the devices are synced, you should launch the Filmora software and go the “Media” button at the top right toolbar. There you will find the “Import” button. You will get a pop-up message asking you to choose the type of device. Select the right one, and your video will be imported in the Filmora interface.
Step 3: Edit Video Pace: Time-Lapse, Jump Cut, Slow Motion
To create crisp, fast-paced videos, you don’t have to gobble up the content eyeing at the duration. Think smart when you have the resources of a tool like Filmora. Here are the three best features that help you create fast-paced yet well-defined recipes.
Time-Lapse: The time-lapse feature allows you to adjust the speed of the video from slow-motion to 10x faster. To use this, double click on a specific clip in your imported video and open the custom speed settings. Use the adjusting meter beside speed to make your clip as fast or slow as you want. You may use the same feature to introduce the slow-motion effects in certain areas of the video.
Now, when you are using either the fast-forward or slow-motion effects, it is best to have stable video footage with consistent lighting and a static background. There are also the options of Reverse Speed that can play the clip backward, as in flash-back. The Ripple edit feature allows you to cut short a long clip seamlessly.
Jump Cut: The Jump Cut is about snipping unwanted areas in the clip. It may sound like the Ripple edit mentioned above, but the ripple edit is more functional for cutting short a continuous video so that the viewer won’t realize the snip. For the Jump Cut, it doesn’t have to be a constant clip. You can get to the next frame or scene with an abracadabra move.
To use Jump Cut, place the cursor over the starting of the clip that you want to cut, and right-click on it and select “Split” (the “scissors” feature on the toolbar does the same thing). To make this look neat, preview the portion of the clip once again and delete the cuts between two clips with the same right-click.
Step 4: Understanding Transitions on Filmora
Transitions make your video more interactive and help you segregate the video from frame-to-frame with effects like dissolve, fade, flash, etc. there are numerous transition options available within the Filmora suit.
The best way to do this drag and drop the clips on the timeline is to trim parts of the clip to shorten it. Once you have all the clips in place, go to the “Transitions” options at the top toolbar to apply it on the end or start of each clip.
Step 5: Audio, Playback & Sound Edits
There are plenty of options that you can remove background noise, add voiceover, add music, and detach audio from video. Refer to the Audios section from your toolbar.
Step 6: Save to Drive/ Emport/ Publish
Once you are satisfied with your content, then go to Export. Choose the format of the video, MOV, MP4, MPG, etc. and whether you wish to publish directly or save to drive.
Tips to Make Your Cooking Videos Stand Out
- Lighting is your best friend. Invest in some quality spotlights or use the best of daylight.
- Mind your video duration. Short and Simple videos get the most views, but your content should not look incomplete. It is not a fact that long and elaborate videos do not get a place on the table; it is all about the relevance of your content. So don’t stop till you get enough.
- If you appear in the video, keep yourself always look good.
- Keep your video titles relevant and prominent, so that people looking for it can readily find it.
- Have a scrumptious custom thumbnail.
How to Promote Your Cooking Channel on YouTube
- Create an inventory before publishing videos. YouTube vlogging is valued for consistency. If you have a list of 10, 15, 20 videos, then you can have enough time in hand to film your next videos.
- Have a consistent style to create brand recognition. Do you think branding is not for Vlogs? Well, I suppose you might be wrong. Branding is for anyone who uses it.
- Share the link of your YouTube videos on other platforms like Twitter and Facebook.
- Encourage your viewers to comment on the video.
- Explore the different YouTube SEO strategies and use the accurate keywords in your video descriptions with hashtags.
With prior planning and practicing, you are bent on developing more confident moves and camera angles. Once you have that, follow this step by step guide to gain speed and prowess and also enjoy the whole adventure.
Richard Bennett
Richard Bennett is a writer and a lover of all things video.
Follow @Richard Bennett
Richard Bennett
Mar 27, 2024• Proven solutions
Cooking and food-oriented videos are among the most outreaching and popular categories of content to publish online, notably, on YouTube, Facebook, or Instagram. So if you are a cooking aficionado, you have excellent potential to gain positive attention and a loyal audience. But to create engaging videos, you’d need a lot more than excellent culinary skills. This article aims to enlighten aspiring food and recipe vloggers about the essentials of video making straight out of the oven, to create enriched content that’s professional, neat, and viral-worthy.
- Part 1: What to Prepare Before Making a Recipe Video?
- Part 2: Make a Cooking Video with Filmora: a Step-by-Step Guide
- Part 3: Tips to Make Your Cooking Videos Stand Out
- Part 4: How to Promote Your Cooking Channel on YouTube?
What to Prepare Before Making a Recipe Video
While you would know best about the prep work needed for the recipes, the prep work for making a video starts with a plan. What goes into the plan?
Brainstorm this equation - Main Content + Duration + Light + Sound + Camera + Camera Angle, Shots & Transition.
The main content is how you picture the finished video. Ask yourself - Do you want an intro gig? Are you going to talk in the video or show only hands and the cooking with a piece of background music? How do you wish to present the ingredients? Would there be additional tips? At what platform are you going to publish your content? How long should be your clippings? Consider all these questions to chalk out a basic framework of your video
The camera is a pivotal element. Whether it is a smartphone or a hi-fidelity digital camera, it is worthwhile to familiarise the best positions and light orientations and the capacity of the device to produce the best quality picture.
How is your sound going to be like? If you are going to talk in the video, it is recommended that you use a microphone. Or else, you can also use background sound. But to mix sound with the video, you’d need an excellent sound editing tool.
Finally, comes the editing and finishing part. Eventually, you’ll need purposive video-editing software to help you work out the video transitions, sound, and visual effects.Choose a toolkit that is easy to learn and that you can get comfortable with so that the job of video editing doesn’t take the focus away from the main task of cooking.
Now, once you have all the essential ingredients to create your video, start practicing. Remember that it is the most natural thing for the first videos to appear amateurish or inept. And that is part of the plan. Don’t be disheartened and keep going.
Make a Cooking Video with Filmora: a Step-by-Step Guide
As one of the easiest-to-use video editing tools, the full-featured Filmora is the right choice considering it can fit most of your needs. Moreover, you’d be delighted to know that the software also has a series of features and functions and even tutorial videos dedicated to cooking videos.
Step 1: Filming the Video
Whether you are going to present a traditional cook-with-me style video or feature the contemporary “jump-cut” style focusing on speedy short videos, you need to prepare all the equipment and ingredients to suit the frame by frame shots. Consider spills, drops, overcooking, etc. as part of the process, so keep adequate substitutes to continue with your project unwaveringly. If you are using a phone, keep it fully charged up. And have a plan beforehand about what you should do when you get an urgent call while shooting. Also, consider doing a site investigation of the shooting spot for any fragile items, pointy corners, slippery areas, curious pets, etc. to avoid trips and falls in the middle of the filming, especially when working with a cameraman who’s following your movement. If you are using a tripod, and floor-standing lights, remember to secure the equipment with plenty of adhesive tapes, lest they bump into an expensive trip or fall.
Step 2: mport Your Video In Filmora
You need to sync the device that you used to film the video with the computer that has Filmora installed. It may be a phone or a camcorder. Once the devices are synced, you should launch the Filmora software and go the “Media” button at the top right toolbar. There you will find the “Import” button. You will get a pop-up message asking you to choose the type of device. Select the right one, and your video will be imported in the Filmora interface.
Step 3: Edit Video Pace: Time-Lapse, Jump Cut, Slow Motion
To create crisp, fast-paced videos, you don’t have to gobble up the content eyeing at the duration. Think smart when you have the resources of a tool like Filmora. Here are the three best features that help you create fast-paced yet well-defined recipes.
Time-Lapse: The time-lapse feature allows you to adjust the speed of the video from slow-motion to 10x faster. To use this, double click on a specific clip in your imported video and open the custom speed settings. Use the adjusting meter beside speed to make your clip as fast or slow as you want. You may use the same feature to introduce the slow-motion effects in certain areas of the video.
Now, when you are using either the fast-forward or slow-motion effects, it is best to have stable video footage with consistent lighting and a static background. There are also the options of Reverse Speed that can play the clip backward, as in flash-back. The Ripple edit feature allows you to cut short a long clip seamlessly.
Jump Cut: The Jump Cut is about snipping unwanted areas in the clip. It may sound like the Ripple edit mentioned above, but the ripple edit is more functional for cutting short a continuous video so that the viewer won’t realize the snip. For the Jump Cut, it doesn’t have to be a constant clip. You can get to the next frame or scene with an abracadabra move.
To use Jump Cut, place the cursor over the starting of the clip that you want to cut, and right-click on it and select “Split” (the “scissors” feature on the toolbar does the same thing). To make this look neat, preview the portion of the clip once again and delete the cuts between two clips with the same right-click.
Step 4: Understanding Transitions on Filmora
Transitions make your video more interactive and help you segregate the video from frame-to-frame with effects like dissolve, fade, flash, etc. there are numerous transition options available within the Filmora suit.
The best way to do this drag and drop the clips on the timeline is to trim parts of the clip to shorten it. Once you have all the clips in place, go to the “Transitions” options at the top toolbar to apply it on the end or start of each clip.
Step 5: Audio, Playback & Sound Edits
There are plenty of options that you can remove background noise, add voiceover, add music, and detach audio from video. Refer to the Audios section from your toolbar.
Step 6: Save to Drive/ Emport/ Publish
Once you are satisfied with your content, then go to Export. Choose the format of the video, MOV, MP4, MPG, etc. and whether you wish to publish directly or save to drive.
Tips to Make Your Cooking Videos Stand Out
- Lighting is your best friend. Invest in some quality spotlights or use the best of daylight.
- Mind your video duration. Short and Simple videos get the most views, but your content should not look incomplete. It is not a fact that long and elaborate videos do not get a place on the table; it is all about the relevance of your content. So don’t stop till you get enough.
- If you appear in the video, keep yourself always look good.
- Keep your video titles relevant and prominent, so that people looking for it can readily find it.
- Have a scrumptious custom thumbnail.
How to Promote Your Cooking Channel on YouTube
- Create an inventory before publishing videos. YouTube vlogging is valued for consistency. If you have a list of 10, 15, 20 videos, then you can have enough time in hand to film your next videos.
- Have a consistent style to create brand recognition. Do you think branding is not for Vlogs? Well, I suppose you might be wrong. Branding is for anyone who uses it.
- Share the link of your YouTube videos on other platforms like Twitter and Facebook.
- Encourage your viewers to comment on the video.
- Explore the different YouTube SEO strategies and use the accurate keywords in your video descriptions with hashtags.
With prior planning and practicing, you are bent on developing more confident moves and camera angles. Once you have that, follow this step by step guide to gain speed and prowess and also enjoy the whole adventure.
Richard Bennett
Richard Bennett is a writer and a lover of all things video.
Follow @Richard Bennett
From Data to Drama: Utilizing Google Trends in Video Planning
How to Use Google Trends to Come up with Video Ideas [Easy Guide]
Richard Bennett
Oct 26, 2023• Proven solutions
There is always something to make a video about. It’s a big world where new things happen every day, in every YouTube niche . One of the best ways to climb to the top of YouTube’s search engine results is to be among the first creators to make a video about a trending topic.
But how do you know what’s trending? If you’re in a huge genre like beauty or technology then it’s not impossible to keep track of the latest news and trends, but you probably hear about things as other people start making videos and as websites start publishing articles. How do you get on top of trends just as they’re becoming trends?
Google Trends, of course!
Google Trends is a completely free tool you can use to determine what’s trending on YouTube or in Google’s search engine. Here’s how you can use Google Trends to figure out what’s trending in your niche and make a video before there’s tons of competition.
Part 1: Seeing The Big Picture
You’ll need to be signed into your Google account to use Google Trends.
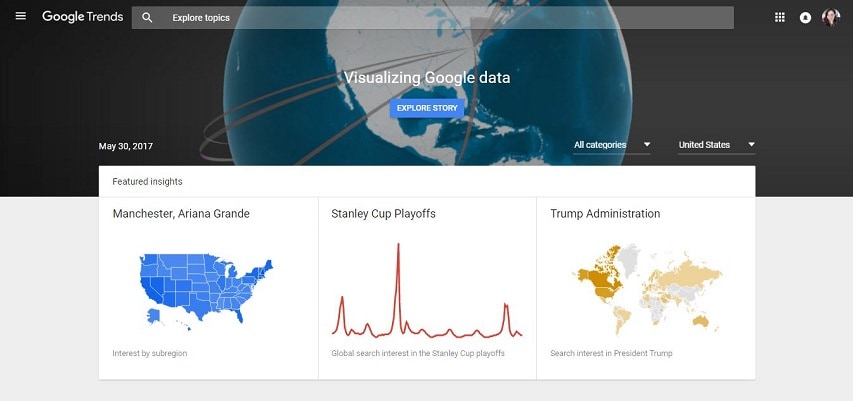
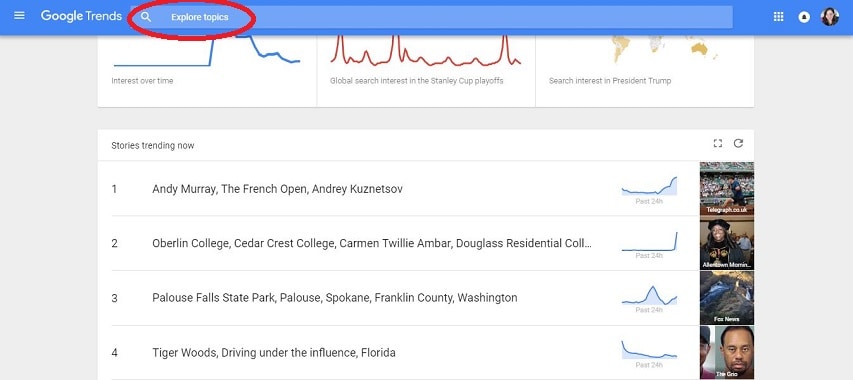
Start off at trends.google.com and you’ll see what’s trending in general – usually big news stories or things like sports finals. The data is laid out like this: at the top there are three ‘Featured Insights’. These are three of the most popular trending topics paired with graphs of their recent search traffic. Underneath these there will be a list of stories that are currently trending. You can click on them to see charts of their search data and links to where the stories are being covered online.
Unless you do news or political commentary on your channel these probably aren’t topics you want to cover, but if you like to insert some topical references into your other videos then it’s still good to be aware of these things.
To get information more relevant to your channel you’re going to have to do some filtering.
Part 2: Getting Results That Matter to You
In the Google Trend home page, scroll down to the ‘Recently Trending’ section and click on ‘More Trending Searches’.
Then click from ‘Daily Search Trends’ to ‘Realtime Search Trends’.
On top you will see two drop-down menus, one is for the category and one is for location.
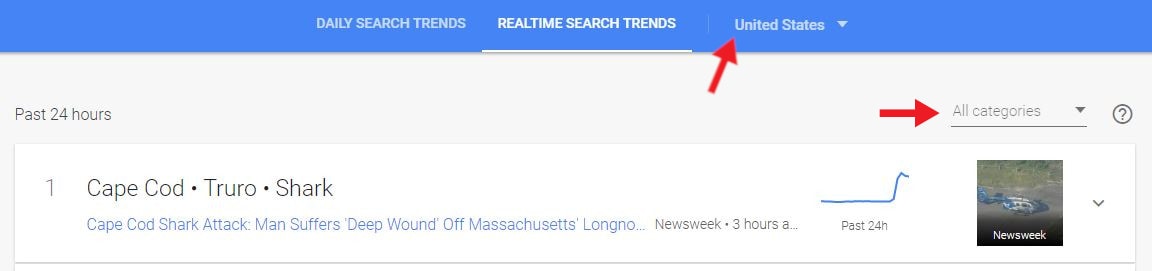
Under All categories select the general theme your channel falls under.
Your options are business, entertainment, health, Sci/Tech, sports, and top stories.
It might be the case that your channel doesn’t fall under any of these themes, but there could still be related stories for you in other categories. For example, if you have a beauty channel then there could be something that’d interest you under health, entertainment, or even business.
Under the location menu choose the region most of your viewers are from. This might not be the same as where you are from – you could be in Australia and most of your viewers could be in the U.S. If you’re not sure where your viewers are from you can find out in your Creator Studio under Analytics > Demographics.
Once you have narrowed down your results you can just scroll through and pick out a topic related to your channel’s theme that you have something to say about.
For example, if you have a gaming channel and you’re looking for a non-gameplay topic to make a video on, you would look under Sci/Tech. If I look under that category today (May 29, 2017) and specify that I want topics trending in the United States then these are my top 5 results:
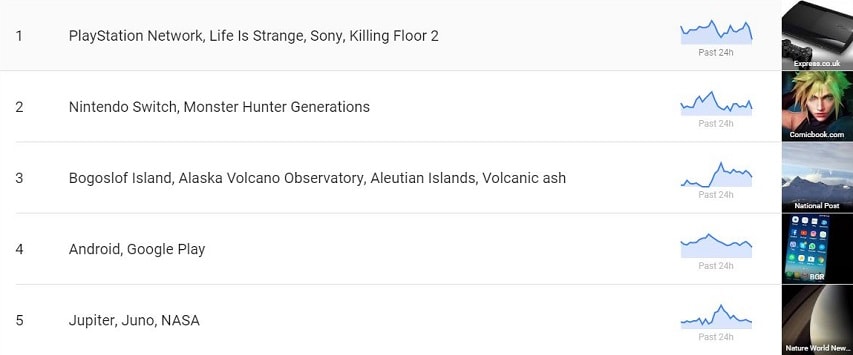
The first two happen to be about gaming. If you, as a gamer, had any strong reaction to either of these topics – whether it’s that you feel like you’re knowledgeable about them, or that you’re excited by something that’s coming up, or that something made you groan – then that would be a sign that you should make a video. Capitalizing on a trend while also covering a topic you have a lot to say about is always a good move.
Having something to say doesn’t have to mean having a strong opinion. If you just find something interesting and want to pass the information along to your viewers then that’s great too.
Clicking on these results will give you more specific data including how often the topic has been searched recently and links to recent news articles. These can give you a better idea of why it is trending and help you come up with what you want to say.
Part 3: Battle of the Keywords
Once you have a topic in mind for your next video – whether it came from Google Trends or your own noggin – think about what the most important keyword for that topic might be.
A keyword is a word or short phrase that people type into a search engine like Google or YouTube. In order for people to find your videos, you’ll have to include a keyword in your video’s title.
Once you have a keyword in mind, type it into the Explore bar at the top of your page in Google Trends.
What happens after you click enter is pretty much magic. Say I want to make a video on how to use Filmora. The first thing I’ll type into that Explore bar is ‘Filmora’.
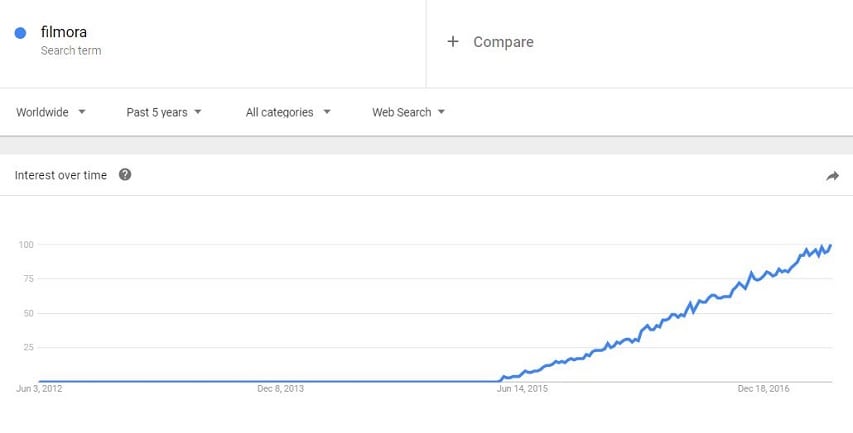
You can see near the top that this chart represents searches for the topic over the last 5 years, which isn’t necessarily useful (although it is sort of cool that you can see when Filmora was ‘born’). I’m going to narrow that down to results from the U.S in the last week.
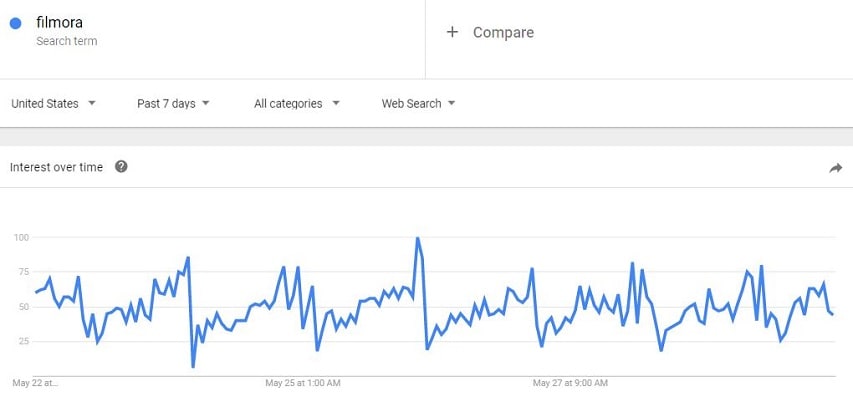
There, now I can see how the popularity of Filmora as a search term has spiked on specific days and times (if you hover over a spike it tells you the time and day) and plan to post my video at a time that capitalizes on these trends.
Next, what other words do I want to include in my video title? Is this a review, a tutorial, or a how-to? By clicking on my search term Filmora, I can edit it to read ‘filmora review’. Then I can click + Compare and type in ‘filmora tutorial’ and ‘how to use Filmora’. Google Trends will create a chart comparing the popularity of those 3 terms.
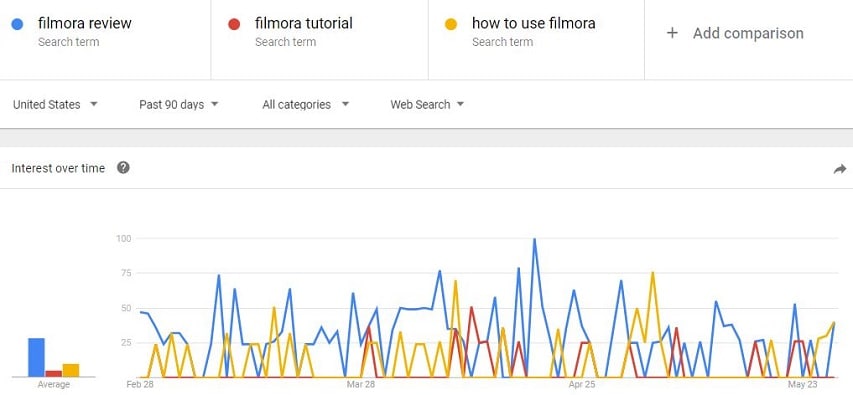
I also ‘zoomed out’ to 90 days – if I’d only looked at how they compared over the last week my results could have been skewed.
It’s pretty clear from the chart that ‘filmora review’ is the strongest of those 3 search terms. The title of my video should definitely start with the words Filmora Review because that is what most people are searching for when they want information about Filmora. Putting your most important keyword/search term first in your video titles will help them rank better in the viewer’s search results.
Although, when you do a comparison like this you should also go to YouTube and search for each potential keyword/phrase individually. It might turn out that there is a ton of strong competition for the most popular search term, and not as much for the second or third most popular. Here’s a search for ‘Filmora Review’ on YouTube:
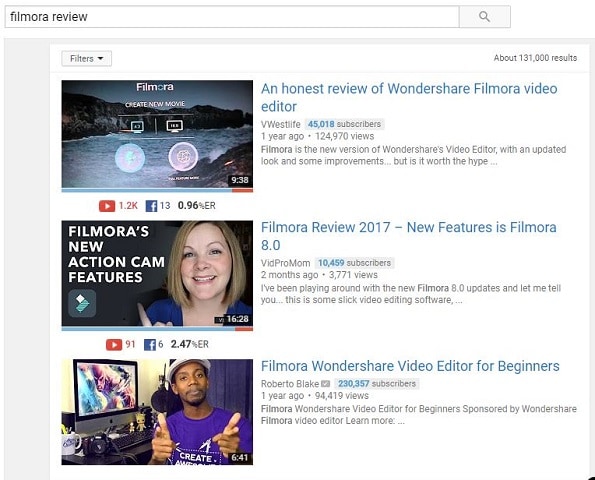
If my view of YouTube looks different from yours it’s because I’m using the VidIQ plugin for Chrome . It’s free and it gives you all kinds of extra info about videos and channels.
The second-highest ranked result is only 2 months old and isn’t from a huge channel. Although there is competition for this keyword, ranking for it is not impossible. It also helps that software reviews are a topic where people will always be looking for the latest information/newest videos.
If the search results for your keyword are dominated by monster channels with millions of subs, and you can’t think of an angle you can use to crack into those top results (i.e. having newer information people will be looking for, which the more established videos are lacking), then maybe try the search with your second best keyword and see if there’s a better opportunity for you to rank there.
One of the biggest benefits of identifying trends and making videos about them quickly is that you can get in before there’s a lot of competition for the first few pages of search results on YouTube or Google, and before larger channels start making videos of their own on the same topic.
Want to make coming up with YouTube video ideas a habit? This post here will help you develop a process to generate more ideas and properly evaluate them.
Making Better YouTube Videos with Filmora
As one of the most widely used video editing software among YouTubers, Filmora provides plentiful editing tools, such as cut, trim, video stabilization , noise removal , chroma key compositing , and color grading. Besides, there are royalty-free music track and sound effects available in the built-in Audio library, and title templates and presets, as well as elements and effects. Download the free trial version below and get started now.
Richard Bennett
Richard Bennett is a writer and a lover of all things video.
Follow @Richard Bennett
Richard Bennett
Oct 26, 2023• Proven solutions
There is always something to make a video about. It’s a big world where new things happen every day, in every YouTube niche . One of the best ways to climb to the top of YouTube’s search engine results is to be among the first creators to make a video about a trending topic.
But how do you know what’s trending? If you’re in a huge genre like beauty or technology then it’s not impossible to keep track of the latest news and trends, but you probably hear about things as other people start making videos and as websites start publishing articles. How do you get on top of trends just as they’re becoming trends?
Google Trends, of course!
Google Trends is a completely free tool you can use to determine what’s trending on YouTube or in Google’s search engine. Here’s how you can use Google Trends to figure out what’s trending in your niche and make a video before there’s tons of competition.
Part 1: Seeing The Big Picture
You’ll need to be signed into your Google account to use Google Trends.
Start off at trends.google.com and you’ll see what’s trending in general – usually big news stories or things like sports finals. The data is laid out like this: at the top there are three ‘Featured Insights’. These are three of the most popular trending topics paired with graphs of their recent search traffic. Underneath these there will be a list of stories that are currently trending. You can click on them to see charts of their search data and links to where the stories are being covered online.
Unless you do news or political commentary on your channel these probably aren’t topics you want to cover, but if you like to insert some topical references into your other videos then it’s still good to be aware of these things.
To get information more relevant to your channel you’re going to have to do some filtering.
Part 2: Getting Results That Matter to You
In the Google Trend home page, scroll down to the ‘Recently Trending’ section and click on ‘More Trending Searches’.
Then click from ‘Daily Search Trends’ to ‘Realtime Search Trends’.
On top you will see two drop-down menus, one is for the category and one is for location.
Under All categories select the general theme your channel falls under.
Your options are business, entertainment, health, Sci/Tech, sports, and top stories.
It might be the case that your channel doesn’t fall under any of these themes, but there could still be related stories for you in other categories. For example, if you have a beauty channel then there could be something that’d interest you under health, entertainment, or even business.
Under the location menu choose the region most of your viewers are from. This might not be the same as where you are from – you could be in Australia and most of your viewers could be in the U.S. If you’re not sure where your viewers are from you can find out in your Creator Studio under Analytics > Demographics.
Once you have narrowed down your results you can just scroll through and pick out a topic related to your channel’s theme that you have something to say about.
For example, if you have a gaming channel and you’re looking for a non-gameplay topic to make a video on, you would look under Sci/Tech. If I look under that category today (May 29, 2017) and specify that I want topics trending in the United States then these are my top 5 results:
The first two happen to be about gaming. If you, as a gamer, had any strong reaction to either of these topics – whether it’s that you feel like you’re knowledgeable about them, or that you’re excited by something that’s coming up, or that something made you groan – then that would be a sign that you should make a video. Capitalizing on a trend while also covering a topic you have a lot to say about is always a good move.
Having something to say doesn’t have to mean having a strong opinion. If you just find something interesting and want to pass the information along to your viewers then that’s great too.
Clicking on these results will give you more specific data including how often the topic has been searched recently and links to recent news articles. These can give you a better idea of why it is trending and help you come up with what you want to say.
Part 3: Battle of the Keywords
Once you have a topic in mind for your next video – whether it came from Google Trends or your own noggin – think about what the most important keyword for that topic might be.
A keyword is a word or short phrase that people type into a search engine like Google or YouTube. In order for people to find your videos, you’ll have to include a keyword in your video’s title.
Once you have a keyword in mind, type it into the Explore bar at the top of your page in Google Trends.
What happens after you click enter is pretty much magic. Say I want to make a video on how to use Filmora. The first thing I’ll type into that Explore bar is ‘Filmora’.
You can see near the top that this chart represents searches for the topic over the last 5 years, which isn’t necessarily useful (although it is sort of cool that you can see when Filmora was ‘born’). I’m going to narrow that down to results from the U.S in the last week.
There, now I can see how the popularity of Filmora as a search term has spiked on specific days and times (if you hover over a spike it tells you the time and day) and plan to post my video at a time that capitalizes on these trends.
Next, what other words do I want to include in my video title? Is this a review, a tutorial, or a how-to? By clicking on my search term Filmora, I can edit it to read ‘filmora review’. Then I can click + Compare and type in ‘filmora tutorial’ and ‘how to use Filmora’. Google Trends will create a chart comparing the popularity of those 3 terms.
I also ‘zoomed out’ to 90 days – if I’d only looked at how they compared over the last week my results could have been skewed.
It’s pretty clear from the chart that ‘filmora review’ is the strongest of those 3 search terms. The title of my video should definitely start with the words Filmora Review because that is what most people are searching for when they want information about Filmora. Putting your most important keyword/search term first in your video titles will help them rank better in the viewer’s search results.
Although, when you do a comparison like this you should also go to YouTube and search for each potential keyword/phrase individually. It might turn out that there is a ton of strong competition for the most popular search term, and not as much for the second or third most popular. Here’s a search for ‘Filmora Review’ on YouTube:
If my view of YouTube looks different from yours it’s because I’m using the VidIQ plugin for Chrome . It’s free and it gives you all kinds of extra info about videos and channels.
The second-highest ranked result is only 2 months old and isn’t from a huge channel. Although there is competition for this keyword, ranking for it is not impossible. It also helps that software reviews are a topic where people will always be looking for the latest information/newest videos.
If the search results for your keyword are dominated by monster channels with millions of subs, and you can’t think of an angle you can use to crack into those top results (i.e. having newer information people will be looking for, which the more established videos are lacking), then maybe try the search with your second best keyword and see if there’s a better opportunity for you to rank there.
One of the biggest benefits of identifying trends and making videos about them quickly is that you can get in before there’s a lot of competition for the first few pages of search results on YouTube or Google, and before larger channels start making videos of their own on the same topic.
Want to make coming up with YouTube video ideas a habit? This post here will help you develop a process to generate more ideas and properly evaluate them.
Making Better YouTube Videos with Filmora
As one of the most widely used video editing software among YouTubers, Filmora provides plentiful editing tools, such as cut, trim, video stabilization , noise removal , chroma key compositing , and color grading. Besides, there are royalty-free music track and sound effects available in the built-in Audio library, and title templates and presets, as well as elements and effects. Download the free trial version below and get started now.
Richard Bennett
Richard Bennett is a writer and a lover of all things video.
Follow @Richard Bennett
Also read:
- High-Quality YouTube Images Download Without Any Cost
- 2024 Approved 5 Innovative Apps to Design Stunning Openings
- [Updated] Demystifying the Math of YouTube Ratio Perfection
- In 2024, Delightful Digests A List of Top Food Channels
- Gamers' Dream Gear YouTube Collection
- Tailoring Audio in YouTube Video Editors for Enhanced Content
- From Raw to Refined Tailoring YouTube Videos with Premiere Pro
- [Updated] Captivating Audiences A Guide to Making Haul Media
- [New] Digital Dominion for Techno Gamers
- Channel Success Metrics Subscriber & Play Buttons for 2024
- Captivating Cold Ideal Snowy Scenes to Brighten Videos for 2024
- Dissecting YouTube Copyright Vs. Creative Commons Ethos for 2024
- 2024 Approved Cutting Edge Identifying the Best 10 Free Online Art Schools on YouTube
- Profitability Playbook The Ultimate Duo of Dm & Yo
- [Updated] Chart-Topping Tunes Compiling an Impressive YouTube Playlist
- Quick-Paced Fortnite Visual Artistry
- In 2024, Converting YouTube Videos Into Engaging GIFs on Devices
- In 2024, Circulating Content The Art of Playlist Sharing
- 2024 Approved Best Practices for Writing Testable, Maintainable JavaScript Code
- Daily Digest Guidelines Tips for Successful Vlogs for 2024
- Countering Harshness Maintaining Poise Online for 2024
- 2024 Approved Best Screen Recorder for YouTube
- Charting Earnings From YouTube AdSense What You Can Expect per 1,000 Views
- Access Your Favorites Anytime The Leading 6 Free Video Downloaders
- How to Make a YouTube Thumbnail On Mac
- 2024 Approved Break Through Boundaries 15+ Best Free Video Starters
- 2024 Approved Essentials for Efficient YouTube Content Trimming
- 2024 Approved Profit From YouTube Monetize YouTube Shorts and Boost Your Income
- 2024 Approved Elevate Your Content Strategy Prime Video Rank Monitors
- Boost Views with Smart YouTube Backlink Tactics for 2024
- Navigating YouTube Strikes Understanding and Resolving Copyright Issues
- Ultimate Screener Tech The Choice of Top YouTube Creators
- Actor's Insight Crafting Engaging Online Reactions on YouTube (3 Pro Tips)
- Unlocking ASMR Potential Professional Filming Practices Revealed
- 2024 Approved Aesthetic Alignment for Online Glamour Content
- Understanding Your Profit Revenue Per Thousand From YouTube's AdSense Income
- [Updated] Avoiding Common Pitfalls in PC-Based YouTube Video Editing
- Leading Websites for Extracting YouTube Intros
- Achieving Affiliate Success with Online Videos for 2024
- [Updated] A Deep Dive Into the Top 9 YouTube Downloader Apps for Android
- Optimal Solution Screen Capture for YouTube Success
- [Updated] 2024 Approved Streamline Vimeo Video Publicity Tactics
- 2024 Approved Enhancing Your FB Video Experience with 1080P Quality
- Complete guide for recovering music files on Realme C53
- In 2024, The Ultimate Guide Upgrade Your FB Videos with HD MP4 Format – Forfree
- [New] Mastering Personalized Emojis in Discord PC/Mobile Tips for 2024
- Tecno Camon 20 Premier 5G ADB Format Tool for PC vs. Other Unlocking Tools Which One is the Best?
- New 2024 Approved Editing on the Go GoPro Quik Review and PC Alternatives
- In 2024, CollabCanvas Mosaic Magic on Instagram Devices
- Expert-Endorsed 8 Tripods for Flawless 4K Footage
- In 2024, Ultimate Guide to Catch the Regional-Located Pokemon For Motorola Defy 2 | Dr.fone
- In 2024, Capture the Catch 5 Pro-Fish Cameras Unveiled
- Hard Resetting an Oppo Reno 8T 5G Device Made Easy | Dr.fone
- Best Methods for Oppo Reno 8T Wont Turn On | Dr.fone
- [Updated] 2024 Approved Mastering the Art of Visual Communication with Discord's Graphics Library
- [Updated] How to Boost Engagement The Science of Effective Video Captions on TikTok
- Easy steps to recover deleted call history from Lava
- Bypass iPhone 6 Plus activation lock without Apple ID
- [New] Dissection of FB Video Dimensions
- [Updated] 2024 Approved Download Unbranded TikTok Videos Online
- How to Spy on Text Messages from Computer & Xiaomi Redmi Note 13 5G | Dr.fone
- [Updated] In 2024, Unleash Your Creativity with These 10 Free, Mac-Friendly TikTok Editors
- [New] Premier Game Recorder Picks Excluding the Mainstream One
- 2024 Approved Beginner's Pathway to ProficientYouCamUse
- Viral Visualization Top Story Filter Guide
- Architects of Unique Virtual Environments
- How To Repair System Issues of iPhone 14 Pro? | Dr.fone
- [Updated] Bringing Smiles without Dollars – The MemeMaker’s Way
- Title: "[Updated] Cooking Chronicles Video Production Insights"
- Author: Brian
- Created at : 2024-05-25 13:15:53
- Updated at : 2024-05-26 13:15:53
- Link: https://youtube-video-recordings.techidaily.com/updated-cooking-chronicles-video-production-insights/
- License: This work is licensed under CC BY-NC-SA 4.0.
