
!["[Updated] Conquering Green Hue Fixing It On Mac For Video Editors"](https://www.lifewire.com/thmb/ik2TzfdHbMhMfL1m9s9Ist7Wp50=/400x300/filters:no_upscale():max_bytes(150000):strip_icc()/high-angle-blurred-view-of-pillars-in-world-map-shape-591407485-57d88e6a5f9b589b0a0a641b.jpg)
"[Updated] Conquering Green Hue Fixing It On Mac For Video Editors"
Conquering Green Hue: Fixing It On Mac For Video Editors
How to Fix the Green Screen on YouTube on Mac

Richard Bennett
Oct 26, 2023• Proven solutions
When you are watching YouTube, you might notice that the video is green while the sound keeps playing. This can be quite frustrating when you are watching something interesting and the YouTube green screen comes up.
There are various reasons as to why you have a green screen while watching videos on YouTube such as some problem with the GPU of Mac. No matter what the instance is, it can be quite overwhelming.
In case the YouTube green screen video issue while watching videos is bothering you and you are looking for a permanent fix to solve it, keep reading. In this guide, you can learn about the various issues that lead to the green screen problem on YouTube and how you can fix it.
But first, let’s take a look at the various issues that are causing the YouTube videos to turn green.
● Outdated Graphic Card Drivers: The issues associated with the graphics card can be a serious factor responsible for the green screen you are seeing while playing YouTube videos on your Mac device. This happens when the graphic drivers are outdated and can no longer support efficacious processing and playing of videos on the device. Graphics Card Drivers rendering is just the use of graphics cards for all rendering of functions such as videos. In case the drivers are outdated as the operating system, you will see a green screen error.
● Unreliable Third-Party Software: Any software from another source when used on Mac can lead to system errors. This will lead to green screen videos. It is more so when malware finds its way into the system when you are downloading the third-party software. This can even be a virus that comes with the software.
● Other Factors: Other factors might be responsible for the green screen videos such as a corrupt operating system.
How to Prevent Green Screen on YouTube on Mac?
In order to solve the YouTube video playing issue prior to moving on to the tricky troubleshooting methods, try out the simple hacks given below to prevent the problem altogether. These temporary hacks are usually quite helpful when you are in a hurry to watch a video.


● Play the YouTube video in some other browser. Often, a certain browser has a history of displaying a green screen on it when you play the videos on YouTube.
● Delete temporary files and cookies on Mac. This frees up space for the system.

● Close the other tabs and interfaces in the browser when you are watching the video online. This way the activities on the open window are not going to lead to an error while playing the video.
● Clear the cache data. By doing this, you can make sure that your system has enough space.
● Update the browser you are using to view videos on the latest browser.

● Reboot the Mac device if you are using it for a while. At times, rebooting the computer is all that you have to do to get the video working properly yet again after an error occurs.
How to Fix YouTube Green Screen?
As the video playing problem is primarily related to graphic drivers and hardware in the computer, further troubleshooting methods are for available for fixing these problems.
Hence, when the hacks fail to work and you keep seeing YouTube green screen, try out the following methods to fix this issue.
1. Disable Hardware Acceleration
The computer uses GPU rather than CPU for loading graphic intensive programs during hardware acceleration.

Nevertheless, some problems might occur when rendering the web pages from the Central Processing Unit to the Graphic Processing Unit. This causes performance problems. You might notice a green or blank screen while you are watching high-quality videos on YouTube.
In such a case, you need to disable hardware acceleration for resolving video playing problems.
● Right-click on the video which is displaying the green screen.
● Choose ‘Setting’ from the menu.
● Now, click to uncheck the option ‘Enable hardware acceleration’.
● Next, close the window to reload the page.
● To watch the video, reopen the website.
If you don’t find the ‘Settings’ option on the right-clicking the green video screen, disable the option of Hardware Acceleration on the web browser.
2. Update the Graphics Card Drivers
In case after establishing the hardware acceleration green screen in the YouTube videos to occur, update the graphics card driver. The video playing issue might have been caused due to the old AMD or NVIDIA graphics card.
Here are the steps to update the Graphics Card Drivers:
● Right-click on ‘My Computer’.
● Now, click on ‘Follow Manage’ and then ‘Device Manager’.
● Next, click on the option ‘Display Adapters’.
● Right-click on the graphics driver and then click on ‘Update Driver Software’.
● Choose ‘Search automatically for updated driver software’. The system will detect the graphics card and will find the latest driver. Restart the PC and the system.
3. Run a Troubleshooter
You can also try running a troubleshooter in the system to fix your green screen issue in YouTube videos.
Check out what you have to do.
● Open the computer ‘Settings’ app.
● Click on the ‘Update & Security’ section.
● Choose ‘Troubleshoot’ and then ‘Hardware and Devices’.
● As soon as the progress is complete, just restart the PC.
Now, you will have to view the videos once more to check if the problem has been resolved.
4. Adjust YouTube Settings
If you are persistently having this problem with YouTube videos, you can try to change the video quality to make it supported by the device. You need to do this in the following steps.
● Open the browser and play the YouTube video you prefer.
● Click on the ‘Gear’ icon and from the menu opt for ‘Quality’.

● Now, you can choose from different video quality options.
Conclusion
You might have seen how easy it is to solve the YouTube green screen issues while running YouTube videos on Mac. So, when you are encountering one, there is no reason to worry. Moreover, following the few hacks given above, you can easily resolve the YouTube green screen issue.
In case you are troubleshooting the issue, make sure that you begin with hardware acceleration and then move on to the other methods. If you want to create a video for YouTube using green screen, you can usevideo editor for Mac from Filmora. It offers various features that you can use to create a unique video.
Learn More: How do Beginners Make a Cool Video for YouTube on Mac>>>
Richard Bennett
Richard Bennett is a writer and a lover of all things video.
Follow @Richard Bennett
Richard Bennett
Oct 26, 2023• Proven solutions
When you are watching YouTube, you might notice that the video is green while the sound keeps playing. This can be quite frustrating when you are watching something interesting and the YouTube green screen comes up.
There are various reasons as to why you have a green screen while watching videos on YouTube such as some problem with the GPU of Mac. No matter what the instance is, it can be quite overwhelming.
In case the YouTube green screen video issue while watching videos is bothering you and you are looking for a permanent fix to solve it, keep reading. In this guide, you can learn about the various issues that lead to the green screen problem on YouTube and how you can fix it.
But first, let’s take a look at the various issues that are causing the YouTube videos to turn green.
● Outdated Graphic Card Drivers: The issues associated with the graphics card can be a serious factor responsible for the green screen you are seeing while playing YouTube videos on your Mac device. This happens when the graphic drivers are outdated and can no longer support efficacious processing and playing of videos on the device. Graphics Card Drivers rendering is just the use of graphics cards for all rendering of functions such as videos. In case the drivers are outdated as the operating system, you will see a green screen error.
● Unreliable Third-Party Software: Any software from another source when used on Mac can lead to system errors. This will lead to green screen videos. It is more so when malware finds its way into the system when you are downloading the third-party software. This can even be a virus that comes with the software.
● Other Factors: Other factors might be responsible for the green screen videos such as a corrupt operating system.
How to Prevent Green Screen on YouTube on Mac?
In order to solve the YouTube video playing issue prior to moving on to the tricky troubleshooting methods, try out the simple hacks given below to prevent the problem altogether. These temporary hacks are usually quite helpful when you are in a hurry to watch a video.
● Play the YouTube video in some other browser. Often, a certain browser has a history of displaying a green screen on it when you play the videos on YouTube.
● Delete temporary files and cookies on Mac. This frees up space for the system.
● Close the other tabs and interfaces in the browser when you are watching the video online. This way the activities on the open window are not going to lead to an error while playing the video.
● Clear the cache data. By doing this, you can make sure that your system has enough space.
● Update the browser you are using to view videos on the latest browser.
● Reboot the Mac device if you are using it for a while. At times, rebooting the computer is all that you have to do to get the video working properly yet again after an error occurs.
How to Fix YouTube Green Screen?
As the video playing problem is primarily related to graphic drivers and hardware in the computer, further troubleshooting methods are for available for fixing these problems.
Hence, when the hacks fail to work and you keep seeing YouTube green screen, try out the following methods to fix this issue.
1. Disable Hardware Acceleration
The computer uses GPU rather than CPU for loading graphic intensive programs during hardware acceleration.
Nevertheless, some problems might occur when rendering the web pages from the Central Processing Unit to the Graphic Processing Unit. This causes performance problems. You might notice a green or blank screen while you are watching high-quality videos on YouTube.
In such a case, you need to disable hardware acceleration for resolving video playing problems.
● Right-click on the video which is displaying the green screen.
● Choose ‘Setting’ from the menu.
● Now, click to uncheck the option ‘Enable hardware acceleration’.
● Next, close the window to reload the page.
● To watch the video, reopen the website.
If you don’t find the ‘Settings’ option on the right-clicking the green video screen, disable the option of Hardware Acceleration on the web browser.
2. Update the Graphics Card Drivers
In case after establishing the hardware acceleration green screen in the YouTube videos to occur, update the graphics card driver. The video playing issue might have been caused due to the old AMD or NVIDIA graphics card.
Here are the steps to update the Graphics Card Drivers:
● Right-click on ‘My Computer’.
● Now, click on ‘Follow Manage’ and then ‘Device Manager’.
● Next, click on the option ‘Display Adapters’.
● Right-click on the graphics driver and then click on ‘Update Driver Software’.
● Choose ‘Search automatically for updated driver software’. The system will detect the graphics card and will find the latest driver. Restart the PC and the system.
3. Run a Troubleshooter
You can also try running a troubleshooter in the system to fix your green screen issue in YouTube videos.
Check out what you have to do.
● Open the computer ‘Settings’ app.
● Click on the ‘Update & Security’ section.
● Choose ‘Troubleshoot’ and then ‘Hardware and Devices’.
● As soon as the progress is complete, just restart the PC.
Now, you will have to view the videos once more to check if the problem has been resolved.
4. Adjust YouTube Settings
If you are persistently having this problem with YouTube videos, you can try to change the video quality to make it supported by the device. You need to do this in the following steps.
● Open the browser and play the YouTube video you prefer.
● Click on the ‘Gear’ icon and from the menu opt for ‘Quality’.
● Now, you can choose from different video quality options.
Conclusion
You might have seen how easy it is to solve the YouTube green screen issues while running YouTube videos on Mac. So, when you are encountering one, there is no reason to worry. Moreover, following the few hacks given above, you can easily resolve the YouTube green screen issue.
In case you are troubleshooting the issue, make sure that you begin with hardware acceleration and then move on to the other methods. If you want to create a video for YouTube using green screen, you can usevideo editor for Mac from Filmora. It offers various features that you can use to create a unique video.
Learn More: How do Beginners Make a Cool Video for YouTube on Mac>>>
Richard Bennett
Richard Bennett is a writer and a lover of all things video.
Follow @Richard Bennett
Stream Like a Pro on YouTube: Best Webcams Reviewed
Best Webcams for YouTube Livestreaming

Max Wales
Mar 27, 2024• Proven solutions
Broadcasting videos in real time on social media can be a great way to share some of the best moments of your life with your friends or to reach new customers for the products your company offers. YouTube is the world’s biggest video sharing platform that already allows its users to stream live videos through third-party applications such as Wirecast Play or OBS. Less than a month ago, YouTube has finally made possible live streaming directly from a computer’s webcam. The option is currently only available on Chrome browsers, but the company claims that more browsers will start offering this feature soon.
In this article, we are going to provide you with all the information you’ll need to create seamless live streams using a webcam and introduce you to some of the best webcam models in 2021.
Best webcams for YouTube Livestreaming in 2021
The quality of the video recording you intend to broadcast live is essential for the success of your live streams. Most built-in laptop webcams produce low-quality videos, and for that reason using an external webcam that captures high-resolution videos can help you create live streams that attract a lot of attention from YouTube’s community.
How to choose the right webcam for live streaming on YouTube?
Compatability: Even the best webcams on the market are completely useless if they are not compatible with your computer. Finding a webcam that works with a PC or a Mac shouldn’t be too difficult because both Windows and iOS platforms offer support for a wide range of models.
Video Resolution: YouTubers that just want to produce simple live streams don’t have to pay a lot of attention to the video resolution, because their videos don’t show too many details. Vloggers and gamers, on the other hand, should consider using webcams that produce 4K or HD footage since lower-priced options have a hard time realistically depicting colors. The quality of the video output a webcam produces can increase its price significantly, so there’s no reason investing in it if you don’t have the intention of utilizing its features to the fullest.
Sound Quality: Besides the video features, you should also look into the webcam’s audio options, because no one wants to watch a video with a terrible sound. Buying an external microphone is probably the best solution to this issue, but if you can’t afford one, then purchasing a webcam with decent audio recording features is the second best option.
Adjustable Location: Although the angle from which you are recording a stream may not seem important, poorly framed live streams are more likely to go unnoticed. A webcam that is easily adjustable can grant you the freedom of choosing your shots on every live stream you share online and it will enable you to control each and every detail in the video.
![]()

The All-in-One Screen Recorder & Video Editor
- Record desktop screen, voiceover, and webcam simultaneously
- Edit recorded clips quickly with a wide range of professional tools
- Built-in plentiful templates and effects
- Export to MP4, MOV, MKV, GIF and multiple formats
For Win 7 or later (64-bit)
For macOS 10.12 or later
 Secure Download
4 Best Webcams for YouTube Live streaming in 2021
There are thousands of different webcams you can use to record a live stream, but the models featured below are some of the very best currently available on the market.
1. Logitech 4K Pro webcam
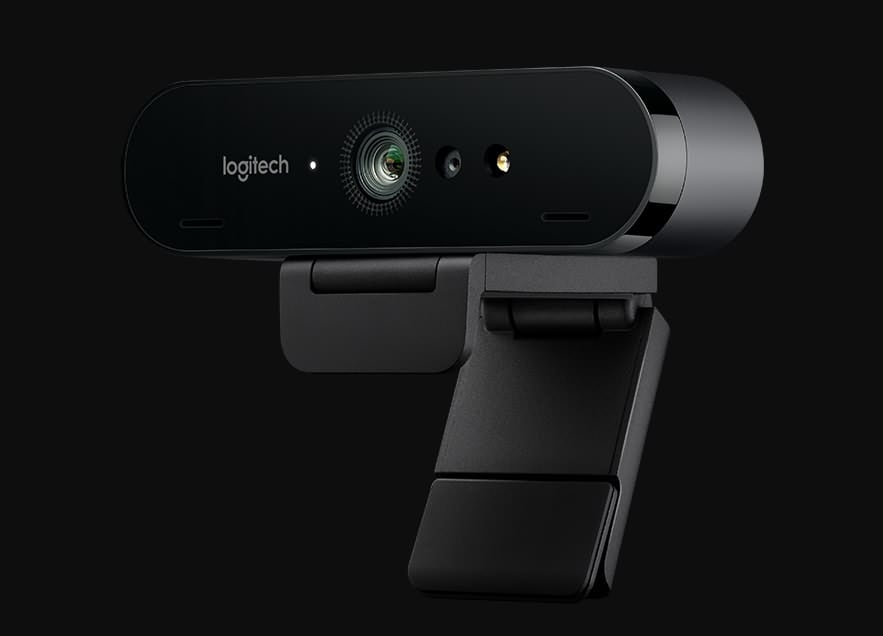
OS: Windows, macOS, Chrome OS
Price: $199
This is currently the only webcam on the market that supports 4K video recording, which makes it a forerunner of innovation and change. Besides the 4K option, the webcam’s features include a 5X digital zoom, infrared facial recognition and the amazing Right Light with HDR option that helps users record videos even under difficult light conditions.
The webcam can perform basic functions, like Skype calls, without the aid of third-party apps, which means that you can use it to create live streams on YouTube even if you don’t have a broadcasting software. The webcam’s stand is designed to fit almost any surface, so mounting the Logitech 4K Pro webcam to a laptop or monitor is quick and simple. The background replacement feature this Logitech’s webcam model offers can be quite useful if you want to use a different background in your YouTube live stream.
Pros:
- Produces incredibly clear and sharp images
- Superb background replacement options
- Expansive field of view
Cons:
- Poor audio recording options
- Internal software is basic
- A limited number of programs can capture 4K footage
2. Logitech HD Pro C920
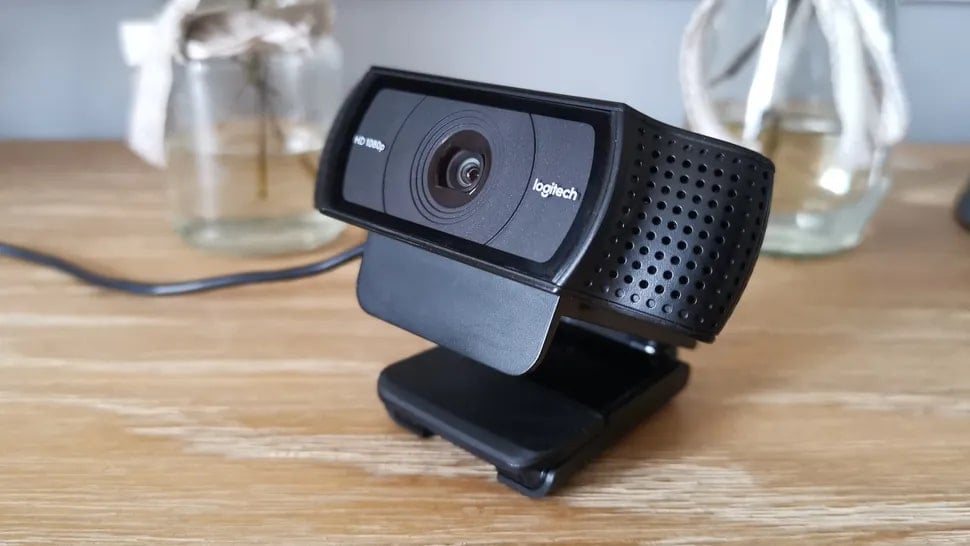
OS: macOS, Windows
Price: $99,99
Vloggers and all other YouTubers who care about video resolution will love using this webcam. Besides being capable of producing crystal clear videos in 1080p or HD 720 resolution at 30 or 60 fps, Logitech HD Pro C922 is also optimized for live streaming, which makes it a perfect webcam for live streaming on YouTube and all other video sharing platforms.
The webcam is equipped with two omnidirectional microphones that can record clear audio, but they pick up background noises easily, so using an external microphone for your live stream is still a much better option. The automatic low-light correction feature is designed to detect flickering lights in a video or increase visibility when streaming from a dimmed location. A foldable stand makes mounting the webcam easy, and you can also use a tripod if you want to record a live stream from an unusual perspective.
Pros:
- Produces 1080p and 720p resolution videos at 30 and 60 fps
- Allows users to integrate live images into their live streams
- Very easy to use
Cons
- Below average audio recording features
- Pricey
- Works only with OBS and XSplit broadcasting software
3. Logitech C922 Pro Stream webcam
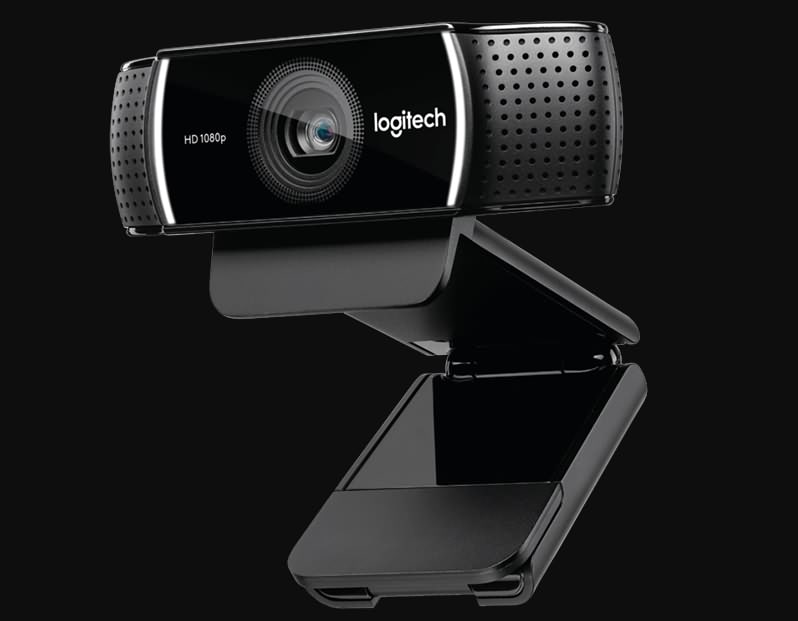
OS: Windows, macOS, Xbox, Chrome OS, Android 5.0 or above
Price: $99,99
Professional streamers, who want to capture impeccable live streams, should look no further. Logitech C922 Pro Stream webcam is the premier option for anyone who wants to be regarded as a professional streamer. This Logitech’s webcam lets you capture live streams in 1080p at 30 fps or 720p at 60 fps, while also providing the background removal feature for live streams on Twitch and YouTube. The video compression ensures that your live streams don’t take up too much of your network’s resources.
The webcam’s microphones enable users to record clear audio and reduce the need to use an external mic on every live stream you make. The Logitech C922 Pro Stream webcam delivers stunning performances in low light conditions, and it also has a 78-degree field of view lens. The webcam’s mounting options are somewhat limited, which can have a negative effect on the visual appeal of your YouTube live streams.
Pros:
- Offers a solid support for audio recording
- Delivers stunning picture quality
- Compatible with a wide range of operating systems
Cons:
- Limited mounting options
- Not plug-and-play friendly on Mac devices
- More expensive than webcams with similar capabilities
4. Microsoft LifeCam Studio
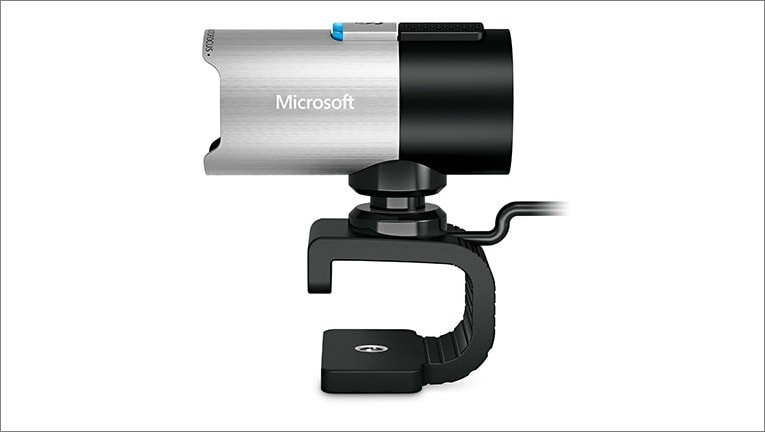
OS: Windows
Price: $99,95
The high-precision glass element lens this webcam features produces clear and sharp images. The Microsoft LifeCam Studio webcam has a 1080p HD sensor and it offers 720p HD video chat option. In addition to these remarkable features, the webcam is also equipped with TrueColor technology with face tracking that automatically adjusts the camera’s exposure to the environment and ensures that your live streams are always bright and colorful.
The Microsoft LifeCam Studio has a wide angle lens and an autofocus feature that guarantees that all live streams are always in focus. The webcam is Skype certified which means that it performs best when used with this software. Audio recording features exceed all expectations since the webcam can record natural audio recordings with no background noises. However, the limited compatibility narrows down the spectrum of its potential users.
Pros:
- Excellent video recording features.
- Crystal clear audio
- Great mounting options
Cons:
- Available only on Windows OS
- Demanding system requirements
- Not optimized for live streaming.
How to live stream from a webcam on YouTube in 2020
Although producing your own live stream on YouTube is easy, there are still a few steps you will have to take before you can start streaming from the webcam on your computer. If you don’t have a YouTube channel, you must make one, in order to be able to create your first live steam.
Step 1
Go to youtube.com/webcam , then complete the channel verification process and make sure that your channel doesn’t have any live streaming restrictions in the last 90 days. Head over to your channel, click on the Create a Video or Post icon in the upper right corner of the web page and select the GoLive option.
Afterward, you should give Chrome permission to access your webcam and the microphone you intend on using to record audio.
Step 2
Immediately after, the platform will ask you to give a title to your stream and it will let you choose whether or not you want the stream to be public or unlisted. It may be a good idea to create a few unlisted streams before you go public if you are still trying to figure out how this feature works.
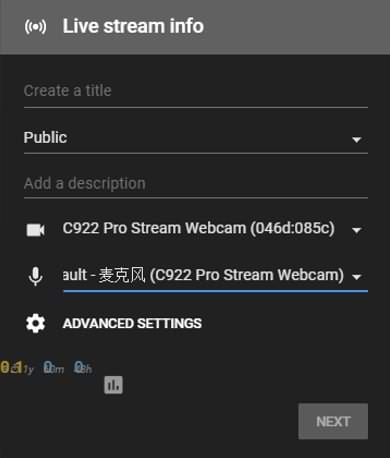
Proceed to select the camera and the microphone you intend to use to record the live stream, and you can also click on the Advanced Settings icon if you want to disable chat during the session or to specify that the live stream includes paid promotions.
Step 3
Once you’ve finished fine-tuning the advanced settings, you should click on the Next button. The platform will offer you to take or upload a thumbnail for your live stream.
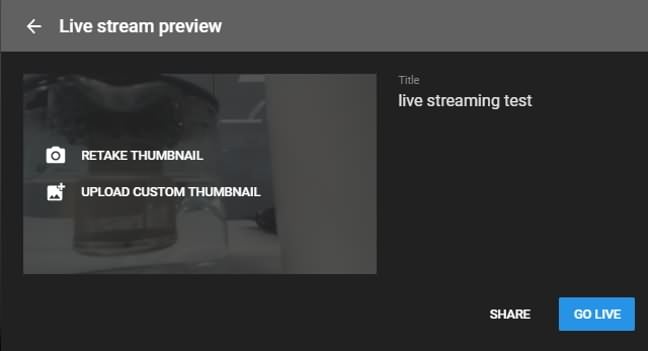
Clicking on the Share icon will enable you to share a live stream on social media, copy the link or access the embed code. Using the Share option is a great way to check if your live stream is functioning properly and to make sure that you are all set to begin the streaming session.
Step 4
Start your live stream by hitting the Go Live button. During the stream, you’ll be able to see and reply to comments people posted, the duration of the stream as well as the number of people following your live stream. If you haven’t shared your live stream before you started a new session you can do so while you are live. Click on the End Stream button to finish your webcam live stream on YouTube.
Step 5
After each live streaming session, YouTube will display some important statistics like the total and average watch time for the particular stream, the number of new subscribers or the number of playbacks of your live stream. The stream will be available for review in YouTube’s Creator Studio in the Events menu.
Max Wales
Max Wales is a writer and a lover of all things video.
Follow @Max Wales
Max Wales
Mar 27, 2024• Proven solutions
Broadcasting videos in real time on social media can be a great way to share some of the best moments of your life with your friends or to reach new customers for the products your company offers. YouTube is the world’s biggest video sharing platform that already allows its users to stream live videos through third-party applications such as Wirecast Play or OBS. Less than a month ago, YouTube has finally made possible live streaming directly from a computer’s webcam. The option is currently only available on Chrome browsers, but the company claims that more browsers will start offering this feature soon.
In this article, we are going to provide you with all the information you’ll need to create seamless live streams using a webcam and introduce you to some of the best webcam models in 2021.
Best webcams for YouTube Livestreaming in 2021
The quality of the video recording you intend to broadcast live is essential for the success of your live streams. Most built-in laptop webcams produce low-quality videos, and for that reason using an external webcam that captures high-resolution videos can help you create live streams that attract a lot of attention from YouTube’s community.
How to choose the right webcam for live streaming on YouTube?
Compatability: Even the best webcams on the market are completely useless if they are not compatible with your computer. Finding a webcam that works with a PC or a Mac shouldn’t be too difficult because both Windows and iOS platforms offer support for a wide range of models.
Video Resolution: YouTubers that just want to produce simple live streams don’t have to pay a lot of attention to the video resolution, because their videos don’t show too many details. Vloggers and gamers, on the other hand, should consider using webcams that produce 4K or HD footage since lower-priced options have a hard time realistically depicting colors. The quality of the video output a webcam produces can increase its price significantly, so there’s no reason investing in it if you don’t have the intention of utilizing its features to the fullest.
Sound Quality: Besides the video features, you should also look into the webcam’s audio options, because no one wants to watch a video with a terrible sound. Buying an external microphone is probably the best solution to this issue, but if you can’t afford one, then purchasing a webcam with decent audio recording features is the second best option.
Adjustable Location: Although the angle from which you are recording a stream may not seem important, poorly framed live streams are more likely to go unnoticed. A webcam that is easily adjustable can grant you the freedom of choosing your shots on every live stream you share online and it will enable you to control each and every detail in the video.
![]()
The All-in-One Screen Recorder & Video Editor
- Record desktop screen, voiceover, and webcam simultaneously
- Edit recorded clips quickly with a wide range of professional tools
- Built-in plentiful templates and effects
- Export to MP4, MOV, MKV, GIF and multiple formats
For Win 7 or later (64-bit)
For macOS 10.12 or later
Secure Download
4 Best Webcams for YouTube Live streaming in 2021
There are thousands of different webcams you can use to record a live stream, but the models featured below are some of the very best currently available on the market.
1. Logitech 4K Pro webcam
OS: Windows, macOS, Chrome OS
Price: $199
This is currently the only webcam on the market that supports 4K video recording, which makes it a forerunner of innovation and change. Besides the 4K option, the webcam’s features include a 5X digital zoom, infrared facial recognition and the amazing Right Light with HDR option that helps users record videos even under difficult light conditions.
The webcam can perform basic functions, like Skype calls, without the aid of third-party apps, which means that you can use it to create live streams on YouTube even if you don’t have a broadcasting software. The webcam’s stand is designed to fit almost any surface, so mounting the Logitech 4K Pro webcam to a laptop or monitor is quick and simple. The background replacement feature this Logitech’s webcam model offers can be quite useful if you want to use a different background in your YouTube live stream.
Pros:
- Produces incredibly clear and sharp images
- Superb background replacement options
- Expansive field of view
Cons:
- Poor audio recording options
- Internal software is basic
- A limited number of programs can capture 4K footage
2. Logitech HD Pro C920
OS: macOS, Windows
Price: $99,99
Vloggers and all other YouTubers who care about video resolution will love using this webcam. Besides being capable of producing crystal clear videos in 1080p or HD 720 resolution at 30 or 60 fps, Logitech HD Pro C922 is also optimized for live streaming, which makes it a perfect webcam for live streaming on YouTube and all other video sharing platforms.
The webcam is equipped with two omnidirectional microphones that can record clear audio, but they pick up background noises easily, so using an external microphone for your live stream is still a much better option. The automatic low-light correction feature is designed to detect flickering lights in a video or increase visibility when streaming from a dimmed location. A foldable stand makes mounting the webcam easy, and you can also use a tripod if you want to record a live stream from an unusual perspective.
Pros:
- Produces 1080p and 720p resolution videos at 30 and 60 fps
- Allows users to integrate live images into their live streams
- Very easy to use
Cons
- Below average audio recording features
- Pricey
- Works only with OBS and XSplit broadcasting software
3. Logitech C922 Pro Stream webcam
OS: Windows, macOS, Xbox, Chrome OS, Android 5.0 or above
Price: $99,99
Professional streamers, who want to capture impeccable live streams, should look no further. Logitech C922 Pro Stream webcam is the premier option for anyone who wants to be regarded as a professional streamer. This Logitech’s webcam lets you capture live streams in 1080p at 30 fps or 720p at 60 fps, while also providing the background removal feature for live streams on Twitch and YouTube. The video compression ensures that your live streams don’t take up too much of your network’s resources.
The webcam’s microphones enable users to record clear audio and reduce the need to use an external mic on every live stream you make. The Logitech C922 Pro Stream webcam delivers stunning performances in low light conditions, and it also has a 78-degree field of view lens. The webcam’s mounting options are somewhat limited, which can have a negative effect on the visual appeal of your YouTube live streams.
Pros:
- Offers a solid support for audio recording
- Delivers stunning picture quality
- Compatible with a wide range of operating systems
Cons:
- Limited mounting options
- Not plug-and-play friendly on Mac devices
- More expensive than webcams with similar capabilities
4. Microsoft LifeCam Studio
OS: Windows
Price: $99,95
The high-precision glass element lens this webcam features produces clear and sharp images. The Microsoft LifeCam Studio webcam has a 1080p HD sensor and it offers 720p HD video chat option. In addition to these remarkable features, the webcam is also equipped with TrueColor technology with face tracking that automatically adjusts the camera’s exposure to the environment and ensures that your live streams are always bright and colorful.
The Microsoft LifeCam Studio has a wide angle lens and an autofocus feature that guarantees that all live streams are always in focus. The webcam is Skype certified which means that it performs best when used with this software. Audio recording features exceed all expectations since the webcam can record natural audio recordings with no background noises. However, the limited compatibility narrows down the spectrum of its potential users.
Pros:
- Excellent video recording features.
- Crystal clear audio
- Great mounting options
Cons:
- Available only on Windows OS
- Demanding system requirements
- Not optimized for live streaming.
How to live stream from a webcam on YouTube in 2020
Although producing your own live stream on YouTube is easy, there are still a few steps you will have to take before you can start streaming from the webcam on your computer. If you don’t have a YouTube channel, you must make one, in order to be able to create your first live steam.
Step 1
Go to youtube.com/webcam , then complete the channel verification process and make sure that your channel doesn’t have any live streaming restrictions in the last 90 days. Head over to your channel, click on the Create a Video or Post icon in the upper right corner of the web page and select the GoLive option.
Afterward, you should give Chrome permission to access your webcam and the microphone you intend on using to record audio.
Step 2
Immediately after, the platform will ask you to give a title to your stream and it will let you choose whether or not you want the stream to be public or unlisted. It may be a good idea to create a few unlisted streams before you go public if you are still trying to figure out how this feature works.
Proceed to select the camera and the microphone you intend to use to record the live stream, and you can also click on the Advanced Settings icon if you want to disable chat during the session or to specify that the live stream includes paid promotions.
Step 3
Once you’ve finished fine-tuning the advanced settings, you should click on the Next button. The platform will offer you to take or upload a thumbnail for your live stream.
Clicking on the Share icon will enable you to share a live stream on social media, copy the link or access the embed code. Using the Share option is a great way to check if your live stream is functioning properly and to make sure that you are all set to begin the streaming session.
Step 4
Start your live stream by hitting the Go Live button. During the stream, you’ll be able to see and reply to comments people posted, the duration of the stream as well as the number of people following your live stream. If you haven’t shared your live stream before you started a new session you can do so while you are live. Click on the End Stream button to finish your webcam live stream on YouTube.
Step 5
After each live streaming session, YouTube will display some important statistics like the total and average watch time for the particular stream, the number of new subscribers or the number of playbacks of your live stream. The stream will be available for review in YouTube’s Creator Studio in the Events menu.
Max Wales
Max Wales is a writer and a lover of all things video.
Follow @Max Wales
Also read:
- Audience Allure Video Marketing Strategies for YouTube Trailers via Filmora for 2024
- [New] Amassing Audiences and Assets Launching a Livestream Business
- Ryan Kaji Youthful Wealth Through Internet Popularity
- [New] Effortless Inclusion YouTube Media on Slides
- Best Practices The 8 Truly Effective Promotion Techniques for 2024
- [Updated] Elevate Your Video Game YouTube Production Mastery
- [Updated] Cutting-Edge Techniques for YouTube Thumbnails, Made for macOS
- In 2024, Broadcasting Made Simple Directly Stream Google Meet to YouTube
- The Shot Without a Lifeline Hand Balancing Hacks
- 2024 Approved Comparing YouTube Policies with Creative Commons
- In 2024, Boosting Your Content Reach with Eye-Catching YouTube Video Thumbnails
- In 2024, Decoding Veiled Content on YouTube
- Efficient Trimming Made Simple with Top 10 Software
- In 2024, Creating Profit on YouTube The Ultimate List of Top Business Channels
- Strategies for Sustainable Income via Product-Based Videos
- 2024 Approved Designing a Memorable YouTube Sign-Off
- Elevate Your Content YouTube's Keyword Strategies Exposed for 2024
- Bewitching Blend YouTube Edition of Top Magic Tricks for 2024
- Driving Traffic to Long-Form Videos via Shorts
- Navigating to the World's 8 High-Speed YouTube Innovators
- Culinary Callings 30 Unique Show Title Suggestions
- In 2024, Clear Youtube's Obscured Visual Field
- 2024 Approved A Symphony of Streams Harmonizing Your Multiple YouTube Views
- Beam It Up! 15 Must-Haves for Your YouTube Live Stream for 2024
- Eco-Effective Marketing Green Screens & CTA Boosting for 2024
- [New] Digital Deck of Cards YouTube's Milestone Challenges
- Pinnacle Video Beginnings 16 YouTube Selections to Increase Watches
- In 2024, Elevate Your Channels Selecting Prime Microphones for Every Content Category
- In 2024, Cut Down to Size Ranking the Best YouTube Video Editors
- In 2024, Elevate Your FreeFire Presence with Top Tips and Tricks
- [New] Access Unlimited Stock Photos via Four Noteworthy YouTubes
- Decipher the Best Video Tracker Tools for High-Impact Results for 2024
- In 2024, Top 10 YouTube Video Trimmers Online
- 2024 Approved Cutting-Edge Techniques Mastering YouTube Subtitle/CC Additions
- [New] Deciphering YouTube Popularity Factors for Higher Placement
- In 2024, Best FreeFire YouTube Hashtags and Tips For YouTube Gaming Videos
- 2024 Approved Cutting-Edge Tips for Professional YouTube Content Creation
- [New] Discovering Video Producers' Digital Command Center
- A Blueprint for Exceptional Product Showcasing
- [Updated] A Guide to the Best Tools for Shortening Video Content Online
- 2024 Approved Digital Audience Accolades for Content Makers
- The Ultimate List of Engaging History Content on YouTube
- [Updated] Boosting Your YouTube Presence with Extended Videos
- Unbox the Joy of 9 Premium, Complete Christmas Movies for Free
- Conceptualists Engineering Marvel Online Worlds
- Comparing Free and Premium YouTube Experiences What's Best for 2024
- 2024 Approved Elevate Your Content with These Top 5 YouTube Marketing Methods
- 2024 Approved Achieving Precise YouTube Content Extraction
- [Updated] Crafting Comfortable Cinematography Amidst the Chill
- From Clips to Streams Merging YouTube & TikTok Content
- Updated 2024 Approved Echo Eradicator The Complete Guide to Clean Auditory Experience
- In 2024, Top 10 Remarkable E-Learning Platforms Excluding Udemy
- [Updated] The Ultimate Guide to Making Money with Vimeo Monetization for 2024
- [New] The Forgotten Basics of Instagram Reels Success for 2024
- In 2024, Network Locked SIM Card Inserted On Your Samsung Galaxy A23 5G Phone? Unlock It Now
- [Updated] In 2024, TikTok Freeze on iPhone? Here's How to Resolve It
- [New] In 2024, Hit the Town Non-GTA Games That Offer Similar Joy
- A Spectrum of Excellence Top 5 TVs for Grading Mastery
- [Updated] 2024 Approved Expert Tips for Effective IO Image Capture Use
- Elevate Your Gameplay Records with Advanced Methods on W11
- [New] Extreme Playlist Best TikTok Crazy Games to Try
- [New] 2024 Approved Social Media Savvy Unlock the Secrets of Crafting Winning Bios on Facebook
- In 2024, A Comprehensive Guide to Mastering iPogo for Pokémon GO On Apple iPhone 12 Pro Max | Dr.fone
- Guide to Mirror Your Tecno Camon 30 Pro 5G to Other Android devices | Dr.fone
- In 2024, Unlock iPhone 6s With Forgotten Passcode Different Methods You Can Try | Dr.fone
- Iconic Screenplays A Cinematic Legacy
- Innovative Ways to Record Without Background Sounds
- [New] How to Convert Your Social Media Presence Into a Sustainable Business Model
- Does Oppo Reno 8T Have Find My Friends? | Dr.fone
- New In 2024, After Effects Guide to Elevating Song Visualization
- [Updated] In 2024, Proven Ways to Cash In Instagram's Leading Revenue Methods
- [New] 2024 Approved Download Any Song on FB for Free
- In 2024, Ultimate guide to get the meltan box pokemon go For Apple iPhone 12 | Dr.fone
- [Updated] Top Tactics for Gameplay Screen Captures for 2024
- Updated Split Your MPEG Videos Like a Pro Top 5 Free Tools for 2024
- How To Change ZTE Lock Screen Password?
- New Discover the Best Free and Paid 3D Animation Programs for Artists for 2024
- How to Fix Android App Not Installed Error on Realme Narzo 60 5G Quickly? | Dr.fone
- [Updated] 2024 Approved Instagram Intensity The Ultimate Guide to Video Audio
- In 2024, Is GSM Flasher ADB Legit? Full Review To Bypass Your Oppo Find N3 FlipFRP Lock
- [New] In 2024, Spotlight on Viral Content TikTok Reactions
- Title: "[Updated] Conquering Green Hue Fixing It On Mac For Video Editors"
- Author: Brian
- Created at : 2024-05-25 13:15:34
- Updated at : 2024-05-26 13:15:34
- Link: https://youtube-video-recordings.techidaily.com/updated-conquering-green-hue-fixing-it-on-mac-for-video-editors/
- License: This work is licensed under CC BY-NC-SA 4.0.
