
![[Updated] Awesome Techniques for Streaming and Uploading on iOS Devices](https://www.lifewire.com/thmb/n1B4xtKlMDYVHkzyTBvmu5xLcFs=/400x300/filters:no_upscale():max_bytes(150000):strip_icc()/Mediacomoutagemap-067f88aca591414eb04b103a36693e0c.JPG)
[Updated] Awesome Techniques for Streaming and Uploading on iOS Devices
Awesome Techniques for Streaming and Uploading on iOS Devices
Create High-Quality Video - Wondershare Filmora
An easy and powerful YouTube video editor
Numerous video and audio effects to choose from
Detailed tutorials provided by the official channel
Initially, iOS users had the option to load videos directly to YouTube via the tap-to-upload feature. However, this option is missing in the recent iOS devices versions. Therefore, many users search for possible ways to post a video on YouTube from iPhone. For this, you have to put some considerations into place before moving on. The video title length should not exceed 100 characters, while the description is maintained at 5,000 characters. Also, ensure the video length doesn’t exceed 15 minutes. Let’s roll out the best ways to upload your videos and make that big catch on subscribers.

In this article
01 [ How to upload a video to YouTube from iPhone or iPad](#Part 1)
02 [Why your phone doesn’t post videos to YouTube](#Part 2)
03 [Make your YouTube video better with Filmora](#Part 3)
How to upload a video to YouTube from iPhone or iPad
Are you ready to start on that big adventure and share your videos on YouTube? Follow these steps to learn how to upload a video to YouTube from your iPhone.
Method 1: Upload using the YouTube iOS app
Using the YouTube app is the simplest way to upload your YouTube videos. The YouTube app should be installed on your iOS device.
Step 1. Launch the YouTube app on your device, then sign in to your account. If you don’t have an account yet, you will need to “Sign up” for a new one before continuing the upload process.
Step 2. Click on the “+” icon found at the bottom of the screen.
Step 3. Then choose the “Upload a video” option from the populated list of options.
Step 4. Check out the pop-up that appears and “Allow access” to it.
Step 5. Edit your video to your preference by trimming or cropping as you desire. Then click on the “Next” option.

Step 6. Add “title and description” to your video. Remember, the title should contain less than 100 characters and the description no more than 500 characters.
Step 7. Then set the visibility mode as “Public” to enable you to share your video over the internet.
Step 8. Click on the “Upload” button to finally upload your video to YouTube.

Method 2: Upload using Photo App
The Photo App has a “Share” option that you can use to upload your videos to YouTube. Here is the guide.
Step 1. Go to your iOS device and tap on the “Photos” app.
Step 2. Then tap on the “Videos Folder” to locate the video you wish to upload to YouTube.

Step 3. Next, tap on the video that you want to upload.
Step 4. Then tap on the “Share” icon located at the bottom left of your iOS device screen.
Step 5. You’ll then access a “Share” menu from where you have various share options for your video.
Step 6. Choose the “YouTube” option to continue to share your video there. At this juncture, ensure you have logged in to your Google Account.

Step 7. You need to provide a “Title” and “Description” of your video. Then go to the “Privacy” Options and make your video “Public.”
Step 8. Finally, tap on the “Publish” tab found at the top-right corner of your screen to make your video viewable by the public.

Method 3: Upload video to YouTube using Safari
Safari is another alternative method to upload a video to YouTube.
Step 1. First, go to “youtube.com” on Safari and sign in.

Step 2. Then tap on the “account” icon at the top right side of the screen.
Step 3. Hit on the “Upload” icon and wait to be redirected to the YouTube Studio desktop site.
Step 4. Click on the “Select Files” option.
Step 5. Choose the video you wish to add to YouTube from the “Photo” library and tap on the “Add” button.

Step 6. Add your video’s “title and description” and hit the “Next” button.
Step 7. Tap on the “Next” button once more to go to the “Visibility” page.
Step 8. Select the “Public” option to upload your video to the public.
Why your phone doesn’t post videos to YouTube
Despite learning how to upload to YouTube from iPhone, you may be perplexed to realize that your phone refuses to post videos to YouTube. What could be the reason?
1) YouTube issues
In most cases, the problem doesn’t arise from your phone but from YouTube. This streaming app may also experience some hitches along the way. Remember that even if your phone sync with your YouTube account to upload videos from the “Camera Roll,” YouTube isn’t managed from the Camera Roll but the YouTube app directly. You can solve the issue by signing out of your YouTube account and signing back in.
2) Connection Strength
Some videos may appear quite large and cause a time-out during the upload process. Check your Wi-Fi or internet connection strength to determine if it needs a boost or wait until the streaming strength is strong for a quick upload. Test your internet speed by searching “internet test speed” on Google. Then click the “Run Speed Test” in the search box. A window will open and give you an estimate of the Mbps that your connection is operating at. If too low, switch to other alternatives.
3) Verify your YouTube account
Verifying your account will help you to enjoy YouTube’s full features. It’s then that you’ll manage to upload videos without any drawbacks. Also, that’s when you’ll manage to upload longer videos that go beyond the 15-minute duration.
4) Pay attention to the video size
There is a limit for videos to post to YouTube. If it is too large or long, the upload will cancel before completion.
5) Be patient
YouTube can save your partial upload for 24 hours. So, you can continue to upload from where you left. Learn to be patient as there could be a surge of user traffic, especially during evenings.
Make your YouTube video better with Filmora
Good video quality will make you go miles ahead of your marketing gig. You can use Filmora mobile application to make your videos look better before uploading them to YouTube. This intuitive video editing app has advanced features and several ways to compose creative videos.
- Stunning video effects that let you add animated text to video
- Easily record your voice-overs with its perfect sound effects
- Split functionality that allows you to slice your video footage into two or more separate video clips
- Playback your clips in reverse and adjust the speed for fast or slow motion
- Select the best aspect ratio for your video
- Advanced camera to create emoji selfies and other video beautification
- Directly share your videos to social media sites like YouTube and Facebook.
Check out the steps to edit your video with Filmora on your iOS device
Step 1. Download and install Filmora
For iOS devices, go to the “Apple Store” to download and install the app. Also, allow it to access your videos, camera, and pictures in the process.
Step 2. Import video
You may already have a video in your library that you wish to upload to YouTube. Nonetheless, you can shoot a video afresh to add. To shoot one, you need to settle on a topic before recording and downloading other images you may need. Ensure you watch what you are filming and use adequate lighting during the shooting process.
Next, begin to import your video file. Just open the application and select the “Create new video” option. Then choose the “Video” icon and select a folder that contains the video to be added. Hit the “Add” button from the bottom right corner.
Step 3. Edit video
Filmora has several editing features to make your video better. Use the “Edit tools” feature to turn your video into an impeccable piece. Easily add filters, adjust the speed, or create subtitles, among other functions. You can also split, trim, or delete the unwanted clip parts.
It is important to add a title and description to your video. Just use the “Titles” button to add the title. Other precepts that you can add include transitions, sound like voice-over,
Step 4. Export and share
You’ve just finished creating and editing your video. Click on the “Save” tab and let the application export your video. Then select the “Save to Camera Roll” option to save the video to your iPhone. Finally, you can upload and share the video directly to your YouTube account.
Conclusion
● However, it appears to be a difficult task; you must have found relief after going through these procedures. You don’t need prior knowledge on how to upload a video to YouTube from your iPhone. Several options are at your disposal. You can use the Safari, YouTube app, or the Photo app to upload your videos. The better part is that you can create top-notch videos with Filmora. This mobile video editing app has a lot to offer, ensuring quality content.
Initially, iOS users had the option to load videos directly to YouTube via the tap-to-upload feature. However, this option is missing in the recent iOS devices versions. Therefore, many users search for possible ways to post a video on YouTube from iPhone. For this, you have to put some considerations into place before moving on. The video title length should not exceed 100 characters, while the description is maintained at 5,000 characters. Also, ensure the video length doesn’t exceed 15 minutes. Let’s roll out the best ways to upload your videos and make that big catch on subscribers.
In this article
01 [ How to upload a video to YouTube from iPhone or iPad](#Part 1)
02 [Why your phone doesn’t post videos to YouTube](#Part 2)
03 [Make your YouTube video better with Filmora](#Part 3)
How to upload a video to YouTube from iPhone or iPad
Are you ready to start on that big adventure and share your videos on YouTube? Follow these steps to learn how to upload a video to YouTube from your iPhone.
Method 1: Upload using the YouTube iOS app
Using the YouTube app is the simplest way to upload your YouTube videos. The YouTube app should be installed on your iOS device.
Step 1. Launch the YouTube app on your device, then sign in to your account. If you don’t have an account yet, you will need to “Sign up” for a new one before continuing the upload process.
Step 2. Click on the “+” icon found at the bottom of the screen.
Step 3. Then choose the “Upload a video” option from the populated list of options.
Step 4. Check out the pop-up that appears and “Allow access” to it.
Step 5. Edit your video to your preference by trimming or cropping as you desire. Then click on the “Next” option.
Step 6. Add “title and description” to your video. Remember, the title should contain less than 100 characters and the description no more than 500 characters.
Step 7. Then set the visibility mode as “Public” to enable you to share your video over the internet.
Step 8. Click on the “Upload” button to finally upload your video to YouTube.
Method 2: Upload using Photo App
The Photo App has a “Share” option that you can use to upload your videos to YouTube. Here is the guide.
Step 1. Go to your iOS device and tap on the “Photos” app.
Step 2. Then tap on the “Videos Folder” to locate the video you wish to upload to YouTube.
Step 3. Next, tap on the video that you want to upload.
Step 4. Then tap on the “Share” icon located at the bottom left of your iOS device screen.
Step 5. You’ll then access a “Share” menu from where you have various share options for your video.
Step 6. Choose the “YouTube” option to continue to share your video there. At this juncture, ensure you have logged in to your Google Account.
Step 7. You need to provide a “Title” and “Description” of your video. Then go to the “Privacy” Options and make your video “Public.”
Step 8. Finally, tap on the “Publish” tab found at the top-right corner of your screen to make your video viewable by the public.
Method 3: Upload video to YouTube using Safari
Safari is another alternative method to upload a video to YouTube.
Step 1. First, go to “youtube.com” on Safari and sign in.
Step 2. Then tap on the “account” icon at the top right side of the screen.
Step 3. Hit on the “Upload” icon and wait to be redirected to the YouTube Studio desktop site.
Step 4. Click on the “Select Files” option.
Step 5. Choose the video you wish to add to YouTube from the “Photo” library and tap on the “Add” button.
Step 6. Add your video’s “title and description” and hit the “Next” button.
Step 7. Tap on the “Next” button once more to go to the “Visibility” page.
Step 8. Select the “Public” option to upload your video to the public.
Why your phone doesn’t post videos to YouTube
Despite learning how to upload to YouTube from iPhone, you may be perplexed to realize that your phone refuses to post videos to YouTube. What could be the reason?
1) YouTube issues
In most cases, the problem doesn’t arise from your phone but from YouTube. This streaming app may also experience some hitches along the way. Remember that even if your phone sync with your YouTube account to upload videos from the “Camera Roll,” YouTube isn’t managed from the Camera Roll but the YouTube app directly. You can solve the issue by signing out of your YouTube account and signing back in.
2) Connection Strength
Some videos may appear quite large and cause a time-out during the upload process. Check your Wi-Fi or internet connection strength to determine if it needs a boost or wait until the streaming strength is strong for a quick upload. Test your internet speed by searching “internet test speed” on Google. Then click the “Run Speed Test” in the search box. A window will open and give you an estimate of the Mbps that your connection is operating at. If too low, switch to other alternatives.
3) Verify your YouTube account
Verifying your account will help you to enjoy YouTube’s full features. It’s then that you’ll manage to upload videos without any drawbacks. Also, that’s when you’ll manage to upload longer videos that go beyond the 15-minute duration.
4) Pay attention to the video size
There is a limit for videos to post to YouTube. If it is too large or long, the upload will cancel before completion.
5) Be patient
YouTube can save your partial upload for 24 hours. So, you can continue to upload from where you left. Learn to be patient as there could be a surge of user traffic, especially during evenings.
Make your YouTube video better with Filmora
Good video quality will make you go miles ahead of your marketing gig. You can use Filmora mobile application to make your videos look better before uploading them to YouTube. This intuitive video editing app has advanced features and several ways to compose creative videos.
- Stunning video effects that let you add animated text to video
- Easily record your voice-overs with its perfect sound effects
- Split functionality that allows you to slice your video footage into two or more separate video clips
- Playback your clips in reverse and adjust the speed for fast or slow motion
- Select the best aspect ratio for your video
- Advanced camera to create emoji selfies and other video beautification
- Directly share your videos to social media sites like YouTube and Facebook.
Check out the steps to edit your video with Filmora on your iOS device
Step 1. Download and install Filmora
For iOS devices, go to the “Apple Store” to download and install the app. Also, allow it to access your videos, camera, and pictures in the process.
Step 2. Import video
You may already have a video in your library that you wish to upload to YouTube. Nonetheless, you can shoot a video afresh to add. To shoot one, you need to settle on a topic before recording and downloading other images you may need. Ensure you watch what you are filming and use adequate lighting during the shooting process.
Next, begin to import your video file. Just open the application and select the “Create new video” option. Then choose the “Video” icon and select a folder that contains the video to be added. Hit the “Add” button from the bottom right corner.
Step 3. Edit video
Filmora has several editing features to make your video better. Use the “Edit tools” feature to turn your video into an impeccable piece. Easily add filters, adjust the speed, or create subtitles, among other functions. You can also split, trim, or delete the unwanted clip parts.
It is important to add a title and description to your video. Just use the “Titles” button to add the title. Other precepts that you can add include transitions, sound like voice-over,
Step 4. Export and share
You’ve just finished creating and editing your video. Click on the “Save” tab and let the application export your video. Then select the “Save to Camera Roll” option to save the video to your iPhone. Finally, you can upload and share the video directly to your YouTube account.
Conclusion
● However, it appears to be a difficult task; you must have found relief after going through these procedures. You don’t need prior knowledge on how to upload a video to YouTube from your iPhone. Several options are at your disposal. You can use the Safari, YouTube app, or the Photo app to upload your videos. The better part is that you can create top-notch videos with Filmora. This mobile video editing app has a lot to offer, ensuring quality content.
6 Ways To Increase Audience Retention on YouTube - Filmora
6 Ways To Increase Audience Retention on YouTube

Richard Bennett
Mar 27, 2024• Proven solutions
Audience retention is one of your most important stats on YouTube. It is even more important than your view count. Your view count really only tells you how many people are finding and clicking on your videos, not whether they are actually watching them. Audience retention refers to how much of a video a viewer watches before clicking away, which is very useful information to have. If you know when people are leaving your videos then you know what you need to work on.
You May Also Like: How to analyse your and your competitors’ YouTube Channel >>
How to structure a YouTube video >>
- Part 1: What is Audience Retention?
- Part 2: How to See Your Audience Retention Report in YouTube?
- Part 3: What is a Good Audience Retention Rate on YouTube?
- Part 4: 6 Ways to Increase YouTube Audience Retention
Part 1: What is Audience Retention?
To put it in simple terms, YouTube audience retention is about how much of each video your viewers watch. It’s usually expressed as a percentage, so if your viewer gets half way through, they will have a retention of 50 per cent.
For YouTube analytics, audience retention is taken as a mean of the retention figures for each of your viewers. For example, if you post a ten-minute video and half your viewers get to the five-minute mark, that’s a retention of 50 per cent. If the other half watch it right to the end, that’s a retention of 100 per cent. The mean of these two figures is 75 per cent, and that’s what YouTube will use as your audience retention figure.
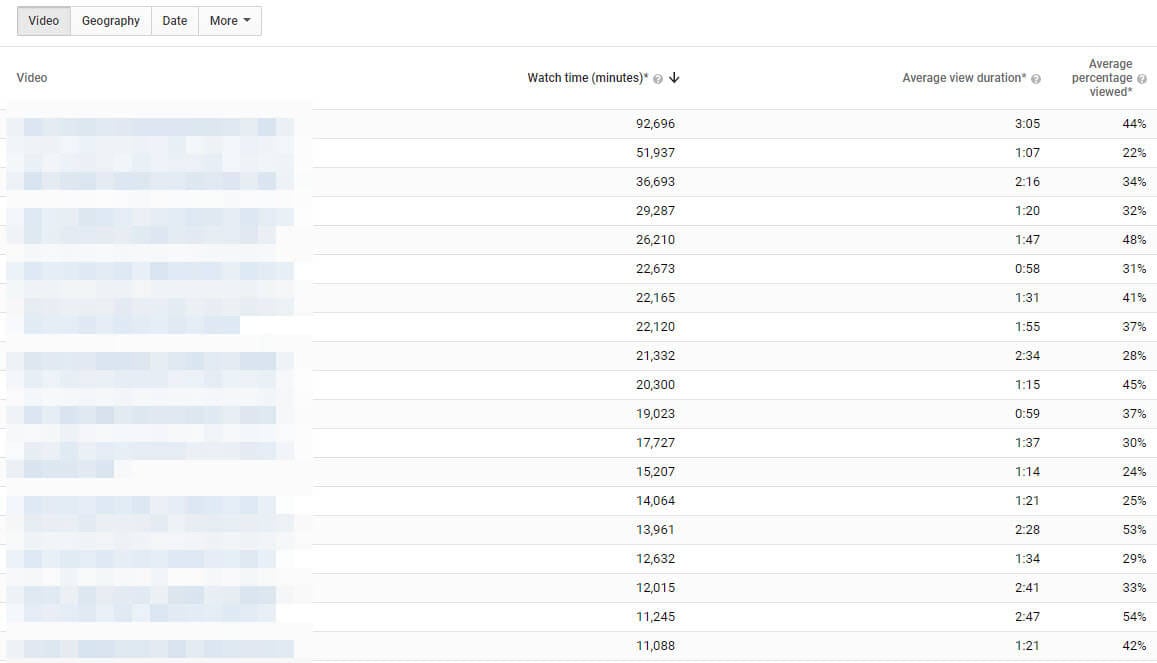
This retention rate affects how highly your video is ranked on YouTube, with videos boasting higher audience retention rates appearing higher in the search results than those which do not. This is because both YouTube and Google are highly focussed on customer satisfaction, and a long watch time means a very happy customer was watching that video. For this reason, it’s well worth considering how to increase YouTube audience retention as it demonstrates that you’re making great content as well as helping you get more viewers.
Part 2: How to See Your Audience Retention Report in YouTube?
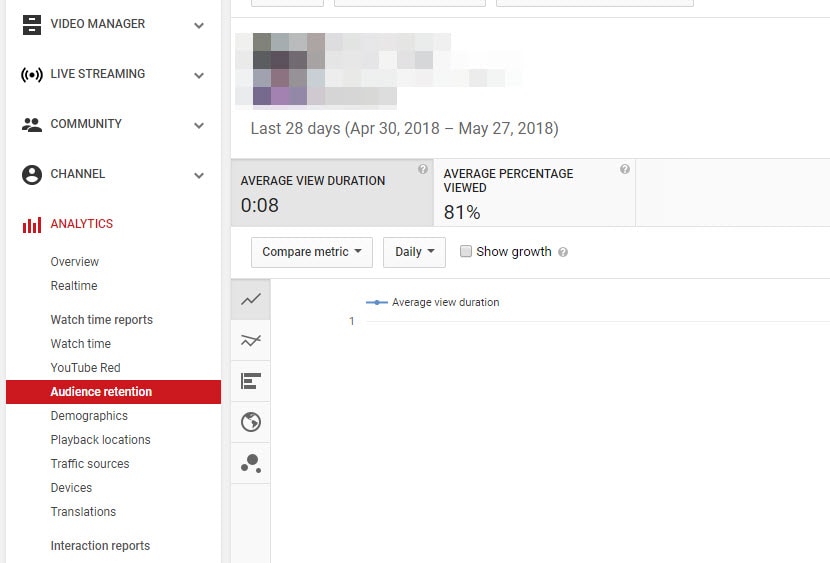
YouTube will produce reports to help you keep track of your audience retention. There are two types of audience retention reports; absolute and relative. Absolute allows you to view a graph of your video’s retention and see when people might be clicking away, or if they are skipping to later parts of your video. If you lose a lot of viewers in the first 15 seconds of your videos then that is a clear indication that your content is not what the viewers who find your videos really want. The relative report is where your video is compared to the average retention of similar videos.
Note that by ‘similar videos’, YouTube means videos of a similar length. There is no way to compare your videos only to other videos in your genre. The relative report will always be somewhat skewed because your videos will be measured against very different content.
To see an audience retention report log into your YouTube account and go to yourCreator Studio. There, selectAudience RetentionunderAnalytics.
Part 3: What is a Good Audience Retention Rate on YouTube?
When you’re considering how to increase YouTube audience retention, it can be good to have a goal in mind. Obviously 100 per cent is going to be the Holy Grail of retention rates, but how many videos are actually going to achieve that? It only takes for one person to ‘accidentally’ click on your video and rapidly click away, or for someone to have to stop for outside reasons, to drag your average down.
According to the YouTube community, a good goal to aim for is around 50 per cent, but as there is a lot which can affect your retention rate, that number may be different for you. Low view numbers sometimes get higher retention rates because it’s mainly subscribers watching, whereas channels with millions of views may suffer due to more people abandoning. Rather than setting yourself a golden number, focus instead on increasing your retention rate from wherever it is now, and celebrate your own success instead of measuring yourself against others.
Part 4: 6 Ways to Increase YouTube Audience Retention
If you’re serious about learning how to increase YouTube audience retention, here are five of the best ideas for you:
1. Compare your videos
Investigating your audience retention report will highlight the videos where you achieved maximum success. Think about what you did here, and work to replicate that technique. Perhaps you were talking about a product, or maybe your structured your video slightly differently. It’s up to you to dissect your video and find out what it was that kept people watching for longer, so that you can repeat this success in the future. You can also use some influencer marketing platform such as InflueNex to take a look at the videos in your similar channels, and learn the popular videos on their channels.
2. Get on with it
Research shows that YouTube viewers have an incredibly short attention span. Depending on who you believe, you could have as much as six seconds or as little as just three to grab their attention and compel them to carry on watching. If you want to improve your audience retention, coming in with an engaging, attention grabbing statement right at the start is crucial to your success. Nobody wants to waste their time watching someone waffle on for ages about their granny or their favorite hobbies, so get right down to it straight away, by telling them what’s in store.
3. Make it visually engaging
Perhaps all you’ve got is a presentation to make. You’re not a gamer, you’re not showing clips of your cat and you’re not doing a makeup tutorial, so surely all you need is a camera, good lighting and your face, right? Wrong. Viewers like to see the visual content changing, and videos which have a range of scenes are usually far more successful than those where it’s just a person talking to camera. Think about how you can insert cutaways, pop up text, different footage and other graphics to keep it interesting for your viewers.
4. Make it shorter
This one is a no brainer really. If you make a one-minute video, how hard is it going to be to keep viewers watching to the end compared to a 20-minute marathon. However, going too short can be negative too, unless you really do have something very quick and simple to showcase. Long videos work well for YouTubers in the gaming niche, in particular, because viewers want to know the end result, but for most of us, these sorts of viewing statistics are hard to reach.
If you consider a viewer who watches three minutes of your content, would you rather they watched three minutes of a ten-minute video and then clicked away bored, or would you rather they finished an entire video that was only three minutes long? Both in terms of audience retention and of your own reputation, having a viewer finish a short video is much more valuable to you than losing someone half way through a long one. That person probably enjoyed your content to the end and will more than likely watch another one of your videos. Conversely, the one you lost half way through was bored enough to stop watching and will probably not bother viewing any other videos of yours in future.
5. Keep them hooked
Think carefully about your YouTube video structure. Ideally, you will tell them at the very start that you’ve got something amazing to share with them later on. This could be a tip, a tutorial, a new product reveal or even something funny. Whatever it is, tell them they’re going to love it from the start, and keep reminding them to watch from the end to get this gift. That doesn’t mean you shouldn’t give them great content all the way through, just that you should save a carrot for the end of the ride to reward those loyal viewers.
So, now you know how to increase YouTube audience retention, what are you going to do about it? Have a go at modifying your videos to boost the numbers who will watch to the end and let us know how you got on.
6. Use an Excellent Video Editor
Content is the king. It is necessary to use a powerful video editor to help you edit videos. With an excellent video editor like Filmora, you can custom stunning videos effortlessly.


Richard Bennett
Richard Bennett is a writer and a lover of all things video.
Follow @Richard Bennett
Richard Bennett
Mar 27, 2024• Proven solutions
Audience retention is one of your most important stats on YouTube. It is even more important than your view count. Your view count really only tells you how many people are finding and clicking on your videos, not whether they are actually watching them. Audience retention refers to how much of a video a viewer watches before clicking away, which is very useful information to have. If you know when people are leaving your videos then you know what you need to work on.
You May Also Like: How to analyse your and your competitors’ YouTube Channel >>
How to structure a YouTube video >>
- Part 1: What is Audience Retention?
- Part 2: How to See Your Audience Retention Report in YouTube?
- Part 3: What is a Good Audience Retention Rate on YouTube?
- Part 4: 6 Ways to Increase YouTube Audience Retention
Part 1: What is Audience Retention?
To put it in simple terms, YouTube audience retention is about how much of each video your viewers watch. It’s usually expressed as a percentage, so if your viewer gets half way through, they will have a retention of 50 per cent.
For YouTube analytics, audience retention is taken as a mean of the retention figures for each of your viewers. For example, if you post a ten-minute video and half your viewers get to the five-minute mark, that’s a retention of 50 per cent. If the other half watch it right to the end, that’s a retention of 100 per cent. The mean of these two figures is 75 per cent, and that’s what YouTube will use as your audience retention figure.
This retention rate affects how highly your video is ranked on YouTube, with videos boasting higher audience retention rates appearing higher in the search results than those which do not. This is because both YouTube and Google are highly focussed on customer satisfaction, and a long watch time means a very happy customer was watching that video. For this reason, it’s well worth considering how to increase YouTube audience retention as it demonstrates that you’re making great content as well as helping you get more viewers.
Part 2: How to See Your Audience Retention Report in YouTube?
YouTube will produce reports to help you keep track of your audience retention. There are two types of audience retention reports; absolute and relative. Absolute allows you to view a graph of your video’s retention and see when people might be clicking away, or if they are skipping to later parts of your video. If you lose a lot of viewers in the first 15 seconds of your videos then that is a clear indication that your content is not what the viewers who find your videos really want. The relative report is where your video is compared to the average retention of similar videos.
Note that by ‘similar videos’, YouTube means videos of a similar length. There is no way to compare your videos only to other videos in your genre. The relative report will always be somewhat skewed because your videos will be measured against very different content.
To see an audience retention report log into your YouTube account and go to yourCreator Studio. There, selectAudience RetentionunderAnalytics.
Part 3: What is a Good Audience Retention Rate on YouTube?
When you’re considering how to increase YouTube audience retention, it can be good to have a goal in mind. Obviously 100 per cent is going to be the Holy Grail of retention rates, but how many videos are actually going to achieve that? It only takes for one person to ‘accidentally’ click on your video and rapidly click away, or for someone to have to stop for outside reasons, to drag your average down.
According to the YouTube community, a good goal to aim for is around 50 per cent, but as there is a lot which can affect your retention rate, that number may be different for you. Low view numbers sometimes get higher retention rates because it’s mainly subscribers watching, whereas channels with millions of views may suffer due to more people abandoning. Rather than setting yourself a golden number, focus instead on increasing your retention rate from wherever it is now, and celebrate your own success instead of measuring yourself against others.
Part 4: 6 Ways to Increase YouTube Audience Retention
If you’re serious about learning how to increase YouTube audience retention, here are five of the best ideas for you:
1. Compare your videos
Investigating your audience retention report will highlight the videos where you achieved maximum success. Think about what you did here, and work to replicate that technique. Perhaps you were talking about a product, or maybe your structured your video slightly differently. It’s up to you to dissect your video and find out what it was that kept people watching for longer, so that you can repeat this success in the future. You can also use some influencer marketing platform such as InflueNex to take a look at the videos in your similar channels, and learn the popular videos on their channels.
2. Get on with it
Research shows that YouTube viewers have an incredibly short attention span. Depending on who you believe, you could have as much as six seconds or as little as just three to grab their attention and compel them to carry on watching. If you want to improve your audience retention, coming in with an engaging, attention grabbing statement right at the start is crucial to your success. Nobody wants to waste their time watching someone waffle on for ages about their granny or their favorite hobbies, so get right down to it straight away, by telling them what’s in store.
3. Make it visually engaging
Perhaps all you’ve got is a presentation to make. You’re not a gamer, you’re not showing clips of your cat and you’re not doing a makeup tutorial, so surely all you need is a camera, good lighting and your face, right? Wrong. Viewers like to see the visual content changing, and videos which have a range of scenes are usually far more successful than those where it’s just a person talking to camera. Think about how you can insert cutaways, pop up text, different footage and other graphics to keep it interesting for your viewers.
4. Make it shorter
This one is a no brainer really. If you make a one-minute video, how hard is it going to be to keep viewers watching to the end compared to a 20-minute marathon. However, going too short can be negative too, unless you really do have something very quick and simple to showcase. Long videos work well for YouTubers in the gaming niche, in particular, because viewers want to know the end result, but for most of us, these sorts of viewing statistics are hard to reach.
If you consider a viewer who watches three minutes of your content, would you rather they watched three minutes of a ten-minute video and then clicked away bored, or would you rather they finished an entire video that was only three minutes long? Both in terms of audience retention and of your own reputation, having a viewer finish a short video is much more valuable to you than losing someone half way through a long one. That person probably enjoyed your content to the end and will more than likely watch another one of your videos. Conversely, the one you lost half way through was bored enough to stop watching and will probably not bother viewing any other videos of yours in future.
5. Keep them hooked
Think carefully about your YouTube video structure. Ideally, you will tell them at the very start that you’ve got something amazing to share with them later on. This could be a tip, a tutorial, a new product reveal or even something funny. Whatever it is, tell them they’re going to love it from the start, and keep reminding them to watch from the end to get this gift. That doesn’t mean you shouldn’t give them great content all the way through, just that you should save a carrot for the end of the ride to reward those loyal viewers.
So, now you know how to increase YouTube audience retention, what are you going to do about it? Have a go at modifying your videos to boost the numbers who will watch to the end and let us know how you got on.
6. Use an Excellent Video Editor
Content is the king. It is necessary to use a powerful video editor to help you edit videos. With an excellent video editor like Filmora, you can custom stunning videos effortlessly.
Richard Bennett
Richard Bennett is a writer and a lover of all things video.
Follow @Richard Bennett
Also read:
- In 2024, Channel Marketing Making a Trailer that Sells More
- [Updated] How to Easily Disable/Remove YouTube Shorts Permanently?
- [Updated] End Credits Designed for You Free Top 6 Suggestions
- In 2024, Elevating Your YouTube Experience Tips on Channel Art and Sizes
- [New] 10 Budget-Friendly Platforms for YouTube Branding Mastery
- [Updated] Elevate Viewing Experience – Enable AV1 on YouTube
- Critical ASMR Video Elements to Note for 2024
- In 2024, Eliminating Odd Shades A Step-by-Step Guide to Flawless Greenscreens
- Unveiling the Past Essential Historical YT Creators for Students
- In 2024, Best Alternative to YouTube IOS & Android's 10 Leading Video Sites
- [Updated] Comparative Analysis of TikTok & YouTube Shorts for Individual Content
- [Updated] Bring Your Vision to Life YouTube Trailers Using Filmora's Magic
- Navigating YouTube Strikes Understanding and Resolving Copyright Issues
- Android Audio Archive A Curated List of Top 6 Free Music Downloading Apps
- [New] Amplify Your Earnings Universal Strategies for YouTube Revenue
- Garner Over a Thousand Viewers Swiftly
- Quick and Free IOS Apps to Convert YouTube Videos to MP3 Files
- Thriving Despite YouTube's Rigorous Copyright Strike System
- 2024 Approved Comprehensive Guide to YouTube's Subscription Advantages
- [New] Top 10 YouTube Video Trimmers Online
- Making an Impact Professional Thumbnail Design for YouTube
- [New] Effortless Fusion of YouTube Audio with iMovie Masterpieces
- In 2024, Amplify Your Content Two Approaches to Skyrocket Traffic
- 2024 Approved Budding Buyers Guide Monetization Platforms for Novice Channels
- [New] Craft Your Best YouTubing Exit - Tips From Industry Leaders
- Navigating Video Dimensions A Focused Look at ASPECT RATIOS
- Craft Stellar YouTube Thumbnails with These 8 Software Alternatives
- [New] Elegant Aesthetics Mastering YouTube's Beauty Landscape
- 2024 Approved Ensuring Transparency in Video Creator Incomes
- Transform Your Video's First Impression with These Fonts
- [Updated] Engage in Enlightening YouTube Exchanges
- Tactics for Avoiding a YouTube Sanction
- [Updated] Enigmatic Cuts YouTube Magicians at Work
- Shoot Cool Vids From Scratch with Your Mac, Newcomers Guide
- Is your Nubia Red Magic 9 Pro+ working too slow? Heres how you can hard reset it | Dr.fone
- In 2024, Protect Your Home for Free Top Security Camera Software
- Step-by-Step Guide to Crafting an Instagram Enterprise Profile
- Calls on Asus ROG Phone 8 Pro Go Straight to Voicemail? 12 Fixes | Dr.fone
- New Best of the Web Free Online Video Editors Ranked for 2024
- New Capture Your Screen A Step-by-Step Guide to Using Filmora Scrn for 2024
- In 2024, Fixing Foneazy MockGo Not Working On Oppo Reno 10 5G | Dr.fone
- How to Mirror Infinix Zero 5G 2023 Turbo to Mac? | Dr.fone
- Craft Your Content's Voyage From Camera to Instagram TV for 2024
- The Ultimate Guide to PC Game Screenshots
- [New] Undercover Audio Gems Top 6 Non-Public Mobile Voice Capturers
- In 2024, Android Lightroom App Breakdown A Complete Review
- Elite Mobile Filming Tech for iPhones
- [Updated] How to Make Big Head Effect Video for TikTok? [3 Ways]
- [Updated] Uncover the Secret to Extra Instagram Filters for Zero Cost for 2024
- In 2024, Capturing Every Detail Best Practices for HP Laptop Recording
- Complete Guide to Hard Reset Your Itel S23+ | Dr.fone
- Which Frame Rate Is Ideal? Analyzing Benefits of 30Fps and 60Fps for 2024
- [New] In 2024, From Planning to Performance Tips for Wirecast & Facebook Livestreaming
- Video Snapshots Made Easy Top 10 Converters for Converting Videos to Images
- New How to Calculate Pixel Density and Aspect Ratio for 2024
- Updated In 2024, Designing Effective Lower Thirds A Guide to FCPX Success
- [Updated] 2024 Approved The Prime List of Budget-Friendly Discord Voice Recording Tools
- In 2024, How to Reset a Samsung Galaxy F14 5G Phone that is Locked?
- 2024 Approved Essential FCPX Plugins Free and Paid Favorites
- [New] Stumble Upon These Hidden Meme Page Treasures
- [New] In 2024, Expert Tips for Capturing and Saving IGTV on Handhrani
- What To Do if Your Oppo A18 Auto Does Not Work | Dr.fone
- Title: [Updated] Awesome Techniques for Streaming and Uploading on iOS Devices
- Author: Brian
- Created at : 2024-05-25 13:10:44
- Updated at : 2024-05-26 13:10:44
- Link: https://youtube-video-recordings.techidaily.com/updated-awesome-techniques-for-streaming-and-uploading-on-ios-devices/
- License: This work is licensed under CC BY-NC-SA 4.0.
