![[Updated] Avoid Blandness in Your Vids Top Recommended YouTube Thumbnail Heights](https://thmb.techidaily.com/bb1f002a7be8b73cd12562f7aa67a81110093e83a5e29cc0296d5b97722e8cc9.png)
"[Updated] Avoid Blandness in Your Vids Top Recommended YouTube Thumbnail Heights"
Avoid Blandness in Your Vids: Top Recommended YouTube Thumbnail Heights
Best YouTube Thumbnail Size You Should Know[The Ultimate Guide]

Richard Bennett
Mar 27, 2024• Proven solutions
Around 300 hours of video is uploaded to Youtube in every single minute. Then content creators need to be more innovative and creative than others in the market. A thumbnail is worth a thousand words that show its real meaning in the case where every month YouTube records a whopping 2 billion active users. To create an impressive and tempting thumbnail, you should set a perfect youtube thumbnail size first.
So you may be wondering what the best youtube thumbnail size is, and how to create a attractive thumbnail for your YouTube videos? Don’t worry I’ll explain everything here. You will learn:
- Part 1: The Ultimate Guide of YouTube Thumbnail Size
- Part 2: Upload and Change a Custom YouTube Thumbnail to Your Video
- Part 3: Q&A– About Creating YouTube Thumbnails
Part 1: The Ultimate Guide of Youtube Thumbnail Size
Every content creator needs to select the right youtube thumbnail size for any given video.
1. What’s the Best YouTube Thumbnail Size(Dimensions)?
According to the YouTube guidelines , the best-suited youtube thumbnail size is 1280x720 pixels with a minimum pixel width of 640 pixels. Also, the custom thumbnail image must be as large as possible as it will be utilized as a preview image in the embedded player.
2. What Are the Compatible Formats for YouTube Thumbnail Image?
The recommended thumbnail image formats are .JPG, .PNG, .GIF, .BMP
3. What’s the Maximum YouTube Thumbnail Size?
The maximum YouTube thumbnail size must be below 2MB. Keeping the limit in mind design your thumbnail image as high-resolution as possible. This will ensure your custom thumbnail doesn’t get rejected by YouTube.
4. What’s the Recommended Aspect Ratio of YouTube Thumbnail?
Usually, the 16:9 ratio is deemed an ideal choice for any YouTube video aiming high view volume. As it is most widely used in YouTube players and previews.
Part 2: Upload and Change a Custom YouTube Thumbnail
With a verified account, you can upload custom thumbnail on new videos as well as change the thumbnail of uploaded videos.
1. For New Video
YouTube makes it very simple and easy for any content creator to publish custom YouTube thumbnail on their video while uploading the video onto the platform. Here’s the method to do so:
- Upload your desired video to YouTube in the Upload section.

- When your upload to the YouTube is completed a section will appear at the down portion of the browser screen showing Video Thumbnails. Here YouTube automatically creates some thumbnail images from your uploaded video and shows them here. These are the screenshots from your video, and you can select any one of them to be your thumbnail.

- You will be able to see a button right next to the image – Custom thumbnail. Click on the button and you can upload a set of images of your choice as the thumbnail of your video.
- Once done you can see the custom image just uploaded as the thumbnail of your video.

- If you want to update the image or change it with another one you can just click on the same image in the video thumbnail section and swap it with any other image.

2. For Already Uploaded Video
To change the thumbnail on an already uploaded video you need to follow these steps:
- Sign in to YouTube Studio associated with your YouTube channel.
- From the menu go to Videos and then select the video you want to upload a custom thumbnail to via its title or thumbnail

- Now in the thumbnail section if you already haven’t uploaded a custom thumbnail, click Custom thumbnail.
- Select your intended thumbnail file and click Save.


Part 3: Q&A– About YouTube Thumbnail Images
You may want to know:
- Question 1: How do I make my youtube thumbnail less than 2mb?
- Question 2: How can I create an attractive youtube thumbnail?
1. How do I make my youtube thumbnail less than 2mb?
YouTube will not allow you to upload a custom thumbnail image if it is bigger than the 2MB limit. So, you need to make sure the file size is below the limit to be able to successfully upload a custom thumbnail. To reduce the image size you can follow the steps below:
- 1. Open Microsoft Paint and open the thumbnail image that is above 2MB size
- 2. Now go to the File menu and click Save as then select JPEG picture
- 3. Select the location you want the file to be saved to
- 4. The thumbnail picture will be reduced to Kilobytes only while maintaining the image quality
2. How can I create an attractive youtube thumbnail?
Utilizing online platforms and software tools to make your thumbnail image informative and attractive can potentially increase your views and traffic. You can use any advanced tools like Wondershare Filmora, Wondershare PixStudio, or Canva to create an aspiring and luring image that will get more views on YouTube just because of the thumbnail image. Here we will show you how to do it with Wondershare Filmora, Wondershare PixStudio and Canva:
1. Try Wondershare Filmora>>
Wondershare Filmora is an outstanding tool if you want to make a perfect thumbnail image. Consider and optimize your thumbnail for mobile devices to offer the best experience to your users on every possible device. Make it stand out as the thumbnail can be the very first thing that might attract a viewer.
Let’s see how you can create your thumbnail using Wondershare Filmora:


2. Try Wondershare PixStudio>>
Wondershare PixStudio provides you massive pre-designed templates which help you to create attractive YouTube Thumbnail. Let’s see the video below and see how you can design your YouTube Thumbnail easily.
3. Try Canva>>
With Canva you can make a distinct and stand-out YouTube thumbnail image. Canva hosts a number of readymade designs that you can use to design and customize it for your use.
Note:
To download the image without the watermark you’ll need to sign-up for a premium account on the Canva.
To sum up
YouTube thumbnail plays an important part for the audience’s first impression on your video. And it is of essential essence as it can attract more viewers to your content. So you should get the right youtube thumbnail size before you start customing your thumbnail. We’ve gone through all the detailed requirements of youtube thumbnail size and how to make the best thumbnail by using the best software solutions. Please leave your comments below if any suggestions. We’d love to hear them!
Richard Bennett
Richard Bennett is a writer and a lover of all things video.
Follow @Richard Bennett
Richard Bennett
Mar 27, 2024• Proven solutions
Around 300 hours of video is uploaded to Youtube in every single minute. Then content creators need to be more innovative and creative than others in the market. A thumbnail is worth a thousand words that show its real meaning in the case where every month YouTube records a whopping 2 billion active users. To create an impressive and tempting thumbnail, you should set a perfect youtube thumbnail size first.
So you may be wondering what the best youtube thumbnail size is, and how to create a attractive thumbnail for your YouTube videos? Don’t worry I’ll explain everything here. You will learn:
- Part 1: The Ultimate Guide of YouTube Thumbnail Size
- Part 2: Upload and Change a Custom YouTube Thumbnail to Your Video
- Part 3: Q&A– About Creating YouTube Thumbnails
Part 1: The Ultimate Guide of Youtube Thumbnail Size
Every content creator needs to select the right youtube thumbnail size for any given video.
1. What’s the Best YouTube Thumbnail Size(Dimensions)?
According to the YouTube guidelines , the best-suited youtube thumbnail size is 1280x720 pixels with a minimum pixel width of 640 pixels. Also, the custom thumbnail image must be as large as possible as it will be utilized as a preview image in the embedded player.
2. What Are the Compatible Formats for YouTube Thumbnail Image?
The recommended thumbnail image formats are .JPG, .PNG, .GIF, .BMP
3. What’s the Maximum YouTube Thumbnail Size?
The maximum YouTube thumbnail size must be below 2MB. Keeping the limit in mind design your thumbnail image as high-resolution as possible. This will ensure your custom thumbnail doesn’t get rejected by YouTube.
4. What’s the Recommended Aspect Ratio of YouTube Thumbnail?
Usually, the 16:9 ratio is deemed an ideal choice for any YouTube video aiming high view volume. As it is most widely used in YouTube players and previews.
Part 2: Upload and Change a Custom YouTube Thumbnail
With a verified account, you can upload custom thumbnail on new videos as well as change the thumbnail of uploaded videos.
1. For New Video
YouTube makes it very simple and easy for any content creator to publish custom YouTube thumbnail on their video while uploading the video onto the platform. Here’s the method to do so:
- Upload your desired video to YouTube in the Upload section.
- When your upload to the YouTube is completed a section will appear at the down portion of the browser screen showing Video Thumbnails. Here YouTube automatically creates some thumbnail images from your uploaded video and shows them here. These are the screenshots from your video, and you can select any one of them to be your thumbnail.
- You will be able to see a button right next to the image – Custom thumbnail. Click on the button and you can upload a set of images of your choice as the thumbnail of your video.
- Once done you can see the custom image just uploaded as the thumbnail of your video.
- If you want to update the image or change it with another one you can just click on the same image in the video thumbnail section and swap it with any other image.
2. For Already Uploaded Video
To change the thumbnail on an already uploaded video you need to follow these steps:
- Sign in to YouTube Studio associated with your YouTube channel.
- From the menu go to Videos and then select the video you want to upload a custom thumbnail to via its title or thumbnail
- Now in the thumbnail section if you already haven’t uploaded a custom thumbnail, click Custom thumbnail.
- Select your intended thumbnail file and click Save.
Part 3: Q&A– About YouTube Thumbnail Images
You may want to know:
- Question 1: How do I make my youtube thumbnail less than 2mb?
- Question 2: How can I create an attractive youtube thumbnail?
1. How do I make my youtube thumbnail less than 2mb?
YouTube will not allow you to upload a custom thumbnail image if it is bigger than the 2MB limit. So, you need to make sure the file size is below the limit to be able to successfully upload a custom thumbnail. To reduce the image size you can follow the steps below:
- 1. Open Microsoft Paint and open the thumbnail image that is above 2MB size
- 2. Now go to the File menu and click Save as then select JPEG picture
- 3. Select the location you want the file to be saved to
- 4. The thumbnail picture will be reduced to Kilobytes only while maintaining the image quality
2. How can I create an attractive youtube thumbnail?
Utilizing online platforms and software tools to make your thumbnail image informative and attractive can potentially increase your views and traffic. You can use any advanced tools like Wondershare Filmora, Wondershare PixStudio, or Canva to create an aspiring and luring image that will get more views on YouTube just because of the thumbnail image. Here we will show you how to do it with Wondershare Filmora, Wondershare PixStudio and Canva:
1. Try Wondershare Filmora>>
Wondershare Filmora is an outstanding tool if you want to make a perfect thumbnail image. Consider and optimize your thumbnail for mobile devices to offer the best experience to your users on every possible device. Make it stand out as the thumbnail can be the very first thing that might attract a viewer.
Let’s see how you can create your thumbnail using Wondershare Filmora:
2. Try Wondershare PixStudio>>
Wondershare PixStudio provides you massive pre-designed templates which help you to create attractive YouTube Thumbnail. Let’s see the video below and see how you can design your YouTube Thumbnail easily.
3. Try Canva>>
With Canva you can make a distinct and stand-out YouTube thumbnail image. Canva hosts a number of readymade designs that you can use to design and customize it for your use.
Note:
To download the image without the watermark you’ll need to sign-up for a premium account on the Canva.
To sum up
YouTube thumbnail plays an important part for the audience’s first impression on your video. And it is of essential essence as it can attract more viewers to your content. So you should get the right youtube thumbnail size before you start customing your thumbnail. We’ve gone through all the detailed requirements of youtube thumbnail size and how to make the best thumbnail by using the best software solutions. Please leave your comments below if any suggestions. We’d love to hear them!
Richard Bennett
Richard Bennett is a writer and a lover of all things video.
Follow @Richard Bennett
Tightening Timelines: The Essential Guide to YouTube Trimming
How to Edit the Length of a Video on YouTube
Richard Bennett
Mar 27, 2024• Proven solutions
Apart from providing video hosting and sharing features, the YouTube platform also has an online editor which is going to provide you with the possibility to make changes and additions online without having to download any particular program. In this guide, we are going to show you how to make your video shorter or longer with YouTube online video editor.
A Better Alternative on How to Edit YouTube Video Length - Wondershare Filmora is a perfect alternative to edit every single clip frame by frame. Not just to shorten or lengthen the video. It offers quite a lot of opportunities. Watch the video below to know more:
Download Mac Version ](https://tools.techidaily.com/wondershare/filmora/download/ )
For instance, the application is offering non-linear ripple video editing. This is going to allow you to combine multiple video clips and pin them together conveniently. What is more, you can also apply PIP and Green Screen professional effects with just a few clicks. Sure, the YouTube video editor is a perfect solution for those who don’t want to achieve professional quality, but if you do, Wondershare Filmora is without a doubt the far better alternative. This is something that’s going to enable you to edit and re-touch your videos as well as to size them appropriately. Instead of dragging two bars together, you will be able to touch every single frame and size it according to your own particular needs. This is going to result in flawless videos.
How to Edit YouTube Video Length Using the built-in Video Editor
The YouTube video editor is easy to use, and you can easily learn how to do all sorts of changes to your video. Let’s see the things that you need to go through in order to edit the length.
Note: From 20th September 2017 users will no longer be able to use the complimentary editing suite. Check the best YouTube video editor alternatives from this complete guide.
Step 1 Get to the video editor

In order to do so, you would have to go ahead and login into your account. Then, go to the “My Channel” panel and select the video that you want to cut. Once you’ve done this, click on the “Video manager” option and click on the “create” tab which should be located on the right side for the page. There, you will be able to find the “Video Editor”. Of course, you can also add “/editor” to YouTube’s URL, and you would be good to go.
Step 2 Import Your Video
Once you’ve done all of the above, you would have to drag your video in order to cut it’s time. Keep in mind that the videos are made out of a maximum of 50 clips. The site is going to save every single video that you upload as a particular clip which could be properly combined with the rest in order to make one larger video. This is important.
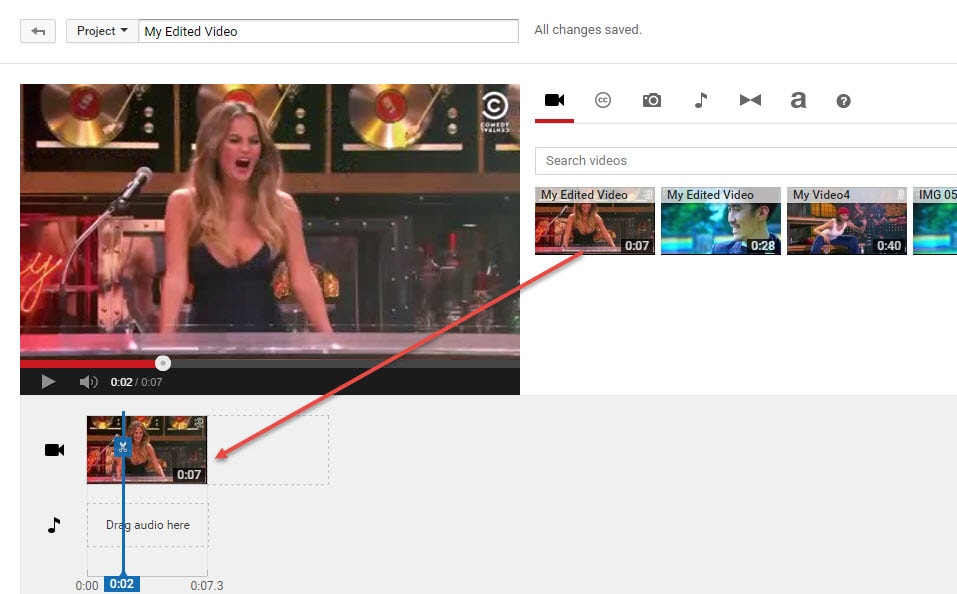
Step 3 Edit the Length
This is the part where you actually get to edit the length of your video. In order to do so effectively, you have to drag the bar at either end of your clip towards the other end in order to shorten the clip conveniently.
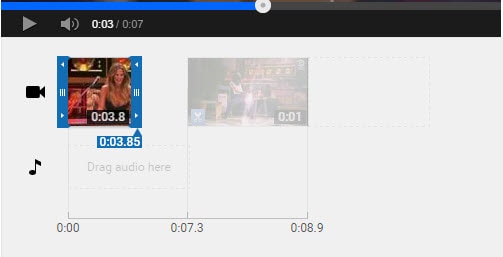
What is more, if you want to increase the length, you have to drag the bar to the opposite end – outwards. There is going to be an indicator which is going to appear at the bottom of the clip, and it’s going to show you the overall duration of the file, and it’s going to adjust itself as you slide the bars accordingly.
Step 4 Save the Clip
Of course, you would have to save the clip in order for the changes to reflect. Even though this might seem like a particularly obvious thing to do, you would be surprise to find out that a lot of people get everything done and then discard the changes by forgetting to save them and their effort goes to waste.
Richard Bennett
Richard Bennett is a writer and a lover of all things video.
Follow @Richard Bennett
Richard Bennett
Mar 27, 2024• Proven solutions
Apart from providing video hosting and sharing features, the YouTube platform also has an online editor which is going to provide you with the possibility to make changes and additions online without having to download any particular program. In this guide, we are going to show you how to make your video shorter or longer with YouTube online video editor.
A Better Alternative on How to Edit YouTube Video Length - Wondershare Filmora is a perfect alternative to edit every single clip frame by frame. Not just to shorten or lengthen the video. It offers quite a lot of opportunities. Watch the video below to know more:
Download Mac Version ](https://tools.techidaily.com/wondershare/filmora/download/ )
For instance, the application is offering non-linear ripple video editing. This is going to allow you to combine multiple video clips and pin them together conveniently. What is more, you can also apply PIP and Green Screen professional effects with just a few clicks. Sure, the YouTube video editor is a perfect solution for those who don’t want to achieve professional quality, but if you do, Wondershare Filmora is without a doubt the far better alternative. This is something that’s going to enable you to edit and re-touch your videos as well as to size them appropriately. Instead of dragging two bars together, you will be able to touch every single frame and size it according to your own particular needs. This is going to result in flawless videos.
How to Edit YouTube Video Length Using the built-in Video Editor
The YouTube video editor is easy to use, and you can easily learn how to do all sorts of changes to your video. Let’s see the things that you need to go through in order to edit the length.
Note: From 20th September 2017 users will no longer be able to use the complimentary editing suite. Check the best YouTube video editor alternatives from this complete guide.
Step 1 Get to the video editor
In order to do so, you would have to go ahead and login into your account. Then, go to the “My Channel” panel and select the video that you want to cut. Once you’ve done this, click on the “Video manager” option and click on the “create” tab which should be located on the right side for the page. There, you will be able to find the “Video Editor”. Of course, you can also add “/editor” to YouTube’s URL, and you would be good to go.
Step 2 Import Your Video
Once you’ve done all of the above, you would have to drag your video in order to cut it’s time. Keep in mind that the videos are made out of a maximum of 50 clips. The site is going to save every single video that you upload as a particular clip which could be properly combined with the rest in order to make one larger video. This is important.
Step 3 Edit the Length
This is the part where you actually get to edit the length of your video. In order to do so effectively, you have to drag the bar at either end of your clip towards the other end in order to shorten the clip conveniently.
What is more, if you want to increase the length, you have to drag the bar to the opposite end – outwards. There is going to be an indicator which is going to appear at the bottom of the clip, and it’s going to show you the overall duration of the file, and it’s going to adjust itself as you slide the bars accordingly.
Step 4 Save the Clip
Of course, you would have to save the clip in order for the changes to reflect. Even though this might seem like a particularly obvious thing to do, you would be surprise to find out that a lot of people get everything done and then discard the changes by forgetting to save them and their effort goes to waste.
Richard Bennett
Richard Bennett is a writer and a lover of all things video.
Follow @Richard Bennett
Also read:
- [New] Incorporating Visual Media Into Free Writings
- Best 20 Kid-Friendly Christmas Carols: FREE Mp3/Mp4 Downloads Available Now!
- Best Top-Rated Websites to Watch & Download 3D Films Without Charge: A Comprehensive List of the Top 10!
- Download Instantly: Premium Quality TikTok Save Apps for Free!
- How to Transfer Data from Huawei Nova Y91 to BlackBerry | Dr.fone
- In 2024, How to Transfer Photos from Samsung Galaxy S23 Tactical Edition to Laptop Without USB | Dr.fone
- In 2024, Pristine Palette Aligner
- Navigating Windows 11 A Deep Dive Into Zoom Usage for 2024
- Resolving 2024 Compatibility Issues - Successfully Starting Modern Warfare on PC
- Social Media Mastery Embedding Twitch Streams on FB
- Solving the LS-0013 Issue in Borderlands 3: A Step-by-Step Guide
- Top Free Video Downloading Apps: The Best Alternatives to RealPlayer
- Top Picks: The Ultimate Selection of Best Summer Blockbusters (2017 & 2018) - Complete Guide
- Title: [Updated] Avoid Blandness in Your Vids Top Recommended YouTube Thumbnail Heights
- Author: Brian
- Created at : 2024-10-02 20:42:06
- Updated at : 2024-10-06 18:58:52
- Link: https://youtube-video-recordings.techidaily.com/updated-avoid-blandness-in-your-vids-top-recommended-youtube-thumbnail-heights/
- License: This work is licensed under CC BY-NC-SA 4.0.