
"[Updated] Audiophile's Guide Techniques to Elevate Sound Recording"
Audiophile’s Guide: Techniques to Elevate Sound Recording
10 Recording Tips for Recording Audio with High Quality

Richard Bennett
Oct 26, 2023• Proven solutions
Getting the best sound for your recording is not as simplistic as buying an expensive microphone. There are many different things you can do to record your audio more clearly. Here are 10 recording tips to record high-quality audio.
1. Silence everything you don’t want your microphone to record
2. Put your mobile phone in airplane mode
3. Minimize echo
4. Block wind from reaching your microphone
5. Upgrade your microphone
6. Adjust your levels
7. Start with a sound cue if you’re planning to do some syncing in post
8. Get close to the sound
9. ADR
10. Record Ambient Sound
Bonus Tip-Record Your Audio with Wondershare Filmora
Wondershare Filmora has great recording features that enable you to record screen , voiceover, and webcam. Just connect the recording device to your computer, and start the recording in Wondershare Filmora and you will get high-quality audio. And you can also easily pick a song from the royalty-free music library on Wondershare Filmora. These audio features on Filmora are rare and very simple to use, you only need to click a few times and your video will have a new sound and background song.


1. Silence everything you don’t want your microphone to record
When you’re recording audio, you have to be more aware of the subtle sounds that drone on in your background. These sounds may include humming from machines with fans, buzzing from lights, and jingling from your pet’s collar. Observe your recording space and find ways to silence everything that you don’t want in your audio recording.
2. Put your mobile phone in airplane mode
Although it may be quite obvious to turn your phone’s ring tone off when you’re recording, it may not be as obvious to put your phone in airplane mode. When phones receive calls or perform searches as part of their background processes, they emit signals that can get picked up by your recording system. Avoid ruining good takes with unwanted sounds of phone signals by putting your phones in airplane mode.
3. Minimize echo
If you are recording yourself talk or sing, make sure to set up your recording space in a way where the sound projected from your voice bounces minimally off the walls and back to your microphone. Bare walls and hardwood floors will cause a lot of bouncing. Make use of materials that will absorb your sound rather than bounce it, like a thick rug or a comforter. If you want your voice to echo, that’s something you should do in post-production.
4. Block wind from reaching your microphone
Although it might not sound so loud and distracting to the naked ear, wind sounds terribly loud through a microphone recording and can cause your audio to clip (distortion of waveform due to output of sound exceeding maximum capacity or 0 dB point). This includes the “wind” that comes out of your mouth when you pronounce words starting with the letter “p.” Use pop filters, windscreens, and deadcats to block wind from reaching your microphone.
5. Upgrade your microphone
As much as you try to control all the noise in your surroundings, your greatest recording limitation will come from the hardware that you use. Improve your recordings by plugging in an external microphone into your camera’s microphone jack or record audio completely separately with a professional microphone.
Need help with deciding on a microphone to buy? Check out our recommended list of microphones.
6. Adjust your levels
Before pressing the record button, see how loudly your microphone picks up the sound you wish to record. Adjust your levels (sensitivity of your microphone) until the sound sits in between -6 dBs and -12dBs. This range gives the source of your sound some room to get louder without the recorded audio getting clipped. When you first listen to audio recorded within this range, it may sound very quiet. No need to worry though because you can increase the volume later in editing.
7. Start with a sound cue if you’re planning to do some syncing in post
If you’re recording separate audio that you plan to sync to your video later in editing, start your recording with a short and loud sound cue like a clap or a high pitched “beep” tone. Later, when you’re editing, it’ll be much easier for you to find the section where your video and additional audio match.
8. Get close to the sound
Unless you’re aiming to record ambient sound, bring your microphone close to the source of sound you are wanting to record. The closer your microphone is to the source of sound, the lower your sensitivity setting can be on your microphone. As a result of lowering your levels, sounds you are not meaning to record will also sound fainter.
9. ADR
When you need to record a scene in a loud setting where you have very little control over the noise, record additional vocals later and replace the original vocals through a process called automated dialogue replacement.
10. Record Ambient Sound
Remember to record ambient sound or “room tone.” You can use these recordings to fill in the blanks if you run out of audio and also smooth out parts of your audio where you hear pops, clicks, and other unwanted noise.
Richard Bennett
Richard Bennett is a writer and a lover of all things video.
Follow @Richard Bennett
Richard Bennett
Oct 26, 2023• Proven solutions
Getting the best sound for your recording is not as simplistic as buying an expensive microphone. There are many different things you can do to record your audio more clearly. Here are 10 recording tips to record high-quality audio.
1. Silence everything you don’t want your microphone to record
2. Put your mobile phone in airplane mode
3. Minimize echo
4. Block wind from reaching your microphone
5. Upgrade your microphone
6. Adjust your levels
7. Start with a sound cue if you’re planning to do some syncing in post
8. Get close to the sound
9. ADR
10. Record Ambient Sound
Bonus Tip-Record Your Audio with Wondershare Filmora
Wondershare Filmora has great recording features that enable you to record screen , voiceover, and webcam. Just connect the recording device to your computer, and start the recording in Wondershare Filmora and you will get high-quality audio. And you can also easily pick a song from the royalty-free music library on Wondershare Filmora. These audio features on Filmora are rare and very simple to use, you only need to click a few times and your video will have a new sound and background song.
1. Silence everything you don’t want your microphone to record
When you’re recording audio, you have to be more aware of the subtle sounds that drone on in your background. These sounds may include humming from machines with fans, buzzing from lights, and jingling from your pet’s collar. Observe your recording space and find ways to silence everything that you don’t want in your audio recording.
2. Put your mobile phone in airplane mode
Although it may be quite obvious to turn your phone’s ring tone off when you’re recording, it may not be as obvious to put your phone in airplane mode. When phones receive calls or perform searches as part of their background processes, they emit signals that can get picked up by your recording system. Avoid ruining good takes with unwanted sounds of phone signals by putting your phones in airplane mode.
3. Minimize echo
If you are recording yourself talk or sing, make sure to set up your recording space in a way where the sound projected from your voice bounces minimally off the walls and back to your microphone. Bare walls and hardwood floors will cause a lot of bouncing. Make use of materials that will absorb your sound rather than bounce it, like a thick rug or a comforter. If you want your voice to echo, that’s something you should do in post-production.
4. Block wind from reaching your microphone
Although it might not sound so loud and distracting to the naked ear, wind sounds terribly loud through a microphone recording and can cause your audio to clip (distortion of waveform due to output of sound exceeding maximum capacity or 0 dB point). This includes the “wind” that comes out of your mouth when you pronounce words starting with the letter “p.” Use pop filters, windscreens, and deadcats to block wind from reaching your microphone.
5. Upgrade your microphone
As much as you try to control all the noise in your surroundings, your greatest recording limitation will come from the hardware that you use. Improve your recordings by plugging in an external microphone into your camera’s microphone jack or record audio completely separately with a professional microphone.
Need help with deciding on a microphone to buy? Check out our recommended list of microphones.
6. Adjust your levels
Before pressing the record button, see how loudly your microphone picks up the sound you wish to record. Adjust your levels (sensitivity of your microphone) until the sound sits in between -6 dBs and -12dBs. This range gives the source of your sound some room to get louder without the recorded audio getting clipped. When you first listen to audio recorded within this range, it may sound very quiet. No need to worry though because you can increase the volume later in editing.
7. Start with a sound cue if you’re planning to do some syncing in post
If you’re recording separate audio that you plan to sync to your video later in editing, start your recording with a short and loud sound cue like a clap or a high pitched “beep” tone. Later, when you’re editing, it’ll be much easier for you to find the section where your video and additional audio match.
8. Get close to the sound
Unless you’re aiming to record ambient sound, bring your microphone close to the source of sound you are wanting to record. The closer your microphone is to the source of sound, the lower your sensitivity setting can be on your microphone. As a result of lowering your levels, sounds you are not meaning to record will also sound fainter.
9. ADR
When you need to record a scene in a loud setting where you have very little control over the noise, record additional vocals later and replace the original vocals through a process called automated dialogue replacement.
10. Record Ambient Sound
Remember to record ambient sound or “room tone.” You can use these recordings to fill in the blanks if you run out of audio and also smooth out parts of your audio where you hear pops, clicks, and other unwanted noise.
Richard Bennett
Richard Bennett is a writer and a lover of all things video.
Follow @Richard Bennett
Crafting Engaging Content with Google Trends Analytics
How to Use Google Trends to Come up with Video Ideas [Easy Guide]
Richard Bennett
Oct 26, 2023• Proven solutions
There is always something to make a video about. It’s a big world where new things happen every day, in every YouTube niche . One of the best ways to climb to the top of YouTube’s search engine results is to be among the first creators to make a video about a trending topic.
But how do you know what’s trending? If you’re in a huge genre like beauty or technology then it’s not impossible to keep track of the latest news and trends, but you probably hear about things as other people start making videos and as websites start publishing articles. How do you get on top of trends just as they’re becoming trends?
Google Trends, of course!
Google Trends is a completely free tool you can use to determine what’s trending on YouTube or in Google’s search engine. Here’s how you can use Google Trends to figure out what’s trending in your niche and make a video before there’s tons of competition.
Part 1: Seeing The Big Picture
You’ll need to be signed into your Google account to use Google Trends.
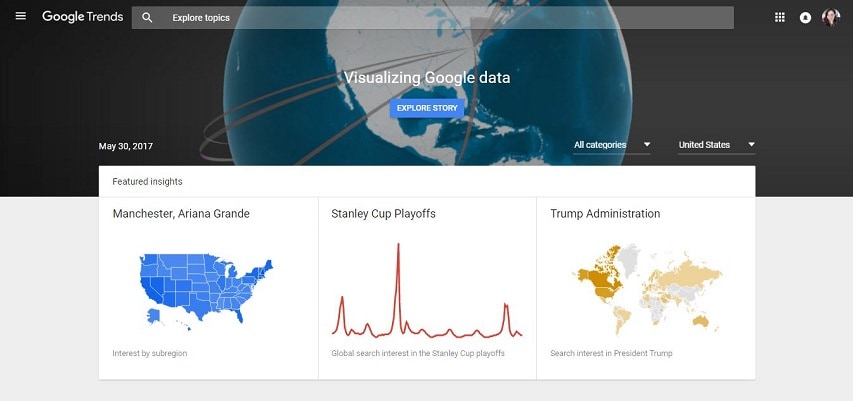
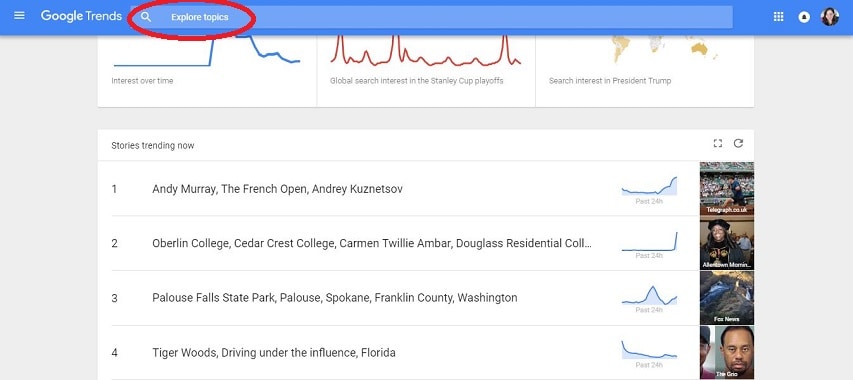
Start off at trends.google.com and you’ll see what’s trending in general – usually big news stories or things like sports finals. The data is laid out like this: at the top there are three ‘Featured Insights’. These are three of the most popular trending topics paired with graphs of their recent search traffic. Underneath these there will be a list of stories that are currently trending. You can click on them to see charts of their search data and links to where the stories are being covered online.
Unless you do news or political commentary on your channel these probably aren’t topics you want to cover, but if you like to insert some topical references into your other videos then it’s still good to be aware of these things.
To get information more relevant to your channel you’re going to have to do some filtering.
Part 2: Getting Results That Matter to You
In the Google Trend home page, scroll down to the ‘Recently Trending’ section and click on ‘More Trending Searches’.
Then click from ‘Daily Search Trends’ to ‘Realtime Search Trends’.
On top you will see two drop-down menus, one is for the category and one is for location.
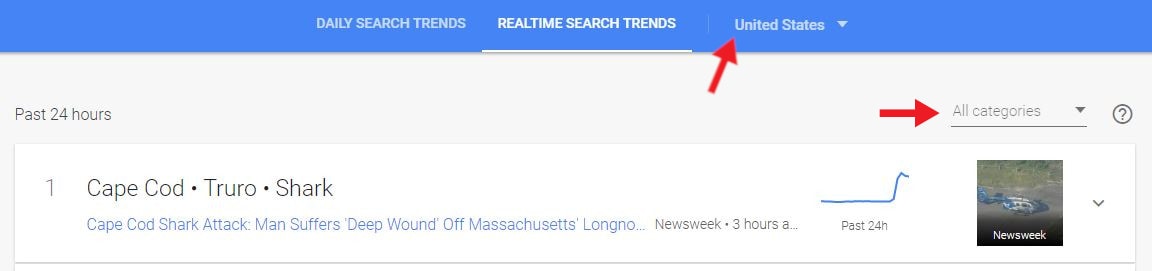
Under All categories select the general theme your channel falls under.
Your options are business, entertainment, health, Sci/Tech, sports, and top stories.
It might be the case that your channel doesn’t fall under any of these themes, but there could still be related stories for you in other categories. For example, if you have a beauty channel then there could be something that’d interest you under health, entertainment, or even business.
Under the location menu choose the region most of your viewers are from. This might not be the same as where you are from – you could be in Australia and most of your viewers could be in the U.S. If you’re not sure where your viewers are from you can find out in your Creator Studio under Analytics > Demographics.
Once you have narrowed down your results you can just scroll through and pick out a topic related to your channel’s theme that you have something to say about.
For example, if you have a gaming channel and you’re looking for a non-gameplay topic to make a video on, you would look under Sci/Tech. If I look under that category today (May 29, 2017) and specify that I want topics trending in the United States then these are my top 5 results:
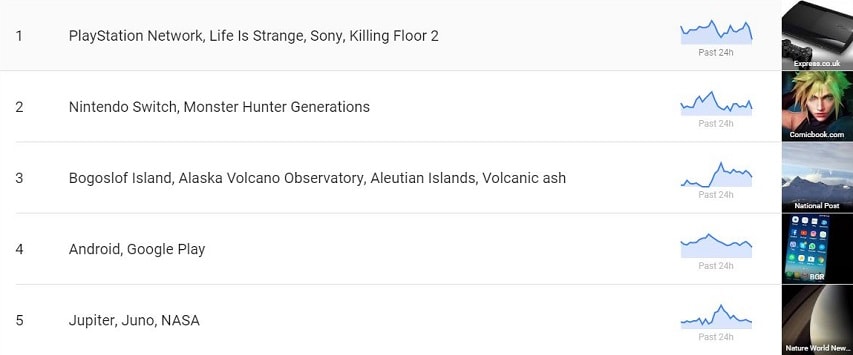
The first two happen to be about gaming. If you, as a gamer, had any strong reaction to either of these topics – whether it’s that you feel like you’re knowledgeable about them, or that you’re excited by something that’s coming up, or that something made you groan – then that would be a sign that you should make a video. Capitalizing on a trend while also covering a topic you have a lot to say about is always a good move.
Having something to say doesn’t have to mean having a strong opinion. If you just find something interesting and want to pass the information along to your viewers then that’s great too.
Clicking on these results will give you more specific data including how often the topic has been searched recently and links to recent news articles. These can give you a better idea of why it is trending and help you come up with what you want to say.
Part 3: Battle of the Keywords
Once you have a topic in mind for your next video – whether it came from Google Trends or your own noggin – think about what the most important keyword for that topic might be.
A keyword is a word or short phrase that people type into a search engine like Google or YouTube. In order for people to find your videos, you’ll have to include a keyword in your video’s title.
Once you have a keyword in mind, type it into the Explore bar at the top of your page in Google Trends.
What happens after you click enter is pretty much magic. Say I want to make a video on how to use Filmora. The first thing I’ll type into that Explore bar is ‘Filmora’.
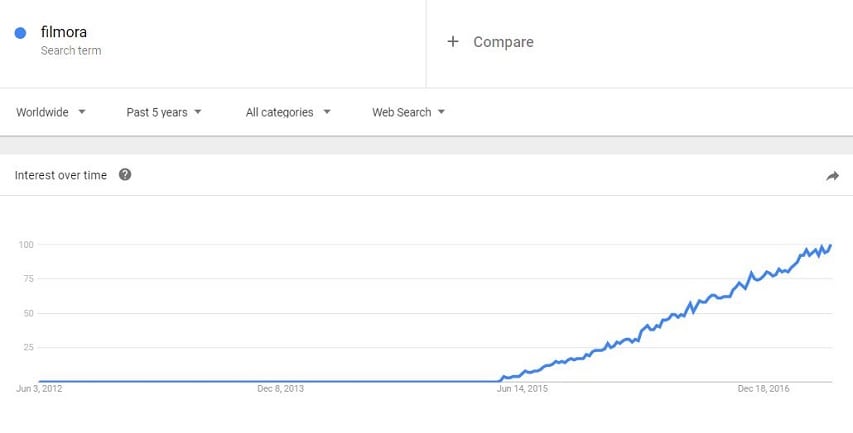
You can see near the top that this chart represents searches for the topic over the last 5 years, which isn’t necessarily useful (although it is sort of cool that you can see when Filmora was ‘born’). I’m going to narrow that down to results from the U.S in the last week.
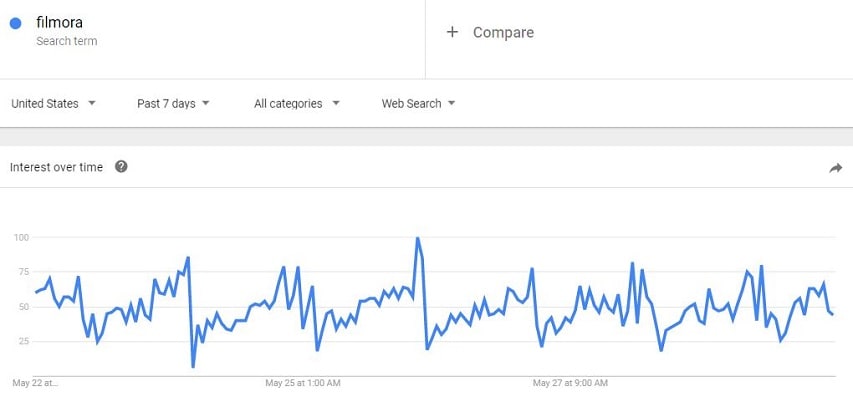
There, now I can see how the popularity of Filmora as a search term has spiked on specific days and times (if you hover over a spike it tells you the time and day) and plan to post my video at a time that capitalizes on these trends.
Next, what other words do I want to include in my video title? Is this a review, a tutorial, or a how-to? By clicking on my search term Filmora, I can edit it to read ‘filmora review’. Then I can click + Compare and type in ‘filmora tutorial’ and ‘how to use Filmora’. Google Trends will create a chart comparing the popularity of those 3 terms.
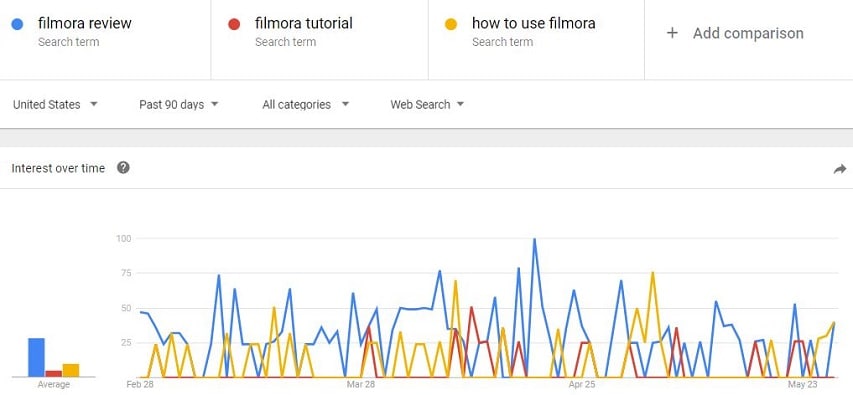
I also ‘zoomed out’ to 90 days – if I’d only looked at how they compared over the last week my results could have been skewed.
It’s pretty clear from the chart that ‘filmora review’ is the strongest of those 3 search terms. The title of my video should definitely start with the words Filmora Review because that is what most people are searching for when they want information about Filmora. Putting your most important keyword/search term first in your video titles will help them rank better in the viewer’s search results.
Although, when you do a comparison like this you should also go to YouTube and search for each potential keyword/phrase individually. It might turn out that there is a ton of strong competition for the most popular search term, and not as much for the second or third most popular. Here’s a search for ‘Filmora Review’ on YouTube:
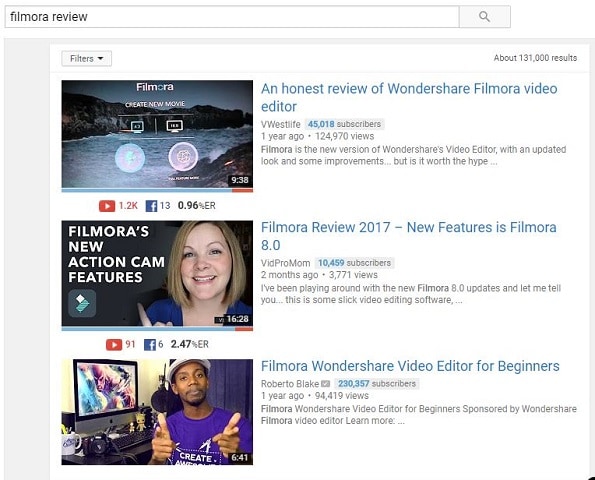
If my view of YouTube looks different from yours it’s because I’m using the VidIQ plugin for Chrome . It’s free and it gives you all kinds of extra info about videos and channels.
The second-highest ranked result is only 2 months old and isn’t from a huge channel. Although there is competition for this keyword, ranking for it is not impossible. It also helps that software reviews are a topic where people will always be looking for the latest information/newest videos.
If the search results for your keyword are dominated by monster channels with millions of subs, and you can’t think of an angle you can use to crack into those top results (i.e. having newer information people will be looking for, which the more established videos are lacking), then maybe try the search with your second best keyword and see if there’s a better opportunity for you to rank there.
One of the biggest benefits of identifying trends and making videos about them quickly is that you can get in before there’s a lot of competition for the first few pages of search results on YouTube or Google, and before larger channels start making videos of their own on the same topic.
Want to make coming up with YouTube video ideas a habit? This post here will help you develop a process to generate more ideas and properly evaluate them.
Making Better YouTube Videos with Filmora
As one of the most widely used video editing software among YouTubers, Filmora provides plentiful editing tools, such as cut, trim, video stabilization , noise removal , chroma key compositing , and color grading. Besides, there are royalty-free music track and sound effects available in the built-in Audio library, and title templates and presets, as well as elements and effects. Download the free trial version below and get started now.
Richard Bennett
Richard Bennett is a writer and a lover of all things video.
Follow @Richard Bennett
Richard Bennett
Oct 26, 2023• Proven solutions
There is always something to make a video about. It’s a big world where new things happen every day, in every YouTube niche . One of the best ways to climb to the top of YouTube’s search engine results is to be among the first creators to make a video about a trending topic.
But how do you know what’s trending? If you’re in a huge genre like beauty or technology then it’s not impossible to keep track of the latest news and trends, but you probably hear about things as other people start making videos and as websites start publishing articles. How do you get on top of trends just as they’re becoming trends?
Google Trends, of course!
Google Trends is a completely free tool you can use to determine what’s trending on YouTube or in Google’s search engine. Here’s how you can use Google Trends to figure out what’s trending in your niche and make a video before there’s tons of competition.
Part 1: Seeing The Big Picture
You’ll need to be signed into your Google account to use Google Trends.
Start off at trends.google.com and you’ll see what’s trending in general – usually big news stories or things like sports finals. The data is laid out like this: at the top there are three ‘Featured Insights’. These are three of the most popular trending topics paired with graphs of their recent search traffic. Underneath these there will be a list of stories that are currently trending. You can click on them to see charts of their search data and links to where the stories are being covered online.
Unless you do news or political commentary on your channel these probably aren’t topics you want to cover, but if you like to insert some topical references into your other videos then it’s still good to be aware of these things.
To get information more relevant to your channel you’re going to have to do some filtering.
Part 2: Getting Results That Matter to You
In the Google Trend home page, scroll down to the ‘Recently Trending’ section and click on ‘More Trending Searches’.
Then click from ‘Daily Search Trends’ to ‘Realtime Search Trends’.
On top you will see two drop-down menus, one is for the category and one is for location.
Under All categories select the general theme your channel falls under.
Your options are business, entertainment, health, Sci/Tech, sports, and top stories.
It might be the case that your channel doesn’t fall under any of these themes, but there could still be related stories for you in other categories. For example, if you have a beauty channel then there could be something that’d interest you under health, entertainment, or even business.
Under the location menu choose the region most of your viewers are from. This might not be the same as where you are from – you could be in Australia and most of your viewers could be in the U.S. If you’re not sure where your viewers are from you can find out in your Creator Studio under Analytics > Demographics.
Once you have narrowed down your results you can just scroll through and pick out a topic related to your channel’s theme that you have something to say about.
For example, if you have a gaming channel and you’re looking for a non-gameplay topic to make a video on, you would look under Sci/Tech. If I look under that category today (May 29, 2017) and specify that I want topics trending in the United States then these are my top 5 results:
The first two happen to be about gaming. If you, as a gamer, had any strong reaction to either of these topics – whether it’s that you feel like you’re knowledgeable about them, or that you’re excited by something that’s coming up, or that something made you groan – then that would be a sign that you should make a video. Capitalizing on a trend while also covering a topic you have a lot to say about is always a good move.
Having something to say doesn’t have to mean having a strong opinion. If you just find something interesting and want to pass the information along to your viewers then that’s great too.
Clicking on these results will give you more specific data including how often the topic has been searched recently and links to recent news articles. These can give you a better idea of why it is trending and help you come up with what you want to say.
Part 3: Battle of the Keywords
Once you have a topic in mind for your next video – whether it came from Google Trends or your own noggin – think about what the most important keyword for that topic might be.
A keyword is a word or short phrase that people type into a search engine like Google or YouTube. In order for people to find your videos, you’ll have to include a keyword in your video’s title.
Once you have a keyword in mind, type it into the Explore bar at the top of your page in Google Trends.
What happens after you click enter is pretty much magic. Say I want to make a video on how to use Filmora. The first thing I’ll type into that Explore bar is ‘Filmora’.
You can see near the top that this chart represents searches for the topic over the last 5 years, which isn’t necessarily useful (although it is sort of cool that you can see when Filmora was ‘born’). I’m going to narrow that down to results from the U.S in the last week.
There, now I can see how the popularity of Filmora as a search term has spiked on specific days and times (if you hover over a spike it tells you the time and day) and plan to post my video at a time that capitalizes on these trends.
Next, what other words do I want to include in my video title? Is this a review, a tutorial, or a how-to? By clicking on my search term Filmora, I can edit it to read ‘filmora review’. Then I can click + Compare and type in ‘filmora tutorial’ and ‘how to use Filmora’. Google Trends will create a chart comparing the popularity of those 3 terms.
I also ‘zoomed out’ to 90 days – if I’d only looked at how they compared over the last week my results could have been skewed.
It’s pretty clear from the chart that ‘filmora review’ is the strongest of those 3 search terms. The title of my video should definitely start with the words Filmora Review because that is what most people are searching for when they want information about Filmora. Putting your most important keyword/search term first in your video titles will help them rank better in the viewer’s search results.
Although, when you do a comparison like this you should also go to YouTube and search for each potential keyword/phrase individually. It might turn out that there is a ton of strong competition for the most popular search term, and not as much for the second or third most popular. Here’s a search for ‘Filmora Review’ on YouTube:
If my view of YouTube looks different from yours it’s because I’m using the VidIQ plugin for Chrome . It’s free and it gives you all kinds of extra info about videos and channels.
The second-highest ranked result is only 2 months old and isn’t from a huge channel. Although there is competition for this keyword, ranking for it is not impossible. It also helps that software reviews are a topic where people will always be looking for the latest information/newest videos.
If the search results for your keyword are dominated by monster channels with millions of subs, and you can’t think of an angle you can use to crack into those top results (i.e. having newer information people will be looking for, which the more established videos are lacking), then maybe try the search with your second best keyword and see if there’s a better opportunity for you to rank there.
One of the biggest benefits of identifying trends and making videos about them quickly is that you can get in before there’s a lot of competition for the first few pages of search results on YouTube or Google, and before larger channels start making videos of their own on the same topic.
Want to make coming up with YouTube video ideas a habit? This post here will help you develop a process to generate more ideas and properly evaluate them.
Making Better YouTube Videos with Filmora
As one of the most widely used video editing software among YouTubers, Filmora provides plentiful editing tools, such as cut, trim, video stabilization , noise removal , chroma key compositing , and color grading. Besides, there are royalty-free music track and sound effects available in the built-in Audio library, and title templates and presets, as well as elements and effects. Download the free trial version below and get started now.
Richard Bennett
Richard Bennett is a writer and a lover of all things video.
Follow @Richard Bennett
Also read:
- [New] Amplify Your Videos Enhancing Thumbnails with Captivating, Creative BGs
- Rising to the Top Essential YouTube Video SEO Techniques for Success
- In 2024, Crafting Video Magic with iMovie, Directed to YouTube
- In 2024, Breathtaking Lyric Videos Made Easy by Lyric Video Maker
- Navigating the Best Online Science Vloggers for Curious Minds
- Investigating YouTube Dialogues
- Unveiling the Mysteries of Video Monetization
- 2024 Approved Continuous Viewing Setup Your YouTube Clips for TV Repetition
- In 2024, Boost Engagement Innovative Templates for Your Video Closings
- How to Avoid and Reverse Strikes on Your YouTube Account for 2024
- [New] Channel Your Inner DJ Discover These Innovative 20 Music Sources on YouTube
- Boost Video Quality on YouTube - The Essential Webcams Guide
- Unlock Content Insights 7 Premier Free Tag Extraction Tools
- Unlock the Full Potential of Your Video with Studio Editor
- [Updated] Enhancing Your YouTube Projects A Compreayer of Visual Improvement
- Eradicating YouTube Content in a Device-Friendly Way
- In 2024, Clear and Steady Essential YouTube Camera Tech
- [Updated] Decoding YouTube's Clandestine Content with Orderliness
- Mastering YouTube Video Transformation Into Animated GIFs (No Save)
- Ultimate List Free YouTube Gallery Downloader Tools
- Elevate Your Channel Identity Essential YouTube Naming Strategies for 2024
- From Scratch to Screen Video Editing with YouTube & Others
- [Updated] Craft an Attractive Animation From Any Video - A Comprehensive Youtube-to-GIF Guide
- Double Down on Viewership YouTube + Twitch Strategy for 2024
- [New] Anime's Best of 2023 on YouTube A Guide to Your Daily Dose
- Exploring Earning Potential An Uncomplicated Triad Technique for YouTube Profit Analysis
- [Updated] Download Free Sound Effects for YouTubers
- Font Selection Wonders Enhancing YouTube Video Thumbnails
- Optimizing Youtube Profits Understanding Your AdSense Earnings per KV
- Rhythmic Resonance Top 10 Yogis on the Web
- 2024 Approved Building Your Own YouTube Organization Toolkit The Watch Later Way
- Crucial Details for Deciding on a YouTube TV Subscription for 2024
- Strategies to Prevent Account Suspension on YouTube
- In 2024, A Comprehensive List of the Best Video Sites Post-YouTube
- [Updated] Comprehensive Directory Extracting YT Template Videos Online
- Essential Guide to YouTube Video Resolutions & Aspects for 2024
- How To Restore a Bricked Poco F5 Pro 5G Back to Operation | Dr.fone
- Pattern Locks Are Unsafe Secure Your Xiaomi 13 Ultra Phone Now with These Tips
- How to Use Phone Clone to Migrate Your Poco M6 Pro 4G Data? | Dr.fone
- About Itel S23 FRP Bypass
- 2024 Approved Exclusive Review Best Free Videocall Platforms W/ Screen View
- [Updated] 10 Essential Film Edits and Their Techniques
- Remove Google FRP Lock on Infinix Hot 30 5G
- The Comprehensive Guide to Recording FB Video Calls
- Revolutionize Your Brand Presence on IGTV with These Top 10 Strategies for 2024
- In 2024, Catchy Cadences in Creative Snaps and Videos
- [Updated] In 2024, Understanding VLC's Screen Recording Features
- [Updated] Switch Showdown Top 10 Arcade Combat Classics for 2024
- 2024 Approved Conquering Gameplay Logic From Console to Computer Playback
- Updated Basic Voice Changing Utilities Outline of Capabilities and Substitutes for 2024
- Total Sphere Camera Systems
- [New] Unleash Voice in Discord TTS User Manual for 2024
- In 2024, The Ultimate Manual for Extracting HD From Facebook
- How to Get and Use Pokemon Go Promo Codes On Apple iPhone 14 Pro Max | Dr.fone
- 2024 Approved Discovering the Most Outstanding Chrome OS Devices for Flawless Vocal Transformation - VideoCraftSuite
- [New] In 2024, Your Guide to the Best IGTV Virtuosos
- [Updated] Decoding Instagram Selfies The Validation Handbook for 2024
- New In 2024, Adobe Premiere Pro CS6 Mac Version Get It Free
- Ultimate Guide from Motorola Razr 40 Ultra FRP Bypass
- Title: "[Updated] Audiophile's Guide Techniques to Elevate Sound Recording"
- Author: Brian
- Created at : 2024-05-25 13:10:21
- Updated at : 2024-05-26 13:10:21
- Link: https://youtube-video-recordings.techidaily.com/updated-audiophiles-guide-techniques-to-elevate-sound-recording/
- License: This work is licensed under CC BY-NC-SA 4.0.
