![[Updated] Artisans Crafting Marvel Fantasy Landscapes](https://thmb.techidaily.com/be34f09b3263dabe58e7e8e9b611840eed5d78451bd041646a395d4031103684.jpg)
[Updated] Artisans Crafting Marvel Fantasy Landscapes
Artisans Crafting Marvel Fantasy Landscapes
Top 4 Marvel Intro Makers Online

Richard Bennett
Mar 27, 2024• Proven solutions
Are you a fan of Marvel’s Tv series? If yes, you must have watched the intro that Marvel includes at the starting of its every video, and you may be looking for a marvel intro maker for yourself. The intro has some cool sound effects with amazing animations. Different superheroes appear on the screen and then fade away. It also features some scenes from other tv series. Overall it is a power-packed intro that grabs the users’ attention, and it becomes difficult to take your eyes off the screen when this intro is played.
When watching this intro, you may get excited and want to make your intro if you are a true Marvel fan. But you might be thinking that how it is possible to blend so many elements and characters in a single video and make the smooth transitions so that everything seems to be going in a flow. The answer to your question is straightforward. You can either use Marlvel intro makers online to make it or use Filmora to make it according to our tutorial. Either way, we get you covered!
Top 4 Marvel Online Intro Makers:
This article will share the top 4 online marvel intro makers that you can use to create your own intros similar to Marvel’s intro easily. So, let’s get started with our main topic.
1. Introchamp.com
Price: $8.38 for 1080p version/ $6.98 for 720p version
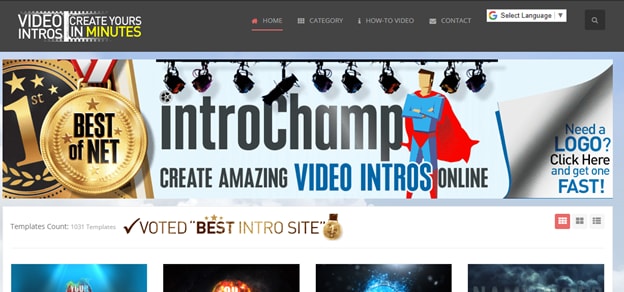
Intro champ is a website that allows you to create video intros in just a few minutes. It is one of the best online intro maker websites out there. If you want to make Marvel’s Intro video, then you can create it using this website. Just click the title to the website, and you will see the screen displayed in the above picture. You will see a search bar on the top right side of your screen. Type “Modern Marvel” in this search bar and hit the enter button. You will see a Marvel intro template that you can use to create your video.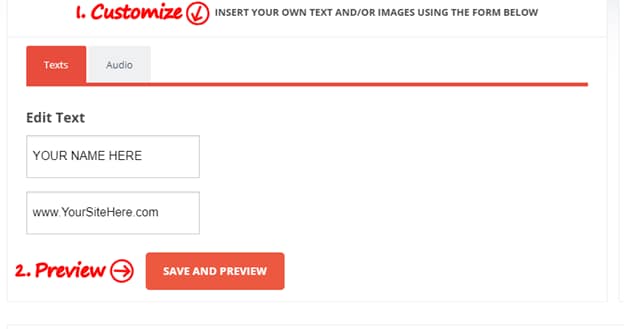
Creating your video is a straightforward process. You need to enter your desired text displayed in two different fields and click on the Save & Preview button. It allows you to try the intro video to have an idea how it will look like. There will be a watermark on the video. If you want to remove that watermark, you need to purchase this template. The 1080p version will cost you around $8.38, and the 780p version will cost around $6.98.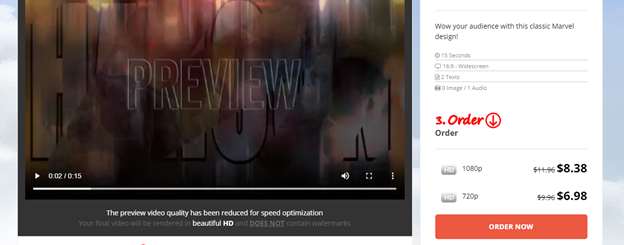
2. Videohive.com
Price: from $10 to $20
The third website that can help you to create online Marvel’s intro videos is Video Hive. It is a website where you can find stock images and stock videos. Just search Marvel Intro in the search bar of the website, and it will display different stock videos that you can use to create intros. 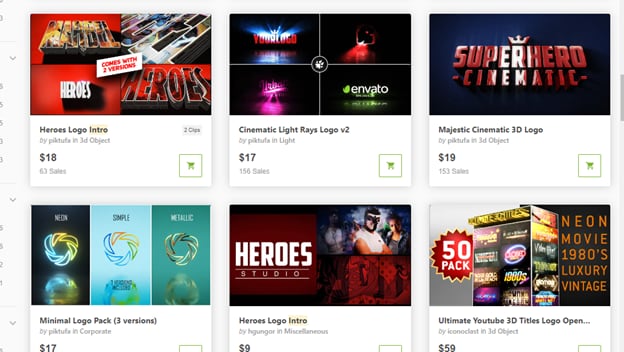
Every stock video has a different price, and you may need to hire a video editor online to create your intro video using this template. It is a bit expensive option, but the results are more convincing at the same time.
3. Tubearsenal.com
Price: $13 for 1080p version/ $9 for 720p version
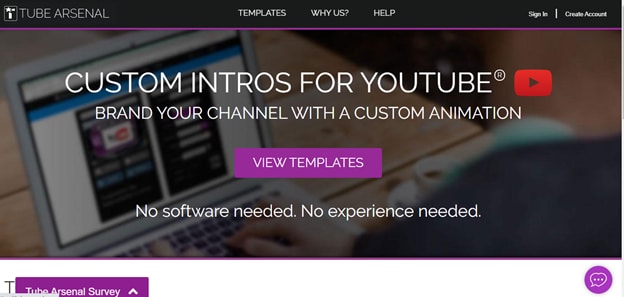
Tube Arsenal is also one of the best and premium intro makers online. It is effortless to use, and you don’t need to download any software or effects because everything here is online. You also don’t need to have any prior experience because it is easy to use platform. 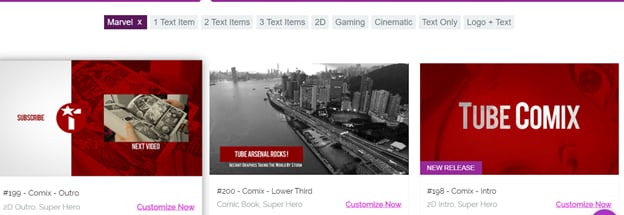
This website contains thousands of intro video templates that you can customize according to your videos’ needs and use. If you want to create Marvel’s intro video, then all you have to do is search “Marvel Intro” in the search bar and select “Comix Intro Template” from the results.
Click on the customize now button, and it will take you to a page where you will find plenty of customization options. You can add your desired text and choose the color of your text. You can also customize the background color and choose a custom music track played with your intro.
4. Filmora X
The fourth option that you have is to create Marvel’s intro video by using Filmora X. Filmora X is one of the latest and premium video editing software out there. You will develop your intro video manually on Filmora X by following a step-by-step procedure. Now you may think that it is not easy, but it is straightforward. You can include the elements that you want and exclude unwanted elements. Overall you can have an excellent experience by using this software.
Conclusion
Many intro maker programs and websites are available online. The websites are easier to use, and you can create your intros in just a few minutes, but they have some limitations. You cannot do much customization on those templates. However, if you use Filmora X, you have many options and can customize your intro how you want. We recommend you give it a try, and we assure you that you won’t regret your decision.


Richard Bennett
Richard Bennett is a writer and a lover of all things video.
Follow @Richard Bennett
Richard Bennett
Mar 27, 2024• Proven solutions
Are you a fan of Marvel’s Tv series? If yes, you must have watched the intro that Marvel includes at the starting of its every video, and you may be looking for a marvel intro maker for yourself. The intro has some cool sound effects with amazing animations. Different superheroes appear on the screen and then fade away. It also features some scenes from other tv series. Overall it is a power-packed intro that grabs the users’ attention, and it becomes difficult to take your eyes off the screen when this intro is played.
When watching this intro, you may get excited and want to make your intro if you are a true Marvel fan. But you might be thinking that how it is possible to blend so many elements and characters in a single video and make the smooth transitions so that everything seems to be going in a flow. The answer to your question is straightforward. You can either use Marlvel intro makers online to make it or use Filmora to make it according to our tutorial. Either way, we get you covered!
Top 4 Marvel Online Intro Makers:
This article will share the top 4 online marvel intro makers that you can use to create your own intros similar to Marvel’s intro easily. So, let’s get started with our main topic.
1. Introchamp.com
Price: $8.38 for 1080p version/ $6.98 for 720p version

Intro champ is a website that allows you to create video intros in just a few minutes. It is one of the best online intro maker websites out there. If you want to make Marvel’s Intro video, then you can create it using this website. Just click the title to the website, and you will see the screen displayed in the above picture. You will see a search bar on the top right side of your screen. Type “Modern Marvel” in this search bar and hit the enter button. You will see a Marvel intro template that you can use to create your video.
Creating your video is a straightforward process. You need to enter your desired text displayed in two different fields and click on the Save & Preview button. It allows you to try the intro video to have an idea how it will look like. There will be a watermark on the video. If you want to remove that watermark, you need to purchase this template. The 1080p version will cost you around $8.38, and the 780p version will cost around $6.98.
2. Videohive.com
Price: from $10 to $20
The third website that can help you to create online Marvel’s intro videos is Video Hive. It is a website where you can find stock images and stock videos. Just search Marvel Intro in the search bar of the website, and it will display different stock videos that you can use to create intros.
Every stock video has a different price, and you may need to hire a video editor online to create your intro video using this template. It is a bit expensive option, but the results are more convincing at the same time.
3. Tubearsenal.com
Price: $13 for 1080p version/ $9 for 720p version
Tube Arsenal is also one of the best and premium intro makers online. It is effortless to use, and you don’t need to download any software or effects because everything here is online. You also don’t need to have any prior experience because it is easy to use platform.
This website contains thousands of intro video templates that you can customize according to your videos’ needs and use. If you want to create Marvel’s intro video, then all you have to do is search “Marvel Intro” in the search bar and select “Comix Intro Template” from the results.
Click on the customize now button, and it will take you to a page where you will find plenty of customization options. You can add your desired text and choose the color of your text. You can also customize the background color and choose a custom music track played with your intro.
4. Filmora X
The fourth option that you have is to create Marvel’s intro video by using Filmora X. Filmora X is one of the latest and premium video editing software out there. You will develop your intro video manually on Filmora X by following a step-by-step procedure. Now you may think that it is not easy, but it is straightforward. You can include the elements that you want and exclude unwanted elements. Overall you can have an excellent experience by using this software.
Conclusion
Many intro maker programs and websites are available online. The websites are easier to use, and you can create your intros in just a few minutes, but they have some limitations. You cannot do much customization on those templates. However, if you use Filmora X, you have many options and can customize your intro how you want. We recommend you give it a try, and we assure you that you won’t regret your decision.
Richard Bennett
Richard Bennett is a writer and a lover of all things video.
Follow @Richard Bennett
Richard Bennett
Mar 27, 2024• Proven solutions
Are you a fan of Marvel’s Tv series? If yes, you must have watched the intro that Marvel includes at the starting of its every video, and you may be looking for a marvel intro maker for yourself. The intro has some cool sound effects with amazing animations. Different superheroes appear on the screen and then fade away. It also features some scenes from other tv series. Overall it is a power-packed intro that grabs the users’ attention, and it becomes difficult to take your eyes off the screen when this intro is played.
When watching this intro, you may get excited and want to make your intro if you are a true Marvel fan. But you might be thinking that how it is possible to blend so many elements and characters in a single video and make the smooth transitions so that everything seems to be going in a flow. The answer to your question is straightforward. You can either use Marlvel intro makers online to make it or use Filmora to make it according to our tutorial. Either way, we get you covered!
Top 4 Marvel Online Intro Makers:
This article will share the top 4 online marvel intro makers that you can use to create your own intros similar to Marvel’s intro easily. So, let’s get started with our main topic.
1. Introchamp.com
Price: $8.38 for 1080p version/ $6.98 for 720p version
Intro champ is a website that allows you to create video intros in just a few minutes. It is one of the best online intro maker websites out there. If you want to make Marvel’s Intro video, then you can create it using this website. Just click the title to the website, and you will see the screen displayed in the above picture. You will see a search bar on the top right side of your screen. Type “Modern Marvel” in this search bar and hit the enter button. You will see a Marvel intro template that you can use to create your video.
Creating your video is a straightforward process. You need to enter your desired text displayed in two different fields and click on the Save & Preview button. It allows you to try the intro video to have an idea how it will look like. There will be a watermark on the video. If you want to remove that watermark, you need to purchase this template. The 1080p version will cost you around $8.38, and the 780p version will cost around $6.98.
2. Videohive.com
Price: from $10 to $20
The third website that can help you to create online Marvel’s intro videos is Video Hive. It is a website where you can find stock images and stock videos. Just search Marvel Intro in the search bar of the website, and it will display different stock videos that you can use to create intros.
Every stock video has a different price, and you may need to hire a video editor online to create your intro video using this template. It is a bit expensive option, but the results are more convincing at the same time.
3. Tubearsenal.com
Price: $13 for 1080p version/ $9 for 720p version
Tube Arsenal is also one of the best and premium intro makers online. It is effortless to use, and you don’t need to download any software or effects because everything here is online. You also don’t need to have any prior experience because it is easy to use platform.
This website contains thousands of intro video templates that you can customize according to your videos’ needs and use. If you want to create Marvel’s intro video, then all you have to do is search “Marvel Intro” in the search bar and select “Comix Intro Template” from the results.
Click on the customize now button, and it will take you to a page where you will find plenty of customization options. You can add your desired text and choose the color of your text. You can also customize the background color and choose a custom music track played with your intro.
4. Filmora X
The fourth option that you have is to create Marvel’s intro video by using Filmora X. Filmora X is one of the latest and premium video editing software out there. You will develop your intro video manually on Filmora X by following a step-by-step procedure. Now you may think that it is not easy, but it is straightforward. You can include the elements that you want and exclude unwanted elements. Overall you can have an excellent experience by using this software.
Conclusion
Many intro maker programs and websites are available online. The websites are easier to use, and you can create your intros in just a few minutes, but they have some limitations. You cannot do much customization on those templates. However, if you use Filmora X, you have many options and can customize your intro how you want. We recommend you give it a try, and we assure you that you won’t regret your decision.
Richard Bennett
Richard Bennett is a writer and a lover of all things video.
Follow @Richard Bennett
On-Camera Charisma: A Guide to Personal Video Content
4 Ways To Set Up Your Talking-Head Shots For YouTube
Richard Bennett
Oct 26, 2023• Proven solutions
A big part of being a YouTuber involves talking to the camera. How you set up your talking-head shot depends on many factors, including how much space you have, what kind of look you’re going for, and how many people you want to fit in one frame. Here are four ways to set up your talking-head shots for YouTube.
| Table of Contents 1. Close Quarters Wide-Angle Vlog Set-Up2. Medium Vlog Set-Up3. Two Person Vlog Set-Up4. Long Teleprompter Vlog Set-Up |
|---|
How to Set Up Your Talking Heads Shots for YouTube Video [Infographic]
We’ve summarized the key points about setting up talking head style video shots with the Infographic below. It is welcomed to share on social media.

How to Set Up Your Talking-Head Shots for YouTube [4 Ways]
1. Close Quarters Wide-Angle Vlog Set-Up
Don’t have a lot of space to set up your camera and lighting equipment? No problem! You can be within an arm’s length away from your camera with a close quarters wide-angle vlog set-up.
With this set-up, you’re going to need a camera with a wide-angle lens, a tripod, a camera-mounted shotgun mic for sound, and a ring light for light.
Set your camera on the tripod and mount the shotgun mic directly on the camera shoe (the electronic bracket on the top of the camera). Inside the circular space of your ring light, position your camera right in the middle of it so that you can shoot your video through it without getting any part of the lighting equipment in your shot.
In the video above, Sean Cannell demonstrates this set-up. As you can see from this example, the wide-angle lens is able to squeeze in a lot of what’s in front of the camera into the shot.
Objects and people that just make it into the sides of the frame will appear more stretched out as the wide-angle causes distortion and enhances perspectives.
If you look closely into Sean’s eyes, you can also see a specular highlight in the shape of a circle. Many people like the way eyes look against a ring light.
2. Medium Vlog Set-Up
If you have more space and want to shoot a more professional-looking talking-head shot with more realistic perspectives, a medium vlog set-up may be a better alternative for you.
For this set-up, you’ll be using a slightly longer standard/normal lens (like a 35mm or a 50mm lens) attached to your camera which would be set on a tripod. Since this longer lens will show less of the surrounding areas as it “zooms” closer into whatever is in front, you will need to sit further back, away from your camera.
Now that you’re further away from your camera, a camera-mounted shotgun mic may not be the best mic for you. For better sound recording, you’ll need a shotgun mic fixed on a mic stand that is set up like a boom mic, positioned just outside of your camera frame.
At the 39 second mark of the above video, electronic music producer deadmau5 is positioned right in the center of this particular set-up.
You can see from how even the background and couch looks across the entire camera frame that there is no distortion or enhanced perspective.
It appears that, to the right of deadmau5 (camera left), there is a key light and to his left (camera right) there may be a fill light for additional lighting. Behind the couch, there’s also a background uplight to create depth between the subject and the background. At the 1:30 mark of this trailer video, you can briefly see how the Masterclass camera crew set up their shot.
3. Two Person Vlog Set-Up
If your talking-head shot has got to include two people, you can use a similar set-up as the medium vlog set-up detailed above.
If you look back at the 39-second mark of deadmau5’s Masterclass trailer, you can see that there’s a lot of space to the left and right of deadmau5. Now imagine the same shot but with two people.
With two people, though, you’ll want to set up your mic slightly differently. Rather than using a directional shotgun mic with a narrow area of sensitivity, you’ll want to use a directional mic with a wider area of sensitivity.
4. Long Teleprompter Vlog Set-Up
If you want to read over a script but still make it appear like you’re looking straight into the camera, you’ll need to use a long teleprompter vlog set-up.
For this set-up, you’ll need all the same equipment as the medium vlog set-up, but you’ll additionally need a teleprompter placed in front of your camera equipped with a long telephoto lens.
You will have to sit much further back away from your camera for two main reasons. Firstly, you want to be able to fit yourself in your much more zoomed-in camera frame (effect of the long telephoto lens). Secondly, you want to be far enough that the camera cannot detect your eyes reading from left to right. You’ll want to be around six meters away from a 17” teleprompter monitor or around four meters away from a 10” teleprompter monitor.
In the above video, Jared Polin uses a long teleprompter vlog set-up.
In the video, he says there’s about 8 feet (2.4 meters) between himself and his lens. At the 1:15 mark of his video, Jared demonstrates how this set-up works.
It is difficult to know whether the movement in his eyes is caused by not being far enough from the lens or from his horizontal nystagmus condition in his eyes.
Looking to find the right lights for your video recording set? Check out our Top 17 Video Lighting Equipment For YouTubers .
Tips for Making a Talking Head Video Better
To make a talking-head video more interesting, you can add some background music to the video, apply some interesting texts or elements. Filmora has built-in royalty-free music tracks and sound effects as well as text templates , filters and motivating elements. Download the free trial version below and release your creativity.
Richard Bennett
Richard Bennett is a writer and a lover of all things video.
Follow @Richard Bennett
Richard Bennett
Oct 26, 2023• Proven solutions
A big part of being a YouTuber involves talking to the camera. How you set up your talking-head shot depends on many factors, including how much space you have, what kind of look you’re going for, and how many people you want to fit in one frame. Here are four ways to set up your talking-head shots for YouTube.
| Table of Contents 1. Close Quarters Wide-Angle Vlog Set-Up2. Medium Vlog Set-Up3. Two Person Vlog Set-Up4. Long Teleprompter Vlog Set-Up |
|---|
How to Set Up Your Talking Heads Shots for YouTube Video [Infographic]
We’ve summarized the key points about setting up talking head style video shots with the Infographic below. It is welcomed to share on social media.
How to Set Up Your Talking-Head Shots for YouTube [4 Ways]
1. Close Quarters Wide-Angle Vlog Set-Up
Don’t have a lot of space to set up your camera and lighting equipment? No problem! You can be within an arm’s length away from your camera with a close quarters wide-angle vlog set-up.
With this set-up, you’re going to need a camera with a wide-angle lens, a tripod, a camera-mounted shotgun mic for sound, and a ring light for light.
Set your camera on the tripod and mount the shotgun mic directly on the camera shoe (the electronic bracket on the top of the camera). Inside the circular space of your ring light, position your camera right in the middle of it so that you can shoot your video through it without getting any part of the lighting equipment in your shot.
In the video above, Sean Cannell demonstrates this set-up. As you can see from this example, the wide-angle lens is able to squeeze in a lot of what’s in front of the camera into the shot.
Objects and people that just make it into the sides of the frame will appear more stretched out as the wide-angle causes distortion and enhances perspectives.
If you look closely into Sean’s eyes, you can also see a specular highlight in the shape of a circle. Many people like the way eyes look against a ring light.
2. Medium Vlog Set-Up
If you have more space and want to shoot a more professional-looking talking-head shot with more realistic perspectives, a medium vlog set-up may be a better alternative for you.
For this set-up, you’ll be using a slightly longer standard/normal lens (like a 35mm or a 50mm lens) attached to your camera which would be set on a tripod. Since this longer lens will show less of the surrounding areas as it “zooms” closer into whatever is in front, you will need to sit further back, away from your camera.
Now that you’re further away from your camera, a camera-mounted shotgun mic may not be the best mic for you. For better sound recording, you’ll need a shotgun mic fixed on a mic stand that is set up like a boom mic, positioned just outside of your camera frame.
At the 39 second mark of the above video, electronic music producer deadmau5 is positioned right in the center of this particular set-up.
You can see from how even the background and couch looks across the entire camera frame that there is no distortion or enhanced perspective.
It appears that, to the right of deadmau5 (camera left), there is a key light and to his left (camera right) there may be a fill light for additional lighting. Behind the couch, there’s also a background uplight to create depth between the subject and the background. At the 1:30 mark of this trailer video, you can briefly see how the Masterclass camera crew set up their shot.
3. Two Person Vlog Set-Up
If your talking-head shot has got to include two people, you can use a similar set-up as the medium vlog set-up detailed above.
If you look back at the 39-second mark of deadmau5’s Masterclass trailer, you can see that there’s a lot of space to the left and right of deadmau5. Now imagine the same shot but with two people.
With two people, though, you’ll want to set up your mic slightly differently. Rather than using a directional shotgun mic with a narrow area of sensitivity, you’ll want to use a directional mic with a wider area of sensitivity.
4. Long Teleprompter Vlog Set-Up
If you want to read over a script but still make it appear like you’re looking straight into the camera, you’ll need to use a long teleprompter vlog set-up.
For this set-up, you’ll need all the same equipment as the medium vlog set-up, but you’ll additionally need a teleprompter placed in front of your camera equipped with a long telephoto lens.
You will have to sit much further back away from your camera for two main reasons. Firstly, you want to be able to fit yourself in your much more zoomed-in camera frame (effect of the long telephoto lens). Secondly, you want to be far enough that the camera cannot detect your eyes reading from left to right. You’ll want to be around six meters away from a 17” teleprompter monitor or around four meters away from a 10” teleprompter monitor.
In the above video, Jared Polin uses a long teleprompter vlog set-up.
In the video, he says there’s about 8 feet (2.4 meters) between himself and his lens. At the 1:15 mark of his video, Jared demonstrates how this set-up works.
It is difficult to know whether the movement in his eyes is caused by not being far enough from the lens or from his horizontal nystagmus condition in his eyes.
Looking to find the right lights for your video recording set? Check out our Top 17 Video Lighting Equipment For YouTubers .
Tips for Making a Talking Head Video Better
To make a talking-head video more interesting, you can add some background music to the video, apply some interesting texts or elements. Filmora has built-in royalty-free music tracks and sound effects as well as text templates , filters and motivating elements. Download the free trial version below and release your creativity.
Richard Bennett
Richard Bennett is a writer and a lover of all things video.
Follow @Richard Bennett
Also read:
- [Updated] Slay the Game Designing Quirky Text Memes
- [Updated] Speed Dial for Vimeo Video Loading for 2024
- 24 Frightful Flicks: A Comprehensive Guide Through the Most Bone-Chilling Horror Movie Selections
- Bypassing 'Directory Not Empty' Warnings: Solutions for Error X80070091
- Download Hindi Songs in 4K Quality - Free
- Download the Top 20 FREE HD Films From Hollywood's Best in 2016 - View Online
- Essential Techniques for Dealing with the Missing fm20.dll Error: A User-Friendly Guide
- Movaviで簡単JPEGをARWFに自由費用で変換
- Streamline Logitech Mouse Drivers in Win11 Updates
- Top Rated No-Cost 4K Video Transformers: Effortlessly Change Your Videos Into High Definition
- Ultimate Tips for Safely Acquiring & Enjoying Cutting-Edge 3D Movies on Your 3D TV Platforms
- Title: [Updated] Artisans Crafting Marvel Fantasy Landscapes
- Author: Brian
- Created at : 2024-10-01 21:33:19
- Updated at : 2024-10-06 20:22:46
- Link: https://youtube-video-recordings.techidaily.com/updated-artisans-crafting-marvel-fantasy-landscapes/
- License: This work is licensed under CC BY-NC-SA 4.0.