![[Updated] Architects Crafting Fantasy Realms for Marvel](https://thmb.techidaily.com/61e5e75a143019f7f7c8689be3de97fce55d395ac791171ba491fd10d2883ba4.jpeg)
[Updated] Architects Crafting Fantasy Realms for Marvel
Architects Crafting Fantasy Realms for Marvel
Top 4 Marvel Intro Makers Online

Richard Bennett
Mar 27, 2024• Proven solutions
Are you a fan of Marvel’s Tv series? If yes, you must have watched the intro that Marvel includes at the starting of its every video, and you may be looking for a marvel intro maker for yourself. The intro has some cool sound effects with amazing animations. Different superheroes appear on the screen and then fade away. It also features some scenes from other tv series. Overall it is a power-packed intro that grabs the users’ attention, and it becomes difficult to take your eyes off the screen when this intro is played.
When watching this intro, you may get excited and want to make your intro if you are a true Marvel fan. But you might be thinking that how it is possible to blend so many elements and characters in a single video and make the smooth transitions so that everything seems to be going in a flow. The answer to your question is straightforward. You can either use Marlvel intro makers online to make it or use Filmora to make it according to our tutorial. Either way, we get you covered!
Top 4 Marvel Online Intro Makers:
This article will share the top 4 online marvel intro makers that you can use to create your own intros similar to Marvel’s intro easily. So, let’s get started with our main topic.
1. Introchamp.com
Price: $8.38 for 1080p version/ $6.98 for 720p version
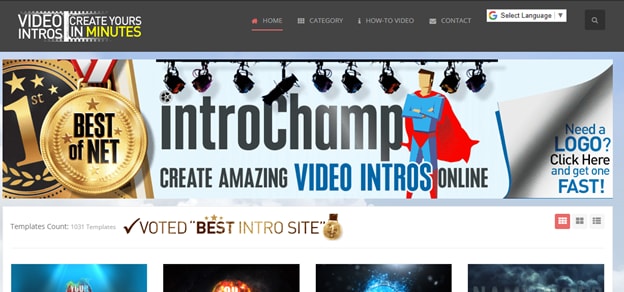
Intro champ is a website that allows you to create video intros in just a few minutes. It is one of the best online intro maker websites out there. If you want to make Marvel’s Intro video, then you can create it using this website. Just click the title to the website, and you will see the screen displayed in the above picture. You will see a search bar on the top right side of your screen. Type “Modern Marvel” in this search bar and hit the enter button. You will see a Marvel intro template that you can use to create your video.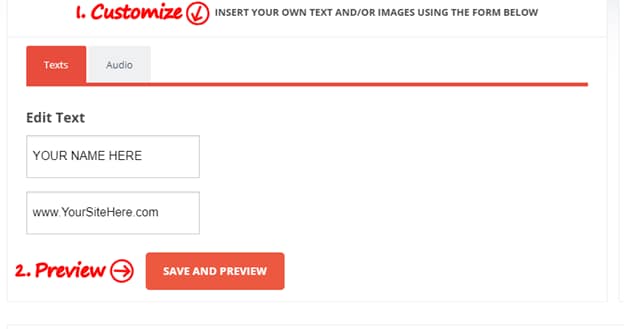
Creating your video is a straightforward process. You need to enter your desired text displayed in two different fields and click on the Save & Preview button. It allows you to try the intro video to have an idea how it will look like. There will be a watermark on the video. If you want to remove that watermark, you need to purchase this template. The 1080p version will cost you around $8.38, and the 780p version will cost around $6.98.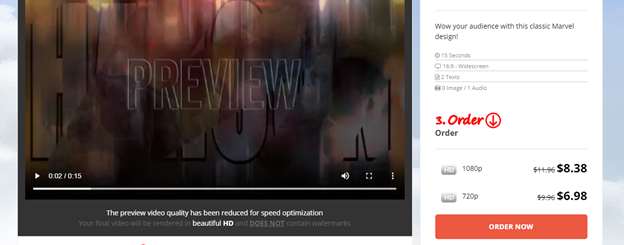
2. Videohive.com
Price: from $10 to $20
The third website that can help you to create online Marvel’s intro videos is Video Hive. It is a website where you can find stock images and stock videos. Just search Marvel Intro in the search bar of the website, and it will display different stock videos that you can use to create intros. 
Every stock video has a different price, and you may need to hire a video editor online to create your intro video using this template. It is a bit expensive option, but the results are more convincing at the same time.
3. Tubearsenal.com
Price: $13 for 1080p version/ $9 for 720p version

Tube Arsenal is also one of the best and premium intro makers online. It is effortless to use, and you don’t need to download any software or effects because everything here is online. You also don’t need to have any prior experience because it is easy to use platform. 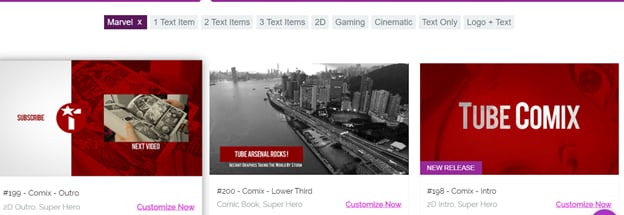
This website contains thousands of intro video templates that you can customize according to your videos’ needs and use. If you want to create Marvel’s intro video, then all you have to do is search “Marvel Intro” in the search bar and select “Comix Intro Template” from the results.
Click on the customize now button, and it will take you to a page where you will find plenty of customization options. You can add your desired text and choose the color of your text. You can also customize the background color and choose a custom music track played with your intro.
4. Filmora X
The fourth option that you have is to create Marvel’s intro video by using Filmora X. Filmora X is one of the latest and premium video editing software out there. You will develop your intro video manually on Filmora X by following a step-by-step procedure. Now you may think that it is not easy, but it is straightforward. You can include the elements that you want and exclude unwanted elements. Overall you can have an excellent experience by using this software.
Conclusion
Many intro maker programs and websites are available online. The websites are easier to use, and you can create your intros in just a few minutes, but they have some limitations. You cannot do much customization on those templates. However, if you use Filmora X, you have many options and can customize your intro how you want. We recommend you give it a try, and we assure you that you won’t regret your decision.


Richard Bennett
Richard Bennett is a writer and a lover of all things video.
Follow @Richard Bennett
Richard Bennett
Mar 27, 2024• Proven solutions
Are you a fan of Marvel’s Tv series? If yes, you must have watched the intro that Marvel includes at the starting of its every video, and you may be looking for a marvel intro maker for yourself. The intro has some cool sound effects with amazing animations. Different superheroes appear on the screen and then fade away. It also features some scenes from other tv series. Overall it is a power-packed intro that grabs the users’ attention, and it becomes difficult to take your eyes off the screen when this intro is played.
When watching this intro, you may get excited and want to make your intro if you are a true Marvel fan. But you might be thinking that how it is possible to blend so many elements and characters in a single video and make the smooth transitions so that everything seems to be going in a flow. The answer to your question is straightforward. You can either use Marlvel intro makers online to make it or use Filmora to make it according to our tutorial. Either way, we get you covered!
Top 4 Marvel Online Intro Makers:
This article will share the top 4 online marvel intro makers that you can use to create your own intros similar to Marvel’s intro easily. So, let’s get started with our main topic.
1. Introchamp.com
Price: $8.38 for 1080p version/ $6.98 for 720p version
Intro champ is a website that allows you to create video intros in just a few minutes. It is one of the best online intro maker websites out there. If you want to make Marvel’s Intro video, then you can create it using this website. Just click the title to the website, and you will see the screen displayed in the above picture. You will see a search bar on the top right side of your screen. Type “Modern Marvel” in this search bar and hit the enter button. You will see a Marvel intro template that you can use to create your video.
Creating your video is a straightforward process. You need to enter your desired text displayed in two different fields and click on the Save & Preview button. It allows you to try the intro video to have an idea how it will look like. There will be a watermark on the video. If you want to remove that watermark, you need to purchase this template. The 1080p version will cost you around $8.38, and the 780p version will cost around $6.98.
2. Videohive.com
Price: from $10 to $20

The third website that can help you to create online Marvel’s intro videos is Video Hive. It is a website where you can find stock images and stock videos. Just search Marvel Intro in the search bar of the website, and it will display different stock videos that you can use to create intros.
Every stock video has a different price, and you may need to hire a video editor online to create your intro video using this template. It is a bit expensive option, but the results are more convincing at the same time.
3. Tubearsenal.com
Price: $13 for 1080p version/ $9 for 720p version
Tube Arsenal is also one of the best and premium intro makers online. It is effortless to use, and you don’t need to download any software or effects because everything here is online. You also don’t need to have any prior experience because it is easy to use platform.
This website contains thousands of intro video templates that you can customize according to your videos’ needs and use. If you want to create Marvel’s intro video, then all you have to do is search “Marvel Intro” in the search bar and select “Comix Intro Template” from the results.
Click on the customize now button, and it will take you to a page where you will find plenty of customization options. You can add your desired text and choose the color of your text. You can also customize the background color and choose a custom music track played with your intro.
4. Filmora X
The fourth option that you have is to create Marvel’s intro video by using Filmora X. Filmora X is one of the latest and premium video editing software out there. You will develop your intro video manually on Filmora X by following a step-by-step procedure. Now you may think that it is not easy, but it is straightforward. You can include the elements that you want and exclude unwanted elements. Overall you can have an excellent experience by using this software.
Conclusion
Many intro maker programs and websites are available online. The websites are easier to use, and you can create your intros in just a few minutes, but they have some limitations. You cannot do much customization on those templates. However, if you use Filmora X, you have many options and can customize your intro how you want. We recommend you give it a try, and we assure you that you won’t regret your decision.
Richard Bennett
Richard Bennett is a writer and a lover of all things video.
Follow @Richard Bennett
Richard Bennett
Mar 27, 2024• Proven solutions
Are you a fan of Marvel’s Tv series? If yes, you must have watched the intro that Marvel includes at the starting of its every video, and you may be looking for a marvel intro maker for yourself. The intro has some cool sound effects with amazing animations. Different superheroes appear on the screen and then fade away. It also features some scenes from other tv series. Overall it is a power-packed intro that grabs the users’ attention, and it becomes difficult to take your eyes off the screen when this intro is played.
When watching this intro, you may get excited and want to make your intro if you are a true Marvel fan. But you might be thinking that how it is possible to blend so many elements and characters in a single video and make the smooth transitions so that everything seems to be going in a flow. The answer to your question is straightforward. You can either use Marlvel intro makers online to make it or use Filmora to make it according to our tutorial. Either way, we get you covered!
Top 4 Marvel Online Intro Makers:
This article will share the top 4 online marvel intro makers that you can use to create your own intros similar to Marvel’s intro easily. So, let’s get started with our main topic.
1. Introchamp.com
Price: $8.38 for 1080p version/ $6.98 for 720p version
Intro champ is a website that allows you to create video intros in just a few minutes. It is one of the best online intro maker websites out there. If you want to make Marvel’s Intro video, then you can create it using this website. Just click the title to the website, and you will see the screen displayed in the above picture. You will see a search bar on the top right side of your screen. Type “Modern Marvel” in this search bar and hit the enter button. You will see a Marvel intro template that you can use to create your video.
Creating your video is a straightforward process. You need to enter your desired text displayed in two different fields and click on the Save & Preview button. It allows you to try the intro video to have an idea how it will look like. There will be a watermark on the video. If you want to remove that watermark, you need to purchase this template. The 1080p version will cost you around $8.38, and the 780p version will cost around $6.98.
2. Videohive.com
Price: from $10 to $20
The third website that can help you to create online Marvel’s intro videos is Video Hive. It is a website where you can find stock images and stock videos. Just search Marvel Intro in the search bar of the website, and it will display different stock videos that you can use to create intros.
Every stock video has a different price, and you may need to hire a video editor online to create your intro video using this template. It is a bit expensive option, but the results are more convincing at the same time.
3. Tubearsenal.com
Price: $13 for 1080p version/ $9 for 720p version
Tube Arsenal is also one of the best and premium intro makers online. It is effortless to use, and you don’t need to download any software or effects because everything here is online. You also don’t need to have any prior experience because it is easy to use platform.
This website contains thousands of intro video templates that you can customize according to your videos’ needs and use. If you want to create Marvel’s intro video, then all you have to do is search “Marvel Intro” in the search bar and select “Comix Intro Template” from the results.
Click on the customize now button, and it will take you to a page where you will find plenty of customization options. You can add your desired text and choose the color of your text. You can also customize the background color and choose a custom music track played with your intro.
4. Filmora X
The fourth option that you have is to create Marvel’s intro video by using Filmora X. Filmora X is one of the latest and premium video editing software out there. You will develop your intro video manually on Filmora X by following a step-by-step procedure. Now you may think that it is not easy, but it is straightforward. You can include the elements that you want and exclude unwanted elements. Overall you can have an excellent experience by using this software.
Conclusion
Many intro maker programs and websites are available online. The websites are easier to use, and you can create your intros in just a few minutes, but they have some limitations. You cannot do much customization on those templates. However, if you use Filmora X, you have many options and can customize your intro how you want. We recommend you give it a try, and we assure you that you won’t regret your decision.
Richard Bennett
Richard Bennett is a writer and a lover of all things video.
Follow @Richard Bennett
A Guide to Crafting Engaging Videos in Adobe Premiere
How to Edit YouTube Videos in Adobe Premiere
Richard Bennett
Mar 27, 2024• Proven solutions
You just made a few videos, and you want to edit them first before uploading to YouTube. The truth is that you may find the editing part a bit more challenging compared to uploading. However, there are now tools like Adobe Premiere that can help make the editing process easier. Read on and learn how to edit YouTube videos with Adobe Premier so that you can create amazing videos.
Related article:Adobe Premiere User Guide
Adobe Premiere is largely targeted towards professional users, and the best alternative you can use today, whether you are a professional user or just a casual YouTube user, is Wondershare Filmora . This is not only a highly effective video editing program, but it is also user-friendly and very easy to use.
Download Mac Version ](https://tools.techidaily.com/wondershare/filmora/download/ )
Adobe is well known for having some of the leading video production tools in the industry. In fact, most of their tools ranging from the Premier Pro and Photoshop to Audition and many others have been used in many video and movie productions, including some of the popular theatrical releases of our times. Their latest professional video editor, Adobe Premier can be summarized as one of the best editors with versatility, depth, and power for high-quality video editing.
How to edit YouTube Videos with Adobe Premier
Step 1: Import the Video Clips
The first step in how to edit YouTube videos with Adobe Premier is to basically import the video clips you want to edit. This is achieved using a simple process of clicking “import” from the “file” drop-down menu. Once you have finished importing your photos or video files, you can then drag them from the sidebar and into the editing area.

Note
- If the videos you want to import are already published online, you can start the process by first downloading them directly from YouTube first, making sure to save them as MP4 files.
- The best way of importing videos from YouTube is by using an innovative video converter like Wondershare Video Converter Ultimate. This program will help in downloading and converting files to a format that is supported by Adobe Premier.
Step 2: Editing
The next step in how edit YouTube videos with Adobe Premiere is to start modifying the video files or photos the way you want. To achieve this, click on “Effects Control” and apply the desired effects. If you want to insert some text or words into your video, select “title” and then click “new title.” Now choose how you would like the words to behave, for instance, “Default Roll” makes the text roll upwards in the page.
Now drag the text that you have created into the editor area. If you want to edit the text, simply double-click to select it, and it will bring up a separate page where you can make further edits. You can then modify the text, font, and the positioning as well. This page also allows you to set whether the text will crawl or roll.

The final part of the process is to import your chosen audio file. This could be the chosen soundtrack for your presentation. Simply drag the audio file onto your editor. You can then modify how the length of your videos or photos by selecting and dragging the specific photo or video. Finally, press enter and your video will start rendering.
Step 3: Save the Edited File and Upload to YouTube
It is important to note that even as you edit YouTube videos with Adobe Premier, the software does not allow direct uploads to YouTube. This means you will need to save the edited file first on your computer and ensure you use a YouTube supported format. The most effective option is to use the codec, which will then save your file in the MPEG-4 format. This is the preferred format for YouTube and Video uploads.
Richard Bennett
Richard Bennett is a writer and a lover of all things video.
Follow @Richard Bennett
Richard Bennett
Mar 27, 2024• Proven solutions
You just made a few videos, and you want to edit them first before uploading to YouTube. The truth is that you may find the editing part a bit more challenging compared to uploading. However, there are now tools like Adobe Premiere that can help make the editing process easier. Read on and learn how to edit YouTube videos with Adobe Premier so that you can create amazing videos.
Related article:Adobe Premiere User Guide
Adobe Premiere is largely targeted towards professional users, and the best alternative you can use today, whether you are a professional user or just a casual YouTube user, is Wondershare Filmora . This is not only a highly effective video editing program, but it is also user-friendly and very easy to use.
Download Mac Version ](https://tools.techidaily.com/wondershare/filmora/download/ )
Adobe is well known for having some of the leading video production tools in the industry. In fact, most of their tools ranging from the Premier Pro and Photoshop to Audition and many others have been used in many video and movie productions, including some of the popular theatrical releases of our times. Their latest professional video editor, Adobe Premier can be summarized as one of the best editors with versatility, depth, and power for high-quality video editing.
How to edit YouTube Videos with Adobe Premier
Step 1: Import the Video Clips
The first step in how to edit YouTube videos with Adobe Premier is to basically import the video clips you want to edit. This is achieved using a simple process of clicking “import” from the “file” drop-down menu. Once you have finished importing your photos or video files, you can then drag them from the sidebar and into the editing area.
Note
- If the videos you want to import are already published online, you can start the process by first downloading them directly from YouTube first, making sure to save them as MP4 files.
- The best way of importing videos from YouTube is by using an innovative video converter like Wondershare Video Converter Ultimate. This program will help in downloading and converting files to a format that is supported by Adobe Premier.
Step 2: Editing
The next step in how edit YouTube videos with Adobe Premiere is to start modifying the video files or photos the way you want. To achieve this, click on “Effects Control” and apply the desired effects. If you want to insert some text or words into your video, select “title” and then click “new title.” Now choose how you would like the words to behave, for instance, “Default Roll” makes the text roll upwards in the page.
Now drag the text that you have created into the editor area. If you want to edit the text, simply double-click to select it, and it will bring up a separate page where you can make further edits. You can then modify the text, font, and the positioning as well. This page also allows you to set whether the text will crawl or roll.
The final part of the process is to import your chosen audio file. This could be the chosen soundtrack for your presentation. Simply drag the audio file onto your editor. You can then modify how the length of your videos or photos by selecting and dragging the specific photo or video. Finally, press enter and your video will start rendering.
Step 3: Save the Edited File and Upload to YouTube
It is important to note that even as you edit YouTube videos with Adobe Premier, the software does not allow direct uploads to YouTube. This means you will need to save the edited file first on your computer and ensure you use a YouTube supported format. The most effective option is to use the codec, which will then save your file in the MPEG-4 format. This is the preferred format for YouTube and Video uploads.
Richard Bennett
Richard Bennett is a writer and a lover of all things video.
Follow @Richard Bennett
Also read:
- [New] In 2024, Aerial Drone Transformation - Trial with First 20 FREE LUTTs
- [Updated] Key Approaches Converting Visual Content on Pinterest To Audio
- [Updated] The Ken Burns Method in Camtasia 9 Explained Simply for 2024
- Boost Your Downloads with These High-Performance, No-Cost YTD Downloader Substitutes!
- Convert Videos Free of Charge From FLV to MP4 Using Movavi's Online Tool
- Easy Steps to Save Full-HD Videos From Facebook on Your Computer or Laptop
- Free Access to the Best 3D Film Teasers: Download & View Our Curated List of Top 20 Clips!
- Free Movie Repository Apps: Exploring the Ultimate Free Movie Downloader Picks
- Getting Your Vlogging Started Key Items & Software
- How to Access the Freshest Films for Free on iPhone Models XS, XS Max & XR: A Guide with Three Tips
- In 2024, How To Bypass the Required Apple Store Verification For iPhone X
- No Jailbreak Required: 3 Steps to Add Moviebox App to Your iPad
- Overcoming Obstacles with High-Definition 4K Videos on YouTube - Expert Solutions Unveiled!
- Solving Quick-Fix Popcorn Time Loading Errors - Easy Repair Guide
- Solving Your HP Sound Troubles: A Guide to Fixing Audio Drivers for Win 10/8/7 Users
- Ultimate Non-Popular Films Viewing List for 2024
- Understanding ChatGPT's Information Gathering: Potential Plagiarism Issues Explored
- Title: [Updated] Architects Crafting Fantasy Realms for Marvel
- Author: Brian
- Created at : 2024-09-30 20:26:11
- Updated at : 2024-10-06 18:31:58
- Link: https://youtube-video-recordings.techidaily.com/updated-architects-crafting-fantasy-realms-for-marvel/
- License: This work is licensed under CC BY-NC-SA 4.0.