
!["[Updated] A Viewer-Friendly Approach Implementing Commentary and Alerts on YouTube"](https://www.lifewire.com/thmb/GbVFfsw-VqZ6h_An8ml2L5jKFLc=/400x300/filters:no_upscale():max_bytes(150000):strip_icc()/google-meet-loading-3ac4fea9077e459c8637ff545365d673.png)
"[Updated] A Viewer-Friendly Approach Implementing Commentary and Alerts on YouTube"
A Viewer-Friendly Approach: Implementing Commentary and Alerts on YouTube
How to Add YouTube Annotations and Cards?

Richard Bennett
Mar 27, 2024• Proven solutions
Update: YouTube has replaced annotation with end screen. You can find the latest informaiton about YouTube screen and YouTube cards here.
YouTube Cards and Annotations are very useful if you want to encourage your viewrs to take an action, like Subscribe, go to another video or associated website, etc. Today, we’re going to show you the differences between cards and annotations, and how to add them in YouTube videos.
Do you want to make your YouTube video more attractive? Wondershare Filmora is a such video editing software designed for YouTube creator. It not only allows you cut, trim, crop, zoom, reverse, rotate the video clips, but also makes the advanced features like green screen, PIP, tilt-shift and mosaic easy like a piece of cake. With Wondershare Filmora, you can ignite your YouTube videos with over 300 effects like Fashion, Beauty, Block Buster, Travel, etc.
 Download Mac Version ](https://tools.techidaily.com/wondershare/filmora/download/ )
The main difference between annotation and cards is their outlook. Cards are more graphical whereas annotations are text based. The cards slide in once you click the small “i” button on the video where as the annotation is there based on the timings set by the user. Moreover the main differences between the two are:
1. YouTube Cards are small and unobtrusive, unless a viewer chooses to click on them, which is why they are the better option when you are trying to get views on other videos. Irritating a few people with a big annotation might be worth it if you also draw other people’s attention to your cause or website, but it is not a good way to endear yourself to people you are trying to get views and subscriptions from. When a card is clicked a thumbnail will appear with a link to your additional content. YouTube Cards are often better than annotations for adding links to your videos because they look much tidier. Also, unlike annotations, cards will be visible to people watching your videos on their mobile devices.
2. You cannot use Cards just to insert notes into your videos, though, and you cannot adjust their size like you can with annotations. So, if you do need a link to be large and extremely noticeable, annotations might still be your best option. Cards and annotations can even be used in combination sometimes.
How to add YouTube Cards
YouTube Cards are similar to annotations but more interactive. They allow the owner of the video to add images and other links. A small box appears, clicking on which will activate the cards.
- Click on the “Video Manager” tab

- Click “Edit” tab under the video screen shot you want to add the card on
- Click on the “Cards” tab

- On the right panel click on “Add Card” drop down menu and select the type of card you want to add
- Click on the create button which will open the corresponding video
- Once you finish the subsequent information required click create card
- Select the timeline for the playhead to appear which leads to the card slide

- Apply changes and exit
How to add YouTube annotations
YouTube Annotation is addition of a text layer, link or hotspots over your video. They add interactive boxes which link to other websites or videos (any link you want).
- Click on the video manager tab
- Click edit tab under the video screen shot you want to add the annotation on
- Click on the “End screen & Annotation” tab

- On the right panel click on “+ Add Element” and select the kind of annotation you want to add
- Adjust the position of Annotation, you can drag the rectangle to locate it at any position of the video, move the slide to set the start and end time of the annotation

- Apply changes
The types of YouTube annotations:
1. Speech Bubbles
Speech Bubbles: look like the dialogue box in a comic strip. There is a tail which you can adjust so it looks like one of the people in your video is saying what is written in the annotation. Speech bubbles are great for adding in funny comments.
2. Notes
Notes: come in a limited selection of colors and can be adjusted to take up a maximum of 30% of your player screen. Sometimes you need a huge annotation to get an important point across, but using huge note annotations too often – especially near the beginnings of your videos – will annoy viewers. If you need a large note annotation make sure to place it later in your video, when a viewer will already be invested in what they are watching and less likely to click away.
3. Titles
Titles: are large pieces of text that go either at the beginning of your video or in-between different topics within your video. YouTube’s titles are not very nice to look at, but they are a decent option if you do not have access to video editing software.
4. Spotlights
Spotlights: have a subtle border and are completely clear inside. Your text only appears when a user hovers over the spotlight. Spotlights are great for turning elements within your video into links.
5. Labels
Labels: are completely transparent, like spotlights, but the user does not have to hover over them for your text to be visible.
6. Pauses
Pauses: are no longer available to add to your videos, although Pause Annotations added before they were removed still work. Pause Annotations used to stop your video for a set period of time when your annotation appeared.
If somebody watches your video and gets to the end then that means they enjoyed it and will probably be open to checking out more of your content. Rather than hoping that your other videos show up in the ‘Suggested Videos’ YouTube will show after yours has finished playing you should always include an outro, or ending card, after your video to recommend your own work. Annotations are used in a lot of successful YouTuber’s ending cards.
One form this takes is small Note annotations in the bottom corners of the screen, one linking to your previous video and one to the next. Sometimes your viewers might not necessarily get the most enjoyment out of your videos by watching them in order, though. Sometimes you want to link viewers to the videos that are most related to the one they just watched.
The best outros also include a subscribe button, which can be created using annotations. These annotations work best when combined with a verbal call to action. Make sure your outro lasts long enough for people to make the decision to subscribe or click another video.
No matter what kind of annotations you are using, you should never use more than two of them at a time anywhere except for your outro. You should also never place annotations at the very top of your screen, or in the middle at the bottom. If your video is embedding on a separate website then the player will cover annotations at the top of the screen, and ads might cover annotations placed in the bottom-middle of the screen. Keep in mind when using annotations that they will not be visible to users watching your videos on mobile devices. If mobile traffic is very important to you then consider using YouTube Cards.
Richard Bennett
Richard Bennett is a writer and a lover of all things video.
Follow @Richard Bennett
Richard Bennett
Mar 27, 2024• Proven solutions
Update: YouTube has replaced annotation with end screen. You can find the latest informaiton about YouTube screen and YouTube cards here.
YouTube Cards and Annotations are very useful if you want to encourage your viewrs to take an action, like Subscribe, go to another video or associated website, etc. Today, we’re going to show you the differences between cards and annotations, and how to add them in YouTube videos.
Do you want to make your YouTube video more attractive? Wondershare Filmora is a such video editing software designed for YouTube creator. It not only allows you cut, trim, crop, zoom, reverse, rotate the video clips, but also makes the advanced features like green screen, PIP, tilt-shift and mosaic easy like a piece of cake. With Wondershare Filmora, you can ignite your YouTube videos with over 300 effects like Fashion, Beauty, Block Buster, Travel, etc.
Download Mac Version ](https://tools.techidaily.com/wondershare/filmora/download/ )
The main difference between annotation and cards is their outlook. Cards are more graphical whereas annotations are text based. The cards slide in once you click the small “i” button on the video where as the annotation is there based on the timings set by the user. Moreover the main differences between the two are:
1. YouTube Cards are small and unobtrusive, unless a viewer chooses to click on them, which is why they are the better option when you are trying to get views on other videos. Irritating a few people with a big annotation might be worth it if you also draw other people’s attention to your cause or website, but it is not a good way to endear yourself to people you are trying to get views and subscriptions from. When a card is clicked a thumbnail will appear with a link to your additional content. YouTube Cards are often better than annotations for adding links to your videos because they look much tidier. Also, unlike annotations, cards will be visible to people watching your videos on their mobile devices.
2. You cannot use Cards just to insert notes into your videos, though, and you cannot adjust their size like you can with annotations. So, if you do need a link to be large and extremely noticeable, annotations might still be your best option. Cards and annotations can even be used in combination sometimes.
How to add YouTube Cards
YouTube Cards are similar to annotations but more interactive. They allow the owner of the video to add images and other links. A small box appears, clicking on which will activate the cards.
- Click on the “Video Manager” tab
- Click “Edit” tab under the video screen shot you want to add the card on
- Click on the “Cards” tab
- On the right panel click on “Add Card” drop down menu and select the type of card you want to add
- Click on the create button which will open the corresponding video
- Once you finish the subsequent information required click create card
- Select the timeline for the playhead to appear which leads to the card slide
- Apply changes and exit
How to add YouTube annotations
YouTube Annotation is addition of a text layer, link or hotspots over your video. They add interactive boxes which link to other websites or videos (any link you want).
- Click on the video manager tab
- Click edit tab under the video screen shot you want to add the annotation on
- Click on the “End screen & Annotation” tab
- On the right panel click on “+ Add Element” and select the kind of annotation you want to add
- Adjust the position of Annotation, you can drag the rectangle to locate it at any position of the video, move the slide to set the start and end time of the annotation
- Apply changes
The types of YouTube annotations:
1. Speech Bubbles
Speech Bubbles: look like the dialogue box in a comic strip. There is a tail which you can adjust so it looks like one of the people in your video is saying what is written in the annotation. Speech bubbles are great for adding in funny comments.
2. Notes
Notes: come in a limited selection of colors and can be adjusted to take up a maximum of 30% of your player screen. Sometimes you need a huge annotation to get an important point across, but using huge note annotations too often – especially near the beginnings of your videos – will annoy viewers. If you need a large note annotation make sure to place it later in your video, when a viewer will already be invested in what they are watching and less likely to click away.
3. Titles
Titles: are large pieces of text that go either at the beginning of your video or in-between different topics within your video. YouTube’s titles are not very nice to look at, but they are a decent option if you do not have access to video editing software.
4. Spotlights
Spotlights: have a subtle border and are completely clear inside. Your text only appears when a user hovers over the spotlight. Spotlights are great for turning elements within your video into links.
5. Labels
Labels: are completely transparent, like spotlights, but the user does not have to hover over them for your text to be visible.
6. Pauses
Pauses: are no longer available to add to your videos, although Pause Annotations added before they were removed still work. Pause Annotations used to stop your video for a set period of time when your annotation appeared.
If somebody watches your video and gets to the end then that means they enjoyed it and will probably be open to checking out more of your content. Rather than hoping that your other videos show up in the ‘Suggested Videos’ YouTube will show after yours has finished playing you should always include an outro, or ending card, after your video to recommend your own work. Annotations are used in a lot of successful YouTuber’s ending cards.
One form this takes is small Note annotations in the bottom corners of the screen, one linking to your previous video and one to the next. Sometimes your viewers might not necessarily get the most enjoyment out of your videos by watching them in order, though. Sometimes you want to link viewers to the videos that are most related to the one they just watched.
The best outros also include a subscribe button, which can be created using annotations. These annotations work best when combined with a verbal call to action. Make sure your outro lasts long enough for people to make the decision to subscribe or click another video.
No matter what kind of annotations you are using, you should never use more than two of them at a time anywhere except for your outro. You should also never place annotations at the very top of your screen, or in the middle at the bottom. If your video is embedding on a separate website then the player will cover annotations at the top of the screen, and ads might cover annotations placed in the bottom-middle of the screen. Keep in mind when using annotations that they will not be visible to users watching your videos on mobile devices. If mobile traffic is very important to you then consider using YouTube Cards.
Richard Bennett
Richard Bennett is a writer and a lover of all things video.
Follow @Richard Bennett
Transform Your Short-Form Video Content - Top Strategies Revealed
10 Expert Suggestions to Make Your YT Shorts Stand Out

Shanoon Cox
Oct 26, 2023• Proven solutions
To make it easier for its audience to find crisp and entertaining content, YouTube has recently come up with a dedicated “Shorts” feature.
Ideally, any YouTube user can find the Shorts option on the app to watch interesting videos of 60 seconds or less. Though, it might take a lot of effort to make your YouTube Shorts videos appealing.
If you also want to go viral, then get to know about these YouTube Shorts tips that every content creator should follow.
YouTube Shorts Feature and Shorts Fund: Things to Know
Before we make you familiar with all kinds of YouTube Shorts tips and tricks, let’s cover some basics. Ideally, YouTube has recently come up with the Shorts feature to focus on short-length videos (and to rival Instagram Reels and TikTok).
You can now find the Shorts icon at the bottom panel on the YouTube app. Using it, you can watch or record short videos on YouTube easily. These are short-form clips of 60 seconds or less that you can create via the Shorts interface of the YouTube app.
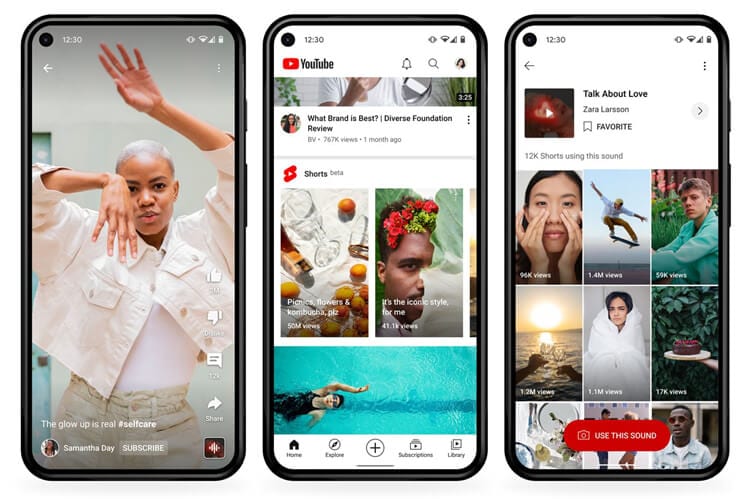
The interface would let you record multiple videos at different intervals and add sound to your clips as well. Later, you can post these short clips on your channel to get more views on YouTube.
YouTube Shorts Fund
YouTube Shorts already hosts a massive number of more than 6 billion daily views as of now. To promote it, Google has come up with a YouTube Shorts Fund of $100M that would be rewarded to various content creators each month.
That is, a “Shorts Bonus” would be added to the account of content creators to appreciate their viral content.
Top 10 Tips for YouTube Shorts That You Must Follow
Now when we have covered all the basics, let’s get to know about some effective YouTube Shorts tricks that would help you come up with interesting content and get more audience for it.
Tip 1: Learn How to Shoot YouTube Shorts
Before you start posting videos on YouTube Shorts, you should know how the feature works. Ideally, you can find a dedicated option for Shorts from the bottom panel on the updated YouTube app. From here, you can watch Shorts or simply choose to create them as well.
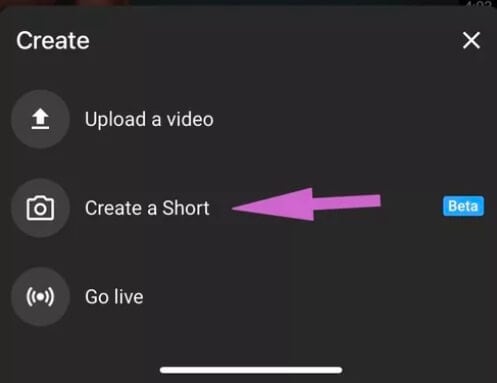
You can give YouTube access to your smartphone camera before you start recording. To record anything, you can just tap and hold the red button (the recording icon) on the interface.
As you would release it, the recording would be stopped. In this way, you can seamlessly move from one scene to another without worrying about editing in post-production.
Tip 2: Stick to a Selective Niche
To have a consistent growth of audience on YouTube shorts, you should stick to a specific niche. If you search on YouTube, you can find short videos related to funny, inspirational, fitness, romantic, and all kinds of niches.
Most of the prominent content creators already apply these YouTube Shorts tips in which they first identify their target audience. Based on that, you can work on the type of content that you want to create and share to attain consistent growth on YouTube.
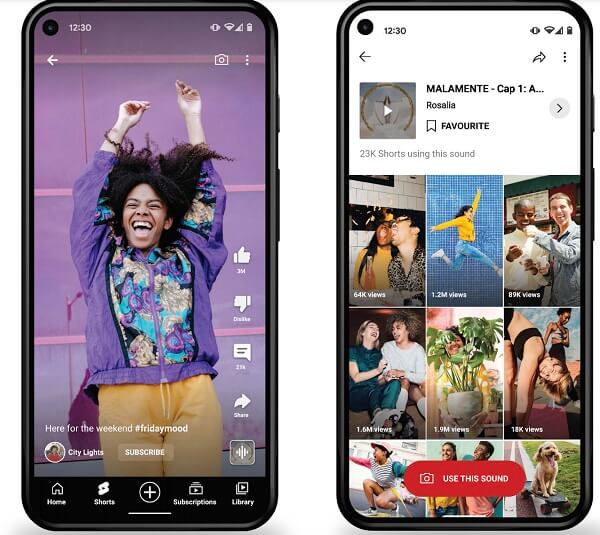
Tip 3: Add Appropriate Background Music to Your Short Videos
One of the best things about YouTube Shorts is that it lets us add a snippet of the music in the background, according to our content. Therefore, you must implement these tips for YouTube Shorts to make the most of this free feature of the app.
After recording your videos, you can tap on the “Sound” or the “Add Music” feature from the interface.
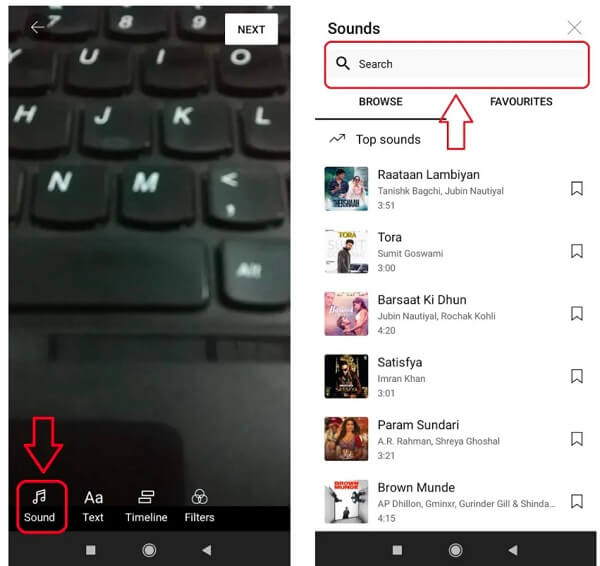
Now, YouTube will automatically load all kinds of trending music that you can use for free. If you want, you can enter the name of any song on the search option of YouTube shorts.
As you would select a track, it will automatically be loaded as the background music for your video. Though, you can also select a specific segment of the track and clip it accordingly to place it on your videos the way you like.
Tip 4: Insert Captions and Text Effects on Your Shorts
Apart from music, you can also add all kinds of text effects to make your YouTube Shorts videos appealing. After you have recorded a video, you can just tap on the text option from the bottom/side panel of the app.
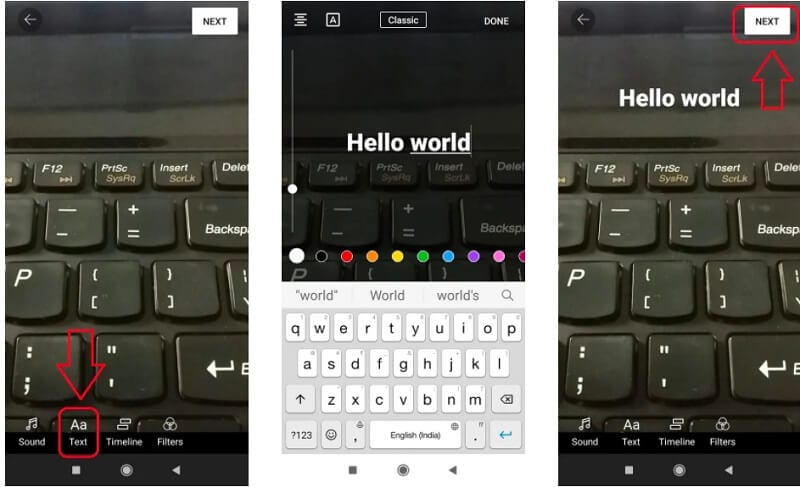
You can now type anything and place it on the video to make it more interesting. If you want, you can also implement these YouTube Shorts tips to add subtitles or pre/post video captions without any hassle.
Tip 5: Adjust the Playback Speed of YouTube Shorts
Since a lot of content creators are coming up with YouTube Shorts, you would have to walk an extra mile to make them more appealing. In these YouTube Shorts tricks, I would recommend adjusting the playback speed of the video.
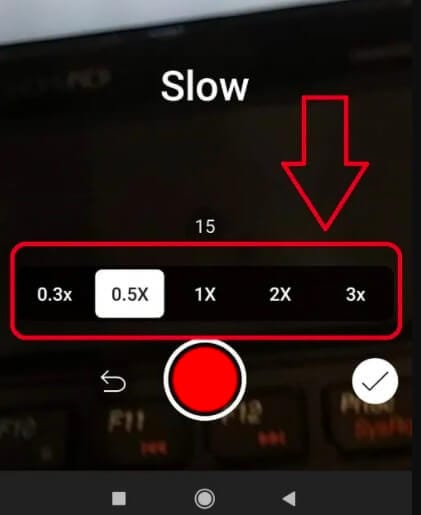
After recording the video, you can tap on the speed icon from the bottom/side panel. Here, you can make your videos play in slow motion or fast forward (in a range of 0.3x to 3x). This will add seamless speed control features to your videos without any technical issues.
Tip 6: Consider the Overall Length of Your Shorts Video
Even though the maximum length of the YouTube Shorts videos is 60 seconds, you don’t have to make it so long. If you look at most of the popular videos on YouTube Shorts, then you will find that they are of less than 30 seconds in length.
Remember, your goal is to come up with crisp and interesting content via YouTube Shorts. To implement these YouTube Shorts tips, you can consider the ideal length of 30-45 seconds and only have essential content in your videos.
Tip 7: Use the Timer Feature to Shoot Your Videos Correctly
A lot of people make the rookie mistake of shooting their videos for too long in Shorts. Therefore, if you want to implement these YouTube Shorts tips and tricks, then consider using the timer feature of the app.

Before shooting the video, you can tap on the timer button from the bottom and set up a preferred duration for it (like 10 or 15 seconds). In this way, you can be sure that you won’t go overboard and keep your videos short automatically.
Tip 8: Set a Preferred Target Audience for YouTube Shorts
Great! Now when you have recorded and edited your video by applying these tips for YouTube Shorts, you are ready to post them. While posting your videos, you would be asked whether the video is targeted at kids or not. If the video is made for kids, then you should select the relevant prompt, as YouTube would improve the overall visibility of your videos in this case.
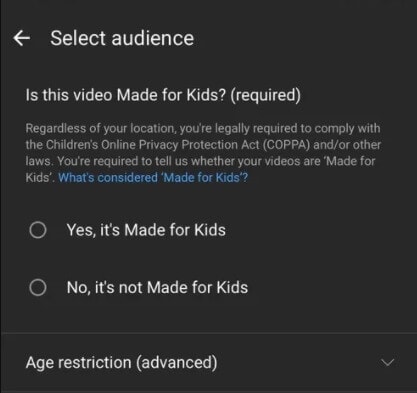
Though, if your videos are targeted at adults, then you should go with the second option instead. This would help you reach out to your target audience on YouTube easily.
Tip 9: Post Your YouTube Shorts the Right Way
Apart from setting the audience preferences of your YouTube Shorts videos, you should also take care of a couple of other things. For instance, you can consider making the visibility of your final video “Public” so that anyone on YouTube can watch it.
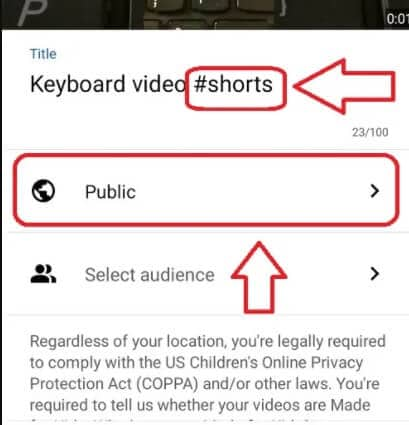
Besides that, it is also recommended to have the keyword “#Shorts” in the title of the video. You can also make the title of the video attractive and can even add a short description that would make your audience click on your YouTube video for sure.
Tip 10: Promote Your YouTube Shorts Video on Other Places
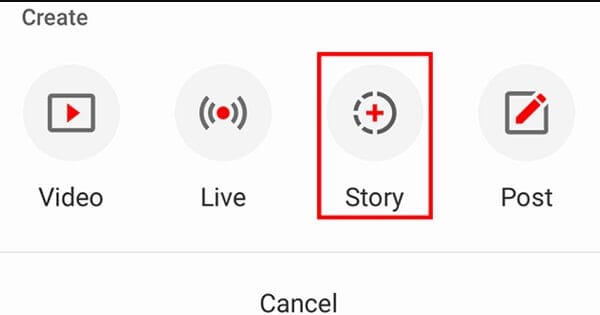
Lastly, posting the YouTube Shorts video is not enough, as you should also promote it to get more views. One of the best YouTube Shorts tips for promotion would be posting the snippet of the video as your Stories on YouTube.
You can also post your YouTube Shorts on other popular social media platforms like Facebook, Twitter, Reddit, WhatsApp, Instagram, etc. by sharing their link. In this way, you can easily redirect your audience from other platforms and increase the visibility of your video.
Bonus Tip: Use a Professional Editor for Your YouTube Shorts Videos
As you can see after going through these YouTube Shorts tricks that the native tool of the app has limited editing options. Therefore, if you want to come up with better videos, then consider using a professional tool like Wondershare Filmora.

The desktop video editing tool has hundreds of filters, transitions, captions, stickers, and other effects to elevate the overall visual appeal of your videos. You can also access numerous AI-integrated features in Filmora and can directly export your videos in YouTube-compatible formats.
Conclusion
That’s a wrap, everyone! I’m sure that after following these expert YouTube Shorts tips and tricks, you can make the most of this newly added YouTube feature. You can consider following the above-listed YouTube Shorts tips to record your videos and make them interesting by adding sound and caption effects.
Though, if you want to make your videos even more appealing, then consider using a reliable and smart video editor like Wondershare Filmora.
Shanoon Cox
Shanoon Cox is a writer and a lover of all things video.
Follow @Shanoon Cox
Shanoon Cox
Oct 26, 2023• Proven solutions
To make it easier for its audience to find crisp and entertaining content, YouTube has recently come up with a dedicated “Shorts” feature.
Ideally, any YouTube user can find the Shorts option on the app to watch interesting videos of 60 seconds or less. Though, it might take a lot of effort to make your YouTube Shorts videos appealing.
If you also want to go viral, then get to know about these YouTube Shorts tips that every content creator should follow.
YouTube Shorts Feature and Shorts Fund: Things to Know
Before we make you familiar with all kinds of YouTube Shorts tips and tricks, let’s cover some basics. Ideally, YouTube has recently come up with the Shorts feature to focus on short-length videos (and to rival Instagram Reels and TikTok).
You can now find the Shorts icon at the bottom panel on the YouTube app. Using it, you can watch or record short videos on YouTube easily. These are short-form clips of 60 seconds or less that you can create via the Shorts interface of the YouTube app.
The interface would let you record multiple videos at different intervals and add sound to your clips as well. Later, you can post these short clips on your channel to get more views on YouTube.
YouTube Shorts Fund
YouTube Shorts already hosts a massive number of more than 6 billion daily views as of now. To promote it, Google has come up with a YouTube Shorts Fund of $100M that would be rewarded to various content creators each month.
That is, a “Shorts Bonus” would be added to the account of content creators to appreciate their viral content.
Top 10 Tips for YouTube Shorts That You Must Follow
Now when we have covered all the basics, let’s get to know about some effective YouTube Shorts tricks that would help you come up with interesting content and get more audience for it.
Tip 1: Learn How to Shoot YouTube Shorts
Before you start posting videos on YouTube Shorts, you should know how the feature works. Ideally, you can find a dedicated option for Shorts from the bottom panel on the updated YouTube app. From here, you can watch Shorts or simply choose to create them as well.
You can give YouTube access to your smartphone camera before you start recording. To record anything, you can just tap and hold the red button (the recording icon) on the interface.
As you would release it, the recording would be stopped. In this way, you can seamlessly move from one scene to another without worrying about editing in post-production.
Tip 2: Stick to a Selective Niche
To have a consistent growth of audience on YouTube shorts, you should stick to a specific niche. If you search on YouTube, you can find short videos related to funny, inspirational, fitness, romantic, and all kinds of niches.
Most of the prominent content creators already apply these YouTube Shorts tips in which they first identify their target audience. Based on that, you can work on the type of content that you want to create and share to attain consistent growth on YouTube.
Tip 3: Add Appropriate Background Music to Your Short Videos
One of the best things about YouTube Shorts is that it lets us add a snippet of the music in the background, according to our content. Therefore, you must implement these tips for YouTube Shorts to make the most of this free feature of the app.
After recording your videos, you can tap on the “Sound” or the “Add Music” feature from the interface.
Now, YouTube will automatically load all kinds of trending music that you can use for free. If you want, you can enter the name of any song on the search option of YouTube shorts.
As you would select a track, it will automatically be loaded as the background music for your video. Though, you can also select a specific segment of the track and clip it accordingly to place it on your videos the way you like.
Tip 4: Insert Captions and Text Effects on Your Shorts
Apart from music, you can also add all kinds of text effects to make your YouTube Shorts videos appealing. After you have recorded a video, you can just tap on the text option from the bottom/side panel of the app.
You can now type anything and place it on the video to make it more interesting. If you want, you can also implement these YouTube Shorts tips to add subtitles or pre/post video captions without any hassle.
Tip 5: Adjust the Playback Speed of YouTube Shorts
Since a lot of content creators are coming up with YouTube Shorts, you would have to walk an extra mile to make them more appealing. In these YouTube Shorts tricks, I would recommend adjusting the playback speed of the video.
After recording the video, you can tap on the speed icon from the bottom/side panel. Here, you can make your videos play in slow motion or fast forward (in a range of 0.3x to 3x). This will add seamless speed control features to your videos without any technical issues.
Tip 6: Consider the Overall Length of Your Shorts Video
Even though the maximum length of the YouTube Shorts videos is 60 seconds, you don’t have to make it so long. If you look at most of the popular videos on YouTube Shorts, then you will find that they are of less than 30 seconds in length.
Remember, your goal is to come up with crisp and interesting content via YouTube Shorts. To implement these YouTube Shorts tips, you can consider the ideal length of 30-45 seconds and only have essential content in your videos.
Tip 7: Use the Timer Feature to Shoot Your Videos Correctly
A lot of people make the rookie mistake of shooting their videos for too long in Shorts. Therefore, if you want to implement these YouTube Shorts tips and tricks, then consider using the timer feature of the app.
Before shooting the video, you can tap on the timer button from the bottom and set up a preferred duration for it (like 10 or 15 seconds). In this way, you can be sure that you won’t go overboard and keep your videos short automatically.
Tip 8: Set a Preferred Target Audience for YouTube Shorts
Great! Now when you have recorded and edited your video by applying these tips for YouTube Shorts, you are ready to post them. While posting your videos, you would be asked whether the video is targeted at kids or not. If the video is made for kids, then you should select the relevant prompt, as YouTube would improve the overall visibility of your videos in this case.
Though, if your videos are targeted at adults, then you should go with the second option instead. This would help you reach out to your target audience on YouTube easily.
Tip 9: Post Your YouTube Shorts the Right Way
Apart from setting the audience preferences of your YouTube Shorts videos, you should also take care of a couple of other things. For instance, you can consider making the visibility of your final video “Public” so that anyone on YouTube can watch it.
Besides that, it is also recommended to have the keyword “#Shorts” in the title of the video. You can also make the title of the video attractive and can even add a short description that would make your audience click on your YouTube video for sure.
Tip 10: Promote Your YouTube Shorts Video on Other Places
Lastly, posting the YouTube Shorts video is not enough, as you should also promote it to get more views. One of the best YouTube Shorts tips for promotion would be posting the snippet of the video as your Stories on YouTube.
You can also post your YouTube Shorts on other popular social media platforms like Facebook, Twitter, Reddit, WhatsApp, Instagram, etc. by sharing their link. In this way, you can easily redirect your audience from other platforms and increase the visibility of your video.
Bonus Tip: Use a Professional Editor for Your YouTube Shorts Videos
As you can see after going through these YouTube Shorts tricks that the native tool of the app has limited editing options. Therefore, if you want to come up with better videos, then consider using a professional tool like Wondershare Filmora.
The desktop video editing tool has hundreds of filters, transitions, captions, stickers, and other effects to elevate the overall visual appeal of your videos. You can also access numerous AI-integrated features in Filmora and can directly export your videos in YouTube-compatible formats.
Conclusion
That’s a wrap, everyone! I’m sure that after following these expert YouTube Shorts tips and tricks, you can make the most of this newly added YouTube feature. You can consider following the above-listed YouTube Shorts tips to record your videos and make them interesting by adding sound and caption effects.
Though, if you want to make your videos even more appealing, then consider using a reliable and smart video editor like Wondershare Filmora.
Shanoon Cox
Shanoon Cox is a writer and a lover of all things video.
Follow @Shanoon Cox
Also read:
- Free Online Services for YouTube Subtitles Download
- 2024 Approved Editing Engine Room
- [New] Elevate Your Content In-Depth Guide to YouTube Video Edits
- Tailor Your Subscribe Bar A Quick Filmora Method for YouTube Authentics
- [Updated] Discovering Clarity in Your Craft Our Choice of Top 12 Vlogging Cameras
- Tailored Free Offer - Unlock Our Exclusive YouTube Banner Pack
- [Updated] Discover the Best in Class Our List of 12 High-Performing Flip Cameras
- How To Deal with YouTube Trolls and Negative Comments
- [New] Efficient Content Curation Steps Towards a Well-Organized 'Watch Later' Playlist
- [New] Building a Successful YouTube Channel Sidestep These 8 Frequent Faux Pas
- [Updated] Critical ASMR Series to Experience
- 2024 Approved Dive Into the World of Dynamic and Entertaining Video Shopping Content
- Evolving Channels 8 Fastest Video Climbers
- In 2024, Authenticating Your YouTube Username & Email
- [New] YouTube Alternatives 3 Best Video Sharing Sites
- Unlock YouTube Potential with TubeBuddy Strategies
- A Guide to Upload Twitch Streams to YouTube for 2024
- 2024 Approved Best Free YouTube Video Editing Apps for iPhone & iPad
- The Essentials of Efficient Video Tagging Methods
- [New] Elevating Your Content's Reach Without Breaching Laws
- Enhancing YouTube Beauty Mastering Video Color Dynamics for 2024
- Streaming Sound Excellence 5 Top Headsets
- [Updated] Continuous Streams Perfect Loops of YouTube Videos for TVs
- Charting the Course to YouTube Livestream Mastery for 2024
- In 2024, Duality of Delivery Engaging Audiences Through Alternative Perspectives for Reaction Videos
- Enhancing Beauty on Streams via Color Grading for 2024
- Seamless Playback Tips & Tricks for Infinite Youtube Views
- Navigating the Platform Apple Devices and YouTube Uploads
- Earning Edge Reached for Subscribers Above 500
- [Updated] Bend the Light Homegrown Animated Innovations
- Strategies for Designing YouTube Video Flow
- Earning Potential Steps to Join the YouTube Premium Club for 2024
- [Updated] Constructing Compelling Channel Overviews
- In 2024, Download YouTube Beats on Android The Ultimate 6-App Guide
- [Updated] In 2024, CameraSection Breakdown Analysis
- 2024 Approved Audio Innovations 8 Cutting-Edge Cartoon Soundtracks Now Available for Download
- [Updated] Scaling Up on IGTV Through Powerful Hash Tagging for 2024
- [Updated] Unlocking Revenue Potential in Facebook's Animated Ads
- Disabling iPhone 13 mini Parental Restrictions With/Without Password
- How to jailbreak iCloud locked Apple iPhone 6s Plus
- No-Cost 4K Video Conversion Top Picks for 2024
- [Updated] The Ultimate Explanimation What PFP Means on TikTok?
- [New] Banishing Vibration Effects in UAV Videos
- Leading Speech Gatherers in Educational Environments for 2024
- [New] 2024 Approved Top 10 Screenshot & Recording Apps for MacOS
- In 2024, How To Unlock a Samsung Galaxy S23 Easily?
- Perfect Palette Playbook Mastering the Art of Grading
- [New] Pro Tips for Capturing Stunning IGTV Content on Mobile & DSLR
- Updated The Best Text-to-Audio Converters of All Times
- In 2024, How to Reset a Oppo A38 Phone that is Locked?
- Title: "[Updated] A Viewer-Friendly Approach Implementing Commentary and Alerts on YouTube"
- Author: Brian
- Created at : 2024-05-25 13:08:40
- Updated at : 2024-05-26 13:08:40
- Link: https://youtube-video-recordings.techidaily.com/updated-a-viewer-friendly-approach-implementing-commentary-and-alerts-on-youtube/
- License: This work is licensed under CC BY-NC-SA 4.0.
