
:max_bytes(150000):strip_icc()/2do-app-57caef685f9b5829f4001c4f.jpg)
"Unlisting YouTube Videos A Guide to Non-Indexable Content"
Unlisting YouTube Videos: A Guide to Non-Indexable Content
Complete Guide: What Does Unlisted Mean on YouTube

Richard Bennett
Mar 27, 2024• Proven solutions
Whether personal or professional purposes, YouTube is a great platform for sharing videos but, there are times, when you don’t wish to share it with each and everyone across the globe. The YouTube unlisted meaning is a video which can be viewed only by the users having the link to it. At the back of your mind, you may be wondering how safe an unlisted video is. Let’s learn in detail what does unlisted mean on YouTube.
- Part 1: What is Unlisted Video on YouTube
- Part 2: How to Make YouTube Videos Unlisted
- Part 3: How to Share Unlisted Video
Wondershare Filmora video editor is one of the most widely used video editing software for YouTubers, it makes the video editing simplified with the pre-programmed effects and templates. You can download the free trial version to check.


Part 1: What Does Unlisted Video Mean on YouTube
The YouTube unlisted meaning is that your video will neither come up in the search results nor on your channel. Only the users who have the link to the video can view it. The link can be shared with anyone and everyone, even with the users who do not have a YouTube account. Many people don’t know the difference between private and unlisted YouTube videos . In order to understand what does unlisted mean on YouTube in a detailed way, let’s dive deeper into it and know the difference between public videos, unlisted videos, and private videos.
1. What is Unlisted YouTube Video
Between private and public, you can find the unlisted videos. What does unlisted mean on YouTube? An unlisted video does not appear in the search results, suggestions or video tab. If you unlist a new video, your subscribers won’t receive any notification informing about it. You can share an unlisted video with the people you wish to share and the users having a link to the video can see it. It can also be viewed by the friend of friends if they share the link with their friends.
The unlisted videos are treated like public videos by YouTube. This means that you cannot use the copyright audio or video and it will be reviewed by the YouTube team if other users flag it as inappropriate content within a timeframe of 24-hours .
What Unlisted YouTube Videos Can Do
The unlisted videos can be shared with family and friends. If you are conducting a webinar and wish to share the video with only the registered users, an unlisted video can be used. You may also use the unlisted video for giving access to the people who embedded it while cleaning the YouTube page. For getting feedback from closed groups for market research or to share online resume link for job applications, the unlisted videos can be of great help.
Takeaway: Unlisted videos are a great way to share personal videos with just your family and friends, or to get feedback from people you trust on videos before you decide whether to make them public.
2. What is Private YouTube Video
The videos that do not appear in the recommendations, search options in YouTube or in your tab are the private videos. When you select the private setting for a video, the subscribers don’t get a notification. The private videos can be seen only by the uploader and the mentioned Google accounts. It is not available for friends of friends which mean if you share a private video with a friend, only that person can see it. If your friend shares it with someone, it won’t be visible to others. If anyone wishes to view a private video, the person has to request permission to view to the uploader.

What Private Youtube Videos Can Do
By using private YouTube videos, the internal company information can be kept confidential, the family videos can be shared safely with the people you wish to, and also store your personal data without worrying about being hacked by the strangers. By choosing the private setting, you may upload and schedule the date and time when a video can be made public on YouTube. It helps in saving storage space on your phone.
Takeaway: A private YouTube video is only available to YouTube users that you invite to view it.
3. What are Public Youtube Videos
The Public setting in the YouTube video is a default setting which allows everyone to see the video you post. When you want your video to appear in the search engine results and want more and more viewers and traffic on your video, you can keep the Public default setting on.
What Public YouTube Videos Can Do
Do you wish to grow your brand awareness? Select the Public default setting as it is the best way to do it. You may use the Public setting in any of these situations below:
- Having a video sharing business like explainer videos, product reviews, commercials, etc. with customers or prospective viewers
- Targeting at earning money through YouTube videos
- Looking forward to the growing personal brand by a YouTuber
- Looking for more and more subscribers on YouTube
But, you must remember that once you post the video, it will be available for everyone throughout the world on YouTube. Even if you decide to change the settings or delete the video, later on, you will be subjected to judgment, professionally and personally. While posting a video with Public setting, you must have an answer to questions like-
- Shall the senior or your boss see this video?
- Can your job prospect hamper with this video?
- Does the video contain harassing or offensive content?
- Can your friends ridicule you after seeing the video content?
If all the questions are answered in YES… then it is better to think hard and long before uploading the video content with Public setting on YouTube. You may upload the content with unlisted or private settings.
Takeaway: If you make a video public, anyone will be able to find and watch it. When uploading a video using default settings through YouTube, it will always default to being a public video.
Below is a brief comparison table about the differences among YouTube Unlisted, Private and Public video settings.
| Feature | Unlisted | Private | Public |
|---|---|---|---|
| Can I share video URL to friends? | Yes | No | Yes |
| Can I add video to YouTube channel? | Yes | No | Yes |
| Can I shows up video in YouTube platform? | No | No | Yes |
| Can I post video on my channel? | No | No | Yes |
| Can I leave a comment? | Yes | No | Yes |
| Can I see it in landing page? | Yes | No | Yes |
| Do People need an account to watch it? | No | No | Yes |
Part 2: How to Make an Unlisted YouTube Video
Follow the below-mentioned steps to make an unlisted YouTube video -
- Log in to your YouTube channel
- In the top right corner, click the add video button
- Find the drop-down menu and choose Upload Video
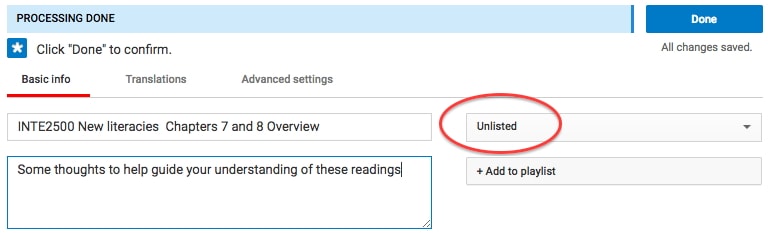
- Select the setting by clicking on Public and a drop-down menu appears to unlisted
- Search the instruction select files to upload your video
- When you start uploading your video, a message box appears, Click Public on the right side corner and select unlisted from the drop-down menu
- Once you have selected unlisted, click Done in the top right corner and your video is published
Part 3: How to Share Your Unlisted Video
If you wish to share the unlisted video , just share the published video link with anyone you wish to share. A Google account is not required to see the video. So, if the person you shared the link with is not logged in to his Google account, still the video can be viewed. The people who have the link to your video can also share and re-share the link in a number of ways. It can be shared on the social media or just forwarded amongst their friends. But, if you don’t want your friends to re-share it, change the settings to Private.
You can see a message showing “this video is unlisted” on YouTube when you want to share someone else’s unlisted video on social platforms. Think before you consider sharing an unlisted video.
Conclusion
Now, that you clearly know what does unlisted mean on YouTube, consider the option while uploading a video. It helps in retaining the privacy of your video.
Richard Bennett
Richard Bennett is a writer and a lover of all things video.
Follow @Richard Bennett
Richard Bennett
Mar 27, 2024• Proven solutions
Whether personal or professional purposes, YouTube is a great platform for sharing videos but, there are times, when you don’t wish to share it with each and everyone across the globe. The YouTube unlisted meaning is a video which can be viewed only by the users having the link to it. At the back of your mind, you may be wondering how safe an unlisted video is. Let’s learn in detail what does unlisted mean on YouTube.
- Part 1: What is Unlisted Video on YouTube
- Part 2: How to Make YouTube Videos Unlisted
- Part 3: How to Share Unlisted Video
Wondershare Filmora video editor is one of the most widely used video editing software for YouTubers, it makes the video editing simplified with the pre-programmed effects and templates. You can download the free trial version to check.
Part 1: What Does Unlisted Video Mean on YouTube
The YouTube unlisted meaning is that your video will neither come up in the search results nor on your channel. Only the users who have the link to the video can view it. The link can be shared with anyone and everyone, even with the users who do not have a YouTube account. Many people don’t know the difference between private and unlisted YouTube videos . In order to understand what does unlisted mean on YouTube in a detailed way, let’s dive deeper into it and know the difference between public videos, unlisted videos, and private videos.
1. What is Unlisted YouTube Video
Between private and public, you can find the unlisted videos. What does unlisted mean on YouTube? An unlisted video does not appear in the search results, suggestions or video tab. If you unlist a new video, your subscribers won’t receive any notification informing about it. You can share an unlisted video with the people you wish to share and the users having a link to the video can see it. It can also be viewed by the friend of friends if they share the link with their friends.
The unlisted videos are treated like public videos by YouTube. This means that you cannot use the copyright audio or video and it will be reviewed by the YouTube team if other users flag it as inappropriate content within a timeframe of 24-hours .
What Unlisted YouTube Videos Can Do
The unlisted videos can be shared with family and friends. If you are conducting a webinar and wish to share the video with only the registered users, an unlisted video can be used. You may also use the unlisted video for giving access to the people who embedded it while cleaning the YouTube page. For getting feedback from closed groups for market research or to share online resume link for job applications, the unlisted videos can be of great help.
Takeaway: Unlisted videos are a great way to share personal videos with just your family and friends, or to get feedback from people you trust on videos before you decide whether to make them public.
2. What is Private YouTube Video
The videos that do not appear in the recommendations, search options in YouTube or in your tab are the private videos. When you select the private setting for a video, the subscribers don’t get a notification. The private videos can be seen only by the uploader and the mentioned Google accounts. It is not available for friends of friends which mean if you share a private video with a friend, only that person can see it. If your friend shares it with someone, it won’t be visible to others. If anyone wishes to view a private video, the person has to request permission to view to the uploader.
What Private Youtube Videos Can Do
By using private YouTube videos, the internal company information can be kept confidential, the family videos can be shared safely with the people you wish to, and also store your personal data without worrying about being hacked by the strangers. By choosing the private setting, you may upload and schedule the date and time when a video can be made public on YouTube. It helps in saving storage space on your phone.
Takeaway: A private YouTube video is only available to YouTube users that you invite to view it.
3. What are Public Youtube Videos
The Public setting in the YouTube video is a default setting which allows everyone to see the video you post. When you want your video to appear in the search engine results and want more and more viewers and traffic on your video, you can keep the Public default setting on.
What Public YouTube Videos Can Do
Do you wish to grow your brand awareness? Select the Public default setting as it is the best way to do it. You may use the Public setting in any of these situations below:
- Having a video sharing business like explainer videos, product reviews, commercials, etc. with customers or prospective viewers
- Targeting at earning money through YouTube videos
- Looking forward to the growing personal brand by a YouTuber
- Looking for more and more subscribers on YouTube
But, you must remember that once you post the video, it will be available for everyone throughout the world on YouTube. Even if you decide to change the settings or delete the video, later on, you will be subjected to judgment, professionally and personally. While posting a video with Public setting, you must have an answer to questions like-
- Shall the senior or your boss see this video?
- Can your job prospect hamper with this video?
- Does the video contain harassing or offensive content?
- Can your friends ridicule you after seeing the video content?
If all the questions are answered in YES… then it is better to think hard and long before uploading the video content with Public setting on YouTube. You may upload the content with unlisted or private settings.
Takeaway: If you make a video public, anyone will be able to find and watch it. When uploading a video using default settings through YouTube, it will always default to being a public video.
Below is a brief comparison table about the differences among YouTube Unlisted, Private and Public video settings.
| Feature | Unlisted | Private | Public |
|---|---|---|---|
| Can I share video URL to friends? | Yes | No | Yes |
| Can I add video to YouTube channel? | Yes | No | Yes |
| Can I shows up video in YouTube platform? | No | No | Yes |
| Can I post video on my channel? | No | No | Yes |
| Can I leave a comment? | Yes | No | Yes |
| Can I see it in landing page? | Yes | No | Yes |
| Do People need an account to watch it? | No | No | Yes |
Part 2: How to Make an Unlisted YouTube Video
Follow the below-mentioned steps to make an unlisted YouTube video -
- Log in to your YouTube channel
- In the top right corner, click the add video button
- Find the drop-down menu and choose Upload Video
- Select the setting by clicking on Public and a drop-down menu appears to unlisted
- Search the instruction select files to upload your video
- When you start uploading your video, a message box appears, Click Public on the right side corner and select unlisted from the drop-down menu
- Once you have selected unlisted, click Done in the top right corner and your video is published
Part 3: How to Share Your Unlisted Video
If you wish to share the unlisted video , just share the published video link with anyone you wish to share. A Google account is not required to see the video. So, if the person you shared the link with is not logged in to his Google account, still the video can be viewed. The people who have the link to your video can also share and re-share the link in a number of ways. It can be shared on the social media or just forwarded amongst their friends. But, if you don’t want your friends to re-share it, change the settings to Private.
You can see a message showing “this video is unlisted” on YouTube when you want to share someone else’s unlisted video on social platforms. Think before you consider sharing an unlisted video.
Conclusion
Now, that you clearly know what does unlisted mean on YouTube, consider the option while uploading a video. It helps in retaining the privacy of your video.
Richard Bennett
Richard Bennett is a writer and a lover of all things video.
Follow @Richard Bennett
Unlocking the Secrets of Effective YouTube Thumbnails
The Ultimate Guide to YouTube Thumbnails that Get Views
Richard Bennett
Oct 26, 2023• Proven solutions
Search for any topic on YouTube and you’ll find thousands of videos. How do you decide which of them to watch? Thumbnails play a major role in what viewers decide to click on. They’re often more important than video titles.
Viewers click on thumbnails that both standout and feel relevant to their search. Your task when it comes to creating YouTube thumbnails is to make something that does both of those things while also maintaining your personal style.
- How to Make a YouTube Thumbnail
- How to Upload a YouTube Thumbnail
- YouTube Thumbnail Makers
- How to Make Thumbnails that Get Clicks (Without Clickbait!)
- Animated YouTube Thumbnails
Part 1: How to Make a YouTube Thumbnail
In order to create a custom video thumbnail, you’ll need a program to put it together in. You can use an image editing program like Photoshop if you have one, but if you don’t you can check out these free thumbnail makers.
Here are some examples of popular thumbnail styles.

1. The Classic Thumbnail (Photo or Screenshot)
A photo that shows what happens in your video – whether that means the finished ‘look’ from your makeup tutorial or you posing in front of the landmark you shot your travel vlog in front of – is a great way to let viewers know what to expect. While curiosity can be a big motive behind clicking on a video thumbnail (or anything online), when people have searched for a specific topic they want to be convinced that your video has what they’re looking for.
#1. Choose Your Photo
To start off, either choose a still frame from your video or take a photograph while you’re still set up from your video. A separate photograph is usually a better idea because your video editor might not be able to export a high-quality snapshot, and also because you’re able to choose your facial expression.
Aim to make this shot a close-up or medium close-up and make sure you’re either in the center of the screen or off to one side, as per the ‘rule of thirds’. Many cameras allow you to bring an optional grid up onto your viewfinder. This will divide your screen into three equal segments both vertically and horizontally. Try to make sure your eyes line up with the top line, and if you’re going to be off to one side then make sure you’re on one of the vertical lines. This will ensure your image is visually appealing.
If you want to add text later, it’s a good idea to be off to one side.
Including your face is important for most types of YouTube videos. People are attracted to eye contact and are more likely to click on thumbnails that feature a face. Gamers might choose to use a picture of a video game character instead and it will have the same effect.
Some situations where it isn’t essential to include your face include tech reviews, where viewers will be more interested in seeing the product, and cooking videos where people are looking to be tempted by a yummy food pic.
#2. Add Text and/or Images
This part isn’t essential – in some cases, a photo is enough – but a lot of the thumbnails for the videos ranked highest in YouTube’s search results include either a couple of words of text, a simple graphic (i.e. an emoji), or both.
In some cases you might use text to make it clear what type of video you’ve made, i.e. ‘review’ or ‘tutorial’. It’s best to keep any text you use brief, but you could get a bit more descriptive and write something like ‘fall makeup tutorial’. Three words is probably the most you can get away with. Remember that your text will be shrunk down with the rest of your image; you need to make it big enough to read easily once it’s shrunk, and that means you don’t have a ton of room for text.
You should also avoid fonts that are harder to read. Fonts with a lot of curves can be harder to read, and you want to make sure you choose a color that stands out from your background. Yellow might work against black, but it probably won’t work against the beige wall of your sunny bedroom. Sans serif fonts tend to be best.
Another tactic used in successful thumbnails is to add small graphics, like emojis or small images (i.e. pumpkins for a Halloween video), which are related to your video’s content. As with text, you don’t want to overload your thumbnail with images, but they’re a great way to add something eye-catching that’s a bit different from competing thumbnails.
2. The Emotional Laser (Background + Face Reacting)
One increasingly popular style of YouTube thumbnail is what we’re going to call the ‘Emotional Laser’. It’s bright (like, blindingly bright), it communicates a clear feeling, and it creates high expectations for how exciting the video’s content is going to be.
The three main elements of the Emotional Laser thumbnail are a background (usually bright), your face on the right wearing an over-pronounced expression, and either the thing your expression is in reaction to (i.e. food, a product, the topic of your video in text) or reinforcement of your emotion (i.e an emoji or question marks) on the left.
#1. Ham It Up (Take Your Reaction Photo)
Take a high-quality photograph of yourself conveying strong emotion. Generally, you want to look extremely excited, disgusted, angry, or shocked depending on the theme of the video.
If there’s an object you want to include in your thumbnail, like a product you’ll be talking about, then it’s a good idea to hold it for this photo. Hold it to one side of your head, turn towards it slightly (but not so much that the camera can only see the side of your face) and put on the expression that’s supposed to be a reaction to the object.
It can be a good idea to take this photo in front of a solid color so you can remove the background easily with chroma key.
#2. Choose Your Background
Your background might be scenery, a solid color, or even the room you filmed the video in. Light or bright colors are popular. Make sure there’s nothing that will distract from your expression. If your background is a room, or anything else where there could be things like pictures hanging, you may want to add a blur effect in the next step.
#3. Put It Together
In your thumbnail maker or a program like Photoshop, you’ll need to put your photo and your background together. This will work differently depending on what program you use. If your program has a chroma key tool and your reaction photo was taken against a solid color then you can make that solid color transparent.
What if I don’t have a separate background? If you don’t have a background you want to use, but you still want your reaction to stand out the same way it would if you did, then you can use your photo editor’s blur tool to turn the normal background of your photo into something you can pop-out from.
#4. Add Extras (Text, Emojis, etc.)
If instead of an object you plan to fill the other side of your thumbnail with text, question marks, emojis, or some other graphic element then now is the time to add it.
Part 2: How to Upload a YouTube Thumbnail
When you upload a new video to YouTube, you will see a Custom thumbnail option under Video thumbnails after your upload is complete.
If you want to add a custom thumbnail to a video that’s already up, that’s easy too.
- Go to your Video Manager in the Creator Studio.
- Find the video you want to change the thumbnail for and click Edit next to it.
- Click Custom thumbnail on the right of the preview screen.
- Upload your thumbnail and click Save changes.
Remember when you’re uploading custom thumbnails that you need to use a .JPG, .GIF, .BMP, or .PNG image with an aspect ratio of 16:9 and that your file size has to be under 2MB.
YouTube recommends that thumbnail images have a resolution of 1280x720px, and you cannot upload an image with a width of less than 640 pixels.
Make sure that all of your thumbnails adhere to YouTube’s Community guidelines. Anything sexually suggestive, violent, or otherwise graphic could result in your video being age-restricted.
Part 3: YouTube Thumbnail Makers
You don’t have to go out and buy a photo editor like Photoshop to make custom video thumbnails (although it’s a good thing to use if you already have it). Here are two free online programs you can use instead:
Canva is an intuitive option with templates for Thumbnails, Channel Art, and other social media graphics. There are stock photos and graphics provided, but not all of them are free (paid options cost $1 each). Canva’s templates do tend to include paid resources, so you may want to use them mostly for their layouts or as inspiration and replace everything they provide with your own images.
Generally, using Canva is as easy as dragging and dropping things where you want them. You’ll be able to set the dimensions for your project so the image you export is a perfect size. Adding text and changing the size, font, or color is easy too.
Adobe Spark also has templates for channel art, and it’s also very easy to use. The first time you use it helpful notes will pop up to guide you through the process. Using templates is especially simple because you just click on the elements in the pre-made thumbnail and replace them with your own photos/text.
You can make changes to the colors in your Spark thumbnail easily by selecting a new color scheme or filter. You can even toggle through layouts easily. When you choose a new layout, Spark will rearrange all the pieces of your current thumbnail to align with the new layout so you can quickly see what it looks like instead of having to rebuild.
Click to check more YouTube thumbnail makers
Part 4: How to Make Thumbnails That Get Clicks (Without Clickbait!)
Here are the top 10 best practices for creating effective YouTube thumbnails:
#1. Show What Your Video Is About
Being mysterious and clickbaity can get you views, if you’re already big. For small YouTubers, it pays off to be clear about your video’s topic. You want people to click who want to watch the actual content of your video. Even if you manage to get some clicks by being mysterious, you’ll probably end up with low viewer retention because people are clicking away when they realize your video isn’t what they were looking for. That will make YouTube’s algorithm rank your video lower, and then even fewer people will find it.
If your video is a product review, show the product in the thumbnail and maybe even write ‘review’ on it. If your video is a makeup tutorial, show your face with the finished makeup and maybe even include pictures of the products you used. People want to know what they’re clicking on before they click.
#2. Use a Consistent Layout
As you grow, you’ll want people to be able to see one of your thumbnails and instantly know it’s yours. Building a recognizable brand is about consistency. Try to stick with one basic layout for all of your videos. You can still customize every individual thumbnail by using different facial expressions and different graphics, but try to use similar backgrounds, fonts, and general layouts (i.e. you to the right of the thumbnails, text to the left) over and over.
#3. Use Your Face
Why should people want to watch your videos? If the answer is ‘because I can teach them to create delicious food’ or ‘because they want to learn about the latest iPhone’ then your thumbnail should include that food or that iPhone.
If part of the reason people want to watch your videos is you – your personality and your sense of humor – then you should be in your thumbnail.
Viewers who are on YouTube because they like seeing a creator’s personality like to feel the presence of that personality in the video thumbnail, and eye contact naturally draws attention and clicks.
#4. Add Small Graphics
Adding small graphics, like emojis or hearts, to your thumbnail can help you stand out in a couple different ways. First, if they’re being compared to thumbnails that are just screenshots from the video, your thumbnails will look a lot more polished. Second, they’ll add a splash of color which can draw eyes to your video in a search where other thumbnails are not using those same colors.
#5. Your Text Should Be Huge
Your thumbnail will end up being a fraction of the size it is while you’re creating it in your thumbnail maker, and that means that any text you use will end up being shrunk down. You could probably type a six-word sentence in a size 18 font and have it look fine while you’re making your thumbnail, but after you upload it there’s no way people will be able to read it at a glance.
Aim for a huge font size, and 3 words or less (so your thumbnail doesn’t end up looking crowded).
#6. Check Out The Competition
Type your video’s title or topic into the search engine on YouTube and look at the thumbnails for the videos that come up. These are your competition. You want to make a thumbnail that is similar enough to what comes up that viewers know it’s on the same topic, but different enough that it stands out.
Generally, if most of the thumbnails have the same layout, you’ll want to mimic that layout. Where you can break from the crowd is in the colors, fonts, and graphics you use.
Part 5: Animated YouTube Thumbnails
Whether or not you upload a custom thumbnail to YouTube, YouTube’s A.I will choose what it thinks are the 3 juiciest seconds of your video (you cannot choose for yourself) and play them as a GIF-like animation when people mouseover your video thumbnails.
As of now, this only works in the Google Chrome desktop browser. Videos have to be at least 30 seconds long to get moving thumbnails.
Alright, now that you know everything about YouTube thumbnails, go make one! Tell us in the comments what you’re going to do to make your video thumbnails stand out.
Touch Up YouTube Videos with Effects & Elements in Filmora
As one of the most widely used video editing software in YouTube video editing, Filmora provides lots of templates and effects with an intuitive interface. Download the free trial version and get started now.
Richard Bennett
Richard Bennett is a writer and a lover of all things video.
Follow @Richard Bennett
Richard Bennett
Oct 26, 2023• Proven solutions
Search for any topic on YouTube and you’ll find thousands of videos. How do you decide which of them to watch? Thumbnails play a major role in what viewers decide to click on. They’re often more important than video titles.
Viewers click on thumbnails that both standout and feel relevant to their search. Your task when it comes to creating YouTube thumbnails is to make something that does both of those things while also maintaining your personal style.
- How to Make a YouTube Thumbnail
- How to Upload a YouTube Thumbnail
- YouTube Thumbnail Makers
- How to Make Thumbnails that Get Clicks (Without Clickbait!)
- Animated YouTube Thumbnails
Part 1: How to Make a YouTube Thumbnail
In order to create a custom video thumbnail, you’ll need a program to put it together in. You can use an image editing program like Photoshop if you have one, but if you don’t you can check out these free thumbnail makers.
Here are some examples of popular thumbnail styles.
1. The Classic Thumbnail (Photo or Screenshot)
A photo that shows what happens in your video – whether that means the finished ‘look’ from your makeup tutorial or you posing in front of the landmark you shot your travel vlog in front of – is a great way to let viewers know what to expect. While curiosity can be a big motive behind clicking on a video thumbnail (or anything online), when people have searched for a specific topic they want to be convinced that your video has what they’re looking for.
#1. Choose Your Photo
To start off, either choose a still frame from your video or take a photograph while you’re still set up from your video. A separate photograph is usually a better idea because your video editor might not be able to export a high-quality snapshot, and also because you’re able to choose your facial expression.
Aim to make this shot a close-up or medium close-up and make sure you’re either in the center of the screen or off to one side, as per the ‘rule of thirds’. Many cameras allow you to bring an optional grid up onto your viewfinder. This will divide your screen into three equal segments both vertically and horizontally. Try to make sure your eyes line up with the top line, and if you’re going to be off to one side then make sure you’re on one of the vertical lines. This will ensure your image is visually appealing.
If you want to add text later, it’s a good idea to be off to one side.
Including your face is important for most types of YouTube videos. People are attracted to eye contact and are more likely to click on thumbnails that feature a face. Gamers might choose to use a picture of a video game character instead and it will have the same effect.
Some situations where it isn’t essential to include your face include tech reviews, where viewers will be more interested in seeing the product, and cooking videos where people are looking to be tempted by a yummy food pic.
#2. Add Text and/or Images
This part isn’t essential – in some cases, a photo is enough – but a lot of the thumbnails for the videos ranked highest in YouTube’s search results include either a couple of words of text, a simple graphic (i.e. an emoji), or both.
In some cases you might use text to make it clear what type of video you’ve made, i.e. ‘review’ or ‘tutorial’. It’s best to keep any text you use brief, but you could get a bit more descriptive and write something like ‘fall makeup tutorial’. Three words is probably the most you can get away with. Remember that your text will be shrunk down with the rest of your image; you need to make it big enough to read easily once it’s shrunk, and that means you don’t have a ton of room for text.
You should also avoid fonts that are harder to read. Fonts with a lot of curves can be harder to read, and you want to make sure you choose a color that stands out from your background. Yellow might work against black, but it probably won’t work against the beige wall of your sunny bedroom. Sans serif fonts tend to be best.
Another tactic used in successful thumbnails is to add small graphics, like emojis or small images (i.e. pumpkins for a Halloween video), which are related to your video’s content. As with text, you don’t want to overload your thumbnail with images, but they’re a great way to add something eye-catching that’s a bit different from competing thumbnails.
2. The Emotional Laser (Background + Face Reacting)
One increasingly popular style of YouTube thumbnail is what we’re going to call the ‘Emotional Laser’. It’s bright (like, blindingly bright), it communicates a clear feeling, and it creates high expectations for how exciting the video’s content is going to be.
The three main elements of the Emotional Laser thumbnail are a background (usually bright), your face on the right wearing an over-pronounced expression, and either the thing your expression is in reaction to (i.e. food, a product, the topic of your video in text) or reinforcement of your emotion (i.e an emoji or question marks) on the left.
#1. Ham It Up (Take Your Reaction Photo)
Take a high-quality photograph of yourself conveying strong emotion. Generally, you want to look extremely excited, disgusted, angry, or shocked depending on the theme of the video.
If there’s an object you want to include in your thumbnail, like a product you’ll be talking about, then it’s a good idea to hold it for this photo. Hold it to one side of your head, turn towards it slightly (but not so much that the camera can only see the side of your face) and put on the expression that’s supposed to be a reaction to the object.
It can be a good idea to take this photo in front of a solid color so you can remove the background easily with chroma key.
#2. Choose Your Background
Your background might be scenery, a solid color, or even the room you filmed the video in. Light or bright colors are popular. Make sure there’s nothing that will distract from your expression. If your background is a room, or anything else where there could be things like pictures hanging, you may want to add a blur effect in the next step.
#3. Put It Together
In your thumbnail maker or a program like Photoshop, you’ll need to put your photo and your background together. This will work differently depending on what program you use. If your program has a chroma key tool and your reaction photo was taken against a solid color then you can make that solid color transparent.
What if I don’t have a separate background? If you don’t have a background you want to use, but you still want your reaction to stand out the same way it would if you did, then you can use your photo editor’s blur tool to turn the normal background of your photo into something you can pop-out from.
#4. Add Extras (Text, Emojis, etc.)
If instead of an object you plan to fill the other side of your thumbnail with text, question marks, emojis, or some other graphic element then now is the time to add it.
Part 2: How to Upload a YouTube Thumbnail
When you upload a new video to YouTube, you will see a Custom thumbnail option under Video thumbnails after your upload is complete.
If you want to add a custom thumbnail to a video that’s already up, that’s easy too.
- Go to your Video Manager in the Creator Studio.
- Find the video you want to change the thumbnail for and click Edit next to it.
- Click Custom thumbnail on the right of the preview screen.
- Upload your thumbnail and click Save changes.
Remember when you’re uploading custom thumbnails that you need to use a .JPG, .GIF, .BMP, or .PNG image with an aspect ratio of 16:9 and that your file size has to be under 2MB.
YouTube recommends that thumbnail images have a resolution of 1280x720px, and you cannot upload an image with a width of less than 640 pixels.
Make sure that all of your thumbnails adhere to YouTube’s Community guidelines. Anything sexually suggestive, violent, or otherwise graphic could result in your video being age-restricted.
Part 3: YouTube Thumbnail Makers
You don’t have to go out and buy a photo editor like Photoshop to make custom video thumbnails (although it’s a good thing to use if you already have it). Here are two free online programs you can use instead:
Canva is an intuitive option with templates for Thumbnails, Channel Art, and other social media graphics. There are stock photos and graphics provided, but not all of them are free (paid options cost $1 each). Canva’s templates do tend to include paid resources, so you may want to use them mostly for their layouts or as inspiration and replace everything they provide with your own images.
Generally, using Canva is as easy as dragging and dropping things where you want them. You’ll be able to set the dimensions for your project so the image you export is a perfect size. Adding text and changing the size, font, or color is easy too.
Adobe Spark also has templates for channel art, and it’s also very easy to use. The first time you use it helpful notes will pop up to guide you through the process. Using templates is especially simple because you just click on the elements in the pre-made thumbnail and replace them with your own photos/text.
You can make changes to the colors in your Spark thumbnail easily by selecting a new color scheme or filter. You can even toggle through layouts easily. When you choose a new layout, Spark will rearrange all the pieces of your current thumbnail to align with the new layout so you can quickly see what it looks like instead of having to rebuild.
Click to check more YouTube thumbnail makers
Part 4: How to Make Thumbnails That Get Clicks (Without Clickbait!)
Here are the top 10 best practices for creating effective YouTube thumbnails:
#1. Show What Your Video Is About
Being mysterious and clickbaity can get you views, if you’re already big. For small YouTubers, it pays off to be clear about your video’s topic. You want people to click who want to watch the actual content of your video. Even if you manage to get some clicks by being mysterious, you’ll probably end up with low viewer retention because people are clicking away when they realize your video isn’t what they were looking for. That will make YouTube’s algorithm rank your video lower, and then even fewer people will find it.
If your video is a product review, show the product in the thumbnail and maybe even write ‘review’ on it. If your video is a makeup tutorial, show your face with the finished makeup and maybe even include pictures of the products you used. People want to know what they’re clicking on before they click.
#2. Use a Consistent Layout
As you grow, you’ll want people to be able to see one of your thumbnails and instantly know it’s yours. Building a recognizable brand is about consistency. Try to stick with one basic layout for all of your videos. You can still customize every individual thumbnail by using different facial expressions and different graphics, but try to use similar backgrounds, fonts, and general layouts (i.e. you to the right of the thumbnails, text to the left) over and over.
#3. Use Your Face
Why should people want to watch your videos? If the answer is ‘because I can teach them to create delicious food’ or ‘because they want to learn about the latest iPhone’ then your thumbnail should include that food or that iPhone.
If part of the reason people want to watch your videos is you – your personality and your sense of humor – then you should be in your thumbnail.
Viewers who are on YouTube because they like seeing a creator’s personality like to feel the presence of that personality in the video thumbnail, and eye contact naturally draws attention and clicks.
#4. Add Small Graphics
Adding small graphics, like emojis or hearts, to your thumbnail can help you stand out in a couple different ways. First, if they’re being compared to thumbnails that are just screenshots from the video, your thumbnails will look a lot more polished. Second, they’ll add a splash of color which can draw eyes to your video in a search where other thumbnails are not using those same colors.
#5. Your Text Should Be Huge
Your thumbnail will end up being a fraction of the size it is while you’re creating it in your thumbnail maker, and that means that any text you use will end up being shrunk down. You could probably type a six-word sentence in a size 18 font and have it look fine while you’re making your thumbnail, but after you upload it there’s no way people will be able to read it at a glance.
Aim for a huge font size, and 3 words or less (so your thumbnail doesn’t end up looking crowded).
#6. Check Out The Competition
Type your video’s title or topic into the search engine on YouTube and look at the thumbnails for the videos that come up. These are your competition. You want to make a thumbnail that is similar enough to what comes up that viewers know it’s on the same topic, but different enough that it stands out.
Generally, if most of the thumbnails have the same layout, you’ll want to mimic that layout. Where you can break from the crowd is in the colors, fonts, and graphics you use.
Part 5: Animated YouTube Thumbnails
Whether or not you upload a custom thumbnail to YouTube, YouTube’s A.I will choose what it thinks are the 3 juiciest seconds of your video (you cannot choose for yourself) and play them as a GIF-like animation when people mouseover your video thumbnails.
As of now, this only works in the Google Chrome desktop browser. Videos have to be at least 30 seconds long to get moving thumbnails.
Alright, now that you know everything about YouTube thumbnails, go make one! Tell us in the comments what you’re going to do to make your video thumbnails stand out.
Touch Up YouTube Videos with Effects & Elements in Filmora
As one of the most widely used video editing software in YouTube video editing, Filmora provides lots of templates and effects with an intuitive interface. Download the free trial version and get started now.
Richard Bennett
Richard Bennett is a writer and a lover of all things video.
Follow @Richard Bennett
Also read:
- [Updated] Beam It Up A Step-By-Step Approach to YouTube Video Luminance
- A Comprehensively Reviewed List of YouTube Video Extractor Apps (Android)
- [New] Customizing Your Watch The Art of Altering YouTube Video Pace
- 15 Best Game Recording Software for YouTuber
- Dish on Titles Crafting Captivating Cookery Channel Names for 2024
- Amplifying Your Content Free Techniques to Boost YouTube Views for 2024
- Ultra-Quick Fortnite Image Design
- In 2024, Avoid Piracy Safe YouTube to MP4 Conversion Tips
- Boost Engagement with Effortless Youtube Thumbnail Tips for 2024
- Step-By-Step Guide to Crafting Compelling Tech Gadget Videos
- YouTube Yielding The Manual to Merging Media with Moolah
- [New] Creating Profit on YouTube The Ultimate List of Top Business Channels
- Maximizing Your Videos' Impact with Perfect Post Times
- Best YouTube Live Streaming Software and Hardware You Should Know
- The Novice's Route to Revenue in the YouTube Realm
- [Updated] Bringing Dialogue to Life Writing for YouTube Videos
- Steps to Uncover YouTube’s Central Editing Nexus
- Sharpen Content Edge with Studio's Advanced Features
- 2024 Approved Cutting Edge Identifying the Best 10 Free Online Art Schools on YouTube
- [New] Diving Deep Into the Income of Ajey (CarryMinati)
- Delving Into the Advantages and Disadvantages of YouTube Premium
- Creating a Link-Building Foundation for Video Marketers for 2024
- See It All - Your Free Selection of 50 YouTube Banners!
- [New] Easy Entrance to Follow Creating a User-Friendly Subscribe Link
- 2024 Approved Clearing Your Name After a YouTube Copyright Strike Notice
- In 2024, Enrich Your Brain with These 15 Ultimate Science Youtubes
- Navigating YouTube Shorts Thumbnail Losses
- [New] Ensuring Visual Presentation YouTube Shorts Thumbnails Fix
- [New] Effortless Fusion of YouTube Audio with iMovie Masterpieces
- Free Online Editors The Essential Guide
- [New] Edu-Odyssey Journey Through Top Learning Sites
- For People Wanting to Mock GPS on Infinix Smart 8 HD Devices | Dr.fone
- [New] Fixing Blurred Footage in Social Media Streaming
- In 2024, Seamless Integration of NVIDIA Screener Techniques
- Non-Retweeted Video Tweet Guide for iPhone & Android Users
- New Crafting Compelling Cinematography 3 Novel Approaches to Weave Sound Into Video Projects
- In 2024, How to Transfer Music from Vivo Y78t to iPod | Dr.fone
- How Do You Get Sun Stone Evolutions in Pokémon For Samsung Galaxy A05? | Dr.fone
- Ways to trade pokemon go from far away On Tecno Spark Go (2024)? | Dr.fone
- [Updated] Correct iOS/Android Video Failures on FB for 2024
- [Updated] In 2024, Becoming a Snapchat Videography Pro Time Control Tactics
- In 2024, Pokemon Go Error 12 Failed to Detect Location On OnePlus Open? | Dr.fone
- Bypassing Google Account With vnROM Bypass For Lenovo
- How To Unlink Your iPhone 13 Pro Max From Your Apple ID
- [New] 2024 Approved Masterclass in Crafting Engaging FB Video Ads
- [Updated] Ultimate Screen Logger - AZ Audits & Diversions
- [New] In 2024, Essential Insights Into Using Discord
- How to Mirror Poco X6 Pro to Mac? | Dr.fone
- In 2024, Basic Techniques Transforming Fishy Chatter in the Win World
- Can I Bypass a Forgotten Phone Password Of Honor?
- In 2024, 5 Quick Methods to Bypass Xiaomi Redmi K70E FRP
- [New] Best Video Grabbers for Mac for 2024
- [New] 2024 Approved Becoming a Zoom Pro The Comprehensive Tutorial for Professional Audio Recordings
- APK Journey to Gaming Bliss Funimate Pro Guide for 2024
- In 2024, Elite Anonymity in Story Consumption, Top 5 Apps
- In 2024, Can I use iTools gpx file to catch the rare Pokemon On Gionee F3 Pro | Dr.fone
- 2024 Approved Top 10 Battle Royale Games
- [New] 2024 Approved Melody Mixin' Adding Tracks to Snapchat Vids
- Updated Image Ratio Essentials Calculate, Find, and Fix for Stunning Visuals for 2024
- Title: "Unlisting YouTube Videos A Guide to Non-Indexable Content"
- Author: Brian
- Created at : 2024-05-25 13:04:48
- Updated at : 2024-05-26 13:04:48
- Link: https://youtube-video-recordings.techidaily.com/unlisting-youtube-videos-a-guide-to-non-indexable-content/
- License: This work is licensed under CC BY-NC-SA 4.0.
