
:max_bytes(150000):strip_icc()/geocoin-57df048c5f9b5865166fa38b.jpg)
"Ultimate Buyer's Guide Top GPUs for YouTube Streamers"
Ultimate Buyer’s Guide: Top GPUs for YouTube Streamers
The Top 10 Capture Cards for YouTube

Richard Bennett
Nov 04, 2022• Proven solutions
If you are like to share gameplay videos, it’s very important that you have a high-quality capture card. With the help of a capture card, you can easily get all of the in-game footage that you need to make amazing videos and grow a healthy YouTube channel . In this article we will break down the top 10 capture cards for gaming YouTubers in 2018:
- Elgato Game Capture HD 60 Pro
- Elgato Game Capture HD 60 S
- Star Tech 4 Port PCI Firewire Adaptor Card with Digital Video Editing
- Hauppage Colossus 2 PCI Express Internal 1080P HD-PVR
- Elgato Game Capture HD
- Imillet HDMI Video Capture with USB 3.0/2.0 Dongle
- HDML Cloner Box Pro
- Pyle PVRC43 Standalone Digital Video Recorder
- HDML Cloner Box Evolve
- AVerMedia AVerCapture HD
Click here for more tips on being a YouTube gamer .
1. Elgato Game Capture HD 60 Pro
Price: $204
Compatibility: Windows, Switch, 360, Xbox One, PS4
Specs: Internal PCI 4k 30fps
Highlights: Made for streaming. Improved benchmark speeds.
This capture card works with an HDMI interface as well as the ability to be plugged into any type of PC game device. The process for setting it up and recording is extremely simple and the casing has been designed for improving the performance of the system and making it easier to integrate with many different devices. With an up to 16 MB per second capture bitrate, this is a pro tool.
2. Elgato Game Capture HD 60 S
Price: $160
Compatibility: Xbox one, switch, ps4
Specs: This device does 1080p at 60 fps
Highlights: This is one of very few game capture devices that come with USB 3.0 compatibility for easy access to almost any type of gaming device.
The card itself is mind-blowingly easy to set up with its external USB. It’s made for live streaming to YouTube, Twitch, and other platforms. There’s very low latency available on this card and it is one of the highest quality tools for console players.
3. Star Tech 4 Port PCI Firewire Adaptor Card with Digital Video Editing
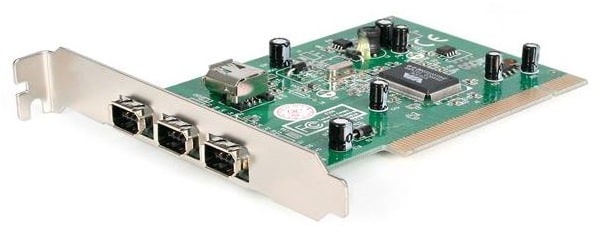
Price: $80
Compatibility: PC, Xbox, PS4
Specs: 1080p, 60 fps
Highlights: This USB 3.0 capture card can be quite easily installed almost anywhere and captures up to 60 frames per second for live streams.
This card comes with a wide range of ports including DVI, Component, HDMI, VGA, and USB. It’s tough to find a capture card that has so many different ports available and this can ensure that it’s possible to capture on almost any type of gaming system or device. A helpful tutorial is also included with this capture card to ensure that you can get the best video format from every console.
4. Hauppauge Colossus 2 PCI Express Internal Card
Price: $135
Compatibility: TV, DVR, Satellite, Xbox, PC, PlayStation
Specs: 1080p, 60 fps
Highlights: This card is an internal PCI card allowing it to remain as a consistent capture device inside a PC.
This card is perfect for recording live programs from a TV to your computer, offloading programs off of your DVR, as well as recording live game footage from PlayStation, Xbox, or your PC. Included alongside this card is the chance to use Stream EEZ for live streaming directly to platforms like Upstream, Twitch, and YouTube.
5. Elgato Game Capture HD
Price: $159
Compatibility: Xbox, PlayStation, Nintendo, PC, Mac
Specs: 1080p at 60fps
Highlights: The game capture HD offers a one-click sharing system to YouTube as well as flashback recording where you can turn back 10 or 15 minutes to record content that just happened.
Overall this is one of the easiest capture cards to set up because it comes with USB 3.0 and HDMI connections. For most modern gaming consoles, it offers the same type of features including the flashback recording solution to record retroactively. The device includes unlimited game capture at a fairly reasonable price and a creation suite so that you can do multitrack recording from your webcam. Editing footage from the card makes it very easy to quickly export clips for all of your content and publish them on social media. This game capture device is also known for its extremely compact design. It is only around the size of a mobile phone, meaning it can be quite easily carried in your pocket.
6. Imillet HDMI Capture Card with USB 3.0 Dongle
Price: $148
Compatibility: Plug and play with no drivers needed. PC, Mac, Linux, any iOS
Specs: 1080p 60 fps
Highlights: Doesn’t require any type of driver installation. This will work on any operating system or computer for quick recording.
The card itself is known for its USB 3.0 support as well as USB 2.0, and for not needing drivers. There is no more compatible card on the market right now. If you have had issues with other cards in the past or you regularly run Linux, you should consider this device to be prepared for all your recording needs. The device will detect the input and adjust output automatically to ensure a crystal-clear picture based on the type of device that you’re recording from. Imillet also offers a great warranty of six months free replacement as well as 12 months free repair on the card for anyone that is ordering it. The software that comes with the card is extremely simple but it does the job quite effectively, allowing for quick recording from multiple devices and simple detection for a video signal and output. Input formats can range from 480p to 1080p and frame rates can go as high as 60 frames per second. The device has great stats for its live capture but many people have experienced problems when trying to record from DVR specifically.
7. HDML Cloner Box Pro
Price: $135
Compatibility: Compatible with game consoles, windows, mac.
Specs: 1080p video at 60fps max
Highlights: The HDML Cloner Box comes with its own remote and the option to record using VGA, AV, YPbPr, and HDMI.
With so many different inputs available on this card it’s possible to record from almost any type of gaming device. With the hardware encoder which is on board, you can save videos as MP4 files and then instantly transfer them over to a flash drive on the device. You can get all of your saved files available without even having access to a PC. The box works as a standalone and it doesn’t have to be plugged into a computer to work. Free editing and converter software are included but with a storage memory card placed in the device and you can record a huge amount of footage and then edit it on your PC later on. With the quick connect feature, it is easy to set up recording and then perform all the functions you need for recording, stopping, and pausing on the remote as you use it. This remains one of the only cards available where it works as a standalone and allows for the chance to save videos to a flash drive or storage device without having to have a computer plugged in. The free converter software and video editing that comes with this device add extra value as well. An optional two-year warranty can make sure that you are ready for anything concerning this card.
8. Pyle PVRC43 Standalone Digital Video Recorder
Price: $80
Compatibility: TV, VCR, DVD, Digital camcorder, Laptop, PC, Mac, Game console
Specs: 480p
Highlights: This works as a standalone recorder with up to 32 GB of onboard memory. There’s no need to plug it into a computer for it to work and with the help of the memory card, you can record a wide range of output videos in AVI.
This card is designed as a standalone option and it’s extremely small with a USB 2.0 interface. Overall the quality of this card is not quite as technically advanced as some of the others on our list but it can record a video that is perfectly appropriate for the web or sharing over platforms like YouTube. The device can be set up quite easily with the help of an RCA connection cable, USB power cable, or other options. Generally, you may need access to an RCA to HDMI adapter if you want to record video off of a more modern laptop or camera. Where this device takes over on its competitors is the idea of just how simple it is to use. It weighs less than a pound and has a ‘one-button operation’ to start and pause recording. As of the completely standalone option, it doesn’t require any type of connection to a computer to record video. If you are looking for one of the simplest capture cards on the market that outputs to AVI in web quality, this is it.
9. HDML Cloner Box Evolve
Price: $121
Compatibility: HDMI input standalone mass compatibility
Specs: 4k video input, 1080p 60fps output
Highlights: This is a standalone USB capture device that comes with its remote. It also features dual HDMI slots allowing for up to two sources of video during recording (so you can also record from a facecam).
The card itself features a stream and capture function so that you can stream gameplay to any type of USB storage device. By plugging in a hard drive you can just press one button to record gaming videos and then handle the process of live streaming, editing, and more. Through two HDMI inputs supported and a very powerful remote control, you record on any device with fantastic image quality and without even having to plug it into any type of computer. While many of these standalone style capture boxes only support the use of minimal storage, this is a device that is capable of getting hooked up to any type of USB external hard drive for a chance to capture nearly unlimited video on your Cloner Box. As a bonus, the MP4 video editing software that is included will make the process of trimming, copying, and converting easier than ever. This has incredible value to the overall product. As an additional bonus, this Cloner Box also features a quick heat dissipation capability which can help to prevent lagging and other common problems that occur with many types of capture boxes when they overheat. A free microphone slot in addition to the HDMI slots makes recording professional voiceovers for any gameplay videos as easy as possible!
10. Avermedia Avercapture HD
Price: $99
Compatibility: Any console, PC, Mac
Specs: This device is capable of capture in full 1080p/60fps as well as the style encoding for quick streaming and easy video capture.
Highlights: The timeshift feature available on this device makes it simple to record retroactively as well as offer ultralow streaming and recording over time. The device makes it easy to capture and stream and it comes with a competitive two-year warranty.
This card works as a USB capture card from most any type of device, it captures through a component input or HDMI input and it has some of the lowest latency for any type of team capture. With one slot for video input as well as an audio input slot, it’s possible to record quick gameplay and voiceovers at any time with very minimal setup. Streaming and recording in full 1080p are done quite easily on this device and it’s designed to use less processing power than some of the competitors to ensure minimal game lag. RECental is included as part of this device so that you can set up live streaming to many of the top platforms available online. The timeshift function comes with a one-hour buffer ensuring if a great gameplay moment happens, you can shift back and begin recording from that time. Commentary and sharing are made easy with the software that’s included with this device. It makes sharing and recording an easy process for any avid video recorder.
Let us know what capture card you use and if you’re happy with it!
Richard Bennett
Richard Bennett is a writer and a lover of all things video.
Follow @Richard Bennett
Richard Bennett
Nov 04, 2022• Proven solutions
If you are like to share gameplay videos, it’s very important that you have a high-quality capture card. With the help of a capture card, you can easily get all of the in-game footage that you need to make amazing videos and grow a healthy YouTube channel . In this article we will break down the top 10 capture cards for gaming YouTubers in 2018:
- Elgato Game Capture HD 60 Pro
- Elgato Game Capture HD 60 S
- Star Tech 4 Port PCI Firewire Adaptor Card with Digital Video Editing
- Hauppage Colossus 2 PCI Express Internal 1080P HD-PVR
- Elgato Game Capture HD
- Imillet HDMI Video Capture with USB 3.0/2.0 Dongle
- HDML Cloner Box Pro
- Pyle PVRC43 Standalone Digital Video Recorder
- HDML Cloner Box Evolve
- AVerMedia AVerCapture HD
Click here for more tips on being a YouTube gamer .
1. Elgato Game Capture HD 60 Pro
Price: $204
Compatibility: Windows, Switch, 360, Xbox One, PS4
Specs: Internal PCI 4k 30fps
Highlights: Made for streaming. Improved benchmark speeds.
This capture card works with an HDMI interface as well as the ability to be plugged into any type of PC game device. The process for setting it up and recording is extremely simple and the casing has been designed for improving the performance of the system and making it easier to integrate with many different devices. With an up to 16 MB per second capture bitrate, this is a pro tool.
2. Elgato Game Capture HD 60 S
Price: $160
Compatibility: Xbox one, switch, ps4
Specs: This device does 1080p at 60 fps
Highlights: This is one of very few game capture devices that come with USB 3.0 compatibility for easy access to almost any type of gaming device.
The card itself is mind-blowingly easy to set up with its external USB. It’s made for live streaming to YouTube, Twitch, and other platforms. There’s very low latency available on this card and it is one of the highest quality tools for console players.
3. Star Tech 4 Port PCI Firewire Adaptor Card with Digital Video Editing
Price: $80
Compatibility: PC, Xbox, PS4
Specs: 1080p, 60 fps
Highlights: This USB 3.0 capture card can be quite easily installed almost anywhere and captures up to 60 frames per second for live streams.
This card comes with a wide range of ports including DVI, Component, HDMI, VGA, and USB. It’s tough to find a capture card that has so many different ports available and this can ensure that it’s possible to capture on almost any type of gaming system or device. A helpful tutorial is also included with this capture card to ensure that you can get the best video format from every console.
4. Hauppauge Colossus 2 PCI Express Internal Card
Price: $135
Compatibility: TV, DVR, Satellite, Xbox, PC, PlayStation
Specs: 1080p, 60 fps
Highlights: This card is an internal PCI card allowing it to remain as a consistent capture device inside a PC.
This card is perfect for recording live programs from a TV to your computer, offloading programs off of your DVR, as well as recording live game footage from PlayStation, Xbox, or your PC. Included alongside this card is the chance to use Stream EEZ for live streaming directly to platforms like Upstream, Twitch, and YouTube.
5. Elgato Game Capture HD
Price: $159
Compatibility: Xbox, PlayStation, Nintendo, PC, Mac
Specs: 1080p at 60fps
Highlights: The game capture HD offers a one-click sharing system to YouTube as well as flashback recording where you can turn back 10 or 15 minutes to record content that just happened.
Overall this is one of the easiest capture cards to set up because it comes with USB 3.0 and HDMI connections. For most modern gaming consoles, it offers the same type of features including the flashback recording solution to record retroactively. The device includes unlimited game capture at a fairly reasonable price and a creation suite so that you can do multitrack recording from your webcam. Editing footage from the card makes it very easy to quickly export clips for all of your content and publish them on social media. This game capture device is also known for its extremely compact design. It is only around the size of a mobile phone, meaning it can be quite easily carried in your pocket.
6. Imillet HDMI Capture Card with USB 3.0 Dongle
Price: $148
Compatibility: Plug and play with no drivers needed. PC, Mac, Linux, any iOS
Specs: 1080p 60 fps
Highlights: Doesn’t require any type of driver installation. This will work on any operating system or computer for quick recording.
The card itself is known for its USB 3.0 support as well as USB 2.0, and for not needing drivers. There is no more compatible card on the market right now. If you have had issues with other cards in the past or you regularly run Linux, you should consider this device to be prepared for all your recording needs. The device will detect the input and adjust output automatically to ensure a crystal-clear picture based on the type of device that you’re recording from. Imillet also offers a great warranty of six months free replacement as well as 12 months free repair on the card for anyone that is ordering it. The software that comes with the card is extremely simple but it does the job quite effectively, allowing for quick recording from multiple devices and simple detection for a video signal and output. Input formats can range from 480p to 1080p and frame rates can go as high as 60 frames per second. The device has great stats for its live capture but many people have experienced problems when trying to record from DVR specifically.
7. HDML Cloner Box Pro
Price: $135
Compatibility: Compatible with game consoles, windows, mac.
Specs: 1080p video at 60fps max
Highlights: The HDML Cloner Box comes with its own remote and the option to record using VGA, AV, YPbPr, and HDMI.
With so many different inputs available on this card it’s possible to record from almost any type of gaming device. With the hardware encoder which is on board, you can save videos as MP4 files and then instantly transfer them over to a flash drive on the device. You can get all of your saved files available without even having access to a PC. The box works as a standalone and it doesn’t have to be plugged into a computer to work. Free editing and converter software are included but with a storage memory card placed in the device and you can record a huge amount of footage and then edit it on your PC later on. With the quick connect feature, it is easy to set up recording and then perform all the functions you need for recording, stopping, and pausing on the remote as you use it. This remains one of the only cards available where it works as a standalone and allows for the chance to save videos to a flash drive or storage device without having to have a computer plugged in. The free converter software and video editing that comes with this device add extra value as well. An optional two-year warranty can make sure that you are ready for anything concerning this card.
8. Pyle PVRC43 Standalone Digital Video Recorder
Price: $80
Compatibility: TV, VCR, DVD, Digital camcorder, Laptop, PC, Mac, Game console
Specs: 480p
Highlights: This works as a standalone recorder with up to 32 GB of onboard memory. There’s no need to plug it into a computer for it to work and with the help of the memory card, you can record a wide range of output videos in AVI.
This card is designed as a standalone option and it’s extremely small with a USB 2.0 interface. Overall the quality of this card is not quite as technically advanced as some of the others on our list but it can record a video that is perfectly appropriate for the web or sharing over platforms like YouTube. The device can be set up quite easily with the help of an RCA connection cable, USB power cable, or other options. Generally, you may need access to an RCA to HDMI adapter if you want to record video off of a more modern laptop or camera. Where this device takes over on its competitors is the idea of just how simple it is to use. It weighs less than a pound and has a ‘one-button operation’ to start and pause recording. As of the completely standalone option, it doesn’t require any type of connection to a computer to record video. If you are looking for one of the simplest capture cards on the market that outputs to AVI in web quality, this is it.
9. HDML Cloner Box Evolve
Price: $121
Compatibility: HDMI input standalone mass compatibility
Specs: 4k video input, 1080p 60fps output
Highlights: This is a standalone USB capture device that comes with its remote. It also features dual HDMI slots allowing for up to two sources of video during recording (so you can also record from a facecam).
The card itself features a stream and capture function so that you can stream gameplay to any type of USB storage device. By plugging in a hard drive you can just press one button to record gaming videos and then handle the process of live streaming, editing, and more. Through two HDMI inputs supported and a very powerful remote control, you record on any device with fantastic image quality and without even having to plug it into any type of computer. While many of these standalone style capture boxes only support the use of minimal storage, this is a device that is capable of getting hooked up to any type of USB external hard drive for a chance to capture nearly unlimited video on your Cloner Box. As a bonus, the MP4 video editing software that is included will make the process of trimming, copying, and converting easier than ever. This has incredible value to the overall product. As an additional bonus, this Cloner Box also features a quick heat dissipation capability which can help to prevent lagging and other common problems that occur with many types of capture boxes when they overheat. A free microphone slot in addition to the HDMI slots makes recording professional voiceovers for any gameplay videos as easy as possible!
10. Avermedia Avercapture HD
Price: $99
Compatibility: Any console, PC, Mac
Specs: This device is capable of capture in full 1080p/60fps as well as the style encoding for quick streaming and easy video capture.
Highlights: The timeshift feature available on this device makes it simple to record retroactively as well as offer ultralow streaming and recording over time. The device makes it easy to capture and stream and it comes with a competitive two-year warranty.
This card works as a USB capture card from most any type of device, it captures through a component input or HDMI input and it has some of the lowest latency for any type of team capture. With one slot for video input as well as an audio input slot, it’s possible to record quick gameplay and voiceovers at any time with very minimal setup. Streaming and recording in full 1080p are done quite easily on this device and it’s designed to use less processing power than some of the competitors to ensure minimal game lag. RECental is included as part of this device so that you can set up live streaming to many of the top platforms available online. The timeshift function comes with a one-hour buffer ensuring if a great gameplay moment happens, you can shift back and begin recording from that time. Commentary and sharing are made easy with the software that’s included with this device. It makes sharing and recording an easy process for any avid video recorder.
Let us know what capture card you use and if you’re happy with it!
Richard Bennett
Richard Bennett is a writer and a lover of all things video.
Follow @Richard Bennett
Transforming Thumbnails: Implementing Neon Borders for Attraction
Your YouTube video, or any other clip published on any forum, gets a larger number of hits if it has an attractive thumbnail. And, the fact is, a thumbnail becomes 10x more attractive when the main character that the image has have a neon border around it.
With that said, in the following sections, you will learn a couple of methods on how to add a YouTube thumbnail border around the main characters and/or objects that are significant to the clip.
In this article
01 Add Glowing Neon Border to YouTube Thumbnail with Filmora
02 Add a Glowing Neon Border in YouTube Thumbnail with Canva
03 Outline a Person in a YouTube Thumbnail with Photoshop
Part 1: How to Add Neon Border to YouTube Thumbnail for Free with Filmora
Being one of the most versatile and intuitive post-production tools available in the market today, Wondershare Filmora X allows you to add a neon border to a YouTube thumbnail quite conveniently. You can learn how to get this done on Windows or Mac by following the steps given below.
For Win 7 or later (64-bit)
For macOS 10.12 or later
Step 1: Define Project Settings and Add Image to the Timeline
Launch Wondershare Filmora X on your PC (a MacBook Pro M1 is used here), ensure that the project aspect ratio is set to 16:9 (Widescreen) on the splash screen, and click New Project. On the main interface, click the Preview quality and display settings icon from the upper-right area of the Timeline, click Change Project Aspect Ratio, click to select 1280 x 720 (HD) from the Resolution menu of the Project Settings box, and click OK to save the custom project settings.

Then select My Media from the menu bar if not already selected, click Project Media from the navigation pane, and click Import from the Media box to select and import the image of the main character or object that you want to use in the thumbnail.

Now, drag the image from the Media box to the Timeline at the bottom.

Step 2: Clear Image Background, Add Border, and Add Custom Background
Go to Effects from the menu bar, click to select the Default tab and then AI Portrait from the navigation pane, and click and drag the Human Segmentation preset from the right box, and place it over the image track in the Timeline.

Double-click the image layer, scroll down the upper-left box to the Video Effects section, and use the Edge Thickness and Edge Feather sliders to adjust the character’s edges to make them as realistic as possible. Click OK when done.

Next, click and drag the Human Border preset over the image track in the Timeline, and follow the same procedure to customize the border. This will give the character a neon border effect.

Now, use the method explained earlier to import a custom image for the background, and drag and place it under the previous track in the Timeline.

If you are running the latest version of Filmora, you will find there are some neon light effects available under AI Portrait as well.

Step 3: Add Titles to Thumbnail
Go to Titles from the menu bar, click to select the Default tab and then Lower 3rds from the navigation pane, and click and drag your preferred lower-third preset from the right window to a separate layer in the Timeline. Double-click the lower-third layer, and use the available options in the upper-left window to change the text, its color, etc., and drag the textbox to place it to your preferred position on the image as well. Click OK to save the changes.
Next, click to select Titles from the navigation pane, and drag your preferred title from the right window to the upper-most track in the Timeline. Now use the method explained earlier to edit the text, its color, position, etc. to make it look professional.

For more tips and tricks for creating YouTube thumbnail, you can check this You Tube thumbnail creating guide.
Step 4: Get the Neon Border Thumbnail
Click the Snapshot (Camera) icon from the upper-right area of the Timeline, go to My Media from the menu bar, right-click the thumbnail of the screenshot you captured, and click Reveal in Finder (on Mac) or Reveal in Explorer (on Windows) to get to the folder the YouTube thumbnail border is saved in.

Part 2: How to Add a Glowing Neon Border in Your YouTube Thumbnail with Canva
Canva is another intuitive editing program that works on the web interface rather than having you download and install an app on your PC. You can add a neon border for YouTube thumbnails using Canva by following the instructions given below:
Step 1: Define Project Settings and Add a Background
After signing in to your Canva account, click Create a design from the top-right corner of the page, click Custom size from the bottom, define 1280 and 720 in the Width and Height fields on the box that appears respectively, and click Create new design.

Now, click to select Background from the navigation bar on the left (if the Background tool is not visible, click More and then choose Background from the expanded list), and click to select a background from the images available in the center pane.

Step 2: Upload an Image and Add Effects
Click Uploads from the navigation bar, click the More icon from the right of the Upload media button present at the top of the center pane, choose your preferred method to upload the image (with the transparent background) that you want to use, upload the image, and drag it from the center pane to the Canvas.
Note: You can use any of the tools available online to remove the background from your image for free.

To add a YouTube thumbnail border, make sure that the image that you added to the Canvas is selected, click the Duplicate icon from the upper-right area, and use the scaling handles of the copy of the image to increase its size a bit. Reposition the image back to its original location as well.
Then, click Edit image from the upper-left corner of the Canvas, click Duotone from the Edit image pane at the center, if need be, click See all, choose your preferred duotone effect to apply on the image, choose your preferred highlight and shadow colors from the box that appears next, and click Back from the top of the pane.

Next, click See all next to the Adjust section from the center pane, and drag the Blur slider to the right to increase the blur effect on the image.

Step 3: Position the Layers
While keeping the duplicate image selected, click the Position button from the upper-right area of the Canvas, and click Background to send the second image behind the first one to get the neon border effect for the photo.

Part 3: How to Outline a Person in a YouTube Thumbnail with Photoshop
Because YouTube thumbnails are nothing but static images, creating YouTube thumbnail border with Adobe Photoshop is comparatively easier. The process of doing this is given below:
Step 1: Define Document Preferences and Import an Image
Launch Adobe Photoshop on your PC, click Create new, and on the New Document customization box, define the width and height values to 1280 and 720 pixels respectively. Select Transparent from the Background Contents menu as well if not already selected. Click Create from the bottom to create a new Photoshop document with the specified document settings. Next, open the folder that contains the source image, drag the photo to Photoshop, and press Enter to place the photo.

Step 2: Remove Background from the Image
Make sure that the image layer is selected in the Layers panel on the right, go to Select from the menu bar at the top, and click Subject. From the bottom of the Layers panel, click the Add a mask icon to get rid of the background, leaving only the human on the Canvas.

Step 3: Add a Custom Background and an Outline Around the Subject
Use the method explained earlier to import a background image of your choice to Photoshop. Drag the background image layer to the bottom in the Layers panel. Double-click the masked layer, click to select Stroke from the left pane of the Layer Style box, and use the options available on the right to manage the size, color, position, etc. of the stroke that has been added around the human subject. Click OK when done, and then export the image normally to use it as a YouTube thumbnail border.

Summary
It is important to know that the default resolution of a YouTube thumbnail is 1280 x 720 pixels that is usually written and referred to as 720p. While adding a YouTube thumbnail border, it is also imperative to have a good sense of color combination and fonts. Furthermore, a decent tool like Wondershare Filmora X must be used to add an appealing neon border around the main subject in the thumbnail image easily and quickly.
02 Add a Glowing Neon Border in YouTube Thumbnail with Canva
03 Outline a Person in a YouTube Thumbnail with Photoshop
Part 1: How to Add Neon Border to YouTube Thumbnail for Free with Filmora
Being one of the most versatile and intuitive post-production tools available in the market today, Wondershare Filmora X allows you to add a neon border to a YouTube thumbnail quite conveniently. You can learn how to get this done on Windows or Mac by following the steps given below.
For Win 7 or later (64-bit)
For macOS 10.12 or later
Step 1: Define Project Settings and Add Image to the Timeline
Launch Wondershare Filmora X on your PC (a MacBook Pro M1 is used here), ensure that the project aspect ratio is set to 16:9 (Widescreen) on the splash screen, and click New Project. On the main interface, click the Preview quality and display settings icon from the upper-right area of the Timeline, click Change Project Aspect Ratio, click to select 1280 x 720 (HD) from the Resolution menu of the Project Settings box, and click OK to save the custom project settings.
Then select My Media from the menu bar if not already selected, click Project Media from the navigation pane, and click Import from the Media box to select and import the image of the main character or object that you want to use in the thumbnail.
Now, drag the image from the Media box to the Timeline at the bottom.
Step 2: Clear Image Background, Add Border, and Add Custom Background
Go to Effects from the menu bar, click to select the Default tab and then AI Portrait from the navigation pane, and click and drag the Human Segmentation preset from the right box, and place it over the image track in the Timeline.
Double-click the image layer, scroll down the upper-left box to the Video Effects section, and use the Edge Thickness and Edge Feather sliders to adjust the character’s edges to make them as realistic as possible. Click OK when done.
Next, click and drag the Human Border preset over the image track in the Timeline, and follow the same procedure to customize the border. This will give the character a neon border effect.
Now, use the method explained earlier to import a custom image for the background, and drag and place it under the previous track in the Timeline.
If you are running the latest version of Filmora, you will find there are some neon light effects available under AI Portrait as well.
Step 3: Add Titles to Thumbnail
Go to Titles from the menu bar, click to select the Default tab and then Lower 3rds from the navigation pane, and click and drag your preferred lower-third preset from the right window to a separate layer in the Timeline. Double-click the lower-third layer, and use the available options in the upper-left window to change the text, its color, etc., and drag the textbox to place it to your preferred position on the image as well. Click OK to save the changes.
Next, click to select Titles from the navigation pane, and drag your preferred title from the right window to the upper-most track in the Timeline. Now use the method explained earlier to edit the text, its color, position, etc. to make it look professional.
For more tips and tricks for creating YouTube thumbnail, you can check this You Tube thumbnail creating guide.
Step 4: Get the Neon Border Thumbnail
Click the Snapshot (Camera) icon from the upper-right area of the Timeline, go to My Media from the menu bar, right-click the thumbnail of the screenshot you captured, and click Reveal in Finder (on Mac) or Reveal in Explorer (on Windows) to get to the folder the YouTube thumbnail border is saved in.
Part 2: How to Add a Glowing Neon Border in Your YouTube Thumbnail with Canva
Canva is another intuitive editing program that works on the web interface rather than having you download and install an app on your PC. You can add a neon border for YouTube thumbnails using Canva by following the instructions given below:
Step 1: Define Project Settings and Add a Background
After signing in to your Canva account, click Create a design from the top-right corner of the page, click Custom size from the bottom, define 1280 and 720 in the Width and Height fields on the box that appears respectively, and click Create new design.
Now, click to select Background from the navigation bar on the left (if the Background tool is not visible, click More and then choose Background from the expanded list), and click to select a background from the images available in the center pane.
Step 2: Upload an Image and Add Effects
Click Uploads from the navigation bar, click the More icon from the right of the Upload media button present at the top of the center pane, choose your preferred method to upload the image (with the transparent background) that you want to use, upload the image, and drag it from the center pane to the Canvas.
Note: You can use any of the tools available online to remove the background from your image for free.
To add a YouTube thumbnail border, make sure that the image that you added to the Canvas is selected, click the Duplicate icon from the upper-right area, and use the scaling handles of the copy of the image to increase its size a bit. Reposition the image back to its original location as well.
Then, click Edit image from the upper-left corner of the Canvas, click Duotone from the Edit image pane at the center, if need be, click See all, choose your preferred duotone effect to apply on the image, choose your preferred highlight and shadow colors from the box that appears next, and click Back from the top of the pane.
Next, click See all next to the Adjust section from the center pane, and drag the Blur slider to the right to increase the blur effect on the image.
Step 3: Position the Layers
While keeping the duplicate image selected, click the Position button from the upper-right area of the Canvas, and click Background to send the second image behind the first one to get the neon border effect for the photo.
Part 3: How to Outline a Person in a YouTube Thumbnail with Photoshop
Because YouTube thumbnails are nothing but static images, creating YouTube thumbnail border with Adobe Photoshop is comparatively easier. The process of doing this is given below:
Step 1: Define Document Preferences and Import an Image
Launch Adobe Photoshop on your PC, click Create new, and on the New Document customization box, define the width and height values to 1280 and 720 pixels respectively. Select Transparent from the Background Contents menu as well if not already selected. Click Create from the bottom to create a new Photoshop document with the specified document settings. Next, open the folder that contains the source image, drag the photo to Photoshop, and press Enter to place the photo.
Step 2: Remove Background from the Image
Make sure that the image layer is selected in the Layers panel on the right, go to Select from the menu bar at the top, and click Subject. From the bottom of the Layers panel, click the Add a mask icon to get rid of the background, leaving only the human on the Canvas.
Step 3: Add a Custom Background and an Outline Around the Subject
Use the method explained earlier to import a background image of your choice to Photoshop. Drag the background image layer to the bottom in the Layers panel. Double-click the masked layer, click to select Stroke from the left pane of the Layer Style box, and use the options available on the right to manage the size, color, position, etc. of the stroke that has been added around the human subject. Click OK when done, and then export the image normally to use it as a YouTube thumbnail border.
Summary
It is important to know that the default resolution of a YouTube thumbnail is 1280 x 720 pixels that is usually written and referred to as 720p. While adding a YouTube thumbnail border, it is also imperative to have a good sense of color combination and fonts. Furthermore, a decent tool like Wondershare Filmora X must be used to add an appealing neon border around the main subject in the thumbnail image easily and quickly.
Also read:
- 2024 Approved Essential Insights for Integrating Hashtags Into Game-Focused YT Content
- Uploading Mastery with Premiere Pro for Online Platforms
- The Money Trail Exploring Mr. Beast's Path
- Top Choices Premier Video Cutting Tools For Online Streaming
- Crafting Motivational Life Vlogs for Fan Engagement
- In 2024, 5 Simplified Steps for Sequential YouTube Video Viewing (Free)
- 2024 Approved A Step-by-Step Guide to Using YouTube's Creative Commons License
- In 2024, Calculating Your Digital Footprint Understanding Views & Income From YouTube
- Boosting Watch Time and Reducing Churn on YouTube The Ultimate List of Methods for 2024
- Accelerate Engagement - Implementing the Top 12 Video Growth Strategies for 2024
- Dynamic Subscriber Buttons for Video Creators - Filmora Edition for 2024
- [Updated] Crafting the Perfect Introduction 15 Viral YouTube Video Intros
- Crafting Perfect YouTube Intro/End Videos at No Cost
- [Updated] Erase the Obvious Techniques for Masked YouTube Content
- In 2024, Comparative Analysis of TikTok & YouTube Shorts for Individual Content
- 2024 Approved Compre Points for a Smooth and Compliant 4K Youtube File Transfer
- Streamline Content Summaries Top Templates Examples
- In 2024, Engaging Audiences with Thrilling Haul Content Creation
- Vlog Verily Tips and Taboos in the Daily Digital Sphere
- IOS/Android Playback Silent YouTube Autoplay Tips
- Understanding YouTube's Content Crafting Environment
- 2024 Approved A Step-by-Step Guide Share YouTube Vids with FB Friends
- Elevate Your YouTube Presence Uncovering the 6 Key Strategies to Boost Retention Rates for 2024
- Tailoring Audio Rate on Mobile and Desktops for YouTube
- Achieve YouTube Stardom Top Strategies for Recognition and Growth
- [Updated] Decoding YouTube Exchange Threads
- [New] Developing a Streamlined Subscription Web Address
- 2024 Approved Deciphering the Language of YouTube Thumbnails Effectiveness
- Bite-Sized Video Lessons, Clearly
- Maximizing Traffic with Effective YouTube Titles
- [New] Crafting Effective YouTube Thumbnails & Banners
- Unique Conversation Starters for Streaming
- Coping with YouTube Copyright Claims A Step-by-Step Guide
- In 2024, Essential Illumination Products for Video Creators
- 2024 Approved Channel Expansion Techniques for 30+ Online Platforms
- The Blueprint for Influential Video Arrangements
- In 2024, Comprehensive Directory Extracting Youtube Intros
- Edu-Core Definitive Learning Channels Online for 2024
- Balancing Act Tripod Use for Stable Vlogging
- Optimizing Your Live Content From Twitch to YouTube Platform
- How to Get and Use Pokemon Go Promo Codes On Apple iPhone SE (2020) | Dr.fone
- In 2024, Is GSM Flasher ADB Legit? Full Review To Bypass Your Motorola Moto G14 Phone FRP Lock
- [Updated] Fixing OBS Screen Blackout Problems
- New In 2024, Inexpensive Mac MP3 Formatter Utility
- How To Change Vivo S18 Pro Lock Screen Password?
- Virtual Havens of Adventure (But Not Like GTA)
- [Updated] Boost Connectivity Discover the Best 5 Chrome Tools for Facebook Videos for 2024
- In 2024, Prime FB Extra Tools Enhanced Firefox Version Compatibility
- The Social Diner TikTok’s Culinary Hotspots
- Designing Your Perfect TikTok Outro for 2024
- [New] Snicker Sphere Hot Gags and Joke Artists of TikTok
- In 2024, How to Unlock T-Mobile iPhone 14 Plus online without SIM Card?
- How to Bypass iPhone 7 Plus Passcode Easily Video Inside | Dr.fone
- [New] 2024 Approved 15 Leading Windows 10 Recorders
- Mellow Your Playlist Device-Specific Techniques
- Best SFPR Settings for Leisurely Scenes for 2024
- The Best Translator to Translate Videos Online
- How to Remove Find My iPhone without Apple ID From your iPhone SE (2020)?
- Alternatives to Xsplit for Efficient Media Management
- How To Deal With the Vivo Y100 Screen Black But Still Works? | Dr.fone
- How To Unlock A Found iPhone 8 Plus?
- [Updated] Agricultural Epics Top 10 Rurality in Games
- Updated Best of the Bunch 6 Audio Conversion Tools Compared for 2024
- Updated Master VLC How to Play Videos in Slow Motion on Desktop and Mobile
- 4 Methods to Turn off Life 360 On Honor Magic5 Ultimate without Anyone Knowing | Dr.fone
- New Sound Purification Techniques How to Combat Persistent Echoes and Hiss for 2024
- In 2024, Easiest Guide How to Clone Vivo V27 Pro Phone? | Dr.fone
- 2024 Approved Streamline Your Social Footprint Share Videos on Facebook Easily
- New In 2024, Blending Sounds and Visuals Expert Strategies for Adding Audio to AE Projects
- New In 2024, Whats an AV1 Format and How Does It Impact Your Life?
- In 2024, Why is iPogo not working On Oppo Reno 10 5G? Fixed | Dr.fone
- In 2024, Best 4K All-in-One Touch Screen Desktops
- [Updated] 2024 Approved Gaming's Finest - Top 12 Tycoon Games Ensuring Hours of Fun
- Title: "Ultimate Buyer's Guide Top GPUs for YouTube Streamers"
- Author: Brian
- Created at : 2024-05-25 13:02:56
- Updated at : 2024-05-26 13:02:56
- Link: https://youtube-video-recordings.techidaily.com/ultimate-buyers-guide-top-gpus-for-youtube-streamers/
- License: This work is licensed under CC BY-NC-SA 4.0.
