
"Tutorial Manage Comment Permissions on YouTube"
Tutorial: Manage Comment Permissions on YouTube
How to Turn on or off Comments on YouTube

Liza Brown
Mar 27, 2024• Proven solutions
YouTube comments are enabled by default, and if they aren’t, learning how to turn on comments on YouTube is extremely simple. One of the major benefits of having the comments enabled on your YouTube videos is that you get genuine feedback from your audiences.
As a brand, it is imperative to thoroughly read all the comments that your YouTube videos receive. This not only helps you do sentimental analysis; it also enables you to understand what the viewers expect from you, and where should you focus more while recording and editing your footage.
Keeping all these points in mind, the following sections explain how to enable comments on YouTube and how to turn off comments on YouTube. Here you will also get to know what other types of security and privacy options are there that you can use to filter the comments posted by the disturbing elements.
Part 1: How to Turn on or Turn off Comments for YouTube Channel
If you don’t want any comments on any of the videos that you publish, you must learn how to disable comments on the YouTube channel. The process of doing so is explained below:
Step 1: Get to YouTube Studio
Use your favorite web browser to go to YouTube and sign in to your Google account. Click your profile picture from the top-right corner of the webpage, and click YouTube Studio from the menu that appears.

Step 2: Go to Channel’s Advanced Settings
From the bottom of the left pane, click the Settings icon, click Channel from the Settings box that comes up next, and go to Advanced settings from the right window.

Step 3: Turn Off Comments
From the Audience section in the right pane itself, click to select the Yes, set this channel as made for kids. I always upload content that’s made for kids radio button. Click SAVE from the bottom-right corner to save the changes in order to turn off comments on all the videos on your YouTube channel.
To turn on comments on all the videos on your YouTube channel, you can follow the instructions given below:
1. Set Channel Videos as Not Made for Kids
Use the method explained above to get to the channel’s Advanced settings box. Select the No, set this channel as not made for kids. I never upload content that’s made for kids radio button. Click SAVE to save the changes.

2. Define Acceptable Comment Types
Click the Settings icon from the bottom of the left pane one more time. On the Settings box, go to the Upload defaults category from the left pane, and go to Advanced settings from the right. From the Comment visibility drop-down list under the Comments section in the right, choose your preferred comment allowance type, and click SAVE to allow the comments on the videos the channel has.

3. Set Comment Allowance for Videos
Back on the YouTube Studio page, click Content from the left pane. From the right section, check the Video box at the top of the list to select all the videos the channel has. Click Edit from the column header, and click Comments from the menu that comes up. From the New value drop-down list, choose your preferred allowance option for the comments, click UPDATE VIDEOS from the upper-right area, check the I understand the implications of this action box, and click UPDATE VIDEOS to allow comments on all the videos of the channel.

Additional Info about Comments Options
The four options that become available when you allow the comments on your YouTube channel along with their meaning are:
- Allow all comments
When you choose this option, YouTube allows everyone to post any kind of comment, irrespective of how inappropriate or unacceptable the text is.
- Hold potentially inappropriate comments for review
This option allows all the comments from all the users only if YouTube assumes that the text is safe, and doesn’t contain any inappropriate words. In case YouTube detects some objectionable content such as spam or slang, the comment is not published, until you review the text, and approve it manually.
- Hold all comments for review
Selecting this option holds all the comments from all the users, and waits for you to review and allow or disallow each of them manually.
- Disable comments
When this option is selected, no one can post a comment to the video(s) whatsoever.
Part 2: Turn on or Turn off Comments for Specific Videos
As you might have noticed, any video that is marked as ‘Made for kids’ doesn’t allow users to post comments. You can exploit this feature to enable or disable commenting on specific YouTube videos as well.
To learn how to turn on comments on YouTube for a specific video, you can follow the steps given below:
Step 1: Go to the Content Page
Use the method explained earlier to go to YouTube Studio, and click Content from the navigation bar in the left.
Step 2: Go to the Target Video’s Details Page
Hover the mouse over the target video in the right window, and click the Details icon.
Step 3: Turn on Comments
From under the Audience section in the right window of the Video details page, select the No, it’s not made for kids radio button. Next, click SHOW MORE, scroll down to the Comments and ratings section, and choose your preferred privacy option from the Comment visibility drop-down list. Click SAVE from the upper-right area to save the changes.

Note: To learn how to disable comments on YouTube for specific video, you can repeat the above steps, and choose the Yes, it’s made for kids radio button from the Audience section when you are on the Video details page.
FAQs About YouTube Comments
1. Why can’t I comment on the YouTube video?
There could be several reasons for this. For instance, the video or the entire channel is configured as ‘Made for kids’ by the owner, comments are disabled for the video or the channel by the owner, you are using some inappropriate words in the comment that have been temporarily blocked by YouTube, and the text requires to be reviewed and approved by the owner before it becomes visible, etc.
2. I want people to comment on my Private video. What should I do?
At the time of this writing, YouTube doesn’t allow anyone to post a comment on any video that has been set as ‘Private’. If your video is configured that way, you must change its nature to ‘Unlisted’, and share its link to the users before they can post a comment.
3. How can I block certain words and links on the YouTube comments?
You can go to YouTube Studio > Settings > Community, and on the Automated Filters tab in the right window, add the words to block in the Blocked words field. You can add multiple words by separating them with commas. To block the comments with links, check the Block links box. Click SAVE to save the changes.

4. If I turn comments off and back on again, will the old comments come back?
Yes. When you turn off the comments, the existing comments disappear. When you turn them back on, all the previous comments reappear, and become visible to the audience.
5. If I change my comment settings, will the existing comments be impacted?
That depends on the nature of the comments. For instance, if you modify the settings, the changes are reflected on the comments posted on the new videos, and the new comments on your channel homepage. However, there will be no impact on the existing comments on the existing videos, new comments on the existing videos, and the existing comments on your channel’s homepage.
Conclusion
It is easy to understand how to turn on comments on YouTube. The best thing is, the comments are enabled by default, and if you don’t need them, you can simply disable them by configuring the videos or the entire channel as ‘Made for kids’. If the comments on any video were enabled previously, and are disabled later on, the existing comments automatically disappear. They reappear when the comments on the video are reenabled.
Liza Brown
Liza Brown is a writer and a lover of all things video.
Follow @Liza Brown
Liza Brown
Mar 27, 2024• Proven solutions
YouTube comments are enabled by default, and if they aren’t, learning how to turn on comments on YouTube is extremely simple. One of the major benefits of having the comments enabled on your YouTube videos is that you get genuine feedback from your audiences.
As a brand, it is imperative to thoroughly read all the comments that your YouTube videos receive. This not only helps you do sentimental analysis; it also enables you to understand what the viewers expect from you, and where should you focus more while recording and editing your footage.
Keeping all these points in mind, the following sections explain how to enable comments on YouTube and how to turn off comments on YouTube. Here you will also get to know what other types of security and privacy options are there that you can use to filter the comments posted by the disturbing elements.
Part 1: How to Turn on or Turn off Comments for YouTube Channel
If you don’t want any comments on any of the videos that you publish, you must learn how to disable comments on the YouTube channel. The process of doing so is explained below:
Step 1: Get to YouTube Studio
Use your favorite web browser to go to YouTube and sign in to your Google account. Click your profile picture from the top-right corner of the webpage, and click YouTube Studio from the menu that appears.
Step 2: Go to Channel’s Advanced Settings
From the bottom of the left pane, click the Settings icon, click Channel from the Settings box that comes up next, and go to Advanced settings from the right window.
Step 3: Turn Off Comments
From the Audience section in the right pane itself, click to select the Yes, set this channel as made for kids. I always upload content that’s made for kids radio button. Click SAVE from the bottom-right corner to save the changes in order to turn off comments on all the videos on your YouTube channel.
To turn on comments on all the videos on your YouTube channel, you can follow the instructions given below:
1. Set Channel Videos as Not Made for Kids
Use the method explained above to get to the channel’s Advanced settings box. Select the No, set this channel as not made for kids. I never upload content that’s made for kids radio button. Click SAVE to save the changes.
2. Define Acceptable Comment Types
Click the Settings icon from the bottom of the left pane one more time. On the Settings box, go to the Upload defaults category from the left pane, and go to Advanced settings from the right. From the Comment visibility drop-down list under the Comments section in the right, choose your preferred comment allowance type, and click SAVE to allow the comments on the videos the channel has.
3. Set Comment Allowance for Videos
Back on the YouTube Studio page, click Content from the left pane. From the right section, check the Video box at the top of the list to select all the videos the channel has. Click Edit from the column header, and click Comments from the menu that comes up. From the New value drop-down list, choose your preferred allowance option for the comments, click UPDATE VIDEOS from the upper-right area, check the I understand the implications of this action box, and click UPDATE VIDEOS to allow comments on all the videos of the channel.
Additional Info about Comments Options
The four options that become available when you allow the comments on your YouTube channel along with their meaning are:
- Allow all comments
When you choose this option, YouTube allows everyone to post any kind of comment, irrespective of how inappropriate or unacceptable the text is.
- Hold potentially inappropriate comments for review
This option allows all the comments from all the users only if YouTube assumes that the text is safe, and doesn’t contain any inappropriate words. In case YouTube detects some objectionable content such as spam or slang, the comment is not published, until you review the text, and approve it manually.
- Hold all comments for review
Selecting this option holds all the comments from all the users, and waits for you to review and allow or disallow each of them manually.
- Disable comments
When this option is selected, no one can post a comment to the video(s) whatsoever.
Part 2: Turn on or Turn off Comments for Specific Videos
As you might have noticed, any video that is marked as ‘Made for kids’ doesn’t allow users to post comments. You can exploit this feature to enable or disable commenting on specific YouTube videos as well.
To learn how to turn on comments on YouTube for a specific video, you can follow the steps given below:
Step 1: Go to the Content Page
Use the method explained earlier to go to YouTube Studio, and click Content from the navigation bar in the left.
Step 2: Go to the Target Video’s Details Page
Hover the mouse over the target video in the right window, and click the Details icon.
Step 3: Turn on Comments
From under the Audience section in the right window of the Video details page, select the No, it’s not made for kids radio button. Next, click SHOW MORE, scroll down to the Comments and ratings section, and choose your preferred privacy option from the Comment visibility drop-down list. Click SAVE from the upper-right area to save the changes.
Note: To learn how to disable comments on YouTube for specific video, you can repeat the above steps, and choose the Yes, it’s made for kids radio button from the Audience section when you are on the Video details page.
FAQs About YouTube Comments
1. Why can’t I comment on the YouTube video?
There could be several reasons for this. For instance, the video or the entire channel is configured as ‘Made for kids’ by the owner, comments are disabled for the video or the channel by the owner, you are using some inappropriate words in the comment that have been temporarily blocked by YouTube, and the text requires to be reviewed and approved by the owner before it becomes visible, etc.
2. I want people to comment on my Private video. What should I do?
At the time of this writing, YouTube doesn’t allow anyone to post a comment on any video that has been set as ‘Private’. If your video is configured that way, you must change its nature to ‘Unlisted’, and share its link to the users before they can post a comment.
3. How can I block certain words and links on the YouTube comments?
You can go to YouTube Studio > Settings > Community, and on the Automated Filters tab in the right window, add the words to block in the Blocked words field. You can add multiple words by separating them with commas. To block the comments with links, check the Block links box. Click SAVE to save the changes.
4. If I turn comments off and back on again, will the old comments come back?
Yes. When you turn off the comments, the existing comments disappear. When you turn them back on, all the previous comments reappear, and become visible to the audience.
5. If I change my comment settings, will the existing comments be impacted?
That depends on the nature of the comments. For instance, if you modify the settings, the changes are reflected on the comments posted on the new videos, and the new comments on your channel homepage. However, there will be no impact on the existing comments on the existing videos, new comments on the existing videos, and the existing comments on your channel’s homepage.
Conclusion
It is easy to understand how to turn on comments on YouTube. The best thing is, the comments are enabled by default, and if you don’t need them, you can simply disable them by configuring the videos or the entire channel as ‘Made for kids’. If the comments on any video were enabled previously, and are disabled later on, the existing comments automatically disappear. They reappear when the comments on the video are reenabled.
Liza Brown
Liza Brown is a writer and a lover of all things video.
Follow @Liza Brown
How to Shuffle YouTube Playlist
We often create playlists on YouTube for different moods, genres, and occasions, but you may want to change the order of the videos or songs in your list. This is where the shuffling feature can help you.
Shuffling your YouTube playlist is an excellent way to mix things up and play various videos or songs from different channels without manually selecting each one.
But if you don’t know how to use the “Shuffle” feature, we’ll show you how to shuffle YouTube playlists on PCs, phones, and TVs. So, keep reading to start randomizing your YouTube playlist to mix up your music or video collection!
How To Shuffle YouTube Playlist On PCs/Phones/TVs?
Whether it’s a mix of our favorite songs, a set of dance videos to help get us through our workout, or a compilation of cat videos that never fail to make us smile, we all have that one go-to playlist we want to listen to over and over again.
But sometimes, even our favorite playlist can feel a little stale. That’s when it’s time to shuffle things up and give the playlist a fresh new feel.
To help you with this, we’ve provided step-by-step tutorials to help you shuffle Youtube playlists on your computer, phone, or Smart TV without having much trouble.
Part 1. How to Shuffle YouTube Playlist on PC?
Here is the step-by-step guide that can help you quickly shuffle your YouTube playlist on your PC, whether it’s before playback while watching, or from the Library:
How To Shuffle the Playlist Before Playlist Playback
The following is a quick rundown of the steps you need to take to shuffle the playlist before playback:
Step 1: First, open a browser on your PC to visit the YouTubewebsite and log in to your account using your credentials.
Step 2: Now, click the “Menu” (hamburger) icon on the top left of the YouTube home page and select your playlist from the menu.

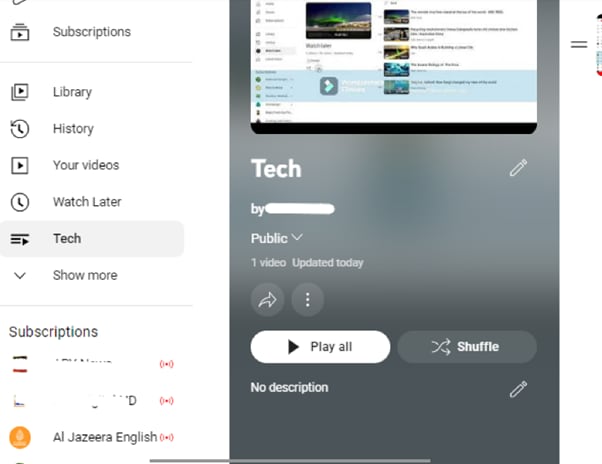
Step 3: On the next page, click the “Shuffle” button next to the “Play All” option in the playlist details section to randomize your YouTube playlist.
That’s about it! Your videos/songs will now play in random order.
How To Shuffle The Playlist While Listening
To learn how to shuffle a YouTube playlist while listening to your favorite songs, do the following steps in sequence:
Step 1: Launch your preferred browser on your PC and head to the “YouTube” homepage.
Step 2: Now, use the search icon to find your favorite song’s playlist or choose from the left “Menu” panel, and click “Play All” to listen to the music.
Step 3: When you start playing, you’ll find your playlist next to the video player. Click the crisscrossed arrows “Shuffle” icon below the playlist title, and the songs will start playing randomly instead of in proper order.

How To Shuffle The Playlist In the Library
If you want to randomize your YouTube playlist in the library section, follow these step-by-step instructions:
Step 1: In the first step, head to the YouTube website using your preferred browser on the PC and sign in to your account.
Step 2: Click the “Library” option from the left side panel on the YouTube homepage and scroll down to the “Playlists” section.
Step 3: In the next step, find your playlist and click the “View Full Playlist” option below. This will take you to the playlist page.
Step 4: Finally, on the playlist page, click the “Shuffle” option next to “Play All” in the details section. Now, when you start watching the videos in the playlist, they will play randomly.
Part 2. How To Shuffle YouTube Playlist On Handy?
It is possible to shuffle your YouTube playlist on your handy (iPhone or Android) with the following workarounds.
How To Shuffle The Playlist Before Playlist Playback/From Library
The following steps will help you shuffle your favorite playlists before playlist playback or from the Library:
Step 1: If the YouTube app is not installed on your phone, head to the “App Store “ or “GooglePlay Store “ and install the app.
Step 2: Now, launch the YouTube app on your handy and tap the “Library” option at the bottom right corner of the app’s home screen.
Step 3: Now, scroll down to the “Playlist” section and tap the playlist you want to shuffle. On the playlist screen, tap “Shuffle” next to the “Play All” option, and that’s it!

You can now enjoy your favorite videos and songs in a new order.
How To Shuffle The Playlist While Listening
To change the order of your favorite songs in the YouTube playlist while listening to it on your mobile device, do the following steps:
Step 1: First, open the “YouTube” app on your device and log into your account if you are not signed in already.
Step 2: On the app’s home screen, tap the “Search” bar, type the playlist name, and tap to open it to start listening to your favorite songs.
Step 3: You will find the playlist available under the video player. Simply tap the crisscrossed arrows “Shuffle” icon below the playlist’s title.

That’s all to it! Now you can enjoy your YouTube playlist in totally random order.
Part 3. How To Shuffle YouTube Playlist on TV?
The YouTube app is also available on smart TVs, which many people find to be a more enjoyable experience than watching YouTube videos on a small screen.
However, unfortunately, there is no way to shuffle a YouTube playlist on a Smart TV. This is a feature that is currently only available on the YouTube website and apps.
But if your Smart TV comes with a built-in Chromecast option, you can screen mirror the YouTube app on your TV and shuffle the playlist to your liking in the following way:
Step 1: In the first step, make sure your Smart TV and mobile device are connected to the same internet connection.
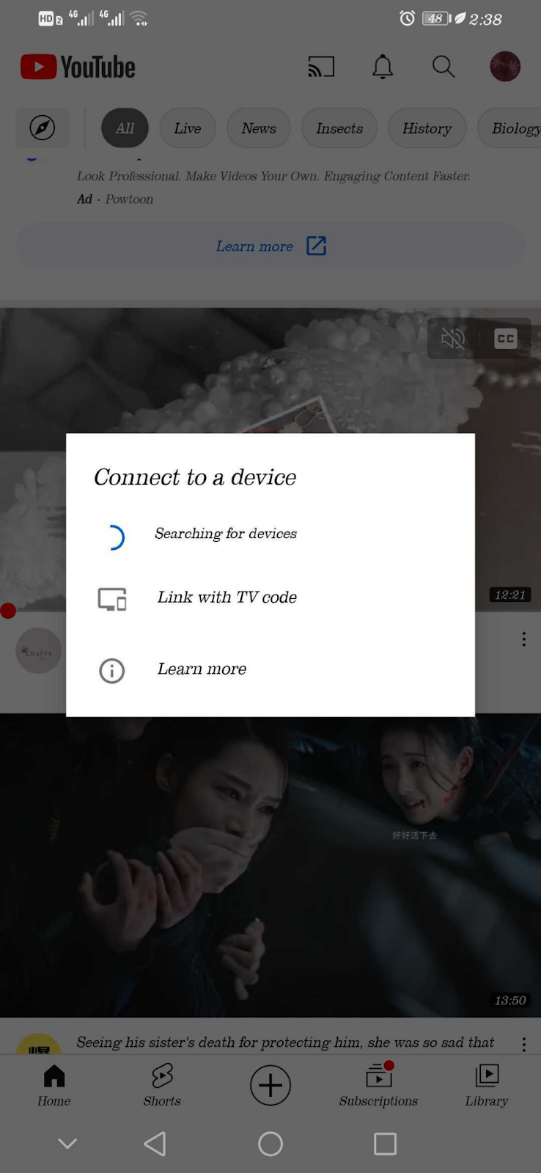
Step 2: In the next step, launch the YouTube app on your device, and access your playlist under the “Library” tab. Tap the “Shuffle” icon in the playlist details section and play your playlist
Step 3: In the final step, tap the “Cast” icon at the top-right of the screen and select your TV from the list to cast to.
Now you can enjoy randomly listen to your favorite songs on a more prominent display without getting bored.
Note:
You can also use other streaming devices like Firestick or Apple Airplay to cast YouTube on your Smart TV.
A Bouns Tip: How To Make a Music Video by Yourself?
We hope you have found appropriate solutions to shuffle your YouTube Playlist. Besides, supposing you are a music and YouTube lover, do you want to create videos with your favourite music? If yes, you can watch the video we have prepared for you. In this video, you will learn how to easily use a user-friendly video editor, Filmora, to make music videos!
In this comprehensive guide, we’ve provided a detailed step-by-step guide to show you how to shuffle YouTube playlists on your computer, mobile device, or Smart TV.
Hopefully, you’ve found this article informative and can now enjoy watching or listening to your favorite video/song in a random order in your YouTube playlist.
We often create playlists on YouTube for different moods, genres, and occasions, but you may want to change the order of the videos or songs in your list. This is where the shuffling feature can help you.
Shuffling your YouTube playlist is an excellent way to mix things up and play various videos or songs from different channels without manually selecting each one.
But if you don’t know how to use the “Shuffle” feature, we’ll show you how to shuffle YouTube playlists on PCs, phones, and TVs. So, keep reading to start randomizing your YouTube playlist to mix up your music or video collection!
How To Shuffle YouTube Playlist On PCs/Phones/TVs?
Whether it’s a mix of our favorite songs, a set of dance videos to help get us through our workout, or a compilation of cat videos that never fail to make us smile, we all have that one go-to playlist we want to listen to over and over again.
But sometimes, even our favorite playlist can feel a little stale. That’s when it’s time to shuffle things up and give the playlist a fresh new feel.
To help you with this, we’ve provided step-by-step tutorials to help you shuffle Youtube playlists on your computer, phone, or Smart TV without having much trouble.
Part 1. How to Shuffle YouTube Playlist on PC?
Here is the step-by-step guide that can help you quickly shuffle your YouTube playlist on your PC, whether it’s before playback while watching, or from the Library:
How To Shuffle the Playlist Before Playlist Playback
The following is a quick rundown of the steps you need to take to shuffle the playlist before playback:
Step 1: First, open a browser on your PC to visit the YouTubewebsite and log in to your account using your credentials.
Step 2: Now, click the “Menu” (hamburger) icon on the top left of the YouTube home page and select your playlist from the menu.
Step 3: On the next page, click the “Shuffle” button next to the “Play All” option in the playlist details section to randomize your YouTube playlist.
That’s about it! Your videos/songs will now play in random order.
How To Shuffle The Playlist While Listening
To learn how to shuffle a YouTube playlist while listening to your favorite songs, do the following steps in sequence:
Step 1: Launch your preferred browser on your PC and head to the “YouTube” homepage.
Step 2: Now, use the search icon to find your favorite song’s playlist or choose from the left “Menu” panel, and click “Play All” to listen to the music.
Step 3: When you start playing, you’ll find your playlist next to the video player. Click the crisscrossed arrows “Shuffle” icon below the playlist title, and the songs will start playing randomly instead of in proper order.
How To Shuffle The Playlist In the Library
If you want to randomize your YouTube playlist in the library section, follow these step-by-step instructions:
Step 1: In the first step, head to the YouTube website using your preferred browser on the PC and sign in to your account.
Step 2: Click the “Library” option from the left side panel on the YouTube homepage and scroll down to the “Playlists” section.
Step 3: In the next step, find your playlist and click the “View Full Playlist” option below. This will take you to the playlist page.
Step 4: Finally, on the playlist page, click the “Shuffle” option next to “Play All” in the details section. Now, when you start watching the videos in the playlist, they will play randomly.
Part 2. How To Shuffle YouTube Playlist On Handy?
It is possible to shuffle your YouTube playlist on your handy (iPhone or Android) with the following workarounds.
How To Shuffle The Playlist Before Playlist Playback/From Library
The following steps will help you shuffle your favorite playlists before playlist playback or from the Library:
Step 1: If the YouTube app is not installed on your phone, head to the “App Store “ or “GooglePlay Store “ and install the app.
Step 2: Now, launch the YouTube app on your handy and tap the “Library” option at the bottom right corner of the app’s home screen.
Step 3: Now, scroll down to the “Playlist” section and tap the playlist you want to shuffle. On the playlist screen, tap “Shuffle” next to the “Play All” option, and that’s it!
You can now enjoy your favorite videos and songs in a new order.
How To Shuffle The Playlist While Listening
To change the order of your favorite songs in the YouTube playlist while listening to it on your mobile device, do the following steps:
Step 1: First, open the “YouTube” app on your device and log into your account if you are not signed in already.
Step 2: On the app’s home screen, tap the “Search” bar, type the playlist name, and tap to open it to start listening to your favorite songs.
Step 3: You will find the playlist available under the video player. Simply tap the crisscrossed arrows “Shuffle” icon below the playlist’s title.
That’s all to it! Now you can enjoy your YouTube playlist in totally random order.
Part 3. How To Shuffle YouTube Playlist on TV?
The YouTube app is also available on smart TVs, which many people find to be a more enjoyable experience than watching YouTube videos on a small screen.
However, unfortunately, there is no way to shuffle a YouTube playlist on a Smart TV. This is a feature that is currently only available on the YouTube website and apps.
But if your Smart TV comes with a built-in Chromecast option, you can screen mirror the YouTube app on your TV and shuffle the playlist to your liking in the following way:
Step 1: In the first step, make sure your Smart TV and mobile device are connected to the same internet connection.
Step 2: In the next step, launch the YouTube app on your device, and access your playlist under the “Library” tab. Tap the “Shuffle” icon in the playlist details section and play your playlist
Step 3: In the final step, tap the “Cast” icon at the top-right of the screen and select your TV from the list to cast to.
Now you can enjoy randomly listen to your favorite songs on a more prominent display without getting bored.
Note:
You can also use other streaming devices like Firestick or Apple Airplay to cast YouTube on your Smart TV.
A Bouns Tip: How To Make a Music Video by Yourself?
We hope you have found appropriate solutions to shuffle your YouTube Playlist. Besides, supposing you are a music and YouTube lover, do you want to create videos with your favourite music? If yes, you can watch the video we have prepared for you. In this video, you will learn how to easily use a user-friendly video editor, Filmora, to make music videos!
In this comprehensive guide, we’ve provided a detailed step-by-step guide to show you how to shuffle YouTube playlists on your computer, mobile device, or Smart TV.
Hopefully, you’ve found this article informative and can now enjoy watching or listening to your favorite video/song in a random order in your YouTube playlist.
Also read:
- Boost Your Engagement Now! - Discover These Key YouTube Shortcuts
- [Updated] Crafting Unique Thumbnails for YouTube Content
- Mini Magnate Ryan Kaji’s Staggering Income From Video Platform
- 2024 Approved Diving Into Popularity Top 10 YouTube Creators by Views & Subs
- [New] Essential Guide to YouTube Video Resolutions & Aspects
- Champion Top Titles Best Free Video Caption Grabs
- Transforming YouTube Videos Bars-Free Vision
- [New] A Bundle of Nine Premium Holiday Treasures Watch for Free on YouTube
- Essential GIF Making Software The Ultimate Guide for 2024
- Climbing to YouTube Zenith A Step-by-Step Guide to Creative Studio Mastery for 2024
- A Beginner's Tutorial How to Insert On-Screen Dialogue in Video Formats
- Beyond the Buffering A Ranked List of Top 27 Video Streamers Excluding YouTube
- [Updated] 5 Innovative Apps to Design Stunning Openings
- Musical Masterclasses in 15 Short Video Formats on YouTube
- A Deep-Dive Into Video Platform Profit Margins DailyMovement vs YouTube
- 2024 Approved Custom Coverage Made Simple Fast-Track Your YouTube Shorts Design
- 12 Unparalleled YouTube Gamers' Intros Revealed Free or Fee for 2024
- YouTube Money Matters How to Understand Your Partner Payouts
- Turn YouTube Videos Into Soundtracks
- 2024 Approved Effortless Music Extraction Choose the Right Apps for YouTube & MP3
- Youtube's Monetization Value per Million Views
- [Updated] Crafting the Perfect YouTube Channel Url A Quick Guide
- [New] Choosing Free Video Editing Software on iPhone & iPad
- The Editor's Guide to Powerful Notebooks and More
- Comparative Study of YouTubes and DailyMentions
- Elevating Your Teaching Toolkit How to Craft Exceptional Videos for Learning for 2024
- Breaking Down YouTube TV Must Know Aspects for Consumers
- [New] 29 Cost-Free YouTube Sound Extractors Free YouTube Audio Downloads
- Elevate Your Video Game Top 10 Keyword Strategy Resources for 2024
- Gaming Insiders' YouTube Channels You Should See
- In 2024, A Step-by-Step Guide to Crafting an Effective YouTube Watch Later Playlist
- [New] Boost Engagement Discover the Top 5 YouTube Promotion Tactics
- Maximize View Count Best YT Thumbnail Sizes
- The Ultimate Guide to Choosing a Premium Portable Vlog Camera
- Channel Aspirations – Reach and Secure 10K Views for YouTube Partner Perks for 2024
- Top 20 Anime-Related YouTube Browses to Brighten Your Day
- Explore 10 Premium YouTube-to-WebM Converter Tools
- [New] A List to Remember Reddit’s Highly Endorsed Top Threads
- [New] Transforming Your Instagram Video Into a Social Sensation
- Infinix Note 30 VIP Not Receiving Texts? 10 Hassle-Free Solutions Here | Dr.fone
- 2024 Approved Revolutionary Tools for Downloading Facebook Content on Firefox, Updated
- 2024 Approved Discovering the Top 5 Audio Mixers Perfect for Mac Users
- In 2024, How to Unlock iPhone SE (2020)?
- [New] In 2024, Innovative Online Services for Crafting Perfect Facebook Covers
- How to Restore Deleted Vivo Y78 5G Pictures An Easy Method Explained.
- In 2024, How to Bypass Apple iPhone 12 Passcode Easily Video Inside | Dr.fone
- Updated 2024 Approved AI-Driven Video Editors for Perfect Reframing Every Time
- Unveiling the Secrets of Facebook Story Filming and Editing
- [New] Samsung UBD-K8500 Review
- [New] 2024 Approved Vimeo's Gratis Editing Guide Enhance Videos on Budget
- Updated Maximizing Creativity A Look at the 6 Best Free Online Audio Adjustment Applications for 2024
- [Updated] 2024 Approved Mastering Instagram’s New Trends Reels and Stories
- Title: "Tutorial Manage Comment Permissions on YouTube"
- Author: Brian
- Created at : 2024-05-25 13:02:45
- Updated at : 2024-05-26 13:02:45
- Link: https://youtube-video-recordings.techidaily.com/tutorial-manage-comment-permissions-on-youtube/
- License: This work is licensed under CC BY-NC-SA 4.0.
