
:max_bytes(150000):strip_icc()/facebooksharing-5c0f9f3346e0fb0001fb71fe.jpg)
Transform Ordinary Thumbnails Into Effervescent Designs
Transform Ordinary Thumbnails Into Effervescent Designs
Your YouTube video, or any other clip published on any forum, gets a larger number of hits if it has an attractive thumbnail. And, the fact is, a thumbnail becomes 10x more attractive when the main character that the image has have a neon border around it.
With that said, in the following sections, you will learn a couple of methods on how to add a YouTube thumbnail border around the main characters and/or objects that are significant to the clip.
In this article
01 Add Glowing Neon Border to YouTube Thumbnail with Filmora
02 Add a Glowing Neon Border in YouTube Thumbnail with Canva
03 Outline a Person in a YouTube Thumbnail with Photoshop
Part 1: How to Add Neon Border to YouTube Thumbnail for Free with Filmora
Being one of the most versatile and intuitive post-production tools available in the market today, Wondershare Filmora X allows you to add a neon border to a YouTube thumbnail quite conveniently. You can learn how to get this done on Windows or Mac by following the steps given below.
For Win 7 or later (64-bit)
For macOS 10.12 or later
Step 1: Define Project Settings and Add Image to the Timeline
Launch Wondershare Filmora X on your PC (a MacBook Pro M1 is used here), ensure that the project aspect ratio is set to 16:9 (Widescreen) on the splash screen, and click New Project. On the main interface, click the Preview quality and display settings icon from the upper-right area of the Timeline, click Change Project Aspect Ratio, click to select 1280 x 720 (HD) from the Resolution menu of the Project Settings box, and click OK to save the custom project settings.

Then select My Media from the menu bar if not already selected, click Project Media from the navigation pane, and click Import from the Media box to select and import the image of the main character or object that you want to use in the thumbnail.

Now, drag the image from the Media box to the Timeline at the bottom.

Step 2: Clear Image Background, Add Border, and Add Custom Background
Go to Effects from the menu bar, click to select the Default tab and then AI Portrait from the navigation pane, and click and drag the Human Segmentation preset from the right box, and place it over the image track in the Timeline.

Double-click the image layer, scroll down the upper-left box to the Video Effects section, and use the Edge Thickness and Edge Feather sliders to adjust the character’s edges to make them as realistic as possible. Click OK when done.

Next, click and drag the Human Border preset over the image track in the Timeline, and follow the same procedure to customize the border. This will give the character a neon border effect.

Now, use the method explained earlier to import a custom image for the background, and drag and place it under the previous track in the Timeline.

If you are running the latest version of Filmora, you will find there are some neon light effects available under AI Portrait as well.

Step 3: Add Titles to Thumbnail
Go to Titles from the menu bar, click to select the Default tab and then Lower 3rds from the navigation pane, and click and drag your preferred lower-third preset from the right window to a separate layer in the Timeline. Double-click the lower-third layer, and use the available options in the upper-left window to change the text, its color, etc., and drag the textbox to place it to your preferred position on the image as well. Click OK to save the changes.
Next, click to select Titles from the navigation pane, and drag your preferred title from the right window to the upper-most track in the Timeline. Now use the method explained earlier to edit the text, its color, position, etc. to make it look professional.

For more tips and tricks for creating YouTube thumbnail, you can check this You Tube thumbnail creating guide.
Step 4: Get the Neon Border Thumbnail
Click the Snapshot (Camera) icon from the upper-right area of the Timeline, go to My Media from the menu bar, right-click the thumbnail of the screenshot you captured, and click Reveal in Finder (on Mac) or Reveal in Explorer (on Windows) to get to the folder the YouTube thumbnail border is saved in.

Part 2: How to Add a Glowing Neon Border in Your YouTube Thumbnail with Canva
Canva is another intuitive editing program that works on the web interface rather than having you download and install an app on your PC. You can add a neon border for YouTube thumbnails using Canva by following the instructions given below:
Step 1: Define Project Settings and Add a Background
After signing in to your Canva account, click Create a design from the top-right corner of the page, click Custom size from the bottom, define 1280 and 720 in the Width and Height fields on the box that appears respectively, and click Create new design.

Now, click to select Background from the navigation bar on the left (if the Background tool is not visible, click More and then choose Background from the expanded list), and click to select a background from the images available in the center pane.

Step 2: Upload an Image and Add Effects
Click Uploads from the navigation bar, click the More icon from the right of the Upload media button present at the top of the center pane, choose your preferred method to upload the image (with the transparent background) that you want to use, upload the image, and drag it from the center pane to the Canvas.
Note: You can use any of the tools available online to remove the background from your image for free.

To add a YouTube thumbnail border, make sure that the image that you added to the Canvas is selected, click the Duplicate icon from the upper-right area, and use the scaling handles of the copy of the image to increase its size a bit. Reposition the image back to its original location as well.
Then, click Edit image from the upper-left corner of the Canvas, click Duotone from the Edit image pane at the center, if need be, click See all, choose your preferred duotone effect to apply on the image, choose your preferred highlight and shadow colors from the box that appears next, and click Back from the top of the pane.

Next, click See all next to the Adjust section from the center pane, and drag the Blur slider to the right to increase the blur effect on the image.

Step 3: Position the Layers
While keeping the duplicate image selected, click the Position button from the upper-right area of the Canvas, and click Background to send the second image behind the first one to get the neon border effect for the photo.

Part 3: How to Outline a Person in a YouTube Thumbnail with Photoshop
Because YouTube thumbnails are nothing but static images, creating YouTube thumbnail border with Adobe Photoshop is comparatively easier. The process of doing this is given below:
Step 1: Define Document Preferences and Import an Image
Launch Adobe Photoshop on your PC, click Create new, and on the New Document customization box, define the width and height values to 1280 and 720 pixels respectively. Select Transparent from the Background Contents menu as well if not already selected. Click Create from the bottom to create a new Photoshop document with the specified document settings. Next, open the folder that contains the source image, drag the photo to Photoshop, and press Enter to place the photo.

Step 2: Remove Background from the Image
Make sure that the image layer is selected in the Layers panel on the right, go to Select from the menu bar at the top, and click Subject. From the bottom of the Layers panel, click the Add a mask icon to get rid of the background, leaving only the human on the Canvas.

Step 3: Add a Custom Background and an Outline Around the Subject
Use the method explained earlier to import a background image of your choice to Photoshop. Drag the background image layer to the bottom in the Layers panel. Double-click the masked layer, click to select Stroke from the left pane of the Layer Style box, and use the options available on the right to manage the size, color, position, etc. of the stroke that has been added around the human subject. Click OK when done, and then export the image normally to use it as a YouTube thumbnail border.

Summary
It is important to know that the default resolution of a YouTube thumbnail is 1280 x 720 pixels that is usually written and referred to as 720p. While adding a YouTube thumbnail border, it is also imperative to have a good sense of color combination and fonts. Furthermore, a decent tool like Wondershare Filmora X must be used to add an appealing neon border around the main subject in the thumbnail image easily and quickly.
02 Add a Glowing Neon Border in YouTube Thumbnail with Canva
03 Outline a Person in a YouTube Thumbnail with Photoshop
Part 1: How to Add Neon Border to YouTube Thumbnail for Free with Filmora
Being one of the most versatile and intuitive post-production tools available in the market today, Wondershare Filmora X allows you to add a neon border to a YouTube thumbnail quite conveniently. You can learn how to get this done on Windows or Mac by following the steps given below.
For Win 7 or later (64-bit)
For macOS 10.12 or later
Step 1: Define Project Settings and Add Image to the Timeline
Launch Wondershare Filmora X on your PC (a MacBook Pro M1 is used here), ensure that the project aspect ratio is set to 16:9 (Widescreen) on the splash screen, and click New Project. On the main interface, click the Preview quality and display settings icon from the upper-right area of the Timeline, click Change Project Aspect Ratio, click to select 1280 x 720 (HD) from the Resolution menu of the Project Settings box, and click OK to save the custom project settings.
Then select My Media from the menu bar if not already selected, click Project Media from the navigation pane, and click Import from the Media box to select and import the image of the main character or object that you want to use in the thumbnail.
Now, drag the image from the Media box to the Timeline at the bottom.
Step 2: Clear Image Background, Add Border, and Add Custom Background
Go to Effects from the menu bar, click to select the Default tab and then AI Portrait from the navigation pane, and click and drag the Human Segmentation preset from the right box, and place it over the image track in the Timeline.
Double-click the image layer, scroll down the upper-left box to the Video Effects section, and use the Edge Thickness and Edge Feather sliders to adjust the character’s edges to make them as realistic as possible. Click OK when done.
Next, click and drag the Human Border preset over the image track in the Timeline, and follow the same procedure to customize the border. This will give the character a neon border effect.
Now, use the method explained earlier to import a custom image for the background, and drag and place it under the previous track in the Timeline.
If you are running the latest version of Filmora, you will find there are some neon light effects available under AI Portrait as well.
Step 3: Add Titles to Thumbnail
Go to Titles from the menu bar, click to select the Default tab and then Lower 3rds from the navigation pane, and click and drag your preferred lower-third preset from the right window to a separate layer in the Timeline. Double-click the lower-third layer, and use the available options in the upper-left window to change the text, its color, etc., and drag the textbox to place it to your preferred position on the image as well. Click OK to save the changes.
Next, click to select Titles from the navigation pane, and drag your preferred title from the right window to the upper-most track in the Timeline. Now use the method explained earlier to edit the text, its color, position, etc. to make it look professional.
For more tips and tricks for creating YouTube thumbnail, you can check this You Tube thumbnail creating guide.
Step 4: Get the Neon Border Thumbnail
Click the Snapshot (Camera) icon from the upper-right area of the Timeline, go to My Media from the menu bar, right-click the thumbnail of the screenshot you captured, and click Reveal in Finder (on Mac) or Reveal in Explorer (on Windows) to get to the folder the YouTube thumbnail border is saved in.
Part 2: How to Add a Glowing Neon Border in Your YouTube Thumbnail with Canva
Canva is another intuitive editing program that works on the web interface rather than having you download and install an app on your PC. You can add a neon border for YouTube thumbnails using Canva by following the instructions given below:
Step 1: Define Project Settings and Add a Background
After signing in to your Canva account, click Create a design from the top-right corner of the page, click Custom size from the bottom, define 1280 and 720 in the Width and Height fields on the box that appears respectively, and click Create new design.
Now, click to select Background from the navigation bar on the left (if the Background tool is not visible, click More and then choose Background from the expanded list), and click to select a background from the images available in the center pane.
Step 2: Upload an Image and Add Effects
Click Uploads from the navigation bar, click the More icon from the right of the Upload media button present at the top of the center pane, choose your preferred method to upload the image (with the transparent background) that you want to use, upload the image, and drag it from the center pane to the Canvas.
Note: You can use any of the tools available online to remove the background from your image for free.
To add a YouTube thumbnail border, make sure that the image that you added to the Canvas is selected, click the Duplicate icon from the upper-right area, and use the scaling handles of the copy of the image to increase its size a bit. Reposition the image back to its original location as well.
Then, click Edit image from the upper-left corner of the Canvas, click Duotone from the Edit image pane at the center, if need be, click See all, choose your preferred duotone effect to apply on the image, choose your preferred highlight and shadow colors from the box that appears next, and click Back from the top of the pane.
Next, click See all next to the Adjust section from the center pane, and drag the Blur slider to the right to increase the blur effect on the image.
Step 3: Position the Layers
While keeping the duplicate image selected, click the Position button from the upper-right area of the Canvas, and click Background to send the second image behind the first one to get the neon border effect for the photo.
Part 3: How to Outline a Person in a YouTube Thumbnail with Photoshop
Because YouTube thumbnails are nothing but static images, creating YouTube thumbnail border with Adobe Photoshop is comparatively easier. The process of doing this is given below:
Step 1: Define Document Preferences and Import an Image
Launch Adobe Photoshop on your PC, click Create new, and on the New Document customization box, define the width and height values to 1280 and 720 pixels respectively. Select Transparent from the Background Contents menu as well if not already selected. Click Create from the bottom to create a new Photoshop document with the specified document settings. Next, open the folder that contains the source image, drag the photo to Photoshop, and press Enter to place the photo.
Step 2: Remove Background from the Image
Make sure that the image layer is selected in the Layers panel on the right, go to Select from the menu bar at the top, and click Subject. From the bottom of the Layers panel, click the Add a mask icon to get rid of the background, leaving only the human on the Canvas.
Step 3: Add a Custom Background and an Outline Around the Subject
Use the method explained earlier to import a background image of your choice to Photoshop. Drag the background image layer to the bottom in the Layers panel. Double-click the masked layer, click to select Stroke from the left pane of the Layer Style box, and use the options available on the right to manage the size, color, position, etc. of the stroke that has been added around the human subject. Click OK when done, and then export the image normally to use it as a YouTube thumbnail border.
Summary
It is important to know that the default resolution of a YouTube thumbnail is 1280 x 720 pixels that is usually written and referred to as 720p. While adding a YouTube thumbnail border, it is also imperative to have a good sense of color combination and fonts. Furthermore, a decent tool like Wondershare Filmora X must be used to add an appealing neon border around the main subject in the thumbnail image easily and quickly.
Innovative YouTube Channel Titles: The Key to Successful Blogging & Filmmaking (No More than 156 Characters)
50+ Youtube Channel Names for Vloggers [100% New]

Richard Bennett
Mar 27, 2024• Proven solutions


Want to make a lasting impression on your YouTube fans? Have a great name! One of the vital decisions you have to take while beginning your vlog channel is selecting a vlog channel name. Believe it or not, your vlog channel name can impact the channel’s success, so choosing the ideal one is essential. If you’re unsure of how to have the best vlog channel names or are just looking for channel rebranding, you’ve come to the right place!
Here, we’ve 50+ lists of the best YouTube channel names for vloggers, along with sections discussing how you can select the ideal one plus their importance for the channel’s growth.
- Part 1: Why are Vlog Channel Names Important?
- Part 2: What to Consider Before Picking YouTube channel names for Vloggers?
- Part 3: 50+ Vlog Channel Names Ideas in 2021
- Part 4: Top 5 Free Vlog Channel Name Generators in 2021
- Part 5: Versatile YouTube Vlogs Editor
Part 1: Why are Vlog Channel Names Important?
Your Channel Name appears on your channel page, videos, and in YouTube’s search results.
Just like a boring title, a generic vlog channel name will not last in the viewer’s memory, precisely when there’s so much competition vying for their YouTube engagement and attention. However, using attention-grabbing, punchy words can make for an entertaining YouTube channel name for vloggers. Remember, if your YouTube channel becomes successful, this will be the name that everyone knows you.
Part 2: What to Consider Before Picking YouTube channel names for Vloggers?
Selecting a vlog channel name might not be simple as it seems. There are multiple options out there, so how will you know if you’ve chosen the right one?
To help you decide better, we’ve designed a step-by-step guide that shows you exactly how to develop some excellent vlog channel name ideas.
Step 1: Consider the Image You Want to Portray
Vlog channel names often highlight the brand or person on the other end. While not the case for all, you will notice how many define their overall objective or mission. This can be ideal to begin when thinking of new Youtube channel names for vloggers. Don’t pretend to be someone you’re not when you select your vlog channel name.
It’s pretty vital that you, the channel owner, portray a message or an image that feels natural and provides your audience with an opportunity for best relation and recognition.
Step 2: Stay Consistent with Your YouTube Niche
The name you select must also reflect the niche upon which you based your channel. If you have a new channel, it can be hard to compete with more prominent vlog channels that cover important content topics. That’s why you should try to be particular and become the best at designing topics for the subject you’ve selected.
While you may get required exposure with a random name to grow your channel, it’s better, to begin with, something focal to the point.
Step 3: Get a Feel for Your Target Audience
Your target audience could be a huge factor in selecting the best name for a vlogging channel. Also, consider other vlog channels in the niche you’ve chosen and read through their video comments. Search out what your audience likes and vice versa. A precise scenario of your audience’s interests will allow you to choose the best name for a vlogging channel.
Step 4: Keep Your Channel Name Short
A YouTube channel name, or username, is max up to 60 characters, but generally, you get nowhere near that! Long channel names are not essential and can also be confusing to the viewers. They can also be tough to replicate or spell while searching. A concise, short username for your YouTube vlog channel can also give you the image of having more authority.
Step 5: Make Your Channel Name Memorable
Remember, if your YouTube vlog channel namebecomes excellent, this will be the name that everyone knows you by. It will be there with your videos, your playlists, and thumbnails. You don’t want a bad image that drags you downwards, but add creative writing tools like word plays, abbreviations, sibilance, alliteration, and puns to increase memorability.
Part 3: 50+ Vlog Channel Names Ideas in 2022
Strictly Cyber
Top Song Critic
Hashtag Hits
All Things Sports
The Virtual Coach
Game Hub
CyberLife
The Daily Cloud
Inner Sphere
Fashion Channel
Button Smasher
Numb thumbs
Gentle Gamer
Headset Hero
Headset Heaven
Headset Habitat / Home
Headset Hub
Gorgeous Gamer
Avatar auditions
3D Josh
abroad broad
adventures abroad
van life
[country] life
van fan
suitcase suckers
hotel hobbyists
travel treats
transit travel
travel tricks
life (long) lovers
love [name]
lovebirds
hug my husband / housewife / boyfriend / girlfriend
husband at home
cuddle my girlfriend
couples paradise
trouble in paradise
couple productions
couples therapy
in a nutshell
tutorial hero
info nuggets
[name] teaches [topic]
[topic] by [name]
learning [topic]
curiosity satisfied
[topic] academy / school / tutorials / teacher / made easy / explained / for beginners
edu owl
nothing too difficult
Part 4: Top 5 Free Vlog Channel Name Generators in 2022
There are numerous ways to personalizing a cool YouTube vlog channel nameor brainstorm fantastic vlog channel name ideas. Check out some of the most used YouTube name generator tools that got the higher ranking even from professionals.
1.Spinxo

This platform helps users search for cool names as per their characters, descriptions, niche, etc. You can begin the search with universal keywords and a set of specific details. Spinxo also helps YouTubers to manage contests online and grab the best suggestions for vlog names.
Queries Required: They can be raised based on multiple things you like, such as Niche, Keywords, and Topics.
Ideal for: Those who have few specific directions about the name.
No. of Results: 30 names.
2.Screen Name Generator
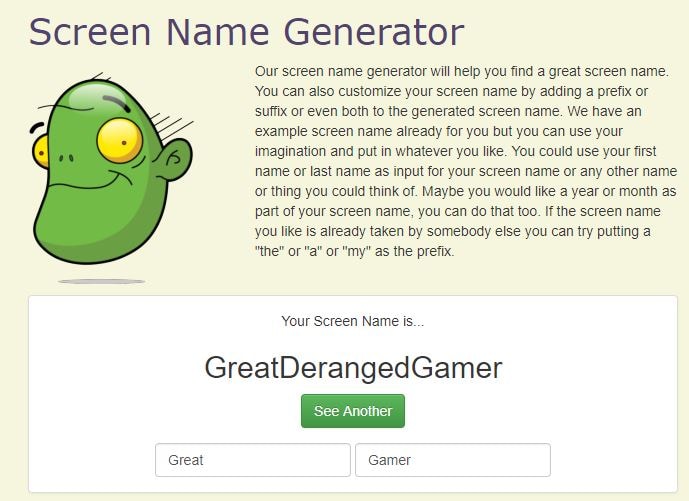
Gamers will admire this YouTube name generator tool that works based on the YouTubers’ provided prefix. It has sections like fantasy name generators, place name generators, username generators, thing names, etc.
Queries Required: It can be with prefix and suffix.
Ideal for: Those who have a specific direction and need for the name.
No. of Results: One name.
3.Username Generator
Username Generator makes it simpler to look for game-specific usernames. Users can put in the keywords and number of lines as their preferences. Then, the software will get you the most appropriate vlog channel names ideas.
Queries Needed: Based on the keywords only.
Best for: those of all genres.
No. of Results: Hundreds of names.
4.Name Generator
This name generator tool also helps people to get the best random combo names where details are pretty particular to content related to your entered works like “vids,” “director,” “TV,” “channel,” etc. Every time you tap the Generate tab provided, it will offer you the most random names.
Queries Required: Based on Prefix and Suffix
Ideal for: Those who have particular directions with the name.
No. of Results: 1
5.Scratch
With this software, you can get the best names for vlogging channels with caps specifications that look awesome. You can select game highlights for your channel name. And, one can also prefer to put several words into the list to get finer results.
Queries Needed: Works with keywords only.
Best for: Those of all genres.
No. of Results: One name.
Part 5: Versatile YouTube Vlogs Editor
After you have decided to develop your YouTube vlog channel, the first thing you’ll look for is premium-looking video editing. And, here, we recommend using Filmora9 to edit YouTube vlogs easily.
You can use Filmora to make YouTube vlogs with built-in royalty-free audio. The software also can help you create fantastic YouTube intros. It consists of 500 plus templates, text resources, and transition effects.
Filmora is the ideal editing tool to make a green screen and split-screen video for YouTubers. Free Download it now to watch if it’s the best for you!
Conclusion
So, now, do you think you got some cool YouTube channel names for vloggers? Share your feedback towards the end of the blog, and let us know if you’ve ever used a free YouTube name generator!
Richard Bennett
Richard Bennett is a writer and a lover of all things video.
Follow @Richard Bennett
Richard Bennett
Mar 27, 2024• Proven solutions
Want to make a lasting impression on your YouTube fans? Have a great name! One of the vital decisions you have to take while beginning your vlog channel is selecting a vlog channel name. Believe it or not, your vlog channel name can impact the channel’s success, so choosing the ideal one is essential. If you’re unsure of how to have the best vlog channel names or are just looking for channel rebranding, you’ve come to the right place!
Here, we’ve 50+ lists of the best YouTube channel names for vloggers, along with sections discussing how you can select the ideal one plus their importance for the channel’s growth.
- Part 1: Why are Vlog Channel Names Important?
- Part 2: What to Consider Before Picking YouTube channel names for Vloggers?
- Part 3: 50+ Vlog Channel Names Ideas in 2021
- Part 4: Top 5 Free Vlog Channel Name Generators in 2021
- Part 5: Versatile YouTube Vlogs Editor
Part 1: Why are Vlog Channel Names Important?
Your Channel Name appears on your channel page, videos, and in YouTube’s search results.
Just like a boring title, a generic vlog channel name will not last in the viewer’s memory, precisely when there’s so much competition vying for their YouTube engagement and attention. However, using attention-grabbing, punchy words can make for an entertaining YouTube channel name for vloggers. Remember, if your YouTube channel becomes successful, this will be the name that everyone knows you.
Part 2: What to Consider Before Picking YouTube channel names for Vloggers?
Selecting a vlog channel name might not be simple as it seems. There are multiple options out there, so how will you know if you’ve chosen the right one?
To help you decide better, we’ve designed a step-by-step guide that shows you exactly how to develop some excellent vlog channel name ideas.
Step 1: Consider the Image You Want to Portray
Vlog channel names often highlight the brand or person on the other end. While not the case for all, you will notice how many define their overall objective or mission. This can be ideal to begin when thinking of new Youtube channel names for vloggers. Don’t pretend to be someone you’re not when you select your vlog channel name.
It’s pretty vital that you, the channel owner, portray a message or an image that feels natural and provides your audience with an opportunity for best relation and recognition.
Step 2: Stay Consistent with Your YouTube Niche
The name you select must also reflect the niche upon which you based your channel. If you have a new channel, it can be hard to compete with more prominent vlog channels that cover important content topics. That’s why you should try to be particular and become the best at designing topics for the subject you’ve selected.
While you may get required exposure with a random name to grow your channel, it’s better, to begin with, something focal to the point.
Step 3: Get a Feel for Your Target Audience
Your target audience could be a huge factor in selecting the best name for a vlogging channel. Also, consider other vlog channels in the niche you’ve chosen and read through their video comments. Search out what your audience likes and vice versa. A precise scenario of your audience’s interests will allow you to choose the best name for a vlogging channel.
Step 4: Keep Your Channel Name Short
A YouTube channel name, or username, is max up to 60 characters, but generally, you get nowhere near that! Long channel names are not essential and can also be confusing to the viewers. They can also be tough to replicate or spell while searching. A concise, short username for your YouTube vlog channel can also give you the image of having more authority.
Step 5: Make Your Channel Name Memorable
Remember, if your YouTube vlog channel namebecomes excellent, this will be the name that everyone knows you by. It will be there with your videos, your playlists, and thumbnails. You don’t want a bad image that drags you downwards, but add creative writing tools like word plays, abbreviations, sibilance, alliteration, and puns to increase memorability.
Part 3: 50+ Vlog Channel Names Ideas in 2022
Strictly Cyber
Top Song Critic
Hashtag Hits
All Things Sports
The Virtual Coach
Game Hub
CyberLife
The Daily Cloud
Inner Sphere
Fashion Channel
Button Smasher
Numb thumbs
Gentle Gamer
Headset Hero
Headset Heaven
Headset Habitat / Home
Headset Hub
Gorgeous Gamer
Avatar auditions
3D Josh
abroad broad
adventures abroad
van life
[country] life
van fan
suitcase suckers
hotel hobbyists
travel treats
transit travel
travel tricks
life (long) lovers
love [name]
lovebirds
hug my husband / housewife / boyfriend / girlfriend
husband at home
cuddle my girlfriend
couples paradise
trouble in paradise
couple productions
couples therapy
in a nutshell
tutorial hero
info nuggets
[name] teaches [topic]
[topic] by [name]
learning [topic]
curiosity satisfied
[topic] academy / school / tutorials / teacher / made easy / explained / for beginners
edu owl
nothing too difficult
Part 4: Top 5 Free Vlog Channel Name Generators in 2022
There are numerous ways to personalizing a cool YouTube vlog channel nameor brainstorm fantastic vlog channel name ideas. Check out some of the most used YouTube name generator tools that got the higher ranking even from professionals.
1.Spinxo
This platform helps users search for cool names as per their characters, descriptions, niche, etc. You can begin the search with universal keywords and a set of specific details. Spinxo also helps YouTubers to manage contests online and grab the best suggestions for vlog names.
Queries Required: They can be raised based on multiple things you like, such as Niche, Keywords, and Topics.
Ideal for: Those who have few specific directions about the name.
No. of Results: 30 names.
2.Screen Name Generator
Gamers will admire this YouTube name generator tool that works based on the YouTubers’ provided prefix. It has sections like fantasy name generators, place name generators, username generators, thing names, etc.
Queries Required: It can be with prefix and suffix.
Ideal for: Those who have a specific direction and need for the name.
No. of Results: One name.
3.Username Generator
Username Generator makes it simpler to look for game-specific usernames. Users can put in the keywords and number of lines as their preferences. Then, the software will get you the most appropriate vlog channel names ideas.
Queries Needed: Based on the keywords only.
Best for: those of all genres.
No. of Results: Hundreds of names.
4.Name Generator
This name generator tool also helps people to get the best random combo names where details are pretty particular to content related to your entered works like “vids,” “director,” “TV,” “channel,” etc. Every time you tap the Generate tab provided, it will offer you the most random names.
Queries Required: Based on Prefix and Suffix
Ideal for: Those who have particular directions with the name.
No. of Results: 1
5.Scratch
With this software, you can get the best names for vlogging channels with caps specifications that look awesome. You can select game highlights for your channel name. And, one can also prefer to put several words into the list to get finer results.
Queries Needed: Works with keywords only.
Best for: Those of all genres.
No. of Results: One name.
Part 5: Versatile YouTube Vlogs Editor
After you have decided to develop your YouTube vlog channel, the first thing you’ll look for is premium-looking video editing. And, here, we recommend using Filmora9 to edit YouTube vlogs easily.
You can use Filmora to make YouTube vlogs with built-in royalty-free audio. The software also can help you create fantastic YouTube intros. It consists of 500 plus templates, text resources, and transition effects.
Filmora is the ideal editing tool to make a green screen and split-screen video for YouTubers. Free Download it now to watch if it’s the best for you!
Conclusion
So, now, do you think you got some cool YouTube channel names for vloggers? Share your feedback towards the end of the blog, and let us know if you’ve ever used a free YouTube name generator!
Richard Bennett
Richard Bennett is a writer and a lover of all things video.
Follow @Richard Bennett
Also read:
- Amplify Engagement Utilizing YouTube Analytics Wisely for 2024
- [Updated] Directly Download YouTube Videos
- In 2024, Comprehensive Guide to Embedding Multiple YouTube Playlists in Websites
- Enhancing Video Quality with Right Lighting for 2024
- Creating Hilarious Reactions Mastering YouTube Tricks (3 Methods) for 2024
- In 2024, Efface Thin Borders for a Seamless YouTube Experience
- In 2024, DIY Movie Making YouTube's Boutique Method
- Mastering Video Profits Dailymotion Vs. YouTube Insights
- Guide to Getting 1000 Subscribers for Your YouTube Channel
- Practical Steps for Immediate Deletion on Youtube Platform
- Elevate Your YouTube Thumbnails - Triple Neon Border Techniques
- [Updated] Elevating Video Previews A Compreayer Approach for YouTube
- Unlock Premium Image Quality Through YouTube's AV1 Settings
- Maximize YouTube Potential Leading Rank Tracker Software
- [Updated] Digital Decibels The Leading YouTube Voices
- Anime for Every Moment The Ultimate List of YouTube Sources for 2024
- Ensuring Earning Potential on YouTubers
- Crafting Content, Cultivating Capital Your Videography Voyage
- Essential Tips for YouTube Audio Optimization for 2024
- Monetization Tracker Tool for Online Videos
- [Updated] Create Impactful YouTube Videos Top 20 Font Picks
- [New] Enhancing Video Discoverability with Ideal Thumbnail Widths and Height
- Mimicking Golden Age Filmmaking in Contemporary Videos
- In 2024, Enhancing YouTube Video Screens Without Barriers
- Engaging Audiences Crafting YouTube Trailers via Filmora
- In 2024, Building Your Own YouTube Organization Toolkit The Watch Later Way
- 2024 Approved Elevate Your Soundbites Insights for YouTube Short Tunes
- 2024 Approved Conquer Zero Viewers 10 Essential Tips for Video Popularity
- Enhance and Clean Up YouTube Footage Borderless Tutorial
- 2024 Approved 29 Cost-Free YouTube Sound Extractors Free YouTube Audio Downloads
- Best 5 YouTube Tag Generators & Tips to Tag Videos Properly
- Will the iPogo Get You Banned and How to Solve It On Apple iPhone 6 Plus | Dr.fone
- How to Transfer Videos from HTC U23 to iPad | Dr.fone
- A Detailed Pokemon Go PvP Tier List to Make you a Pro Trainer For Apple iPhone 14 Pro | Dr.fone
- [New] In 2024, The Ultimate How-To for Navigating Old Features on FB, Mobile/PC
- How Do You Get Sun Stone Evolutions in Pokémon For Samsung Galaxy S24? | Dr.fone
- 2024 Approved Miniature Homes Japanese & Chinese Inspirations
- New Mastering Vocal Mimicry for Actors - Highest Rated Male to Female Change Apps, 2024
- Updated Top Picks Windows Movie Maker Replacements Youll Love
- New Premier Applications for Audio File Isolation From Visual Content
- [Updated] Unpacking the Rules Instagram's Video Length Caps
- Google Play Services Wont Update? 12 Fixes are Here on Honor Magic 5 | Dr.fone
- 2024 Approved Mastering TikTok's Algorithm for Increased Engagement
- 2024 Approved Tips & Tricks To Perfectly Use the Audio Mixer in Filmora
- Remove Google FRP lock on Find N3
- [New] When Order Falls Premium Lineup of Best Zombie Games for 2024
- New 2024 Approved Adobe Premiere Pro Download and Use Guide In Depth
- New 2024 Approved Mastering Auditory Narratives The Ultimate List of Where to Find Premium Podcast Sound Effects
- WhatsApp Video Maker Software Top Picks for 2024
- New In 2024, VN Video Editor PC Review A Quick Look
- All Things You Need to Know about Wipe Data/Factory Reset For Infinix Smart 8 Plus | Dr.fone
- IRecorder Testing A Comprehensive Review for 2024
- Quick Guide to Sharing Your Favorite GIFs on Instagram for 2024
- [Updated] In-Depth Tutorial for Gameplay Recorders on Win10
- Top 6 Apps/Services to Trace Any Apple iPhone 6s Plus Location By Mobile Number | Dr.fone
- Title: Transform Ordinary Thumbnails Into Effervescent Designs
- Author: Brian
- Created at : 2024-05-25 13:01:47
- Updated at : 2024-05-26 13:01:47
- Link: https://youtube-video-recordings.techidaily.com/transform-ordinary-thumbnails-into-effervescent-designs/
- License: This work is licensed under CC BY-NC-SA 4.0.
