
:max_bytes(150000):strip_icc():format(webp)/GettyImages-515810476-aabe0e5a88b44bb1ae49a5bfa97bec62.jpg)
"Transform Clips Into Content From Premiere to YouTube"
Transform Clips Into Content: From Premiere to YouTube
How Do I Use Adobe Premiere To Upload YouTube Videos?

Benjamin Arango
Mar 27, 2024• Proven solutions
Whilst getting the editing and post work just right on any project is what we all aim for, the ultimate aim is for other people to see our creations, and the most popular way to achieve that is YouTube . Chances are, if you are producing video, you will be putting some of it on YouTube at some point, so let’s have a look at the most efficient way to get your work from Premiere to YouTube.
Check if your computer meet the Premiere System Requirements >>
This is a basic tutorial about Adobe Premiere, professional video editing software. However, if video editing is new to you, consider Wondershare Filmora , which is a powerful but easy-to-use tool for users just starting out. Download the free trial version below.
 Download Mac Version ](https://tools.techidaily.com/wondershare/filmora/download/ )
How Do I Use Adobe Premiere To Upload YouTube Videos
1. Master Copy
Before exporting your work, it is important to first create a master copy of your project that is ‘as is’, in that it reflects the settings and codecs used in the original footage.
To do this you simply select the sequence within the Timeline or in the Project Panel, and go through the menu tree via File > Export > Media to bring up the export dialogue.

To create your Master Copy, simply select the first option of ‘Match Sequence Settings’, this exports a file that is of the same quality as your original footage, essentially producing a digital copy of the work for archiving before anything else is done.
With you work safe and secure it is now time to look at ensuring the project is suitable for YouTube. With our sequence selected in the Timeline or Project Panel again, we go through the same File > Export > Media path to bring up the media export dialogue as before.
2. Container
The first option we have to consider is the file format that our finished video needs to be in. Here you should refer to YouTube for its guidelines, whilst they do accept a number of file formats, digging through the YouTube help system to find the settings for highest quality we find that they recommend MPEG4 as the container, using the codec.

We can also see further recommended settings in this screenshot that will be covered later.
The good news is that Premiere automatically selects the appropriate container for us when we select our codec, however it is worth knowing the file type YouTube is expecting just to check yourself.
3. Video Codec
So having established that YouTube recommends the MPEG4 container using the codec, the first option we need to look for in the media export dialogue is to select the appropriate Format.
This is the first drop down in the dialogue box, and in this case we simply select from the list.

Once you select you can check the ‘output name’ field and see that premiere is automatically set the output file to .mp4 which is exactly what we need.
4. Preset
The next field we come to is the ‘Preset’ dropdown menu. This is a major help to most people, as Adobe have very kindly included large numbers of presets to quickly adapt video settings to suit specific uses. They vary depending on the exact version of Premiere you are using, and each format type does have its own list of presets, as we can see has a large number for YouTube, but also has many presets for specific devices (presets for iPad, Kindle, Nook, various other tablets and phones, Vimeo and a host of others) to make getting the right settings that bit easier for us.

It is important here to select the correct preset from the various YouTube options. You want to select the resolution and frame rate that match your source file, for the best results. So, if your source file is 1080p with a frame rate of 29.97 fps then that is the YouTube setting you would select.
Once a preset is selected a summary of the settings is displayed below, normally these will be well suited to your project, however you can fine tune anything you wish by selecting the video or audio tabs at the bottom which give you the chance to adjust each parameter individually. If you do this, you can save these changes as a custom preset by clicking the button at the side of the Preset dropdown menu and simply use it on later projects by selecting it from the list the same as any other, a great time saving tool.

5. Rendering
Once you are satisfied with the settings, either from the Preset alone or if you have adjusted anything yourself, you are nearly ready to render the file and export it.
For YouTube it is recommended you select the ‘Use Maximum Render Quality’ option to maintain the best output you can, it does add time to the render process but if you value the quality of your work it is worthwhile.
Finally you can choose a suitable filename and the destination of the file by clicking on the ‘Output Name’ field.
I normally use a filename that includes the destination medium so I can differentiate between different versions of a project and know which one to upload where, in this case I include ‘youtube’, but if I were planning on uploading clips of the project to vimeo as well for instance there may be a cut of the project with ‘vimeo’ in the name too. The destination is personal preference, because I do use filenames to differentiate versions I can put the various iterations into a single project file, others have folder structures for each type of file , so all YouTube output goes into a single folder and so on, how you organize is entirely dependent on how you work.

Once those are selected clicking ‘Export’ starts the rendering process, and eventually (how long depends on the speed of your computer and the size and type of file involved), you will end up with your YouTube optimized video in the location you chose.
Here I created 4 key frames that let the ‘Animation’ object move around the ‘Demo Text’ Object and finally come to rest below it. Whilst this type of effect does look very effective on screen, such is the ease of use of After Effects it really is just a few minutes work to achieve.
Learn more details about How to add text in Premiere >>
6. Uploading
Now you have your file, the next step is to go to your YouTube account and log in if you need to.
On the top of your homepage on the right is the upload button, selecting that brings up the select file menu as below.

You can either drag your file into the window or click on it to open a standard file browser to locate the desired file, click and the upload will begin. The dropdown underneath allows you to set the video as Public, Unlisted or Private. You can change this at any time once the video is uploaded as well.
This opens the upload progress window, where you can add in a name, description and tags as well as add the video to a playlist or adjust the privacy settings as the video is uploading.

Once the upload as finished, you can do final adjustments to settings and choose a thumbnail for the video. The final step is to click the ‘Publish’ button and your video will be processed and go live.

Benjamin Arango
Benjamin Arango is a writer and a lover of all things video.
Follow @Benjamin Arango
Benjamin Arango
Mar 27, 2024• Proven solutions
Whilst getting the editing and post work just right on any project is what we all aim for, the ultimate aim is for other people to see our creations, and the most popular way to achieve that is YouTube . Chances are, if you are producing video, you will be putting some of it on YouTube at some point, so let’s have a look at the most efficient way to get your work from Premiere to YouTube.
Check if your computer meet the Premiere System Requirements >>
This is a basic tutorial about Adobe Premiere, professional video editing software. However, if video editing is new to you, consider Wondershare Filmora , which is a powerful but easy-to-use tool for users just starting out. Download the free trial version below.
Download Mac Version ](https://tools.techidaily.com/wondershare/filmora/download/ )
How Do I Use Adobe Premiere To Upload YouTube Videos
1. Master Copy
Before exporting your work, it is important to first create a master copy of your project that is ‘as is’, in that it reflects the settings and codecs used in the original footage.
To do this you simply select the sequence within the Timeline or in the Project Panel, and go through the menu tree via File > Export > Media to bring up the export dialogue.
To create your Master Copy, simply select the first option of ‘Match Sequence Settings’, this exports a file that is of the same quality as your original footage, essentially producing a digital copy of the work for archiving before anything else is done.
With you work safe and secure it is now time to look at ensuring the project is suitable for YouTube. With our sequence selected in the Timeline or Project Panel again, we go through the same File > Export > Media path to bring up the media export dialogue as before.
2. Container
The first option we have to consider is the file format that our finished video needs to be in. Here you should refer to YouTube for its guidelines, whilst they do accept a number of file formats, digging through the YouTube help system to find the settings for highest quality we find that they recommend MPEG4 as the container, using the codec.
We can also see further recommended settings in this screenshot that will be covered later.
The good news is that Premiere automatically selects the appropriate container for us when we select our codec, however it is worth knowing the file type YouTube is expecting just to check yourself.
3. Video Codec
So having established that YouTube recommends the MPEG4 container using the codec, the first option we need to look for in the media export dialogue is to select the appropriate Format.
This is the first drop down in the dialogue box, and in this case we simply select from the list.
Once you select you can check the ‘output name’ field and see that premiere is automatically set the output file to .mp4 which is exactly what we need.
4. Preset
The next field we come to is the ‘Preset’ dropdown menu. This is a major help to most people, as Adobe have very kindly included large numbers of presets to quickly adapt video settings to suit specific uses. They vary depending on the exact version of Premiere you are using, and each format type does have its own list of presets, as we can see has a large number for YouTube, but also has many presets for specific devices (presets for iPad, Kindle, Nook, various other tablets and phones, Vimeo and a host of others) to make getting the right settings that bit easier for us.
It is important here to select the correct preset from the various YouTube options. You want to select the resolution and frame rate that match your source file, for the best results. So, if your source file is 1080p with a frame rate of 29.97 fps then that is the YouTube setting you would select.
Once a preset is selected a summary of the settings is displayed below, normally these will be well suited to your project, however you can fine tune anything you wish by selecting the video or audio tabs at the bottom which give you the chance to adjust each parameter individually. If you do this, you can save these changes as a custom preset by clicking the button at the side of the Preset dropdown menu and simply use it on later projects by selecting it from the list the same as any other, a great time saving tool.
5. Rendering
Once you are satisfied with the settings, either from the Preset alone or if you have adjusted anything yourself, you are nearly ready to render the file and export it.
For YouTube it is recommended you select the ‘Use Maximum Render Quality’ option to maintain the best output you can, it does add time to the render process but if you value the quality of your work it is worthwhile.
Finally you can choose a suitable filename and the destination of the file by clicking on the ‘Output Name’ field.
I normally use a filename that includes the destination medium so I can differentiate between different versions of a project and know which one to upload where, in this case I include ‘youtube’, but if I were planning on uploading clips of the project to vimeo as well for instance there may be a cut of the project with ‘vimeo’ in the name too. The destination is personal preference, because I do use filenames to differentiate versions I can put the various iterations into a single project file, others have folder structures for each type of file , so all YouTube output goes into a single folder and so on, how you organize is entirely dependent on how you work.
Once those are selected clicking ‘Export’ starts the rendering process, and eventually (how long depends on the speed of your computer and the size and type of file involved), you will end up with your YouTube optimized video in the location you chose.
Here I created 4 key frames that let the ‘Animation’ object move around the ‘Demo Text’ Object and finally come to rest below it. Whilst this type of effect does look very effective on screen, such is the ease of use of After Effects it really is just a few minutes work to achieve.
Learn more details about How to add text in Premiere >>
6. Uploading
Now you have your file, the next step is to go to your YouTube account and log in if you need to.
On the top of your homepage on the right is the upload button, selecting that brings up the select file menu as below.
You can either drag your file into the window or click on it to open a standard file browser to locate the desired file, click and the upload will begin. The dropdown underneath allows you to set the video as Public, Unlisted or Private. You can change this at any time once the video is uploaded as well.
This opens the upload progress window, where you can add in a name, description and tags as well as add the video to a playlist or adjust the privacy settings as the video is uploading.
Once the upload as finished, you can do final adjustments to settings and choose a thumbnail for the video. The final step is to click the ‘Publish’ button and your video will be processed and go live.
Benjamin Arango
Benjamin Arango is a writer and a lover of all things video.
Follow @Benjamin Arango
Miniature Music Menus: Actors in Audio World
Create High Quality YouTube Video - Wondershare Filmora
An easy and powerful YouTube video editor
Numerous video and audio effects to choose from
Detailed tutorials provided by the official channel
The entertainment industry is continually taking the world by storm. Lots of improvements are on the rise, especially online. Several apps are now at your fingertip, and you can access lots of videos and music right from your mobile phone. The social media platform has made it easy for millions of users to access information from other creators and editors. From Facebook, Instagram, WhatsApp, and the new kid in the block YouTube Shorts. And being that YouTube streaming service already harbors many users, Shorts has just come at the right time, with ready users at hand. Additionally, YouTube shorts music will spice up your listening experience like never before.
In this article
02 Which role does music play in YouTube Shorts?
03 YouTube Shorts Music - Things You Need to Know
What are YouTube Shorts?
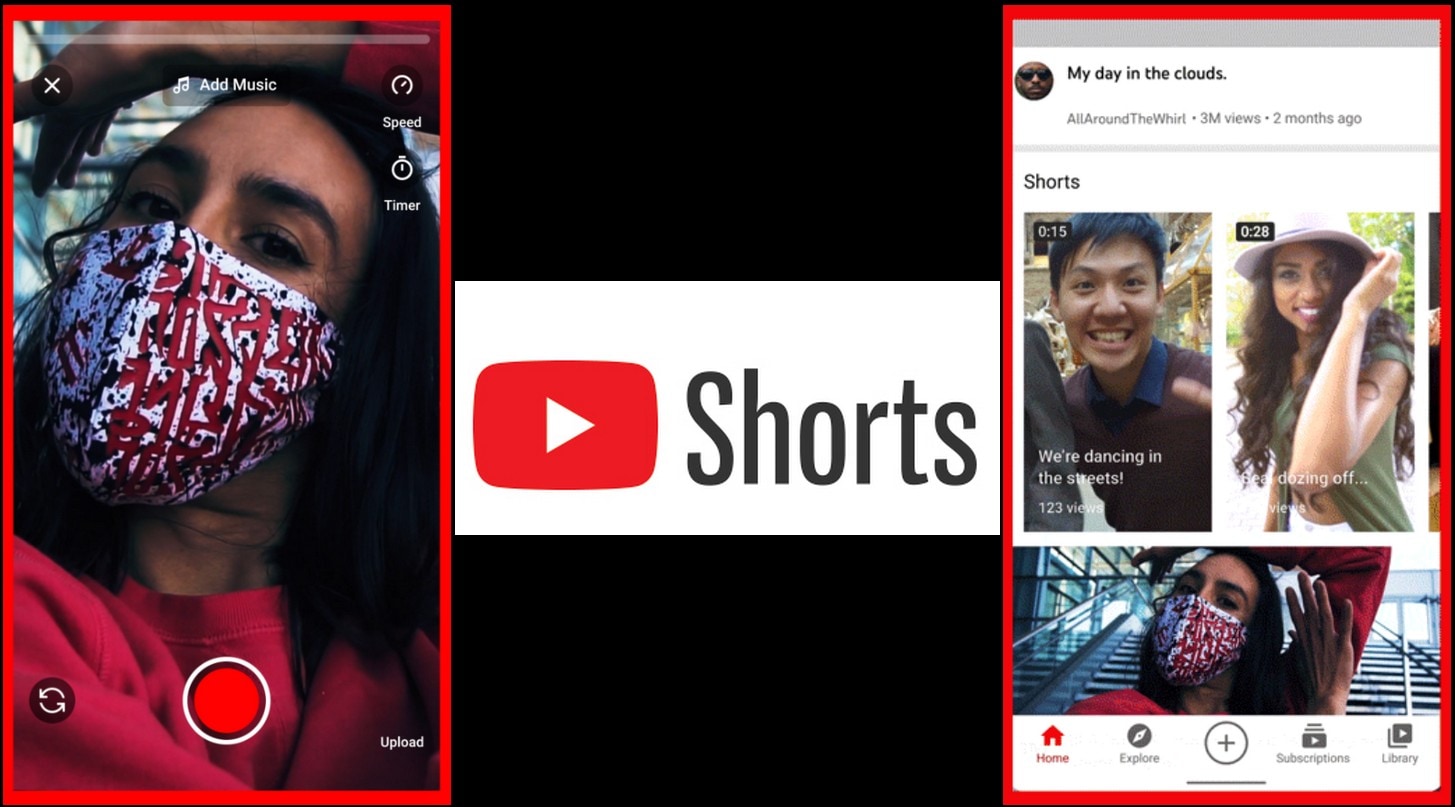
YouTube Shorts is an app feature in YouTube that was introduced in 2020. It has so far rolled out in more than 100 countries. It enables both artists and creators to compose short videos to express any feeling. It could be for entertainment or educational purposes. However, the videos are short, not exceeding 60 seconds, with a default length of 15 seconds. You also have the option to record your videos with music to add value to your video.
YouTube Shorts has two main features; a platform to watch short videos and a tool you can use to compose your own short-form videos. To watch the clip, just go to the “Homepage” and find several thumbnails for popular Shorts. Then click on a video and land on the vertical video player to watch the video. Likewise, you can use the thumbs up or down to like or dislike the video. Additionally, you can pause the video and post a comment or share the Shorts with other fans.
Which role does music play in YouTube Shorts?
Music is always soothing to the soul. And using YouTube shorts music is a quick way to boost your video performance. Check below the importance of using music in your Shorts.
- Generates important emotions
Music creates a good mood, giving your audience a positive feeling towards your YouTube Shorts. Any sound will touch the listener, making the videos more interesting and beautiful.
- Music is memorable
If you use a particular tune, then there is a way your listeners will think directly of you when they hear the tune. It gives more value to the Shorts. Choosing the right music for your Shorts video is also important .
- Music represents who you are
You may put across your message via Shorts but adding some music will help the viewer directly imagine your identity.
- For effective message
Music can stimulate actions, causing immediate attraction to the listener. Use YouTube Shorts music to emphasize the overall story.
YouTube Shorts Music - Things You Need to Know
1. How to add music to your YouTube Shorts video?
As a creator, it is ideal to know how to add music to your YouTube Shorts video. Follow these steps to add music using the YouTube Shorts creator tool camera.
Step 1. First, select the Shorts video that you want to add music to.
Step 2. Then click on the “YouTube Shorts creator camera” tool.
Step 3. You’ll then be directed to your camera where you’ll find the “Add Music” option.
Step 4. Then find a “Library of songs” from popular artists that you can use. Select the song you wish to use.
Step 5. Finally, tap the “Use This Sound” option found at the bottom of the screen. Then just cue up what part of the song to use on your Shorts and go-ahead to record and upload the video.
2. The sources of music for YouTube Shorts?
You can use any music clip as long as it is not a copyrighted piece of music. Bellow are common sources where to find background music for YouTube Shorts video.
YouTube Audio Library: This is the first place to source YouTube Shorts music. YouTube is free and contains tons of free songs. You can sort your selection by duration, genre, instrument, mood, etc. To access music, go to the “Creator Studio” > “Create” > “Audio Library” and select which music to use.
Free Music Archive: This is another free site where you can discover an array of curated background music for any type of content. You’ll get more than 1,500 tracks at the tap of a button.
SoundCloud: SoundCloud streaming music service lets you use its “Creative Commons” music as long as you follow the guidelines that are laid down by the artist.
Converted music from your computer: You can also download and convert available songs from Spotify, Amazon Music, Tidal, among other streaming services. Just get a music converter tool that will remove encryption from the tracks to make it free for use forever.
3. How to extend music on YouTube Shorts?
Even though the typical duration for YouTube Shorts music is 15 seconds, you can make them longer up to 60 seconds. Just record multiple clips at 15 seconds intervals that add up to 60 seconds.
4. Can I use my own audio in YouTube Shorts?
Yes, you can use your audio in YouTube Shorts. Several converter apps are available for downloading and converting music to playable formats. Filmora is one available tool that will provide free music and let you edit your videos with minimal effort. More so, you can import and export your music in any format to make stunning YouTube Shorts videos.
Key Features of Filmora
- Edit and export your videos at a high resolution of up to 4K
- Use it to add animated messages from the titles and text library
- Easily adjust the audio of each music track on your timeline
- Add any mood with its royalty-free songs and sound effects to YouTube Shorts videos
How to add a music track to your video with Filmora
1. First, open up Filmora and go to “Project Settings” and select the “Change project aspect ratio” option.
2. From the aspect ratio, select “9:16” portrait.
3. Then set the resolution according to your preference.
4. Next, select the “Frame rate” according to your existing video that you wish to convert into Shorts. Hit the “OK” button to save the settings.
5. Drag and drop your footage onto the timeline. Ensure you keep the project settings.
6. You can add text or music to your footage. To add music, first, download music from YouTube or other sources into your computer.
7. Then click on the “Audio” option from the “Menu” bar and choose music that’s already available on your PC.
8. Next, import the music to the video. Just click on the “File” > “Import File” > “Import Video Files” option.
9. Click on the “+” icon to add the music to your video.
10. You’ll then have the song onto your project.
For Win 7 or later (64-bit)
For macOS 10.12 or later
5. Do artists earn royalties from Shorts?
Yes. Artists do receive some revenue from their music if creators use their songs in YouTube Short videos. Royalties come from ad revenue but it will depend on the type of ad on the video. So, more popular videos get higher rates than non-popular ones.
6. What to post on YouTube Shorts?
You can post several videos to YouTube Shorts which include:
- Tutorials: teach your viewers via YouTube Shorts.
- Confessional videos: This is when you speak to your viewers about what you are passionate about.
- Entertainment videos: You can also entertain your viewers with funny videos.
7. Can I promote my music on YouTube Shorts?
YouTube Shorts is a perfect platform to promote your music if you are an artist. You can either hire an influencer or do it yourself as an artist. These tips will help you to successfully promote your brand.
Be precise: Condense all the important details in your video and ensure the background music aligns with the theme.
Think widely: Check at what others are adding to their Shorts. You can include memes and other entertaining clips.
Post videos more often: Since YouTube Shorts are short videos that can’t accommodate so much information, try to post your videos more often so that your viewers follow up closely on what you are putting across.
Use catchy music: It doesn’t mean that the latest singles are more catchy or viral. Songs from a few years ago can also be equally catchy.
8. How are YouTube Shorts different from other short-form videos?
YouTube streaming service is already a popular platform that provides tones of music and video clips. Encompassing Shorts just pushed it at the forefront. The userbase is readily available and any Shorts you post will be widely viewed in over 100 countries. More so, you can extract music from the platform for use on your Shorts videos.
Conclusion
You can make a great milestone with YouTube Shorts music than if you didn’t use any. Music makes your videos catchy and interesting to viewers. Several platforms are available for sourcing music to use on your Shorts. More so, you can use the recommended app, Filmora, to add free music to your videos.
The entertainment industry is continually taking the world by storm. Lots of improvements are on the rise, especially online. Several apps are now at your fingertip, and you can access lots of videos and music right from your mobile phone. The social media platform has made it easy for millions of users to access information from other creators and editors. From Facebook, Instagram, WhatsApp, and the new kid in the block YouTube Shorts. And being that YouTube streaming service already harbors many users, Shorts has just come at the right time, with ready users at hand. Additionally, YouTube shorts music will spice up your listening experience like never before.
In this article
02 Which role does music play in YouTube Shorts?
03 YouTube Shorts Music - Things You Need to Know
What are YouTube Shorts?
YouTube Shorts is an app feature in YouTube that was introduced in 2020. It has so far rolled out in more than 100 countries. It enables both artists and creators to compose short videos to express any feeling. It could be for entertainment or educational purposes. However, the videos are short, not exceeding 60 seconds, with a default length of 15 seconds. You also have the option to record your videos with music to add value to your video.
YouTube Shorts has two main features; a platform to watch short videos and a tool you can use to compose your own short-form videos. To watch the clip, just go to the “Homepage” and find several thumbnails for popular Shorts. Then click on a video and land on the vertical video player to watch the video. Likewise, you can use the thumbs up or down to like or dislike the video. Additionally, you can pause the video and post a comment or share the Shorts with other fans.
Which role does music play in YouTube Shorts?
Music is always soothing to the soul. And using YouTube shorts music is a quick way to boost your video performance. Check below the importance of using music in your Shorts.
- Generates important emotions
Music creates a good mood, giving your audience a positive feeling towards your YouTube Shorts. Any sound will touch the listener, making the videos more interesting and beautiful.
- Music is memorable
If you use a particular tune, then there is a way your listeners will think directly of you when they hear the tune. It gives more value to the Shorts. Choosing the right music for your Shorts video is also important .
- Music represents who you are
You may put across your message via Shorts but adding some music will help the viewer directly imagine your identity.
- For effective message
Music can stimulate actions, causing immediate attraction to the listener. Use YouTube Shorts music to emphasize the overall story.
YouTube Shorts Music - Things You Need to Know
1. How to add music to your YouTube Shorts video?
As a creator, it is ideal to know how to add music to your YouTube Shorts video. Follow these steps to add music using the YouTube Shorts creator tool camera.
Step 1. First, select the Shorts video that you want to add music to.
Step 2. Then click on the “YouTube Shorts creator camera” tool.
Step 3. You’ll then be directed to your camera where you’ll find the “Add Music” option.
Step 4. Then find a “Library of songs” from popular artists that you can use. Select the song you wish to use.
Step 5. Finally, tap the “Use This Sound” option found at the bottom of the screen. Then just cue up what part of the song to use on your Shorts and go-ahead to record and upload the video.
2. The sources of music for YouTube Shorts?
You can use any music clip as long as it is not a copyrighted piece of music. Bellow are common sources where to find background music for YouTube Shorts video.
YouTube Audio Library: This is the first place to source YouTube Shorts music. YouTube is free and contains tons of free songs. You can sort your selection by duration, genre, instrument, mood, etc. To access music, go to the “Creator Studio” > “Create” > “Audio Library” and select which music to use.
Free Music Archive: This is another free site where you can discover an array of curated background music for any type of content. You’ll get more than 1,500 tracks at the tap of a button.
SoundCloud: SoundCloud streaming music service lets you use its “Creative Commons” music as long as you follow the guidelines that are laid down by the artist.
Converted music from your computer: You can also download and convert available songs from Spotify, Amazon Music, Tidal, among other streaming services. Just get a music converter tool that will remove encryption from the tracks to make it free for use forever.
3. How to extend music on YouTube Shorts?
Even though the typical duration for YouTube Shorts music is 15 seconds, you can make them longer up to 60 seconds. Just record multiple clips at 15 seconds intervals that add up to 60 seconds.
4. Can I use my own audio in YouTube Shorts?
Yes, you can use your audio in YouTube Shorts. Several converter apps are available for downloading and converting music to playable formats. Filmora is one available tool that will provide free music and let you edit your videos with minimal effort. More so, you can import and export your music in any format to make stunning YouTube Shorts videos.
Key Features of Filmora
- Edit and export your videos at a high resolution of up to 4K
- Use it to add animated messages from the titles and text library
- Easily adjust the audio of each music track on your timeline
- Add any mood with its royalty-free songs and sound effects to YouTube Shorts videos
How to add a music track to your video with Filmora
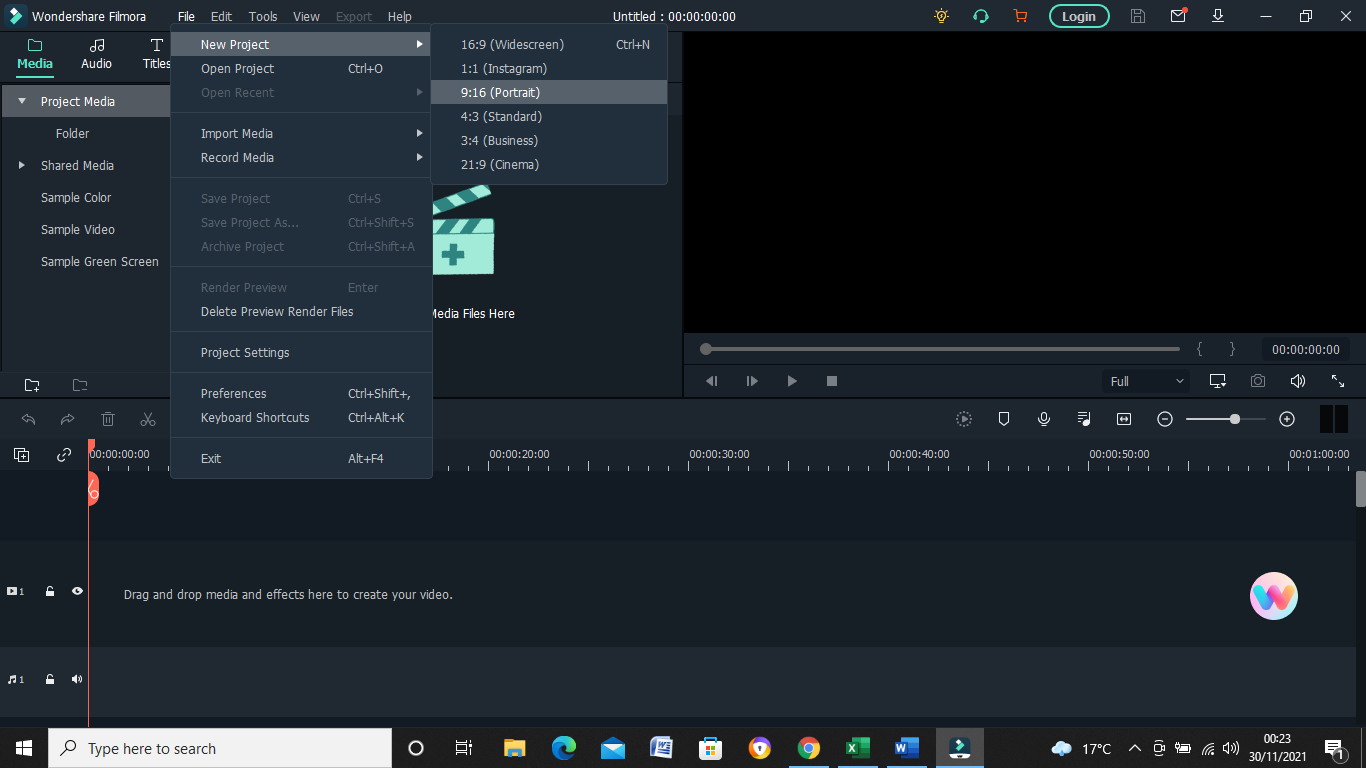
1. First, open up Filmora and go to “Project Settings” and select the “Change project aspect ratio” option.
2. From the aspect ratio, select “9:16” portrait.
3. Then set the resolution according to your preference.
4. Next, select the “Frame rate” according to your existing video that you wish to convert into Shorts. Hit the “OK” button to save the settings.
5. Drag and drop your footage onto the timeline. Ensure you keep the project settings.
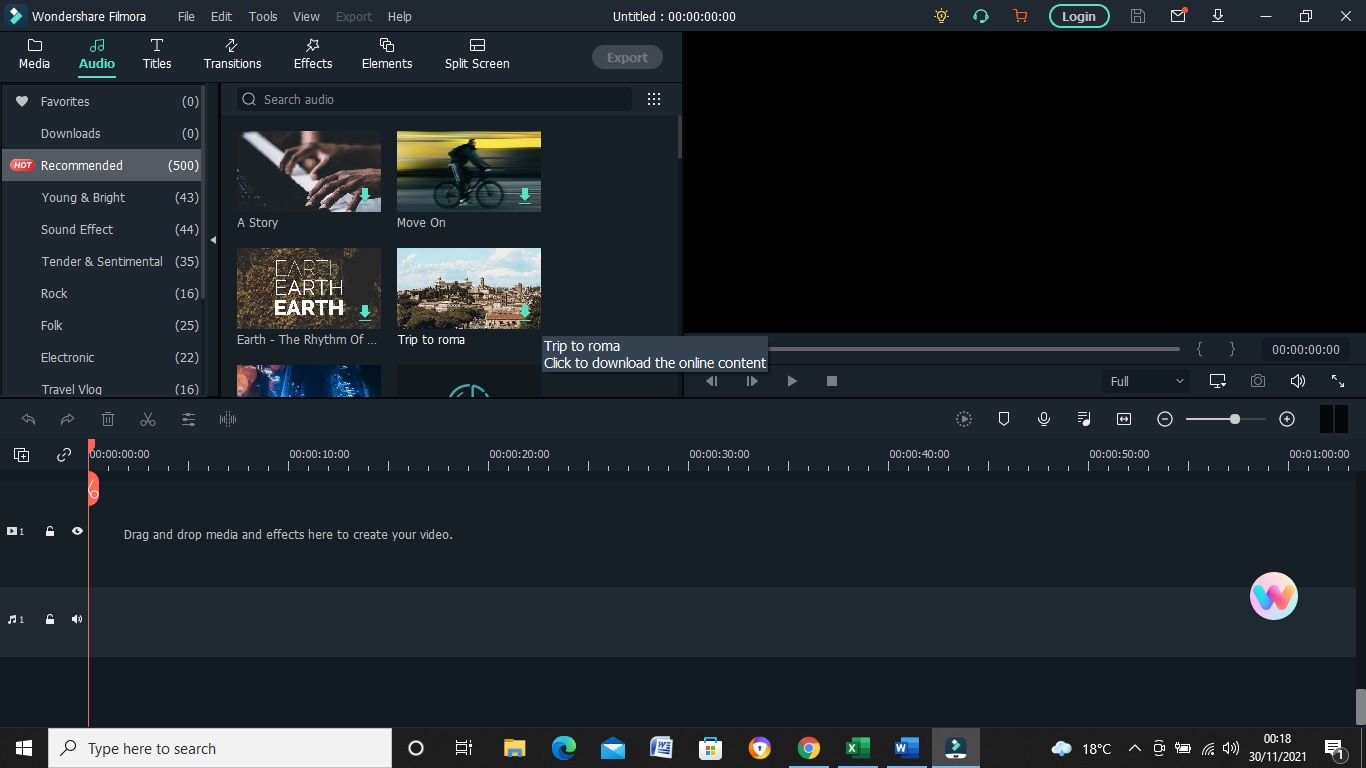
6. You can add text or music to your footage. To add music, first, download music from YouTube or other sources into your computer.
7. Then click on the “Audio” option from the “Menu” bar and choose music that’s already available on your PC.
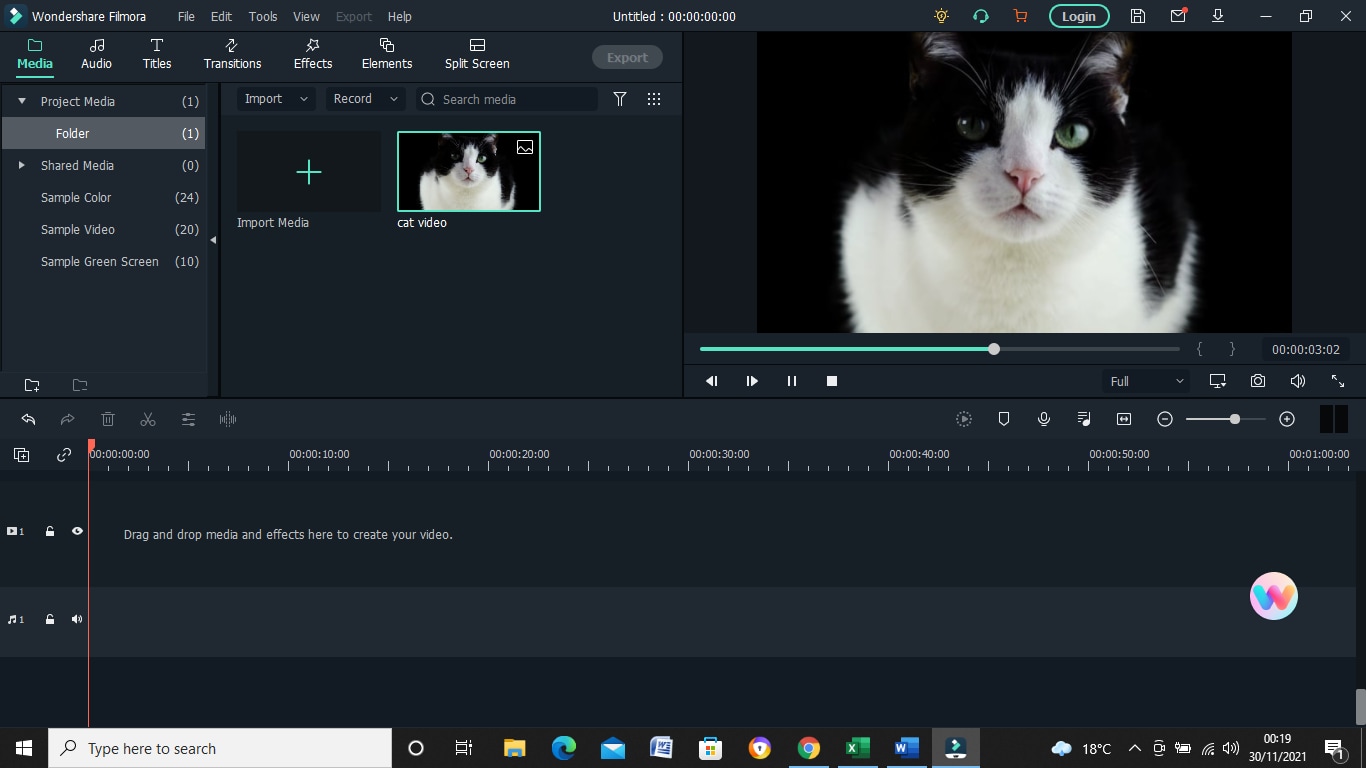
8. Next, import the music to the video. Just click on the “File” > “Import File” > “Import Video Files” option.
9. Click on the “+” icon to add the music to your video.
10. You’ll then have the song onto your project.
For Win 7 or later (64-bit)
For macOS 10.12 or later
5. Do artists earn royalties from Shorts?
Yes. Artists do receive some revenue from their music if creators use their songs in YouTube Short videos. Royalties come from ad revenue but it will depend on the type of ad on the video. So, more popular videos get higher rates than non-popular ones.
6. What to post on YouTube Shorts?
You can post several videos to YouTube Shorts which include:
- Tutorials: teach your viewers via YouTube Shorts.
- Confessional videos: This is when you speak to your viewers about what you are passionate about.
- Entertainment videos: You can also entertain your viewers with funny videos.
7. Can I promote my music on YouTube Shorts?
YouTube Shorts is a perfect platform to promote your music if you are an artist. You can either hire an influencer or do it yourself as an artist. These tips will help you to successfully promote your brand.
Be precise: Condense all the important details in your video and ensure the background music aligns with the theme.
Think widely: Check at what others are adding to their Shorts. You can include memes and other entertaining clips.
Post videos more often: Since YouTube Shorts are short videos that can’t accommodate so much information, try to post your videos more often so that your viewers follow up closely on what you are putting across.
Use catchy music: It doesn’t mean that the latest singles are more catchy or viral. Songs from a few years ago can also be equally catchy.
8. How are YouTube Shorts different from other short-form videos?
YouTube streaming service is already a popular platform that provides tones of music and video clips. Encompassing Shorts just pushed it at the forefront. The userbase is readily available and any Shorts you post will be widely viewed in over 100 countries. More so, you can extract music from the platform for use on your Shorts videos.
Conclusion
You can make a great milestone with YouTube Shorts music than if you didn’t use any. Music makes your videos catchy and interesting to viewers. Several platforms are available for sourcing music to use on your Shorts. More so, you can use the recommended app, Filmora, to add free music to your videos.
The entertainment industry is continually taking the world by storm. Lots of improvements are on the rise, especially online. Several apps are now at your fingertip, and you can access lots of videos and music right from your mobile phone. The social media platform has made it easy for millions of users to access information from other creators and editors. From Facebook, Instagram, WhatsApp, and the new kid in the block YouTube Shorts. And being that YouTube streaming service already harbors many users, Shorts has just come at the right time, with ready users at hand. Additionally, YouTube shorts music will spice up your listening experience like never before.
In this article
02 Which role does music play in YouTube Shorts?
03 YouTube Shorts Music - Things You Need to Know
What are YouTube Shorts?
YouTube Shorts is an app feature in YouTube that was introduced in 2020. It has so far rolled out in more than 100 countries. It enables both artists and creators to compose short videos to express any feeling. It could be for entertainment or educational purposes. However, the videos are short, not exceeding 60 seconds, with a default length of 15 seconds. You also have the option to record your videos with music to add value to your video.
YouTube Shorts has two main features; a platform to watch short videos and a tool you can use to compose your own short-form videos. To watch the clip, just go to the “Homepage” and find several thumbnails for popular Shorts. Then click on a video and land on the vertical video player to watch the video. Likewise, you can use the thumbs up or down to like or dislike the video. Additionally, you can pause the video and post a comment or share the Shorts with other fans.
Which role does music play in YouTube Shorts?
Music is always soothing to the soul. And using YouTube shorts music is a quick way to boost your video performance. Check below the importance of using music in your Shorts.
- Generates important emotions
Music creates a good mood, giving your audience a positive feeling towards your YouTube Shorts. Any sound will touch the listener, making the videos more interesting and beautiful.
- Music is memorable
If you use a particular tune, then there is a way your listeners will think directly of you when they hear the tune. It gives more value to the Shorts. Choosing the right music for your Shorts video is also important .
- Music represents who you are
You may put across your message via Shorts but adding some music will help the viewer directly imagine your identity.
- For effective message
Music can stimulate actions, causing immediate attraction to the listener. Use YouTube Shorts music to emphasize the overall story.
YouTube Shorts Music - Things You Need to Know
1. How to add music to your YouTube Shorts video?
As a creator, it is ideal to know how to add music to your YouTube Shorts video. Follow these steps to add music using the YouTube Shorts creator tool camera.
Step 1. First, select the Shorts video that you want to add music to.
Step 2. Then click on the “YouTube Shorts creator camera” tool.
Step 3. You’ll then be directed to your camera where you’ll find the “Add Music” option.
Step 4. Then find a “Library of songs” from popular artists that you can use. Select the song you wish to use.
Step 5. Finally, tap the “Use This Sound” option found at the bottom of the screen. Then just cue up what part of the song to use on your Shorts and go-ahead to record and upload the video.
2. The sources of music for YouTube Shorts?
You can use any music clip as long as it is not a copyrighted piece of music. Bellow are common sources where to find background music for YouTube Shorts video.
YouTube Audio Library: This is the first place to source YouTube Shorts music. YouTube is free and contains tons of free songs. You can sort your selection by duration, genre, instrument, mood, etc. To access music, go to the “Creator Studio” > “Create” > “Audio Library” and select which music to use.
Free Music Archive: This is another free site where you can discover an array of curated background music for any type of content. You’ll get more than 1,500 tracks at the tap of a button.
SoundCloud: SoundCloud streaming music service lets you use its “Creative Commons” music as long as you follow the guidelines that are laid down by the artist.
Converted music from your computer: You can also download and convert available songs from Spotify, Amazon Music, Tidal, among other streaming services. Just get a music converter tool that will remove encryption from the tracks to make it free for use forever.
3. How to extend music on YouTube Shorts?
Even though the typical duration for YouTube Shorts music is 15 seconds, you can make them longer up to 60 seconds. Just record multiple clips at 15 seconds intervals that add up to 60 seconds.
4. Can I use my own audio in YouTube Shorts?
Yes, you can use your audio in YouTube Shorts. Several converter apps are available for downloading and converting music to playable formats. Filmora is one available tool that will provide free music and let you edit your videos with minimal effort. More so, you can import and export your music in any format to make stunning YouTube Shorts videos.
Key Features of Filmora
- Edit and export your videos at a high resolution of up to 4K
- Use it to add animated messages from the titles and text library
- Easily adjust the audio of each music track on your timeline
- Add any mood with its royalty-free songs and sound effects to YouTube Shorts videos
How to add a music track to your video with Filmora
1. First, open up Filmora and go to “Project Settings” and select the “Change project aspect ratio” option.
2. From the aspect ratio, select “9:16” portrait.
3. Then set the resolution according to your preference.
4. Next, select the “Frame rate” according to your existing video that you wish to convert into Shorts. Hit the “OK” button to save the settings.
5. Drag and drop your footage onto the timeline. Ensure you keep the project settings.
6. You can add text or music to your footage. To add music, first, download music from YouTube or other sources into your computer.
7. Then click on the “Audio” option from the “Menu” bar and choose music that’s already available on your PC.
8. Next, import the music to the video. Just click on the “File” > “Import File” > “Import Video Files” option.
9. Click on the “+” icon to add the music to your video.
10. You’ll then have the song onto your project.
For Win 7 or later (64-bit)
For macOS 10.12 or later
5. Do artists earn royalties from Shorts?
Yes. Artists do receive some revenue from their music if creators use their songs in YouTube Short videos. Royalties come from ad revenue but it will depend on the type of ad on the video. So, more popular videos get higher rates than non-popular ones.
6. What to post on YouTube Shorts?
You can post several videos to YouTube Shorts which include:
- Tutorials: teach your viewers via YouTube Shorts.
- Confessional videos: This is when you speak to your viewers about what you are passionate about.
- Entertainment videos: You can also entertain your viewers with funny videos.
7. Can I promote my music on YouTube Shorts?
YouTube Shorts is a perfect platform to promote your music if you are an artist. You can either hire an influencer or do it yourself as an artist. These tips will help you to successfully promote your brand.
Be precise: Condense all the important details in your video and ensure the background music aligns with the theme.
Think widely: Check at what others are adding to their Shorts. You can include memes and other entertaining clips.
Post videos more often: Since YouTube Shorts are short videos that can’t accommodate so much information, try to post your videos more often so that your viewers follow up closely on what you are putting across.
Use catchy music: It doesn’t mean that the latest singles are more catchy or viral. Songs from a few years ago can also be equally catchy.
8. How are YouTube Shorts different from other short-form videos?
YouTube streaming service is already a popular platform that provides tones of music and video clips. Encompassing Shorts just pushed it at the forefront. The userbase is readily available and any Shorts you post will be widely viewed in over 100 countries. More so, you can extract music from the platform for use on your Shorts videos.
Conclusion
You can make a great milestone with YouTube Shorts music than if you didn’t use any. Music makes your videos catchy and interesting to viewers. Several platforms are available for sourcing music to use on your Shorts. More so, you can use the recommended app, Filmora, to add free music to your videos.
Also read:
- Best Practices for Organizing Online Video Stories
- 2024 Approved Audiovisual Excellence YouTube Videos in Premiere Pro
- 2024 Approved Choosing the Best Camera for Filming Mirrorless or DSLR
- Best of the Best Cutting-Edge Hiring Videos #1-10 for 2024
- Fluid Fusion Combining Videos for a Unified Youtube Presence
- YouTube Broadcasting How to Stream Your Twitch Content
- Love in Full View Discovering Youtube & Vimeo's Top 7 Wedding Movies
- In 2024, Enhancing YouTube Beauty Mastering Video Color Dynamics
- [Updated] DIY Video Mastery 10 Straightforward Concepts Everyone Should Try
- Transform Your YouTube Experience with Bespoeid Shorts Thumbnails
- In 2024, Enhancing Video Discoverability with Ideal Thumbnail Widths and Height
- The Most Intriguing Movies on YouTube Streams
- The Ultimate Method for Discovering Hidden Vids
- 2024 Approved Boost Engagement Advanced YouTube Tag Strategies Revealed
- In 2024, Easy Steps to Youtubing Prosperity Channel Size Not a Barrier
- Enhance Visibility, Amplify Impact (Video SEO) for 2024
- Mastering the Download of Your YouTube Playlist Today
- 2024 Approved Cutting Through the Clutter How to Stream Top-Notch Upside-Down Content on Youtube
- Proven #Hashtags for YouTube Audience Surge
- In 2024, Dominating the YouTube Sphere Key Strategies for Top-Tier Presence
- [Updated] Elevate Your Video Game Select Top 20 Thumbnail Fonts
- [Updated] 2024 Approved Digital Chronicles Recording and Preserving Your Roblox Playthroughs on MacOS
- What Legendaries Are In Pokemon Platinum On Realme 12+ 5G? | Dr.fone
- 6 Ways to Change Spotify Location On Your Xiaomi 14 | Dr.fone
- Updated 2024 Approved Quality Matters A Step-by-Step Guide to Converting Video to MP3
- New Movie Making Demystified A Simple, Step-by-Step Approach
- How To Optimize Playback Settings in Snapchat Applications
- 2024 Approved Mastering Screen Recording in Adobe Captivate A Step-by-Step Guide
- In 2024, Rootjunky APK To Bypass Google FRP Lock For Samsung Galaxy S23 FE
- Updated Harmonic Voyages Adding Profound Echoes to Your Audio Creations on a PC with Windows OS for 2024
- [Updated] 2024 Approved Developer's Dream Selecting Optimal Android Emulators for Mac/PC
- How To Transfer WhatsApp From iPhone 11 to other iPhone 15 Pro devices? | Dr.fone
- How to Bypass Google FRP Lock on Gionee F3 Pro Devices
- 2024 Approved Xiaomi's New Smartphone Screenshot Tool A Game Changer in Recording Tech
- Updated In 2024, Where to Download and Listen DJ Music?
- Title: "Transform Clips Into Content From Premiere to YouTube"
- Author: Brian
- Created at : 2024-05-25 13:01:45
- Updated at : 2024-05-26 13:01:45
- Link: https://youtube-video-recordings.techidaily.com/transform-clips-into-content-from-premiere-to-youtube/
- License: This work is licensed under CC BY-NC-SA 4.0.
