
:max_bytes(150000):strip_icc()/Echo-Dot-vs-HomePod-Mini-ea64d290bbc2457494228d7c763f9e26.jpg)
The Ultimate Strategy for Increasing YouTube Traffic
The Ultimate Strategy for Increasing YouTube Traffic
How to Optimize YouTube Tags/Title/Description for More Views

Richard Bennett
Mar 27, 2024• Proven solutions
Making awesome video content is just the first hurdle to overcome. Getting people to watch them is the next and a much bigger obstacle in your path. Just as a blogger must work hard to get people to read their blog, so a YouTuber needs to find ways to get more views on their videos.
For any piece of content on the internet, discoverability is key to exposure. After all, nobody will watch your video or read your blog if they can’t find it, right? A blogger would do this by lacing their content with SEO - search engine optimization. But how can a YouTuber do the same? The answer lies in something known as YouTube tags optimization. In this article, we will let you know how to add, edit and optimize YouTube tags easily for more views, and some tips on YouTube title and description.
Quick Jump Menu
- What are YouTube tags and why they are so important
- How to come up with YouTube tags and optimize them
- How to Tag YouTube and Add Title, Description
- How to Improve YouTube video Metadata: Tags, Title, Description
- Tips for Tagging YouTube and Writing Title, Description
Before we get started, I want to recommend the best video editing software for YouTubers - Wondershare Filmora , an easy to use while powerful video editor that allows you not only to cut, split, crop, resize, reverse your videos, but also offers you multiple video effects specially designed for Fashion, Beauty, Gaming, Travel, Education, etc. Check the video to know more fantastic features:
 Download Mac Version ](https://tools.techidaily.com/wondershare/filmora/download/ )
Part 1: What are YouTube tags and why they are so important
YouTube tags are used when you upload a video on YouTube. You need to specify the type of video. In other words, you need to describe your video with keywords. But you might think about why you need to add these words. YouTube can’t figure out what my videos are about? Unfortunately, YouTube can’t though its algorithm is much more advanced than before.
You must know the competition between videos is furious since 500 hours of video per minute are uploaded on YouTube . In this case, it is important to let the YouTube algorithm know your video by adding related tags to have a higher ranking. So the better tags we choose, the higher chance to rank in the top 1, which means you will get more views!
Using YouTube meta tags wisely can broaden your reach and help new people discover your content. However, don’t be tempted to insert irrelevant tags just because you know they are high traffic. You will be found out and penalized as a result. Just as you did with your description, research your keywords, place the most important ones first and use as many as you can.
What are the three YouTube tag types?
YouTube has three different types of tags and each of them has a specific purpose. The tags are-
Specific – The specific tag types are keywords-oriented. These keywords specifically pertain to the content of your video. In this tag type, the particular video is highlighted with the keyword tags. Often while typing the keywords in your mind, YouTube suggests phrases and keywords according to the content of your video. You may apply the suggestions and also add more general or common versions of the same keywords.
Compound – The compound tags are usually using more than two words. Many a time it is seen that users prefer tagging the complete title of the video. If you are using your video title as the compound tag, ensure that you do not include the prepositions like or, as, and, etc. This is because YouTube allows just 500 characters in the title and ignore the prepositions. It is always advised to use all the 500 characters YouTube has allowed without wasting the characters on prepositions as it will automatically be ignored.
Generic – The generic tags are the ones that describe the entire video in one or two words. These tags are used in all the videos of yours. These tags are used across your channel for all the videos you post. It is important to have such general constant tags.
Part 2: How to add YouTube tags and optimize them
The more relevant tags you add, the better it is. The best part is YouTube doesn’t restrict the number of tags but adding all is not possible and adding something irrelevant doesn’t make sense. So, your YouTube video tags must be the smart ones for more views. Educated tagging is what is required.
1. Brand-Specific Tags Addition - Every business wants their brand name to show up in the search results on YouTube and Google. Self-referencing your video or tagging your brand name in a number of variations is a smart way of letting others know your brand.
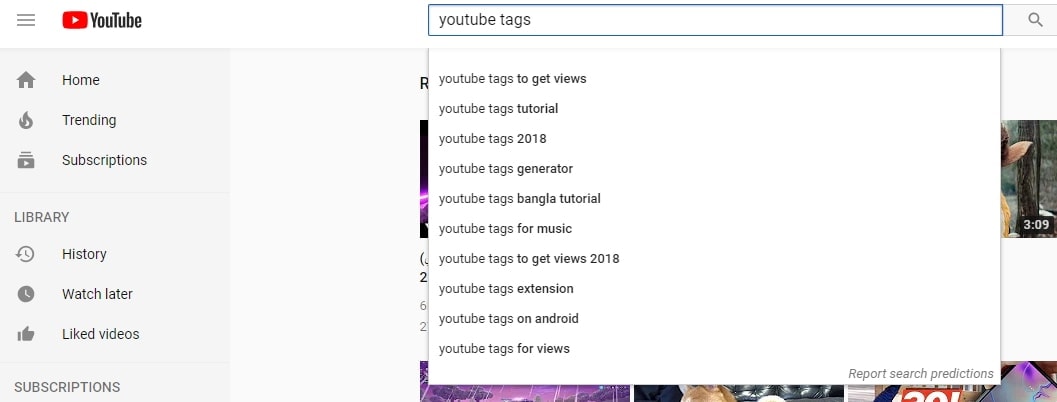
2. Using YouTube Auto Suggest – Play with the search option on YouTube and check out the YouTube suggestions when you search. Try to recognize the common videos that pop up while searching for something important and relevant to yours. Try searching for random keywords according to your YouTube search experience.
3. Use the YouTube Keyword Search Tool – Lastly, you may use the YouTube keyword suggestion tool. It helps you to extract the relevant keywords from the videos of your competitors and create suggestions according to the basic term provided by you.
4. Use Specific Tags - After using tools, you need to narrow down your tags specifically, like tags “learn 3D paper cutting”. The search volume may not be huge, but these kinds of tags can let YouTube know your video very well. Give it a try!
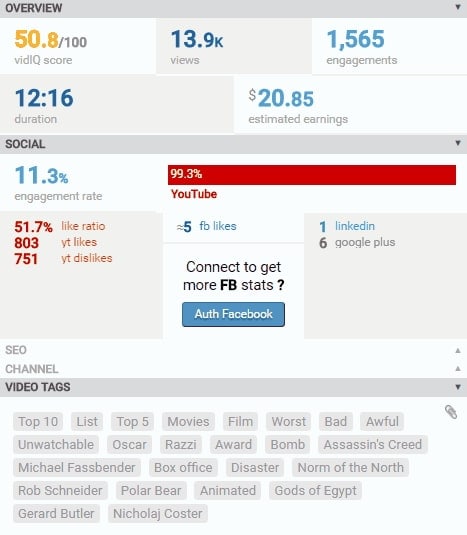
5. Check competitor’s Tags - When you check tags from other brands, it is not suggested to copy them all. What you need to do is find what you are missing and try to cover that area. However, only third-party tools can help you do that. In the market, VidIQ is highly used. It has a free version. Most of all data including tags can be found for higher views.
YouTube Tags Bonus Tips
Here you can learn some tips when optimizing tags. You can use singular and plural tags. Sometimes remember to add some misspelling tags because users tend to mistype some words, so it’s better to cover this kind of tag. You can get more information on misspelled words . More tips are listed below.
- Build on what you learned in your keyword research and use high traffic keywords as tags
- Use as many tags as possible, but without being spammy
- Build related playlists using particular tags
- Be generic; ‘big’, ‘funny’ and ‘sweet’ are fine, but ‘luscious’, ‘delightful’ and ‘splendid’ don’t make the best tags
- Put the most important tags first
- Mix single word tags with ‘long tail’ tags, e.g. ‘how to’
Part 3: How to Tag YouTube and Add Title, Description
For a New Video
- Step 1. The first thing you need to do is to sign in to your YouTube account .
- Step 2. Then click the Upload button that’s found on the top right corner of the window.

- Step 3. Then select the video that you want to upload. You will be asked to add a title, description, and tags.
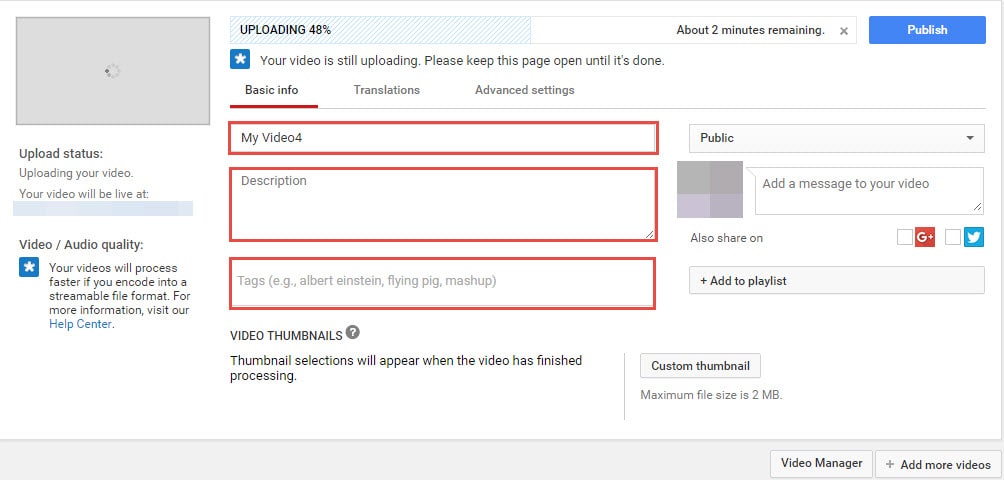
- Step 4. After uploading, you can still edit the YouTube title, description, and tags.
For a Published Video
There are times when you want to change the title, description or tag of an already published video. The good news is that YouTube allows you to re-edit them whenever you want to.
- Step 1. Log into your YouTube account
- Step 2. Click the account name found at the top right-hand corner of the screen. Then you will have a dropdown menu. Select Video Manager to show a list of your uploaded videos.

- Step 3. Click the Edit button that’s found right next to the video that you want to modify. In the Video Information, you can now change the title, description or any of the tags. Click on the Save Changes button when you are done.
Part 4: How to Improve YouTube Video Title and Description
Metadata on YouTube is where both the viewers and the platform itself can find out what your video is all about. It helps people search for your video, helps YouTube to categorize it correctly and, when done well, can broaden the reach of your content. YouTube meta consists of three main parts: tags, title and description. Here’s how you can use each of these three elements to create powerful metadata for your video:
1. Title
YouTube titles play a big part in the ranking factors for search. That means you’ve got to think about what the people most likely to want to see your video will type into the search bar, as well as the words that accurately describe your video.
For example, if you have a clip of your cat Fluffy climbing a tree, calling your video ‘Fluffy climbs a tree’ is not the best idea. Nobody knows who Fluffy is; it could be your rabbit, dog, daughter or feather duster for all the YouTube community knows, and nobody is going to be searching for it.
A better title would be ‘cat climbs a tree, but you could even improve on that. How about ‘funny cat climbs a tree’, which would capture all those people looking for funny cat videos. Or, even better, ‘funny Persian cat climbs a tree’, also capturing those people who adore Persian cats.
You can see how building awesome YouTube titles can happen organically like this, but it’s also worth doing your homework too. We have collected a handful of YouTube Keyword tools for you to improve your YouTube meta, so check out the suggestions and work forwards from there.
Best practices
- Research your keywords and include high traffic keywords at the start of the title
- Keep titles under 70 characters
- Branding, episode number, and other non-essential info should be at the end of the title
- Review your YouTube titles from time to time and update with new keywords as search trends change
- Avoid clickbait titles or misleading titles as this will affect your view time and subsequently your ranking in search
2. Description
Your description is a much longer piece of YouTube meta, so you can really go to town with your YouTube keywords here. You’ve got up to 5,000 characters to fill in, and we strongly advise that you aim to use every single one. This really is a golden opportunity, not only to get people motivated to watch all of your video, but also to be indexed correctly through well researched YouTube keywords.
You may have noticed that, on the search page itself, only a small part of the description actually shows up; 120 characters of it to be precise. This doesn’t affect indexing, but it does mean you have to plan your YouTube description carefully to really hook people into clicking through from just the first sentence or two.
Best practices
- Make the first sentence or two compelling and captivating to get people to click
- Research the best YouTube keywords to use to ensure your video is correctly indexed
- At the end of your YouTube description, include a call to action to direct viewers on what to do next (subscribe, click through to the website, look at a product, watch more videos, etc.)
- If your video is long, consider placing time codes in your description to help users jump to their areas of interest
- Add links to products showcased, your social channels, or website as you wish
- Don’t forget to credit any music you’ve used here
Part 5: Tips for Tagging YouTube and Writing Title, Description
So, now we’ve got the basics down, let’s move on to some top tips for getting your metadata just right:
- 1. Do not spam
Irrelevant keywords will not do you any favors in the long run. Using a popular search term such as ‘funny cat’ when actually it’s a video of you unboxing your product will simply irritate your viewers. You’ll get more views, but for shorter durations, and that will hurt not only your ranking but also your reputation. The people you want to draw in with your YouTube meta should be those who are genuinely interested in your videos, as these are the people who will share, comment and interact with you.
- 2. Don’t put tags in the description
YouTube has given you a place to put your tags, and that’s not in the description area of your meta. Placing tags in the description area is known as tag stuffing and can lead to videos being removed or penalized.
- 3. Update regularly
YouTube meta is not a static thing. Trends change, search statistics fluctuate, and the needs of your viewers alter as time goes on. For this reason, you should look to update your meta from time to time, at least once every six months or so. Re-research your keywords and optimize for today’s trending search terms.
You May Also Like: YouTube SEO Complete Guide
Conclusion
Take some time to perfect your meta on YouTube and see how many more views it helps you get. Let us know if you have any other tips for developing powerful metadata, and how optimizing your meta has worked for you!
Download Mac Version ](https://tools.techidaily.com/wondershare/filmora/download/ )
Richard Bennett
Richard Bennett is a writer and a lover of all things video.
Follow @Richard Bennett
Richard Bennett
Mar 27, 2024• Proven solutions
Making awesome video content is just the first hurdle to overcome. Getting people to watch them is the next and a much bigger obstacle in your path. Just as a blogger must work hard to get people to read their blog, so a YouTuber needs to find ways to get more views on their videos.
For any piece of content on the internet, discoverability is key to exposure. After all, nobody will watch your video or read your blog if they can’t find it, right? A blogger would do this by lacing their content with SEO - search engine optimization. But how can a YouTuber do the same? The answer lies in something known as YouTube tags optimization. In this article, we will let you know how to add, edit and optimize YouTube tags easily for more views, and some tips on YouTube title and description.
Quick Jump Menu
- What are YouTube tags and why they are so important
- How to come up with YouTube tags and optimize them
- How to Tag YouTube and Add Title, Description
- How to Improve YouTube video Metadata: Tags, Title, Description
- Tips for Tagging YouTube and Writing Title, Description
Before we get started, I want to recommend the best video editing software for YouTubers - Wondershare Filmora , an easy to use while powerful video editor that allows you not only to cut, split, crop, resize, reverse your videos, but also offers you multiple video effects specially designed for Fashion, Beauty, Gaming, Travel, Education, etc. Check the video to know more fantastic features:
Download Mac Version ](https://tools.techidaily.com/wondershare/filmora/download/ )
Part 1: What are YouTube tags and why they are so important
YouTube tags are used when you upload a video on YouTube. You need to specify the type of video. In other words, you need to describe your video with keywords. But you might think about why you need to add these words. YouTube can’t figure out what my videos are about? Unfortunately, YouTube can’t though its algorithm is much more advanced than before.
You must know the competition between videos is furious since 500 hours of video per minute are uploaded on YouTube . In this case, it is important to let the YouTube algorithm know your video by adding related tags to have a higher ranking. So the better tags we choose, the higher chance to rank in the top 1, which means you will get more views!
Using YouTube meta tags wisely can broaden your reach and help new people discover your content. However, don’t be tempted to insert irrelevant tags just because you know they are high traffic. You will be found out and penalized as a result. Just as you did with your description, research your keywords, place the most important ones first and use as many as you can.
What are the three YouTube tag types?
YouTube has three different types of tags and each of them has a specific purpose. The tags are-
Specific – The specific tag types are keywords-oriented. These keywords specifically pertain to the content of your video. In this tag type, the particular video is highlighted with the keyword tags. Often while typing the keywords in your mind, YouTube suggests phrases and keywords according to the content of your video. You may apply the suggestions and also add more general or common versions of the same keywords.
Compound – The compound tags are usually using more than two words. Many a time it is seen that users prefer tagging the complete title of the video. If you are using your video title as the compound tag, ensure that you do not include the prepositions like or, as, and, etc. This is because YouTube allows just 500 characters in the title and ignore the prepositions. It is always advised to use all the 500 characters YouTube has allowed without wasting the characters on prepositions as it will automatically be ignored.
Generic – The generic tags are the ones that describe the entire video in one or two words. These tags are used in all the videos of yours. These tags are used across your channel for all the videos you post. It is important to have such general constant tags.
Part 2: How to add YouTube tags and optimize them
The more relevant tags you add, the better it is. The best part is YouTube doesn’t restrict the number of tags but adding all is not possible and adding something irrelevant doesn’t make sense. So, your YouTube video tags must be the smart ones for more views. Educated tagging is what is required.
1. Brand-Specific Tags Addition - Every business wants their brand name to show up in the search results on YouTube and Google. Self-referencing your video or tagging your brand name in a number of variations is a smart way of letting others know your brand.
2. Using YouTube Auto Suggest – Play with the search option on YouTube and check out the YouTube suggestions when you search. Try to recognize the common videos that pop up while searching for something important and relevant to yours. Try searching for random keywords according to your YouTube search experience.
3. Use the YouTube Keyword Search Tool – Lastly, you may use the YouTube keyword suggestion tool. It helps you to extract the relevant keywords from the videos of your competitors and create suggestions according to the basic term provided by you.
4. Use Specific Tags - After using tools, you need to narrow down your tags specifically, like tags “learn 3D paper cutting”. The search volume may not be huge, but these kinds of tags can let YouTube know your video very well. Give it a try!
5. Check competitor’s Tags - When you check tags from other brands, it is not suggested to copy them all. What you need to do is find what you are missing and try to cover that area. However, only third-party tools can help you do that. In the market, VidIQ is highly used. It has a free version. Most of all data including tags can be found for higher views.
YouTube Tags Bonus Tips
Here you can learn some tips when optimizing tags. You can use singular and plural tags. Sometimes remember to add some misspelling tags because users tend to mistype some words, so it’s better to cover this kind of tag. You can get more information on misspelled words . More tips are listed below.
- Build on what you learned in your keyword research and use high traffic keywords as tags
- Use as many tags as possible, but without being spammy
- Build related playlists using particular tags
- Be generic; ‘big’, ‘funny’ and ‘sweet’ are fine, but ‘luscious’, ‘delightful’ and ‘splendid’ don’t make the best tags
- Put the most important tags first
- Mix single word tags with ‘long tail’ tags, e.g. ‘how to’
Part 3: How to Tag YouTube and Add Title, Description
For a New Video
- Step 1. The first thing you need to do is to sign in to your YouTube account .
- Step 2. Then click the Upload button that’s found on the top right corner of the window.
- Step 3. Then select the video that you want to upload. You will be asked to add a title, description, and tags.
- Step 4. After uploading, you can still edit the YouTube title, description, and tags.
For a Published Video
There are times when you want to change the title, description or tag of an already published video. The good news is that YouTube allows you to re-edit them whenever you want to.
- Step 1. Log into your YouTube account
- Step 2. Click the account name found at the top right-hand corner of the screen. Then you will have a dropdown menu. Select Video Manager to show a list of your uploaded videos.
- Step 3. Click the Edit button that’s found right next to the video that you want to modify. In the Video Information, you can now change the title, description or any of the tags. Click on the Save Changes button when you are done.
Part 4: How to Improve YouTube Video Title and Description
Metadata on YouTube is where both the viewers and the platform itself can find out what your video is all about. It helps people search for your video, helps YouTube to categorize it correctly and, when done well, can broaden the reach of your content. YouTube meta consists of three main parts: tags, title and description. Here’s how you can use each of these three elements to create powerful metadata for your video:
1. Title
YouTube titles play a big part in the ranking factors for search. That means you’ve got to think about what the people most likely to want to see your video will type into the search bar, as well as the words that accurately describe your video.
For example, if you have a clip of your cat Fluffy climbing a tree, calling your video ‘Fluffy climbs a tree’ is not the best idea. Nobody knows who Fluffy is; it could be your rabbit, dog, daughter or feather duster for all the YouTube community knows, and nobody is going to be searching for it.
A better title would be ‘cat climbs a tree, but you could even improve on that. How about ‘funny cat climbs a tree’, which would capture all those people looking for funny cat videos. Or, even better, ‘funny Persian cat climbs a tree’, also capturing those people who adore Persian cats.
You can see how building awesome YouTube titles can happen organically like this, but it’s also worth doing your homework too. We have collected a handful of YouTube Keyword tools for you to improve your YouTube meta, so check out the suggestions and work forwards from there.
Best practices
- Research your keywords and include high traffic keywords at the start of the title
- Keep titles under 70 characters
- Branding, episode number, and other non-essential info should be at the end of the title
- Review your YouTube titles from time to time and update with new keywords as search trends change
- Avoid clickbait titles or misleading titles as this will affect your view time and subsequently your ranking in search
2. Description
Your description is a much longer piece of YouTube meta, so you can really go to town with your YouTube keywords here. You’ve got up to 5,000 characters to fill in, and we strongly advise that you aim to use every single one. This really is a golden opportunity, not only to get people motivated to watch all of your video, but also to be indexed correctly through well researched YouTube keywords.
You may have noticed that, on the search page itself, only a small part of the description actually shows up; 120 characters of it to be precise. This doesn’t affect indexing, but it does mean you have to plan your YouTube description carefully to really hook people into clicking through from just the first sentence or two.
Best practices
- Make the first sentence or two compelling and captivating to get people to click
- Research the best YouTube keywords to use to ensure your video is correctly indexed
- At the end of your YouTube description, include a call to action to direct viewers on what to do next (subscribe, click through to the website, look at a product, watch more videos, etc.)
- If your video is long, consider placing time codes in your description to help users jump to their areas of interest
- Add links to products showcased, your social channels, or website as you wish
- Don’t forget to credit any music you’ve used here
Part 5: Tips for Tagging YouTube and Writing Title, Description
So, now we’ve got the basics down, let’s move on to some top tips for getting your metadata just right:
- 1. Do not spam
Irrelevant keywords will not do you any favors in the long run. Using a popular search term such as ‘funny cat’ when actually it’s a video of you unboxing your product will simply irritate your viewers. You’ll get more views, but for shorter durations, and that will hurt not only your ranking but also your reputation. The people you want to draw in with your YouTube meta should be those who are genuinely interested in your videos, as these are the people who will share, comment and interact with you.
- 2. Don’t put tags in the description
YouTube has given you a place to put your tags, and that’s not in the description area of your meta. Placing tags in the description area is known as tag stuffing and can lead to videos being removed or penalized.
- 3. Update regularly
YouTube meta is not a static thing. Trends change, search statistics fluctuate, and the needs of your viewers alter as time goes on. For this reason, you should look to update your meta from time to time, at least once every six months or so. Re-research your keywords and optimize for today’s trending search terms.
You May Also Like: YouTube SEO Complete Guide
Conclusion
Take some time to perfect your meta on YouTube and see how many more views it helps you get. Let us know if you have any other tips for developing powerful metadata, and how optimizing your meta has worked for you!
Download Mac Version ](https://tools.techidaily.com/wondershare/filmora/download/ )
Richard Bennett
Richard Bennett is a writer and a lover of all things video.
Follow @Richard Bennett
Bridging Streaming Realms: Twitch to YouTube Conversion Strategies
Create High-Quality Video - Wondershare Filmora
An easy and powerful YouTube video editor
Numerous video and audio effects to choose from
Detailed tutorials provided by the official channel
Amidst many online applications is Twitch. This live streaming platform takes your experience to another level. You can use it to make crafts, play games, attract broadcasters, and many more. Twitch was launched in 2011, and since then, it has attracted millions of users, managing a database of about 4 million broadcasters by early 2020. With it, users can stream their activities as others watch in real-time. Just browse a category to find a stream.
You can also follow streamers that you like on the platform and get updates and notifications immediately after they are posted. But how do you start a career on a platform like Twitch? You need to broadcast and gather a large following. You can use built-in audiences from other platforms like Facebook. Let’s dive into the core of the matter and look at how to upload Twitch streams to YouTube and build your platform.

In this article
02 What is the benefit of uploading your Twitch Streams to YouTube
03 How to upload your Twitch Streams to YouTube
What is Twitch VOD?
Twitch Video on Demand (VOD) is a recording of previously streamed content. It provides briefings if you missed catching the Twitch live stream. Just watch the VOD from your favorite streamer and be engaged the best way possible. However, VODs don’t last forever. They are removed after two weeks of broadcast. But streamers with Partner Status can have their VODs last up to 60 days.
- How to enable Twitch VOD?
VODs are the best form to archive streams that your fans missed. Even though they are not enabled by default, you can manually enable them and not let your fans miss any important event from your channel. They’ll find it under the “Videos” tab on any Twitch channel. Follow these steps to enable VOD on your channel.
Step 1. Go to your profile icon in the top right corner of Twitch
Check in the “Channel & Video” section and locate the “Stream Key & Preferences” menu.

Step 2. Click on “Creator Dashboard”
Remember, you can enable VODs from your creator dashboard. Just go under the “Settings” tab and click on the “Stream section” of the creator dashboard. Check under the subtitle “VOD Settings” and get the option to store past broadcasts. You can also toggle the slider to store your past broadcasts.

Step 3 Click on the “Settings” tab on the left-hand side and go to Stream
You’ll get various drop-down menu options. Click on the “Settings” tab and choose the “Stream” option. The system will navigate to a new page, thus setting your preferences for VODs and clips.
Step 4. Go to “VOD Settings” and toggle on the “Store Past Broadcast.”
Ensure you have the toggle option turned ON under the “VOD Settings.” If it’s “ON,” you’ll realize the toggle will be purple, with a checkmark in it. Twitch will be confirmed to be enabled if it’s purple.

- Frequently Asked Question about Twitch VOD
These are some questions frequently asked by Twitch users.
1. How long will Twitch store my VOD
Your Twitch can either be stored for 14 or 60 days, depending on your level. For Twitch Prime, Twitch Partner or a Twitch Turbo user has their past broadcasts automatically saved for 60 days before deletion. But if you are not connected to these three options, your past broadcasts will be saved for only 14 days before deletion.
Since your past broadcasts cannot be live for more than 60 days, you have the option to download the video to your computer before the validity days expire and Twitch deletes it. You can use an External Hard drive to save the past broadcast content. Likewise, it is possible to turn your past broadcast content into Highlight and, in turn, permanently store them on Twitch.
2. What is the difference between Twitch VOD, Highlights, and Clips
Twitch VOD is a previously saved video of your live stream content. You choose to save either part or the entire content of your previously streamed content. More so, you don’t need any additional requirements to use VOD.
Highlights are short videos that have been edited from your past broadcast content. You can save them on Twitch permanently. Streamers majorly use highlights to save video game achievements. Unlike VOD Twitch that can be saved up to 60 days, Highlights usually lasts no more than 3 minutes.
- To make Highlights on Twitch, first, navigate to your Dashboard.
- Then scroll down and click on “Content” > “Video Producer.
- Next, press on “All Videos” to change them to “Past Broadcasts.”
- Now press the “Highlight” button, and Twitch will immediately open a new tab for “Twitch Highlighter Tool.”
- Then select the video part to include as “Highlight” and press the “Create Highlights” button.
- Wait a while for the process to be completed, and Voila! You have your Highlights created.
When it comes to Twitch Clip, you can capture special moments in a stream you are currently watching. On the same note, you can share clips with friends and other users on social media platforms. Such shared clips contain a link where others view the source or video from.
The clips you create will automatically be saved on the streamer’s channel on the “Clips” page, where other viewers can see them too. Nonetheless, you can download “clips” to your computer and, in turn, upload them whenever you want to. And note that you can help your stream grow via “Clips” by letting your viewers clip and share your stream moments.
- To create “Clips” on Twitch, identify which Streamers channel you wish to create a clip from.
- Then click on the “Clapper board” icon. Next, edit your clip between 5 and 60 seconds long.
- Finally, create a title and publish your Clip. You’ll also enjoy the privilege to share your clip’s link to other social media networks.
What is the benefit of uploading your Twitch Streams to YouTube
You stand to gain a lot when you upload your Twitch Streams to YouTube.
1) To enlighten your followers
Your followers will see your streams and make the best decisions. Viewers can check out your recordings and other highlights from past streams. It will help them decide whether they like what they see and probably join your live streams.
2) Twitch provides content for you to share and monetize on YouTube
Since Twitch streaming is more popular nowadays, many people throng it for content. It is not wise to rely entirely on Twitch to discover as a Twitch Streamer. Posting to YouTube will make it known within a short time. You would have announced your streams most nobly and kept your followers up to date, attracting new ones as well.
3) To keep your followers engaged even when you are offline
Even though live streaming is important, some viewers may not attend the live sessions due to different time zones or other commitments. In this regard, when uploaded to YouTube, Twitch will give them a chance to watch your content just whenever they log in. They, therefore, have the option to watch a Twitch VOD of the live stream they missed.
How to upload your Twitch Streams to YouTube
Check how to upload Twitch streams to YouTube from the Twitch website.
Step 1. Identify the little arrow next to your name on the Twitch website and click on it. Then click on the “Video Producer” to take you to a list of your Twitch videos.

Step 2. Check out and click on the “three-dots” on the video you wish to upload to YouTube. Click on the “Export” tab.
Step 3. A menu will then pop up. Here, you can fill in the description, title, and tags that you would like to appear on the YouTube video. There is an option for Twitch to split your video automatically. If you wish so, then tick the “Checkbox” to enable it. Then click on the “Start Export” option to export your Twitch streams to YouTube.

Bouns! Edit Your Twitch Video with Filmora
The quality of your video matters when it comes to uploading Twitch Streams to YouTube. Using a third-party tool to edit your video is the first step in ensuring your videos communicate meaningful content. Filmora comes in handy to bring your imaginations to life. Use it for simple creation without limits, even for beginners.
- Use it to track moving objects in video clips
- Easily match any image of the selected clip
- Its powerful tools let you edit your video by cropping, splitting, adjusting speed, etc
- The video keyframe easily indicates the beginning and end of the parameters
For Win 7 or later (64-bit)
For macOS 10.12 or later
Conclusion
● Don’t just focus on how to upload Twitch streams to YouTube but also consider the quality of video you are posting to YouTube. Remember, your video quality will speak much more of you than any other description. So, strive to produce quality videos using the best tool, Filmora. The app is easy to use and will elevate your views and imaginations through your video in the most impactful way.
Amidst many online applications is Twitch. This live streaming platform takes your experience to another level. You can use it to make crafts, play games, attract broadcasters, and many more. Twitch was launched in 2011, and since then, it has attracted millions of users, managing a database of about 4 million broadcasters by early 2020. With it, users can stream their activities as others watch in real-time. Just browse a category to find a stream.
You can also follow streamers that you like on the platform and get updates and notifications immediately after they are posted. But how do you start a career on a platform like Twitch? You need to broadcast and gather a large following. You can use built-in audiences from other platforms like Facebook. Let’s dive into the core of the matter and look at how to upload Twitch streams to YouTube and build your platform.
In this article
02 What is the benefit of uploading your Twitch Streams to YouTube
03 How to upload your Twitch Streams to YouTube
What is Twitch VOD?
Twitch Video on Demand (VOD) is a recording of previously streamed content. It provides briefings if you missed catching the Twitch live stream. Just watch the VOD from your favorite streamer and be engaged the best way possible. However, VODs don’t last forever. They are removed after two weeks of broadcast. But streamers with Partner Status can have their VODs last up to 60 days.
- How to enable Twitch VOD?
VODs are the best form to archive streams that your fans missed. Even though they are not enabled by default, you can manually enable them and not let your fans miss any important event from your channel. They’ll find it under the “Videos” tab on any Twitch channel. Follow these steps to enable VOD on your channel.
Step 1. Go to your profile icon in the top right corner of Twitch
Check in the “Channel & Video” section and locate the “Stream Key & Preferences” menu.
Step 2. Click on “Creator Dashboard”
Remember, you can enable VODs from your creator dashboard. Just go under the “Settings” tab and click on the “Stream section” of the creator dashboard. Check under the subtitle “VOD Settings” and get the option to store past broadcasts. You can also toggle the slider to store your past broadcasts.
Step 3 Click on the “Settings” tab on the left-hand side and go to Stream
You’ll get various drop-down menu options. Click on the “Settings” tab and choose the “Stream” option. The system will navigate to a new page, thus setting your preferences for VODs and clips.
Step 4. Go to “VOD Settings” and toggle on the “Store Past Broadcast.”
Ensure you have the toggle option turned ON under the “VOD Settings.” If it’s “ON,” you’ll realize the toggle will be purple, with a checkmark in it. Twitch will be confirmed to be enabled if it’s purple.
- Frequently Asked Question about Twitch VOD
These are some questions frequently asked by Twitch users.
1. How long will Twitch store my VOD
Your Twitch can either be stored for 14 or 60 days, depending on your level. For Twitch Prime, Twitch Partner or a Twitch Turbo user has their past broadcasts automatically saved for 60 days before deletion. But if you are not connected to these three options, your past broadcasts will be saved for only 14 days before deletion.
Since your past broadcasts cannot be live for more than 60 days, you have the option to download the video to your computer before the validity days expire and Twitch deletes it. You can use an External Hard drive to save the past broadcast content. Likewise, it is possible to turn your past broadcast content into Highlight and, in turn, permanently store them on Twitch.
2. What is the difference between Twitch VOD, Highlights, and Clips
Twitch VOD is a previously saved video of your live stream content. You choose to save either part or the entire content of your previously streamed content. More so, you don’t need any additional requirements to use VOD.
Highlights are short videos that have been edited from your past broadcast content. You can save them on Twitch permanently. Streamers majorly use highlights to save video game achievements. Unlike VOD Twitch that can be saved up to 60 days, Highlights usually lasts no more than 3 minutes.
- To make Highlights on Twitch, first, navigate to your Dashboard.
- Then scroll down and click on “Content” > “Video Producer.
- Next, press on “All Videos” to change them to “Past Broadcasts.”
- Now press the “Highlight” button, and Twitch will immediately open a new tab for “Twitch Highlighter Tool.”
- Then select the video part to include as “Highlight” and press the “Create Highlights” button.
- Wait a while for the process to be completed, and Voila! You have your Highlights created.
When it comes to Twitch Clip, you can capture special moments in a stream you are currently watching. On the same note, you can share clips with friends and other users on social media platforms. Such shared clips contain a link where others view the source or video from.
The clips you create will automatically be saved on the streamer’s channel on the “Clips” page, where other viewers can see them too. Nonetheless, you can download “clips” to your computer and, in turn, upload them whenever you want to. And note that you can help your stream grow via “Clips” by letting your viewers clip and share your stream moments.
- To create “Clips” on Twitch, identify which Streamers channel you wish to create a clip from.
- Then click on the “Clapper board” icon. Next, edit your clip between 5 and 60 seconds long.
- Finally, create a title and publish your Clip. You’ll also enjoy the privilege to share your clip’s link to other social media networks.
What is the benefit of uploading your Twitch Streams to YouTube
You stand to gain a lot when you upload your Twitch Streams to YouTube.
1) To enlighten your followers
Your followers will see your streams and make the best decisions. Viewers can check out your recordings and other highlights from past streams. It will help them decide whether they like what they see and probably join your live streams.
2) Twitch provides content for you to share and monetize on YouTube
Since Twitch streaming is more popular nowadays, many people throng it for content. It is not wise to rely entirely on Twitch to discover as a Twitch Streamer. Posting to YouTube will make it known within a short time. You would have announced your streams most nobly and kept your followers up to date, attracting new ones as well.
3) To keep your followers engaged even when you are offline
Even though live streaming is important, some viewers may not attend the live sessions due to different time zones or other commitments. In this regard, when uploaded to YouTube, Twitch will give them a chance to watch your content just whenever they log in. They, therefore, have the option to watch a Twitch VOD of the live stream they missed.
How to upload your Twitch Streams to YouTube
Check how to upload Twitch streams to YouTube from the Twitch website.
Step 1. Identify the little arrow next to your name on the Twitch website and click on it. Then click on the “Video Producer” to take you to a list of your Twitch videos.
Step 2. Check out and click on the “three-dots” on the video you wish to upload to YouTube. Click on the “Export” tab.
Step 3. A menu will then pop up. Here, you can fill in the description, title, and tags that you would like to appear on the YouTube video. There is an option for Twitch to split your video automatically. If you wish so, then tick the “Checkbox” to enable it. Then click on the “Start Export” option to export your Twitch streams to YouTube.
Bouns! Edit Your Twitch Video with Filmora
The quality of your video matters when it comes to uploading Twitch Streams to YouTube. Using a third-party tool to edit your video is the first step in ensuring your videos communicate meaningful content. Filmora comes in handy to bring your imaginations to life. Use it for simple creation without limits, even for beginners.
- Use it to track moving objects in video clips
- Easily match any image of the selected clip
- Its powerful tools let you edit your video by cropping, splitting, adjusting speed, etc
- The video keyframe easily indicates the beginning and end of the parameters
For Win 7 or later (64-bit)
For macOS 10.12 or later
Conclusion
● Don’t just focus on how to upload Twitch streams to YouTube but also consider the quality of video you are posting to YouTube. Remember, your video quality will speak much more of you than any other description. So, strive to produce quality videos using the best tool, Filmora. The app is easy to use and will elevate your views and imaginations through your video in the most impactful way.
Also read:
- In 2024, Audience’ Market Leaders in YouTube's Short Clips Downloads
- Clear and Steady Essential YouTube Camera Tech
- In 2024, A Detailed Exploration YouTube's Visionary Suite
- [Updated] 2023'S Top Social Moment Infographics
- [New] Elevate Engagement Personalized YouTube Thumbnail Guide
- Essential Tips for Successful YouTube Broadcasts for 2024
- [New] Essential Gear for Video Blogging Top-Rated Camera Lenses Revealed
- 2024 Approved Building Your First Channel Essential Video Gear List
- In 2024, Elevating Your Content Choosing Right YouTube Duos/Groups
- Tailored Sound Solutions Ideal Mics For Educational, Gaming & Blogging Channels
- A New Take on Favorite Movies - #7 Alternatives for 2024
- Best Free Introduction Software for Youtubers
- IPhone & Android's Alternative to YouTube Experience
- Decoding the Secret of Highest Quality YouTube MP3s
- [New] Comparing YouTube Policies with Creative Commons
- Eternal Void A Complete Ban on YouTube Short Video Feature
- Transform YouTube Soundtracks on iPhone with These 6 Choices
- FREE 6 Best YouTube to MP3 Downloader for Android
- In 2024, Digital Dollars Earn From YouTubers in 8 Ways
- [New] Best YouTube Audio Extractors Free, Easy Download & Convert
- Best Applications for Crafting Dynamic Video Entrances
- Learn to Record, Save, & Share YouTube Content A Cost-Free Approach
- Average Revenue What Every View Contributes to Creators
- Foundational Codes for YouTube Enthusiasts
- 2024 Approved Channel Surge Strategy Using YouTube Outros for Rapid Expansion
- The Ultimate Guide to Free, Online Short Video Downloading
- [Updated] Cutting-Edge Icons and Logos From 6 Innovative Websites
- Charting Financial Success The Tale of Ajey (CarryMinati) and YouTube for 2024
- Quick & Easy Guide to Turn Videos Into Animated GIF Delights
- Maximize Reach The Top Ten Keywords Discovery Platforms for YouTubers
- Scrutinizing the Financial Lifelines that Drive TSeries' Youtube Success
- In 2024, Cutting Techniques for Sports Entertainment Films
- 2024 Approved DJ Beats Unleashed High-Fidelity Templates Downloaded Easily
- Nailing the Desktop/Mobile YouTube Speed Control
- Simple Screen-Capture Techniques to Grab YouTube Soundtracks
- Designing Effective Video Previews for Channels
- [Updated] Crafting Captivating Edu-Vids on YouTube A Step-by-Step Guide
- Efficient Hashtag Use for Skyrocketing YouTube Audience
- Chasing Profit on Platforms YouTube Partner Application Steps for 2024
- Rectified Hidden Status of Shorts
- In 2024, Efficiency in Action Rapid Removal of YouTube Discussions
- [Updated] Adept Principles for YouTube Participants
- FIFA's Best Players Trendy Videos on YouTube
- 2024 Approved Boost Engagement Discover the Top 5 YouTube Promotion Tactics
- Bridge the Gap How to Multistream for a Wider, Diverse Audience for 2024
- [Updated] Revolutionize Your Followers List with Top Twitter Cleanup Tools for 2024
- Complete guide for recovering contacts files on Y100i.
- [New] Mastering Discord's Profile Pics A Guide to Sizzling Pfps for 2024
- In 2024, Master the Game with Standout TikTok Profile Frames
- A How-To Guide on Bypassing the iPhone 15 iCloud Lock
- Enhancing Social Engagement with Zoom-FB Live Streams
- New 2024 Approved The SFX Seekers Companion Navigating to 8 Exceptional Online Locations for Accessing Premium-Quality, No-Cost Audio Assets
- [Updated] In 2024, Elevate Your Discussions Mastering Google Meet Dialogue
- [New] Unveiling Simple Sync OBS + Zoom Journey
- Is GSM Flasher ADB Legit? Full Review To Bypass Your Itel P55FRP Lock
- In 2024, A Guide Samsung Galaxy F54 5G Wireless and Wired Screen Mirroring | Dr.fone
- Updated Cut and Trim Videos on PC Top Software Options
- [Updated] Grasping Social Media Success Basic Facebook Statistics
- Unlock Your Disabled iPhone 6s Plus Without iTunes in 5 Ways
- [New] Top 6 TikTok Income Predictors Summarized
- Title: The Ultimate Strategy for Increasing YouTube Traffic
- Author: Brian
- Created at : 2024-05-25 12:59:18
- Updated at : 2024-05-26 12:59:18
- Link: https://youtube-video-recordings.techidaily.com/the-ultimate-strategy-for-increasing-youtube-traffic/
- License: This work is licensed under CC BY-NC-SA 4.0.
