
:max_bytes(150000):strip_icc()/GettyImages-153126740-584f1ddc3df78c491e4b2c60.jpg)
The Blueprint for Successful Collaborative Video Production on YouTube
The Blueprint for Successful Collaborative Video Production on YouTube
YouTube Collaboration Guide to Find Partners and Make Collab Videos

Richard Bennett
Oct 26, 2023• Proven solutions
If you watch YouTube then you don’t need to be told why it’s a good idea for creators to collaborate. You get the chance to grow by being introduced to your partner’s audience, you make a friend to support and be supported by as you both grow your channels, and it always looks like a ton of fun. The question isn’t why you should collab, it’s how.
Finding someone to collab with, approaching them, and figuring out how to actually make the video can be all be challenging. Here are some tips:
- 6 Tips About Finding Collab Partners
- How to Ask Someone to Collab
- How to Make a Collab video
- Launching Your Collab
Best YouTube Video Editor–Wondershare Filmora
Wondershare Filmora has all the essential features needed by a PC video editing app like creating slideshows, trimming, merging, cropping, adding background music, rotating videos as well as some special features like APP, motion elements, animated texts, overlays, and filters, etc., and finally, the users can upload their edited video to YouTube directly. Just get started and create your own YouTube video with Wondershare Filmora!


6 Tips About Finding Collab Partners
Here are 6 questions you should ask yourself when you’re looking for potential collaborators on YouTube.
1. Who Are My Friends?
The easiest way to think of a potential collab partner is just to think of who you’re already friendly with. The best place to look for collab partners is probably in your list of subscribers. Someone who already knows what you do and enjoys it will probably be receptive to the idea of doing a video with you.
You can even sort your own subscribers by their sub counts to find someone with about the same sized channel as you.
2. Who’s In The Same Boat as Me?
You don’t have to already have a friendship, or even a creator-subscriber, relationship with someone to consider them as a potential partner (although it’s not a bad idea to subscribe to them before you send your request).
Consider people who are in the same niche as you who have approximately the same sized channel as you. If you’re in different genres the collab doesn’t make sense, and if there’s a significant size difference between your channels then it’s a lot more valuable to one of you than the other.
3. What Can This Person Offer My Audience?
Part of why you collaborate is to grow your audience, but that should never be at the expense of your current subscriber base. Before you reach out to a potential collab partner, seriously consider whether you think your audience will enjoy a video that features them.
Your partner should be someone who delivers content that is relevant to your own audience (for example, it makes no sense for a tech YouTuber to collaborate with someone whose channel is about cupcakes – their techie audience doesn’t want to learn about cupcakes).
4. Do I Like Their Videos?
Before you send anyone a message, make sure you’ve watched and enjoyed a few of their videos. If you don’t find them entertaining then your audience probably won’t either. Also, if you don’t seem to have any knowledge of someone’s content then they probably won’t want to work with you.
5. What Kind of Videos Could We Make?
The time to start brainstorming is not after you’ve already sent a collab request. You should think of a few ideas before you reach out, both to show your potential partner that you’re serious and to ensure that your audience is getting well-planned content.
6. Who’s in My Area?
You can do a long-distance collab, but if it is possible to physically meet up with someone to plan and shoot the videos then that’s way better.
How to Ask Someone to Collab
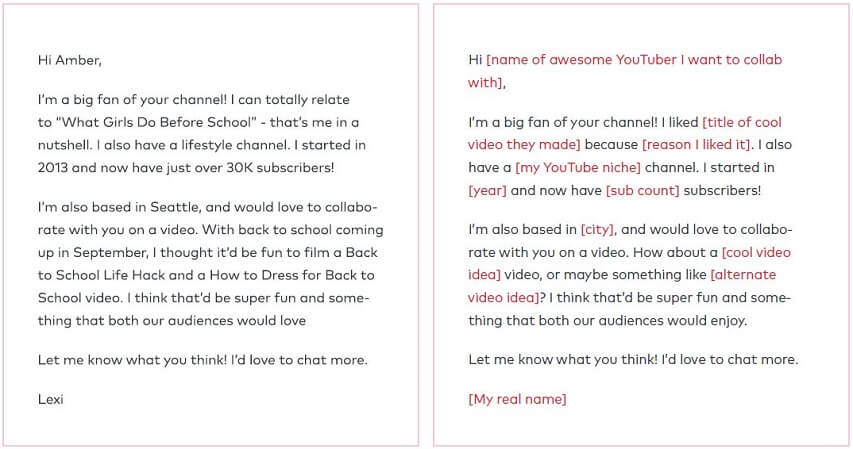
Here’s an example of a collab pitch, and a template you can use to write your own! It’s from filmora.io’s free YouTube Toolkit, which you can download with the Get Subs Guide here .
Here are some more tips:
1. Use Their Name
This one probably seems basic, but it is very easy to send a message where you just say ‘hey’ and jump to your point without actually using someone’s name. That’s a mistake in this scenario. You want to let your potential partner know that you are specifically interested in working with them and aren’t just fishing for anyone who might work with you.
2. Mention Their Content
Show an interest in your future partner’s videos. You should have watched at least a couple of them as part of deciding to reach out, so mention a video of theirs that you liked and talk about why. Let the other person know that you genuinely enjoy what they do and think your audience will too.
3. Pitch Video Ideas
You should have a couple of ideas for videos you could do together ready when you contact someone. You don’t want to reach out to someone and then seem like you expect them to do all the planning. You may not end up doing one of the ideas you pitch, but you’ll still come off better if you have something in mind when you first send your message.
4. Keep Your Message Simple
You don’t want to overwhelm someone with a huge amount of text the first time you contact them. Check out the example at the beginning of this section to get an idea of the length you should go for.
5. Be an Equal
Remember that you are just as wonderful a creator as the person you are approaching. You don’t want to fawn too heavily and cast yourself more as a fan than a serious creator in your own right (not that you can’t be both).
6. Most Creators Have an Email Address on Their Channel Page
It usually isn’t difficult to find contact information for a YouTuber. If you go to someone’s channel page and click into the About tab, there will usually be a section called ‘For business inquiries’ under ‘Details’. Click ‘View Email Address’ next to that and you’ll have a means of contacting the person you want to collaborate with.
You can also reach out through DMs or other social media. If you use a platform like Twitter, however, you may want to be a bit more casual and start a conversation before building up to asking them about a collab.
How to Make a Collab Video
Here are 3 ways you can collaborate with other YouTubers.
Shout Each Other Out
This is the easiest way to collab because you don’t have to meet up or do much planning together. Essentially, you just make your own video and let everyone know how much you like your partner’s channel (combined with linking your viewers to them), and they do the same.
Make sure to agree beforehand on how long you’ll spend plugging each other in your videos, so one of you doesn’t go on way longer than the other.
This probably isn’t a hugely effective method of collaborating if your goal is to grow (I wouldn’t check out someone’s channel just because I was told to), but it certainly is easy.
Be Guests in Each Other’s Videos
This might be the most fun type of collab to watch. The person whose channel the video appears on is the ‘host’ and the video is done in something closer to their usual style (which will be more appealing to their subscribers), and their collab partner is a guest. You might want to do two of these videos so you each have one for your own channel.
Depending on your YouTube niche, you might do a fun activity together or you might interview your guest about a subject you think your subscribers are interested in.
In order to pull off a collab like this, you need to be able to meet in person.
Long Distance Collaborations
It’s harder to collab if you can’t meet up, but it isn’t impossible. You can exchange footage to use in each other’s videos, or you can record a Google Hangout or Skype chat.
Launching Your Collab
Here are some tips for making sure both you and your partner get the most out of the collab videos you’ve made.
Agree on a Launch Date/Time
If you each have a video for your own channel then you want to make sure those go up at the same time. It’ll be awkward if you post your video and shout out your partner/their collab video and when people go to check that out it isn’t up.
You may want to post your videos as unlisted initially if you’re worried about one of you taking longer to upload. Then, once your videos are both completely ready to go, you can switch their listing to ‘public’ at the exact same time.
Promote Your Collab
Before you post your collab videos, you might want to build hype by mentioning the upcoming collab video in your solo videos leading up to it. If you and your partner are active on platforms like Instagram and Snapchat, you can do things like post behind the scenes pictures of your collab videos to generate excitement.
Comment on Each Other’s Videos
After you’ve posted your collabs, make sure to leave each other comments about how much fun it was working together. You might want to interact publicly on social media too. Overall, just be friends. You want to maintain this relationship to leave the door open to future collabs, and your viewers will want to believe in your friendship too. Your partner’s subscribers are more likely to be interested in you when they feel like you’re buddies with one of their favorite creators.
Make sure to discuss how much promotion you’ll each do for the collab before and after it launches. If one of you does a ton of promotion and the other just does one tweet, it won’t make the person who’s done way more promotion feel great.
Have you ever collaborated on YouTube? If you could collaborate with anyone, who would it be and what kind of video would you make?
Richard Bennett
Richard Bennett is a writer and a lover of all things video.
Follow @Richard Bennett
Richard Bennett
Oct 26, 2023• Proven solutions
If you watch YouTube then you don’t need to be told why it’s a good idea for creators to collaborate. You get the chance to grow by being introduced to your partner’s audience, you make a friend to support and be supported by as you both grow your channels, and it always looks like a ton of fun. The question isn’t why you should collab, it’s how.
Finding someone to collab with, approaching them, and figuring out how to actually make the video can be all be challenging. Here are some tips:
- 6 Tips About Finding Collab Partners
- How to Ask Someone to Collab
- How to Make a Collab video
- Launching Your Collab
Best YouTube Video Editor–Wondershare Filmora
Wondershare Filmora has all the essential features needed by a PC video editing app like creating slideshows, trimming, merging, cropping, adding background music, rotating videos as well as some special features like APP, motion elements, animated texts, overlays, and filters, etc., and finally, the users can upload their edited video to YouTube directly. Just get started and create your own YouTube video with Wondershare Filmora!
6 Tips About Finding Collab Partners
Here are 6 questions you should ask yourself when you’re looking for potential collaborators on YouTube.
1. Who Are My Friends?
The easiest way to think of a potential collab partner is just to think of who you’re already friendly with. The best place to look for collab partners is probably in your list of subscribers. Someone who already knows what you do and enjoys it will probably be receptive to the idea of doing a video with you.
You can even sort your own subscribers by their sub counts to find someone with about the same sized channel as you.
2. Who’s In The Same Boat as Me?
You don’t have to already have a friendship, or even a creator-subscriber, relationship with someone to consider them as a potential partner (although it’s not a bad idea to subscribe to them before you send your request).
Consider people who are in the same niche as you who have approximately the same sized channel as you. If you’re in different genres the collab doesn’t make sense, and if there’s a significant size difference between your channels then it’s a lot more valuable to one of you than the other.
3. What Can This Person Offer My Audience?
Part of why you collaborate is to grow your audience, but that should never be at the expense of your current subscriber base. Before you reach out to a potential collab partner, seriously consider whether you think your audience will enjoy a video that features them.
Your partner should be someone who delivers content that is relevant to your own audience (for example, it makes no sense for a tech YouTuber to collaborate with someone whose channel is about cupcakes – their techie audience doesn’t want to learn about cupcakes).
4. Do I Like Their Videos?
Before you send anyone a message, make sure you’ve watched and enjoyed a few of their videos. If you don’t find them entertaining then your audience probably won’t either. Also, if you don’t seem to have any knowledge of someone’s content then they probably won’t want to work with you.
5. What Kind of Videos Could We Make?
The time to start brainstorming is not after you’ve already sent a collab request. You should think of a few ideas before you reach out, both to show your potential partner that you’re serious and to ensure that your audience is getting well-planned content.
6. Who’s in My Area?
You can do a long-distance collab, but if it is possible to physically meet up with someone to plan and shoot the videos then that’s way better.
How to Ask Someone to Collab
Here’s an example of a collab pitch, and a template you can use to write your own! It’s from filmora.io’s free YouTube Toolkit, which you can download with the Get Subs Guide here .
Here are some more tips:
1. Use Their Name
This one probably seems basic, but it is very easy to send a message where you just say ‘hey’ and jump to your point without actually using someone’s name. That’s a mistake in this scenario. You want to let your potential partner know that you are specifically interested in working with them and aren’t just fishing for anyone who might work with you.
2. Mention Their Content
Show an interest in your future partner’s videos. You should have watched at least a couple of them as part of deciding to reach out, so mention a video of theirs that you liked and talk about why. Let the other person know that you genuinely enjoy what they do and think your audience will too.
3. Pitch Video Ideas
You should have a couple of ideas for videos you could do together ready when you contact someone. You don’t want to reach out to someone and then seem like you expect them to do all the planning. You may not end up doing one of the ideas you pitch, but you’ll still come off better if you have something in mind when you first send your message.
4. Keep Your Message Simple
You don’t want to overwhelm someone with a huge amount of text the first time you contact them. Check out the example at the beginning of this section to get an idea of the length you should go for.
5. Be an Equal
Remember that you are just as wonderful a creator as the person you are approaching. You don’t want to fawn too heavily and cast yourself more as a fan than a serious creator in your own right (not that you can’t be both).
6. Most Creators Have an Email Address on Their Channel Page
It usually isn’t difficult to find contact information for a YouTuber. If you go to someone’s channel page and click into the About tab, there will usually be a section called ‘For business inquiries’ under ‘Details’. Click ‘View Email Address’ next to that and you’ll have a means of contacting the person you want to collaborate with.
You can also reach out through DMs or other social media. If you use a platform like Twitter, however, you may want to be a bit more casual and start a conversation before building up to asking them about a collab.
How to Make a Collab Video
Here are 3 ways you can collaborate with other YouTubers.
Shout Each Other Out
This is the easiest way to collab because you don’t have to meet up or do much planning together. Essentially, you just make your own video and let everyone know how much you like your partner’s channel (combined with linking your viewers to them), and they do the same.
Make sure to agree beforehand on how long you’ll spend plugging each other in your videos, so one of you doesn’t go on way longer than the other.
This probably isn’t a hugely effective method of collaborating if your goal is to grow (I wouldn’t check out someone’s channel just because I was told to), but it certainly is easy.
Be Guests in Each Other’s Videos
This might be the most fun type of collab to watch. The person whose channel the video appears on is the ‘host’ and the video is done in something closer to their usual style (which will be more appealing to their subscribers), and their collab partner is a guest. You might want to do two of these videos so you each have one for your own channel.
Depending on your YouTube niche, you might do a fun activity together or you might interview your guest about a subject you think your subscribers are interested in.
In order to pull off a collab like this, you need to be able to meet in person.
Long Distance Collaborations
It’s harder to collab if you can’t meet up, but it isn’t impossible. You can exchange footage to use in each other’s videos, or you can record a Google Hangout or Skype chat.
Launching Your Collab
Here are some tips for making sure both you and your partner get the most out of the collab videos you’ve made.
Agree on a Launch Date/Time
If you each have a video for your own channel then you want to make sure those go up at the same time. It’ll be awkward if you post your video and shout out your partner/their collab video and when people go to check that out it isn’t up.
You may want to post your videos as unlisted initially if you’re worried about one of you taking longer to upload. Then, once your videos are both completely ready to go, you can switch their listing to ‘public’ at the exact same time.
Promote Your Collab
Before you post your collab videos, you might want to build hype by mentioning the upcoming collab video in your solo videos leading up to it. If you and your partner are active on platforms like Instagram and Snapchat, you can do things like post behind the scenes pictures of your collab videos to generate excitement.
Comment on Each Other’s Videos
After you’ve posted your collabs, make sure to leave each other comments about how much fun it was working together. You might want to interact publicly on social media too. Overall, just be friends. You want to maintain this relationship to leave the door open to future collabs, and your viewers will want to believe in your friendship too. Your partner’s subscribers are more likely to be interested in you when they feel like you’re buddies with one of their favorite creators.
Make sure to discuss how much promotion you’ll each do for the collab before and after it launches. If one of you does a ton of promotion and the other just does one tweet, it won’t make the person who’s done way more promotion feel great.
Have you ever collaborated on YouTube? If you could collaborate with anyone, who would it be and what kind of video would you make?
Richard Bennett
Richard Bennett is a writer and a lover of all things video.
Follow @Richard Bennett
Natural Vs. Artificial: Balancing Your Set’s Illumination
Lighting Tips for Vlogging: How to Light
Richard Bennett
Mar 27, 2024• Proven solutions
One of the best things you can do for your video quality is to ensure you have great lighting. Viewers find poor lighting distracting and it’s hard for them to see how great your content is if they are busy thinking about why your video is so dark. By creating a great lighting set up you can ensure that the people watching your videos are only thinking about how much they’re enjoying them.
Going outside and using natural light is the cheapest way to get a lot of light for your videos. If your vlog is not suited to the great outdoors then you need to get more strategic. You can turn on all the lights in your living room and still end up with a dark, grainy, video.
Video Lighting Basics: Three Point Lighting

The most common technique of lighting a scene is called three-point lighting. It involves three different sources of light in the shot and is used by portrait photographers, which is also a great method for lighting your vlog.
The brightest source of light is also known as the key light which need to be high quality. A window will work, but if you do not have access to one where you are filming then consider an LED panel light or a softbox light like the ones used in portrait photography.
This first light will create a dramatic shadow across half of your face. You want to reduce this shadow, but not get rid of it completely.
Rather than setting up another light source on the opposite side of the camera, put up a reflector to bounce some light back onto your face. This reflector is called your ‘Fill Light’.
The fill light is less bright than the primary source of light and it is placed on the side opposite to the key light. Its purpose is to reduce shadows produced by the key light and the reflector will need to be mounted on a stand.
The final step to creating three point lighting is to set up another light behind you. This is your ‘Backlight’, and it will help you stand out from your background. Backlight or Hair light is always placed behind and above the subject to create separation between the subject in the shot and the background. This basic lighting technique can be applied in almost every scene you shoot, which is why it is important to keep an open mind and to continue experimenting with possible light setups.
Watch Video! Top Lighting Tips for Vlogging
Lightning Tips for Aspiring YouTube Videographers
Becoming the master of light will take some time and practice, so it is crucial to remain curious and anxious to learn new tricks throughout that process if you want to continually become better. These tips will help you make the first steps on that journey.
1. Focus Your Key Light
Try to focus your Key Light so that it lights only you and not your background. Do this by mounting anything that can cast a shadow onto your Key Light to control the area where the light hits. If you are using a window for your Key Light then you can use a curtain. If you use a softbox light then your light will already be somewhat focused.
2. Use Natural Lighting
The light provided by the Sun is still the best light source, you can have in your video. The trouble is that natural light changes quickly, which makes it highly unpredictable. The best way to deal with this challenge is to come prepared to the set and to get the shot you want as quickly as you can.
3. Try DIY Lightning
Literally, anything from candles to LED light bulbs can serve as a source of light in a shot. You just need to pay attention to the light temperature, because warmer light sources may highlight reds and yellows that can make your footage look less realistic.
4. Use Lightning Kits
This is by far the best option if you want to be in complete control of the light on your set. You can adjust the intensity of the lights, use filters, diffusers and all sorts of other accessories to create the light that flatters the subjects of your videos. The only downside is that you’ll have to spend a considerable amount of money if you want to have a professional lighting kit.
5. Set up reflectors
Sets of reflectors are often under $50, so they are fairly affordable. However, some vloggers choose to forgo purchasing reflectors and make their own out of tinfoil.

If your strong main light is too hard on your eyes then you can use a translucent ‘reflector’ to soften it. Set your translucent reflector, or other screen, up in front of your main light to diffuse it.
If you are hosting a beauty vlog then you might consider a slightly different set up. Instead of having your main light off to one side set it up directly in front of you so your entire face is lit evenly. It is still a good idea to use fill lights in this set up to give you some dimension, and a backlight is even more essential for helping you stand out from the background. The even light hitting your face will also make you look flat if you do not use a backlight.

If you are using all of the lighting options available to you and your video still looks too dark then you can try brightening it by opening up the aperture of your camera lens/setting a lower f-stop. Letting more light into your camera can help your footage look brighter, although you also run the risk of making things look overexposed/ washed out if you are not careful.
If you are stuck shooting in low light conditions it is best to use a lens with a wider aperture/lower f-stop. This will make the best of the light you do have.
Richard Bennett
Richard Bennett is a writer and a lover of all things video.
Follow @Richard Bennett
Richard Bennett
Mar 27, 2024• Proven solutions
One of the best things you can do for your video quality is to ensure you have great lighting. Viewers find poor lighting distracting and it’s hard for them to see how great your content is if they are busy thinking about why your video is so dark. By creating a great lighting set up you can ensure that the people watching your videos are only thinking about how much they’re enjoying them.
Going outside and using natural light is the cheapest way to get a lot of light for your videos. If your vlog is not suited to the great outdoors then you need to get more strategic. You can turn on all the lights in your living room and still end up with a dark, grainy, video.
Video Lighting Basics: Three Point Lighting
The most common technique of lighting a scene is called three-point lighting. It involves three different sources of light in the shot and is used by portrait photographers, which is also a great method for lighting your vlog.
The brightest source of light is also known as the key light which need to be high quality. A window will work, but if you do not have access to one where you are filming then consider an LED panel light or a softbox light like the ones used in portrait photography.
This first light will create a dramatic shadow across half of your face. You want to reduce this shadow, but not get rid of it completely.
Rather than setting up another light source on the opposite side of the camera, put up a reflector to bounce some light back onto your face. This reflector is called your ‘Fill Light’.
The fill light is less bright than the primary source of light and it is placed on the side opposite to the key light. Its purpose is to reduce shadows produced by the key light and the reflector will need to be mounted on a stand.
The final step to creating three point lighting is to set up another light behind you. This is your ‘Backlight’, and it will help you stand out from your background. Backlight or Hair light is always placed behind and above the subject to create separation between the subject in the shot and the background. This basic lighting technique can be applied in almost every scene you shoot, which is why it is important to keep an open mind and to continue experimenting with possible light setups.
Watch Video! Top Lighting Tips for Vlogging
Lightning Tips for Aspiring YouTube Videographers
Becoming the master of light will take some time and practice, so it is crucial to remain curious and anxious to learn new tricks throughout that process if you want to continually become better. These tips will help you make the first steps on that journey.
1. Focus Your Key Light
Try to focus your Key Light so that it lights only you and not your background. Do this by mounting anything that can cast a shadow onto your Key Light to control the area where the light hits. If you are using a window for your Key Light then you can use a curtain. If you use a softbox light then your light will already be somewhat focused.
2. Use Natural Lighting
The light provided by the Sun is still the best light source, you can have in your video. The trouble is that natural light changes quickly, which makes it highly unpredictable. The best way to deal with this challenge is to come prepared to the set and to get the shot you want as quickly as you can.
3. Try DIY Lightning
Literally, anything from candles to LED light bulbs can serve as a source of light in a shot. You just need to pay attention to the light temperature, because warmer light sources may highlight reds and yellows that can make your footage look less realistic.
4. Use Lightning Kits
This is by far the best option if you want to be in complete control of the light on your set. You can adjust the intensity of the lights, use filters, diffusers and all sorts of other accessories to create the light that flatters the subjects of your videos. The only downside is that you’ll have to spend a considerable amount of money if you want to have a professional lighting kit.
5. Set up reflectors
Sets of reflectors are often under $50, so they are fairly affordable. However, some vloggers choose to forgo purchasing reflectors and make their own out of tinfoil.
If your strong main light is too hard on your eyes then you can use a translucent ‘reflector’ to soften it. Set your translucent reflector, or other screen, up in front of your main light to diffuse it.
If you are hosting a beauty vlog then you might consider a slightly different set up. Instead of having your main light off to one side set it up directly in front of you so your entire face is lit evenly. It is still a good idea to use fill lights in this set up to give you some dimension, and a backlight is even more essential for helping you stand out from the background. The even light hitting your face will also make you look flat if you do not use a backlight.
If you are using all of the lighting options available to you and your video still looks too dark then you can try brightening it by opening up the aperture of your camera lens/setting a lower f-stop. Letting more light into your camera can help your footage look brighter, although you also run the risk of making things look overexposed/ washed out if you are not careful.
If you are stuck shooting in low light conditions it is best to use a lens with a wider aperture/lower f-stop. This will make the best of the light you do have.
Richard Bennett
Richard Bennett is a writer and a lover of all things video.
Follow @Richard Bennett
Also read:
- [Updated] Demystifying the World of YouTube and Its Keywords
- Polishing Audio in Home Recordings on YouTube
- PhotoMagic Studio
- Stepwise Discovery of Covert YouTube Archives
- Snagging YouTube Vanished Videos Your 2-Path Guide
- [New] Elevate Your Fitness with These Leading Yoga Vids
- [New] Access Unlimited Free, High-Quality Green Screen Footage Online
- [New] Banish YouTube Shorts Forever with Ease
- Regulatory Stance on Recording YouTube Video Content
- Making Money From YouTube Shorts Key Elements & Profit Possibilities
- Unleashing Your Creative Spark Stylistic Self-Discovery [High CTR]
- In 2024, Driving Traffic to Long-Form Videos via Shorts
- The Step-by-Step Guide to YouTube Gamers' Broadcasting
- Elevating YouTube Live with High-Quality Webcam Cameras
- In 2024, Discover the Top 3 Alternative Video Portals
- 2024 Approved Best 7 LIVE Streaming Apps to Amplify Your YouTube Presence on iPhone and Android
- Expert Advice to Recover Missing Thumbnails From Videos
- Dynamic Scripting for Videos
- 2024 Approved Essential Guide to Top 12 Free and Paid Gaming Introduction Creators
- Bursting Boundaries, Breaking Barriers The Top Ten Reasons for Your YouTube Viewer Void
- Digital Dollars Kings & Queens YouTube Edition for 2024
- [Updated] Breaking the Mold How to Create a Standout YouTube Channel Name
- Vocal Visions Instructions for Posting Songs on YouTube
- 2024 Approved Dual-Stream Technique for Massive Viewer Growth
- 2024 Approved Altering Who Can Access Your YouTube Videos
- 2024 Approved Conquering the Labyrinth of Lesser-Known YouTube Content
- Dive Into the World of Cosmetics Launching a Beauty Channel for 2024
- Best Recording Equipment For Creating YouTube Masterpieces
- Initiate, Ideate, Implement Step-by-Step Guide to Building a YouTube Channel
- Bursting Laughter Crafting Engaging Reaction Videos on YouTube (3 Methods)
- [Updated] Cut to Perfection A Detailed Guide on YouTube Short Video Making
- Crafting a Dynamic YouTube Subscriber Shortcut
- Copycatting Charisma Making Ingenious Parodies
- The Ultimate Android Video Editor App Roundup
- [Updated] 2024 Approved Navigating the Complexities of Facebook Slideshow Tools
- [Updated] In 2024, Android & iOS Leaderboard of PS2 Emulation Software
- [New] In 2024, Quick Guide to Optimized and Streamlined Mac Screenshots via Keyboard Shortcuts
- [Updated] Mastering Personalized Emojis in Discord PC/Mobile Tips for 2024
- New Free Video Editing on a Budget Top Chromebook Options
- Top 10 AirPlay Apps in Tecno Camon 20 for Streaming | Dr.fone
- How to Fix Android App Not Installed Error on Poco C55 Quickly? | Dr.fone
- New In 2024, Audio Sanitization Made Simple A Guide to Voice-Less Video Enhancement
- [Updated] 2024 Approved Prime PC Screensaver Record Pro
- [New] In 2024, Traveling Back in Social Media Years A Practical FB Guide
- [New] Leading 10 High-Resolution Monitors with Built-In Video Editing
- [New] In 2024, Behind the Scenes of Top TikTok Reaction Hits
- Title: The Blueprint for Successful Collaborative Video Production on YouTube
- Author: Brian
- Created at : 2024-05-25 12:55:02
- Updated at : 2024-05-26 12:55:02
- Link: https://youtube-video-recordings.techidaily.com/the-blueprint-for-successful-collaborative-video-production-on-youtube/
- License: This work is licensed under CC BY-NC-SA 4.0.
