
:max_bytes(150000):strip_icc():format(webp)/18-Hidden-Snapchat-Features-efa75dca521e4cf6bb321dc960276deb.jpg)
The Art of Plotting Success on YouTube
The Art of Plotting Success on YouTube
The Best Storytelling Techniques to Grow Your YouTube Channel

Richard Bennett
Oct 26, 2023• Proven solutions
In the distracting world, we live in, you need to be a good storyteller to grow your YouTube channel. Your audience is not going to stick around to watch your whole video if your content isn’t enticing or relatable. If you want to get people to watch all your videos, you need to get them emotionally invested with your stories.
Here are 3 methods for creating an awesome story:
1. Create Suspense
The hero has an objective, but the plan might fail.
The likelihood of something going wrong is what makes a story suspenseful. When you tell a suspenseful story, your audience will have a heightened focus and a strong motivation to continue listening. They want to know if the hero succeeds. Keep the audience waiting and expecting. Don’t give away the ending right away.
What Does a Suspenseful Story Sound Like?
When we talk about a story that is dragging on, it is because there is no suspense. There is nothing at stake, there are no obstacles, there is no problem and, with no problem, there is no promise of resolution.
Here are a few examples you can use to pump more suspense into your story:
- Address a fear (example: being alone for the prom)
- An objective (example: asking the crush out to the dance)
- Consequences of failing (example: being embarrassed in front of the whole school)
- Limited time (example: prom is next week)
- Obstacles (example: the crush has an aggressive ex.)
You can feel your heart rate speeding up simply thinking about the character’s story in the example. Does it have a happy ending or not? We want to know!
Raise Questions After Questions
A good storyteller knows that as soon as they answer a question for their audience, they need to present another one. The audience will always need to have a puzzle in their mind, one that needs to be solved. That is what will keep their interest.
For example: If the hero ends up going to the prom with his crush, the next big question can be: Will they kiss at the last dance?
This continues building on the tension and increasing the stakes evermore.
Check out the suspenseful story from YouTuber, MissRemiAshten . The way she tells the story, we discover more and about her psycho neighbor and the incident gradually. A little bit of information about the neighbor is revealed at a time… not all at once.
Include a Cliffhanger
We’ve all had those moments at the end of an intense television show where we are shouting at the screen because it suddenly cut to black as the main characters were left in a precarious position. That emotional outburst is brought to us by a good cliffhanger, and a good cliffhanger can assure us that the audience will return for more.
But there needs to be more! A cliffhanger is a promise to the viewer that eventually they will be rewarded for their patience and it will be satisfying.
In this cliffhanger from Casey Neistat, he simply asks us a question, “Was that good?” This calls upon us to recall all the awesome YouTube videos we have seen created by filmmakers that aren’t considered “prestigious.” A cliffhanger does not have to end with an epic reveal; it can wrap up with loose ends and allow the audience to tie it up themselves.
How to Deliver a Good Cliffhanger
Applying good cliffhangers to your YouTube videos is a balancing act. You want to draw your audience in, but you also need to have a payoff that is worth the wait.
Done well, a cliffhanger will leave your audience wanting more. Done poorly, a cliffhanger will leave your audience feeling to mislead and a little ripped off, hesitant to listen to more stories from you.
A good cliffhanger does not have to be life or death, but it does have to be the moment the story has been leading up to.
Before you start telling your story, consider the key details that are most impactful.
Once you have the points you want to hit, plan out the reveal. Weave the story together, but withhold the pivotal details until the cliffhanger. Thendeliver it on camera confidently .
Here are two ways you can present your cliffhanger for amplified effect:
1. Slow Down and Have Pauses
As your story intensifies, bring the pace down — or stop completely. The silence becomes the cliffhanger. It can last a second or more, depending on how confident you are in the tension you have built.
Your next words or shots can be the reveal. If you are skilled enough, you can lead into another story one that connects to the previous. If you are trying this, make sure that in the end, the payoff has double the impact. The reveal needs to be twice as powerful if you are going to take the audience on another journey before wrapping up and answering the long-awaited questions.
2. Use Repetition
Whether you want to misdirect your audience or hammer home a point, using repetition throughout your story will help you build the tension you need to establish the cliffhanger.
In this example, we see YouTuber, A little bit of Monika uses both pace and repetition in her storytelling method.
The video starts off at a speedy pace, all the way until the last scene where the confrontation occurs. That’s her slowing down the story so that we are all anticipating the reveal. Is she or is she not actor, Saoirse Ronan?
Through this short video, the repetition of the name is used to show her confidence that her roommate is not who she said it is. The more affirming she becomes, the more likely we as the viewers are going to side with her. This is a simple example of misdirection.
The more you say something or show something, the more important it becomes for the audience — at least, you want it to appear important.
2. Use Empathy
A storyteller must be empathetic.
If your audience cannot empathize with what you are communicating, it would not have the intended effect. Storytelling is all about taking people out of their bodies and putting them in someone else’s.
If you are telling a story about the time your car broke down, you want people to empathize and feel the helplessness of being stuck on a highway, waving cars down to help.
Empathy makes people feel more human. Telling a story people can relate to, even if it didn’t happen to them, is a sign of a quality storyteller.
Don’t Use Too Many Facts and Figures
If you began your story by saying that 1/1,000 cars on the highway break down, that doesn’t evoke any major emotion. There is nothing human about it.
It’s an interesting stat, sure, but the audience is unsure how they should respond. Is that a lot? Is that because of the highway? Is it because of the drivers? Nobody knows… it’s numbered with no context.
However, if you told the story about that time you had to abandon your vehicle and walk down the highway in order to make your important appointment. Suddenly, the audience can empathize with the tribulations you have gone through.
Facts and figures are useful in reports, but not as much in compelling stories.
Evoke the Senses
If I talk about hot melting chocolate, standing in the rain, or the smell of your grandmother’s bedroom, your senses are activated. From all your life experiences, your brain is able to form familiar sensations without any physical changes to your surrounding. That’s the power of storytelling.
Good storytellers use these sensory details and descriptive imagery to spice up a story. This draws the audience in and gives them a more immersive experience when listening to your stories.
Ask yourself these questions:
- What does it smell like?
- What can you hear?
- What do you see?
- What can you physically feel?
This example from YouTuber, Kiril Dobrev perfectly exemplifies what sensory igniting storytelling can do. He illustrates the sensation of being in Hong Kong, not simply through visuals but physical motions and audio effects.
Use Metaphors
As a YouTube storyteller, sometimes you will have to communicate complex ideas. When that happens, use a metaphor to increase the impact.
If you are telling a story about how much you dislike your teacher, you can list off all the ways she is unlikable or you can sum it up with a line like this: “My teacher makes the school a prison.”
That is a metaphor comparing school to prison. Most people haven’t been to prison, but understand what the metaphor is insinuating. School is not a fun place to be because of that teacher.
By connecting two different things, you allow the audience to paint the image in their mind quickly. It doesn’t take a lot of words to create a memorable metaphor. I encourage you to use metaphors anytime you need to address something complicated.
3. Take the Audience on a Meaningful Journey
Perhaps the most important element of a good story is that the journey is meaningful.
- Is it educational?
- Is it entertaining?
- Is it motivational or inspiring?
Knowing how you want to leave your audience feeling is foresight that will improve your YouTube storytelling abilities. Before you start telling your tale, ask: How do I want to change my audience?
YouTuber, Jamie Windsor tells a few stories connected to creativity and plagiarism. Anyone who has ever created anything can relate to his story and thus his audience can empathize.
It is also clear as a viewer that at the end of this 15-minute long video, his audience will have gone on a meaningful journey with him.
His story is a cautionary tale. He wants to educate us so that we can avoid making the same mistakes he did. He used his real-life experience to teach us and that makes it a meaningful video to watch. That was a good story.
Are there any YouTubers that you consider to be fantastic storytellers? Please share it in the comments box below.
Select a Versatile Video Editing Software to Stand Up from Numerous YouTubers
Users worldwide highly recommend Filmora because it comes loaded with various features, which helps to discover the editing skills, add an image to the imagination, and empower creativity.


Richard Bennett
Richard Bennett is a writer and a lover of all things video.
Follow @Richard Bennett
Richard Bennett
Oct 26, 2023• Proven solutions
In the distracting world, we live in, you need to be a good storyteller to grow your YouTube channel. Your audience is not going to stick around to watch your whole video if your content isn’t enticing or relatable. If you want to get people to watch all your videos, you need to get them emotionally invested with your stories.
Here are 3 methods for creating an awesome story:
1. Create Suspense
The hero has an objective, but the plan might fail.
The likelihood of something going wrong is what makes a story suspenseful. When you tell a suspenseful story, your audience will have a heightened focus and a strong motivation to continue listening. They want to know if the hero succeeds. Keep the audience waiting and expecting. Don’t give away the ending right away.
What Does a Suspenseful Story Sound Like?
When we talk about a story that is dragging on, it is because there is no suspense. There is nothing at stake, there are no obstacles, there is no problem and, with no problem, there is no promise of resolution.
Here are a few examples you can use to pump more suspense into your story:
- Address a fear (example: being alone for the prom)
- An objective (example: asking the crush out to the dance)
- Consequences of failing (example: being embarrassed in front of the whole school)
- Limited time (example: prom is next week)
- Obstacles (example: the crush has an aggressive ex.)
You can feel your heart rate speeding up simply thinking about the character’s story in the example. Does it have a happy ending or not? We want to know!
Raise Questions After Questions
A good storyteller knows that as soon as they answer a question for their audience, they need to present another one. The audience will always need to have a puzzle in their mind, one that needs to be solved. That is what will keep their interest.
For example: If the hero ends up going to the prom with his crush, the next big question can be: Will they kiss at the last dance?
This continues building on the tension and increasing the stakes evermore.
Check out the suspenseful story from YouTuber, MissRemiAshten . The way she tells the story, we discover more and about her psycho neighbor and the incident gradually. A little bit of information about the neighbor is revealed at a time… not all at once.
Include a Cliffhanger
We’ve all had those moments at the end of an intense television show where we are shouting at the screen because it suddenly cut to black as the main characters were left in a precarious position. That emotional outburst is brought to us by a good cliffhanger, and a good cliffhanger can assure us that the audience will return for more.
But there needs to be more! A cliffhanger is a promise to the viewer that eventually they will be rewarded for their patience and it will be satisfying.
In this cliffhanger from Casey Neistat, he simply asks us a question, “Was that good?” This calls upon us to recall all the awesome YouTube videos we have seen created by filmmakers that aren’t considered “prestigious.” A cliffhanger does not have to end with an epic reveal; it can wrap up with loose ends and allow the audience to tie it up themselves.
How to Deliver a Good Cliffhanger
Applying good cliffhangers to your YouTube videos is a balancing act. You want to draw your audience in, but you also need to have a payoff that is worth the wait.
Done well, a cliffhanger will leave your audience wanting more. Done poorly, a cliffhanger will leave your audience feeling to mislead and a little ripped off, hesitant to listen to more stories from you.
A good cliffhanger does not have to be life or death, but it does have to be the moment the story has been leading up to.
Before you start telling your story, consider the key details that are most impactful.
Once you have the points you want to hit, plan out the reveal. Weave the story together, but withhold the pivotal details until the cliffhanger. Thendeliver it on camera confidently .
Here are two ways you can present your cliffhanger for amplified effect:
1. Slow Down and Have Pauses
As your story intensifies, bring the pace down — or stop completely. The silence becomes the cliffhanger. It can last a second or more, depending on how confident you are in the tension you have built.
Your next words or shots can be the reveal. If you are skilled enough, you can lead into another story one that connects to the previous. If you are trying this, make sure that in the end, the payoff has double the impact. The reveal needs to be twice as powerful if you are going to take the audience on another journey before wrapping up and answering the long-awaited questions.
2. Use Repetition
Whether you want to misdirect your audience or hammer home a point, using repetition throughout your story will help you build the tension you need to establish the cliffhanger.
In this example, we see YouTuber, A little bit of Monika uses both pace and repetition in her storytelling method.
The video starts off at a speedy pace, all the way until the last scene where the confrontation occurs. That’s her slowing down the story so that we are all anticipating the reveal. Is she or is she not actor, Saoirse Ronan?
Through this short video, the repetition of the name is used to show her confidence that her roommate is not who she said it is. The more affirming she becomes, the more likely we as the viewers are going to side with her. This is a simple example of misdirection.
The more you say something or show something, the more important it becomes for the audience — at least, you want it to appear important.
2. Use Empathy
A storyteller must be empathetic.
If your audience cannot empathize with what you are communicating, it would not have the intended effect. Storytelling is all about taking people out of their bodies and putting them in someone else’s.
If you are telling a story about the time your car broke down, you want people to empathize and feel the helplessness of being stuck on a highway, waving cars down to help.
Empathy makes people feel more human. Telling a story people can relate to, even if it didn’t happen to them, is a sign of a quality storyteller.
Don’t Use Too Many Facts and Figures
If you began your story by saying that 1/1,000 cars on the highway break down, that doesn’t evoke any major emotion. There is nothing human about it.
It’s an interesting stat, sure, but the audience is unsure how they should respond. Is that a lot? Is that because of the highway? Is it because of the drivers? Nobody knows… it’s numbered with no context.
However, if you told the story about that time you had to abandon your vehicle and walk down the highway in order to make your important appointment. Suddenly, the audience can empathize with the tribulations you have gone through.
Facts and figures are useful in reports, but not as much in compelling stories.
Evoke the Senses
If I talk about hot melting chocolate, standing in the rain, or the smell of your grandmother’s bedroom, your senses are activated. From all your life experiences, your brain is able to form familiar sensations without any physical changes to your surrounding. That’s the power of storytelling.
Good storytellers use these sensory details and descriptive imagery to spice up a story. This draws the audience in and gives them a more immersive experience when listening to your stories.
Ask yourself these questions:
- What does it smell like?
- What can you hear?
- What do you see?
- What can you physically feel?
This example from YouTuber, Kiril Dobrev perfectly exemplifies what sensory igniting storytelling can do. He illustrates the sensation of being in Hong Kong, not simply through visuals but physical motions and audio effects.
Use Metaphors
As a YouTube storyteller, sometimes you will have to communicate complex ideas. When that happens, use a metaphor to increase the impact.
If you are telling a story about how much you dislike your teacher, you can list off all the ways she is unlikable or you can sum it up with a line like this: “My teacher makes the school a prison.”
That is a metaphor comparing school to prison. Most people haven’t been to prison, but understand what the metaphor is insinuating. School is not a fun place to be because of that teacher.
By connecting two different things, you allow the audience to paint the image in their mind quickly. It doesn’t take a lot of words to create a memorable metaphor. I encourage you to use metaphors anytime you need to address something complicated.
3. Take the Audience on a Meaningful Journey
Perhaps the most important element of a good story is that the journey is meaningful.
- Is it educational?
- Is it entertaining?
- Is it motivational or inspiring?
Knowing how you want to leave your audience feeling is foresight that will improve your YouTube storytelling abilities. Before you start telling your tale, ask: How do I want to change my audience?
YouTuber, Jamie Windsor tells a few stories connected to creativity and plagiarism. Anyone who has ever created anything can relate to his story and thus his audience can empathize.
It is also clear as a viewer that at the end of this 15-minute long video, his audience will have gone on a meaningful journey with him.
His story is a cautionary tale. He wants to educate us so that we can avoid making the same mistakes he did. He used his real-life experience to teach us and that makes it a meaningful video to watch. That was a good story.
Are there any YouTubers that you consider to be fantastic storytellers? Please share it in the comments box below.
Select a Versatile Video Editing Software to Stand Up from Numerous YouTubers
Users worldwide highly recommend Filmora because it comes loaded with various features, which helps to discover the editing skills, add an image to the imagination, and empower creativity.
Richard Bennett
Richard Bennett is a writer and a lover of all things video.
Follow @Richard Bennett
How Neuroscience Insights Enhance Effective Corporate Governance
How to Make Killer YouTube Channel Art
Richard Bennett
Mar 27, 2024• Proven solutions
Call it channel art, call it a cover, banner or whatever you like, the fact remains that YouTube channel art is one of the key elements of any successful YouTube channel. Your viewers arrive at your channel to see your videos, but it is the channel art that can market your brand and products to them.
As much as creating great videos with personality can sell your YouTube channel, the way your channel looks and feels is equally important. Take a brief look around any popular YouTuber’s channel and you’ll see that they’ve invested time and thought into creating beautiful, eye-catching channel art for it.
If you’re still in the dark about how to create YouTube channel art; we’re here to help. Here’s what you need to know.
Quick Jump Menu
- What is YouTube channel art [5 Elements Should Be Included]
- YouTube Channel Art Dimensions & Size [Mobile/Tablet/Desktop/TV]
- Why should you care about channel art
- Tips for making channel art
- Tools you need to create killer YouTube channel art
- Download YouTube Channel Art Templates for Free
- YouTube Channel Art Dimensions Cheatsheet [Infographic]
The Filmora team has made a video tutorial about how to master YouTube Channel Art, watch it before digging in. Remember to download the free Filmora Trial version to have a try.
Download Mac Version ](https://tools.techidaily.com/wondershare/filmora/download/ )
Part 1: What is YouTube channel art?
YouTube channel art includes thumbnails, banners, watermarks, and icons. Thumbnails will help viewers decide to watch your videos, and a personalized banner will tell people who you are and what your vlog is about. Watermarks both label your work as yours and protect it from theft. Your icon is the avatar you will use to communicate with your subscribers. You can totally change the look and feel of the page and the changes will carry forwards for the page display on all platforms. However, the elements might look slightly different on desktops, mobile devices, and TV screens.
1. Banner
A banner sits at the top of your channel, welcoming viewers to your videos and promoting your brand. Having your brand front and center here is a great plan, as it gives people confidence in who they are watching, as well as raising your brand profile on the platform.
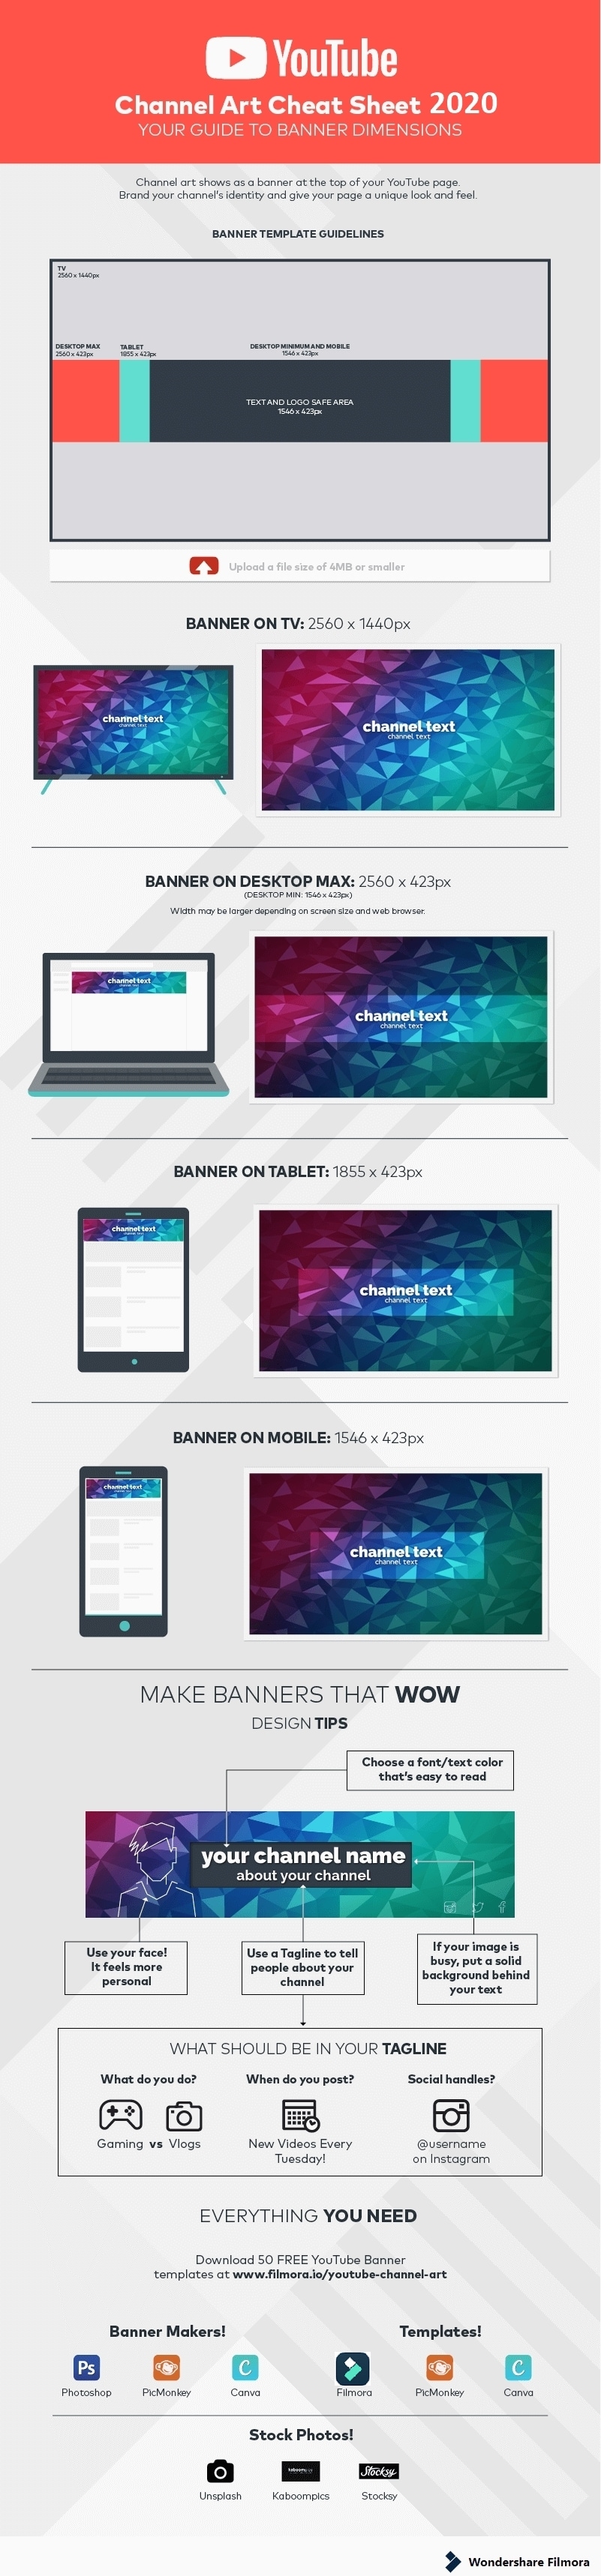
Size: 2560x1440px recommended. Cannot be smaller than 2048x1152px.
Safe Area for All Devices: 1546x423px
File Size: 6MB or smaller
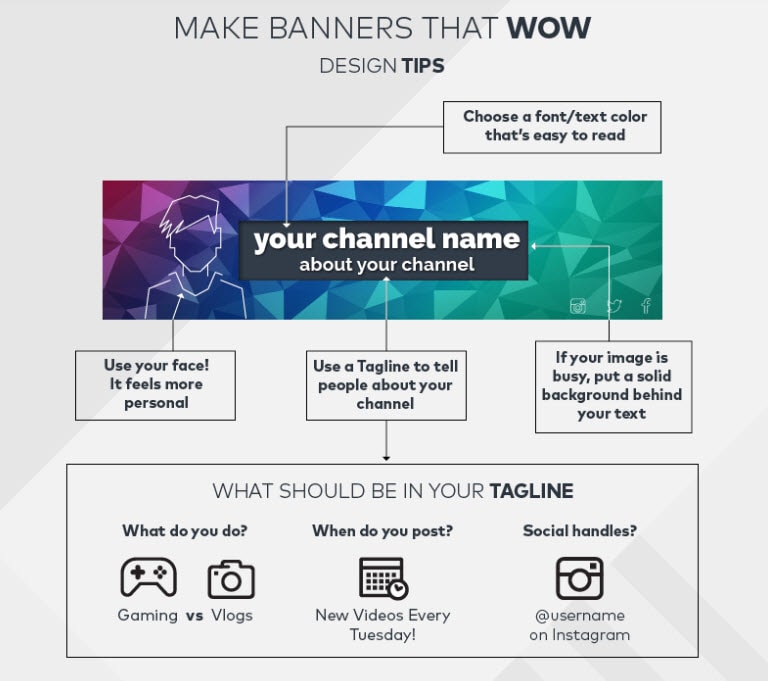
Do:
- Make sure all your text is in the safe area
- Include channel information like what kinds of videos you make and your upload days
- Add social media links
Don’t:
- Use a font or font color that’s hard to read at a glance
- Put a busy background or photo directly behind your text (put a solid background in-between)
How to Upload a YouTube Banner / Channel Art
Go to My Channel and select Add channel art near the top of the screen (if this is the first time), or hover over your existing channel art to make the edit icon show up.
2. Watermark
Watermarking your videos, banner and other content you produce can help protect your hard work. Sharing should be encouraged on YouTube, but you should absolutely get the credit for your content. A watermark ensures your brand is being acknowledged whenever someone hits the share button.
3. Thumbnail
Developing unique thumbnails can really encourage more video views. Rather than just using a still from your actual video, you can create unique art to accompany each upload, describing what’s within the video and motivating people to watch.
Size: 1289x720px recommended. Width cannot be less than 640px.
File Size: 2MB or smaller
Format: .JPG, .GIF (no moving GIFS), .BMP, .PNG
Do:
- Use colors that stand out
- Have a consistent format (all your thumbnails should have the same basic layout)
- Include your face (or a character’s face, if you’re a gamer)
- Show viewers what your video is about
Don’t:
- Include anything sexually suggestive or violent.
- Write more than 3 words or use a small font
How to Upload a YouTube Thumbnail
In the screen right after you’ve uploaded a video (in your Creator Studio), select Custom thumbnail under Video thumbnails after you upload a video.
OR
Select Edit next to your video in the Video Manager/Creator Studio. In the preview screen, click Custom thumbnail.
4. Icon or logo
If you’re building a brand on YouTube, you should absolutely have a recognizable logo or, at least, an icon that is unique to you. This way you’ll start to be recognized whenever people stumble across your footage, even if it’s on another platform such as Facebook.
Size: 800x800px recommended. Can be square or round, but must render to 98x98px.
Format: JPG, GIF (no animated GIFs), BMP, PNG
Do:
- Use a close up of your face (if you want a custom URL: only channels that use photos as icons qualify)
- Use a simple logo (if that’s more on-brand for you)
Don’t:
- Use a full-body picture (it won’t look good shrunk down)
- Use a picture of a celebrity or an image that falls under someone else’s copyright
How to Upload a YouTube Profile Picture / Icon
Go to My Channel, hover over your existing channel icon, and click the edit icon (looks like a pencil). Then, click Edit.
5. Channel art links
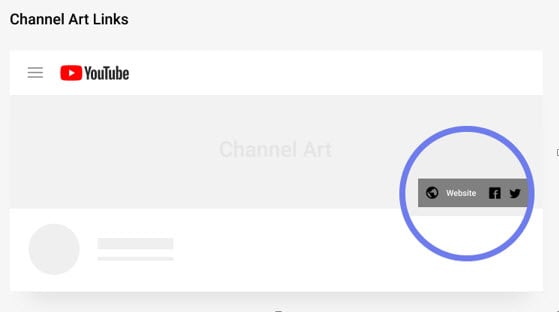
Adding links to your YouTube channel is a no-brainer. After all, if people love your channel, why not get them engaged on your social networks and website too? Adding links is easy in the Creator Studio, and you can choose to have links overlaid on your channel art too.
6. YouTube Intros
Ideal Length: under 10 seconds is alright. Under 5 seconds is better.
Placement: within the first 30 seconds of your video.
Do:
- Use music
- Include colors and images that match your personal brand
- Include the name of your channel
Don’t:
- Make it longer than 10 seconds
How to Add a YouTube Intro
Add your intro before you upload using your video editing software. It’s best to create it in a separate project and export it as a clip you can re-use in all your videos. Click here to download some free intros
7. YouTube End Screens / Outros
Length: 5-20 seconds
Placement: the last 5-20 seconds of your video
Your video must be at least 25 seconds in order to add an end screen.
Do:
- Link to at least 1 video or playlist
- Prompt viewers to subscribe
- Include social icons and handles so people can find you
Don’t:
- Overcrowd the screen with options (it makes people less likely to click anything)
Part 2: YouTube Channel Art Dimensions & Image Size Checklist
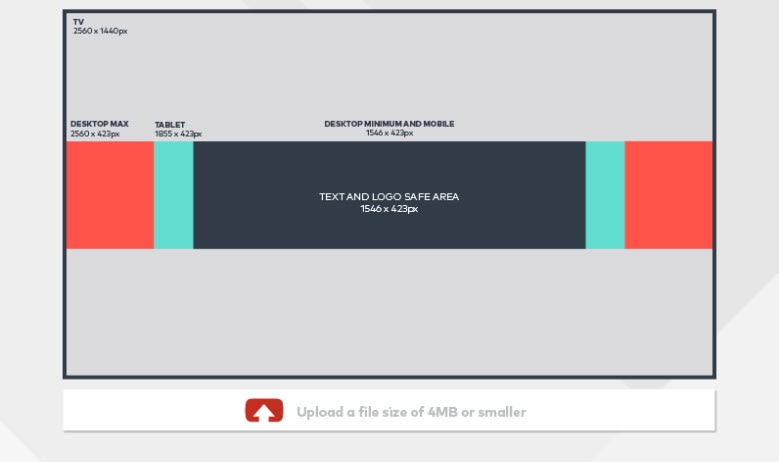
Getting the sizing of your channel art right is crucial. If you don’t plan this from the start, then all the effort you put into designing your channel art will be wasted, as it will either not display properly or will just look terrible. YouTube has provided these guidelines for channel art designs:
- The file size must not exceed 6MB
- The image should ideally be 2560 x 1440 pixels
- The minimum image size is 2048 x 1152 pixels
- The maximum width is 2560 x 423 pixels
The ideal dimensions for different devices are listed below:
- Mobile:1546px * 423px
- Tablet :1855px * 423px
- Desktop:2560px * 423px
- TV:2560px * 1440px
You see, YouTube channel art 2560*1440 px is ideal for TV devices. If you’re not sure about the width and height of the channel art image, you can download the Channel Art Templates from YouTube Official Site to check.
Keeping in mind people will access your channel on a variety of screen sizes, you’re going to need to design channel art that fits within these proportions and displays correctly no matter how it’s viewed. Use the ‘safe area’ displayed on YouTube to ensure your logo and branding is correct on every screen size.
Part 3: Why should you care about channel art?
If you’re wondering if you should really be bothered about channel art, the answer is you absolutely should. Channel art is all about branding, and in today’s cluttered web world, having a strong, recognizable brand is crucial. Rather than simply having a place to upload some videos, your YouTube channel can become a powerful marketing tool for promoting your brand and values.
According to research, we are a highly visual species. 65 percent of people learn better visually, and when you’re thinking about retaining information, 90 percent of what we store in our brains is visual information. By presenting your viewers with visual content, you’re helping them take it in, retain it better and remember you for the future.
Part 4: Tips for Making Channel Art
1. Tips for Making Thumbnails
A thumbnail is an image that represents your video in YouTube’s search results. There are things you can do with your thumbnail that will make it more likely to get clicked on. Always upload your own thumbnail rather than relying on the one YouTube automatically chooses, and make sure the thumbnail you use is related to the content of your video.
One of the most important things to remember is that thumbnails are small. It is better if there is not a lot going on in them because details will be hard to see. If there is any text in your thumbnail make sure it is huge so that people can still read it once it has been shrunken down.
If you are making a thumbnail for a vlog entry then choose a shot that has you in it, particularly one where you are not too far away from the camera. It is also a good idea if the thumbnails for your vlog entries all look similar so it is easy for people browsing to recognize which videos are yours.
2. Tips for Making Watermarks
Watermarks work best when they are small and transparent so they do not distract viewers from your videos. If your watermark is colored, there should not be more than one or two colors. Unlike the full version of your logo, you do not want your watermark to be overly eye-catching.
3. Tips for Making Icons
Watermarks work best when they are small and transparent so they do not distract viewers from your videos. If your watermark is colored, there should not be more than one or two colors. Unlike the full version of your logo, you do not want your watermark to be overly eye-catching.
Part 5: Best Free & Paid YouTube Channel Art Maker [2021 List]
Fortunately, you don’t need to be a renowned artist or graphic designer to get some swish YouTube art ready for your channel. With some of the easy-to-use, powerful tools that are available out there, you can make some beautiful, professional-looking channel art in no time at all. Here are six of our favorite tools for creating amazing youtube channel art:
1. Photoshop
Produced by Adobe, Photoshop has been leading the way in professional design software for many years. When it comes to creating logos, banners, editing photos and more, nothing really comes close to the power of this software. While the professional version of Photoshop can set you back several hundreds of dollars, Photoshop Elements is much more affordable at around the $100 mark, and has enough functionality to do most things you’d need for your channel art.
New from Adobe is Adobe Spark Post, a free-to-use web and iOS app which has been specifically designed to help you create beautiful channel art. Although it can only provide basic channel art without much in the way of editing tools, if you’re new to graphic design and want a free, user-friendly way to create your art, this could be worth considering.
2. Wondershare PixStudio

Wondershare PixStudio is an all-in-one and powerful online graphic design maker for everyone. This online platform provides a wonderful creative design solution for you. Just through drag and drop templates, and then use photos/text/elements to design. After the simple and fast design, One-Click to download your creations, and share to your Facebook, Instagram Story, and YouTube Thumbnails, etc. immediately.
This online platform empowers anyone to create a beautiful design within a few steps. No professional skills required! By simply dragging and dropping the creative elements and templates, you are capable to release your imagination and convert it to stunning artwork.
3. Fotor
For a good, user-friendly way to create professional-looking YouTube channel art, Fotor is a pretty solid choice. Using a simple drag and drop interface, users can create a unique channel banner using preset designs or even uploading their own artwork.
The developers of Fotor have built in a bespoke banner maker, preset to the exact size required for YouTube channel art. This makes it easier than ever to ensure you develop excellent channel art which will display correctly on any device. Editing is limited, so advanced designers will probably find it all a bit too simplistic, but for the man on the street, this is a perfect choice.
4. Canva
Canva really stands out from the competition for the number of customizable design elements present on the website. From shapes to backgrounds, images to text, there are thousands of awesome, professional-looking elements to choose from to create your unique channel art.
Similar to Fotor, those who know what they’re doing in the design field will find it lacking in functionality, and there’s an irritating glitch where you can’t stretch more than one image to the ends of the canvas. Watch out for premium design elements too, as lots require payment, although usually not more than a dollar or two.
5. PicMonkey
For a good middle ground between expensive but powerful Photoshop and free but limited options like Canva and Fotor, PicMonkey is a great solution. It has plenty of design functionality, from working with layers to performing tasks like blending, and you can free draw and erase parts of your image too.
We found PicMonkey capable of pretty much everything you’d need to create a professional YouTube banner, and it’s a fair bit more user friendly than Photoshop too. It’s not free, but at a cost of $7.99 per month, it’s pretty affordable for what you get.
6. Snappa
Another web-based freemium service, Snappa has the added advantage of coming pre-loaded with all the dimensions of popular social channel’s banners, profile images and more, including YouTube. That means you can work on your channel art directly, seeing clearly which parts will be displayed on what devices.
The drawback to this particular platform is the sheer volume of stock images already on the site. There are some nice ones, but due to the lack of organization you need to scroll through quite a few mediocre options to find them. There’s also a fairly ungenerous limit on how many items you can create and save without upgrading, but the pro version is fairly affordable at just $10 a month.
There are many other services out there to help you create your YouTube channel art and what’s best for you will depend on the type of channel art you’re looking to create, as well as your own abilities with graphic design. Try some of the free versions before you jump in and pay for things, as some are actually really rather good.
Part 6: YouTube Channel Art Templates Free Download
If you don’t know how to make youtube channel art, don’t be worry, because in the following part, I’ll share with you some free youtube channel art templates. The Filmora team has a community and forum for YouTube creators and it has designed some stunning YouTube Channel Art templates for different genres channels such as gaming, beauty, travel, comedy and education. Click here to download 50 free YouTube Banners, JPG & PhotoShop files. Examples:


Part 7: YouTube Channel Art Dimensions Cheatsheet [Infographic]
Usually, a viewer won’t visit your channel page and see your channel art until after they’ve watched one of your videos. The reason they’ve clicked to see your channel is that they want to learn more about you – do you have more videos like the one they just watched? Do you post a lot? Are you worth subscribing to?
If a viewer who is on the fence about subscribing to you arrives on your channel page and sees that you haven’t bothered uploading channel art, or that you’re using something that looks sloppy, odds are they won’t subscribe. This ‘Channel Art Cheat Sheet’ will help ensure you aren’t losing potential subscribers.
Recommended Video Editing Software for YouTube
The best video editor for YouTubers - Wondershare Filmora , not only allows you to cut, crop, rotate, reverse videos, but also offers your advanced features like PIP, Green Screen, or audio mixing. What’s more, you can find lots of effects on Fashion, gaming, education, tutorial, sports, etc. Check this article to know more.
Download Mac Version ](https://tools.techidaily.com/wondershare/filmora/download/ )
Richard Bennett
Richard Bennett is a writer and a lover of all things video.
Follow @Richard Bennett
Richard Bennett
Mar 27, 2024• Proven solutions
Call it channel art, call it a cover, banner or whatever you like, the fact remains that YouTube channel art is one of the key elements of any successful YouTube channel. Your viewers arrive at your channel to see your videos, but it is the channel art that can market your brand and products to them.
As much as creating great videos with personality can sell your YouTube channel, the way your channel looks and feels is equally important. Take a brief look around any popular YouTuber’s channel and you’ll see that they’ve invested time and thought into creating beautiful, eye-catching channel art for it.
If you’re still in the dark about how to create YouTube channel art; we’re here to help. Here’s what you need to know.
Quick Jump Menu
- What is YouTube channel art [5 Elements Should Be Included]
- YouTube Channel Art Dimensions & Size [Mobile/Tablet/Desktop/TV]
- Why should you care about channel art
- Tips for making channel art
- Tools you need to create killer YouTube channel art
- Download YouTube Channel Art Templates for Free
- YouTube Channel Art Dimensions Cheatsheet [Infographic]
The Filmora team has made a video tutorial about how to master YouTube Channel Art, watch it before digging in. Remember to download the free Filmora Trial version to have a try.
Download Mac Version ](https://tools.techidaily.com/wondershare/filmora/download/ )
Part 1: What is YouTube channel art?
YouTube channel art includes thumbnails, banners, watermarks, and icons. Thumbnails will help viewers decide to watch your videos, and a personalized banner will tell people who you are and what your vlog is about. Watermarks both label your work as yours and protect it from theft. Your icon is the avatar you will use to communicate with your subscribers. You can totally change the look and feel of the page and the changes will carry forwards for the page display on all platforms. However, the elements might look slightly different on desktops, mobile devices, and TV screens.
1. Banner
A banner sits at the top of your channel, welcoming viewers to your videos and promoting your brand. Having your brand front and center here is a great plan, as it gives people confidence in who they are watching, as well as raising your brand profile on the platform.
Size: 2560x1440px recommended. Cannot be smaller than 2048x1152px.
Safe Area for All Devices: 1546x423px
File Size: 6MB or smaller
Do:
- Make sure all your text is in the safe area
- Include channel information like what kinds of videos you make and your upload days
- Add social media links
Don’t:
- Use a font or font color that’s hard to read at a glance
- Put a busy background or photo directly behind your text (put a solid background in-between)
How to Upload a YouTube Banner / Channel Art
Go to My Channel and select Add channel art near the top of the screen (if this is the first time), or hover over your existing channel art to make the edit icon show up.
2. Watermark
Watermarking your videos, banner and other content you produce can help protect your hard work. Sharing should be encouraged on YouTube, but you should absolutely get the credit for your content. A watermark ensures your brand is being acknowledged whenever someone hits the share button.
3. Thumbnail
Developing unique thumbnails can really encourage more video views. Rather than just using a still from your actual video, you can create unique art to accompany each upload, describing what’s within the video and motivating people to watch.
Size: 1289x720px recommended. Width cannot be less than 640px.
File Size: 2MB or smaller
Format: .JPG, .GIF (no moving GIFS), .BMP, .PNG
Do:
- Use colors that stand out
- Have a consistent format (all your thumbnails should have the same basic layout)
- Include your face (or a character’s face, if you’re a gamer)
- Show viewers what your video is about
Don’t:
- Include anything sexually suggestive or violent.
- Write more than 3 words or use a small font
How to Upload a YouTube Thumbnail
In the screen right after you’ve uploaded a video (in your Creator Studio), select Custom thumbnail under Video thumbnails after you upload a video.
OR
Select Edit next to your video in the Video Manager/Creator Studio. In the preview screen, click Custom thumbnail.
4. Icon or logo
If you’re building a brand on YouTube, you should absolutely have a recognizable logo or, at least, an icon that is unique to you. This way you’ll start to be recognized whenever people stumble across your footage, even if it’s on another platform such as Facebook.
Size: 800x800px recommended. Can be square or round, but must render to 98x98px.
Format: JPG, GIF (no animated GIFs), BMP, PNG
Do:
- Use a close up of your face (if you want a custom URL: only channels that use photos as icons qualify)
- Use a simple logo (if that’s more on-brand for you)
Don’t:
- Use a full-body picture (it won’t look good shrunk down)
- Use a picture of a celebrity or an image that falls under someone else’s copyright
How to Upload a YouTube Profile Picture / Icon
Go to My Channel, hover over your existing channel icon, and click the edit icon (looks like a pencil). Then, click Edit.
5. Channel art links
Adding links to your YouTube channel is a no-brainer. After all, if people love your channel, why not get them engaged on your social networks and website too? Adding links is easy in the Creator Studio, and you can choose to have links overlaid on your channel art too.
6. YouTube Intros
Ideal Length: under 10 seconds is alright. Under 5 seconds is better.
Placement: within the first 30 seconds of your video.
Do:
- Use music
- Include colors and images that match your personal brand
- Include the name of your channel
Don’t:
- Make it longer than 10 seconds
How to Add a YouTube Intro
Add your intro before you upload using your video editing software. It’s best to create it in a separate project and export it as a clip you can re-use in all your videos. Click here to download some free intros
7. YouTube End Screens / Outros
Length: 5-20 seconds
Placement: the last 5-20 seconds of your video
Your video must be at least 25 seconds in order to add an end screen.
Do:
- Link to at least 1 video or playlist
- Prompt viewers to subscribe
- Include social icons and handles so people can find you
Don’t:
- Overcrowd the screen with options (it makes people less likely to click anything)
Part 2: YouTube Channel Art Dimensions & Image Size Checklist
Getting the sizing of your channel art right is crucial. If you don’t plan this from the start, then all the effort you put into designing your channel art will be wasted, as it will either not display properly or will just look terrible. YouTube has provided these guidelines for channel art designs:
- The file size must not exceed 6MB
- The image should ideally be 2560 x 1440 pixels
- The minimum image size is 2048 x 1152 pixels
- The maximum width is 2560 x 423 pixels
The ideal dimensions for different devices are listed below:
- Mobile:1546px * 423px
- Tablet :1855px * 423px
- Desktop:2560px * 423px
- TV:2560px * 1440px
You see, YouTube channel art 2560*1440 px is ideal for TV devices. If you’re not sure about the width and height of the channel art image, you can download the Channel Art Templates from YouTube Official Site to check.
Keeping in mind people will access your channel on a variety of screen sizes, you’re going to need to design channel art that fits within these proportions and displays correctly no matter how it’s viewed. Use the ‘safe area’ displayed on YouTube to ensure your logo and branding is correct on every screen size.
Part 3: Why should you care about channel art?
If you’re wondering if you should really be bothered about channel art, the answer is you absolutely should. Channel art is all about branding, and in today’s cluttered web world, having a strong, recognizable brand is crucial. Rather than simply having a place to upload some videos, your YouTube channel can become a powerful marketing tool for promoting your brand and values.
According to research, we are a highly visual species. 65 percent of people learn better visually, and when you’re thinking about retaining information, 90 percent of what we store in our brains is visual information. By presenting your viewers with visual content, you’re helping them take it in, retain it better and remember you for the future.
Part 4: Tips for Making Channel Art
1. Tips for Making Thumbnails
A thumbnail is an image that represents your video in YouTube’s search results. There are things you can do with your thumbnail that will make it more likely to get clicked on. Always upload your own thumbnail rather than relying on the one YouTube automatically chooses, and make sure the thumbnail you use is related to the content of your video.
One of the most important things to remember is that thumbnails are small. It is better if there is not a lot going on in them because details will be hard to see. If there is any text in your thumbnail make sure it is huge so that people can still read it once it has been shrunken down.
If you are making a thumbnail for a vlog entry then choose a shot that has you in it, particularly one where you are not too far away from the camera. It is also a good idea if the thumbnails for your vlog entries all look similar so it is easy for people browsing to recognize which videos are yours.
2. Tips for Making Watermarks
Watermarks work best when they are small and transparent so they do not distract viewers from your videos. If your watermark is colored, there should not be more than one or two colors. Unlike the full version of your logo, you do not want your watermark to be overly eye-catching.
3. Tips for Making Icons
Watermarks work best when they are small and transparent so they do not distract viewers from your videos. If your watermark is colored, there should not be more than one or two colors. Unlike the full version of your logo, you do not want your watermark to be overly eye-catching.
Part 5: Best Free & Paid YouTube Channel Art Maker [2021 List]
Fortunately, you don’t need to be a renowned artist or graphic designer to get some swish YouTube art ready for your channel. With some of the easy-to-use, powerful tools that are available out there, you can make some beautiful, professional-looking channel art in no time at all. Here are six of our favorite tools for creating amazing youtube channel art:
1. Photoshop
Produced by Adobe, Photoshop has been leading the way in professional design software for many years. When it comes to creating logos, banners, editing photos and more, nothing really comes close to the power of this software. While the professional version of Photoshop can set you back several hundreds of dollars, Photoshop Elements is much more affordable at around the $100 mark, and has enough functionality to do most things you’d need for your channel art.
New from Adobe is Adobe Spark Post, a free-to-use web and iOS app which has been specifically designed to help you create beautiful channel art. Although it can only provide basic channel art without much in the way of editing tools, if you’re new to graphic design and want a free, user-friendly way to create your art, this could be worth considering.
2. Wondershare PixStudio
Wondershare PixStudio is an all-in-one and powerful online graphic design maker for everyone. This online platform provides a wonderful creative design solution for you. Just through drag and drop templates, and then use photos/text/elements to design. After the simple and fast design, One-Click to download your creations, and share to your Facebook, Instagram Story, and YouTube Thumbnails, etc. immediately.
This online platform empowers anyone to create a beautiful design within a few steps. No professional skills required! By simply dragging and dropping the creative elements and templates, you are capable to release your imagination and convert it to stunning artwork.
3. Fotor
For a good, user-friendly way to create professional-looking YouTube channel art, Fotor is a pretty solid choice. Using a simple drag and drop interface, users can create a unique channel banner using preset designs or even uploading their own artwork.
The developers of Fotor have built in a bespoke banner maker, preset to the exact size required for YouTube channel art. This makes it easier than ever to ensure you develop excellent channel art which will display correctly on any device. Editing is limited, so advanced designers will probably find it all a bit too simplistic, but for the man on the street, this is a perfect choice.
4. Canva
Canva really stands out from the competition for the number of customizable design elements present on the website. From shapes to backgrounds, images to text, there are thousands of awesome, professional-looking elements to choose from to create your unique channel art.
Similar to Fotor, those who know what they’re doing in the design field will find it lacking in functionality, and there’s an irritating glitch where you can’t stretch more than one image to the ends of the canvas. Watch out for premium design elements too, as lots require payment, although usually not more than a dollar or two.
5. PicMonkey
For a good middle ground between expensive but powerful Photoshop and free but limited options like Canva and Fotor, PicMonkey is a great solution. It has plenty of design functionality, from working with layers to performing tasks like blending, and you can free draw and erase parts of your image too.
We found PicMonkey capable of pretty much everything you’d need to create a professional YouTube banner, and it’s a fair bit more user friendly than Photoshop too. It’s not free, but at a cost of $7.99 per month, it’s pretty affordable for what you get.
6. Snappa
Another web-based freemium service, Snappa has the added advantage of coming pre-loaded with all the dimensions of popular social channel’s banners, profile images and more, including YouTube. That means you can work on your channel art directly, seeing clearly which parts will be displayed on what devices.
The drawback to this particular platform is the sheer volume of stock images already on the site. There are some nice ones, but due to the lack of organization you need to scroll through quite a few mediocre options to find them. There’s also a fairly ungenerous limit on how many items you can create and save without upgrading, but the pro version is fairly affordable at just $10 a month.
There are many other services out there to help you create your YouTube channel art and what’s best for you will depend on the type of channel art you’re looking to create, as well as your own abilities with graphic design. Try some of the free versions before you jump in and pay for things, as some are actually really rather good.
Part 6: YouTube Channel Art Templates Free Download
If you don’t know how to make youtube channel art, don’t be worry, because in the following part, I’ll share with you some free youtube channel art templates. The Filmora team has a community and forum for YouTube creators and it has designed some stunning YouTube Channel Art templates for different genres channels such as gaming, beauty, travel, comedy and education. Click here to download 50 free YouTube Banners, JPG & PhotoShop files. Examples:
Part 7: YouTube Channel Art Dimensions Cheatsheet [Infographic]
Usually, a viewer won’t visit your channel page and see your channel art until after they’ve watched one of your videos. The reason they’ve clicked to see your channel is that they want to learn more about you – do you have more videos like the one they just watched? Do you post a lot? Are you worth subscribing to?
If a viewer who is on the fence about subscribing to you arrives on your channel page and sees that you haven’t bothered uploading channel art, or that you’re using something that looks sloppy, odds are they won’t subscribe. This ‘Channel Art Cheat Sheet’ will help ensure you aren’t losing potential subscribers.
Recommended Video Editing Software for YouTube
The best video editor for YouTubers - Wondershare Filmora , not only allows you to cut, crop, rotate, reverse videos, but also offers your advanced features like PIP, Green Screen, or audio mixing. What’s more, you can find lots of effects on Fashion, gaming, education, tutorial, sports, etc. Check this article to know more.
Download Mac Version ](https://tools.techidaily.com/wondershare/filmora/download/ )
Richard Bennett
Richard Bennett is a writer and a lover of all things video.
Follow @Richard Bennett
Also read:
- In 2024, Advanced Editing for Published YouTube Videos
- 2024 Approved Bespoke URLs for YouTube Channels An Easy Way
- Prime Channel List 10 YouTube Sources for Analysis
- YouTube Master of Moneymaking Skills
- In 2024, Download Youtube Audio Safely & Legally in 3 Ways
- [New] Efficient Deletion Techniques for Online Discussions
- Mastering YouTube Creation Standard Studio or Innovative Beta
- In 2024, AdSense Profits on YouTube Earnings per Thousand Video Watchers
- From Vision to Reality Personal Animation Mastery
- Channel Surge Strategy Using YouTube Outros for Rapid Expansion
- Boost Your YouTube Earnings with Effective AdSense Use
- [Updated] Breaking the Mold How to Create a Standout YouTube Channel Name
- From Raw Footage to YouTube A Step-by-Step Process Unveiled
- 2024 Approved Cross-Platform Comparison IPhone vs Android YouTube Viewing
- In 2024, Best Selection Turn Your Videos Into Text Fast
- Circumnavigating YouTube's Block List for 2024
- In 2024, 30 Tips & Tricks to Take Your YouTube Shorts Templates to the Next Level
- [New] Essential Steps to Add Custom Imagery in YouTube Videos
- Crafting a Music Career 15 Essential Video Tutorials for Artists for 2024
- 2024 Approved Boosting Viewer Interest with Optimal Video Thumbnail Sizes
- 2024 Approved Crafting Your YouTube Content for Specific Crowds
- [New] Creative Commons Legalities Explained Simply
- Discover Top 10 Flv-to-YouTube Conversion Tools
- Unveiling Income Insights A Triple Step Technique for Tracking YouTube Revenue
- Navigating the Complexity of YouTube Thumbnail Psychology
- In 2024, Elevate Your Online Presence with Captivating Haul Videos
- [Updated] Best Free Downloaders Download YouTube Thumbnail for Free
- [Updated] Elevate Your Engagement Top 10 Video Response Insights
- [New] Craft Your Narrative Best Free Mobile Editors, Android Focus
- [New] Essential GIF Making Software The Ultimate Guide
- [New] Enhance Video Storytelling with Smart Chapter Insertion Techniques on YouTube
- Shedding Light on Videography Excellence
- Boost Engagement and Traffic with These Top Video Marketing Moves
- [Updated] Enhancing Presentations Adding YouTube to Google Slides
- [New] Cultivating Your Persona in the World of Gamers
- Crafting Clearer Communication The Art of Adding Text to Video Media for 2024
- YouTube’s Rules The Creator's Perspective
- Efficient Viewing The Comprehensive Guide for Creating YouTube Watch Later Lists
- Professional 3D Creation Software for Video Startups
- [New] 2024 | How to Make a YouTube Intro Video?
- [New] Becoming a Wise Trader Top Video Tutorials
- In 2024, Audiovisual Excellence on YouTube Through Enhancements
- 2024 Approved Best Practices for YouTube Card Implementation
- Direct YouTube Tunes to MP3s Online & Offline Options
- 2024 Approved Crown Jewels of Online Watching YouTube's Treasures
- 2024 Approved Crescendo Control Secure Sound Sharing Online
- 2024 Approved Effortless Rearrangement of Your Personalized Lists
- Real-Time Trends Hourly Top 10 YouTube Pickers
- How To Change Your Apple ID Password On your iPhone 15 Plus
- 2024 Approved Comprehensive Walkthrough Using Every Feature in Mac's Preview Software
- 4 Ways to Transfer Music from Nokia 130 Music to iPhone | Dr.fone
- In 2024, How to Change Lock Screen Wallpaper on Infinix Smart 8 HD
- In 2024, How to Remove iPhone 12 Pro Device from iCloud
- Unveiling the Top 8 Instagram Schedulers for iPhone and Android Users for 2024
- How to Remove iPhone 6 Plus Device from iCloud
- Revolutionize Your Reach on TikTok's Hot List for 2024
- In 2024, Process of Screen Sharing Honor Magic Vs 2 to PC- Detailed Steps | Dr.fone
- Ultimate Screen Recorder Companion for Windows 10 for 2024
- [Updated] Non-Twitter Video Tweeting Hacks for the Modern User for 2024
- Updated Best Apps for Creating WhatsApp Status Videos and Photos
- New Make a Lasting Impression 9 Top Intro Creators for Videos
- [New] In 2024, Innovative Photography Adding Stylish Borders to Instagram Pics
- Quickly Remove Google FRP Lock on Nokia
- New In 2024, Get the Right Fit Best Aspect Ratio Calculators for Images and Videos
- New In 2024, Discover the Best Video Editing Software Beyond Windows Movie Maker
- 2024 Approved TikTok Visual Transformation Switch Backgrounds with 3 Simple Tricks
- Scheduling Zoom Conferences for Android Users
- In 2024, How to Remove an AirTag from Your Apple ID Account On iPhone 14 Plus?
- [New] Seamless Integration Mac Recording Techniques for Snapchat for 2024
- [New] Silence Problem Twitter Videos Lacking Sounds for 2024
- Oppo A2 Tutorial - Bypass Lock Screen,Security Password Pin,Fingerprint,Pattern
- How to Change Spotify Location After Moving to Another Country On Tecno Pova 6 Pro 5G | Dr.fone
- Lowering OBS Video Bandwidth
- In 2024, Must-Use Livestream Shopping Apps for Seamless Online System
- [New] In 2024, Is Your Social Media Strategy Up-to-Date with Facebook Changes?
- [New] 2024 Approved Capture Every Moment on Mac, FREE!
- Detailed guide of ispoofer for pogo installation On Nubia Red Magic 9 Pro+ | Dr.fone
- [Updated] 2024 Approved Get the Best Free PC Sound Logger – Download X-Recorder
- All Must-Knows to Use Fake GPS GO Location Spoofer On OnePlus Nord CE 3 5G | Dr.fone
- The Best Zero-Cost Video Editors for Newcomers Desktop, Online, Mobile
- Secure Your Screen Content - Mastering the EZvide Technique for 2024
- How to Change Your Oppo Find N3 Flip Location on life360 Without Anyone Knowing? | Dr.fone
- 5 Best Route Generator Apps You Should Try On Meizu 21 Pro | Dr.fone
- In 2024, How to Hide/Fake Snapchat Location on Your Samsung Galaxy S24 Ultra | Dr.fone
- In 2024, Detailed guide of ispoofer for pogo installation On Xiaomi Civi 3 | Dr.fone
- [New] Direct From Instagram Masterful Techniques for IGTV Video Transferring for 2024
- In 2024, All You Need To Know About Mega Greninja For Lava Blaze 2 | Dr.fone
- Unlocking Cash on the Snapchat Grid for 2024
- Possible solutions to restore deleted music from Nokia C32
- [Updated] 2024 Approved Insider's Look at Instagram Viewership Metrics
- Experience the Best Download Options for FB Lite Videos - 2023 Ranking
- 2024 Approved Apowersoft Free A Dive Into Screen Recorder Magic
- Hassle-Free Ways to Remove FRP Lock from Samsung Galaxy Z Fold 5 Phones with/without a PC
- In 2024, How to Fake Snapchat Location without Jailbreak On Realme 12+ 5G | Dr.fone
- Updated 2024 Approved How Can I Control Speed of a Video
- Title: The Art of Plotting Success on YouTube
- Author: Brian
- Created at : 2024-05-25 12:54:41
- Updated at : 2024-05-26 12:54:41
- Link: https://youtube-video-recordings.techidaily.com/the-art-of-plotting-success-on-youtube/
- License: This work is licensed under CC BY-NC-SA 4.0.
