
:max_bytes(150000):strip_icc()/gettyimages-612441534-2000-915697f3325a4f2f9c1f2822c925a493.jpg)
"Take Your YouTube Clips to the Next Level Ultimate Editing Tips"
Take Your YouTube Clips to the Next Level: Ultimate Editing Tips
How To Edit YouTube Videos

Richard Bennett
Oct 26, 2023• Proven solutions
YouTube videos have a certain look and feel that many viewers have come to expect and enjoy. Much of the aesthetics of YouTube videos developed as a result of the biggest YouTubers having to quickly and efficiently edit videos together on a daily basis. Below is our list of some of the most common video editing techniques used by famous YouTubers.
Part 1: Introduction
1. Start Big
“I’m doing something really exciting… within the first ten seconds of this video. That way you stay here.” – Liza Koshy (How To Be A YouTuber 101!! | Lizzza)
In the same way that a teaser or trailer builds anticipation for a full film, many YouTubers start with a preview of the most high-energy part of their video.
In Jake Paul’s prank vlog (above), Jake shows his brother, Logan, chasing and beating him up as Jake screams for help at the top of his lungs. The already high-energy scene is even more intensified by the epic music playing in the background. This seven-second clip, which resurfaces halfway through the video, is enough to entice many viewers to continue watching. It very effectively leaves enough room for viewers to wonder, “How did Logan’s room actually look in the end?” “What was Logan’s initial reaction before he started chasing Jake?” By creating curiosity gaps like these, you can incentivize your viewers to close these gaps by watching longer.
2. Opening Title Introduction
Just as TV episodes begin with opening credits and theme music, quite similarly, some YouTubers start their YouTube videos with an intro.
Greg from “How To Drink” has an effective twenty-second intro (above). In this video, he shows you who he is and what his videos are generally about. Since these two things don’t change so much for him from video to video, he can start many of his videos off with this same intro.
Below is a video tutorial about how to add text and titles to video in Filmora, hope that helps you in creating your own YouTube video texts and titles.


For more information on intros, check out our post on How to Make a YouTube Intro?
Part 2: Cuts
1. Jump Cut
A jump cut is a simple and straightforward type of video editing cutting technique that “jumps” from one section of a clip to a later section of a clip, cutting out whatever happened in the middle. Some of the middle parts you might want to remove may include mistakes, long silent pauses, and filler words (umm, like, etc.).
Although the use of jump cuts to remove these parts had been discouraged for a long time in the film world, its extensive use by so many YouTubers has established it as its own style that many viewers have come to expect and enjoy. The jumpiness that comes from jump cuts can be effective in keeping your audience’s attention in a shock-inducing manner.
Jump cuts can also be used to show a passage of time in a creative way or make objects magically appear on-screen.
Zack King (above) makes a toy taxi magically appear in his hands using this video editing technique. Filmora allows you to do jump cut easily, you can watch the tutorial below and learn more jump cut tips and tricks .
2. Associative Cut
Not everyone in your audience may recognize the cultural or historical references you make in your videos. It can, therefore, be helpful (and also quite enjoyable) to show the original clip of the reference you are making.
In the same vlog that Jake Paul gets chased down by his brother (above), twenty-eight seconds into the video, Jake expresses his desire to go fast in his car. Right after he says “I want to go fast,” Jake cuts into a scene from the movie Talladega Nights. In that scene, Ricky Bobby, Will Ferrell’s character, also says that he wants to go fast.

Part 3: Transform
1. Zoom
Many YouTubers digitally adjust the zoom of their talking head shots in order to create additional emphasis or suspense. When zoom is used very slowly and smoothly, this technique can be effective in building up suspense and drawing a viewer deeper into the speaker’s message. When a drastic zoom is used suddenly, it can be effective in emphasizing a particular spoken line.
RiceGum is one YouTuber who uses zoom video editing effects extensively in his talking head videos. Want to pan and zoom your video footage too? Check our guide to getting Ken Burns Effect on Videos .
2. Camera Shake
Camera shake is a video effect that makes the original clip appear like it was filmed during a violent earthquake. Many YouTubers use this effect to emphasize their voice when they are talking about something erratic or out of control.
3. Color/Level Adjustment
A lot of comedy YouTubers change the color and levels of their videos in order to emphasize different moods. One common thing YouTubers do when they talk about anything slightly sad is to gradually fade out the colors in their talking head shots. In a cheesy way, the black and white look can emphasize a feeling of emptiness. For his “sad” reactions, PewDiePie often jump cuts into a black and white, slowed down clip of his sad face while playing some sad music in the background. To emphasize a darker message, some YouTubers increase the amount of shadows in their video. In the video below, while his daughter is delivering a darker message from 0:32 to 0:50, La Guardia Cross gradually adds more shadows around his daughter’s face through what appears to be a vignette effect.
Part 4: Transitions
1. Wipe
Many YouTubers transition from one scene into the next using a wipe transition. In a wipe transition, the next clip that you want to transition into slides into the frame horizontally or vertically until it completely covers the first clip. For additional wiping effect, many YouTubers also use a fast, high pitched “woosh” sound effect with this transition.
2. Zoom
The zoom transition is quite similar to the wipe transition, except it uses a zoom effect. Many of the top YouTubers combine this transition with a lower-pitched “woosh” sound effect.
Part 5: Visual Elements
In other genres of film, the only appropriate visual elements filmmakers can tastefully add to their footage seem to be clean looking, seamlessly integrated text and motion graphics. YouTube, on the other hand, is another world with much more room to get outrageous. Many of the top YouTubers add a lot of visual elements (emojis , images, filters, explosions) to their videos to emphasize their jokes, play-on-words, historical or cultural references, and mood.
1. Call-To-Action Visuals
Whether they’re prompting you to subscribe, like, comment, or check out their purchasable merchandise, many YouTubers include visuals to strengthen their calls-to-action.
Part 6: Time Manipulation
1. Timelapse
“The staple of any Casey Neistat vlog is the timelapse, which he uses both to further the narrative or set the time of day.” -@omgurheadsgone
A lot of cameras now come with a timelapse/hyperlapse function, requiring no further video editing. To achieve the kind of timelapses that Casey Neistat makes, though, you’ll have to film real-time footage and then manipulate the speed of it in post. Since sped up ambient sound is hardly ever pleasing to the ear, a lot of YouTubers replace the audio with music that enhances the mood of the timelapse.
2. Slow Motion
Slowing down footage is another way YouTubers like to manipulate the passage of time. This technique can draw the audience’s attention into the intricacies of a movement captured on film. But if you stretch your video clip digitally in order to achieve this look, your video may not look so smooth – your software will need to create extra frames of footage based on your existing footage. The solution around this problem is to make sure to record your video at a very high frame rate.

Part 7: Audio
1. Censor
The traditional practice for censoring out explicit language in television has been to replace profanity with a high pitched “bleep” sound effect . YouTubers, however, have popularized the use of animal sound effects to censor out explicit language. Epic Meal Time frequently uses the “caw” of a crow for this purpose.
2. Sound Effects
Whether it is pouring water into a cup or drinking a glass of water, adding louder sound effects can enhance your viewer’s experience of the action that is taking place on camera.
3. Background Music
Music is very effective in helping people feel all kinds of emotions. It is no wonder so many of the top YouTubers make gratuitous use of music in their videos. Some even add background music to every single clip of their entire YouTube video and only drop the music when the following technique (below) is used.
4. Muting Background Music
A lot of YouTubers who talk over background music abruptly mute the music when they want their audience to focus their attention on whatever it is that they have to say at that very moment. Isolating one’s speech in this way can be a very effective way to emphasize something serious or emphasize a punchline to a joke.
5. Voice-Over
Adding additional recorded verbal commentary is another technique used by many of the top YouTubers. This technique can be helpful when the visuals of your footage do not sufficiently communicate the full message you want to get across to your audience.
6. Compressor
A lot of video editing software programs give you the option to add compression to your video’s audio. Compression lessens the dynamic range between the softest and loudest parts of your audio. This technique can help your speech sound more uniform in volume.
For those who want to make their YouTube videos better, I recommend Wondershare Filmora for editing YouTube videos . Filmora video editor allows you to create and edit a YouTube video easily with plentiful templates and effects pre-programmed.
Richard Bennett
Richard Bennett is a writer and a lover of all things video.
Follow @Richard Bennett
Richard Bennett
Oct 26, 2023• Proven solutions
YouTube videos have a certain look and feel that many viewers have come to expect and enjoy. Much of the aesthetics of YouTube videos developed as a result of the biggest YouTubers having to quickly and efficiently edit videos together on a daily basis. Below is our list of some of the most common video editing techniques used by famous YouTubers.
Part 1: Introduction
1. Start Big
“I’m doing something really exciting… within the first ten seconds of this video. That way you stay here.” – Liza Koshy (How To Be A YouTuber 101!! | Lizzza)
In the same way that a teaser or trailer builds anticipation for a full film, many YouTubers start with a preview of the most high-energy part of their video.
In Jake Paul’s prank vlog (above), Jake shows his brother, Logan, chasing and beating him up as Jake screams for help at the top of his lungs. The already high-energy scene is even more intensified by the epic music playing in the background. This seven-second clip, which resurfaces halfway through the video, is enough to entice many viewers to continue watching. It very effectively leaves enough room for viewers to wonder, “How did Logan’s room actually look in the end?” “What was Logan’s initial reaction before he started chasing Jake?” By creating curiosity gaps like these, you can incentivize your viewers to close these gaps by watching longer.
2. Opening Title Introduction
Just as TV episodes begin with opening credits and theme music, quite similarly, some YouTubers start their YouTube videos with an intro.
Greg from “How To Drink” has an effective twenty-second intro (above). In this video, he shows you who he is and what his videos are generally about. Since these two things don’t change so much for him from video to video, he can start many of his videos off with this same intro.
Below is a video tutorial about how to add text and titles to video in Filmora, hope that helps you in creating your own YouTube video texts and titles.
For more information on intros, check out our post on How to Make a YouTube Intro?
Part 2: Cuts
1. Jump Cut
A jump cut is a simple and straightforward type of video editing cutting technique that “jumps” from one section of a clip to a later section of a clip, cutting out whatever happened in the middle. Some of the middle parts you might want to remove may include mistakes, long silent pauses, and filler words (umm, like, etc.).
Although the use of jump cuts to remove these parts had been discouraged for a long time in the film world, its extensive use by so many YouTubers has established it as its own style that many viewers have come to expect and enjoy. The jumpiness that comes from jump cuts can be effective in keeping your audience’s attention in a shock-inducing manner.
Jump cuts can also be used to show a passage of time in a creative way or make objects magically appear on-screen.
Zack King (above) makes a toy taxi magically appear in his hands using this video editing technique. Filmora allows you to do jump cut easily, you can watch the tutorial below and learn more jump cut tips and tricks .
2. Associative Cut
Not everyone in your audience may recognize the cultural or historical references you make in your videos. It can, therefore, be helpful (and also quite enjoyable) to show the original clip of the reference you are making.
In the same vlog that Jake Paul gets chased down by his brother (above), twenty-eight seconds into the video, Jake expresses his desire to go fast in his car. Right after he says “I want to go fast,” Jake cuts into a scene from the movie Talladega Nights. In that scene, Ricky Bobby, Will Ferrell’s character, also says that he wants to go fast.
Part 3: Transform
1. Zoom
Many YouTubers digitally adjust the zoom of their talking head shots in order to create additional emphasis or suspense. When zoom is used very slowly and smoothly, this technique can be effective in building up suspense and drawing a viewer deeper into the speaker’s message. When a drastic zoom is used suddenly, it can be effective in emphasizing a particular spoken line.
RiceGum is one YouTuber who uses zoom video editing effects extensively in his talking head videos. Want to pan and zoom your video footage too? Check our guide to getting Ken Burns Effect on Videos .
2. Camera Shake
Camera shake is a video effect that makes the original clip appear like it was filmed during a violent earthquake. Many YouTubers use this effect to emphasize their voice when they are talking about something erratic or out of control.
3. Color/Level Adjustment
A lot of comedy YouTubers change the color and levels of their videos in order to emphasize different moods. One common thing YouTubers do when they talk about anything slightly sad is to gradually fade out the colors in their talking head shots. In a cheesy way, the black and white look can emphasize a feeling of emptiness. For his “sad” reactions, PewDiePie often jump cuts into a black and white, slowed down clip of his sad face while playing some sad music in the background. To emphasize a darker message, some YouTubers increase the amount of shadows in their video. In the video below, while his daughter is delivering a darker message from 0:32 to 0:50, La Guardia Cross gradually adds more shadows around his daughter’s face through what appears to be a vignette effect.
Part 4: Transitions
1. Wipe
Many YouTubers transition from one scene into the next using a wipe transition. In a wipe transition, the next clip that you want to transition into slides into the frame horizontally or vertically until it completely covers the first clip. For additional wiping effect, many YouTubers also use a fast, high pitched “woosh” sound effect with this transition.
2. Zoom
The zoom transition is quite similar to the wipe transition, except it uses a zoom effect. Many of the top YouTubers combine this transition with a lower-pitched “woosh” sound effect.
Part 5: Visual Elements
In other genres of film, the only appropriate visual elements filmmakers can tastefully add to their footage seem to be clean looking, seamlessly integrated text and motion graphics. YouTube, on the other hand, is another world with much more room to get outrageous. Many of the top YouTubers add a lot of visual elements (emojis , images, filters, explosions) to their videos to emphasize their jokes, play-on-words, historical or cultural references, and mood.
1. Call-To-Action Visuals
Whether they’re prompting you to subscribe, like, comment, or check out their purchasable merchandise, many YouTubers include visuals to strengthen their calls-to-action.
Part 6: Time Manipulation
1. Timelapse
“The staple of any Casey Neistat vlog is the timelapse, which he uses both to further the narrative or set the time of day.” -@omgurheadsgone
A lot of cameras now come with a timelapse/hyperlapse function, requiring no further video editing. To achieve the kind of timelapses that Casey Neistat makes, though, you’ll have to film real-time footage and then manipulate the speed of it in post. Since sped up ambient sound is hardly ever pleasing to the ear, a lot of YouTubers replace the audio with music that enhances the mood of the timelapse.
2. Slow Motion
Slowing down footage is another way YouTubers like to manipulate the passage of time. This technique can draw the audience’s attention into the intricacies of a movement captured on film. But if you stretch your video clip digitally in order to achieve this look, your video may not look so smooth – your software will need to create extra frames of footage based on your existing footage. The solution around this problem is to make sure to record your video at a very high frame rate.
Part 7: Audio
1. Censor
The traditional practice for censoring out explicit language in television has been to replace profanity with a high pitched “bleep” sound effect . YouTubers, however, have popularized the use of animal sound effects to censor out explicit language. Epic Meal Time frequently uses the “caw” of a crow for this purpose.
2. Sound Effects
Whether it is pouring water into a cup or drinking a glass of water, adding louder sound effects can enhance your viewer’s experience of the action that is taking place on camera.
3. Background Music
Music is very effective in helping people feel all kinds of emotions. It is no wonder so many of the top YouTubers make gratuitous use of music in their videos. Some even add background music to every single clip of their entire YouTube video and only drop the music when the following technique (below) is used.
4. Muting Background Music
A lot of YouTubers who talk over background music abruptly mute the music when they want their audience to focus their attention on whatever it is that they have to say at that very moment. Isolating one’s speech in this way can be a very effective way to emphasize something serious or emphasize a punchline to a joke.
5. Voice-Over
Adding additional recorded verbal commentary is another technique used by many of the top YouTubers. This technique can be helpful when the visuals of your footage do not sufficiently communicate the full message you want to get across to your audience.
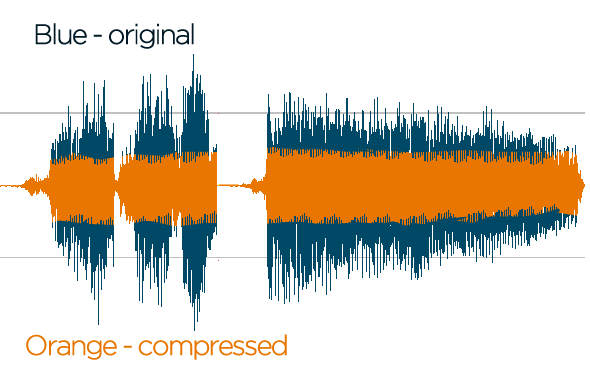
6. Compressor
A lot of video editing software programs give you the option to add compression to your video’s audio. Compression lessens the dynamic range between the softest and loudest parts of your audio. This technique can help your speech sound more uniform in volume.
For those who want to make their YouTube videos better, I recommend Wondershare Filmora for editing YouTube videos . Filmora video editor allows you to create and edit a YouTube video easily with plentiful templates and effects pre-programmed.
Richard Bennett
Richard Bennett is a writer and a lover of all things video.
Follow @Richard Bennett
Unveiling Allure: Comprehensive Beauty How-Tos on Youtube
Ultimate Guide to Beauty on YouTube - Gear, Makeup Tutorials, and More
Richard Bennett
Oct 26, 2023• Proven solutions
Beauty and lifestyle are two of the most popular categories on YouTube, and they might also be the categories most associated with brand deals. Whether you’re hoping to earn revenue as a beauty influencer, or just want to post some fun makeup tutorials, this guide is for you!
We’ll walk you through deciding on a theme for your channel, setting up your equipment, and give you tips for actually recording your videos.
1. **[Finding Your Niche in Beauty or Lifestyle](#niche)**
- Types of Beauty Videos – Your Content Strategy
- How to Get Products to Review
- Simple Camera Setup for Beauty Vloggers
- Lighting for Beauty
- Top Ring Lights for YouTube
- Build Your Own Diva Ring Light
- How to Make a Makeup Tutorial – Before You Start
- How to Make a Makeup Tutorial – Recording
- How to Make a Makeup Tutorial – After Shooting
Best YouTube Video Editor- Wondershare Filmora
Wondershare Filmora is specifically made keeping quality on priority and to make sure all the videos are edited well with the highest accuracy. You can trim, merge, crop, add background music, rotate videos as well as add motion elements, animated texts, overlays, and filters, etc. to your makeup video, and the video can also be uploaded to YouTube or burned to DVD directly.
Finding Your Niche in Beauty or Lifestyle
As a new makeup, beauty, or lifestyle YouTuber you’ll be jumping into a category that’s already packed with thousands of channels. In order to gain any momentum, you’ll have to decide on a particular thing you want to be known for. That’s your niche.
People looking for beauty tutorials are often looking for someone who has something in particular in common with them. Hairstyling for a specific ethnicity, for example, is a potential niche because people want to learn how to style their own hair, not a hair in general.
Another way you could find a niche is by taking on a specific area of interest, like a skincare channel with a focus on coping with acne or a makeup channel with a focus on natural products.
SunKissAlba has a lifestyle channel that focuses on a ‘natural’ niche. She posts videos about every aspect of her lifestyle from putting on makeup to cooking, but natural/non-toxic products are a constant theme through everything she does. By niching her channel she hasn’t limited what kinds of videos she can do at all - she posts a huge variety of different types of videos. What she has done is to make her channel particularly valuable to audiences interested in things that are natural or organic.
Types of Beauty Videos – Your Content Strategy
It’s a lot easier to come up with weekly video ideas when you have an overarching strategy.
The easiest way to figure out what kinds of videos you should make (and this can also help determine your niche!) is to think about what you already do and enjoy. If skincare is particularly important to you, for example, then you could build a content strategy that includes things like your favorite sunscreen, what different ingredients in skincare products are for, or even how to make a DIY face mask.
The same thing goes if you love doing big glamourous makeups for going out. Think about what you like, and that will determine what you should talk about in your videos.
Instead of buying new products to use in videos, try to use and showcase what you already have.
Here are some common types of beauty and lifestyle videos:
Get Ready With Me: a video where you put your makeup on which helps your audience get to know you better.
Monthly Favorites: showcases your favorite products from the last month.
Makeup Collection: viewers will want to see what you have.
DIY: create something, like a homemade moisturizer, and show your viewers how to make their own.
Makeup Hauls: show off what you’ve bought recently.
Lookbooks: put together a few looks based on a theme, like a specific color or event.
First Impressions: show yourself using a new product for the first time.
Makeup Tutorials: teach your viewers how to achieve a particular look, like a smokey eye.
What’s In My Bag: empty your handbag to show viewers what you carry around with you, particularly your most essential makeup.
My Routine: show viewers your morning skincare routine, or how you usually take your makeup off before bed. Any of your beauty-related routines will be interesting to your followers.
You should also be ready to jump on trends as they jump up. You can get a bump in viewership from people searching for a particular trend. Here are a couple of examples of past trends:
- Boyfriend Does My Makeup
- Kid’s Makeup Challenge
- No Mirror Makeup Challenge
How to Get Products to Review
You probably already know that a lot of the products popular beauty YouTubers review in their videos were sent to them for free. Brands want to get their products into the hands of creators who have ‘influence’ both in the hopes that their audiences will decide to buy them and as part of generating buzz – getting more people talking about their products so more people become interested.
In order for a brand to consider sending you a free product to review or feature in a video, you will first have to have a large enough following.
What is ‘large enough’? There’s no magic number of YouTube subscribers or Instagram followers. How large your following needs to be will depend on what brands you want to work with, as well as whether your channel has a specific niche.
Large brands will want to work with larger creators. Smaller brands that are still trying to build notoriety may be more open to working with creators whose followings are not as large.
If you have a very specific niche then that could create more opportunities for you as a mid-sized YouTuber. If you specialize in styling curly black hair, and a brand is marketing a product made specifically for styling curly black hair, then your smaller following will be more valuable to that brand than the larger audience of a more general channel.
Here are 4 tips for getting free products for review:
- Follow your favorite brands on Instagram and subscribe to their YouTube channels. Make sure to take them when you feature their products in your posts or videos.
- Focus on growing your community/audience. As you start getting more subscribers and building up momentum for your channel, brands might start reaching out to you. We’ve got some tips on growing your YouTube channel here .
- Make a pitch to a brand. The first step in this is figuring out who to pitch to. You can send smaller brands DMs via Instagram or Twitter and politely ask for contact info for a PR person. Never ask for free product or sponsorship at this point, just information you can use to contact PR.
- Send an email with your pitch to the brand’s PR person. Your email should introduce yourself, describe your content, and talk about what type of audience you have (how many subscribers, where are they located, how old are they, etc. This information is all available in your Creator Studio analytics).
Make sure to link to your channel so they can verify what you say (do not hide your subscriber count).
Emphasize what value you could provide the brand with (i.e. ‘I’ve had a lot of success with videos on managing acne and I’m sure my subscribers would love to see a review of your cream’) and outline what kind of video you’d like to make (i.e. a five-minute review focusing on the product, or a short feature in a longer makeup tutorial).
Simple Camera Setup for Beauty Vloggers
There are a lot of different ways to set up your camera for a ‘talking head’ video (anything that is primarily you talking to the camera). Keep reading to learn about a popular ring-light setup for beauty videos, or click here to learn 4 different camera setups .
In an ideal situation, this is what you’ll build your setup out of:
- Camera with a flip-out screen
- Ring light
- Camera-mounted shotgun mic
- Tripod (unless you can mount your camera inside your ring light)
If you don’t have access to all of the equipment above, try some of these:
- Smartphone camera
- DIY ring light
- Smartphone shotgun mic or LAV
Step 1: Set your camera and ring light (your camera should be sitting directly behind your ring light, or mounted inside of it) up about 3 feet away from your subject (yourself).
You might want to experiment with sitting at different distances to see how the lighting looks on your face.
Step 2: Set your camera up a bit higher than your face and tilt it down towards yourself (shooting from slightly above is always more flattering). It should be set up at about a 15° angle to you.
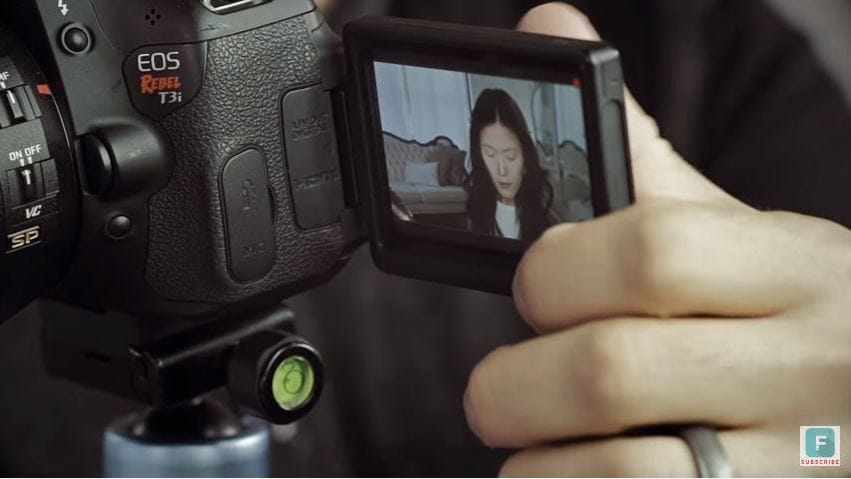
Step 3: Check your frame (this is easiest if your camera has a screen that flips out) to make sure there’s not too much empty space in your shot.
Step 4: Adjust your camera’s focus so your picture is clear. You may need to set up a lamp, chair, or stuffed animal as a stand-in for yourself while you stand behind the camera adjusting the focus.
Turn off autofocus and adjust your focus manually by turning the focus ring on your lens, if you’re using a DSLR or mirrorless camera.
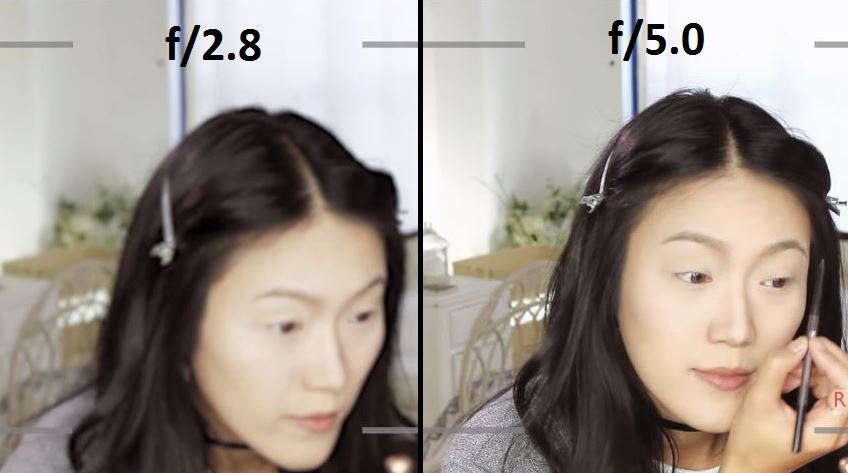
Step 5: Set your f-stop (aperture) so that your depth of field is deep enough for you to lean forwards or backward without becoming blurry.
An aperture of f/5.0 is good if you’re going to be moving around a lot, but if you’re not going to be moving much and want a blurry background you might want to go with f/2.8 or lower.
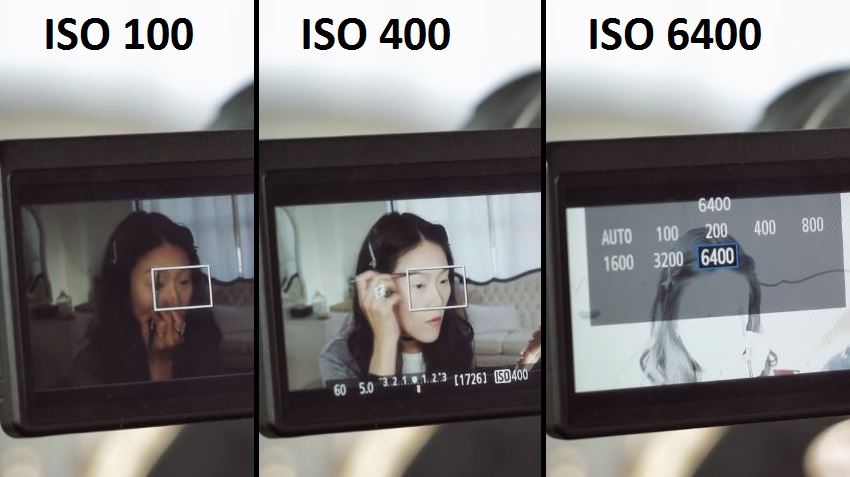
Step 6: Set your ISO (film speed). A lower ISO will give you a darker, but higher quality, image. A higher ISO will lower your quality and give you a brighter image.
ISO 400 should be a happy medium for shooting inside with your ring light, but you may need to try out a couple of settings to find one perfect for your situation.
For more info on camera settings for beauty videos, click here .
Lighting for Beauty
The key to achieving a high-quality picture for your beauty video is having a lot of light.
A ring light (whether it’s one you purchase or one you make) will give you even light over your whole face, and that may be enough. Ring lights are considered one of the biggest ‘secrets’ to beauty on YouTube (as explained in this Racked article ).
There are, however, some reasons you might want additional light:
To Light your Background/Space
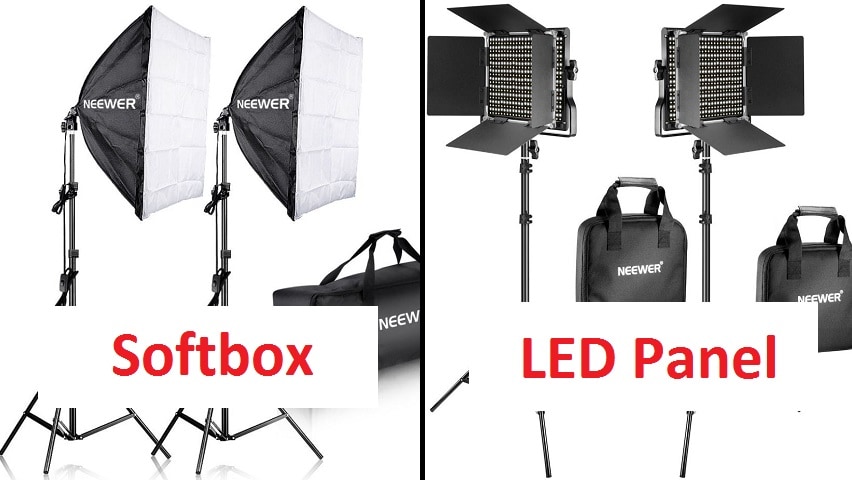
If you only have a ring light/front light then you may end up looking like you’re surrounded by shadows. If you want more light for your space you can use windows, household lamps, or professional video lights like softboxes or LED panels.
To Stand Out Against your Background (‘Backlighting’)
A front light that’s lighting you evenly is also lighting whatever’s behind you evenly, which can make your overall picture look flat.
Setting up a light to shine up at you from behind will help you pop out from your background by creating a silhouette.
You can use an LED panel or a household lamp as a backlight.
To Add Dimension to Your Face (Side Lights/ Fill Lights)
Setting up lights to hit you from the sides will help you look more three dimensional. It can also give your video a general quality boost because the picture quality is always better when there’s tons of light.
You can use softboxes, LED panels, clamp lights, household lamps, or any other light source you can think of.
Lighting Tips!
* **_Use ‘daylight’ bulbs in any household lighting/clamp lights you use._ This way, your light will all be the same color and you won’t have to do a lot of color correction (the more yellow-colored light most indoor lights give off will make you look orange).**
You can buy daylight-colored bulbs for about $5.
- Clamp lights ($10 each) and paper lanterns ($10 each) provide great lighting and are much more affordable than professional lighting kits. The paper lanterns will provide even, diffused, light and the clamp lights will be easy to set up wherever you need them.
- Check out these DIY tips for creating your own reflectors and diffusers .
Top Ring Lights for YouTube
1. Neewer Dimmable Fluorescent Ring Light - $110
One cool feature of the Neewer Ring Light is that you can choose between daylight and a more orange-tinted light depending on which of the included filters you use. In almost all situations you’ll want to use white light/daylight because the orange light will make you look orange, but if you ever wanted to create a warmer image to achieve a particular effect you’d have that option with this light.
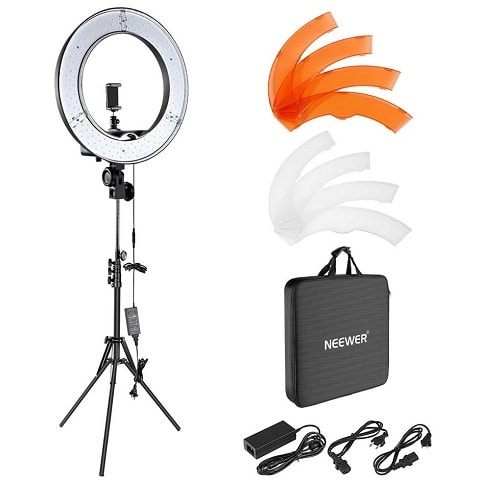
This light is dimmable and can be adjusted to the angle that suits your shot. That’s true of our number 2 pick too, and the second place light actually has a slight edge over the Neewer light because its color temperature is 5400K which is slightly closer to daylight than Neewer’s 5500K, but that’s honestly not super important for YouTube. They’re close enough that you won’t be able to tell the difference, and this light is over $100 more affordable.
2. Prismatic Halo Ring Light - $260
This lightweight ring light is easy to transport, set up, and mount your phone or camera to. It’s a fluorescent ‘daylight’ (5400K) light, so the colors in your videos will look natural.
This light is dimmable, so you can turn it down if it’s too bright, and the Prismatic Light Stand will allow you to tilt your light to the perfect angle. This will be handy if you’re mounting your camera inside the ring but want to place it slightly above your face instead of having it look at you head on.
Build Your Own Diva Ring Light
A ring light is an important tool for a lot of beauty YouTubers, but it doesn’t fit into everyone’s budget. Here’s one popular way to create your own ring light for about $20.
A lot of people have done this DIY, but we’re using Kevin’s video because we love how he added the stand.
What you need:
- A wire wreath frame
- Zip ties
- LED rope light (16 ft, daylight)
- Tinfoil
- Metal paper towel stand
- Scissors
Step 1: Wrap your wreath frame in tinfoil. Make sure the tinfoil is shaped to the wreath so that there is a curve on the inside where your rope light can sit.
Step 2: Place your rope light inside the curve of your frame. Wind it around for 3 loops so you have 2 rows of lighting tube sitting next to each other.
Step 3: Use the zip ties to fasten in the rope light. Wrap them tightly around your frame and lights in several (6-8) places.
Step 4: Cut off the tails of the zip ties.
This is your ring light. Continue to step 5 if you want it to have a stand (you might just want to clip it up somewhere).
Step 5: Fasten your ring light tightly to your paper towel stand securely with several zip ties. Make sure to fasten it at the bottom (where the excess rope light is coming out of your ring light). Cut off the tails of the zip ties.
How to Make a Makeup Tutorial – Before You Start
Before you start recording your makeup tutorial there are a few things you should do.
- Write an outline. You might even want to write yourself a transcript. Having a concrete plan before you start recording will help ensure your tutorial is useful for viewers. You’ll realize where you might need to slow down and show a particular step in more detail, or where your viewers might find a particular step tricky, in a way you want if you just jump into a makeup routine you know perfectly.
- Layout your supplies. Make sure everything you need for your tutorial is laid out neatly in front of you so you can access it all easily. Try to use clean brushes – it just looks nicer.
- Tidy up. If you want your viewers to trust you when it comes to aesthetics, it’s important that your studio area is clean and tidy. You may even want to use a backdrop.
- Do a video test. Before you start your video for real, start recording and shoot some test footage. Watch that back to make sure you like the look of your frame, your face is never blurry, and you’re happy with the overall look of things.
- Do an audio test. If you’re going to be talking in your video instead of recording a voiceover after, do an audio test to make sure your audience will be able to hear you clearly.
How to Make a Makeup Tutorial – Recording
Here are some things to keep in mind while you record your makeup tutorial:
- Show what you’re using. When you use a product, brush, or any other beauty supply make sure to let your audience know what you’re using and why you chose it. This isn’t about promoting brands, it’s about making it easy for viewers to duplicate your results.
If you’re using autofocus, you can hold products up to the screen and wait for it to kick in. If you’re not using autofocus, just hold them up next to you for a moment. You can also shoot separate closeups of each product and cut them into your main tutorial video. - Highlight small details. Describe what you’re doing in a lot of detail and don’t gloss over anything. Assume the person watching your tutorial doesn’t know anything about putting on makeup.
- Take stills for your thumbnail. Remember to take some still photos of your finished makeup to use in your YouTube thumbnail.
How to Make a Makeup Tutorial – After Shooting
Once you’ve finished recording and put away all your camera gear, there’s still work to do. You still need to edit your video and post it on YouTube. Here are some tips for that:
- Add transitions and effects. If you have several clips or even just distinct sections of your main clip, then adding transitions can be a great way to hold your viewers’ attention.
If you spend a lot of time on a repetitive step, you may want to speed that part up and make it a time-lapse. - Add your intro. Having a short (usually around 5 seconds) intro sequence is a great way to strengthen your personal lifestyle brand. You can download free intros right here on filmora.io .
- Title your video. Make sure your most important keyword – the type of look you’re creating, or a product you’re reviewing – is near the beginning of your video’s title. Searching for the topic of your video and writing a title similar to the highest-ranking results is a good way to start.
Remember to include what type of video you made, i.e. ‘tutorial’, ‘review’, or ‘get ready with me’, in your title. People might include these kinds of words in their search queries and, even if they find your video another way, they’ll probably want to know what they’re clicking on before they click. - Customize your thumbnail. Again, search for your video’s topic and see what comes up. You want your thumbnail to look related to the top results, but you also want it to jump out at potential viewers. There may be something you can add to the thumbnail photos you took that will help you stand out, like a bright border, an emoji, or a closeup of a product you feature in the video.
- Write a detailed description. Putting the products you use in your video description will help your viewers, and it’s a great place to include affiliate links if you ever join an affiliate program (like Amazon’s) to generate some revenue.
Are you already making beauty videos? If so, let us know if you have any of your own tips!
Richard Bennett
Richard Bennett is a writer and a lover of all things video.
Follow @Richard Bennett
Richard Bennett
Oct 26, 2023• Proven solutions
Beauty and lifestyle are two of the most popular categories on YouTube, and they might also be the categories most associated with brand deals. Whether you’re hoping to earn revenue as a beauty influencer, or just want to post some fun makeup tutorials, this guide is for you!
We’ll walk you through deciding on a theme for your channel, setting up your equipment, and give you tips for actually recording your videos.
1. **[Finding Your Niche in Beauty or Lifestyle](#niche)**
- Types of Beauty Videos – Your Content Strategy
- How to Get Products to Review
- Simple Camera Setup for Beauty Vloggers
- Lighting for Beauty
- Top Ring Lights for YouTube
- Build Your Own Diva Ring Light
- How to Make a Makeup Tutorial – Before You Start
- How to Make a Makeup Tutorial – Recording
- How to Make a Makeup Tutorial – After Shooting
Best YouTube Video Editor- Wondershare Filmora
Wondershare Filmora is specifically made keeping quality on priority and to make sure all the videos are edited well with the highest accuracy. You can trim, merge, crop, add background music, rotate videos as well as add motion elements, animated texts, overlays, and filters, etc. to your makeup video, and the video can also be uploaded to YouTube or burned to DVD directly.
Finding Your Niche in Beauty or Lifestyle
As a new makeup, beauty, or lifestyle YouTuber you’ll be jumping into a category that’s already packed with thousands of channels. In order to gain any momentum, you’ll have to decide on a particular thing you want to be known for. That’s your niche.
People looking for beauty tutorials are often looking for someone who has something in particular in common with them. Hairstyling for a specific ethnicity, for example, is a potential niche because people want to learn how to style their own hair, not a hair in general.
Another way you could find a niche is by taking on a specific area of interest, like a skincare channel with a focus on coping with acne or a makeup channel with a focus on natural products.
SunKissAlba has a lifestyle channel that focuses on a ‘natural’ niche. She posts videos about every aspect of her lifestyle from putting on makeup to cooking, but natural/non-toxic products are a constant theme through everything she does. By niching her channel she hasn’t limited what kinds of videos she can do at all - she posts a huge variety of different types of videos. What she has done is to make her channel particularly valuable to audiences interested in things that are natural or organic.
Types of Beauty Videos – Your Content Strategy
It’s a lot easier to come up with weekly video ideas when you have an overarching strategy.
The easiest way to figure out what kinds of videos you should make (and this can also help determine your niche!) is to think about what you already do and enjoy. If skincare is particularly important to you, for example, then you could build a content strategy that includes things like your favorite sunscreen, what different ingredients in skincare products are for, or even how to make a DIY face mask.
The same thing goes if you love doing big glamourous makeups for going out. Think about what you like, and that will determine what you should talk about in your videos.
Instead of buying new products to use in videos, try to use and showcase what you already have.
Here are some common types of beauty and lifestyle videos:
Get Ready With Me: a video where you put your makeup on which helps your audience get to know you better.
Monthly Favorites: showcases your favorite products from the last month.
Makeup Collection: viewers will want to see what you have.
DIY: create something, like a homemade moisturizer, and show your viewers how to make their own.
Makeup Hauls: show off what you’ve bought recently.
Lookbooks: put together a few looks based on a theme, like a specific color or event.
First Impressions: show yourself using a new product for the first time.
Makeup Tutorials: teach your viewers how to achieve a particular look, like a smokey eye.
What’s In My Bag: empty your handbag to show viewers what you carry around with you, particularly your most essential makeup.
My Routine: show viewers your morning skincare routine, or how you usually take your makeup off before bed. Any of your beauty-related routines will be interesting to your followers.
You should also be ready to jump on trends as they jump up. You can get a bump in viewership from people searching for a particular trend. Here are a couple of examples of past trends:
- Boyfriend Does My Makeup
- Kid’s Makeup Challenge
- No Mirror Makeup Challenge
How to Get Products to Review
You probably already know that a lot of the products popular beauty YouTubers review in their videos were sent to them for free. Brands want to get their products into the hands of creators who have ‘influence’ both in the hopes that their audiences will decide to buy them and as part of generating buzz – getting more people talking about their products so more people become interested.
In order for a brand to consider sending you a free product to review or feature in a video, you will first have to have a large enough following.
What is ‘large enough’? There’s no magic number of YouTube subscribers or Instagram followers. How large your following needs to be will depend on what brands you want to work with, as well as whether your channel has a specific niche.
Large brands will want to work with larger creators. Smaller brands that are still trying to build notoriety may be more open to working with creators whose followings are not as large.
If you have a very specific niche then that could create more opportunities for you as a mid-sized YouTuber. If you specialize in styling curly black hair, and a brand is marketing a product made specifically for styling curly black hair, then your smaller following will be more valuable to that brand than the larger audience of a more general channel.
Here are 4 tips for getting free products for review:
- Follow your favorite brands on Instagram and subscribe to their YouTube channels. Make sure to take them when you feature their products in your posts or videos.
- Focus on growing your community/audience. As you start getting more subscribers and building up momentum for your channel, brands might start reaching out to you. We’ve got some tips on growing your YouTube channel here .
- Make a pitch to a brand. The first step in this is figuring out who to pitch to. You can send smaller brands DMs via Instagram or Twitter and politely ask for contact info for a PR person. Never ask for free product or sponsorship at this point, just information you can use to contact PR.
- Send an email with your pitch to the brand’s PR person. Your email should introduce yourself, describe your content, and talk about what type of audience you have (how many subscribers, where are they located, how old are they, etc. This information is all available in your Creator Studio analytics).
Make sure to link to your channel so they can verify what you say (do not hide your subscriber count).
Emphasize what value you could provide the brand with (i.e. ‘I’ve had a lot of success with videos on managing acne and I’m sure my subscribers would love to see a review of your cream’) and outline what kind of video you’d like to make (i.e. a five-minute review focusing on the product, or a short feature in a longer makeup tutorial).
Simple Camera Setup for Beauty Vloggers
There are a lot of different ways to set up your camera for a ‘talking head’ video (anything that is primarily you talking to the camera). Keep reading to learn about a popular ring-light setup for beauty videos, or click here to learn 4 different camera setups .
In an ideal situation, this is what you’ll build your setup out of:
- Camera with a flip-out screen
- Ring light
- Camera-mounted shotgun mic
- Tripod (unless you can mount your camera inside your ring light)
If you don’t have access to all of the equipment above, try some of these:
- Smartphone camera
- DIY ring light
- Smartphone shotgun mic or LAV
Step 1: Set your camera and ring light (your camera should be sitting directly behind your ring light, or mounted inside of it) up about 3 feet away from your subject (yourself).
You might want to experiment with sitting at different distances to see how the lighting looks on your face.
Step 2: Set your camera up a bit higher than your face and tilt it down towards yourself (shooting from slightly above is always more flattering). It should be set up at about a 15° angle to you.
Step 3: Check your frame (this is easiest if your camera has a screen that flips out) to make sure there’s not too much empty space in your shot.
Step 4: Adjust your camera’s focus so your picture is clear. You may need to set up a lamp, chair, or stuffed animal as a stand-in for yourself while you stand behind the camera adjusting the focus.
Turn off autofocus and adjust your focus manually by turning the focus ring on your lens, if you’re using a DSLR or mirrorless camera.
Step 5: Set your f-stop (aperture) so that your depth of field is deep enough for you to lean forwards or backward without becoming blurry.
An aperture of f/5.0 is good if you’re going to be moving around a lot, but if you’re not going to be moving much and want a blurry background you might want to go with f/2.8 or lower.
Step 6: Set your ISO (film speed). A lower ISO will give you a darker, but higher quality, image. A higher ISO will lower your quality and give you a brighter image.
ISO 400 should be a happy medium for shooting inside with your ring light, but you may need to try out a couple of settings to find one perfect for your situation.
For more info on camera settings for beauty videos, click here .
Lighting for Beauty
The key to achieving a high-quality picture for your beauty video is having a lot of light.
A ring light (whether it’s one you purchase or one you make) will give you even light over your whole face, and that may be enough. Ring lights are considered one of the biggest ‘secrets’ to beauty on YouTube (as explained in this Racked article ).
There are, however, some reasons you might want additional light:
To Light your Background/Space
If you only have a ring light/front light then you may end up looking like you’re surrounded by shadows. If you want more light for your space you can use windows, household lamps, or professional video lights like softboxes or LED panels.
To Stand Out Against your Background (‘Backlighting’)
A front light that’s lighting you evenly is also lighting whatever’s behind you evenly, which can make your overall picture look flat.
Setting up a light to shine up at you from behind will help you pop out from your background by creating a silhouette.
You can use an LED panel or a household lamp as a backlight.
To Add Dimension to Your Face (Side Lights/ Fill Lights)
Setting up lights to hit you from the sides will help you look more three dimensional. It can also give your video a general quality boost because the picture quality is always better when there’s tons of light.
You can use softboxes, LED panels, clamp lights, household lamps, or any other light source you can think of.
Lighting Tips!
* **_Use ‘daylight’ bulbs in any household lighting/clamp lights you use._ This way, your light will all be the same color and you won’t have to do a lot of color correction (the more yellow-colored light most indoor lights give off will make you look orange).**
You can buy daylight-colored bulbs for about $5.
- Clamp lights ($10 each) and paper lanterns ($10 each) provide great lighting and are much more affordable than professional lighting kits. The paper lanterns will provide even, diffused, light and the clamp lights will be easy to set up wherever you need them.
- Check out these DIY tips for creating your own reflectors and diffusers .
Top Ring Lights for YouTube
1. Neewer Dimmable Fluorescent Ring Light - $110
One cool feature of the Neewer Ring Light is that you can choose between daylight and a more orange-tinted light depending on which of the included filters you use. In almost all situations you’ll want to use white light/daylight because the orange light will make you look orange, but if you ever wanted to create a warmer image to achieve a particular effect you’d have that option with this light.
This light is dimmable and can be adjusted to the angle that suits your shot. That’s true of our number 2 pick too, and the second place light actually has a slight edge over the Neewer light because its color temperature is 5400K which is slightly closer to daylight than Neewer’s 5500K, but that’s honestly not super important for YouTube. They’re close enough that you won’t be able to tell the difference, and this light is over $100 more affordable.
2. Prismatic Halo Ring Light - $260
This lightweight ring light is easy to transport, set up, and mount your phone or camera to. It’s a fluorescent ‘daylight’ (5400K) light, so the colors in your videos will look natural.
This light is dimmable, so you can turn it down if it’s too bright, and the Prismatic Light Stand will allow you to tilt your light to the perfect angle. This will be handy if you’re mounting your camera inside the ring but want to place it slightly above your face instead of having it look at you head on.
Build Your Own Diva Ring Light
A ring light is an important tool for a lot of beauty YouTubers, but it doesn’t fit into everyone’s budget. Here’s one popular way to create your own ring light for about $20.
A lot of people have done this DIY, but we’re using Kevin’s video because we love how he added the stand.
What you need:
- A wire wreath frame
- Zip ties
- LED rope light (16 ft, daylight)
- Tinfoil
- Metal paper towel stand
- Scissors
Step 1: Wrap your wreath frame in tinfoil. Make sure the tinfoil is shaped to the wreath so that there is a curve on the inside where your rope light can sit.
Step 2: Place your rope light inside the curve of your frame. Wind it around for 3 loops so you have 2 rows of lighting tube sitting next to each other.
Step 3: Use the zip ties to fasten in the rope light. Wrap them tightly around your frame and lights in several (6-8) places.
Step 4: Cut off the tails of the zip ties.
This is your ring light. Continue to step 5 if you want it to have a stand (you might just want to clip it up somewhere).
Step 5: Fasten your ring light tightly to your paper towel stand securely with several zip ties. Make sure to fasten it at the bottom (where the excess rope light is coming out of your ring light). Cut off the tails of the zip ties.
How to Make a Makeup Tutorial – Before You Start
Before you start recording your makeup tutorial there are a few things you should do.
- Write an outline. You might even want to write yourself a transcript. Having a concrete plan before you start recording will help ensure your tutorial is useful for viewers. You’ll realize where you might need to slow down and show a particular step in more detail, or where your viewers might find a particular step tricky, in a way you want if you just jump into a makeup routine you know perfectly.
- Layout your supplies. Make sure everything you need for your tutorial is laid out neatly in front of you so you can access it all easily. Try to use clean brushes – it just looks nicer.
- Tidy up. If you want your viewers to trust you when it comes to aesthetics, it’s important that your studio area is clean and tidy. You may even want to use a backdrop.
- Do a video test. Before you start your video for real, start recording and shoot some test footage. Watch that back to make sure you like the look of your frame, your face is never blurry, and you’re happy with the overall look of things.
- Do an audio test. If you’re going to be talking in your video instead of recording a voiceover after, do an audio test to make sure your audience will be able to hear you clearly.
How to Make a Makeup Tutorial – Recording
Here are some things to keep in mind while you record your makeup tutorial:
- Show what you’re using. When you use a product, brush, or any other beauty supply make sure to let your audience know what you’re using and why you chose it. This isn’t about promoting brands, it’s about making it easy for viewers to duplicate your results.
If you’re using autofocus, you can hold products up to the screen and wait for it to kick in. If you’re not using autofocus, just hold them up next to you for a moment. You can also shoot separate closeups of each product and cut them into your main tutorial video. - Highlight small details. Describe what you’re doing in a lot of detail and don’t gloss over anything. Assume the person watching your tutorial doesn’t know anything about putting on makeup.
- Take stills for your thumbnail. Remember to take some still photos of your finished makeup to use in your YouTube thumbnail.
How to Make a Makeup Tutorial – After Shooting
Once you’ve finished recording and put away all your camera gear, there’s still work to do. You still need to edit your video and post it on YouTube. Here are some tips for that:
- Add transitions and effects. If you have several clips or even just distinct sections of your main clip, then adding transitions can be a great way to hold your viewers’ attention.
If you spend a lot of time on a repetitive step, you may want to speed that part up and make it a time-lapse. - Add your intro. Having a short (usually around 5 seconds) intro sequence is a great way to strengthen your personal lifestyle brand. You can download free intros right here on filmora.io .
- Title your video. Make sure your most important keyword – the type of look you’re creating, or a product you’re reviewing – is near the beginning of your video’s title. Searching for the topic of your video and writing a title similar to the highest-ranking results is a good way to start.
Remember to include what type of video you made, i.e. ‘tutorial’, ‘review’, or ‘get ready with me’, in your title. People might include these kinds of words in their search queries and, even if they find your video another way, they’ll probably want to know what they’re clicking on before they click. - Customize your thumbnail. Again, search for your video’s topic and see what comes up. You want your thumbnail to look related to the top results, but you also want it to jump out at potential viewers. There may be something you can add to the thumbnail photos you took that will help you stand out, like a bright border, an emoji, or a closeup of a product you feature in the video.
- Write a detailed description. Putting the products you use in your video description will help your viewers, and it’s a great place to include affiliate links if you ever join an affiliate program (like Amazon’s) to generate some revenue.
Are you already making beauty videos? If so, let us know if you have any of your own tips!
Richard Bennett
Richard Bennett is a writer and a lover of all things video.
Follow @Richard Bennett
Also read:
- 2024 Approved Craft a Unique Channel Look for Free
- Elevate Your Content with These Top 5 YouTube Marketing Methods for 2024
- Launch Free Youtube Events A Step-by-Step Guide
- 2024 Approved Crafting Cinema YouTube's Compreranche Guide for Filmmakers
- [New] Elevate Your Video Entrance with These Tools
- YouTube Vs. DailyMention Identifying Key Variations
- [Updated] 5 Key Aspects to Consider When Sizing Your YouTube Thumbnail
- Youtube's Opposite Order Rearranging Videos in Reverse Flow
- Youtube's Next Gen Streaming Made Easy with OBS Tutorial
- Discover Keyword Power 30 Must-Use Hashtags for FreeGame Content for 2024
- [New] A Social Media Perspective Dissecting IGTV versus YouTube's Features
- Avoiding Files, Enjoying Animated GIFs YouTube Video Mastery
- How Much Money Can You Make via YouTube Ad Revenue and CPM Rates?
- Brightening Up Your YouTube Pixels
- [Updated] Digital Text Generator for Videos
- Seamless Video Capture & Save with Top Apps List
- [Updated] Elevate Visibility, Maximize Views - SEO for Videos
- In 2024, Building Mental Armor Against Online Critics
- 2024 Approved Audit Your Channel's Financial Success
- [Updated] Decoding YouTube's Algorithm The Role of Keyword Optimization
- Beginner's Guide to Video Making Mastering 10 Straightforward YouTube Concepts
- [New] Beneath the Spotlight Top YouTube Events After VidCon
- 2024 Approved 10 YouTube Havens for Entrepreneurs & Business Gurus
- Game Masters Top Ten Female Gaming Influencers
- Channel Enhancement Through Unnatural Popularity Gains for 2024
- Tailoring Audio Rate on Mobile and Desktops for YouTube
- Leverage Creative Studio for Maximum YouTube Reach and Engagement
- Gaining Traction Effective SEO Techniques for YouTube Videos
- Innovative Editing Strategies to Transform Your YouTube Channel
- [Updated] Emulating Old Hollywood Style in Modern Videos
- In 2024, Essential ASMR Creators to Follow
- 10 Online Tools to Retrieve YouTube Graphics
- [Updated] Discover the Best in Class Our List of 12 High-Performing Flip Cameras
- From Startup to Success Skyrocketing Youtube Subs
- 2024 Approved Crafting Compelling YouTube Profile Definitions
- [New] Animating Elegance Self-Designed Tricks & Effects
- 2024 Approved Best Screen Recorder for YouTube
- 2024 Approved Achieve Uninterrupted YouTube Experience Across OS Platforms
- Hands-On Tips for Masterful Video Edits with YouTube Studio
- Enhance Engagement Top 12 Tactics for YouTube Success
- In 2024, Decision-Making in the Workplace A Neurological Approach to Efficacy and Ethics
- Transform Your Presence Advanced Tricks for Live Video Graphics
- New Unlocking YouTube Audio A Simple Downloading Tutorial
- New 2024 Approved Top-Rated Vegas Pro Alternatives for Mac A Comprehensive List
- Essential Steps to Design Impressive Facebook Slideshows
- In 2024, Effective Ways To Fix Checkra1n Error 31 On iPhone X
- 2024 Approved Trailblazing Through Time-Era Images Explore 3 Inverse Techniques on Facebook
- 5 Easy Ways to Change Location on YouTube TV On Lava Blaze 2 5G | Dr.fone
- [New] 2024 Approved Turbo Charge Your TikTok Following with These Tips
- 2024 Approved Top 5 Techniques for Capturing Live Sound Over the Web
- 5 Techniques to Transfer Data from Asus ROG Phone 7 Ultimate to iPhone 15/14/13/12 | Dr.fone
- How to Change Nokia C110 Location on Skout | Dr.fone
- New Tune-Tracking Tools 10 Highly Rated Song Recognition Apps for Android Users
- In 2024, How to Embrace TikTok as a MacBook Enthusiast
- S Best PC Video Dubbing Programs Reviews and Downloads for 2024
- In 2024, Integrating GoPro Adventures with Popular Social Media Channels
- Zombified Zealotry Artist
- In 2024, Top Free Video Calls on PC/Mac OS for Easy Online Meetings
- New March Into Madness Wondershare Filmora Coupon Code for Easter 2024
- [Updated] Zoom Mastering Screen-Sharing Basics
- [Updated] In 2024, Revolutionize Discord Top Bots to Boost Interaction
- In 2024, The Best Methods to Unlock the iPhone Locked to Owner for iPhone 15 Pro Max | Dr.fone
- [New] Cutting-Edge Emulators Choose the Best 15 for Your Device
- Sneak Peeks Into Instagram's Latest Hacks
- In 2024, 2 Ways to Monitor Nokia C210 Activity | Dr.fone
- 2024 Approved Exploring and Locating Videos on Facebook Platform
- How to Unlock Vivo Y27 5G Phone without Any Data Loss
- Top 9 Xiaomi Redmi Note 13 Pro+ 5G Monitoring Apps for Parental Controls | Dr.fone
- [New] Master the Art of Message Interaction on Desktop/Mobile
- The Art of Pure Audio Removing Unwanted Noise for Professional Soundtracks Using Filmora
- New Free Online Subtitle Solutions Top 10 Picks
- [New] 2024 Approved Commencing Your Google Meet Experience
- [Updated] The Ultimate Guide to Navigating TikTok with Top 7 Emojis for 2024
- [New] In 2024, Streaming Showdown Is Streamlabs or OBS Your Best Choice?
- Updated Why Mp3 Converter for Windows Is a Game-Changer (And Why You Should Read About It) for 2024
- A Roster of 8 Top Color Match Generators for 2024
- How to Download and Use Windows Movie Maker 10 for 2024
- Effective Strategies to Document Competitive Play
- How to Unlock Vivo Phone Pattern Lock without Factory Reset
- Title: "Take Your YouTube Clips to the Next Level Ultimate Editing Tips"
- Author: Brian
- Created at : 2024-05-25 12:54:01
- Updated at : 2024-05-26 12:54:01
- Link: https://youtube-video-recordings.techidaily.com/take-your-youtube-clips-to-the-next-level-ultimate-editing-tips/
- License: This work is licensed under CC BY-NC-SA 4.0.
