
"Swift Channels Growth Optimizing Viewership with Collaborative Videos"
Swift Channels Growth: Optimizing Viewership with Collaborative Videos
YouTube Outros that Grow Your Channel Faster

Richard Bennett
Oct 26, 2023• Proven solutions
Your YouTube outro, or end screen , is your last chance to keep a viewer on your channel. There are a lot of videos in the ‘Related’ sidebar that might catch their attention, or they could decide to go back to their search results.
A good outro will prompt viewers to keep watching related content from you instead of from someone else, and it could even convince them to subscribe.
- YouTube Outro Basics
- YouTube Outro Templates
- How to Use YouTube’s End Screen Feature
- How YouTube Outros/End Screens Can Help You Grow on YouTube
Part 1: YouTube Outro Basics
From the video above we can see that it features video recommendations and a prominent subscribe button.
A YouTube end screen might have the following features:
Videos: you can embed links/thumbnails for videos you’ve made on similar topics in order to keep viewers watching your content.
Playlists: instead of (or in addition to) linking to individual videos, you can embed playlists and link viewers to all of your content on a particular topic.
Subscribe Button: prompt viewers to subscribe to your channel.
Background: you may choose to use all of the elements described above in combination with an end card consisting of a moving background or still image. You can even find templates that will have slots for all your thumbnails and buttons.
You may also want to include social icons and handles for your accounts on sites like Instagram or Twitter. These won’t be clickable (you’ll need to add them yourself outside of YouTube’s end screen tool), but they’ll still let viewers know where else they can find and follow you.
Part 2: YouTube Outro Templates Download
Here are 4 sites where you can download templates for YouTube Outros:


Tube Arsenal: this site has a good selection of customizable outros with moving backgrounds. On the Tube Arsenal site, before you download, you can adjust the colors and text included in your outro and even load in your own logo.
You can preview your customized outro by clicking Preview Still or Preview Movie.
Outros on Tube Arsenal cost $9 for 720P or $13 for 1080p.

Outro Maker: you can get animated end screens/outros from Outro Maker for $2.99 a month (or, if you just need one outro, you can probably finish it during your 7-day free trial).
Outro Maker uses the content already uploaded onto your channel to create your outro, so you will need to link the service with your channel.

Biteable: the templates you can customize on Biteable are not specifically designed to be YouTube Outros and will not have slots for your end screen elements. The videos start out a lot longer than you’ll want for an end screen (an end screen can’t last longer than 20 seconds), but you can shorten them by deleting all the ‘scenes’ you don’t need and keeping just the one or two you want.
The clips you can get from Biteable look great, and their process for changing the text and colors is simple and intuitive.
You can create 5 free projects every month with Biteable, but you’ll need to upgrade to their paid service to download them. It’s $30 for one month.

Velosofy: this site has a decent selection of templates you can download for free. However, the downloads are all project files for programs like Adobe Photoshop or After Effects. You’ll need to have the program that goes with your download in order to customize your outro.
You can also find free outro templates by searching for them on YouTube! Lots of people have created free outros to share with the YouTube community.
Besides downloading outro templates from the website, you can also create it with some outro makers or with the video editing software that you are using. Wondershare Filmora video editor is the video editor that I used often, it is featured some cool templates and preset for making an outro. I recommend you try it as well.


Part 3: How to Use YouTube’s End Screen Feature
Make sure to create a space at the end of your video for the elements of your end screen to sit on top of. Your end screen will not add to the length of your video, it will overlay onto the last 5-20 seconds.
Here’s how you add an End Screen:
- Go to your YouTube Studio, then switch to Videos on the left menu;
- Click Details next to the video you want to add an end screen to.
- Click the End screen in the menu under the lower right window.
- Click Element to start adding videos, playlists, and subscribe buttons to your outro. You could also choose to use the same layout as a previous end screen with Import From Video, or you could apply multiple elements at once with a YouTube Template.
- Drag the elements to where you want them and adjust the timing using the timeline.
- Click Save when you’re done.
Part 4: How YouTube Outros/End Screens Can Help You Grow on YouTube
One of the most important statistics for measuring the growth of Your YouTube channel is Watch Time. You need 4,000 hours of watch time (over the past 12 months) in order to qualify for monetization/the YouTube Partner Program, and watch time also plays an important role in how your videos are ranked in YouTube’s search results.
Watch time is more important than views. If you’re getting views, but people are only watching short sections of your video, YouTube’s algorithm thinks the people who are clicking on your videos don’t like them and ranks them lower.
Outros are one of the best ways of increasing the watch time for your channel, because the whole point of an outro is to convince viewers to stick around and watch more videos. Here are some best practices:
Link to related videos and playlists: if someone has watched one video on a topic to the end, they’ll likely be interested in another highly related video from you. For example, someone who’s watched a Let’s Play for God of War is more likely to be interested in another God of War video than your review of your new gaming headset.
Link to your newest video: YouTube’s algorithm places the most weight on the data it collects about your video within the first 24 hours of it being listed as Public. To give your newest video it’s the best chance at success, you should do everything you can to boost its watch time when it’s first posted and linking to it in the end screens of all your other videos is one way to do that.
You don’t have to change every screen individually, YouTube lets you link to your most recent video automatically.
Link to Playlists: if you can get a viewer watching a playlist of related videos then that’s great for your watch time. If they’re already in a playlist they’re far more likely to watch multiple videos than if they have to go to your channel page and hunt down the content they’re interested in.
Include a ‘CTA’ with your subscribe button: besides just including a button people can use to subscribe, you should ask them to click on it with a ‘Call to Action’ or CTA. This can mean writing something like ‘Subscribe for more videos!’ on your end card, or asking them in an outro voiceover. People are more likely to subscribe if you ask than if you don’t.
Are you using a YouTube outro? What elements do you include, and how do you think it’s helped the growth of your channel?
Richard Bennett
Richard Bennett is a writer and a lover of all things video.
Follow @Richard Bennett
Richard Bennett
Oct 26, 2023• Proven solutions
Your YouTube outro, or end screen , is your last chance to keep a viewer on your channel. There are a lot of videos in the ‘Related’ sidebar that might catch their attention, or they could decide to go back to their search results.
A good outro will prompt viewers to keep watching related content from you instead of from someone else, and it could even convince them to subscribe.
- YouTube Outro Basics
- YouTube Outro Templates
- How to Use YouTube’s End Screen Feature
- How YouTube Outros/End Screens Can Help You Grow on YouTube
Part 1: YouTube Outro Basics
From the video above we can see that it features video recommendations and a prominent subscribe button.
A YouTube end screen might have the following features:
Videos: you can embed links/thumbnails for videos you’ve made on similar topics in order to keep viewers watching your content.
Playlists: instead of (or in addition to) linking to individual videos, you can embed playlists and link viewers to all of your content on a particular topic.
Subscribe Button: prompt viewers to subscribe to your channel.
Background: you may choose to use all of the elements described above in combination with an end card consisting of a moving background or still image. You can even find templates that will have slots for all your thumbnails and buttons.
You may also want to include social icons and handles for your accounts on sites like Instagram or Twitter. These won’t be clickable (you’ll need to add them yourself outside of YouTube’s end screen tool), but they’ll still let viewers know where else they can find and follow you.
Part 2: YouTube Outro Templates Download
Here are 4 sites where you can download templates for YouTube Outros:
Tube Arsenal: this site has a good selection of customizable outros with moving backgrounds. On the Tube Arsenal site, before you download, you can adjust the colors and text included in your outro and even load in your own logo.
You can preview your customized outro by clicking Preview Still or Preview Movie.
Outros on Tube Arsenal cost $9 for 720P or $13 for 1080p.
Outro Maker: you can get animated end screens/outros from Outro Maker for $2.99 a month (or, if you just need one outro, you can probably finish it during your 7-day free trial).
Outro Maker uses the content already uploaded onto your channel to create your outro, so you will need to link the service with your channel.
Biteable: the templates you can customize on Biteable are not specifically designed to be YouTube Outros and will not have slots for your end screen elements. The videos start out a lot longer than you’ll want for an end screen (an end screen can’t last longer than 20 seconds), but you can shorten them by deleting all the ‘scenes’ you don’t need and keeping just the one or two you want.
The clips you can get from Biteable look great, and their process for changing the text and colors is simple and intuitive.
You can create 5 free projects every month with Biteable, but you’ll need to upgrade to their paid service to download them. It’s $30 for one month.
Velosofy: this site has a decent selection of templates you can download for free. However, the downloads are all project files for programs like Adobe Photoshop or After Effects. You’ll need to have the program that goes with your download in order to customize your outro.
You can also find free outro templates by searching for them on YouTube! Lots of people have created free outros to share with the YouTube community.
Besides downloading outro templates from the website, you can also create it with some outro makers or with the video editing software that you are using. Wondershare Filmora video editor is the video editor that I used often, it is featured some cool templates and preset for making an outro. I recommend you try it as well.
Part 3: How to Use YouTube’s End Screen Feature
Make sure to create a space at the end of your video for the elements of your end screen to sit on top of. Your end screen will not add to the length of your video, it will overlay onto the last 5-20 seconds.
Here’s how you add an End Screen:
- Go to your YouTube Studio, then switch to Videos on the left menu;
- Click Details next to the video you want to add an end screen to.
- Click the End screen in the menu under the lower right window.
- Click Element to start adding videos, playlists, and subscribe buttons to your outro. You could also choose to use the same layout as a previous end screen with Import From Video, or you could apply multiple elements at once with a YouTube Template.
- Drag the elements to where you want them and adjust the timing using the timeline.
- Click Save when you’re done.
Part 4: How YouTube Outros/End Screens Can Help You Grow on YouTube
One of the most important statistics for measuring the growth of Your YouTube channel is Watch Time. You need 4,000 hours of watch time (over the past 12 months) in order to qualify for monetization/the YouTube Partner Program, and watch time also plays an important role in how your videos are ranked in YouTube’s search results.
Watch time is more important than views. If you’re getting views, but people are only watching short sections of your video, YouTube’s algorithm thinks the people who are clicking on your videos don’t like them and ranks them lower.
Outros are one of the best ways of increasing the watch time for your channel, because the whole point of an outro is to convince viewers to stick around and watch more videos. Here are some best practices:
Link to related videos and playlists: if someone has watched one video on a topic to the end, they’ll likely be interested in another highly related video from you. For example, someone who’s watched a Let’s Play for God of War is more likely to be interested in another God of War video than your review of your new gaming headset.
Link to your newest video: YouTube’s algorithm places the most weight on the data it collects about your video within the first 24 hours of it being listed as Public. To give your newest video it’s the best chance at success, you should do everything you can to boost its watch time when it’s first posted and linking to it in the end screens of all your other videos is one way to do that.
You don’t have to change every screen individually, YouTube lets you link to your most recent video automatically.
Link to Playlists: if you can get a viewer watching a playlist of related videos then that’s great for your watch time. If they’re already in a playlist they’re far more likely to watch multiple videos than if they have to go to your channel page and hunt down the content they’re interested in.
Include a ‘CTA’ with your subscribe button: besides just including a button people can use to subscribe, you should ask them to click on it with a ‘Call to Action’ or CTA. This can mean writing something like ‘Subscribe for more videos!’ on your end card, or asking them in an outro voiceover. People are more likely to subscribe if you ask than if you don’t.
Are you using a YouTube outro? What elements do you include, and how do you think it’s helped the growth of your channel?
Richard Bennett
Richard Bennett is a writer and a lover of all things video.
Follow @Richard Bennett
Conciseness in Content: Editing Your YouTube Videos Smartly
How to Edit the Length of a Video on YouTube
Richard Bennett
Mar 27, 2024• Proven solutions
Apart from providing video hosting and sharing features, the YouTube platform also has an online editor which is going to provide you with the possibility to make changes and additions online without having to download any particular program. In this guide, we are going to show you how to make your video shorter or longer with YouTube online video editor.
A Better Alternative on How to Edit YouTube Video Length - Wondershare Filmora is a perfect alternative to edit every single clip frame by frame. Not just to shorten or lengthen the video. It offers quite a lot of opportunities. Watch the video below to know more:
Download Mac Version ](https://tools.techidaily.com/wondershare/filmora/download/ )
For instance, the application is offering non-linear ripple video editing. This is going to allow you to combine multiple video clips and pin them together conveniently. What is more, you can also apply PIP and Green Screen professional effects with just a few clicks. Sure, the YouTube video editor is a perfect solution for those who don’t want to achieve professional quality, but if you do, Wondershare Filmora is without a doubt the far better alternative. This is something that’s going to enable you to edit and re-touch your videos as well as to size them appropriately. Instead of dragging two bars together, you will be able to touch every single frame and size it according to your own particular needs. This is going to result in flawless videos.
How to Edit YouTube Video Length Using the built-in Video Editor
The YouTube video editor is easy to use, and you can easily learn how to do all sorts of changes to your video. Let’s see the things that you need to go through in order to edit the length.
Note: From 20th September 2017 users will no longer be able to use the complimentary editing suite. Check the best YouTube video editor alternatives from this complete guide.
Step 1 Get to the video editor

In order to do so, you would have to go ahead and login into your account. Then, go to the “My Channel” panel and select the video that you want to cut. Once you’ve done this, click on the “Video manager” option and click on the “create” tab which should be located on the right side for the page. There, you will be able to find the “Video Editor”. Of course, you can also add “/editor” to YouTube’s URL, and you would be good to go.
Step 2 Import Your Video
Once you’ve done all of the above, you would have to drag your video in order to cut it’s time. Keep in mind that the videos are made out of a maximum of 50 clips. The site is going to save every single video that you upload as a particular clip which could be properly combined with the rest in order to make one larger video. This is important.
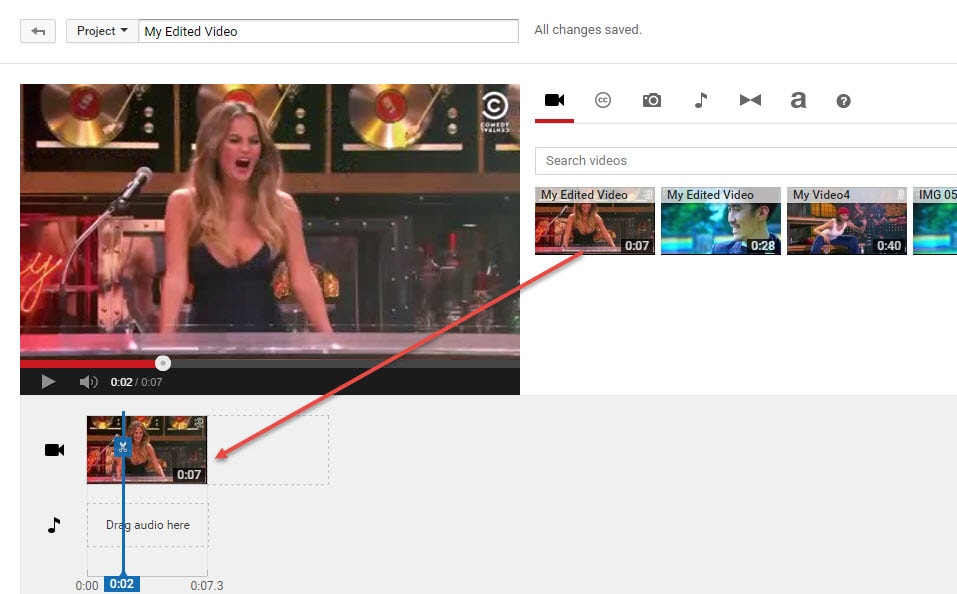
Step 3 Edit the Length
This is the part where you actually get to edit the length of your video. In order to do so effectively, you have to drag the bar at either end of your clip towards the other end in order to shorten the clip conveniently.
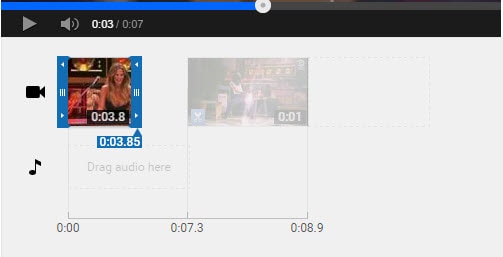
What is more, if you want to increase the length, you have to drag the bar to the opposite end – outwards. There is going to be an indicator which is going to appear at the bottom of the clip, and it’s going to show you the overall duration of the file, and it’s going to adjust itself as you slide the bars accordingly.
Step 4 Save the Clip
Of course, you would have to save the clip in order for the changes to reflect. Even though this might seem like a particularly obvious thing to do, you would be surprise to find out that a lot of people get everything done and then discard the changes by forgetting to save them and their effort goes to waste.
Richard Bennett
Richard Bennett is a writer and a lover of all things video.
Follow @Richard Bennett
Richard Bennett
Mar 27, 2024• Proven solutions
Apart from providing video hosting and sharing features, the YouTube platform also has an online editor which is going to provide you with the possibility to make changes and additions online without having to download any particular program. In this guide, we are going to show you how to make your video shorter or longer with YouTube online video editor.
A Better Alternative on How to Edit YouTube Video Length - Wondershare Filmora is a perfect alternative to edit every single clip frame by frame. Not just to shorten or lengthen the video. It offers quite a lot of opportunities. Watch the video below to know more:
Download Mac Version ](https://tools.techidaily.com/wondershare/filmora/download/ )
For instance, the application is offering non-linear ripple video editing. This is going to allow you to combine multiple video clips and pin them together conveniently. What is more, you can also apply PIP and Green Screen professional effects with just a few clicks. Sure, the YouTube video editor is a perfect solution for those who don’t want to achieve professional quality, but if you do, Wondershare Filmora is without a doubt the far better alternative. This is something that’s going to enable you to edit and re-touch your videos as well as to size them appropriately. Instead of dragging two bars together, you will be able to touch every single frame and size it according to your own particular needs. This is going to result in flawless videos.
How to Edit YouTube Video Length Using the built-in Video Editor
The YouTube video editor is easy to use, and you can easily learn how to do all sorts of changes to your video. Let’s see the things that you need to go through in order to edit the length.
Note: From 20th September 2017 users will no longer be able to use the complimentary editing suite. Check the best YouTube video editor alternatives from this complete guide.
Step 1 Get to the video editor
In order to do so, you would have to go ahead and login into your account. Then, go to the “My Channel” panel and select the video that you want to cut. Once you’ve done this, click on the “Video manager” option and click on the “create” tab which should be located on the right side for the page. There, you will be able to find the “Video Editor”. Of course, you can also add “/editor” to YouTube’s URL, and you would be good to go.
Step 2 Import Your Video
Once you’ve done all of the above, you would have to drag your video in order to cut it’s time. Keep in mind that the videos are made out of a maximum of 50 clips. The site is going to save every single video that you upload as a particular clip which could be properly combined with the rest in order to make one larger video. This is important.
Step 3 Edit the Length
This is the part where you actually get to edit the length of your video. In order to do so effectively, you have to drag the bar at either end of your clip towards the other end in order to shorten the clip conveniently.
What is more, if you want to increase the length, you have to drag the bar to the opposite end – outwards. There is going to be an indicator which is going to appear at the bottom of the clip, and it’s going to show you the overall duration of the file, and it’s going to adjust itself as you slide the bars accordingly.
Step 4 Save the Clip
Of course, you would have to save the clip in order for the changes to reflect. Even though this might seem like a particularly obvious thing to do, you would be surprise to find out that a lot of people get everything done and then discard the changes by forgetting to save them and their effort goes to waste.
Richard Bennett
Richard Bennett is a writer and a lover of all things video.
Follow @Richard Bennett
Also read:
- [Updated] Auto-Enhancing Shots with Innovative Exposure Algorithms
- [Updated] Dominate Search Results Powerful YouTube SEO Techniques Exposed
- [Updated] Dynamic Videos Made Easy with Best Stabilizers
- [Updated] The Artisan's Guide to Picture in Picture Videos on macOS Systems
- [Updated] Unboxing PureAudioFinder A Look Into the Latest Release
- 2024 Approved Harmonizing Your Browsing Experience with Automatic YouTube Playback on Facebook
- 起動不能に対する解決策: Win11環境下でのSSDコピー後に発生するトラブル
- Efficient Revenue Streams The Guide to Making Money From YouTube Mobile for 2024
- Enhancing Video Visibility on YouTube with Imaginative Thumbnails
- Into the Heart of Windows 10 Flawless Media Import Techniques
- Mastering the Download of YouTube's Default Thumbnails Effortlessly
- Navigating Updated Earnings Policies for Streamers
- Title: Swift Channels Growth Optimizing Viewership with Collaborative Videos
- Author: Brian
- Created at : 2024-10-09 19:35:35
- Updated at : 2024-10-12 18:02:48
- Link: https://youtube-video-recordings.techidaily.com/swift-channels-growth-optimizing-viewership-with-collaborative-videos/
- License: This work is licensed under CC BY-NC-SA 4.0.