
:max_bytes(150000):strip_icc()/Internet-Explorer-56a6c3ec3df78cf7728fee70.png)
Superior 7 DSLR Choices Perfect for Social Media Streaming
Superior 7 DSLR Choices Perfect for Social Media Streaming
Best 7 DSLR Vlogging Cameras

Shanoon Cox
Nov 01, 2022• Proven solutions
DSLR cameras are great for vloggers who are serious about filmmaking. But with so many DSLR cameras to choose from, it can be difficult to make a decision on one. We have come up with a list of seven of the best DSLR vlogging cameras to help you with your search.
WHAT TO LOOK FOR IN A VLOGGING CAMERA
1. Fully articulated screen (flip screen)
2. Good continual autofocus while recording video
3. Good focus priority through face recognition
4. Touch to focus
5. Good low-light performance
6. external mic jack, hot/cold shoe bracket
7. optical image stabilization
8. good battery life
Check out my full list of 10 Things To Look For In A Vlogging Camera to understand the importance of these camera features.
THE 7 BEST DSLR CAMERAS FOR VLOGGING
| Camera | Release Date | Sensor Size | Flip Screen | Mic Port | Price | |
|---|---|---|---|---|---|---|
| CanonEOS6D Mark II | 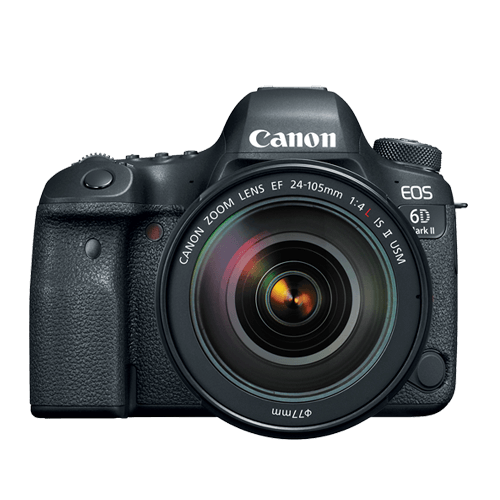 |
June2017 | Full frame(35.9 x 24 mm) | Fully Articulated | Yes | $$ |
| CanonEOS RebelSL2 | 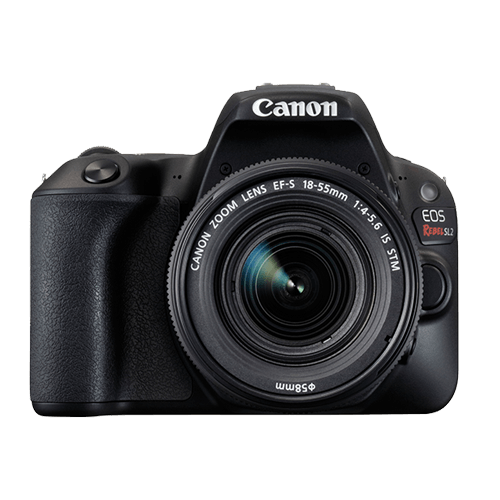 |
June2017 | APS-C(22.3 x 14.9 mm) | Fully Articulated | Yes | $ |
| CanonEOS RebelT7i | 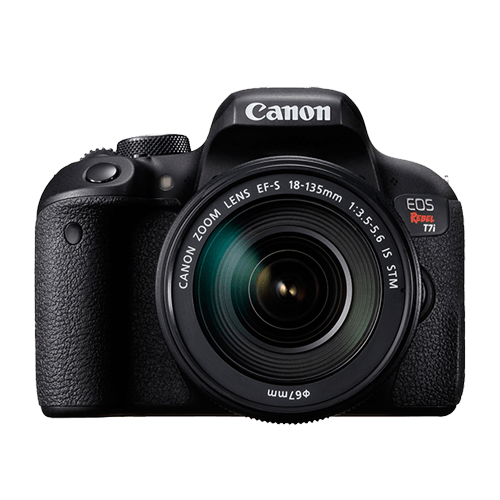 |
February2017 | APS-C(22.3 x 14.9 mm) | Fully Articulated | Yes | $- |
| CanonEOS77D | 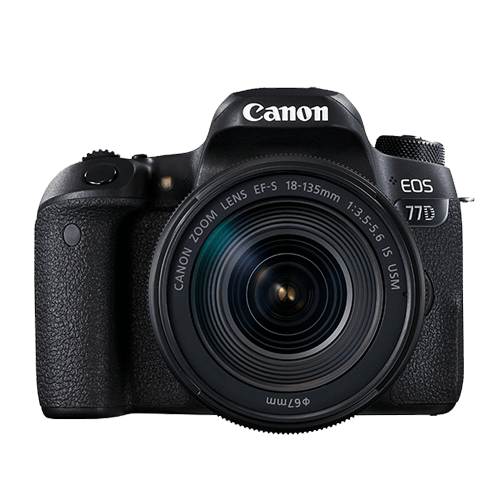 |
February2017 | APS-C(22.3 x 14.9 mm) | Fully Articulated | Yes | $- |
| NikonD5600 | 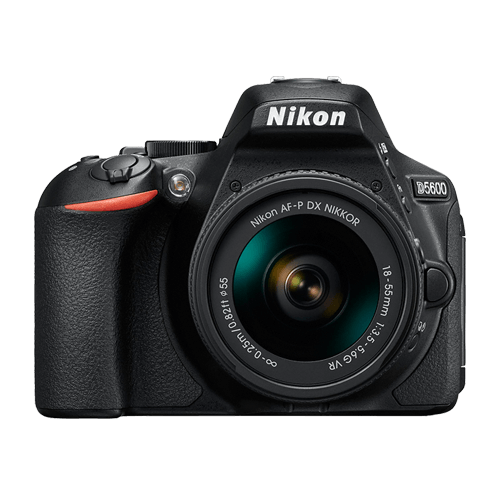 |
November2016 | APS-C(23.5 x 15.6 mm) | Fully Articulated | Yes | $- |
| CanonEOS5D Mark IV | 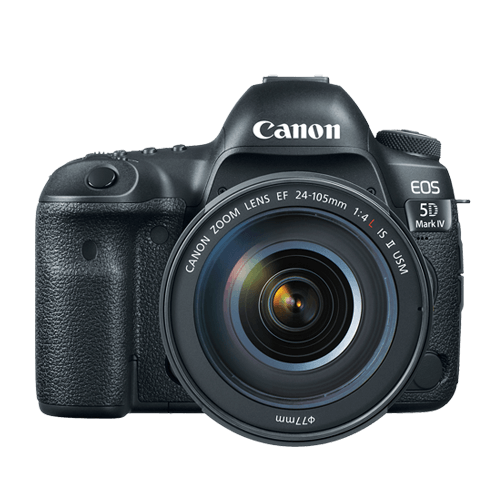 |
August2017 | Full frame(36 x 24 mm) | No | Yes | $$$ |
| CanonEOS80D | 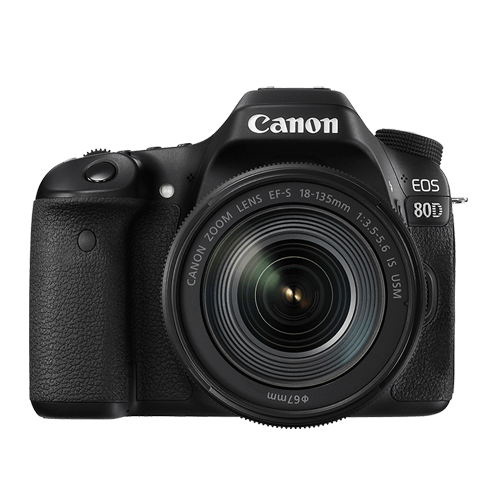 |
February2016 | APS-C(22.5 x 15 mm) | Fully Articulated | Yes | $$ |
|
Best daily DSLR camera for vlogging: Canon EOS T7i The camera you use to record your daily vlogs doesn’t have to be the best camera on the market. It just has to offer enough options to make the process of making a vlog as smooth as it can possibly be. The T7i is not the most powerful DSLR camera out there, but its 24.2 MP APS-C CMOS sensor and a DIGIC 7 image processor are more than enough to meet the needs of most daily vloggers. You can record full HD 1080p videos at 60 fps and use this camera to create HDR and time-lapse movies. You can set the T7i’s ISO up as high as 51200, which is pretty good. The T7i’s dual pixel CMOS AF system makes sure that the camera focuses quickly and it helps you avoid creating video clips that are out focus. There’s also a built-in Wi-FI with an NFC feature that enables you to share your videos with a smartphone device you connect to the camera. PROS - Long battery life - Remarkable image quality at high ISO values CONS - Can’t record 4K videos - Viewfinder is tiny |
|---|---|
|
Best entry-level DSLR camera for vlogging: Canon EOS SL2 The Canon EOS SL2 was released just a year ago and it wins our 2018 vote for the best entry-level DSLR camera for vlogging. The SL2 packs a lot of features in a compact camera body. The camera only weighs 1 lb, which is considered light among most DSLR cameras. Many vloggers may enjoy the fact that they can hold up this light camera in front of themselves with more ease. Like a lot of entry-level DSLR cameras, the SL2 comes with an APS-C crop sensor. With ISO capabilities that can reach up to 51200, you’ll be able to film up to full HD 1080p videos at 60 fps, even under low light conditions. All recent Canon cameras perform very well when it comes to autofocus and the SL2 is no exception. It does, however, have fewer points of focus. The SL2 comes with a 9-point AF system. The SL2 also has a fully-articulated screen and a microphone jack. PROS - Microphone jack - Wi-Fi connectivity CONS - No 4K video support - Optical image stabilizer could be better |
|
Best mid-range DSLR camera for vlogging: Canon EOS 80D The Canon EOS 80D is the successor of the 70D which was at one time considered by many YouTubers the ultimate DSLR camera for vlogging. The 80D is a larger camera than the SL2, weighing 1.61 lbs. In its larger build, this camera additionally (compared to the SL2) packs a 45-point AF system, longer battery life, a headphone port, and it is environmentally sealed so you can shoot in tough conditions. This camera’s great performance in autofocusing makes it a great mid-range DSLR camera for vlogging. PROS - Feature-rich - Continuous AF feature performs beautifully while recording high-res videos CONS - Just one SD card slot - PC sync connection features could be better |
|
Best professional DSLR camera for vlogging: Canon EOS 6D Mark II There’s a lot of DSLR cameras that come with a fully-articulated screen and a microphone jack, but the Canon EOS 6D Mark II is actually the only one in the market that comes equipped with both of those, plus a full-frame sensor. It is its full-frame sensor that really sets this camera apart from the other vlogging DLSR cameras. Because of its full-frame sensor, this camera performs much better in low light conditions. With this larger sensor, you’ll also be able to capture footage that looks more cinematic with high-quality bokeh (more blur to your out-of-focus areas). The 6D Mark II also has great battery life compared to all the reviewed cameras above. Unfortunately, this camera does not shoot in 4K. PROS - ISO sensitivity goes up to 102400 - Amazing touchscreen controls CONS - No 4K video recording option - No USB 3.0 |
Want to compare even more cameras? Check out…
12 Best Vlogging Cameras
Top 11 Cheap Vlogging Cameras
8 Best Mirrorless Cameras For Vlogging
12 Best Vlogging Cameras With A Flip Screen
Shanoon Cox
Shanoon Cox is a writer and a lover of all things video.
Follow @Shanoon Cox
Shanoon Cox
Nov 01, 2022• Proven solutions
DSLR cameras are great for vloggers who are serious about filmmaking. But with so many DSLR cameras to choose from, it can be difficult to make a decision on one. We have come up with a list of seven of the best DSLR vlogging cameras to help you with your search.
WHAT TO LOOK FOR IN A VLOGGING CAMERA
1. Fully articulated screen (flip screen)
2. Good continual autofocus while recording video
3. Good focus priority through face recognition
4. Touch to focus
5. Good low-light performance
6. external mic jack, hot/cold shoe bracket
7. optical image stabilization
8. good battery life
Check out my full list of 10 Things To Look For In A Vlogging Camera to understand the importance of these camera features.
THE 7 BEST DSLR CAMERAS FOR VLOGGING
| Camera | Release Date | Sensor Size | Flip Screen | Mic Port | Price | |
|---|---|---|---|---|---|---|
| CanonEOS6D Mark II | |
June2017 | Full frame(35.9 x 24 mm) | Fully Articulated | Yes | $$ |
| CanonEOS RebelSL2 | |
June2017 | APS-C(22.3 x 14.9 mm) | Fully Articulated | Yes | $ |
| CanonEOS RebelT7i | |
February2017 | APS-C(22.3 x 14.9 mm) | Fully Articulated | Yes | $- |
| CanonEOS77D | |
February2017 | APS-C(22.3 x 14.9 mm) | Fully Articulated | Yes | $- |
| NikonD5600 | |
November2016 | APS-C(23.5 x 15.6 mm) | Fully Articulated | Yes | $- |
| CanonEOS5D Mark IV | |
August2017 | Full frame(36 x 24 mm) | No | Yes | $$$ |
| CanonEOS80D | |
February2016 | APS-C(22.5 x 15 mm) | Fully Articulated | Yes | $$ |
|
Best daily DSLR camera for vlogging: Canon EOS T7i The camera you use to record your daily vlogs doesn’t have to be the best camera on the market. It just has to offer enough options to make the process of making a vlog as smooth as it can possibly be. The T7i is not the most powerful DSLR camera out there, but its 24.2 MP APS-C CMOS sensor and a DIGIC 7 image processor are more than enough to meet the needs of most daily vloggers. You can record full HD 1080p videos at 60 fps and use this camera to create HDR and time-lapse movies. You can set the T7i’s ISO up as high as 51200, which is pretty good. The T7i’s dual pixel CMOS AF system makes sure that the camera focuses quickly and it helps you avoid creating video clips that are out focus. There’s also a built-in Wi-FI with an NFC feature that enables you to share your videos with a smartphone device you connect to the camera. PROS - Long battery life - Remarkable image quality at high ISO values CONS - Can’t record 4K videos - Viewfinder is tiny |
|---|---|
|
Best entry-level DSLR camera for vlogging: Canon EOS SL2 The Canon EOS SL2 was released just a year ago and it wins our 2018 vote for the best entry-level DSLR camera for vlogging. The SL2 packs a lot of features in a compact camera body. The camera only weighs 1 lb, which is considered light among most DSLR cameras. Many vloggers may enjoy the fact that they can hold up this light camera in front of themselves with more ease. Like a lot of entry-level DSLR cameras, the SL2 comes with an APS-C crop sensor. With ISO capabilities that can reach up to 51200, you’ll be able to film up to full HD 1080p videos at 60 fps, even under low light conditions. All recent Canon cameras perform very well when it comes to autofocus and the SL2 is no exception. It does, however, have fewer points of focus. The SL2 comes with a 9-point AF system. The SL2 also has a fully-articulated screen and a microphone jack. PROS - Microphone jack - Wi-Fi connectivity CONS - No 4K video support - Optical image stabilizer could be better |
|
Best mid-range DSLR camera for vlogging: Canon EOS 80D The Canon EOS 80D is the successor of the 70D which was at one time considered by many YouTubers the ultimate DSLR camera for vlogging. The 80D is a larger camera than the SL2, weighing 1.61 lbs. In its larger build, this camera additionally (compared to the SL2) packs a 45-point AF system, longer battery life, a headphone port, and it is environmentally sealed so you can shoot in tough conditions. This camera’s great performance in autofocusing makes it a great mid-range DSLR camera for vlogging. PROS - Feature-rich - Continuous AF feature performs beautifully while recording high-res videos CONS - Just one SD card slot - PC sync connection features could be better |
|
Best professional DSLR camera for vlogging: Canon EOS 6D Mark II There’s a lot of DSLR cameras that come with a fully-articulated screen and a microphone jack, but the Canon EOS 6D Mark II is actually the only one in the market that comes equipped with both of those, plus a full-frame sensor. It is its full-frame sensor that really sets this camera apart from the other vlogging DLSR cameras. Because of its full-frame sensor, this camera performs much better in low light conditions. With this larger sensor, you’ll also be able to capture footage that looks more cinematic with high-quality bokeh (more blur to your out-of-focus areas). The 6D Mark II also has great battery life compared to all the reviewed cameras above. Unfortunately, this camera does not shoot in 4K. PROS - ISO sensitivity goes up to 102400 - Amazing touchscreen controls CONS - No 4K video recording option - No USB 3.0 |
Want to compare even more cameras? Check out…
12 Best Vlogging Cameras
Top 11 Cheap Vlogging Cameras
8 Best Mirrorless Cameras For Vlogging
12 Best Vlogging Cameras With A Flip Screen
Shanoon Cox
Shanoon Cox is a writer and a lover of all things video.
Follow @Shanoon Cox
No Download Necessary: YouTube-to-GIF Conversion Made Easy
How to Convert YouTube Videos to GIFs
Shanoon Cox
Mar 27, 2024• Proven solutions
A GIF adds an extra element to any conversation and makes the reader feel connected to the post. Using GIF can turn useful if done rightly. It narrates a story in a single animated image for social media conversation. In this article, we will brief you about how to convert YouTube to gif, various GIF converters, their uses, and the pros and cons of each converter.
Let’s get started!
How to Convert a YouTube Video into GIFs?
1. YouTube to GIF Directly
Here is a quick way to convert the YouTube video to GIFs without typing a YouTube to GIF website.
Gif.com is a free and easy-to-use video editor available with multiple effects. This converter was created keeping in mind how people spend hours and money on paid platforms.
Follow the below steps to convert a YouTube video into gifs.
- In the YouTube video page, add gif before youtube.com. For example, I want to convert the YouTube video https://www.youtube.com/watch?v=40fuGLmwHwk to GIFs, here is how it looks like after adding gif at the beginning: https://www.gifyoutube.com/watch?v=40fuGLmwHwk . Press the enter button on your keyboard and you will enter the gifs.com directly.

- In gifs.com, you can play and pause the YouTube video and drag the bar to select a desired moment for gif. Press the “Create Gif” button on the top right side to convert the specific part of the YouTube video to gif.
- You will then be directed to the result page to see your GIF created using the YouTube video, and you can change the GIF title and the tag.
- Lastly, you need to copy the link and share it!
Pros of converting YouTube to GIFs with Gifs.com:
- The interface is easy to use and it provides lots of tools to adjust.
- Simple functionality.
Cons:
- The watermark on your created GIF can be removed only after purchasing the premium version.
- GIFs can be downloaded only by registered users.
2. FreeGifMaker.me
FreeGifMaker is one simple online tool that allows the creation of animated Gifs for free. A minimum of two pictures has to be uploaded out of ten. It takes few seconds and is super easy to make a GIF from a YouTube video. You can use FreeGifMaker.me in some easy steps.
- Open the website http://freegifmaker.me/youtube-to-gif/ on your desktop.
- Go to YouTube and copy the video URL you want to create a GIF of and paste it on the website mentioned above.
- Then click “Load YouTube Video” below the URL and wait for a few seconds while the tool checks the video source.
- Once the YouTube video is loaded, enter the gif duration, start time, and click on the “Make a GIF button.” It will redirect you to the result page.
- Pros:
- Conversion size is unlimited**.**
- There is no usage of ads.
- Easy to make Gifs.
- Cons:
- The upload speed is slow.
- The converter gives limited options for editing.
3. Wondershare Online UniConverter
Online UniConverter converts video into a high-quality animated GIF and allows editing. It is a simple converter with unique features.
If you want to convert your YouTube video into a GIF, follow the steps.
- You need to upload your video through the “Choose Files” option. You can also copy the link from YouTube.
- Wait for some time once you upload the file; you can then set your start time, end time, frame rate according to your needs.
- Lastly, click on “Create GIF” and download your GIF. You can also save it through the dropdown option available besides “Download.”
- Pros:
- Easy to handle.
- A wide range of customization tools is available.
- Zero ads.
- Cons:
- Upload speed is slow.
- Conversion size is limited.
4. GifRun
It is a video maker that started in 2013, and GifRun converts videos from YouTube, Facebook, and other sources to high-quality GIFs. You can create Gifs free of cost from GifRun.
Here is how you can use Gifrun.
- Open the website and paste the URL you want to convert into Gif. Later, press “Get Video” option below the URL box.
- In this step, you can adjust the duration, start time, add text, and also pause and preview the video. Once you’re done altering the video, click “Create GIF.”
- Lastly, click on the “Download” button beside the add text button, or share the link directly.
- Pros:
- Fast conversion and download.
- There is no upload limit.
- The video preview feature is available.
- Cons:
- UI is ad-infested.
- Supports YouTube videos only.
5. Makeagif
This GIF converter creates high-quality GIFs in no time. You need to paste the URL in Makeagif and nothing much. It can make GIFs from Instagram, Facebook, Twitter, and other platforms easily.
The only issue is that it supports one type of conversion with a maximum limit of 25MB.
Here is how you can make your favorite GIF in few steps.
- Open makeagif.com and paste the YouTube URL in the box available.
- Once you paste the URL, the website will automatically take you to the edit page to edit GIF length, start time, speed, and add caption and stickers. The next step is to select the category to which the video belongs available on the left side of the screen.
- After editing, click on “Continue to publishing” then “Create GIF” at the lower right corner of the screen. Voila! Your GIF is ready to use.
- Pros:
- The UI is user-friendly.
- Ads are minimal
- Various GIF conversions are supported.
- Cons:
- The conversion size is small.
- Batch conversions are not available.
6. ImgFlip
It is a creative GIF website supporting various videos from other websites such as Vimeo and YouTube. ImgFlip has innovative customization tools for cropping, reshaping, adding text and, a lot more, but you just need to be aware of the ads.
Want to know how to create GIF? Go through these simple steps.
- You can make GIFs both from Video and Images. To make GIF from a video, paste the YouTube URL in the box at the top, upload the tape from your device’s file.
- After pasting the URL, you will be given lots of customization options. Choose the effect of your choice for your GIF.
- Lastly, click on “Generate GIF” available on the right side of the screen. You can now share the GIF via your device or download it.
- Pros:
- Plenty of customization options.
- Fast conversion.
- Easy to upload and use.
- Cons:
- Ads pop up frequently.
- Offline conversion is unavailable.
7. GIPHY
It is a free GIF converter that helps you download free YouTube GIFs. You can also make GIFs from your photos, videos available on your device along with video URLs and images. The only problem is, to use Giphy you first have to log in to the app.
Follow the below steps to create a GIF from YouTube videos with Giphy:
- Open Giphy on your device and click on “Create” on the top right-side of your screen.
- Paste the URL in the space given below. A pop-up will tell you to log in. Log in to the website to continue.
- The video you choose should be less than 15 seconds and under 100MB. You will be given editing options from which you can select the start time and duration of your GIF along with Captions and Tags.
- In the end, press the “Create GIF” button to make the GIF. When it’s done, you will be redirected to the GIF page. You can then share your GIF on any social media site.
- Pros:
- Ads are absent
- Uploading is fast
- Wide range of free GIFs available
- Cons:
- Not perfect for green hands
8. Imgur
It is one of the best apps that offers tons of images, memes, and GIFs. You can make GIFs of less than 60 seconds with high quality, which you can share anywhere.
Here are three easy steps to make GIFs
- Visit the page “imgur.com/vidgif” and paste your YouTube URL there.
- Set a start time by clicking or dragging on the timeline. The total runtime is also adjustable, with 60 seconds as the maximum time for GIFs.
- Lastly, press on “Create GIF” to see the magic. The GIF is converted from the YouTube video.
- Pros:
- The users can share the post of their choice
- Users can save posts.
- Great collection of short GIFs and videos.
- Cons:
- During loading, the screen flashes.
9 VEED.IO
Veed is a simple YouTube video converter that makes your work super easy. It converts YouTube videos into GIFs with various editing options like crop, trim, text ads, and many more.
Check out how to use VEED in 3 steps.
- Start by pasting the URL of your YouTube video into VEED, Your video will be ready to convert into GIF.
- Now you are all set to edit your video. You have the option to crop and trim the video. You can also include different font styles, colors, and sizes of your choice.
- Lastly, download the GIF you made in VEED.
- Pros:
- Downloading the software is not mandatory.
- UI is simple and easy to navigate.
- The subtitle option is present.
- Cons:
- It takes a lot of time to upload video.
- Many basic tools.
10. Kapwing
Kapwing is a helpful video converter that can easily turn any video into GIFs with a click. It can also convert different files such as 3GP, GIF, WEBM.
To create beautiful GIFs with this video editor, follow these easy steps.
- Open Kapwing video editor and upload your video from YouTube.
- Choose the “Export dropdown” option and choose the format you wish to convert.
You can also preview the GIF and customize it as per your choice.
- In the final step, export the video by clicking the “Export Video” button. Save and download the newly created GIF and share it anywhere with your friends.
- Pros:
- Great editing tools.
- Easy to use.
- Cons:
- Available only on the website.
- Too many tools for the same purpose.
Final Thoughts
With the increased use of GIFs on social media, you can now easily convert your favorite YouTube videos into GIFs on your own. All you have to do is simply choose the tools mentioned above and share it with your friends.
Shanoon Cox
Shanoon Cox is a writer and a lover of all things video.
Follow @Shanoon Cox
Shanoon Cox
Mar 27, 2024• Proven solutions
A GIF adds an extra element to any conversation and makes the reader feel connected to the post. Using GIF can turn useful if done rightly. It narrates a story in a single animated image for social media conversation. In this article, we will brief you about how to convert YouTube to gif, various GIF converters, their uses, and the pros and cons of each converter.
Let’s get started!
How to Convert a YouTube Video into GIFs?
1. YouTube to GIF Directly
Here is a quick way to convert the YouTube video to GIFs without typing a YouTube to GIF website.
Gif.com is a free and easy-to-use video editor available with multiple effects. This converter was created keeping in mind how people spend hours and money on paid platforms.
Follow the below steps to convert a YouTube video into gifs.
- In the YouTube video page, add gif before youtube.com. For example, I want to convert the YouTube video https://www.youtube.com/watch?v=40fuGLmwHwk to GIFs, here is how it looks like after adding gif at the beginning: https://www.gifyoutube.com/watch?v=40fuGLmwHwk . Press the enter button on your keyboard and you will enter the gifs.com directly.
- In gifs.com, you can play and pause the YouTube video and drag the bar to select a desired moment for gif. Press the “Create Gif” button on the top right side to convert the specific part of the YouTube video to gif.
- You will then be directed to the result page to see your GIF created using the YouTube video, and you can change the GIF title and the tag.
- Lastly, you need to copy the link and share it!
Pros of converting YouTube to GIFs with Gifs.com:
- The interface is easy to use and it provides lots of tools to adjust.
- Simple functionality.
Cons:
- The watermark on your created GIF can be removed only after purchasing the premium version.
- GIFs can be downloaded only by registered users.
2. FreeGifMaker.me
FreeGifMaker is one simple online tool that allows the creation of animated Gifs for free. A minimum of two pictures has to be uploaded out of ten. It takes few seconds and is super easy to make a GIF from a YouTube video. You can use FreeGifMaker.me in some easy steps.
- Open the website http://freegifmaker.me/youtube-to-gif/ on your desktop.
- Go to YouTube and copy the video URL you want to create a GIF of and paste it on the website mentioned above.
- Then click “Load YouTube Video” below the URL and wait for a few seconds while the tool checks the video source.
- Once the YouTube video is loaded, enter the gif duration, start time, and click on the “Make a GIF button.” It will redirect you to the result page.
- Pros:
- Conversion size is unlimited**.**
- There is no usage of ads.
- Easy to make Gifs.
- Cons:
- The upload speed is slow.
- The converter gives limited options for editing.
3. Wondershare Online UniConverter
Online UniConverter converts video into a high-quality animated GIF and allows editing. It is a simple converter with unique features.
If you want to convert your YouTube video into a GIF, follow the steps.
- You need to upload your video through the “Choose Files” option. You can also copy the link from YouTube.
- Wait for some time once you upload the file; you can then set your start time, end time, frame rate according to your needs.
- Lastly, click on “Create GIF” and download your GIF. You can also save it through the dropdown option available besides “Download.”
- Pros:
- Easy to handle.
- A wide range of customization tools is available.
- Zero ads.
- Cons:
- Upload speed is slow.
- Conversion size is limited.
4. GifRun
It is a video maker that started in 2013, and GifRun converts videos from YouTube, Facebook, and other sources to high-quality GIFs. You can create Gifs free of cost from GifRun.
Here is how you can use Gifrun.
- Open the website and paste the URL you want to convert into Gif. Later, press “Get Video” option below the URL box.
- In this step, you can adjust the duration, start time, add text, and also pause and preview the video. Once you’re done altering the video, click “Create GIF.”
- Lastly, click on the “Download” button beside the add text button, or share the link directly.
- Pros:
- Fast conversion and download.
- There is no upload limit.
- The video preview feature is available.
- Cons:
- UI is ad-infested.
- Supports YouTube videos only.
5. Makeagif
This GIF converter creates high-quality GIFs in no time. You need to paste the URL in Makeagif and nothing much. It can make GIFs from Instagram, Facebook, Twitter, and other platforms easily.
The only issue is that it supports one type of conversion with a maximum limit of 25MB.
Here is how you can make your favorite GIF in few steps.
- Open makeagif.com and paste the YouTube URL in the box available.
- Once you paste the URL, the website will automatically take you to the edit page to edit GIF length, start time, speed, and add caption and stickers. The next step is to select the category to which the video belongs available on the left side of the screen.
- After editing, click on “Continue to publishing” then “Create GIF” at the lower right corner of the screen. Voila! Your GIF is ready to use.
- Pros:
- The UI is user-friendly.
- Ads are minimal
- Various GIF conversions are supported.
- Cons:
- The conversion size is small.
- Batch conversions are not available.
6. ImgFlip
It is a creative GIF website supporting various videos from other websites such as Vimeo and YouTube. ImgFlip has innovative customization tools for cropping, reshaping, adding text and, a lot more, but you just need to be aware of the ads.
Want to know how to create GIF? Go through these simple steps.
- You can make GIFs both from Video and Images. To make GIF from a video, paste the YouTube URL in the box at the top, upload the tape from your device’s file.
- After pasting the URL, you will be given lots of customization options. Choose the effect of your choice for your GIF.
- Lastly, click on “Generate GIF” available on the right side of the screen. You can now share the GIF via your device or download it.
- Pros:
- Plenty of customization options.
- Fast conversion.
- Easy to upload and use.
- Cons:
- Ads pop up frequently.
- Offline conversion is unavailable.
7. GIPHY
It is a free GIF converter that helps you download free YouTube GIFs. You can also make GIFs from your photos, videos available on your device along with video URLs and images. The only problem is, to use Giphy you first have to log in to the app.
Follow the below steps to create a GIF from YouTube videos with Giphy:
- Open Giphy on your device and click on “Create” on the top right-side of your screen.
- Paste the URL in the space given below. A pop-up will tell you to log in. Log in to the website to continue.
- The video you choose should be less than 15 seconds and under 100MB. You will be given editing options from which you can select the start time and duration of your GIF along with Captions and Tags.
- In the end, press the “Create GIF” button to make the GIF. When it’s done, you will be redirected to the GIF page. You can then share your GIF on any social media site.
- Pros:
- Ads are absent
- Uploading is fast
- Wide range of free GIFs available
- Cons:
- Not perfect for green hands
8. Imgur
It is one of the best apps that offers tons of images, memes, and GIFs. You can make GIFs of less than 60 seconds with high quality, which you can share anywhere.
Here are three easy steps to make GIFs
- Visit the page “imgur.com/vidgif” and paste your YouTube URL there.
- Set a start time by clicking or dragging on the timeline. The total runtime is also adjustable, with 60 seconds as the maximum time for GIFs.
- Lastly, press on “Create GIF” to see the magic. The GIF is converted from the YouTube video.
- Pros:
- The users can share the post of their choice
- Users can save posts.
- Great collection of short GIFs and videos.
- Cons:
- During loading, the screen flashes.
9 VEED.IO
Veed is a simple YouTube video converter that makes your work super easy. It converts YouTube videos into GIFs with various editing options like crop, trim, text ads, and many more.
Check out how to use VEED in 3 steps.
- Start by pasting the URL of your YouTube video into VEED, Your video will be ready to convert into GIF.
- Now you are all set to edit your video. You have the option to crop and trim the video. You can also include different font styles, colors, and sizes of your choice.
- Lastly, download the GIF you made in VEED.
- Pros:
- Downloading the software is not mandatory.
- UI is simple and easy to navigate.
- The subtitle option is present.
- Cons:
- It takes a lot of time to upload video.
- Many basic tools.
10. Kapwing
Kapwing is a helpful video converter that can easily turn any video into GIFs with a click. It can also convert different files such as 3GP, GIF, WEBM.
To create beautiful GIFs with this video editor, follow these easy steps.
- Open Kapwing video editor and upload your video from YouTube.
- Choose the “Export dropdown” option and choose the format you wish to convert.
You can also preview the GIF and customize it as per your choice.
- In the final step, export the video by clicking the “Export Video” button. Save and download the newly created GIF and share it anywhere with your friends.
- Pros:
- Great editing tools.
- Easy to use.
- Cons:
- Available only on the website.
- Too many tools for the same purpose.
Final Thoughts
With the increased use of GIFs on social media, you can now easily convert your favorite YouTube videos into GIFs on your own. All you have to do is simply choose the tools mentioned above and share it with your friends.
Shanoon Cox
Shanoon Cox is a writer and a lover of all things video.
Follow @Shanoon Cox
Also read:
- In 2024, 10 Best Non-YouTube Video Platforms IPhone/Android Edition
- [New] Crafting Content, Cultivating Capital Your Videography Voyage
- Navigating Video Dimensions A Focused Look at ASPECT RATIOS
- Deciphering Your Pathway to YouTube's Maker Land for 2024
- Boost Creativity with Free Audio Effects Online
- Configuring Who Can See Your YouTube Clips
- [Updated] Creating Seamless Connections Spotify to YouTube Music Conversion
- 2024 Approved 15 Best YouTube Channels for Stock Market to Follow
- [New] Creating Profit on YouTube The Ultimate List of Top Business Channels
- The Filmmaker's Guide to Avoiding Overused Channel Labels
- In 2024, Cinema for All? A Comparative Look at Vimeo & YouTube
- The Hidden Challenges & Solutions in Uploading Large Video Files to YouTube
- 2024 Approved Boosting Online Presence Top 30 FreeFire Hashtags and Tag Strategies
- YouTube Advertising Crafting a Winning Campaign
- 2024 Approved Escaping YouTube Ranked List of 27 Alternative Streaming Services
- 2024 Approved Affordable Methods to Craft Your Own YouTube Intros
- [Updated] Enhance Visibility The Power of Customized YouTube Templates
- Cutting Edge Techniques YouTube Trailers Through Filmora's Lens
- Channel Identity Constructing Memorable Templates for Gamers
- [Updated] Elevate Your Content Game Studio Aptitude Essentials
- In 2024, ClipCraft Designer
- How To Upload Videos to YouTube [a Step-by-Step Guide]
- The Easy Fix for a Desired List Directionality
- Harness the Power of YouTube's Movie Maker for Professionals
- [New] Chuckle Chest Selecting 15 Hilarious Video Treasures for Your Viewing Pleasure
- In 2024, Enhance YouTube Views Leveraging Outro Content Partnerships
- [New] Boost YouTube Videos' Appeal - 3 Ways to Incorporate Neon Borders
- In 2024, Crafting Engaging Content Add YouTube to Slides
- Tasty Tales Ideal Naming for Culinary Broadcasts
- Efficiently Managing YouTube Videos with the Watch Later Feature
- 4 Ways to Transfer Music from Motorola G54 5G to iPhone | Dr.fone
- IG Upgrade Starts Here Top Tools for Follower Growth for 2024
- [New] From Invisible to Iconic Top Strategies for Standout Facebook Profiles
- In 2024, The Alchemy of Animation in Snapchat Videos
- [New] Essential Tips for Sims 4 Video Gaming
- Best Chromecast Microphones for High-Quality Sound Capture for 2024
- [Updated] 2024 Approved Navigating Through Best 6 Free Online Converters TikTok to MP3
- What is the best Pokemon for pokemon pvp ranking On Realme 12 5G? | Dr.fone
- New In 2024, Unlock Efficient Typing Top Mac Speech-to-Text Software with No Installation Required
- How to Bypass Activation Lock from iPhone 15 or iPad?
- In 2024, How to Mirror PC Screen to Infinix Hot 30i Phones? | Dr.fone
- [Updated] Mastering the Art of Transforming Social Media Videos to GIFs
- 4 Ways to Fix Android Blue Screen of Death On Itel P40+ | Dr.fone
- [Updated] 2024 Approved Voice-Activated TikTok Mastering Siri on Your iPhone
- [Updated] 2024 Approved PrimeWeb High Definition Cam Suite
- Updated Are You Facing Trouble in Playing a TS File? We Got You! Read the Article Below to Learn the Most About TS Format, Pros and Cons, and More
- Proven Ways in How To Hide Location on Life360 For Realme C53 | Dr.fone
- [Updated] 2024 Approved The Blue Bands Promise Tips for Longevity
- [Updated] 2024 Approved Inaugural Vision Preservation Review & Alternate Suggestions
- In 2024, Non-GameBar Recorders Best Tools for Game Capture
- A Complete Guide To OEM Unlocking on Nubia Red Magic 8S Pro+
- In 2024, Proven Ways in How To Hide Location on Life360 For Oppo Reno 8T | Dr.fone
- 2024 Approved Behind-the-Scenes of Successful OneStream Livestreams
- Can I play MKV movies on Moto G84 5G?
- [Updated] 2024 Approved Easy Steps to Record Skype on Both Platforms
- [Updated] In 2024, Browse Backwards A Guide to Facebook Archives
- Title: Superior 7 DSLR Choices Perfect for Social Media Streaming
- Author: Brian
- Created at : 2024-05-25 12:53:17
- Updated at : 2024-05-26 12:53:17
- Link: https://youtube-video-recordings.techidaily.com/superior-7-dslr-choices-perfect-for-social-media-streaming/
- License: This work is licensed under CC BY-NC-SA 4.0.
