
:max_bytes(150000):strip_icc()/001_airpods-wont-turn-on-f721d401944949bcbd88afb727c19214.jpg)
"Streamlining Your YouTube Views A Guide to Blocking Advertisements"
Streamlining Your YouTube Views: A Guide to Blocking Advertisements
How to Block YouTube Ads on Chrome/Firefox/Android/iPhone

Richard Bennett
Mar 27, 2024• Proven solutions
YouTube is unquestionably the world’s most popular video-sharing platform with a massive 2 billion active monthly users. With such a large audience, advertisers are pouring a lot of funds into Google’s video platform that makes up a big portion of the company’s advertising revenue. Unfortunately, according to the BI Intelligence Digital Trust Survey , YouTube serves up the most annoying ads with 43 percent of the respondents considering YouTube ads most irksome.
Every now and then you’ll get annoyed with the obtrusive ads and ask how to block YouTube ads. Getting away with the un-skippable and plagued 30-second ads during the playback or the onscreen pop-up ads that come suddenly on the playing screen will make your life miserable when watching a show or practicing a dance move. To help you escape the forced ads on YouTube we’ll go through the YouTube ad blocking techniques available. You will learn:
- Part 1: How to block YouTube ads on the computer (Chrome & Firefox)
- Part 2: How to block YouTube ads on the mobile phone (Android & iPhone)
Here is the video guide to help you block Youtube ads on the computer and mobile phone


Part 1: How to block YouTube ads on the computer (Chrome & Firefox)
In case you care about and want to support content creators on YouTube, you can buy the YouTube Premium which will also give you access to exclusive shows and will eliminate ads from your YouTube life.
However, as most of us won’t like the idea of paying for a free service, there are possible solutions of how to block YouTube ads in Chrome or Firefox. You will need to install a third-party browser extension proficient in blocking the annoying YouTube ads in Google Chrome or Mozilla Firefox.
1.Google Chrome
Chrome allows you to have extensions to enhance the browser features and interact more with the content presented to you. These third-party extensions or sometimes called Add-ons can help prevent the irritating YouTube ads to show up on the site. To install them, follow the steps.
- 1. Open Google Chrome browser and go to Menu.
- 2. In the Menu look for “More Tools” and in there tap the “Extensions”.
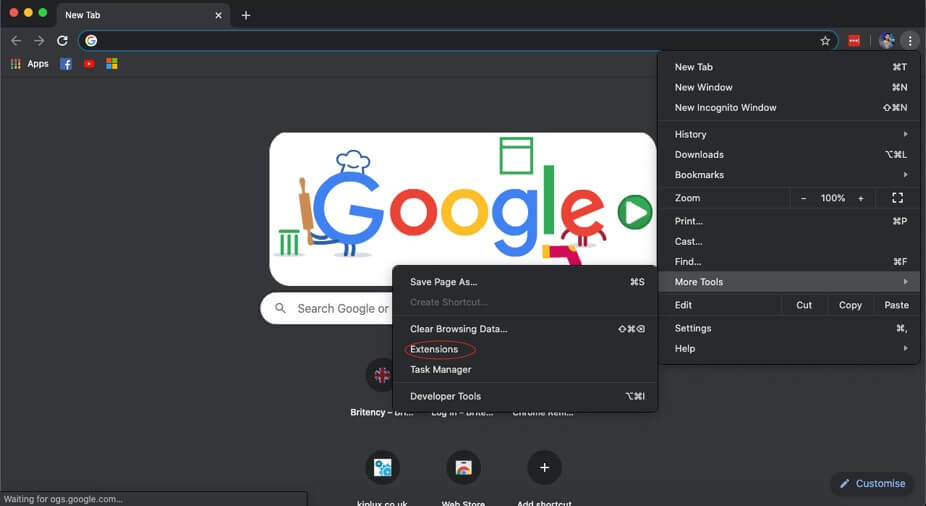
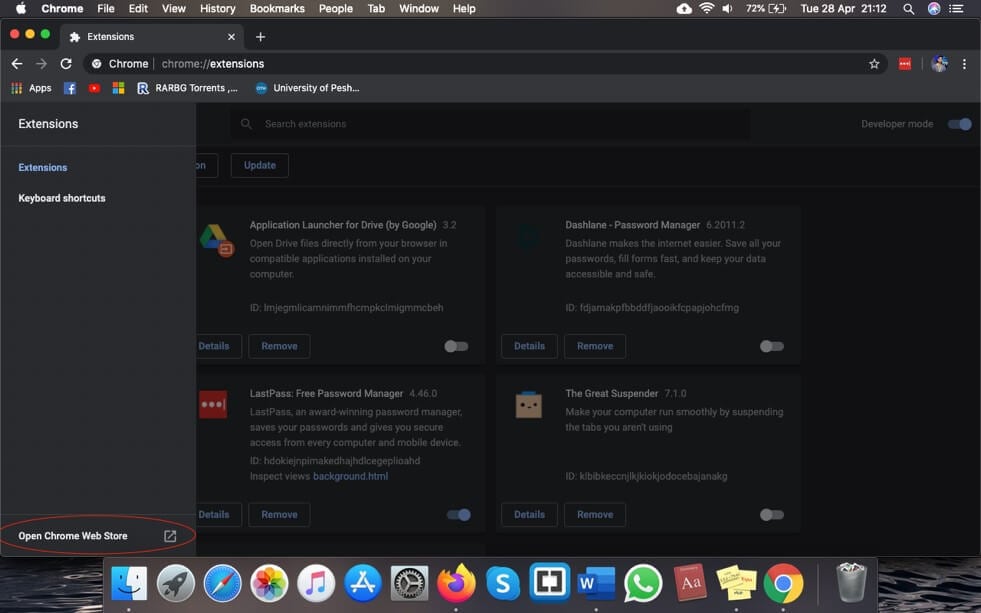
- 3. In the Extensions tap the “Main menu” at the left-hand side. It will show the menu here open the Chrome Web Store. Or you can simply open Chrome Web Store
- 4. You will need to sign in with your Google account if you’re not already signed in.
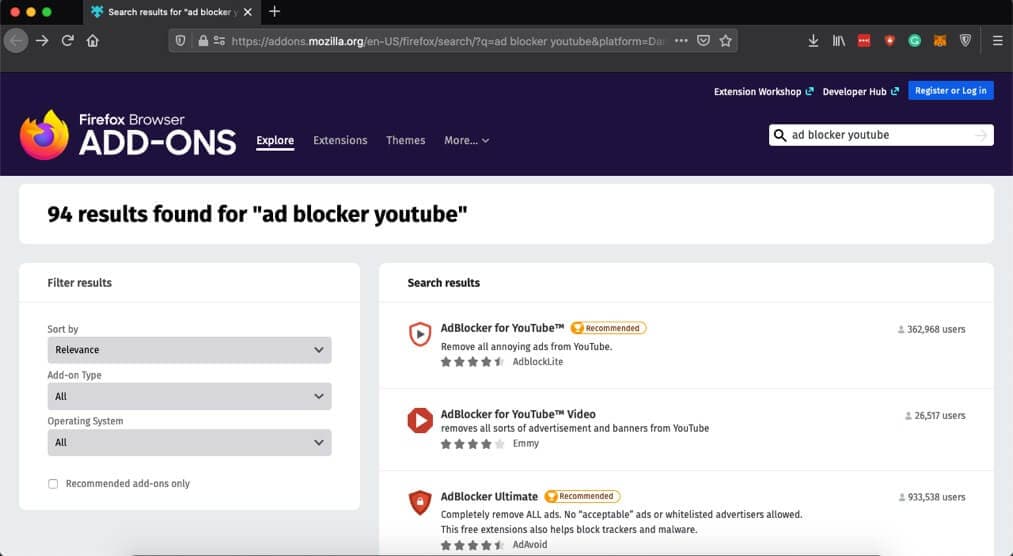
- 5. In the search box type “ad blocker YouTube” and tap enter. You’ll see a list of ad blockers available for chrome.
- 6. You will adblocker’s specifically for YouTube ads. Select whichever you like and it will block the YouTube ads on Chrome.

2.Mozilla Firefox
You can also install third-party extensions to block YouTube ads from popping up in the middle of the playback. To install the extensions, follow the steps.
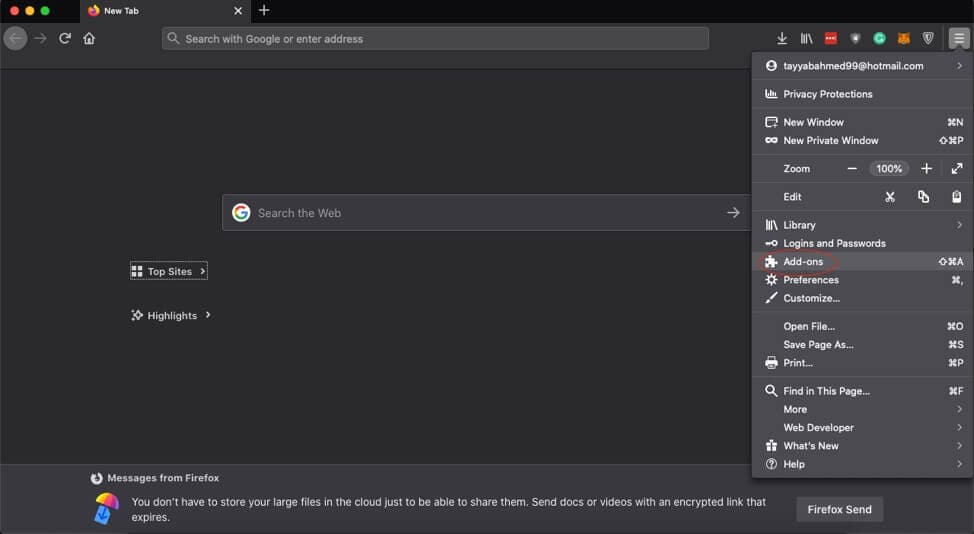
- 1. Tap the Hamburger Menu on Firefox at the top-right corner and select Add-ons.
- 2. In the search bar “Find more extensions” type “ad blocker YouTube” and press enter.
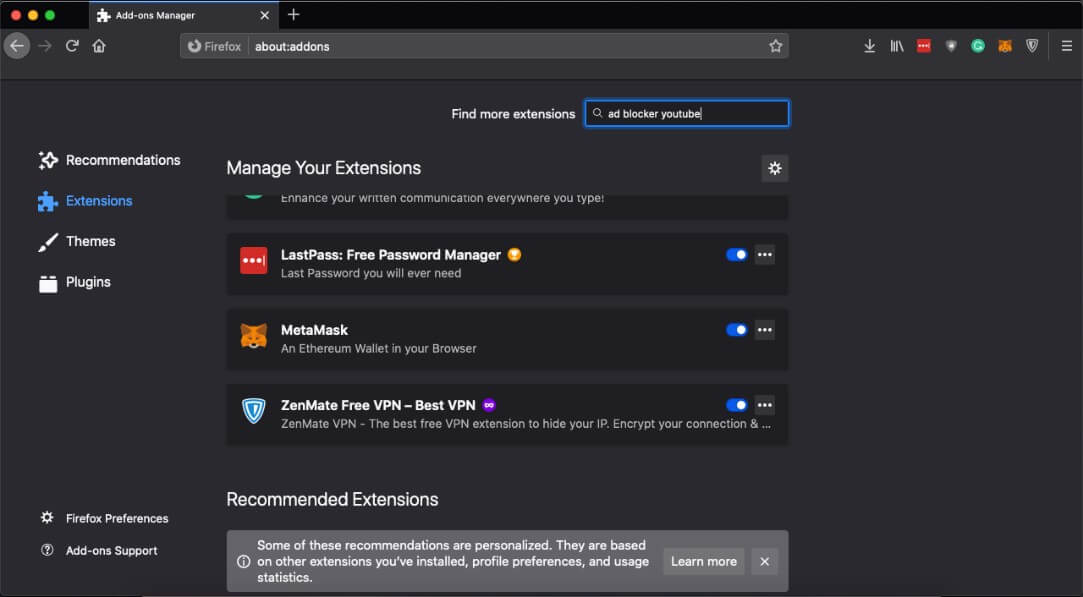
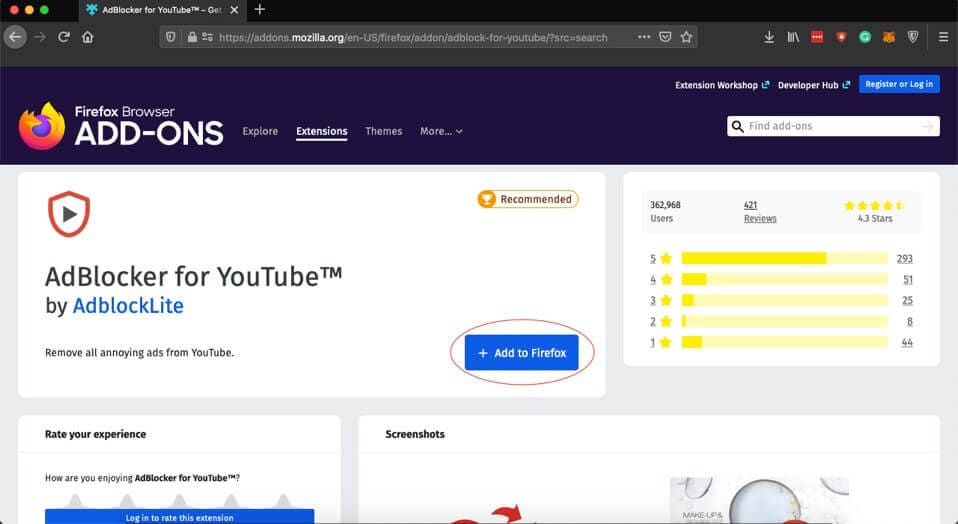
- 3. Select an appropriate ad blocker and it will protect you from the irritating ads.
- 4. Tap the “Add to Firefox” to download the extension.
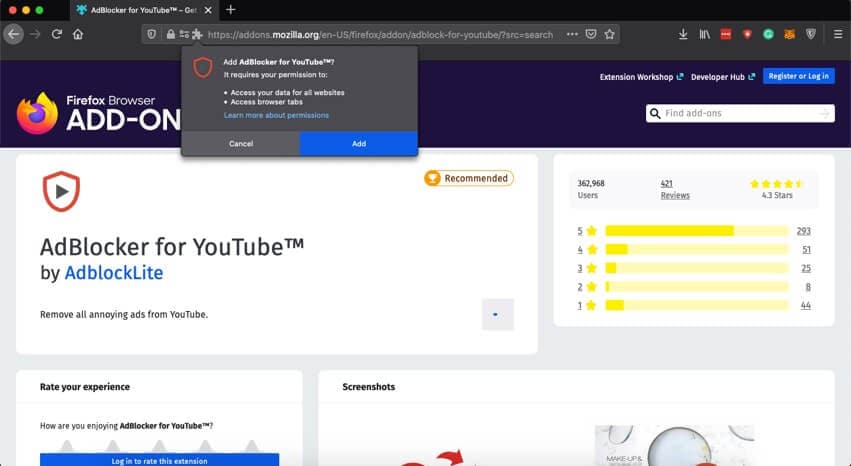
- 5. It will ask for permission, press “Add” again to grant the permissions.
Part 2: How to block YouTube ads on the mobile phone (Android & iPhone)
Ads can cause inconvenience and make YouTube watching a sour experience. To protect yourself from the constant nagging ads on mobile platforms both Android and iPhone you can utilize the numerous ad-blocking apps for Android and iOS. Though the simplest method of blocking the ads and watch YouTube content without ads is to use the Adblock Browser available both for both devices at Google Play Store and Apple Store. This technique won’t require you to root your Android phone or jailbreak the iPhone for watching ad-free YouTube videos.
1.Android
Android is pretty flexible and allows you to add many feature-rich third-party apps. Though there might be other options available to get rid of the irksome YouTube ads, the easiest and single app solution to remove ads is downloading an Adblock browser app that will act as your default browser when you try to want to watch YouTube videos. The steps to set up your Android to block YouTube ads are down here.
- 1. Click Here to install Adblock Browser on your Android device.
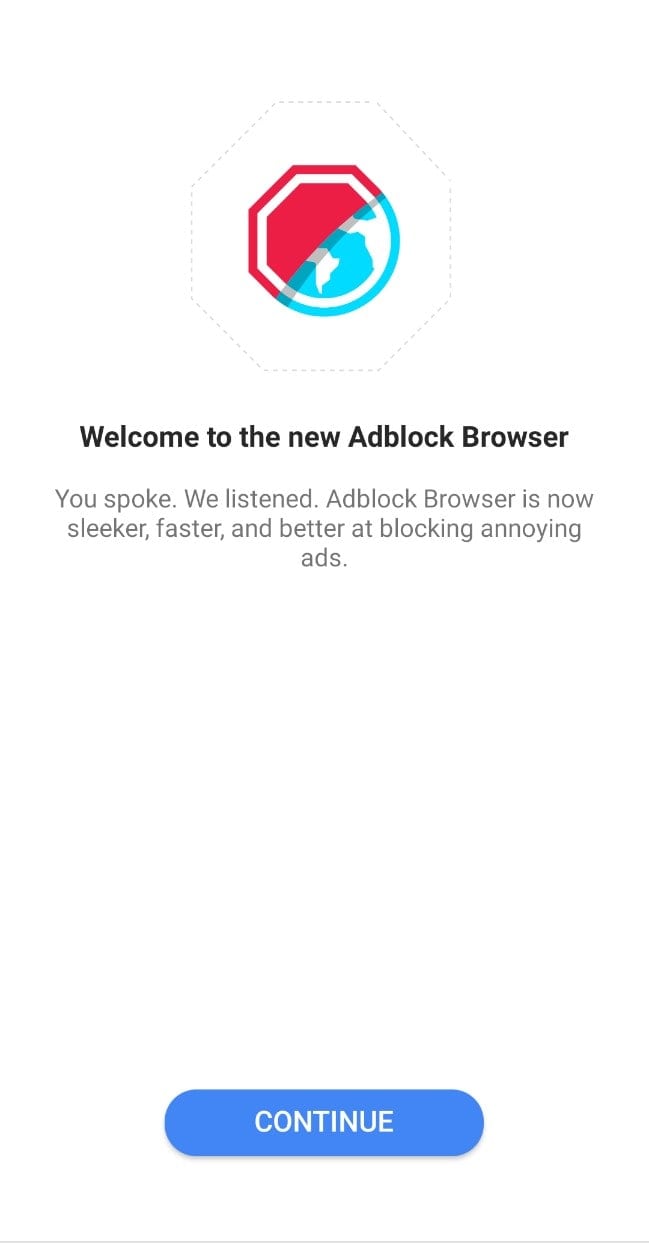
- 2. It is a full-fledged browser and can act as your primary browser for YouTube playback.

- 3. After installing the Adblock Browser your Android device may still try to play videos in the YouTube app.
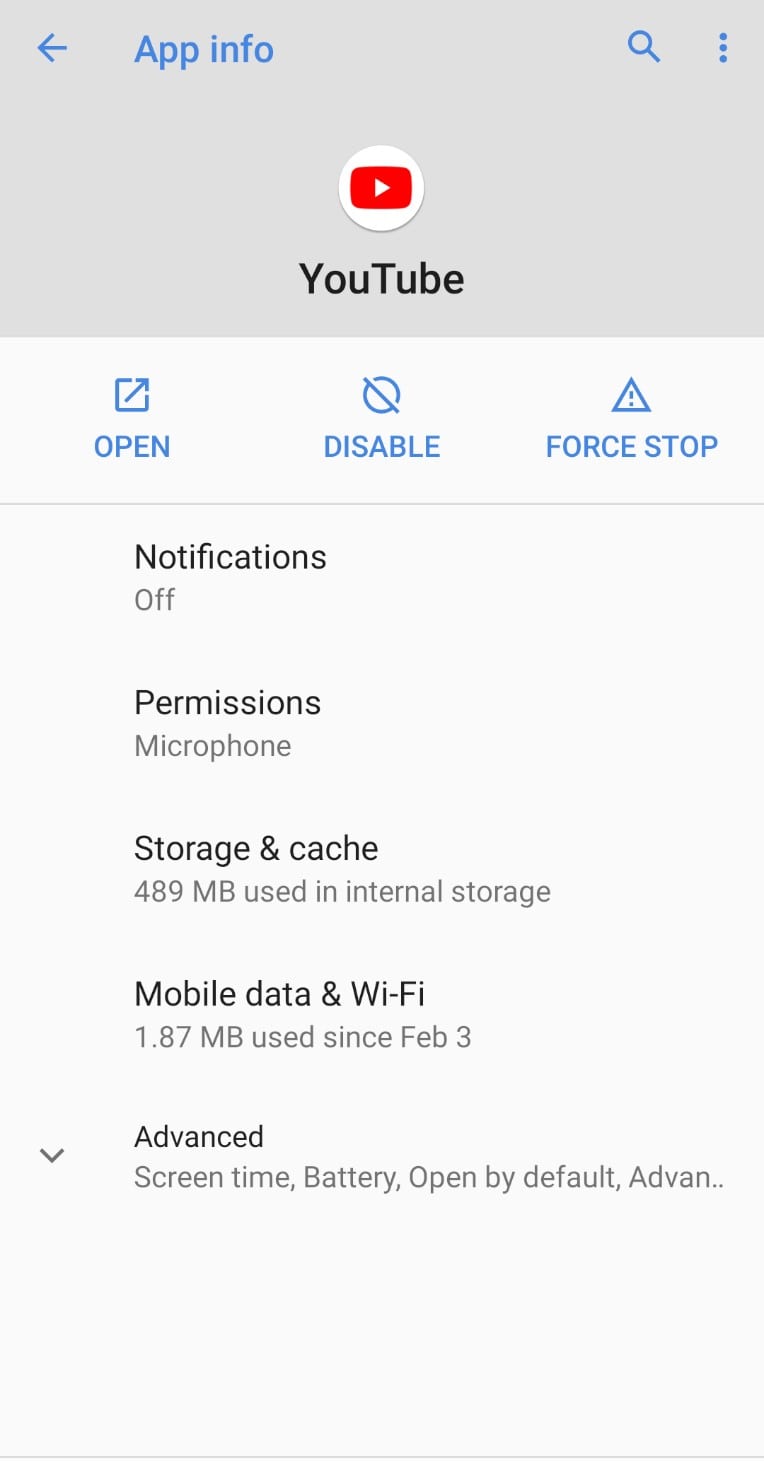
- 4. To current that, open the “Settings” on your Android and go to “Apps & notifications” and press See all. In the apps find YouTube, tap in to see app info.
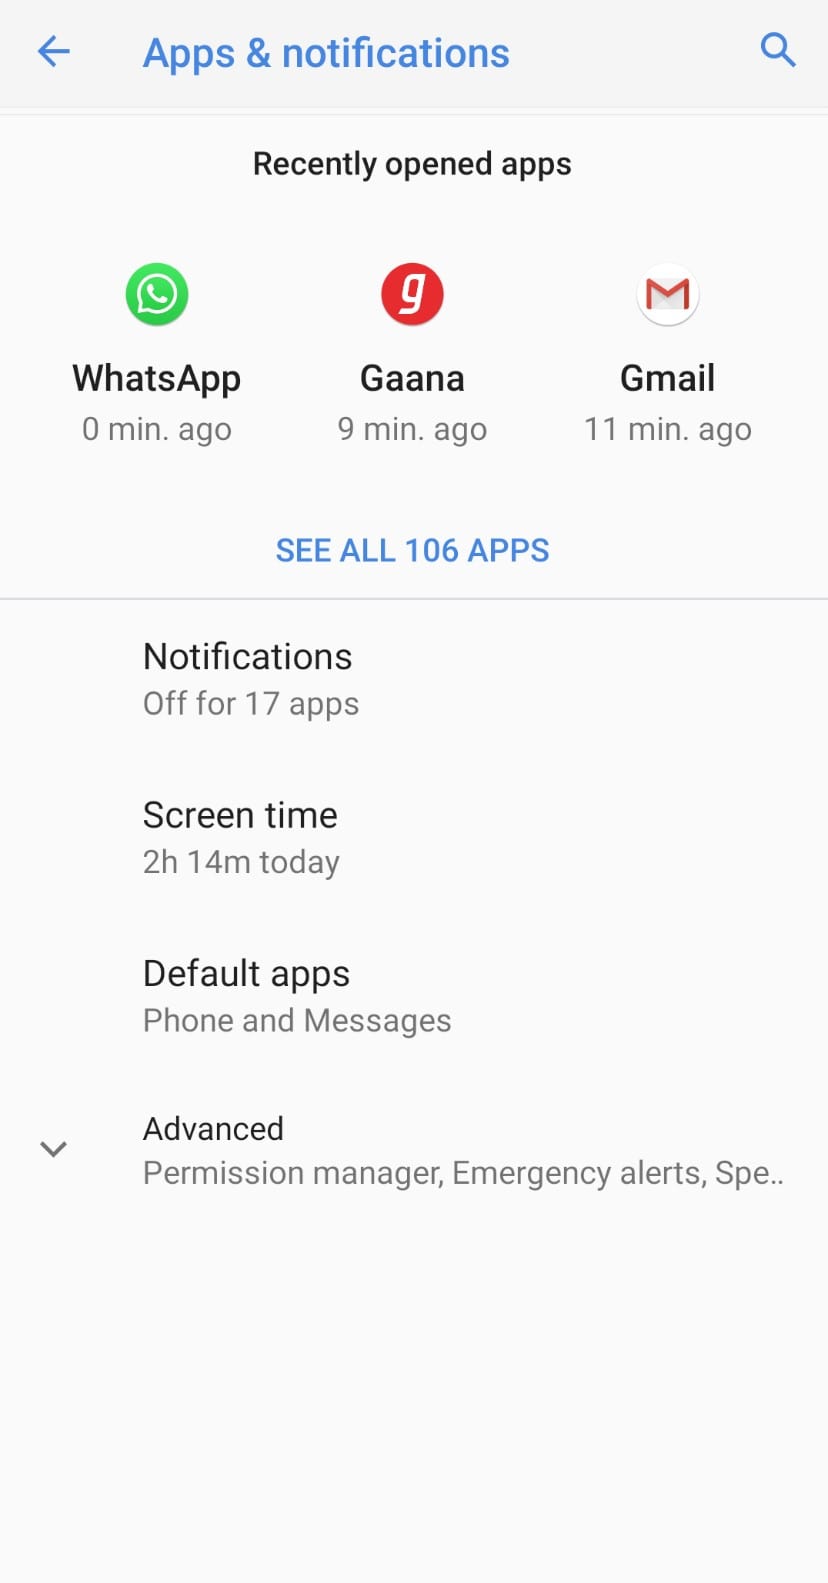
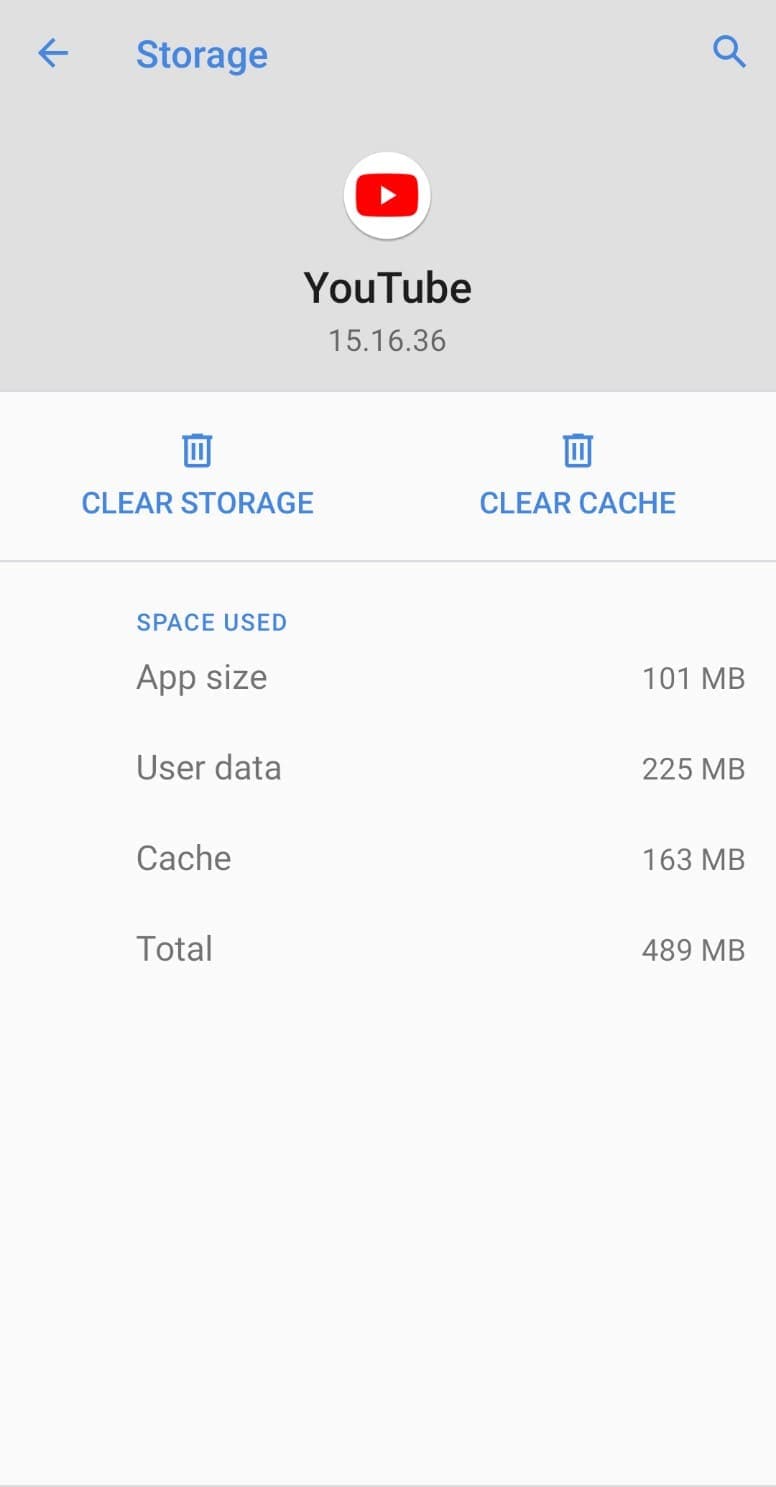
- 5. In the App info screen click “Storage & cache”.
- 6. Tap on “Clear storage”. This will clear all the cache and data of the app from the operating system.
- 7. Now your YouTube videos will be played in the Adblock Browser.
2.iPhone
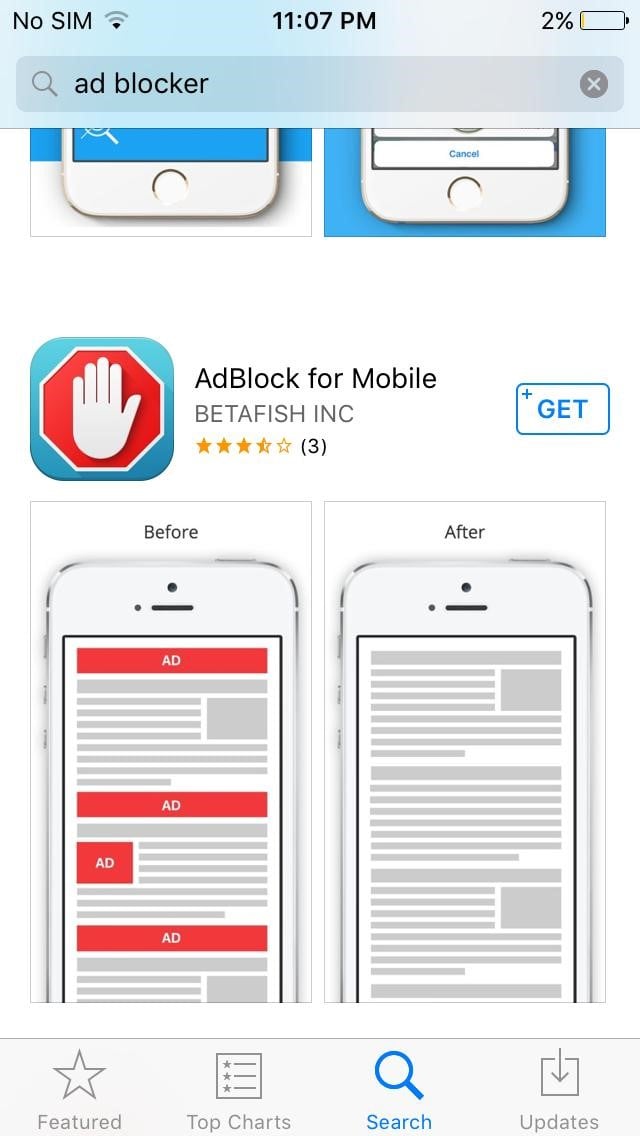
On iOS, you can keep using the default iOS browser and still be able to block YouTube ads in the Safari browser app. You can add third-party ad blocker apps to disable YouTube ads on your iPhone and link it as the Content Blocker in the Safari settings. To activate the ad blocking feature, follow the steps.
- 1. Open Apple Store and download any ad blocker app you like.
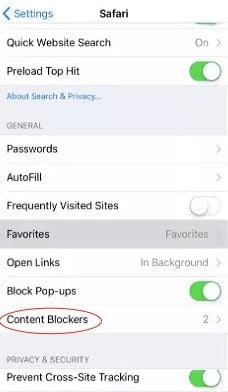
- 2. Now come to the iPhone device Settings and go to Safari.
- 3. In the Safari settings, you will find a “Block Pop-ups” toggle button, activate it.
- 4. Right below the toggle button, you’ll see the “Content Blockers” tap to configure it.
- 5. The ad blocker app you just downloaded will be displaying under Allow these content blockers, enable it with the toggle button.
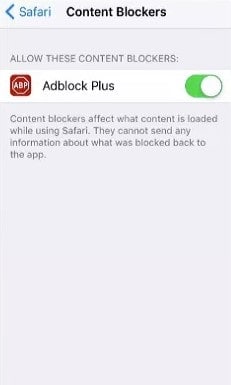
- 6. Now your Safari browser will block all YouTube ads during playback.
Conclusion
Ads can be annoying and time-wasting if you are being forced to watch them every other minute. YouTube is as addictive as its active userbase depict and during that addiction, anyone will not accept an interruption. To do away with the disruptive adds and block YouTube ads on any of your devices from PC to Mac, or mobile devices you need to have an adblocker application that will disable YouTube ads and make your video viewing experience smooth and relishing.
Richard Bennett
Richard Bennett is a writer and a lover of all things video.
Follow @Richard Bennett
Richard Bennett
Mar 27, 2024• Proven solutions
YouTube is unquestionably the world’s most popular video-sharing platform with a massive 2 billion active monthly users. With such a large audience, advertisers are pouring a lot of funds into Google’s video platform that makes up a big portion of the company’s advertising revenue. Unfortunately, according to the BI Intelligence Digital Trust Survey , YouTube serves up the most annoying ads with 43 percent of the respondents considering YouTube ads most irksome.
Every now and then you’ll get annoyed with the obtrusive ads and ask how to block YouTube ads. Getting away with the un-skippable and plagued 30-second ads during the playback or the onscreen pop-up ads that come suddenly on the playing screen will make your life miserable when watching a show or practicing a dance move. To help you escape the forced ads on YouTube we’ll go through the YouTube ad blocking techniques available. You will learn:
- Part 1: How to block YouTube ads on the computer (Chrome & Firefox)
- Part 2: How to block YouTube ads on the mobile phone (Android & iPhone)
Here is the video guide to help you block Youtube ads on the computer and mobile phone
Part 1: How to block YouTube ads on the computer (Chrome & Firefox)
In case you care about and want to support content creators on YouTube, you can buy the YouTube Premium which will also give you access to exclusive shows and will eliminate ads from your YouTube life.
However, as most of us won’t like the idea of paying for a free service, there are possible solutions of how to block YouTube ads in Chrome or Firefox. You will need to install a third-party browser extension proficient in blocking the annoying YouTube ads in Google Chrome or Mozilla Firefox.
1.Google Chrome
Chrome allows you to have extensions to enhance the browser features and interact more with the content presented to you. These third-party extensions or sometimes called Add-ons can help prevent the irritating YouTube ads to show up on the site. To install them, follow the steps.
- 1. Open Google Chrome browser and go to Menu.
- 2. In the Menu look for “More Tools” and in there tap the “Extensions”.
- 3. In the Extensions tap the “Main menu” at the left-hand side. It will show the menu here open the Chrome Web Store. Or you can simply open Chrome Web Store
- 4. You will need to sign in with your Google account if you’re not already signed in.
- 5. In the search box type “ad blocker YouTube” and tap enter. You’ll see a list of ad blockers available for chrome.
- 6. You will adblocker’s specifically for YouTube ads. Select whichever you like and it will block the YouTube ads on Chrome.
2.Mozilla Firefox
You can also install third-party extensions to block YouTube ads from popping up in the middle of the playback. To install the extensions, follow the steps.
- 1. Tap the Hamburger Menu on Firefox at the top-right corner and select Add-ons.
- 2. In the search bar “Find more extensions” type “ad blocker YouTube” and press enter.
- 3. Select an appropriate ad blocker and it will protect you from the irritating ads.
- 4. Tap the “Add to Firefox” to download the extension.
- 5. It will ask for permission, press “Add” again to grant the permissions.
Part 2: How to block YouTube ads on the mobile phone (Android & iPhone)
Ads can cause inconvenience and make YouTube watching a sour experience. To protect yourself from the constant nagging ads on mobile platforms both Android and iPhone you can utilize the numerous ad-blocking apps for Android and iOS. Though the simplest method of blocking the ads and watch YouTube content without ads is to use the Adblock Browser available both for both devices at Google Play Store and Apple Store. This technique won’t require you to root your Android phone or jailbreak the iPhone for watching ad-free YouTube videos.
1.Android
Android is pretty flexible and allows you to add many feature-rich third-party apps. Though there might be other options available to get rid of the irksome YouTube ads, the easiest and single app solution to remove ads is downloading an Adblock browser app that will act as your default browser when you try to want to watch YouTube videos. The steps to set up your Android to block YouTube ads are down here.
- 1. Click Here to install Adblock Browser on your Android device.
- 2. It is a full-fledged browser and can act as your primary browser for YouTube playback.
- 3. After installing the Adblock Browser your Android device may still try to play videos in the YouTube app.
- 4. To current that, open the “Settings” on your Android and go to “Apps & notifications” and press See all. In the apps find YouTube, tap in to see app info.
- 5. In the App info screen click “Storage & cache”.
- 6. Tap on “Clear storage”. This will clear all the cache and data of the app from the operating system.
- 7. Now your YouTube videos will be played in the Adblock Browser.
2.iPhone
On iOS, you can keep using the default iOS browser and still be able to block YouTube ads in the Safari browser app. You can add third-party ad blocker apps to disable YouTube ads on your iPhone and link it as the Content Blocker in the Safari settings. To activate the ad blocking feature, follow the steps.
- 1. Open Apple Store and download any ad blocker app you like.
- 2. Now come to the iPhone device Settings and go to Safari.
- 3. In the Safari settings, you will find a “Block Pop-ups” toggle button, activate it.
- 4. Right below the toggle button, you’ll see the “Content Blockers” tap to configure it.
- 5. The ad blocker app you just downloaded will be displaying under Allow these content blockers, enable it with the toggle button.
- 6. Now your Safari browser will block all YouTube ads during playback.
Conclusion
Ads can be annoying and time-wasting if you are being forced to watch them every other minute. YouTube is as addictive as its active userbase depict and during that addiction, anyone will not accept an interruption. To do away with the disruptive adds and block YouTube ads on any of your devices from PC to Mac, or mobile devices you need to have an adblocker application that will disable YouTube ads and make your video viewing experience smooth and relishing.
Richard Bennett
Richard Bennett is a writer and a lover of all things video.
Follow @Richard Bennett
Efficiency at Fingertips: Swiftly Upload Videos From iPhone/iPad to YouTube
Create High-Quality Video - Wondershare Filmora
An easy and powerful YouTube video editor
Numerous video and audio effects to choose from
Detailed tutorials provided by the official channel
Initially, iOS users had the option to load videos directly to YouTube via the tap-to-upload feature. However, this option is missing in the recent iOS devices versions. Therefore, many users search for possible ways to post a video on YouTube from iPhone. For this, you have to put some considerations into place before moving on. The video title length should not exceed 100 characters, while the description is maintained at 5,000 characters. Also, ensure the video length doesn’t exceed 15 minutes. Let’s roll out the best ways to upload your videos and make that big catch on subscribers.

In this article
01 [ How to upload a video to YouTube from iPhone or iPad](#Part 1)
02 [Why your phone doesn’t post videos to YouTube](#Part 2)
03 [Make your YouTube video better with Filmora](#Part 3)
How to upload a video to YouTube from iPhone or iPad
Are you ready to start on that big adventure and share your videos on YouTube? Follow these steps to learn how to upload a video to YouTube from your iPhone.
Method 1: Upload using the YouTube iOS app
Using the YouTube app is the simplest way to upload your YouTube videos. The YouTube app should be installed on your iOS device.
Step 1. Launch the YouTube app on your device, then sign in to your account. If you don’t have an account yet, you will need to “Sign up” for a new one before continuing the upload process.
Step 2. Click on the “+” icon found at the bottom of the screen.
Step 3. Then choose the “Upload a video” option from the populated list of options.
Step 4. Check out the pop-up that appears and “Allow access” to it.
Step 5. Edit your video to your preference by trimming or cropping as you desire. Then click on the “Next” option.

Step 6. Add “title and description” to your video. Remember, the title should contain less than 100 characters and the description no more than 500 characters.
Step 7. Then set the visibility mode as “Public” to enable you to share your video over the internet.
Step 8. Click on the “Upload” button to finally upload your video to YouTube.

Method 2: Upload using Photo App
The Photo App has a “Share” option that you can use to upload your videos to YouTube. Here is the guide.
Step 1. Go to your iOS device and tap on the “Photos” app.
Step 2. Then tap on the “Videos Folder” to locate the video you wish to upload to YouTube.

Step 3. Next, tap on the video that you want to upload.
Step 4. Then tap on the “Share” icon located at the bottom left of your iOS device screen.
Step 5. You’ll then access a “Share” menu from where you have various share options for your video.
Step 6. Choose the “YouTube” option to continue to share your video there. At this juncture, ensure you have logged in to your Google Account.

Step 7. You need to provide a “Title” and “Description” of your video. Then go to the “Privacy” Options and make your video “Public.”
Step 8. Finally, tap on the “Publish” tab found at the top-right corner of your screen to make your video viewable by the public.

Method 3: Upload video to YouTube using Safari
Safari is another alternative method to upload a video to YouTube.
Step 1. First, go to “youtube.com” on Safari and sign in.

Step 2. Then tap on the “account” icon at the top right side of the screen.
Step 3. Hit on the “Upload” icon and wait to be redirected to the YouTube Studio desktop site.
Step 4. Click on the “Select Files” option.
Step 5. Choose the video you wish to add to YouTube from the “Photo” library and tap on the “Add” button.

Step 6. Add your video’s “title and description” and hit the “Next” button.
Step 7. Tap on the “Next” button once more to go to the “Visibility” page.
Step 8. Select the “Public” option to upload your video to the public.
Why your phone doesn’t post videos to YouTube
Despite learning how to upload to YouTube from iPhone, you may be perplexed to realize that your phone refuses to post videos to YouTube. What could be the reason?
1) YouTube issues
In most cases, the problem doesn’t arise from your phone but from YouTube. This streaming app may also experience some hitches along the way. Remember that even if your phone sync with your YouTube account to upload videos from the “Camera Roll,” YouTube isn’t managed from the Camera Roll but the YouTube app directly. You can solve the issue by signing out of your YouTube account and signing back in.
2) Connection Strength
Some videos may appear quite large and cause a time-out during the upload process. Check your Wi-Fi or internet connection strength to determine if it needs a boost or wait until the streaming strength is strong for a quick upload. Test your internet speed by searching “internet test speed” on Google. Then click the “Run Speed Test” in the search box. A window will open and give you an estimate of the Mbps that your connection is operating at. If too low, switch to other alternatives.
3) Verify your YouTube account
Verifying your account will help you to enjoy YouTube’s full features. It’s then that you’ll manage to upload videos without any drawbacks. Also, that’s when you’ll manage to upload longer videos that go beyond the 15-minute duration.
4) Pay attention to the video size
There is a limit for videos to post to YouTube. If it is too large or long, the upload will cancel before completion.
5) Be patient
YouTube can save your partial upload for 24 hours. So, you can continue to upload from where you left. Learn to be patient as there could be a surge of user traffic, especially during evenings.
Make your YouTube video better with Filmora
Good video quality will make you go miles ahead of your marketing gig. You can use Filmora mobile application to make your videos look better before uploading them to YouTube. This intuitive video editing app has advanced features and several ways to compose creative videos.
- Stunning video effects that let you add animated text to video
- Easily record your voice-overs with its perfect sound effects
- Split functionality that allows you to slice your video footage into two or more separate video clips
- Playback your clips in reverse and adjust the speed for fast or slow motion
- Select the best aspect ratio for your video
- Advanced camera to create emoji selfies and other video beautification
- Directly share your videos to social media sites like YouTube and Facebook.
Check out the steps to edit your video with Filmora on your iOS device
Step 1. Download and install Filmora
For iOS devices, go to the “Apple Store” to download and install the app. Also, allow it to access your videos, camera, and pictures in the process.
Step 2. Import video
You may already have a video in your library that you wish to upload to YouTube. Nonetheless, you can shoot a video afresh to add. To shoot one, you need to settle on a topic before recording and downloading other images you may need. Ensure you watch what you are filming and use adequate lighting during the shooting process.
Next, begin to import your video file. Just open the application and select the “Create new video” option. Then choose the “Video” icon and select a folder that contains the video to be added. Hit the “Add” button from the bottom right corner.
Step 3. Edit video
Filmora has several editing features to make your video better. Use the “Edit tools” feature to turn your video into an impeccable piece. Easily add filters, adjust the speed, or create subtitles, among other functions. You can also split, trim, or delete the unwanted clip parts.
It is important to add a title and description to your video. Just use the “Titles” button to add the title. Other precepts that you can add include transitions, sound like voice-over,
Step 4. Export and share
You’ve just finished creating and editing your video. Click on the “Save” tab and let the application export your video. Then select the “Save to Camera Roll” option to save the video to your iPhone. Finally, you can upload and share the video directly to your YouTube account.
Conclusion
● However, it appears to be a difficult task; you must have found relief after going through these procedures. You don’t need prior knowledge on how to upload a video to YouTube from your iPhone. Several options are at your disposal. You can use the Safari, YouTube app, or the Photo app to upload your videos. The better part is that you can create top-notch videos with Filmora. This mobile video editing app has a lot to offer, ensuring quality content.
Initially, iOS users had the option to load videos directly to YouTube via the tap-to-upload feature. However, this option is missing in the recent iOS devices versions. Therefore, many users search for possible ways to post a video on YouTube from iPhone. For this, you have to put some considerations into place before moving on. The video title length should not exceed 100 characters, while the description is maintained at 5,000 characters. Also, ensure the video length doesn’t exceed 15 minutes. Let’s roll out the best ways to upload your videos and make that big catch on subscribers.
In this article
01 [ How to upload a video to YouTube from iPhone or iPad](#Part 1)
02 [Why your phone doesn’t post videos to YouTube](#Part 2)
03 [Make your YouTube video better with Filmora](#Part 3)
How to upload a video to YouTube from iPhone or iPad
Are you ready to start on that big adventure and share your videos on YouTube? Follow these steps to learn how to upload a video to YouTube from your iPhone.
Method 1: Upload using the YouTube iOS app
Using the YouTube app is the simplest way to upload your YouTube videos. The YouTube app should be installed on your iOS device.
Step 1. Launch the YouTube app on your device, then sign in to your account. If you don’t have an account yet, you will need to “Sign up” for a new one before continuing the upload process.
Step 2. Click on the “+” icon found at the bottom of the screen.
Step 3. Then choose the “Upload a video” option from the populated list of options.
Step 4. Check out the pop-up that appears and “Allow access” to it.
Step 5. Edit your video to your preference by trimming or cropping as you desire. Then click on the “Next” option.
Step 6. Add “title and description” to your video. Remember, the title should contain less than 100 characters and the description no more than 500 characters.
Step 7. Then set the visibility mode as “Public” to enable you to share your video over the internet.
Step 8. Click on the “Upload” button to finally upload your video to YouTube.
Method 2: Upload using Photo App
The Photo App has a “Share” option that you can use to upload your videos to YouTube. Here is the guide.
Step 1. Go to your iOS device and tap on the “Photos” app.
Step 2. Then tap on the “Videos Folder” to locate the video you wish to upload to YouTube.
Step 3. Next, tap on the video that you want to upload.
Step 4. Then tap on the “Share” icon located at the bottom left of your iOS device screen.
Step 5. You’ll then access a “Share” menu from where you have various share options for your video.
Step 6. Choose the “YouTube” option to continue to share your video there. At this juncture, ensure you have logged in to your Google Account.
Step 7. You need to provide a “Title” and “Description” of your video. Then go to the “Privacy” Options and make your video “Public.”
Step 8. Finally, tap on the “Publish” tab found at the top-right corner of your screen to make your video viewable by the public.
Method 3: Upload video to YouTube using Safari
Safari is another alternative method to upload a video to YouTube.
Step 1. First, go to “youtube.com” on Safari and sign in.
Step 2. Then tap on the “account” icon at the top right side of the screen.
Step 3. Hit on the “Upload” icon and wait to be redirected to the YouTube Studio desktop site.
Step 4. Click on the “Select Files” option.
Step 5. Choose the video you wish to add to YouTube from the “Photo” library and tap on the “Add” button.
Step 6. Add your video’s “title and description” and hit the “Next” button.
Step 7. Tap on the “Next” button once more to go to the “Visibility” page.
Step 8. Select the “Public” option to upload your video to the public.
Why your phone doesn’t post videos to YouTube
Despite learning how to upload to YouTube from iPhone, you may be perplexed to realize that your phone refuses to post videos to YouTube. What could be the reason?
1) YouTube issues
In most cases, the problem doesn’t arise from your phone but from YouTube. This streaming app may also experience some hitches along the way. Remember that even if your phone sync with your YouTube account to upload videos from the “Camera Roll,” YouTube isn’t managed from the Camera Roll but the YouTube app directly. You can solve the issue by signing out of your YouTube account and signing back in.
2) Connection Strength
Some videos may appear quite large and cause a time-out during the upload process. Check your Wi-Fi or internet connection strength to determine if it needs a boost or wait until the streaming strength is strong for a quick upload. Test your internet speed by searching “internet test speed” on Google. Then click the “Run Speed Test” in the search box. A window will open and give you an estimate of the Mbps that your connection is operating at. If too low, switch to other alternatives.
3) Verify your YouTube account
Verifying your account will help you to enjoy YouTube’s full features. It’s then that you’ll manage to upload videos without any drawbacks. Also, that’s when you’ll manage to upload longer videos that go beyond the 15-minute duration.
4) Pay attention to the video size
There is a limit for videos to post to YouTube. If it is too large or long, the upload will cancel before completion.
5) Be patient
YouTube can save your partial upload for 24 hours. So, you can continue to upload from where you left. Learn to be patient as there could be a surge of user traffic, especially during evenings.
Make your YouTube video better with Filmora
Good video quality will make you go miles ahead of your marketing gig. You can use Filmora mobile application to make your videos look better before uploading them to YouTube. This intuitive video editing app has advanced features and several ways to compose creative videos.
- Stunning video effects that let you add animated text to video
- Easily record your voice-overs with its perfect sound effects
- Split functionality that allows you to slice your video footage into two or more separate video clips
- Playback your clips in reverse and adjust the speed for fast or slow motion
- Select the best aspect ratio for your video
- Advanced camera to create emoji selfies and other video beautification
- Directly share your videos to social media sites like YouTube and Facebook.
Check out the steps to edit your video with Filmora on your iOS device
Step 1. Download and install Filmora
For iOS devices, go to the “Apple Store” to download and install the app. Also, allow it to access your videos, camera, and pictures in the process.
Step 2. Import video
You may already have a video in your library that you wish to upload to YouTube. Nonetheless, you can shoot a video afresh to add. To shoot one, you need to settle on a topic before recording and downloading other images you may need. Ensure you watch what you are filming and use adequate lighting during the shooting process.
Next, begin to import your video file. Just open the application and select the “Create new video” option. Then choose the “Video” icon and select a folder that contains the video to be added. Hit the “Add” button from the bottom right corner.
Step 3. Edit video
Filmora has several editing features to make your video better. Use the “Edit tools” feature to turn your video into an impeccable piece. Easily add filters, adjust the speed, or create subtitles, among other functions. You can also split, trim, or delete the unwanted clip parts.
It is important to add a title and description to your video. Just use the “Titles” button to add the title. Other precepts that you can add include transitions, sound like voice-over,
Step 4. Export and share
You’ve just finished creating and editing your video. Click on the “Save” tab and let the application export your video. Then select the “Save to Camera Roll” option to save the video to your iPhone. Finally, you can upload and share the video directly to your YouTube account.
Conclusion
● However, it appears to be a difficult task; you must have found relief after going through these procedures. You don’t need prior knowledge on how to upload a video to YouTube from your iPhone. Several options are at your disposal. You can use the Safari, YouTube app, or the Photo app to upload your videos. The better part is that you can create top-notch videos with Filmora. This mobile video editing app has a lot to offer, ensuring quality content.
Also read:
- Can Affordable View Count Gains Be Achieved Naturally for 2024
- 8 Premium Complimentary Streaming Media Processors
- In 2024, DIY Tripods| How to Stabilize Your Camera without Buying a Tripod
- YouTube Legality Taking Content Offline
- [New] Ensuring Profit Tracking on Your Channel
- [New] A Comprehensive Look at YouTube's AdSense Mechanisms
- Transform Your Unboxing Videos with These Tips
- In 2024, Enhance Smarts with These Premier 15 Science YTs
- [New] Avoid Boredom Learn to Shuffle YouTube Lists
- Incorporating YouTube's Video Content on Your Domain
- Economic Elders YouTube's Most Knowledgeable Financial Stations
- Online Platforms Embedding Video Playlists From YouTube
- [Updated] Crafting a Content Schedule The Path to Gaining Traction on YouTube
- [Updated] Effortless Audio Blending Into YouTube Clips Using Editors
- [New] Backwards Viewing A New Lens for Analyzing YouTube Content
- [New] Igniting the Lights The Procedure for Starting a TikTok Broadcast From Computer for 2024
- How to Bypass iCloud Lock from Apple iPhone 6 Plus
- How to Unlock Apple iPhone SE (2022) Passcode without iTunes without Knowing Passcode?
- In 2024, Does Life360 Notify When You Log Out On Honor 90 GT? | Dr.fone
- In 2024, How can I get more stardust in pokemon go On Nokia C32? | Dr.fone
- 2024 Approved Optimizing Visual Content Adding Black Bar & Box to Facebook Videos
- [Updated] 2024 Approved Virtual Stage War Is Likee Poised to Overtake TikTok?
- A Step-by-Step Guide on Using ADB and Fastboot to Remove FRP Lock on your Lava Blaze 2 Pro
- 2024 Approved How to Record Films Seamlessly Across Tech Devices
- Build High-Impact Facebook Ad Videos - FREE Creation Kit Provides Tools for 2024
- How To Translate Video From Japanese to English Online, In 2024
- Title: "Streamlining Your YouTube Views A Guide to Blocking Advertisements"
- Author: Brian
- Created at : 2024-05-25 12:53:00
- Updated at : 2024-05-26 12:53:00
- Link: https://youtube-video-recordings.techidaily.com/streamlining-your-youtube-views-a-guide-to-blocking-advertisements/
- License: This work is licensed under CC BY-NC-SA 4.0.
