
:max_bytes(150000):strip_icc()/Google-IO-narrow-5f29c4777cf94e1291f3921f22964aed.jpg)
"Stream Video Smoothly Save PC/Mac Screens to YouTube"
Stream Video Smoothly: Save PC/Mac Screens to YouTube
10 Record Screen and Upload to YouTube Tools [PC, Mac, Online]

Richard Bennett
Mar 27, 2024• Proven solutions
Recording the screen, including the audio, can help you introduce your gaming flow, show how to perform a task on the computer, or create a presentation. You can also upload the screen record to YouTube for free. There are several solutions if you want to record your screen and upload it to YouTube. You can record the screen with some screen recording software on your Mac or your Windows PC or with some online screen recording software or the screen recording feature built-in YouTube itself. In this article, we will show you how to to record screens and upload to YouTube on Windows and Mac with some screen recorders , some of which are free to use, or freemium, which are built in your computer. Check it out now.
- Part 1: Record Screen and Upload to YouTube Directly on PC
- Part 2: Record Screen and Upload to YouTube Online
- Part 3: Record Screen and Upload it to YouTube on Mac
Recommended YouTube Screen Recorders to Record Screen and Upload to YouTube Directly [Windows & Mac]
The following YouTube screen recording software can be used on both Windows and Mac computers. You can record the entire screen or a particular portion of the screen, record your own voiceover or add music to the recorded video and then upload it to YouTube directly.
Using Wondershare Filmora
Filmora is an easy-to-use yet powerful enough video editing software which features the Recording tools. Using Filmora, you can record the desktop screen , audio and webcam simultaneously. But compared with Filmora, the highest frame rates that Filmora can capture at 1 second is 60FPS.

Launch Wondershare Filmora and choose Full Feature mode to begin a project. Go to the Record tab and choose Record PC Screen. There are three types of screen recording to choose from – Target Window, Full Screen and Custom. You can also choose to record computer system audio or record from microphone. Click the icons to turn them off or on accordingly. Click Settings to see if there’s anything you need to adjust before recording.
 Download Mac Version ](https://tools.techidaily.com/wondershare/filmora/download/ )
The recorded footage will be loaded to the Media panel directly, you can then cut out imperfect frames, add some texts and titles, or apply transitions and filters to it. To upload the recorded screen video, click the Export in the main interface, and then switch to YouTube tab in the Export window.

Sign in your YouTube account and complete the video info accordingly and then click the Export button to upload the recorded video to YouTube directly.
If you are looking for more screen recorders which can run on Windows, Mac, Linux, Android, iOS or online for different purposes, you can check our picks of the best screen recorders for all platforms based on different purposes.
Part 1: How to Record Screen on Windows PC and Upload to YouTube Directly
1. Bandicam
To record screen using Bandicam, select “Screen Recording” and a green-edged rectangle window will appear. Adjust the rectangle window on the video then play the video.
Clicking the REC button will change the green-edged line of the rectangle window to red. Click the stop button to stop recording. To watch the recorded video, go to the “General” tab and click “Open.”
You can also upload your desired videos to YouTube from Bandicam by clicking the “Upload” button found under Bandicam’s “Output” tab.

2. Using Microsoft Expression Encoder 4
You can download Microsoft Expression Encoder 4 to record the screen of your device and upload it to YouTube. The software has a screen capture tool and encoder. Install the software as you would usually do. There’ll be 2 shortcuts in the start menu – Microsoft Expression Encoder 4 Screen Capture (used to capture the screen) and Microsoft Expression Encoder 4 (converts the screen into a video that can be uploaded to YouTube).
3. Using Ezvid
Ezvid can record screen and audio simultaneously. It can also capture the whole area of the screen, making it perfect for tutorial videos. Ezvid also has speech synthesis that translates text captions into artificial human language, so it can easily produce human sound with only a click of a button.
4. Using Smartpixel
Smartpixel is a screen recorder for Android and Windows. It has a user-friendly interface and different editing as well as recording functions. Smartpixel can export various video formats such as 3gp, MP4, wmv, avi and flv. It also allows you to upload videos to different online platforms like GoPlay and YouTube.
Part 2: How to Record Screen Online
1. Using YouTube
You can now also record desktop screen with the features in YouTube. To start recording the screen using YouTube, you just need to sign-in to the website using your Google Account. Click “Creator Studio”. Go to Live Streaming and choose “Events”. You’ll be directed to the “Create Event” page. Provide the title for your screencast video, set the video’s privacy to either Private or Unlisted.
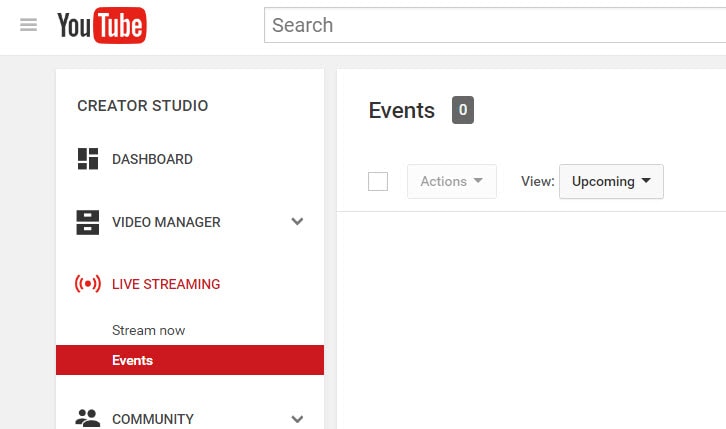
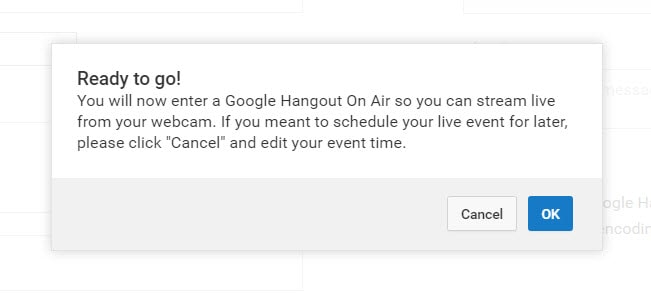
Click “Go Live Now” The Hangouts on Air page will open. Start the webcam from recording by clicking the camera icon. If you don’t want to record audio, you can just click the microphone icon.
Click “Screenshare” and choose a desktop window that you want to record for the screencast. Click “Start Screenshare” to share the screen then click the “Start Broadcast” button to begin recording the screen. When you’re done recording, just “Stop Broadcast” and go to the YouTube website. The new screencast video is stored in your YouTube video dashboard. You can share the video or download it to your Google Drive.
For more details, you can check How to record YouTube videos . If you’re looking for more online screen recorders for YouTube, you can check our picks of the 10 Best Free Online Screen Recorders .
2. Using FlexClip - Free Online Screen Recorder
FlexClip is a complete bundle of creativity. Why so? It is because it’s a web-based tool that helps you with image and video editing and post-production. It also offers a free online screen recording option.
FlexClip lets you record your webcam, screen, and audio with a simple click. Contrarily, you can also record simultaneous screens without a hitch! It can record almost anything that is being displayed on your computer screen. So be it gameplays, seminars, courses, presentations, or anything, you can always use this program to save your recording.
And once you’re done capturing the screen, FlexClip also allows you to edit your recording. You can add subtitles, highlights, overlays, and annotations to increase your video’s worth. So no wonder why FlexClip is one of the leading web-based software for free online screen capturing, especially if you want to make great YouTube videos.
The recording process is easy. All you need to do is visit the website and click the “Start Recording” button.
Then, choose your layout to start recording the screen and audio. When you’re finished, just hit the “Stop” button to end recording to edit the video in FlexClip’s built-in video editor. Lastly, download the screencast to upload it to your YouTube channel.
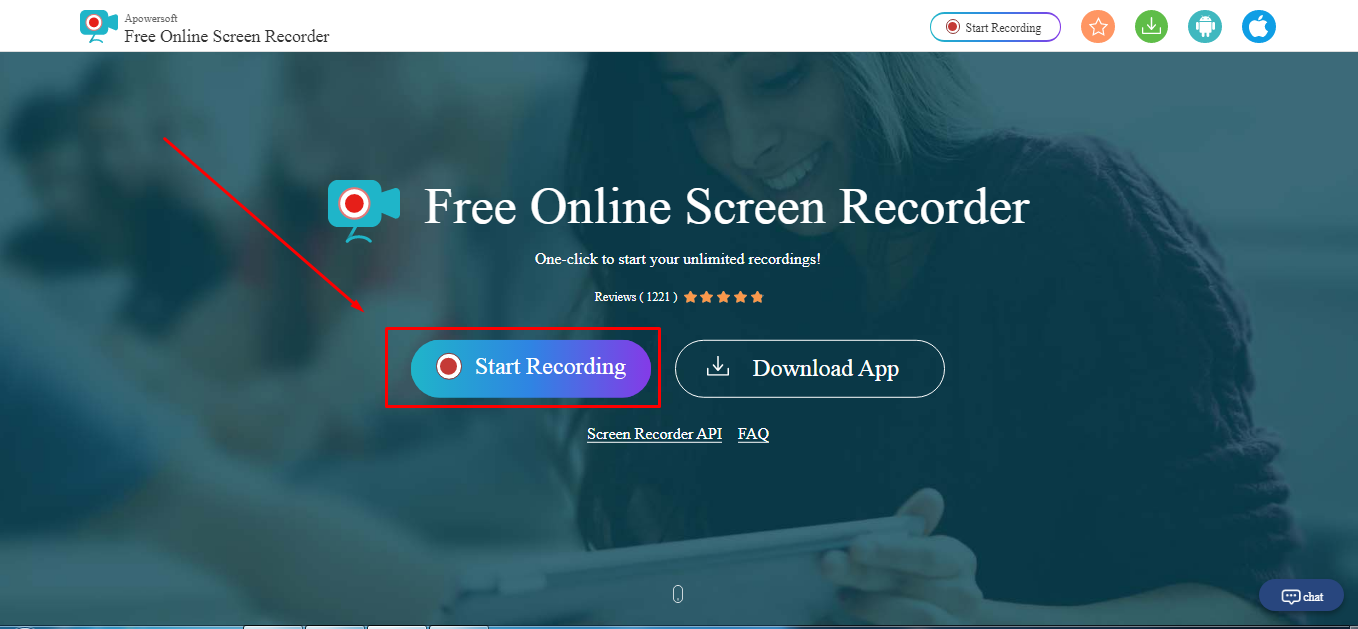
3. Using Apowersoft - Online Screen Recorder (Free)
Apowersoft is a renowned company that creates digital products, including file compressors, watermark removers, and more. Since there’s a growing demand for screen recorders for YouTube, the Apowersoft creators have also launched a “Free Online Screen Recorder.” Yup! You’re reading the right name.
Apowersoft – Free Online Screen Recorder eases the screen recording process. While it’s an online tool, you can also download the app on your Mac or Windows OS.
It’s a free program with simple features, such as a screen and webcam recording with audio. So if your YouTube content doesn’t require overlays, subtitles, or other editing stuff, this software is ideal due to its simplicity.
You can click the “Start Recording” button to get started.
.
Then, select the screen you wish to record, and save the captured screen to your local disk or cloud so you can upload the videos later to your YouTube channel.
Part 3: How to Record Screen for YouTube with Free Screen Recorder on Mac
1. Using QuickTime Player
QuickTime Player can be used to record movies from your camera or the screen of your iPad, iPod touch or iPhone. It can also record your Mac’s screen or record audio from your microphone. To record the screen of your Pad, iPod touch or iPhone, you should use the movie-recording function. You can use it to record the screen for YouTube video, or you can also record the YouTube video and empower it with your creativity.
For more details of using QuickTime Player to record YouTube videos, check our guide: How to record videos with Quicktime.
2. Using Screen Flow
Screen Flow is our second pick for Mac. Although it’s paid software, you can still enjoy the blessings of this screen recorder through the trial version. It’s a very handy tool that allows Mac screen recording and all iOS devices, such as iPhones and iPad.
Okay! So what’s good about screen flow? Let’s uncover. Firstly, it’s an editor + screen recorder specifically made for YouTube. You can capture the screen and edit the footage before uploading it to your channel.
Secondly, this software allows you to record simultaneous screens and your webcam. Plus, you can also record your voice through its mic recording option.
Another great thing about Screen Flow is that it has numerous video filters and a customizable title library. It also permits you to save screen recordings on your Mac or directly share them to your YouTube channel, other social media accounts, websites, or cloud storage in a few clicks.
Here’s a video to help you get started with screen recording on your Mac using Screen Flow:
3. Using Vmaker
Vmaker is another authentic software to record screens for your YouTube videos. It’s a free program, but you can buy premium versions to unlock more features.
The tool is trusted by many software review websites, such as “crozdesk.” It is available on both Mac and Windows OS. However, it seems like this software performs well on Mac operating systems.
Vmaker allows you to record your screen, your favorite YouTube videos, and the audio – all together! You can record the entire Mac screen or a specific portion in HD quality. Moreover, the software allows you to pick resolutions up to 4K to record the media.
This program also offers editing features like adding subtitles, music, flip, blur, trim, and more to create an awesome video. All videos are saved to your cloud workspace once you finish recording. Then, you can share the recorded video screens on your YouTube.
The tool is ideal for making tutorials, courses, demos, and product review videos. All you need to do is download Vmaker on your Mac. Choose a webcam, screen, or both with audio for recording. Start recording in the highest quality. Edit your video and share it on your YouTube channel.
Conclusion
Above are some screen recorders that you can use to record YouTube videos or record the screen and webcam simultaneously to make a video and upload it it to YouTube. If you want to record a screen video and edit it further, you should try Wondershare Filmora video editor.
Download Mac Version ](https://tools.techidaily.com/wondershare/filmora/download/ )
FAQs
Q1. How do you record your screen on a Mac for YouTube?
There are some great tools for screen recording on Mac for YouTube. The most loved and enjoyed program is Filmora by Wondershare. It’s a professional tool for screen recording and video editing. Most importantly, it has a user-friendly interface and records your screen in high quality.
Another option is the Quick Time Player. This program also allows screen recording. Likewise, Screen Flow is also a great program for screen capturing for YouTube on Mac.
Q2. Can I screen-record and upload it to YouTube?
There are two ways to do it. First, you can download the free or paid screen recording software on your Windows or macOS. Second, you can look for online screen recorders like FlexClip or the built-in YouTube recorder and directly share the recorded video to your channel.
Some tools, like Apowersoft and Vmaker, save screen recordings to the cloud or local disk. And there’s no direct sharing of the recorded screens to your YouTube channel. So if you’re using such programs, you will need to sign in to your YouTube channel and upload the file from your computer hard drive.
Q3. How do I record my computer screen for 2022?
Some of the greatest video editing and screen recording tools like Filmora, Bandicam, and FlexClip allow you to record your computer screen. Depending on the software, you can directly share the video to your YouTube channel. Or, save the video on your computer and then upload it on your channel.
Richard Bennett
Richard Bennett is a writer and a lover of all things video.
Follow @Richard Bennett
Richard Bennett
Mar 27, 2024• Proven solutions
Recording the screen, including the audio, can help you introduce your gaming flow, show how to perform a task on the computer, or create a presentation. You can also upload the screen record to YouTube for free. There are several solutions if you want to record your screen and upload it to YouTube. You can record the screen with some screen recording software on your Mac or your Windows PC or with some online screen recording software or the screen recording feature built-in YouTube itself. In this article, we will show you how to to record screens and upload to YouTube on Windows and Mac with some screen recorders , some of which are free to use, or freemium, which are built in your computer. Check it out now.
- Part 1: Record Screen and Upload to YouTube Directly on PC
- Part 2: Record Screen and Upload to YouTube Online
- Part 3: Record Screen and Upload it to YouTube on Mac
Recommended YouTube Screen Recorders to Record Screen and Upload to YouTube Directly [Windows & Mac]
The following YouTube screen recording software can be used on both Windows and Mac computers. You can record the entire screen or a particular portion of the screen, record your own voiceover or add music to the recorded video and then upload it to YouTube directly.
Using Wondershare Filmora
Filmora is an easy-to-use yet powerful enough video editing software which features the Recording tools. Using Filmora, you can record the desktop screen , audio and webcam simultaneously. But compared with Filmora, the highest frame rates that Filmora can capture at 1 second is 60FPS.
Launch Wondershare Filmora and choose Full Feature mode to begin a project. Go to the Record tab and choose Record PC Screen. There are three types of screen recording to choose from – Target Window, Full Screen and Custom. You can also choose to record computer system audio or record from microphone. Click the icons to turn them off or on accordingly. Click Settings to see if there’s anything you need to adjust before recording.
Download Mac Version ](https://tools.techidaily.com/wondershare/filmora/download/ )
The recorded footage will be loaded to the Media panel directly, you can then cut out imperfect frames, add some texts and titles, or apply transitions and filters to it. To upload the recorded screen video, click the Export in the main interface, and then switch to YouTube tab in the Export window.
Sign in your YouTube account and complete the video info accordingly and then click the Export button to upload the recorded video to YouTube directly.
If you are looking for more screen recorders which can run on Windows, Mac, Linux, Android, iOS or online for different purposes, you can check our picks of the best screen recorders for all platforms based on different purposes.
Part 1: How to Record Screen on Windows PC and Upload to YouTube Directly
1. Bandicam
To record screen using Bandicam, select “Screen Recording” and a green-edged rectangle window will appear. Adjust the rectangle window on the video then play the video.
Clicking the REC button will change the green-edged line of the rectangle window to red. Click the stop button to stop recording. To watch the recorded video, go to the “General” tab and click “Open.”
You can also upload your desired videos to YouTube from Bandicam by clicking the “Upload” button found under Bandicam’s “Output” tab.
2. Using Microsoft Expression Encoder 4
You can download Microsoft Expression Encoder 4 to record the screen of your device and upload it to YouTube. The software has a screen capture tool and encoder. Install the software as you would usually do. There’ll be 2 shortcuts in the start menu – Microsoft Expression Encoder 4 Screen Capture (used to capture the screen) and Microsoft Expression Encoder 4 (converts the screen into a video that can be uploaded to YouTube).
3. Using Ezvid
Ezvid can record screen and audio simultaneously. It can also capture the whole area of the screen, making it perfect for tutorial videos. Ezvid also has speech synthesis that translates text captions into artificial human language, so it can easily produce human sound with only a click of a button.
4. Using Smartpixel
Smartpixel is a screen recorder for Android and Windows. It has a user-friendly interface and different editing as well as recording functions. Smartpixel can export various video formats such as 3gp, MP4, wmv, avi and flv. It also allows you to upload videos to different online platforms like GoPlay and YouTube.
Part 2: How to Record Screen Online
1. Using YouTube
You can now also record desktop screen with the features in YouTube. To start recording the screen using YouTube, you just need to sign-in to the website using your Google Account. Click “Creator Studio”. Go to Live Streaming and choose “Events”. You’ll be directed to the “Create Event” page. Provide the title for your screencast video, set the video’s privacy to either Private or Unlisted.
Click “Go Live Now” The Hangouts on Air page will open. Start the webcam from recording by clicking the camera icon. If you don’t want to record audio, you can just click the microphone icon.
Click “Screenshare” and choose a desktop window that you want to record for the screencast. Click “Start Screenshare” to share the screen then click the “Start Broadcast” button to begin recording the screen. When you’re done recording, just “Stop Broadcast” and go to the YouTube website. The new screencast video is stored in your YouTube video dashboard. You can share the video or download it to your Google Drive.
For more details, you can check How to record YouTube videos . If you’re looking for more online screen recorders for YouTube, you can check our picks of the 10 Best Free Online Screen Recorders .
2. Using FlexClip - Free Online Screen Recorder
FlexClip is a complete bundle of creativity. Why so? It is because it’s a web-based tool that helps you with image and video editing and post-production. It also offers a free online screen recording option.
FlexClip lets you record your webcam, screen, and audio with a simple click. Contrarily, you can also record simultaneous screens without a hitch! It can record almost anything that is being displayed on your computer screen. So be it gameplays, seminars, courses, presentations, or anything, you can always use this program to save your recording.
And once you’re done capturing the screen, FlexClip also allows you to edit your recording. You can add subtitles, highlights, overlays, and annotations to increase your video’s worth. So no wonder why FlexClip is one of the leading web-based software for free online screen capturing, especially if you want to make great YouTube videos.
The recording process is easy. All you need to do is visit the website and click the “Start Recording” button.
Then, choose your layout to start recording the screen and audio. When you’re finished, just hit the “Stop” button to end recording to edit the video in FlexClip’s built-in video editor. Lastly, download the screencast to upload it to your YouTube channel.
3. Using Apowersoft - Online Screen Recorder (Free)
Apowersoft is a renowned company that creates digital products, including file compressors, watermark removers, and more. Since there’s a growing demand for screen recorders for YouTube, the Apowersoft creators have also launched a “Free Online Screen Recorder.” Yup! You’re reading the right name.
Apowersoft – Free Online Screen Recorder eases the screen recording process. While it’s an online tool, you can also download the app on your Mac or Windows OS.
It’s a free program with simple features, such as a screen and webcam recording with audio. So if your YouTube content doesn’t require overlays, subtitles, or other editing stuff, this software is ideal due to its simplicity.
You can click the “Start Recording” button to get started.
.
Then, select the screen you wish to record, and save the captured screen to your local disk or cloud so you can upload the videos later to your YouTube channel.
Part 3: How to Record Screen for YouTube with Free Screen Recorder on Mac
1. Using QuickTime Player
QuickTime Player can be used to record movies from your camera or the screen of your iPad, iPod touch or iPhone. It can also record your Mac’s screen or record audio from your microphone. To record the screen of your Pad, iPod touch or iPhone, you should use the movie-recording function. You can use it to record the screen for YouTube video, or you can also record the YouTube video and empower it with your creativity.
For more details of using QuickTime Player to record YouTube videos, check our guide: How to record videos with Quicktime.
2. Using Screen Flow
Screen Flow is our second pick for Mac. Although it’s paid software, you can still enjoy the blessings of this screen recorder through the trial version. It’s a very handy tool that allows Mac screen recording and all iOS devices, such as iPhones and iPad.
Okay! So what’s good about screen flow? Let’s uncover. Firstly, it’s an editor + screen recorder specifically made for YouTube. You can capture the screen and edit the footage before uploading it to your channel.
Secondly, this software allows you to record simultaneous screens and your webcam. Plus, you can also record your voice through its mic recording option.
Another great thing about Screen Flow is that it has numerous video filters and a customizable title library. It also permits you to save screen recordings on your Mac or directly share them to your YouTube channel, other social media accounts, websites, or cloud storage in a few clicks.
Here’s a video to help you get started with screen recording on your Mac using Screen Flow:
3. Using Vmaker
Vmaker is another authentic software to record screens for your YouTube videos. It’s a free program, but you can buy premium versions to unlock more features.
The tool is trusted by many software review websites, such as “crozdesk.” It is available on both Mac and Windows OS. However, it seems like this software performs well on Mac operating systems.
Vmaker allows you to record your screen, your favorite YouTube videos, and the audio – all together! You can record the entire Mac screen or a specific portion in HD quality. Moreover, the software allows you to pick resolutions up to 4K to record the media.
This program also offers editing features like adding subtitles, music, flip, blur, trim, and more to create an awesome video. All videos are saved to your cloud workspace once you finish recording. Then, you can share the recorded video screens on your YouTube.
The tool is ideal for making tutorials, courses, demos, and product review videos. All you need to do is download Vmaker on your Mac. Choose a webcam, screen, or both with audio for recording. Start recording in the highest quality. Edit your video and share it on your YouTube channel.
Conclusion
Above are some screen recorders that you can use to record YouTube videos or record the screen and webcam simultaneously to make a video and upload it it to YouTube. If you want to record a screen video and edit it further, you should try Wondershare Filmora video editor.
Download Mac Version ](https://tools.techidaily.com/wondershare/filmora/download/ )
FAQs
Q1. How do you record your screen on a Mac for YouTube?
There are some great tools for screen recording on Mac for YouTube. The most loved and enjoyed program is Filmora by Wondershare. It’s a professional tool for screen recording and video editing. Most importantly, it has a user-friendly interface and records your screen in high quality.
Another option is the Quick Time Player. This program also allows screen recording. Likewise, Screen Flow is also a great program for screen capturing for YouTube on Mac.
Q2. Can I screen-record and upload it to YouTube?
There are two ways to do it. First, you can download the free or paid screen recording software on your Windows or macOS. Second, you can look for online screen recorders like FlexClip or the built-in YouTube recorder and directly share the recorded video to your channel.
Some tools, like Apowersoft and Vmaker, save screen recordings to the cloud or local disk. And there’s no direct sharing of the recorded screens to your YouTube channel. So if you’re using such programs, you will need to sign in to your YouTube channel and upload the file from your computer hard drive.
Q3. How do I record my computer screen for 2022?
Some of the greatest video editing and screen recording tools like Filmora, Bandicam, and FlexClip allow you to record your computer screen. Depending on the software, you can directly share the video to your YouTube channel. Or, save the video on your computer and then upload it on your channel.
Richard Bennett
Richard Bennett is a writer and a lover of all things video.
Follow @Richard Bennett
Streamline YouTube Sounds to MP3 Using Mac
How to Convert YouTube Videos to MP3 Songs on Mac
Richard Bennett
Mar 27, 2024• Proven solutions
Ever see a video from YouTube and want to convert to an MP3 of that song for your computer, smartphone or tablet? Want to convert YouTube videos into audios and download them as ringtones, or share them with friends? A YouTube MP3 converter for Mac lets you do those things quickly and easily, without any special computer knowledge.
The major choice you face is whether to use an online YouTube MP3 converter for Mac with high quality, or use a program to convert YouTube videos into MP3s. We’ll take a look at both options and recommend some websites and programs for you to use.
- Part1. Desktop Softwares for Mac to Convert YouTube Videos into MP3s
- Part 2. Online YouTube MP3 Converters for Mac
Part1. Desktop Softwares for Mac to Convert YouTube Videos into MP3s
Just like the online applications, there are many programs to choose from that allow you to convert YouTube videos to MP3s for Mac. We’ll take a closer look at one free option that is great if your needs are limited, and one pay program with complete and superior performance. These are the best recommended YouTube to MP3 converters for Apple Mac OS X:
Youtube Converter 1: MediaHuman’s Free YouTube to MP3 Converter
MediaHuman’s Free YouTube to MP3 Converter offers fast conversions with superior fidelity, for exceptionally clear MP3 files. It works well not only with YouTube, but also Vimeo, Soundcloud, Dailymotion and VEVO.
- Pros: High quality MP3s, can simultaneously process multiple files, export direct to iTunes, simple tag editor for easy organization, supports nearly two dozen languages, Windows, Mac and Linux versions
- Cons: Limited editing options, requires paid upgrade to access all features, requires 40 Mb storage space, limited format support
Youtube Converter 2: Wondershare Filmora for Mac
Wondershare Filmora for Mac is an outstanding YouTube MP3 converter for Mac, with a suite of superior features. This program not only allows you to convert videos to MP3 files, it also allows you to edit and add effects, save to a native music library, and more. If you have more sophisticated needs for saving, converting and editing YouTube videos and MP3s, Wondershare Filmora is a great choice. The very affordable price tag is another attraction.
- Pros: Superior MP3 quality, hundreds of additional editing features, export directly to a variety of social media platforms and services, supports all common formats
- Cons: Pay option and professional capabilities may be unnecessary for novice users
Check a video below to get an overview of this program:
If you are using a windows, check this tutorial instead


CNET reviewed Wondershare Filmora for Mac (Originally Wondershare Video Editor for Mac) and also praised the program extensively: “Wondershare Video Editor provides all the freedom you need to arrange clips and music with a wealth of available filters and transitions. This is a beautiful and capable piece of software.”
Take a close look at your needs and preferences for performance to make the perfect decision about which is the best YouTube MP3 converter for Mac for you.
Part 2. Online YouTube MP3 Converters for Mac
There are several online applications that allow you to convert YouTube videos to MP3s. Two of the best are:
Conversion Method 1: YouTube MP3 (online conversion site)
YouTube MP3 is designed with simplicity in mind: you simply paste the YouTube URL into the field and click the “Convert Video” button and the YouTube MP3 website takes care of the rest. When the conversion is complete, you can download your MP3 file from their servers.
- Pros: No account needed, free-to-use, compatible with all devices and formats
- Cons: Requires fast and reliable online connection, takes 3-4 minutes per video
Conversion Method 2: YouTube in MP3 (online conversion site)
YouTube in MP3 is very similar to the above application, although it offers several appealing extra features. Paste in your URL and click, and the program does the work quickly – your download will be ready in seconds. This service works on computers, smartphones and tablets, in a variety of formats.
- Pros: No account or sign up necessary, free-to-use, offers low-, standard-, and high-quality output, edit MP3s online prior to download
- Cons: Requires a very good online connection, lacks more advanced editing and format features of a YouTube MP3 converter for Mac program
You may also like: How to Convert MKV to MP4 without Losing Quality [Free Converters Provided] >>
Richard Bennett
Richard Bennett is a writer and a lover of all things video.
Follow @Richard Bennett
Richard Bennett
Mar 27, 2024• Proven solutions
Ever see a video from YouTube and want to convert to an MP3 of that song for your computer, smartphone or tablet? Want to convert YouTube videos into audios and download them as ringtones, or share them with friends? A YouTube MP3 converter for Mac lets you do those things quickly and easily, without any special computer knowledge.
The major choice you face is whether to use an online YouTube MP3 converter for Mac with high quality, or use a program to convert YouTube videos into MP3s. We’ll take a look at both options and recommend some websites and programs for you to use.
- Part1. Desktop Softwares for Mac to Convert YouTube Videos into MP3s
- Part 2. Online YouTube MP3 Converters for Mac
Part1. Desktop Softwares for Mac to Convert YouTube Videos into MP3s
Just like the online applications, there are many programs to choose from that allow you to convert YouTube videos to MP3s for Mac. We’ll take a closer look at one free option that is great if your needs are limited, and one pay program with complete and superior performance. These are the best recommended YouTube to MP3 converters for Apple Mac OS X:
Youtube Converter 1: MediaHuman’s Free YouTube to MP3 Converter
MediaHuman’s Free YouTube to MP3 Converter offers fast conversions with superior fidelity, for exceptionally clear MP3 files. It works well not only with YouTube, but also Vimeo, Soundcloud, Dailymotion and VEVO.
- Pros: High quality MP3s, can simultaneously process multiple files, export direct to iTunes, simple tag editor for easy organization, supports nearly two dozen languages, Windows, Mac and Linux versions
- Cons: Limited editing options, requires paid upgrade to access all features, requires 40 Mb storage space, limited format support
Youtube Converter 2: Wondershare Filmora for Mac
Wondershare Filmora for Mac is an outstanding YouTube MP3 converter for Mac, with a suite of superior features. This program not only allows you to convert videos to MP3 files, it also allows you to edit and add effects, save to a native music library, and more. If you have more sophisticated needs for saving, converting and editing YouTube videos and MP3s, Wondershare Filmora is a great choice. The very affordable price tag is another attraction.
- Pros: Superior MP3 quality, hundreds of additional editing features, export directly to a variety of social media platforms and services, supports all common formats
- Cons: Pay option and professional capabilities may be unnecessary for novice users
Check a video below to get an overview of this program:
If you are using a windows, check this tutorial instead
CNET reviewed Wondershare Filmora for Mac (Originally Wondershare Video Editor for Mac) and also praised the program extensively: “Wondershare Video Editor provides all the freedom you need to arrange clips and music with a wealth of available filters and transitions. This is a beautiful and capable piece of software.”
Take a close look at your needs and preferences for performance to make the perfect decision about which is the best YouTube MP3 converter for Mac for you.
Part 2. Online YouTube MP3 Converters for Mac
There are several online applications that allow you to convert YouTube videos to MP3s. Two of the best are:
Conversion Method 1: YouTube MP3 (online conversion site)
YouTube MP3 is designed with simplicity in mind: you simply paste the YouTube URL into the field and click the “Convert Video” button and the YouTube MP3 website takes care of the rest. When the conversion is complete, you can download your MP3 file from their servers.
- Pros: No account needed, free-to-use, compatible with all devices and formats
- Cons: Requires fast and reliable online connection, takes 3-4 minutes per video
Conversion Method 2: YouTube in MP3 (online conversion site)
YouTube in MP3 is very similar to the above application, although it offers several appealing extra features. Paste in your URL and click, and the program does the work quickly – your download will be ready in seconds. This service works on computers, smartphones and tablets, in a variety of formats.
- Pros: No account or sign up necessary, free-to-use, offers low-, standard-, and high-quality output, edit MP3s online prior to download
- Cons: Requires a very good online connection, lacks more advanced editing and format features of a YouTube MP3 converter for Mac program
You may also like: How to Convert MKV to MP4 without Losing Quality [Free Converters Provided] >>
Richard Bennett
Richard Bennett is a writer and a lover of all things video.
Follow @Richard Bennett
Also read:
- The Best ASMR Microphones You Should Try for 2024
- [New] Brand Yourself Differently Strategies for Finding Uncommon Names
- Hubs for Finding Google's Ad Sponsors on Video
- [New] Discover 8 Essential Sites for Pristine Green Screen Images
- Claim Cost-Free Visuals From Highest-Rated 4 YouTube Sources
- Professional Tips Designing YouTube Trailers in Filmora
- Breakdown Fundamental Aspects of ASMR Videos
- Fixed Shorts - No More Hidden Content
- In 2024, Elevate Your YouTube Presence The Art of SEO Optimization
- Curating a Musical Portfolio in Youtube for 2024
- 2024 Approved Easy Extraction Top 10 YouTube Text Grabber Apps Reviewed
- Steps to an Exceptional YouTube Closure
- Best 16 YouTube Intro Makers to Bring You More Views
- Acquire No-Cost Sounds for Videos & Podcasts!
- From Novice to Connoisseur Transform Your Sub4sub Experience Now
- [New] Beginner's Guide Top 10 YouTube Editing Tricks
- [Updated] Crafting the Quintessential Thumbnails for Live Video Success
- In 2024, A Guide to Crafting Effective YouTube Backlinks
- Get a Cleaner Look in Your Videos Quickly and Easily
- [New] Earnings Spectrum Unveiling the Financial Power of DailyMovement and YouTube
- Online Tutorial Adding YouTube Playlists to Your Site
- YouTube Video Aspect Ratio Guide Optimal Upload Sizes
- Discover the Top 30 FreeFire Hashtags for Amplifying Video Growth for 2024
- Efficiently Removing Youtube Channels A Device-Centric Approach
- Cut the Clutter, Convert Videos Discover the Best Alternatives for Flv to YT
- Top 8 Techniques for Grabbing Attention in YT Thumbnails
- [Updated] Essential Video Equipment for Successful YouTube Channels
- Transform Clips Into Content From Premiere to YouTube
- [New] Becoming an Economic Force A Guide to Earning on YouTube
- Time Traveling Through Retro Filmmaking Techniques
- How to Stay on Top of YouTube Moderation Standards
- [Updated] 20 Best Free Platforms for YouTube Channel Beginners
- Filmmaker’s Pathway to Anime Subscription Buttons in Filmora
- Streamline Your Content with These 20 Essential YouTube Hacks
- Broadcast Perfection Recommended Tech and Apps for YouTubers for 2024
- Navigating Popular Comment Pathways
- Navigating the Obscure Screen Issue in Youtube
- Android's Best YouTube Video Downloaders Reviewed
- [Updated] Erase the Obvious Techniques for Masked YouTube Content
- [New] In 2024, PC's Premier PS3 Imitators Ranked Top 5 Choices
- [New] Enhancing Clarity in Low-Quality Facebook Streams
- [Updated] Ultimate Guide to Top Video Editors for Webcams for 2024
- New Top-Rated MP3 Converters for Mac Reviews and Comparisons for 2024
- In 2024, The Complete Guide to Infinix Note 30 VIP Racing Edition FRP Bypass Everything You Need to Know
- Two Ways to Track My Boyfriends Xiaomi Redmi K70E without Him Knowing | Dr.fone
- [Updated] 2024 Approved Premium Tools for Tag Analysis Across FB, Twitter and Instagram
- Updated Breakdown of Job Functions in the World of Movie-Making
- Virtual Universes Clash Metaverse V/S Multiverse
- [New] Ideal Blueprint Top 6 Fresh Mojave Homes for 2024
- Highest Quality Action Capturing Methods for 2024
- [Updated] A Comprehensible Guide on Saving Instagram Story Content
- How To Factory Unlock Your Telstra Apple iPhone 7 Plus
- How to Bypass iCloud Lock on Apple iPhone 11 Pro
- Tips & Tricks to Streamline Your Zoom Meetings for 2024
- [New] 2024 Approved Frame-by-Frame Screen Capturer
- [New] Game Capturing Simplified Unveiling the Best of Windows 11 Methods
- [New] Pioneering Televised Facebook Interactions via Live Streams
- Gmail Not Working on Vivo Y78t 7 Common Problems & Fixes | Dr.fone
- Updated Audio Mastery on ChromeOS Easier Than You Think, In 2024
- [New] 2024 Approved Accidental TikTok Update Restore or Reload Content?
- Picsart Shield Invisible Smile, Vanished Gaze
- Title: "Stream Video Smoothly Save PC/Mac Screens to YouTube"
- Author: Brian
- Created at : 2024-05-25 12:52:15
- Updated at : 2024-05-26 12:52:15
- Link: https://youtube-video-recordings.techidaily.com/stream-video-smoothly-save-pcmac-screens-to-youtube/
- License: This work is licensed under CC BY-NC-SA 4.0.
