:max_bytes(150000):strip_icc()/googleaskphotosai-dc323a4a137549d59c5ac6ff0f98eb7b.png)
"Stepwise Strategies Building a Playlist on YouTube"
Stepwise Strategies: Building a Playlist on YouTube
How to Make a Playlist on YouTube

Liza Brown
Mar 27, 2024• Proven solutions
Youtube is one of the largest video-sharing platforms used worldwide by different people and nations without any limitation or restriction of language, region, or interests. It contains billions of videos, and thousands of new videos are uploaded on Youtube daily. To make your channel or your brand stand out in this crowd, it is important to arrange your videos in the form of playlists. These playlists help you manage your videos and allow the viewers to find the required video easily and conveniently. In this article, we are going to show you how to make a playlist on Youtube.
Youtube playlists not only help in arranging the videos that you upload on Youtube. But you can also create a playlist of any video available on Youtube. Whether it is a song, recipe, movie, or something else, you add it into your playlist to arrange them according to your needs to access them easily when needed.
How to make a playlist on Youtube of your uploaded videos
If you are running a Youtube channel and upload videos very often, then it is important to arrange them so that the viewers can easily explore and find their relevant video in no time. The best way to do that is to make a separate playlist for each type of video you upload. To know how to make a playlist on Youtube, follow the below steps.
- Open Youtube. Click on your “Channel Icon” in the upper right corner, then click on “Your Channel”.
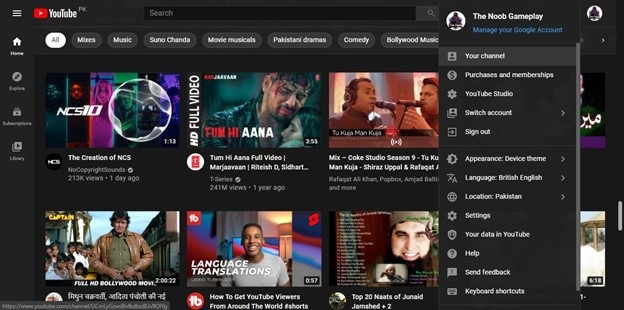
- Under Your Channel, click on the “Manage Videos” button. It will open the Youtube Studio of your Channel.

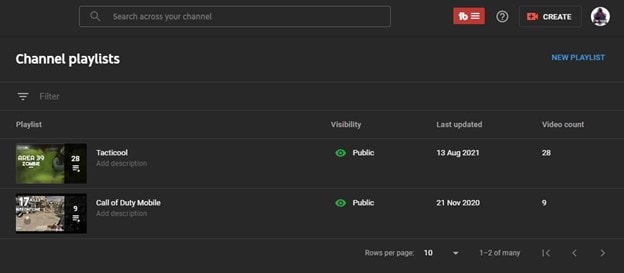
- In Youtube Studio, click on “Playlists” located on the left sidebar of the Studio.

- In this window, click on “New Playlist” located below your channel’s icon.
- Now it will ask you to enter “Playlist Title” and its “Visibility.” Name it accordingly and under Visibility, select an appropriate option according to your requirement and hit “Create.” Now your playlist is successfully created.

- Whenever you upload a new video on this channel, you can select the playlist you have created. While uploading the video, you can find a section named “Playlists” under the details tab.
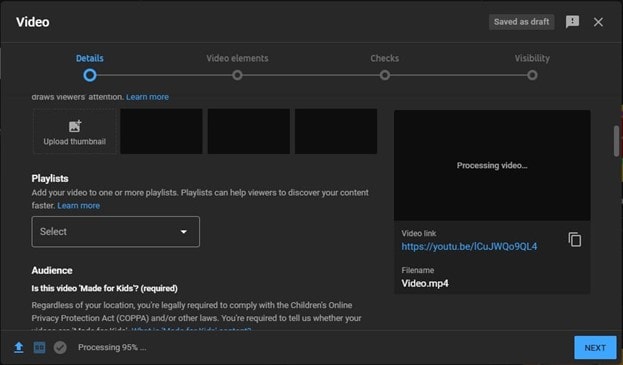
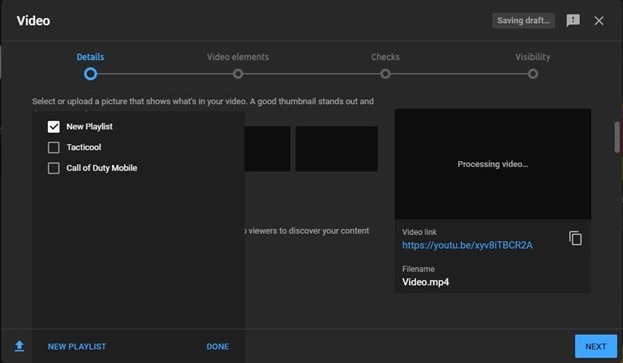
- Click on the drop-down menu to open select a playlist from the playlists that you have created. Select one and hit “Done.”
After uploading the video, it will be added to the playlist that you have selected. You can create as many playlists as you want. There is no restriction on that.
How to make a playlist on Youtube of others’ videos
Sometimes you like a video so much that you want to save it for future use or add it to your favorites. In such cases, creating a Youtube playlist is the best option. It will help you arrange the videos according to their type. To make a playlist on Youtube of others’ videos, follow the below steps.
- Open Youtube. Play a video that you want to save to a Playlist.
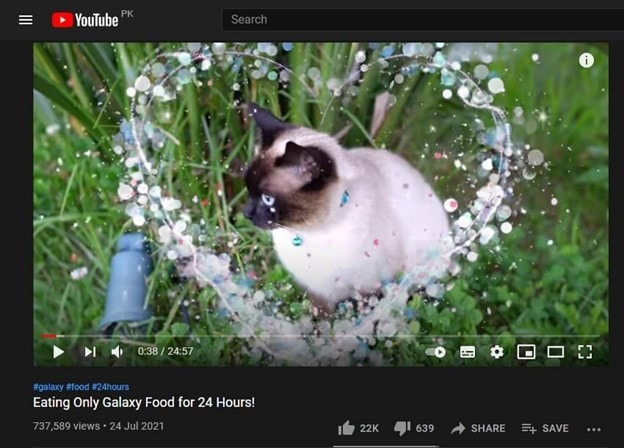
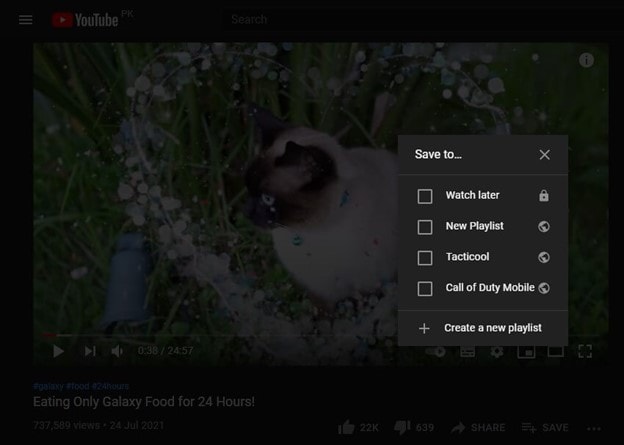
- Click on the “Save” on the right side below the video. It will open a new pop-up window that will ask you to select a playlist to add this video to it. But since you want to create a new playlist, click on the “Create a new Playlist.”
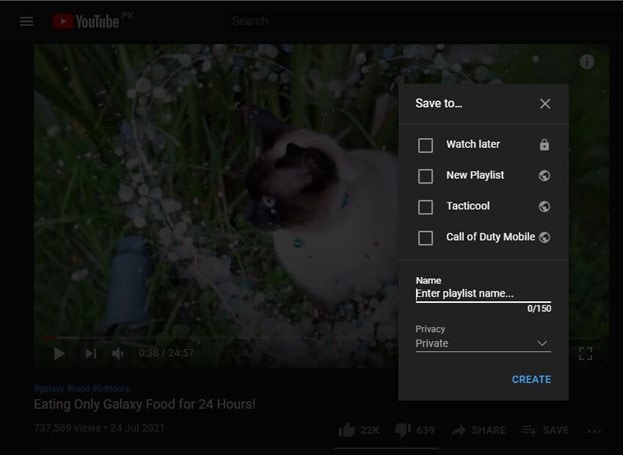
- It will ask you to enter the Name and select the privacy of the playlist. Name it and choose the privacy according to your preference and hit “Create.” Your video will be added to the new playlist.
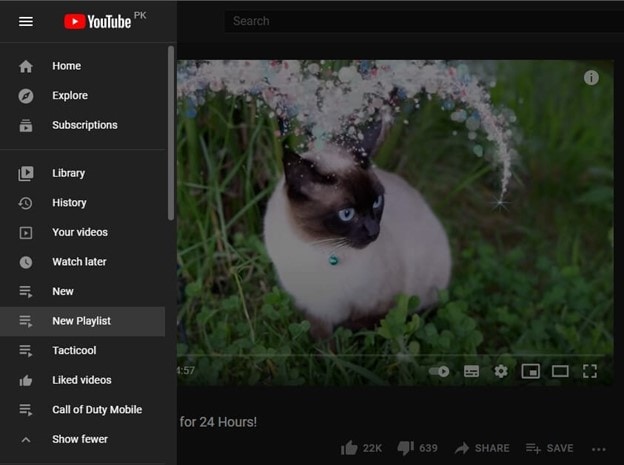
- You can easily access these playlists by clicking the three lines in the upper left corner of Youtube. Here you can find all the Playlists that you will create. Click on the playlist to access all the videos that are included in it.
Conclusion
Both of these processes of how to make a playlist on Youtube will help you whether you are a content creator or a simple Youtube user. With such a huge video database, it is difficult for users to keep their favorite videos to access them whenever they need them. Making a Youtube playlist can be very beneficial in such cases.


Liza Brown
Liza Brown is a writer and a lover of all things video.
Follow @Liza Brown
Liza Brown
Mar 27, 2024• Proven solutions
Youtube is one of the largest video-sharing platforms used worldwide by different people and nations without any limitation or restriction of language, region, or interests. It contains billions of videos, and thousands of new videos are uploaded on Youtube daily. To make your channel or your brand stand out in this crowd, it is important to arrange your videos in the form of playlists. These playlists help you manage your videos and allow the viewers to find the required video easily and conveniently. In this article, we are going to show you how to make a playlist on Youtube.
Youtube playlists not only help in arranging the videos that you upload on Youtube. But you can also create a playlist of any video available on Youtube. Whether it is a song, recipe, movie, or something else, you add it into your playlist to arrange them according to your needs to access them easily when needed.
How to make a playlist on Youtube of your uploaded videos
If you are running a Youtube channel and upload videos very often, then it is important to arrange them so that the viewers can easily explore and find their relevant video in no time. The best way to do that is to make a separate playlist for each type of video you upload. To know how to make a playlist on Youtube, follow the below steps.
- Open Youtube. Click on your “Channel Icon” in the upper right corner, then click on “Your Channel”.
- Under Your Channel, click on the “Manage Videos” button. It will open the Youtube Studio of your Channel.
- In Youtube Studio, click on “Playlists” located on the left sidebar of the Studio.
- In this window, click on “New Playlist” located below your channel’s icon.
- Now it will ask you to enter “Playlist Title” and its “Visibility.” Name it accordingly and under Visibility, select an appropriate option according to your requirement and hit “Create.” Now your playlist is successfully created.
- Whenever you upload a new video on this channel, you can select the playlist you have created. While uploading the video, you can find a section named “Playlists” under the details tab.
- Click on the drop-down menu to open select a playlist from the playlists that you have created. Select one and hit “Done.”
After uploading the video, it will be added to the playlist that you have selected. You can create as many playlists as you want. There is no restriction on that.
How to make a playlist on Youtube of others’ videos
Sometimes you like a video so much that you want to save it for future use or add it to your favorites. In such cases, creating a Youtube playlist is the best option. It will help you arrange the videos according to their type. To make a playlist on Youtube of others’ videos, follow the below steps.
- Open Youtube. Play a video that you want to save to a Playlist.
- Click on the “Save” on the right side below the video. It will open a new pop-up window that will ask you to select a playlist to add this video to it. But since you want to create a new playlist, click on the “Create a new Playlist.”
- It will ask you to enter the Name and select the privacy of the playlist. Name it and choose the privacy according to your preference and hit “Create.” Your video will be added to the new playlist.
- You can easily access these playlists by clicking the three lines in the upper left corner of Youtube. Here you can find all the Playlists that you will create. Click on the playlist to access all the videos that are included in it.
Conclusion
Both of these processes of how to make a playlist on Youtube will help you whether you are a content creator or a simple Youtube user. With such a huge video database, it is difficult for users to keep their favorite videos to access them whenever they need them. Making a Youtube playlist can be very beneficial in such cases.
Liza Brown
Liza Brown is a writer and a lover of all things video.
Follow @Liza Brown
Optimal Video Formats to Skyrocket Your YouTube Popularity
Best Video Format for YouTube Uploading

Richard Bennett
Feb 01, 2024• Proven solutions
Uploading your content in the best video format for YouTube can save you a lot of frustration. In this article, we will teach you about some of the best video formats and settings .
To upload a video to YouTube you have to make sure that you are using one of the video file formats that is supported by the platform itself. Here they are:
- MP4
- MOV
- AVI
- FLV
- 3GPP
- WMV
- WebM
- MPEGS
YouTube recommends uploading your videos as MP4 files. Some benefits of MP4s are that the files are not as large as AVIs, they provide better quality than FLVs, and they often display with the same quality or better as you would get watching the video on a native video player. Other file formats like 3GPP and MPEG-PS generally have resolutions too small for high-resolution tablets or desktop devices.
If your phone or video editing software does not output MP4 videos, consider getting video editing software or a conversion program that can (like Filmora Video Editor).
Filmora is an easy-to-use video editing program that can export to MP4, WMV, AVI, MOV, F4V, MKV, TS, 3GP, MPEG-2, WEBM, GIF, and MP3. You can convert a video to an MP4 simply by importing it into Filmora, dragging it into the timeline, and exporting it in the MP4 format.
The Best Upload Settings for YouTube
The best video code:
The best video format: MP4
Audio should be produced using the LC format and stereo 5.1 or standard stereo. You can upload separate MP3 audio format files for voiceovers if you need to.
The aspect ratio for a video should be 16:9 so that it won’t have black bars on the side when uploaded to YouTube. YouTube has also made it possible for 9:16 (portrait) style videos to be viewed without black bars, full screen, using their iOS app.
You should export in at least 30 frames per second. Many creators push that to 60 frames per second, which is better for most types of videos (although it may not make a noticeable difference for others).
The maximum size for quick upload and load time on YouTube is generally under 2gb. Luckily MP4 offers a great degree of compression without sacrificing too much image quality.
If you scale down the file size of the video by reducing the resolution or choosing a format with more compression, that can cause you to lose quality. If you need a smaller file, it’s always better to scale down the length of a video rather than continually compress the file or lose frames from the video.
Although a 2 GB file of a very long will easily upload to YouTube, it will probably be very low quality.
Do you agree that MP4 is the best video format for YouTube, or do you use something else?
Create Stunning Videos with a High-Quality Video Editor
Richard Bennett
Richard Bennett is a writer and a lover of all things video.
Follow @Richard Bennett
Richard Bennett
Feb 01, 2024• Proven solutions
Uploading your content in the best video format for YouTube can save you a lot of frustration. In this article, we will teach you about some of the best video formats and settings .
To upload a video to YouTube you have to make sure that you are using one of the video file formats that is supported by the platform itself. Here they are:
- MP4
- MOV
- AVI
- FLV
- 3GPP
- WMV
- WebM
- MPEGS
YouTube recommends uploading your videos as MP4 files. Some benefits of MP4s are that the files are not as large as AVIs, they provide better quality than FLVs, and they often display with the same quality or better as you would get watching the video on a native video player. Other file formats like 3GPP and MPEG-PS generally have resolutions too small for high-resolution tablets or desktop devices.
If your phone or video editing software does not output MP4 videos, consider getting video editing software or a conversion program that can (like Filmora Video Editor).
Filmora is an easy-to-use video editing program that can export to MP4, WMV, AVI, MOV, F4V, MKV, TS, 3GP, MPEG-2, WEBM, GIF, and MP3. You can convert a video to an MP4 simply by importing it into Filmora, dragging it into the timeline, and exporting it in the MP4 format.
The Best Upload Settings for YouTube
The best video code:
The best video format: MP4
Audio should be produced using the LC format and stereo 5.1 or standard stereo. You can upload separate MP3 audio format files for voiceovers if you need to.
The aspect ratio for a video should be 16:9 so that it won’t have black bars on the side when uploaded to YouTube. YouTube has also made it possible for 9:16 (portrait) style videos to be viewed without black bars, full screen, using their iOS app.
You should export in at least 30 frames per second. Many creators push that to 60 frames per second, which is better for most types of videos (although it may not make a noticeable difference for others).
The maximum size for quick upload and load time on YouTube is generally under 2gb. Luckily MP4 offers a great degree of compression without sacrificing too much image quality.
If you scale down the file size of the video by reducing the resolution or choosing a format with more compression, that can cause you to lose quality. If you need a smaller file, it’s always better to scale down the length of a video rather than continually compress the file or lose frames from the video.
Although a 2 GB file of a very long will easily upload to YouTube, it will probably be very low quality.
Do you agree that MP4 is the best video format for YouTube, or do you use something else?
Create Stunning Videos with a High-Quality Video Editor
Richard Bennett
Richard Bennett is a writer and a lover of all things video.
Follow @Richard Bennett
Also read:
- [New] 2024 Approved Stepwise Strategies for High Quality Time Lapse Videos in GoPro Studio
- [New] Channel Charisma Techniques for Amplifying YouTube Visibility
- [Updated] Cutting Edge Computing Select the Optimal Device for Video Editing
- [Updated] In 2024, 8 Best YouTube Video Promotion Services (Real)
- [Updated] In 2024, Memorable Personal Frames for TikTok Profiles Top Ideas
- [Updated] Pro Mobile Techniques for Snapchat Recording for 2024
- 2024 Approved Enhancing Television Experience Playback Tips for YouTube Content
- Achieving Financial Gain Through YouTube Videos for 2024
- Embedding YouTube Playlists with Minimal Complexity and Maximum Impact
- Embrace Cold Choosing Heated Backdrops for YouTube for 2024
- Fixing Startup Problems for Tekken 8 Game on Personal Computers Efficiently
- How to Transfer Contacts from Honor Magic V2 to Other Android Devices Devices? | Dr.fone
- In 2024, Xiaomi 11 Series Brings Cinema Quality Into Mobile Devices
- Multimedia Designer's Space
- Proven Ways to Fix There Was A Problem Parsing the Package on Tecno Pova 5 | Dr.fone
- Why Your Poco M6 Pro 4G Screen Might be Unresponsive and How to Fix It | Dr.fone
- Title: Stepwise Strategies Building a Playlist on YouTube
- Author: Brian
- Created at : 2024-10-09 18:27:44
- Updated at : 2024-10-12 18:10:24
- Link: https://youtube-video-recordings.techidaily.com/stepwise-strategies-building-a-playlist-on-youtube/
- License: This work is licensed under CC BY-NC-SA 4.0.