
:max_bytes(150000):strip_icc()/AirTags-d0c59672dec24b1b947c239fd7c6b934.jpg)
SEO Essentials for Climbing the YouTube Popularity Ladder
SEO Essentials for Climbing the YouTube Popularity Ladder
The 12-step YouTube SEO Guide for Beginners Who Want More Views

Shanoon Cox
Oct 26, 2023• Proven solutions
The joy of creating on YouTube is often dampened by the disappointment of underperforming videos. You have published your content and it’s not getting the views you had hoped.
Well, let’s change that!
In this guide, I’m going to walk you through YouTube SEO from the very start to the very end.
Nothing complicated. No paid programs or expensive apps needed. We are going back to basics and get your videos discovered.
Ready?
Let’s Go!
Part 1: Research Your Topic and Competitors
Come up with a video idea . Can’t come up with one? Let me help. I heard you can make a mean scrambled egg, why don’t you show the world how you do it?
Excellent! Let’s go with that idea.
Wait, don’t go making the video yet. First, we have to do some research. We need to know what videos already exist out there.
Step 1: Find Related Videos
Do a quick search on YouTube to see what videos already exist on your topic.

Uh oh… your video will be competing against celebrities like Gordon Ramsay and Jamie Oliver.
Okay, don’t panic! There is a fantastic quote, credited to bestselling author, Jon Acuff , that goes:
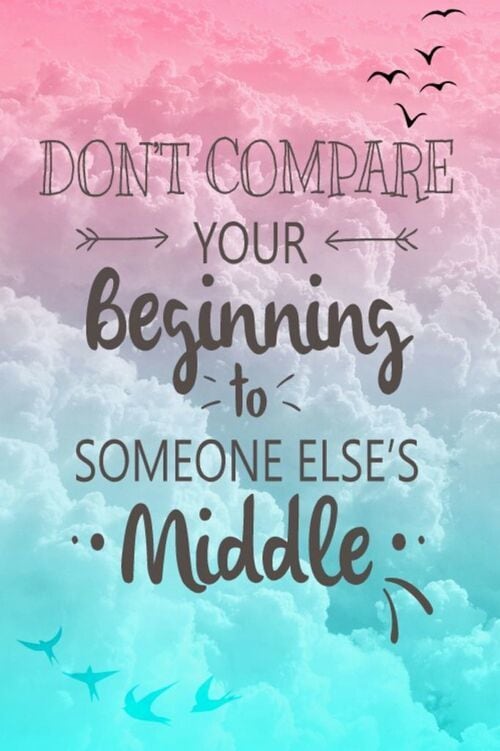
While researching your competition, you will feel overwhelmed, but remember, you are at the beginning, and Gordon Ramsay and Jamie Oliver are not even at their middle, they are way passed the finish line. You still have a long journey to go, so don’t get discouraged, get inspired!
Watch those videos and understand what they are all about.
Understand that people watch YouTube for 3 key reasons:
- To be entertained
- To learn something new
- To be inspired
A video that can hit all 3 marks is going to be positioned for success. Don’t fret too much about the competition, as long as your content is good, you will see improvement.
So if you think this scrambled egg idea can hit those 3 marks, then I encourage you to go to the next step. If you don’t, let’s regroup and brainstorm some more YouTube video ideas .
Step 2: Find Keywords
Now that we’ve decided that we are sticking with the video idea, we are ready to do some keyword research. Keywords are the words and phrases people type in the YouTube search bar to discover videos.
Come up with as many relevant keywords as you can. Start by entering a keyword into the YouTube search bar. This will tell you what are the most popular searches associated with that keyword:
Once you have an idea of what people are searching for related to your topic, you’ll want to find more relevant keywords. I like to use the free app, Ubersuggest to do that.

This app gives you a whole list of long-tail keywords, which are 3-4-word phrases which is specific to what your video is about.
Some you will use to dig deeper in and other you will deem irrelevant to your videos. A good way of determining the value of a keyword is by the stats the application shows.
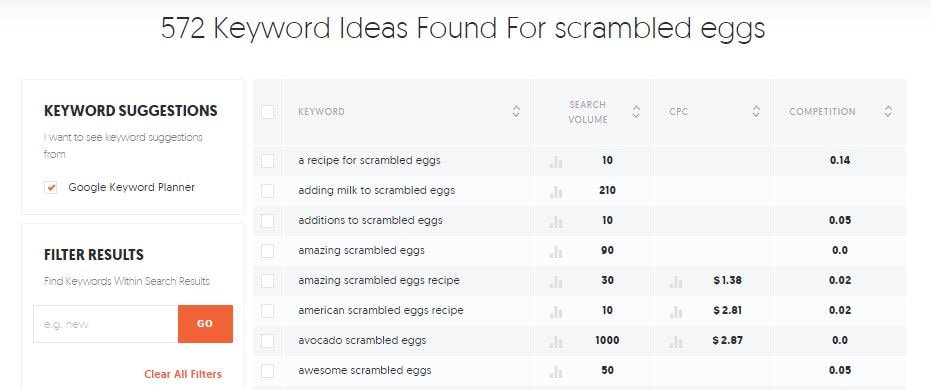
How to Read Keyword Suggestions
Once you have a list of keywords, you will see some numbers on the right-hand side. Here is what each one is about:
- Search volume is the number used to identify the popularity of the keyword. The higher the number the more people are searching for it.
- CPC is the value accredited by YouTube, determining how much advertisers are paying to target audiences who search for that keyword and click on the link.
- Competition is the number used to qualify how many other content are using that keyword.
The two categories that matter most to us right now is Search Volume and Competition. We want keywords with high search volume and low competition rate.
In the example above, you can see that the keyword “avocado scrambled eggs” has a Search Volume of 1,000 and a competition rate of 0.0. This is a good keyword to target, if you can incorporate an avocado to your dish… which of course you can!
Step 3: Write Title
I know you might want to deal with the Title, Description, and Tags after you’ve filmed and edited your video. But if you want to apply a YouTube SEO-focused strategy, then these should be addressed before you even pick up a camera as it can greatly dictate the content you end up creating.
A good YouTube title sparks curiosity, evokes emotional reaction, and promises value to your viewers.
Of course you can title your video simply: Making Scrambled Eggs
But does it spark curiosity? Not really… most people can make scrambled eggs.
Does it evoke any emotion? Maybe hunger… but even then, not really…
Finally, does it promise value? Well, assuming that most people can at least crack an egg into a pan, then hardly.
Your scrambled egg is special! Your video is special! We need to evoke that in the title — and as long as you are not writing any clickbait and deliver on what the title suggest, you can do this.
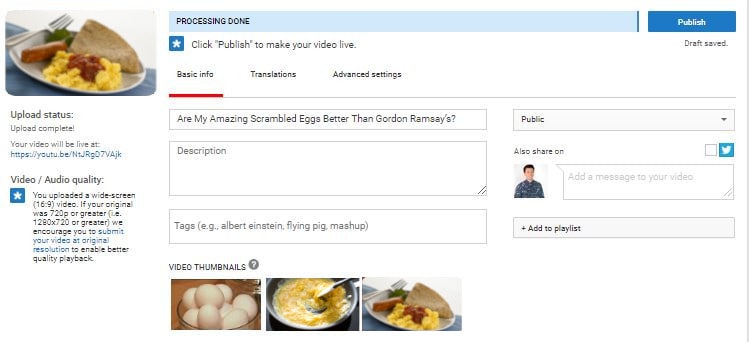
So, how about this: Are My Amazing Scrambled Eggs Better Than Gordon Ramsay’s?
Hmmm… Well, is it? We know that the Gordon Ramsay’s video has almost 30M views. Many people have already tried cooking it, I’m sure. There is only one way to find out, by encouraging others to try it over Gordon’s.
You don’t need to go for a somewhat contentious title like this, but that’s the idea, you want something that gets people curious, make them feel a certain way, and in the end, make them better for having watched your video.
See how a good title can guide the rest of your video?
Step 4: Write Description
You aren’t going to be writing the description for the viewers necessarily, you are going to be writing it for YouTube’s algorithms. The better YouTube understands what your video is about, the better they can show it to people searching for it.
This means you need to include the keywords you were researching at the beginning of your description, as YouTube will be using them to identify the content of your video. 1 or 2 keywords that best represent your video is enough. Don’t stuff the title with too many keywords or you’ll risk sounding like a robot.
But also use the description for practical uses too, if you have additional information such as supportive links, outline of the video’s content, a list of materials, step-by-step guide, or a recipe that you think your human viewers will find useful, you should input that in the description as well.
Step 5: Write Tags
Thank goodness we did the keyword research in Step 2, because coming up with tags is not as easy as it looks.
Pull 15 keywords from the list and keep it somewhere safe.
Note: The keywords you used in the title should be found in your tags, and since they are the most important ones, you should place them first.
Organize your keywords in the tag as such:
Have the specific keywords at the top, followed by more general keywords, and then branded ones:
Specific: How to make scrambled eggs
General: Scrambled eggs
Branded: Gordon Ramsay scrambled eggs
Part 2: Make The Best Darn Video Possible
It doesn’t matter how relevant your keywords are or how epic your title is, if you video sucks (i.e. your viewers click in and leave right away), YouTube will not show it in search.
Even if you haven’t created any videos yet, you can follow these next steps to ensure you are following the best practices to structure your video.
Step 6: Plan and Film the Hook
The first few seconds is where the largest percentage of your earned viewership will drop off. Odds are 20% of your viewers won’t even get past the first 10 seconds .
What you need is a hook, an intro that ensures this video is what they want to watch and let’s them know what they can expect.
Step 7: Film B-Roll
One static camera shot of you talking or cooking or giving a tutorial can cause your viewers to lose attention.
In order to keep your viewers interest, you will need b-roll, or supplemental footage you can cut to give you video more life.
While jump cuts (cuts made on a sequential clip of the same subject or in the same camera position) are fine, having additional footage to cut to will make your video feel more fluid.
So when you are filming your scrambled egg video, make sure you get some footage of you cracking the egg, scrambling it, and serving it on the plate.
Step 8: Encourage Viewers to Engage in Video
Liking, disliking, subscribing, and commenting on your video will all help your performance indirectly.
While YouTube wouldn’t rank your video higher simply because you have more likes subscribers, or comments, engagement from viewers help your video get discovered. If you get a like or comment from a YouTuber with a lot of subscribers, your video may be visible to those who are following that YouTuber for a while.
The best way to get engagement from your audience is to encourage them to like and subscribe or ask them a question or start a dialogue.
For example, in this scrambled egg video you are making, at the end you can ask, “So what do you think, is this better than Gordon Ramsay?”

Who knows, who will respond.
Step 9: Design a Thumbnail
You could have made a brilliant video, but if you have a poor quality thumbnail that is unattractive, then the overall performance of your video will suffer — and good SEO can only do so much after that.
Your viewers will absolutely judge your video by its cover so it’s important to put some thought into it and not solely rely on the three random thumbnail choices that YouTube picks for you.

Take a look at your competition. If they all look the same, do something different. Add text or a human face (preferably yours) to evoke emotion, as viewers are more likely to click into a video if they see an expressive image.
Don’t want to pay money for a photo editing software such as Photoshop?
You can use an online service called Canva or download GIMP , an open-source photo editor much like Photoshop, but far less powerful. These will help you get the job done as you are starting out.
Want to know more thumbnail maker? Check our picks of the best free YouTube thumbnail makers .
Part 3: Publishing With Attention to Optimization
Well done finishing the video! You are almost there… but not there yet.

Come on, keep going!
Step 10: Fill Out Your Videos Assets
The video is done, the thumbnail is designed, and you have all your title, description, and tags ready to go. This step is easy, upload the video, and fill out the assets, and give yourself a pat on the back.
Step 11: Add Transcripts
In addition to making your content accessible for people who don’t want to or can’t listen to the audio in your video, adding subtitles and closed captions will help YouTube understand the spoken content in your video.
While YouTube does have an automatic subtitle generator, it’s not reliable enough to be used for identifying the keywords you use in your video.
You can choose to write out the whole transcript of your video yourself, but if you are press on time, which of course you are, you can simply go and edit the automatic transcript already available in your video. By the way, you can also use some automatic transcription software.
Step 12: Add Video to Playlist
Finally the last thing you need to do for your video is to add it to a playlist. Even though it might be the first video in the playlist, it helps YouTube identify your video if you organize it in a playlist. As you accumulate more content, having videos in playlists makes content easier to find and keeps relevant videos together.
When viewers searches, having your videos in playlists increases the chance of it being discovered.
So if your first video is about scrambled eggs, maybe you next video can be about the awesome butter toasts.
I guess, you are on your way to making a pretty badass breakfast playlist. I personally can’t wait to see it!
If you treat SEO as an afterthought, only after your video is created, you are not using it to its full potential. If you follow these 12 steps during the course of your production, you will find that SEO doesn’t simply help your video perform at the end, but contributes in all the other phases of creating your video as well.
Besides considering YouTube SEO, you should make a good YouTube video as well. Filmora is a powerful video editing software that features lots of templates and effects. Get the free trial version below and have a try today.


Do you have any questions about SEO? Please leave us a comment below.
Shanoon Cox
Shanoon Cox is a writer and a lover of all things video.
Follow @Shanoon Cox
Shanoon Cox
Oct 26, 2023• Proven solutions
The joy of creating on YouTube is often dampened by the disappointment of underperforming videos. You have published your content and it’s not getting the views you had hoped.
Well, let’s change that!
In this guide, I’m going to walk you through YouTube SEO from the very start to the very end.
Nothing complicated. No paid programs or expensive apps needed. We are going back to basics and get your videos discovered.
Ready?
Let’s Go!
Part 1: Research Your Topic and Competitors
Come up with a video idea . Can’t come up with one? Let me help. I heard you can make a mean scrambled egg, why don’t you show the world how you do it?
Excellent! Let’s go with that idea.
Wait, don’t go making the video yet. First, we have to do some research. We need to know what videos already exist out there.
Step 1: Find Related Videos
Do a quick search on YouTube to see what videos already exist on your topic.
Uh oh… your video will be competing against celebrities like Gordon Ramsay and Jamie Oliver.
Okay, don’t panic! There is a fantastic quote, credited to bestselling author, Jon Acuff , that goes:
While researching your competition, you will feel overwhelmed, but remember, you are at the beginning, and Gordon Ramsay and Jamie Oliver are not even at their middle, they are way passed the finish line. You still have a long journey to go, so don’t get discouraged, get inspired!
Watch those videos and understand what they are all about.
Understand that people watch YouTube for 3 key reasons:
- To be entertained
- To learn something new
- To be inspired
A video that can hit all 3 marks is going to be positioned for success. Don’t fret too much about the competition, as long as your content is good, you will see improvement.
So if you think this scrambled egg idea can hit those 3 marks, then I encourage you to go to the next step. If you don’t, let’s regroup and brainstorm some more YouTube video ideas .
Step 2: Find Keywords
Now that we’ve decided that we are sticking with the video idea, we are ready to do some keyword research. Keywords are the words and phrases people type in the YouTube search bar to discover videos.
Come up with as many relevant keywords as you can. Start by entering a keyword into the YouTube search bar. This will tell you what are the most popular searches associated with that keyword:
Once you have an idea of what people are searching for related to your topic, you’ll want to find more relevant keywords. I like to use the free app, Ubersuggest to do that.
This app gives you a whole list of long-tail keywords, which are 3-4-word phrases which is specific to what your video is about.
Some you will use to dig deeper in and other you will deem irrelevant to your videos. A good way of determining the value of a keyword is by the stats the application shows.
How to Read Keyword Suggestions
Once you have a list of keywords, you will see some numbers on the right-hand side. Here is what each one is about:
- Search volume is the number used to identify the popularity of the keyword. The higher the number the more people are searching for it.
- CPC is the value accredited by YouTube, determining how much advertisers are paying to target audiences who search for that keyword and click on the link.
- Competition is the number used to qualify how many other content are using that keyword.
The two categories that matter most to us right now is Search Volume and Competition. We want keywords with high search volume and low competition rate.
In the example above, you can see that the keyword “avocado scrambled eggs” has a Search Volume of 1,000 and a competition rate of 0.0. This is a good keyword to target, if you can incorporate an avocado to your dish… which of course you can!
Step 3: Write Title
I know you might want to deal with the Title, Description, and Tags after you’ve filmed and edited your video. But if you want to apply a YouTube SEO-focused strategy, then these should be addressed before you even pick up a camera as it can greatly dictate the content you end up creating.
A good YouTube title sparks curiosity, evokes emotional reaction, and promises value to your viewers.
Of course you can title your video simply: Making Scrambled Eggs
But does it spark curiosity? Not really… most people can make scrambled eggs.
Does it evoke any emotion? Maybe hunger… but even then, not really…
Finally, does it promise value? Well, assuming that most people can at least crack an egg into a pan, then hardly.
Your scrambled egg is special! Your video is special! We need to evoke that in the title — and as long as you are not writing any clickbait and deliver on what the title suggest, you can do this.
So, how about this: Are My Amazing Scrambled Eggs Better Than Gordon Ramsay’s?
Hmmm… Well, is it? We know that the Gordon Ramsay’s video has almost 30M views. Many people have already tried cooking it, I’m sure. There is only one way to find out, by encouraging others to try it over Gordon’s.
You don’t need to go for a somewhat contentious title like this, but that’s the idea, you want something that gets people curious, make them feel a certain way, and in the end, make them better for having watched your video.
See how a good title can guide the rest of your video?
Step 4: Write Description
You aren’t going to be writing the description for the viewers necessarily, you are going to be writing it for YouTube’s algorithms. The better YouTube understands what your video is about, the better they can show it to people searching for it.
This means you need to include the keywords you were researching at the beginning of your description, as YouTube will be using them to identify the content of your video. 1 or 2 keywords that best represent your video is enough. Don’t stuff the title with too many keywords or you’ll risk sounding like a robot.
But also use the description for practical uses too, if you have additional information such as supportive links, outline of the video’s content, a list of materials, step-by-step guide, or a recipe that you think your human viewers will find useful, you should input that in the description as well.
Step 5: Write Tags
Thank goodness we did the keyword research in Step 2, because coming up with tags is not as easy as it looks.
Pull 15 keywords from the list and keep it somewhere safe.
Note: The keywords you used in the title should be found in your tags, and since they are the most important ones, you should place them first.
Organize your keywords in the tag as such:
Have the specific keywords at the top, followed by more general keywords, and then branded ones:
Specific: How to make scrambled eggs
General: Scrambled eggs
Branded: Gordon Ramsay scrambled eggs
Part 2: Make The Best Darn Video Possible
It doesn’t matter how relevant your keywords are or how epic your title is, if you video sucks (i.e. your viewers click in and leave right away), YouTube will not show it in search.
Even if you haven’t created any videos yet, you can follow these next steps to ensure you are following the best practices to structure your video.
Step 6: Plan and Film the Hook
The first few seconds is where the largest percentage of your earned viewership will drop off. Odds are 20% of your viewers won’t even get past the first 10 seconds .
What you need is a hook, an intro that ensures this video is what they want to watch and let’s them know what they can expect.
Step 7: Film B-Roll
One static camera shot of you talking or cooking or giving a tutorial can cause your viewers to lose attention.
In order to keep your viewers interest, you will need b-roll, or supplemental footage you can cut to give you video more life.
While jump cuts (cuts made on a sequential clip of the same subject or in the same camera position) are fine, having additional footage to cut to will make your video feel more fluid.
So when you are filming your scrambled egg video, make sure you get some footage of you cracking the egg, scrambling it, and serving it on the plate.
Step 8: Encourage Viewers to Engage in Video
Liking, disliking, subscribing, and commenting on your video will all help your performance indirectly.
While YouTube wouldn’t rank your video higher simply because you have more likes subscribers, or comments, engagement from viewers help your video get discovered. If you get a like or comment from a YouTuber with a lot of subscribers, your video may be visible to those who are following that YouTuber for a while.
The best way to get engagement from your audience is to encourage them to like and subscribe or ask them a question or start a dialogue.
For example, in this scrambled egg video you are making, at the end you can ask, “So what do you think, is this better than Gordon Ramsay?”
Who knows, who will respond.
Step 9: Design a Thumbnail
You could have made a brilliant video, but if you have a poor quality thumbnail that is unattractive, then the overall performance of your video will suffer — and good SEO can only do so much after that.
Your viewers will absolutely judge your video by its cover so it’s important to put some thought into it and not solely rely on the three random thumbnail choices that YouTube picks for you.
Take a look at your competition. If they all look the same, do something different. Add text or a human face (preferably yours) to evoke emotion, as viewers are more likely to click into a video if they see an expressive image.
Don’t want to pay money for a photo editing software such as Photoshop?
You can use an online service called Canva or download GIMP , an open-source photo editor much like Photoshop, but far less powerful. These will help you get the job done as you are starting out.
Want to know more thumbnail maker? Check our picks of the best free YouTube thumbnail makers .
Part 3: Publishing With Attention to Optimization
Well done finishing the video! You are almost there… but not there yet.
Come on, keep going!
Step 10: Fill Out Your Videos Assets
The video is done, the thumbnail is designed, and you have all your title, description, and tags ready to go. This step is easy, upload the video, and fill out the assets, and give yourself a pat on the back.
Step 11: Add Transcripts
In addition to making your content accessible for people who don’t want to or can’t listen to the audio in your video, adding subtitles and closed captions will help YouTube understand the spoken content in your video.
While YouTube does have an automatic subtitle generator, it’s not reliable enough to be used for identifying the keywords you use in your video.
You can choose to write out the whole transcript of your video yourself, but if you are press on time, which of course you are, you can simply go and edit the automatic transcript already available in your video. By the way, you can also use some automatic transcription software.
Step 12: Add Video to Playlist
Finally the last thing you need to do for your video is to add it to a playlist. Even though it might be the first video in the playlist, it helps YouTube identify your video if you organize it in a playlist. As you accumulate more content, having videos in playlists makes content easier to find and keeps relevant videos together.
When viewers searches, having your videos in playlists increases the chance of it being discovered.
So if your first video is about scrambled eggs, maybe you next video can be about the awesome butter toasts.
I guess, you are on your way to making a pretty badass breakfast playlist. I personally can’t wait to see it!
If you treat SEO as an afterthought, only after your video is created, you are not using it to its full potential. If you follow these 12 steps during the course of your production, you will find that SEO doesn’t simply help your video perform at the end, but contributes in all the other phases of creating your video as well.
Besides considering YouTube SEO, you should make a good YouTube video as well. Filmora is a powerful video editing software that features lots of templates and effects. Get the free trial version below and have a try today.
Do you have any questions about SEO? Please leave us a comment below.
Shanoon Cox
Shanoon Cox is a writer and a lover of all things video.
Follow @Shanoon Cox
Daily Deeds for Digital Diaries: Tips on Virtual Journeys
The Dos and Don’ts of Daily Vlogging

Richard Bennett
Oct 26, 2023• Proven solutions
If you are making videos on YouTube, you’ll have come to a point where you feel daring enough to take on the ultimate challenge: daily vlogging.
You might have been inspired by other creators on YouTube or you might have heard of VEDA: Vlog every day April (or August). You might have also watched some videos from influencers telling you that the ruthless YouTube algorithm demands daily content if you aspire to grow an audience.
There are many reasons why you may want to try your hand at becoming a daily vlogger, but here are 3 motivating reasons to conquer your vlogging fears and get started.
Bonus Tip-The Best Daily Vlog Maker- Wondershare Filmora
Vlogging is an art and people use vlogging to upload videos daily to their YouTube channel. This is natural if you are recording videos daily, you will need a tool like Wondershare Filmora to edit your videos with precision. To make your task easy, Wondershare Filmora has all the features and effects that are required to edit a daily vlog video that you can upload directly from Filmora itself. You can make use of features like add text, background music, filters & effects, etc if you are a daily vlogger as it would help you a lot in making the video look professional in less time.
Why Daily Vlog Anyways?
Build discipline: Like exercising and eating healthy, you have to commit to it and do it regularly in order to see any lasting results. Vlogging is the same. However, if you’re a creator, making videos whenever you feel like it and want to give yourself a kick in the behind, daily vlogging is a practice that will keep you accountable. You have to do it every day. No excuses.
Practice more: How do the best become the best? They practice… every day. If what you want to do is become the greatest video creator you can be, make the best videos you can make, and build the largest following that you can, then let daily vlogging be your boot camp to reach those goals.
Please the YouTube algorithm: It’s true, YouTube wants to see that you are consistently posting fresh content. Every new video you upload will have a day or two to impress the algorithm, this metric is often referred to as view velocity . YouTube will give your video a lift, suggesting it to new viewers, if they see that it is being enjoyed. By publishing daily, you increase your chances of attracting more viewers.
Now that you know the benefits, how should you approach it?
The Dos and Don’ts of Daily Vlogging
1. Do Get Some Experience First
If you are starting out on YouTube, as in, you made one or two videos make sure you can vlog weekly for a few months before moving to daily. You wouldn’t run a marathon without training; you can hurt yourself if you do. Have an idea of what you are getting yourself into, otherwise, it can burn you out and ruin the joy of video creation for you completely.
2. Don’t Film Everything
Having a daily vlog does not mean always having the camera on. Every minute you film is a minute of footage you will have to watch later, a minute you will have to decide whether to cut from your final video. Every second of recorded footage is multiplied in the editing room and it would be impossible for you to meet your daily deadline if you have too much. The key is to start editing as you film, that way, you only film what you need. It doesn’t hurt to have extra footage, but being excessive can waste your time and add little to the final product.
3. Do Plan Out Your Day (Not Your Night)
Knowing where you need to go, who you are going to see and talk to, where you are going to have lunch, which route you are going to take home, and any other occurrences that can happen during the day will greatly increase your chances of success. A day is long and can be made longer when you have a video on your mind. Wouldn’t it be nice to save some of your decision making energy by having it all planned out? And if you are worried that over planning will reduce serendipitous moments that you want, don’t, your day won’t always go as planned… that’s just life.
Additionally, avoid filming at night. It will become a major stress to your health. Filming at night means pulling all-nighters to publish the next day, and then repeating that daily (nightly).
4. Don’t Spend too Long On a Script… Or Your Video
The beauty of daily vlog is to speak your mind and show your personality, not to perform a Shakespearean sonnet by heart. You shouldn’t try to memorize a whole script every day. That would be brutal! What you can have is an outline of the key points you want to hit, certain things you want to say, convey, or record to tell your story, knowing where you want certain cuts to happen helps too, but don’t workshop it too long, because tomorrow will be another show and done is better than perfect.
5. Do Use Templates, Presets, Hotkeys, and Shortcuts
Any chance you have to cut down on your editing time, use it. This means creating and properly storing templates of visuals you want to incorporate into your video. This means adding presets for effects that you feel you would use again. This means learning the editing hotkeys so you can streamline your process. Here are Filmora’s hotkeys .
6. Don’t Forget to Label Your Content
Staying organized is so important, especially as you begin to accumulate more and more footage. It might seem tedious initially, but this good habit can save you a lot of wasted hours later on when you need to find that specific shot that you swore you had…
7. Do Have A Goal
Have an idea of how long you are going to be going daily. Will it be one month, two months, or a year? Or will it be until you reach a certain amount of views, subscribers, or watch time? While it might feel liberating to venture into the great unknown without a clear destination, having a goal will allow you to keep motivated even when times are hard. After all, once you’ve hit your goal and still feel like there is more fuel in you, keep daily vlogging. There is no better feeling than exceeding your own expectations.
8. Don’t Worry About Equipment (But Be Aware of Bad Audio)
You’ve heard it before: you don’t need anything fancy to be a vlogger. If you are looking to increase your toolbox, we have a helpful YouTube gear starter guide for you. But look at it this way, there will be days when you realized that you forgot to charge the battery on your camera or that you left your tripod at home. Don’t abandon the whole project simply because you don’t have what you need.
The important thing is to film, tell a story, edit, and upload. You can do all that on your smartphone or computer webcam if you have to, so don’t let your equipment or lack thereof break your streak. If there is one thing you should put attention on is audio, if you don’t have excellent gear, try to avoid filming in loud places, such as construction sites, dance halls, or highway overpasses.
9. Do Bring a Camera With You Everywhere
Although you shouldn’t worry about your equipment, it is still a good habit to carry your camera with you everywhere. From the moment you wake up to the moment you go to sleep you are a daily vlogger, you never know when something will happen. Always be prepared. Your camera is to you, as a gun is to a soldier. It’s what sets you apart from all the civilians, so keep it close at hand.
10. Don’t Neglect Your Health
Earlier I compared daily vlogging to running a marathon, and like a marathon, there is a point where you need to be aware of yourself. You want to push yourself, but you don’t want to overdo it to a point where you damage your physical or mental health. Only you know when you have gone too far. If you feel like daily vlogging is ruining your life and the goal you set for yourself isn’t something you desire anymore, ask yourself: can I take a week off and decide if video creating is something I want to continue?
11. Do Watch Other Daily Vloggers
By seeing how other YouTubers have done daily vlogs, you can get ideas, see what aspect of their videos you like or dislike, and learn from their presentation, content, and community engagement. By watching daily vloggers, you can also start interacting with their content as well. It is always easier to stay motivated when you have support. By watching and reaching out to the daily vloggers you enjoy, you can build a network of people who are going through the same journey as you.
12. Don’t Forget About Your Audience
Remember that in the end, you are creating videos for someone else to enjoy. Even though you might be doing the daily vlog for yourself, if you want your viewers to return every day, you have to have an overall mission for your project. Is your message one that is aimed to motivate or do you want to document a journey? Don’t create your content in a vacuum, ask your viewers for feedback so you know how to improve.
Embarking on your daily vlogging adventure is not one to take lightly, but after 1 month, 1 season, or 1 year, you will be able to look back and see all that you have accomplished and feel proud. With the advice from this article, you can properly prepare yourself and enjoy each step of the process. Don’t overthink it, have fun!
Are you thinking of starting your daily vlog? Let us know what’s stopping you from the comments.
Richard Bennett
Richard Bennett is a writer and a lover of all things video.
Follow @Richard Bennett
Richard Bennett
Oct 26, 2023• Proven solutions
If you are making videos on YouTube, you’ll have come to a point where you feel daring enough to take on the ultimate challenge: daily vlogging.
You might have been inspired by other creators on YouTube or you might have heard of VEDA: Vlog every day April (or August). You might have also watched some videos from influencers telling you that the ruthless YouTube algorithm demands daily content if you aspire to grow an audience.
There are many reasons why you may want to try your hand at becoming a daily vlogger, but here are 3 motivating reasons to conquer your vlogging fears and get started.
Bonus Tip-The Best Daily Vlog Maker- Wondershare Filmora
Vlogging is an art and people use vlogging to upload videos daily to their YouTube channel. This is natural if you are recording videos daily, you will need a tool like Wondershare Filmora to edit your videos with precision. To make your task easy, Wondershare Filmora has all the features and effects that are required to edit a daily vlog video that you can upload directly from Filmora itself. You can make use of features like add text, background music, filters & effects, etc if you are a daily vlogger as it would help you a lot in making the video look professional in less time.
Why Daily Vlog Anyways?
Build discipline: Like exercising and eating healthy, you have to commit to it and do it regularly in order to see any lasting results. Vlogging is the same. However, if you’re a creator, making videos whenever you feel like it and want to give yourself a kick in the behind, daily vlogging is a practice that will keep you accountable. You have to do it every day. No excuses.
Practice more: How do the best become the best? They practice… every day. If what you want to do is become the greatest video creator you can be, make the best videos you can make, and build the largest following that you can, then let daily vlogging be your boot camp to reach those goals.
Please the YouTube algorithm: It’s true, YouTube wants to see that you are consistently posting fresh content. Every new video you upload will have a day or two to impress the algorithm, this metric is often referred to as view velocity . YouTube will give your video a lift, suggesting it to new viewers, if they see that it is being enjoyed. By publishing daily, you increase your chances of attracting more viewers.
Now that you know the benefits, how should you approach it?
The Dos and Don’ts of Daily Vlogging
1. Do Get Some Experience First
If you are starting out on YouTube, as in, you made one or two videos make sure you can vlog weekly for a few months before moving to daily. You wouldn’t run a marathon without training; you can hurt yourself if you do. Have an idea of what you are getting yourself into, otherwise, it can burn you out and ruin the joy of video creation for you completely.
2. Don’t Film Everything
Having a daily vlog does not mean always having the camera on. Every minute you film is a minute of footage you will have to watch later, a minute you will have to decide whether to cut from your final video. Every second of recorded footage is multiplied in the editing room and it would be impossible for you to meet your daily deadline if you have too much. The key is to start editing as you film, that way, you only film what you need. It doesn’t hurt to have extra footage, but being excessive can waste your time and add little to the final product.
3. Do Plan Out Your Day (Not Your Night)
Knowing where you need to go, who you are going to see and talk to, where you are going to have lunch, which route you are going to take home, and any other occurrences that can happen during the day will greatly increase your chances of success. A day is long and can be made longer when you have a video on your mind. Wouldn’t it be nice to save some of your decision making energy by having it all planned out? And if you are worried that over planning will reduce serendipitous moments that you want, don’t, your day won’t always go as planned… that’s just life.
Additionally, avoid filming at night. It will become a major stress to your health. Filming at night means pulling all-nighters to publish the next day, and then repeating that daily (nightly).
4. Don’t Spend too Long On a Script… Or Your Video
The beauty of daily vlog is to speak your mind and show your personality, not to perform a Shakespearean sonnet by heart. You shouldn’t try to memorize a whole script every day. That would be brutal! What you can have is an outline of the key points you want to hit, certain things you want to say, convey, or record to tell your story, knowing where you want certain cuts to happen helps too, but don’t workshop it too long, because tomorrow will be another show and done is better than perfect.
5. Do Use Templates, Presets, Hotkeys, and Shortcuts
Any chance you have to cut down on your editing time, use it. This means creating and properly storing templates of visuals you want to incorporate into your video. This means adding presets for effects that you feel you would use again. This means learning the editing hotkeys so you can streamline your process. Here are Filmora’s hotkeys .
6. Don’t Forget to Label Your Content
Staying organized is so important, especially as you begin to accumulate more and more footage. It might seem tedious initially, but this good habit can save you a lot of wasted hours later on when you need to find that specific shot that you swore you had…
7. Do Have A Goal
Have an idea of how long you are going to be going daily. Will it be one month, two months, or a year? Or will it be until you reach a certain amount of views, subscribers, or watch time? While it might feel liberating to venture into the great unknown without a clear destination, having a goal will allow you to keep motivated even when times are hard. After all, once you’ve hit your goal and still feel like there is more fuel in you, keep daily vlogging. There is no better feeling than exceeding your own expectations.
8. Don’t Worry About Equipment (But Be Aware of Bad Audio)
You’ve heard it before: you don’t need anything fancy to be a vlogger. If you are looking to increase your toolbox, we have a helpful YouTube gear starter guide for you. But look at it this way, there will be days when you realized that you forgot to charge the battery on your camera or that you left your tripod at home. Don’t abandon the whole project simply because you don’t have what you need.
The important thing is to film, tell a story, edit, and upload. You can do all that on your smartphone or computer webcam if you have to, so don’t let your equipment or lack thereof break your streak. If there is one thing you should put attention on is audio, if you don’t have excellent gear, try to avoid filming in loud places, such as construction sites, dance halls, or highway overpasses.
9. Do Bring a Camera With You Everywhere
Although you shouldn’t worry about your equipment, it is still a good habit to carry your camera with you everywhere. From the moment you wake up to the moment you go to sleep you are a daily vlogger, you never know when something will happen. Always be prepared. Your camera is to you, as a gun is to a soldier. It’s what sets you apart from all the civilians, so keep it close at hand.
10. Don’t Neglect Your Health
Earlier I compared daily vlogging to running a marathon, and like a marathon, there is a point where you need to be aware of yourself. You want to push yourself, but you don’t want to overdo it to a point where you damage your physical or mental health. Only you know when you have gone too far. If you feel like daily vlogging is ruining your life and the goal you set for yourself isn’t something you desire anymore, ask yourself: can I take a week off and decide if video creating is something I want to continue?
11. Do Watch Other Daily Vloggers
By seeing how other YouTubers have done daily vlogs, you can get ideas, see what aspect of their videos you like or dislike, and learn from their presentation, content, and community engagement. By watching daily vloggers, you can also start interacting with their content as well. It is always easier to stay motivated when you have support. By watching and reaching out to the daily vloggers you enjoy, you can build a network of people who are going through the same journey as you.
12. Don’t Forget About Your Audience
Remember that in the end, you are creating videos for someone else to enjoy. Even though you might be doing the daily vlog for yourself, if you want your viewers to return every day, you have to have an overall mission for your project. Is your message one that is aimed to motivate or do you want to document a journey? Don’t create your content in a vacuum, ask your viewers for feedback so you know how to improve.
Embarking on your daily vlogging adventure is not one to take lightly, but after 1 month, 1 season, or 1 year, you will be able to look back and see all that you have accomplished and feel proud. With the advice from this article, you can properly prepare yourself and enjoy each step of the process. Don’t overthink it, have fun!
Are you thinking of starting your daily vlog? Let us know what’s stopping you from the comments.
Richard Bennett
Richard Bennett is a writer and a lover of all things video.
Follow @Richard Bennett
Also read:
- YouTube Equipment for Gaming Channels - Best Gaming Gears
- Break the Ice - How to Make a Hit YouTube Reaction in Just 15 Minutes or Less for 2024
- In 2024, Authentic Audience Boosting Legal Practices That Work
- The Riches A Deep Dive Into Mr. Beast's Wealth
- A Beginner’s Pathway Building a Simple YouTube Signup for 2024
- Audiovisual Excellence The Premier Video Formats for YouTube
- [New] Elevate Your Content Steps to Boosting YouTube Visibility
- In 2024, Channel Identity Constructing Memorable Templates for Gamers
- Co-Production Strategies for Online Content Proliferation
- In 2024, Adding Richness YouTube Videos in Slideshows
- [New] Comedy Canvas Painting Laughter with Top 10 Video Concepts
- From Ordinary to Outstanding Crafting Unique Shorts Thumbnails
- [Updated] A Quick Tutorial On How To Convert Image To YouTube Thumbnail
- YouTube Playlist Rearrangement Made Simple
- The Ultimate How-To for Your YouTube Music Collection
- Deciphering the Code Understanding What 'Unlisted' On YouTube Means for 2024
- [New] Edit Like a Champion—Top Strategies for Beginner YouTubers
- [New] Flavorful Feeds World Class TikTok Foodies
- How To Change Vivo Y36i Lock Screen Password?
- Best Subtitle Converters Win & Mac Edition, Leading 8 SBT to SRTR Tools for 2024
- [Updated] In 2024, Vidma Screen Recorder Review
- How to use iSpoofer on Sony Xperia 10 V? | Dr.fone
- 2024 Approved Proven Strategies for Vimeo Media Insertion in PPTs
- In 2024, Byte-to-GB A Day's Long Film Storage Needs
- [Updated] Top 10+ Instagram Content Downloaders Reviewed
- [Updated] In 2024, Signs You're Not in Someone's Contact List
- Lenovo Simple Recording Techniques
- Assessing VLC's Competitors and Contenders
- Additional Tips About Sinnoh Stone For Tecno Spark 10 4G | Dr.fone
- [Updated] In 2024, Joining Google Meet A Step-by-Step Guide
- [New] 2024 Approved Starting a New Chapter Establishing an Enterprise IG Page
- Is your OnePlus 12 working too slow? Heres how you can hard reset it | Dr.fone
- [Updated] Navigating TikTok's Voiceover Landscape for 2024
- Title: SEO Essentials for Climbing the YouTube Popularity Ladder
- Author: Brian
- Created at : 2024-05-25 12:49:00
- Updated at : 2024-05-26 12:49:00
- Link: https://youtube-video-recordings.techidaily.com/seo-essentials-for-climbing-the-youtube-popularity-ladder/
- License: This work is licensed under CC BY-NC-SA 4.0.
