"Self-Filmed Brilliance Secrets for YouTube Success"
Self-Filmed Brilliance: Secrets for YouTube Success
4 Ways To Set Up Your Talking-Head Shots For YouTube

Richard Bennett
Oct 26, 2023• Proven solutions
A big part of being a YouTuber involves talking to the camera. How you set up your talking-head shot depends on many factors, including how much space you have, what kind of look you’re going for, and how many people you want to fit in one frame. Here are four ways to set up your talking-head shots for YouTube.
| Table of Contents 1. Close Quarters Wide-Angle Vlog Set-Up2. Medium Vlog Set-Up3. Two Person Vlog Set-Up4. Long Teleprompter Vlog Set-Up |
|---|
How to Set Up Your Talking Heads Shots for YouTube Video [Infographic]
We’ve summarized the key points about setting up talking head style video shots with the Infographic below. It is welcomed to share on social media.

How to Set Up Your Talking-Head Shots for YouTube [4 Ways]
1. Close Quarters Wide-Angle Vlog Set-Up
Don’t have a lot of space to set up your camera and lighting equipment? No problem! You can be within an arm’s length away from your camera with a close quarters wide-angle vlog set-up.
With this set-up, you’re going to need a camera with a wide-angle lens, a tripod, a camera-mounted shotgun mic for sound, and a ring light for light.
Set your camera on the tripod and mount the shotgun mic directly on the camera shoe (the electronic bracket on the top of the camera). Inside the circular space of your ring light, position your camera right in the middle of it so that you can shoot your video through it without getting any part of the lighting equipment in your shot.
In the video above, Sean Cannell demonstrates this set-up. As you can see from this example, the wide-angle lens is able to squeeze in a lot of what’s in front of the camera into the shot.
Objects and people that just make it into the sides of the frame will appear more stretched out as the wide-angle causes distortion and enhances perspectives.
If you look closely into Sean’s eyes, you can also see a specular highlight in the shape of a circle. Many people like the way eyes look against a ring light.
2. Medium Vlog Set-Up
If you have more space and want to shoot a more professional-looking talking-head shot with more realistic perspectives, a medium vlog set-up may be a better alternative for you.
For this set-up, you’ll be using a slightly longer standard/normal lens (like a 35mm or a 50mm lens) attached to your camera which would be set on a tripod. Since this longer lens will show less of the surrounding areas as it “zooms” closer into whatever is in front, you will need to sit further back, away from your camera.
Now that you’re further away from your camera, a camera-mounted shotgun mic may not be the best mic for you. For better sound recording, you’ll need a shotgun mic fixed on a mic stand that is set up like a boom mic, positioned just outside of your camera frame.
At the 39 second mark of the above video, electronic music producer deadmau5 is positioned right in the center of this particular set-up.
You can see from how even the background and couch looks across the entire camera frame that there is no distortion or enhanced perspective.
It appears that, to the right of deadmau5 (camera left), there is a key light and to his left (camera right) there may be a fill light for additional lighting. Behind the couch, there’s also a background uplight to create depth between the subject and the background. At the 1:30 mark of this trailer video, you can briefly see how the Masterclass camera crew set up their shot.
3. Two Person Vlog Set-Up
If your talking-head shot has got to include two people, you can use a similar set-up as the medium vlog set-up detailed above.
If you look back at the 39-second mark of deadmau5’s Masterclass trailer, you can see that there’s a lot of space to the left and right of deadmau5. Now imagine the same shot but with two people.
With two people, though, you’ll want to set up your mic slightly differently. Rather than using a directional shotgun mic with a narrow area of sensitivity, you’ll want to use a directional mic with a wider area of sensitivity.
4. Long Teleprompter Vlog Set-Up
If you want to read over a script but still make it appear like you’re looking straight into the camera, you’ll need to use a long teleprompter vlog set-up.
For this set-up, you’ll need all the same equipment as the medium vlog set-up, but you’ll additionally need a teleprompter placed in front of your camera equipped with a long telephoto lens.
You will have to sit much further back away from your camera for two main reasons. Firstly, you want to be able to fit yourself in your much more zoomed-in camera frame (effect of the long telephoto lens). Secondly, you want to be far enough that the camera cannot detect your eyes reading from left to right. You’ll want to be around six meters away from a 17” teleprompter monitor or around four meters away from a 10” teleprompter monitor.
In the above video, Jared Polin uses a long teleprompter vlog set-up.
In the video, he says there’s about 8 feet (2.4 meters) between himself and his lens. At the 1:15 mark of his video, Jared demonstrates how this set-up works.
It is difficult to know whether the movement in his eyes is caused by not being far enough from the lens or from his horizontal nystagmus condition in his eyes.
Looking to find the right lights for your video recording set? Check out our Top 17 Video Lighting Equipment For YouTubers .
Tips for Making a Talking Head Video Better
To make a talking-head video more interesting, you can add some background music to the video, apply some interesting texts or elements. Filmora has built-in royalty-free music tracks and sound effects as well as text templates , filters and motivating elements. Download the free trial version below and release your creativity.


Richard Bennett
Richard Bennett is a writer and a lover of all things video.
Follow @Richard Bennett
Richard Bennett
Oct 26, 2023• Proven solutions
A big part of being a YouTuber involves talking to the camera. How you set up your talking-head shot depends on many factors, including how much space you have, what kind of look you’re going for, and how many people you want to fit in one frame. Here are four ways to set up your talking-head shots for YouTube.
| Table of Contents 1. Close Quarters Wide-Angle Vlog Set-Up2. Medium Vlog Set-Up3. Two Person Vlog Set-Up4. Long Teleprompter Vlog Set-Up |
|---|
How to Set Up Your Talking Heads Shots for YouTube Video [Infographic]
We’ve summarized the key points about setting up talking head style video shots with the Infographic below. It is welcomed to share on social media.
How to Set Up Your Talking-Head Shots for YouTube [4 Ways]
1. Close Quarters Wide-Angle Vlog Set-Up
Don’t have a lot of space to set up your camera and lighting equipment? No problem! You can be within an arm’s length away from your camera with a close quarters wide-angle vlog set-up.
With this set-up, you’re going to need a camera with a wide-angle lens, a tripod, a camera-mounted shotgun mic for sound, and a ring light for light.
Set your camera on the tripod and mount the shotgun mic directly on the camera shoe (the electronic bracket on the top of the camera). Inside the circular space of your ring light, position your camera right in the middle of it so that you can shoot your video through it without getting any part of the lighting equipment in your shot.
In the video above, Sean Cannell demonstrates this set-up. As you can see from this example, the wide-angle lens is able to squeeze in a lot of what’s in front of the camera into the shot.
Objects and people that just make it into the sides of the frame will appear more stretched out as the wide-angle causes distortion and enhances perspectives.
If you look closely into Sean’s eyes, you can also see a specular highlight in the shape of a circle. Many people like the way eyes look against a ring light.
2. Medium Vlog Set-Up
If you have more space and want to shoot a more professional-looking talking-head shot with more realistic perspectives, a medium vlog set-up may be a better alternative for you.
For this set-up, you’ll be using a slightly longer standard/normal lens (like a 35mm or a 50mm lens) attached to your camera which would be set on a tripod. Since this longer lens will show less of the surrounding areas as it “zooms” closer into whatever is in front, you will need to sit further back, away from your camera.
Now that you’re further away from your camera, a camera-mounted shotgun mic may not be the best mic for you. For better sound recording, you’ll need a shotgun mic fixed on a mic stand that is set up like a boom mic, positioned just outside of your camera frame.
At the 39 second mark of the above video, electronic music producer deadmau5 is positioned right in the center of this particular set-up.
You can see from how even the background and couch looks across the entire camera frame that there is no distortion or enhanced perspective.
It appears that, to the right of deadmau5 (camera left), there is a key light and to his left (camera right) there may be a fill light for additional lighting. Behind the couch, there’s also a background uplight to create depth between the subject and the background. At the 1:30 mark of this trailer video, you can briefly see how the Masterclass camera crew set up their shot.
3. Two Person Vlog Set-Up
If your talking-head shot has got to include two people, you can use a similar set-up as the medium vlog set-up detailed above.
If you look back at the 39-second mark of deadmau5’s Masterclass trailer, you can see that there’s a lot of space to the left and right of deadmau5. Now imagine the same shot but with two people.
With two people, though, you’ll want to set up your mic slightly differently. Rather than using a directional shotgun mic with a narrow area of sensitivity, you’ll want to use a directional mic with a wider area of sensitivity.
4. Long Teleprompter Vlog Set-Up
If you want to read over a script but still make it appear like you’re looking straight into the camera, you’ll need to use a long teleprompter vlog set-up.
For this set-up, you’ll need all the same equipment as the medium vlog set-up, but you’ll additionally need a teleprompter placed in front of your camera equipped with a long telephoto lens.
You will have to sit much further back away from your camera for two main reasons. Firstly, you want to be able to fit yourself in your much more zoomed-in camera frame (effect of the long telephoto lens). Secondly, you want to be far enough that the camera cannot detect your eyes reading from left to right. You’ll want to be around six meters away from a 17” teleprompter monitor or around four meters away from a 10” teleprompter monitor.
In the above video, Jared Polin uses a long teleprompter vlog set-up.
In the video, he says there’s about 8 feet (2.4 meters) between himself and his lens. At the 1:15 mark of his video, Jared demonstrates how this set-up works.
It is difficult to know whether the movement in his eyes is caused by not being far enough from the lens or from his horizontal nystagmus condition in his eyes.
Looking to find the right lights for your video recording set? Check out our Top 17 Video Lighting Equipment For YouTubers .
Tips for Making a Talking Head Video Better
To make a talking-head video more interesting, you can add some background music to the video, apply some interesting texts or elements. Filmora has built-in royalty-free music tracks and sound effects as well as text templates , filters and motivating elements. Download the free trial version below and release your creativity.
Richard Bennett
Richard Bennett is a writer and a lover of all things video.
Follow @Richard Bennett
Richard Bennett
Oct 26, 2023• Proven solutions
A big part of being a YouTuber involves talking to the camera. How you set up your talking-head shot depends on many factors, including how much space you have, what kind of look you’re going for, and how many people you want to fit in one frame. Here are four ways to set up your talking-head shots for YouTube.
| Table of Contents 1. Close Quarters Wide-Angle Vlog Set-Up2. Medium Vlog Set-Up3. Two Person Vlog Set-Up4. Long Teleprompter Vlog Set-Up |
|---|
How to Set Up Your Talking Heads Shots for YouTube Video [Infographic]
We’ve summarized the key points about setting up talking head style video shots with the Infographic below. It is welcomed to share on social media.
How to Set Up Your Talking-Head Shots for YouTube [4 Ways]
1. Close Quarters Wide-Angle Vlog Set-Up
Don’t have a lot of space to set up your camera and lighting equipment? No problem! You can be within an arm’s length away from your camera with a close quarters wide-angle vlog set-up.
With this set-up, you’re going to need a camera with a wide-angle lens, a tripod, a camera-mounted shotgun mic for sound, and a ring light for light.
Set your camera on the tripod and mount the shotgun mic directly on the camera shoe (the electronic bracket on the top of the camera). Inside the circular space of your ring light, position your camera right in the middle of it so that you can shoot your video through it without getting any part of the lighting equipment in your shot.
In the video above, Sean Cannell demonstrates this set-up. As you can see from this example, the wide-angle lens is able to squeeze in a lot of what’s in front of the camera into the shot.
Objects and people that just make it into the sides of the frame will appear more stretched out as the wide-angle causes distortion and enhances perspectives.
If you look closely into Sean’s eyes, you can also see a specular highlight in the shape of a circle. Many people like the way eyes look against a ring light.
2. Medium Vlog Set-Up
If you have more space and want to shoot a more professional-looking talking-head shot with more realistic perspectives, a medium vlog set-up may be a better alternative for you.
For this set-up, you’ll be using a slightly longer standard/normal lens (like a 35mm or a 50mm lens) attached to your camera which would be set on a tripod. Since this longer lens will show less of the surrounding areas as it “zooms” closer into whatever is in front, you will need to sit further back, away from your camera.
Now that you’re further away from your camera, a camera-mounted shotgun mic may not be the best mic for you. For better sound recording, you’ll need a shotgun mic fixed on a mic stand that is set up like a boom mic, positioned just outside of your camera frame.
At the 39 second mark of the above video, electronic music producer deadmau5 is positioned right in the center of this particular set-up.
You can see from how even the background and couch looks across the entire camera frame that there is no distortion or enhanced perspective.
It appears that, to the right of deadmau5 (camera left), there is a key light and to his left (camera right) there may be a fill light for additional lighting. Behind the couch, there’s also a background uplight to create depth between the subject and the background. At the 1:30 mark of this trailer video, you can briefly see how the Masterclass camera crew set up their shot.
3. Two Person Vlog Set-Up
If your talking-head shot has got to include two people, you can use a similar set-up as the medium vlog set-up detailed above.
If you look back at the 39-second mark of deadmau5’s Masterclass trailer, you can see that there’s a lot of space to the left and right of deadmau5. Now imagine the same shot but with two people.
With two people, though, you’ll want to set up your mic slightly differently. Rather than using a directional shotgun mic with a narrow area of sensitivity, you’ll want to use a directional mic with a wider area of sensitivity.
4. Long Teleprompter Vlog Set-Up
If you want to read over a script but still make it appear like you’re looking straight into the camera, you’ll need to use a long teleprompter vlog set-up.
For this set-up, you’ll need all the same equipment as the medium vlog set-up, but you’ll additionally need a teleprompter placed in front of your camera equipped with a long telephoto lens.
You will have to sit much further back away from your camera for two main reasons. Firstly, you want to be able to fit yourself in your much more zoomed-in camera frame (effect of the long telephoto lens). Secondly, you want to be far enough that the camera cannot detect your eyes reading from left to right. You’ll want to be around six meters away from a 17” teleprompter monitor or around four meters away from a 10” teleprompter monitor.
In the above video, Jared Polin uses a long teleprompter vlog set-up.
In the video, he says there’s about 8 feet (2.4 meters) between himself and his lens. At the 1:15 mark of his video, Jared demonstrates how this set-up works.
It is difficult to know whether the movement in his eyes is caused by not being far enough from the lens or from his horizontal nystagmus condition in his eyes.
Looking to find the right lights for your video recording set? Check out our Top 17 Video Lighting Equipment For YouTubers .
Tips for Making a Talking Head Video Better
To make a talking-head video more interesting, you can add some background music to the video, apply some interesting texts or elements. Filmora has built-in royalty-free music tracks and sound effects as well as text templates , filters and motivating elements. Download the free trial version below and release your creativity.
Richard Bennett
Richard Bennett is a writer and a lover of all things video.
Follow @Richard Bennett
The Key Role of YouTube Trailers in Enhancing Revenue
How to Create a YouTube Channel Trailer to Increase Revenue
Richard Bennett
Mar 27, 2024• Proven solutions
Many YouTube content creators assume that no one checks out their channel trailer . Some may not even know about the concept of a trailer, while others are not sure how to create one. We will explain the concept of a YouTube channel trailer, how to make a great trailer, and how to get more subscribers and views through a quality trailer on your YouTube channel.
- Part1: What is a YouTube Channel Trailer
- Part2: How to Add YouTube Trailer to Channel
- Part3: Best YouTube Trailer Maker
- Part4: 5 Tips for Creating a Great Trailer
Part 1: What is a YouTube Channel Trailer?
Think of a channel trailer as an introduction to a movie or television show. You can choose to show the trailer to anyone who is not subscribe to your channel, when they land on your channel page.
The objective of a trailer is to hook the audience, promote your personality and content, and convince them it will be worth their time to check out some of your videos. And you must do all these things within 30 to 45 seconds !
Most content creators can benefit from creating a channel trailer. Unless you are a famous personality through a sports/acting/television/singing career, people who land on your channel may have no idea who you are. A proper trailer gives them an introduction to your personality and content.
Part 2: How to Add YouTube Trailer to Channel
After you know how to create a YouTube trail, why not add your new created trailer to YouTube channel right now. Here is the right steps.
Step 1: Go to channel
Log in your YouTube account. Then click your users icon to find My channel. At the top right corner, click CUSTOMIZE CHANNEL and then choose For new visitors.
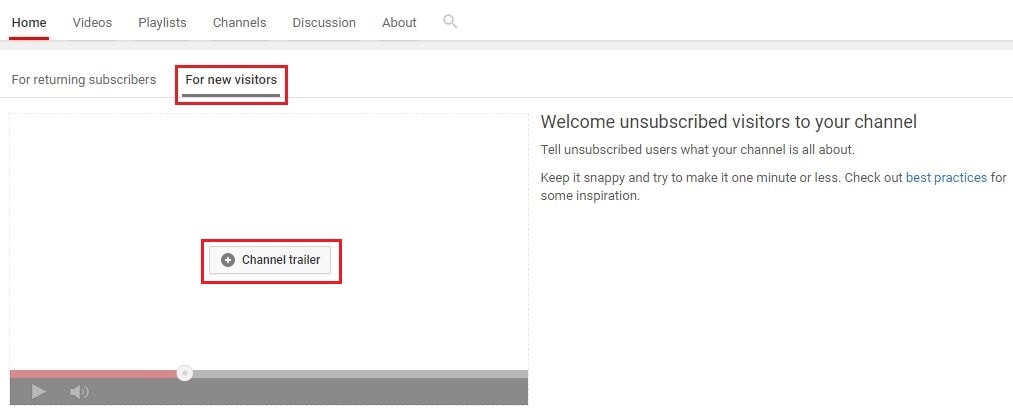
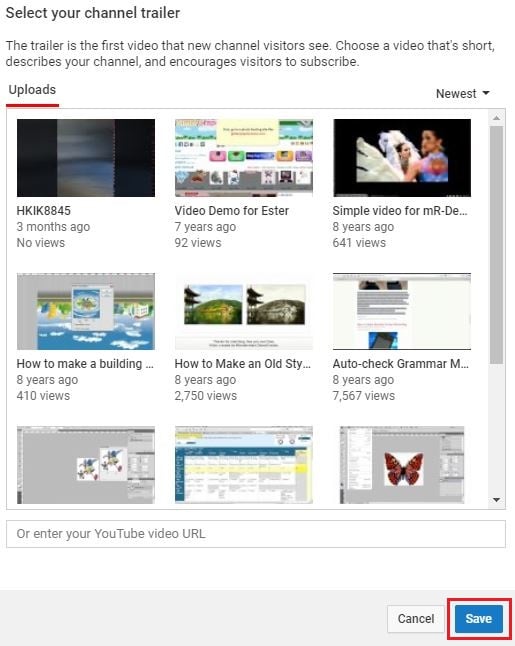
Step 2: Add trailer to YouTube
After clicking plus icon in the middle to add your amazing trailer, a playlist window will appear. Now select the trailer you want to use. Click Save. Then you will see a trailer is added. You can also change trailer or remove trailer.
Part 3: Best Channel YouTube Trailer Maker
1. Wondershare Filmora
Searching for a free and powerful video editing tool that you can use on both Windows and Mac computers? Wondershare Filmora may be the ideal program for you. It is very easy to use, even for beginners who do not have that much editing experience.
Features:
- It is free and very easy to add captions to the trailer video.
- There are many interesting options for adding video effects within the program.
- It features a modern interface that is intuitive and easy to operate. All the important controls and settings are easily accessible through the menus and submenus.
- The program operates smoothly, even on older machines.
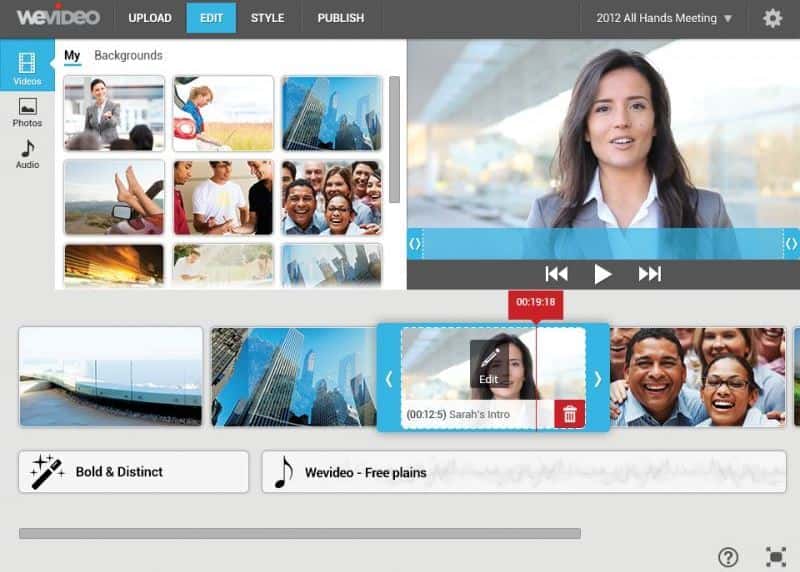
2. WeVideo
Hoping to edit content while you are on the go? By using a less powerful laptop, library computer or a friend’s device, you could edit your trailer within a couple hours. WeVideo is an online video editor that makes it so easy to edit videos in up to 4K resolution.
Features:
- The program is fast and very easy to use. It does not even require any downloads.
- As it is an online program, there are no compatibility issues with Windows, Mac or even Chromebook devices.
- It is possible to mix and match up to 600 different formats for graphics, audio, video and other effects.
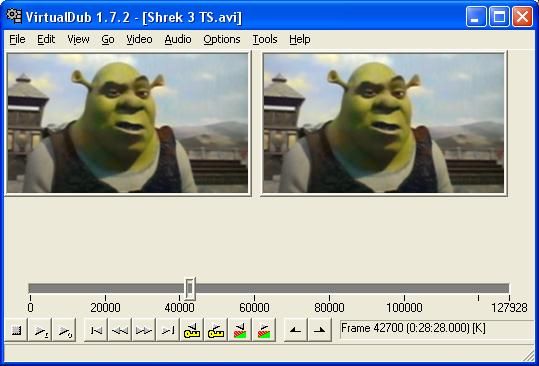
3. Virtual Dub
If you are seeking something that is open source and free, you may be interested in Virtual Dub. It is a completely free and open source program that you can use for quick capturing, encoding and editing video.
While it is not going to give you the same power and options as some of the other editors, it is a very simple tool that can be effective for specific use cases. If you are just hoping to record, encode and quickly put together a 30 second YouTube trailer, it is the ideal program.
Features:
- Offers the ability to capture videos on Windows, Mac and Linux computers.
- Works best with AVI files, but it is possible to use other video formats such as MKV and MP4 as well.
- It is possible to create video using a series of image files - or merge image files into existing video content.
Part 4: 5 Tips for Creating a Great Trailer
1. Let Viewers Know What is Coming
People appreciate routine. You can mention how many times a week you create content and the days when you publish. You can also have a brief overview of the type of videos you make, which will tell a new viewer what to expect if they subscribe to your channel!
2. Keep It Short
YouTube trailers that are more than a minute long will not succeed. People have a very short attention span. They want to be hooked immediately. 30 to 45 seconds is the sweet spot, with 30 seconds preferable! It may sound overwhelming to condense everything about your channel into 30 seconds, but that is where a great video script can help! However, sometimes both short videos and long videos work.
3. Use Some Fun Annotations
YouTube is great for having unique and helpful graphics on the screen while your video is playing. Having some fun and useful annotations, such as the days you make videos or a subscribe icon, during the intro video can be very helpful to new viewers. They also help to boost viewer engagement with your content!

4. Assume You Have New Viewers
Do not create a YouTube channel trailer with inside jokes or comments. This trailer is for people who know nothing about you or your channel. You are trying to hook them into your content, not provide a few laughs to existing subscribers.
5. Update Your Trailer Regularly
As a content creator, you may find that your brand changes every six months to a year. Maybe you change up your look, type of content, frequency of uploads or other parts of the channel. Ensure you are updating your trailer each time you make significant changes to your channel!
Conclusion
Creating a channel trailer for your YouTube page is a wonderful way to introduce a new audience to your content. They learn about you and the topics that you are passionate about. It convinces them to watch one of your videos and subscribe to your channel. And by using one of the YouTube Trailer Maker software options above, you will be creating quality trailers for your channel in no time!
Richard Bennett
Richard Bennett is a writer and a lover of all things video.
Follow @Richard Bennett
Richard Bennett
Mar 27, 2024• Proven solutions
Many YouTube content creators assume that no one checks out their channel trailer . Some may not even know about the concept of a trailer, while others are not sure how to create one. We will explain the concept of a YouTube channel trailer, how to make a great trailer, and how to get more subscribers and views through a quality trailer on your YouTube channel.
- Part1: What is a YouTube Channel Trailer
- Part2: How to Add YouTube Trailer to Channel
- Part3: Best YouTube Trailer Maker
- Part4: 5 Tips for Creating a Great Trailer
Part 1: What is a YouTube Channel Trailer?
Think of a channel trailer as an introduction to a movie or television show. You can choose to show the trailer to anyone who is not subscribe to your channel, when they land on your channel page.
The objective of a trailer is to hook the audience, promote your personality and content, and convince them it will be worth their time to check out some of your videos. And you must do all these things within 30 to 45 seconds !
Most content creators can benefit from creating a channel trailer. Unless you are a famous personality through a sports/acting/television/singing career, people who land on your channel may have no idea who you are. A proper trailer gives them an introduction to your personality and content.
Part 2: How to Add YouTube Trailer to Channel
After you know how to create a YouTube trail, why not add your new created trailer to YouTube channel right now. Here is the right steps.
Step 1: Go to channel
Log in your YouTube account. Then click your users icon to find My channel. At the top right corner, click CUSTOMIZE CHANNEL and then choose For new visitors.
Step 2: Add trailer to YouTube
After clicking plus icon in the middle to add your amazing trailer, a playlist window will appear. Now select the trailer you want to use. Click Save. Then you will see a trailer is added. You can also change trailer or remove trailer.
Part 3: Best Channel YouTube Trailer Maker
1. Wondershare Filmora
Searching for a free and powerful video editing tool that you can use on both Windows and Mac computers? Wondershare Filmora may be the ideal program for you. It is very easy to use, even for beginners who do not have that much editing experience.
Features:
- It is free and very easy to add captions to the trailer video.
- There are many interesting options for adding video effects within the program.
- It features a modern interface that is intuitive and easy to operate. All the important controls and settings are easily accessible through the menus and submenus.
- The program operates smoothly, even on older machines.
2. WeVideo
Hoping to edit content while you are on the go? By using a less powerful laptop, library computer or a friend’s device, you could edit your trailer within a couple hours. WeVideo is an online video editor that makes it so easy to edit videos in up to 4K resolution.
Features:
- The program is fast and very easy to use. It does not even require any downloads.
- As it is an online program, there are no compatibility issues with Windows, Mac or even Chromebook devices.
- It is possible to mix and match up to 600 different formats for graphics, audio, video and other effects.
3. Virtual Dub
If you are seeking something that is open source and free, you may be interested in Virtual Dub. It is a completely free and open source program that you can use for quick capturing, encoding and editing video.
While it is not going to give you the same power and options as some of the other editors, it is a very simple tool that can be effective for specific use cases. If you are just hoping to record, encode and quickly put together a 30 second YouTube trailer, it is the ideal program.
Features:
- Offers the ability to capture videos on Windows, Mac and Linux computers.
- Works best with AVI files, but it is possible to use other video formats such as MKV and MP4 as well.
- It is possible to create video using a series of image files - or merge image files into existing video content.
Part 4: 5 Tips for Creating a Great Trailer
1. Let Viewers Know What is Coming
People appreciate routine. You can mention how many times a week you create content and the days when you publish. You can also have a brief overview of the type of videos you make, which will tell a new viewer what to expect if they subscribe to your channel!
2. Keep It Short
YouTube trailers that are more than a minute long will not succeed. People have a very short attention span. They want to be hooked immediately. 30 to 45 seconds is the sweet spot, with 30 seconds preferable! It may sound overwhelming to condense everything about your channel into 30 seconds, but that is where a great video script can help! However, sometimes both short videos and long videos work.
3. Use Some Fun Annotations
YouTube is great for having unique and helpful graphics on the screen while your video is playing. Having some fun and useful annotations, such as the days you make videos or a subscribe icon, during the intro video can be very helpful to new viewers. They also help to boost viewer engagement with your content!
4. Assume You Have New Viewers
Do not create a YouTube channel trailer with inside jokes or comments. This trailer is for people who know nothing about you or your channel. You are trying to hook them into your content, not provide a few laughs to existing subscribers.
5. Update Your Trailer Regularly
As a content creator, you may find that your brand changes every six months to a year. Maybe you change up your look, type of content, frequency of uploads or other parts of the channel. Ensure you are updating your trailer each time you make significant changes to your channel!
Conclusion
Creating a channel trailer for your YouTube page is a wonderful way to introduce a new audience to your content. They learn about you and the topics that you are passionate about. It convinces them to watch one of your videos and subscribe to your channel. And by using one of the YouTube Trailer Maker software options above, you will be creating quality trailers for your channel in no time!
Richard Bennett
Richard Bennett is a writer and a lover of all things video.
Follow @Richard Bennett
Also read:
- [Updated] Earn Big on YouTube Shorts Tips for Profitable Content Creation
- 2024 Approved Tips for Shaping Images with Photoshop Curves
- A Step-by-Step Guide for Earning with YouTube Shorts
- ABBYY Announces Chip vonBurg's Appointment to Chief of Strategic Customer Growth Initiatives
- Accelerated Learning for Chromakey Artistry
- Choosing Your Smart Entryway: A Thorough Examination of Ring vs Nest Bell Systems
- Editor's Dream Machine Top Portable Video Edits Tools for 2024
- Effortless Transferring 5 Pathways to Download IGTV on Computers for 2024
- Elevate Your Channel Hit the 10,000 View Mark Fast!
- Gross Income Strategies for Podcasters
- In 2024, Ultimate Guide to iPhone/Android Photo Editors
- In 2024, Unlock Apple ID without Phone Number From iPhone 11
- Resolved: Troubleshooting Lag in Forza Horizon 5 - Tips & Fixes
- Tomorrow's Reality Progress in Virtual Worlds for 2024
- Title: Self-Filmed Brilliance Secrets for YouTube Success
- Author: Brian
- Created at : 2024-10-12 16:57:12
- Updated at : 2024-10-18 18:29:52
- Link: https://youtube-video-recordings.techidaily.com/self-filmed-brilliance-secrets-for-youtube-success/
- License: This work is licensed under CC BY-NC-SA 4.0.