
"Seamless Screen Stretch Cycle YouTube on Television Display"
Seamless Screen Stretch: Cycle YouTube on Television Display
Loop is a YouTube video format that allows viewers to watch a continuous sequence of videos. Loop is similar to traditional YouTube videos, but it can be played on a TV screen like a traditional TV show. Loop is a great way to keep viewers engaged with your content. It’s like a one-stop shop for all your content needs. You can use it to promote your latest video series.
Why looping YouTube videos on a TV is a great idea? First, it can be a fun way to watch your favorite videos without having to worry about the time. Second, it can be a way to save money on your cable. By watching your favorite videos on loop, you can cut down on the number of times you need to watch them.
If you are watching a series of videos, for example, looping them can help you to remember what happened in each one. Secondly, it can help you to learn new information more easily. If you are watching a tutorial or a video about a new topic, looping can help you to remember the details better.
Free Download For Win 7 or later(64-bit)
Free Download For macOS 10.14 or later


Part 1: How to Create a Loop Video for YouTube
There is a lot of debate around whether or not creating a loop video is necessary for success on YouTube. Some people believe that it’s not necessary, while others believe that it is a must. The main benefit of creating a loop video is that it helps to keep your audience engaged. It also helps to create a sense of continuity between your videos.
Creating a loop video for your YouTube channel increases engagement because viewers can watch the video over and over again. This can lead to more clicks on your ads, which can lead to more revenue. It can also increase your subscribers and views. Maybe some people want to watch the same video multiple times in a row without having to keep pressing the play button on the remote.
Filmora is the best video loop editor:
If you need a powerful video editing tool that will let you create high-quality clips with multiple loops, look no further than Filmora . This software allows you to make various loops of your videos for use in social media, on your website or wherever desired. Plus, with Filmora, there is no limit on the number of loops you can create.
Loop video works well for corporate presentations, tutorials, explainer videos, and much more. You can create looping videos by choosing from one of Filmora’s many templates or creating your own. It’s easy to get started with looping video editing in Filmora! Some people want to watch a video while they do other things, like work on the computer.
Filmora is incredibly easy to use. You can quickly create videos by importing footage, editing and adding effects, and exporting your videos. Plus, the software has several built-in tools that let you customize your videos further. It has many features that make it an excellent choice for anyone looking to create high-quality videos quickly and easily.
How can we loop a video on Filmora? Follow these steps to create a looping video on Filmora:
Step 1 Download the Filmora and create a project
Free Download For Win 7 or later(64-bit)
Free Download For macOS 10.14 or later
You can download the Filmora for free. After installation of this software open it and click on Create New Project. Filmora is not only the video maker or editor, you can also add text and music to your videos, and share them on social media or with friends.

Step 2 Open the video and make copies
Open the video in your timeline. All you need to do is right-click on the video and click on copy. Then simply click or press Ctrl+V on your keyboard and do that for times. You can make as many copies as you want. Then you will have the same clip over and over again which creates the loop effect.
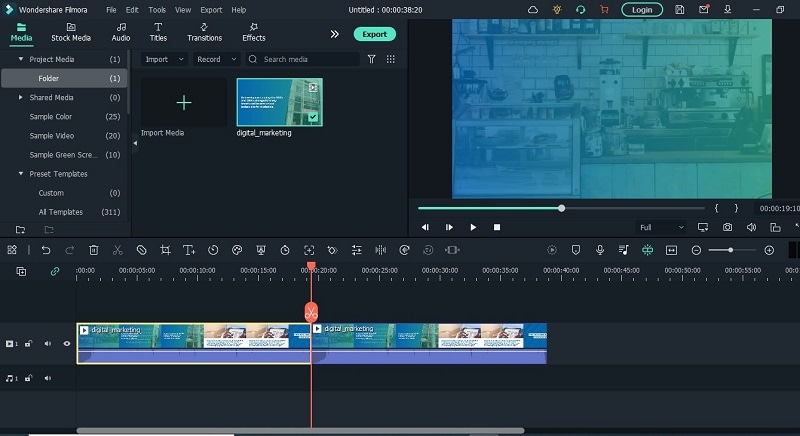
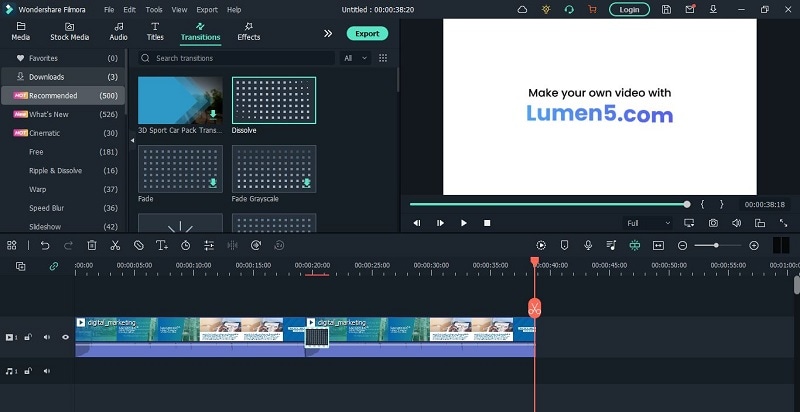
Step 3 Add Transition or any title in the video
After making copies of your video. Add some transitions in your video. Adding transitions to videos can help to keep your videos looking polished and professional. Not only do transitions add an extra layer of visual interest, but they can also help to underscore specific points in your video.
Benefits to create loop video on Filmora
There are many benefits to creating looping videos, especially when using a tool like Filmora. Loop videos are great for social media since they can be set to play on a loop and are viewable without sound. They’re also perfect for short attention spans since you can watch them over and over again without getting bored.
This can be useful for marketing purposes, as it can keep people interested in your video content. Additionally, looping can create a more engaging video experience for viewers, as it keeps them engaged by playing the same clip over and over again. You can easily add captions, and titles to your loop video.
When viewers can pause, rewind, and playback a video over and over again, they are more engaged with it. This increases the chances that they will watch the entire video, and may even share it with friends. You can create a sense of community and connection with your customers. And best of all? You can keep the magic going by adding sound effects and music!
Part 2: Loop a YouTube Video on TV from a Mobile
One of the great features of YouTube is that you can loop YouTube videos on your TV. This means that you can watch a video over and over again without having to fast forward through it. This is great for kids who are constantly asking to watch the same video over and over again. You can also use this feature to watch videos that you have missed.
There is something about relaxing music on the loop that can help to take the edge off. Whether it’s to help you wind down before bed, or to help you relax after a long day, there’s no doubt that looping YouTube on TV can be helpful. Whether you’re looking for something light and calming, or something to help you wind down after a long day, there’s sure to be something on YouTube that can fit the bill.
Let’s have a look at some steps that how to repeat YouTube videos on smart TV.
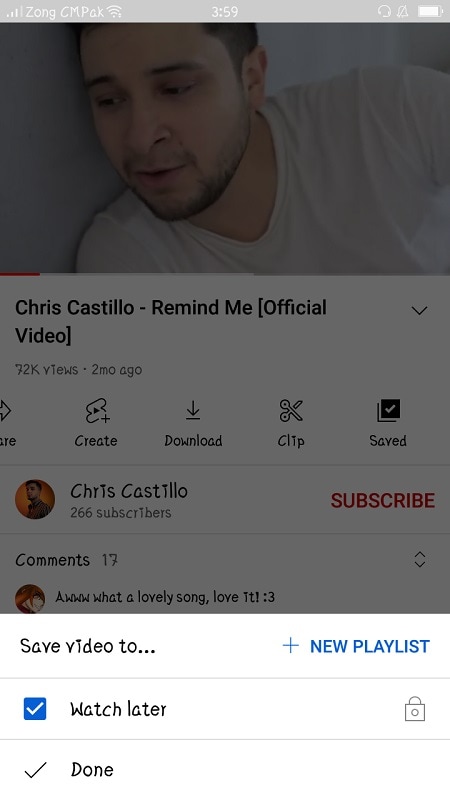
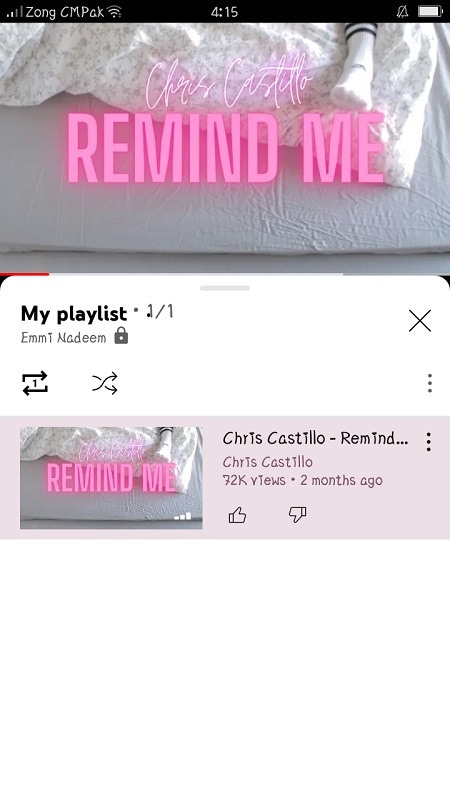
Step 1 Create a Playlist of one or multiple videos
The YouTube app is available on the google play store. You can easily download it from your mobile phones, android, etc. When you open a video on YouTube, several options will appear (like, share, subscribe). You can save the video in your existing playlist or you can create a new playlist.
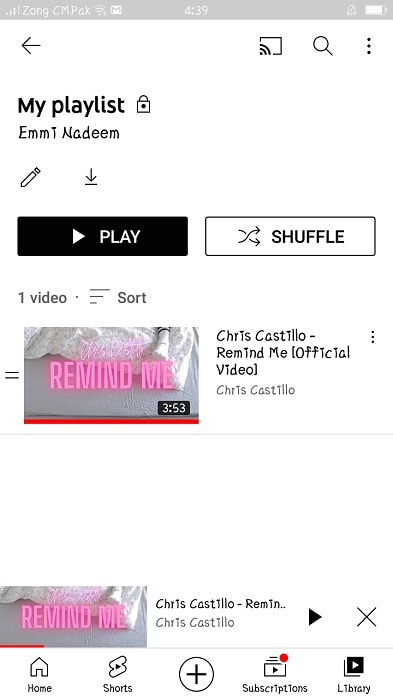
Step 2 Go to the library and select the loop symbol
Click on library this will take you to a list of libraries that have YouTube collections. This can be a great way to find new material to watch, or to find old material that you may have missed. Play back the playlist that you want to loop on the smart TV.
Step 3 Loop the playlist and send the list to the TV
Play the list and click on the loop symbol. At last, launch the YouTube video on your TV. The video will start playing in a loop. It can only be stopped from your mobile phone on which you start playing the list.
Why you might want to loop a YouTube video on a smart TV?
Some people want to watch a video over and over again without having to wait for it to load each time. Looping in a YouTube video can help you do this. Another reason to loop a YouTube video on your TV is if you want to watch it while you are doing something else. YouTube only loops the playlist.
Looping a YouTube video on your TV can also be useful if you have a lot of videos that you want to watch but don’t have enough time for. Looping YouTube videos on your television is a great way to keep your young ones entertained and engaged. Not only are they getting their daily dose of educational content, but they are also being kept enertained.
Wondershare Filmora Loop YouTube videos on PC and Mac with simple clicks.
Free Download Free Download Learn More

![]()
Conclusion
Looping YouTube videos on smart TV is an excellent way to watch the content you love, no matter where you are. While it may be true that loop YouTube videos on a smart TV are not imminent, there are some major benefits to be gained from implementing the new technology.
It’s easy to do, and it can be a great way to spend time with family members and friends. Looping YouTube videos on a smart TV is a great way to add some fun and excitement to your experience. The best part is, there are no limitations or restrictions you can loop as many videos as you want, and watch them in any order!
Free Download For Win 7 or later(64-bit)
Free Download For macOS 10.14 or later
Part 1: How to Create a Loop Video for YouTube
There is a lot of debate around whether or not creating a loop video is necessary for success on YouTube. Some people believe that it’s not necessary, while others believe that it is a must. The main benefit of creating a loop video is that it helps to keep your audience engaged. It also helps to create a sense of continuity between your videos.
Creating a loop video for your YouTube channel increases engagement because viewers can watch the video over and over again. This can lead to more clicks on your ads, which can lead to more revenue. It can also increase your subscribers and views. Maybe some people want to watch the same video multiple times in a row without having to keep pressing the play button on the remote.
Filmora is the best video loop editor:
If you need a powerful video editing tool that will let you create high-quality clips with multiple loops, look no further than Filmora . This software allows you to make various loops of your videos for use in social media, on your website or wherever desired. Plus, with Filmora, there is no limit on the number of loops you can create.
Loop video works well for corporate presentations, tutorials, explainer videos, and much more. You can create looping videos by choosing from one of Filmora’s many templates or creating your own. It’s easy to get started with looping video editing in Filmora! Some people want to watch a video while they do other things, like work on the computer.
Filmora is incredibly easy to use. You can quickly create videos by importing footage, editing and adding effects, and exporting your videos. Plus, the software has several built-in tools that let you customize your videos further. It has many features that make it an excellent choice for anyone looking to create high-quality videos quickly and easily.
How can we loop a video on Filmora? Follow these steps to create a looping video on Filmora:
Step 1 Download the Filmora and create a project
Free Download For Win 7 or later(64-bit)
Free Download For macOS 10.14 or later
You can download the Filmora for free. After installation of this software open it and click on Create New Project. Filmora is not only the video maker or editor, you can also add text and music to your videos, and share them on social media or with friends.
Step 2 Open the video and make copies
Open the video in your timeline. All you need to do is right-click on the video and click on copy. Then simply click or press Ctrl+V on your keyboard and do that for times. You can make as many copies as you want. Then you will have the same clip over and over again which creates the loop effect.
Step 3 Add Transition or any title in the video
After making copies of your video. Add some transitions in your video. Adding transitions to videos can help to keep your videos looking polished and professional. Not only do transitions add an extra layer of visual interest, but they can also help to underscore specific points in your video.

Benefits to create loop video on Filmora
There are many benefits to creating looping videos, especially when using a tool like Filmora. Loop videos are great for social media since they can be set to play on a loop and are viewable without sound. They’re also perfect for short attention spans since you can watch them over and over again without getting bored.
This can be useful for marketing purposes, as it can keep people interested in your video content. Additionally, looping can create a more engaging video experience for viewers, as it keeps them engaged by playing the same clip over and over again. You can easily add captions, and titles to your loop video.
When viewers can pause, rewind, and playback a video over and over again, they are more engaged with it. This increases the chances that they will watch the entire video, and may even share it with friends. You can create a sense of community and connection with your customers. And best of all? You can keep the magic going by adding sound effects and music!
Part 2: Loop a YouTube Video on TV from a Mobile
One of the great features of YouTube is that you can loop YouTube videos on your TV. This means that you can watch a video over and over again without having to fast forward through it. This is great for kids who are constantly asking to watch the same video over and over again. You can also use this feature to watch videos that you have missed.
There is something about relaxing music on the loop that can help to take the edge off. Whether it’s to help you wind down before bed, or to help you relax after a long day, there’s no doubt that looping YouTube on TV can be helpful. Whether you’re looking for something light and calming, or something to help you wind down after a long day, there’s sure to be something on YouTube that can fit the bill.
Let’s have a look at some steps that how to repeat YouTube videos on smart TV.
Step 1 Create a Playlist of one or multiple videos
The YouTube app is available on the google play store. You can easily download it from your mobile phones, android, etc. When you open a video on YouTube, several options will appear (like, share, subscribe). You can save the video in your existing playlist or you can create a new playlist.
Step 2 Go to the library and select the loop symbol
Click on library this will take you to a list of libraries that have YouTube collections. This can be a great way to find new material to watch, or to find old material that you may have missed. Play back the playlist that you want to loop on the smart TV.
Step 3 Loop the playlist and send the list to the TV
Play the list and click on the loop symbol. At last, launch the YouTube video on your TV. The video will start playing in a loop. It can only be stopped from your mobile phone on which you start playing the list.
Why you might want to loop a YouTube video on a smart TV?
Some people want to watch a video over and over again without having to wait for it to load each time. Looping in a YouTube video can help you do this. Another reason to loop a YouTube video on your TV is if you want to watch it while you are doing something else. YouTube only loops the playlist.
Looping a YouTube video on your TV can also be useful if you have a lot of videos that you want to watch but don’t have enough time for. Looping YouTube videos on your television is a great way to keep your young ones entertained and engaged. Not only are they getting their daily dose of educational content, but they are also being kept enertained.
Wondershare Filmora Loop YouTube videos on PC and Mac with simple clicks.
Free Download Free Download Learn More
![]()
Conclusion
Looping YouTube videos on smart TV is an excellent way to watch the content you love, no matter where you are. While it may be true that loop YouTube videos on a smart TV are not imminent, there are some major benefits to be gained from implementing the new technology.
It’s easy to do, and it can be a great way to spend time with family members and friends. Looping YouTube videos on a smart TV is a great way to add some fun and excitement to your experience. The best part is, there are no limitations or restrictions you can loop as many videos as you want, and watch them in any order!
Channel King & Queen Academy: YouTube Excellence
YouTube Creator Studio is a powerful tool for content creators. It allows you to manage and optimize YouTube channels for better performance. With YouTube studio monetization features, you can keep track of your revenues. The creator study also allows you to manage your videos and see how well they are performing. This article explores the monetization Youtube Studio in detail, including how to access and use it.
YouTube-Ready Video Editor A top choice for many creators looking to outperform their competitors on YouTube!
Free Download Free Download Learn More

Part 1. Introduction to YouTube Studio: Definition and Uses
Every creator is aware of YouTube Studio com monetization as a tool for managing YouTube. However, how much can you say about channel monetization YouTube Studio? Let’s have a look at what you need to know:
What is YouTube Studio?

YouTube Studio is a tool that allows creators and other users to manage their channels. Formerly known as YouTube Creator Studio, the tool helps you to edit and monitor the performance of your videos, You can also view and reply to comments, or even schedule content.
Uses of YouTube Studio
YouTube Studio is an essential tool for creators and brands. It helps them manage their presence on YouTube. Individuals can also grow their channels and track the progress they have made. Other people also use YouTube Studio as a hub to get a snapshot of their channel’s performance. It makes it easier to manage videos and offer opportunities for monetizing content through the YouTube Partner Program (YPP). The features that creators can access via the studio include:
- Manage the channel: YouTube Studio allows creators to customize their channel’s appearance, branding, description, and layout.
- Editing of videos: Options for editing videos in the Studio include details, end screens, thumbnails, uploading videos, subtitles, and adding or managing playlists.
- View your performance: Detailed insights are available about the performance of the videos, audience demographics, watch time, and more.
- YouTube Monetization: All the tools and settings for monetizing your videos and Shorts on YouTube are found on the Studio.
- Manage your comments: The comments section of the Studio allows you to view and reply to comments on your videos.
Part 2. Master Your YouTube Presence: Essential Steps to Dominate Creator Studio
Getting started with YouTube Creator Studio is simple. Log in to your YouTube, and click on the profile pic at the right corner of the page. Then select YouTube Studio from the dropdown menu.
Step-by-Step Guide for Using YouTube Creator Studio
Beginners may find it a bit tricky to navigate the YouTube Creator Studio. There are a lot of tools to explore, each with a unique function. Let’s break down the essentials to get you started.
- Step 1: Navigating the YouTube Studio
- Step 2: Exploring the Creator Dashboard
- Step 3: Manage Your Content
- Step 4: Monitoring Channel Performance
- Step 5: Review Your Studio Monetization Tab
Step 1: Navigating the YouTube Studio

To launch the YouTube Creator Studio, head over to studio.youtube.com and sign in. Then click on your profile pic and select YouTube Studio. On the left-hand side of the Studio screen, browse to navigate the features.
Step 2: Exploring the Creator Dashboard

The YouTube Creator Studio Dashboard provides all the handy information needed to create a growth strategy for your channel. You will see the analytics of your top videos and a summary of your views. You will also see your current subscribers watch time, and more:
- Review how your most recent video is performing
- Review personalized suggestions to grow your channel
- Check recent comments and respond appropriately
- Watch the latest updates from the YouTube team
- Look at important notifications to avoid copyright violations or monetization issues on time
- Explore the audio library to gain access to free soundtracks and music
Step 3: Manage Your Content

Click on the Content tab on the dashboard. Manage your content by editing or just reviewing the performance of each video. You can also create playlists linked to the videos to choose watch time.
Step 4: Monitoring Channel Performance

The YouTube Creator Studio Analytics provides a summary of your video metrics and reports. This will help you figure out what is working. The analytics also point out what needs to be improved to gain more views. Be sure to check views and watch time to get an accurate picture of the channel’s performance.
Step 5: Review Your Studio Monetization Tab

The monetization tab shows the monetization status of your channel. On the left side of the dashboard, click Earn to access this feature. After being accepted to the YPP, you can make money from advertising revenue, merch shelf, channel membership, and the fan-funded program. Before monetization, this page shows how far you are to meet the eligibility criteria.
Importance of Verifying the YouTube Channel
After uploading your videos to YouTube Creator Studio, you need to optimize each for monetization. This ensures that the algorithm works in your favor. It is also important to create an AdSense Account and link it to your channel. This will:
- Increase your level of credibility because a verified YouTube channel is seen as more trustworthy by viewers
- Protect you and your channel from impersonation by preventing other users from creating fake accounts under your name.
- Unlock additional features such as the ability to lie stream in HD and customer the channel layout.
Linking your AdSense to the Account is also a crucial step towards getting paid for your creation on YouTube. It ensures that your earnings get to you. After joining the YPP, you are allowed to change your linked AdSense account if you already have one. You can also monetize more than one channel using the same AdSense account, and keep track of your earnings.
Part 3. Create YouTube-Ready Videos with Wondershare Filmora
The success of your YouTube channel largely depends on the quality of the videos uploaded. You need video editing software that will make your creator studio attractive even before opening individual videos. Wondershare Filmora is a top choice for many creators looking to outperform their competitors on YouTube. Explore the range of possibilities with Filmora ranging from creative video effects to stunning text animations.
Free Download For Win 7 or later(64-bit)
Free Download For macOS 10.14 or later
Making YouTube-ready videos with Filmora is quick and easy. You need to have great footage to start with. Then, explore the editing features that will make the video stand out. Let’s have a look at the steps involved:
- Step 1: Launch Filmora
- Step 2: Create a New Project and Import Files
- Step 3: Organize Your Project Material
- Step 4: Place Files on the Timeline
- Step 5: Apply Visual Effects
- Step 6: Conduct the Color Correction Process
- Step 7: Export and Share
Step 1: Launch Filmora
Launch Filmora by double-clicking the desktop icon. On the welcome window, select the aspect ratio you want to use.

Step 2: Create a New Project and Import Files
After launching Filmora, click New Project on the welcome screen. Once the editor loads, import the media files from the options provided.

Step 3: Organize Your Project Material
Manage the files you will be using in the editing project. The My Album option allows you to organize the file using different criteria such as type or purpose.

Step 4: Place Files on the Timeline
Time to start editing your video. Place the video and audio files on the timeline while removing the redundant parts. Use the drag-and-drop feature to edit the clips, one at a time, cutting out unneeded footage to have a clear story.

Step 5: Apply Visual Effects
After removing the unwanted parts from the video clips, detach the audio and video files. Insert transitions between clips, add music, and use other visual effects on Filmora to make the video more exciting.

Step 6: Conduct the Color Correction Process
The effects icon gives you access to filters and overlays to make your video colors more vivid. Select the filters of choice, and drag and drop it to where you want to use on the timeline.

Step 7: Export and Share
Once you are satisfied with the video outcome, export it in MP4 format, ready for upload on YouTube. Save it in your local drive, and upload it to YouTube via the Creator Studio.

Conclusion
The YouTube Creator Studio allows you to manage your channel and content in a central location. You get access to all the essential features, including analytics and content editing. Also, manage the monetization of your videos and reply to comments. Good video editing software will play a crucial role in building your channel. We recommend exploring video editing features on Wondershare Filmora to make better videos for your channels. With most tasks now optimized, editing videos with Filmora is now easier and fun.
Free Download Free Download Learn More
Part 1. Introduction to YouTube Studio: Definition and Uses
Every creator is aware of YouTube Studio com monetization as a tool for managing YouTube. However, how much can you say about channel monetization YouTube Studio? Let’s have a look at what you need to know:
What is YouTube Studio?
YouTube Studio is a tool that allows creators and other users to manage their channels. Formerly known as YouTube Creator Studio, the tool helps you to edit and monitor the performance of your videos, You can also view and reply to comments, or even schedule content.
Uses of YouTube Studio
YouTube Studio is an essential tool for creators and brands. It helps them manage their presence on YouTube. Individuals can also grow their channels and track the progress they have made. Other people also use YouTube Studio as a hub to get a snapshot of their channel’s performance. It makes it easier to manage videos and offer opportunities for monetizing content through the YouTube Partner Program (YPP). The features that creators can access via the studio include:
- Manage the channel: YouTube Studio allows creators to customize their channel’s appearance, branding, description, and layout.
- Editing of videos: Options for editing videos in the Studio include details, end screens, thumbnails, uploading videos, subtitles, and adding or managing playlists.
- View your performance: Detailed insights are available about the performance of the videos, audience demographics, watch time, and more.
- YouTube Monetization: All the tools and settings for monetizing your videos and Shorts on YouTube are found on the Studio.
- Manage your comments: The comments section of the Studio allows you to view and reply to comments on your videos.
Part 2. Master Your YouTube Presence: Essential Steps to Dominate Creator Studio
Getting started with YouTube Creator Studio is simple. Log in to your YouTube, and click on the profile pic at the right corner of the page. Then select YouTube Studio from the dropdown menu.
Step-by-Step Guide for Using YouTube Creator Studio
Beginners may find it a bit tricky to navigate the YouTube Creator Studio. There are a lot of tools to explore, each with a unique function. Let’s break down the essentials to get you started.
- Step 1: Navigating the YouTube Studio
- Step 2: Exploring the Creator Dashboard
- Step 3: Manage Your Content
- Step 4: Monitoring Channel Performance
- Step 5: Review Your Studio Monetization Tab
Step 1: Navigating the YouTube Studio
To launch the YouTube Creator Studio, head over to studio.youtube.com and sign in. Then click on your profile pic and select YouTube Studio. On the left-hand side of the Studio screen, browse to navigate the features.
Step 2: Exploring the Creator Dashboard
The YouTube Creator Studio Dashboard provides all the handy information needed to create a growth strategy for your channel. You will see the analytics of your top videos and a summary of your views. You will also see your current subscribers watch time, and more:
- Review how your most recent video is performing
- Review personalized suggestions to grow your channel
- Check recent comments and respond appropriately
- Watch the latest updates from the YouTube team
- Look at important notifications to avoid copyright violations or monetization issues on time
- Explore the audio library to gain access to free soundtracks and music
Step 3: Manage Your Content
Click on the Content tab on the dashboard. Manage your content by editing or just reviewing the performance of each video. You can also create playlists linked to the videos to choose watch time.
Step 4: Monitoring Channel Performance
The YouTube Creator Studio Analytics provides a summary of your video metrics and reports. This will help you figure out what is working. The analytics also point out what needs to be improved to gain more views. Be sure to check views and watch time to get an accurate picture of the channel’s performance.
Step 5: Review Your Studio Monetization Tab
The monetization tab shows the monetization status of your channel. On the left side of the dashboard, click Earn to access this feature. After being accepted to the YPP, you can make money from advertising revenue, merch shelf, channel membership, and the fan-funded program. Before monetization, this page shows how far you are to meet the eligibility criteria.
Importance of Verifying the YouTube Channel
After uploading your videos to YouTube Creator Studio, you need to optimize each for monetization. This ensures that the algorithm works in your favor. It is also important to create an AdSense Account and link it to your channel. This will:
- Increase your level of credibility because a verified YouTube channel is seen as more trustworthy by viewers
- Protect you and your channel from impersonation by preventing other users from creating fake accounts under your name.
- Unlock additional features such as the ability to lie stream in HD and customer the channel layout.
Linking your AdSense to the Account is also a crucial step towards getting paid for your creation on YouTube. It ensures that your earnings get to you. After joining the YPP, you are allowed to change your linked AdSense account if you already have one. You can also monetize more than one channel using the same AdSense account, and keep track of your earnings.
Part 3. Create YouTube-Ready Videos with Wondershare Filmora
The success of your YouTube channel largely depends on the quality of the videos uploaded. You need video editing software that will make your creator studio attractive even before opening individual videos. Wondershare Filmora is a top choice for many creators looking to outperform their competitors on YouTube. Explore the range of possibilities with Filmora ranging from creative video effects to stunning text animations.
Free Download For Win 7 or later(64-bit)
Free Download For macOS 10.14 or later
Making YouTube-ready videos with Filmora is quick and easy. You need to have great footage to start with. Then, explore the editing features that will make the video stand out. Let’s have a look at the steps involved:
- Step 1: Launch Filmora
- Step 2: Create a New Project and Import Files
- Step 3: Organize Your Project Material
- Step 4: Place Files on the Timeline
- Step 5: Apply Visual Effects
- Step 6: Conduct the Color Correction Process
- Step 7: Export and Share
Step 1: Launch Filmora
Launch Filmora by double-clicking the desktop icon. On the welcome window, select the aspect ratio you want to use.
Step 2: Create a New Project and Import Files
After launching Filmora, click New Project on the welcome screen. Once the editor loads, import the media files from the options provided.
Step 3: Organize Your Project Material
Manage the files you will be using in the editing project. The My Album option allows you to organize the file using different criteria such as type or purpose.
Step 4: Place Files on the Timeline
Time to start editing your video. Place the video and audio files on the timeline while removing the redundant parts. Use the drag-and-drop feature to edit the clips, one at a time, cutting out unneeded footage to have a clear story.
Step 5: Apply Visual Effects
After removing the unwanted parts from the video clips, detach the audio and video files. Insert transitions between clips, add music, and use other visual effects on Filmora to make the video more exciting.
Step 6: Conduct the Color Correction Process
The effects icon gives you access to filters and overlays to make your video colors more vivid. Select the filters of choice, and drag and drop it to where you want to use on the timeline.
Step 7: Export and Share
Once you are satisfied with the video outcome, export it in MP4 format, ready for upload on YouTube. Save it in your local drive, and upload it to YouTube via the Creator Studio.
Conclusion
The YouTube Creator Studio allows you to manage your channel and content in a central location. You get access to all the essential features, including analytics and content editing. Also, manage the monetization of your videos and reply to comments. Good video editing software will play a crucial role in building your channel. We recommend exploring video editing features on Wondershare Filmora to make better videos for your channels. With most tasks now optimized, editing videos with Filmora is now easier and fun.
Also read:
- [New] 2024 Approved Hilarity Unleashed Top 7 Amusing YouTube Channel Skits
- [New] Charting a Successful Course in YouTube Keywords
- [New] The Ultimate App Review for Crafting Unique Reels for 2024
- [Updated] Downloading Standardized Youtube Images with Ease & Precision
- 2024 Approved Content Creation Crossroads IGTV Vs. YouTube - Which One Fits Best?
- 4 solution to get rid of pokemon fail to detect location On Realme Narzo 60 Pro 5G | Dr.fone
- A Critical Look at 'Watch Dogs: Legion's Latest Chapter: London Reimagined
- Blitz 30-Second Guide to Fast Thumbnails for 2024
- Boost Your PC Speed! Tackle Windows 11 Sluggishness with These 8 Fixes
- Day Jobs & Digital Passion Striking a Balance for 2024
- Elevate Your Video Entrance with These Tools
- How to Mirror Honor Play 40C to Mac? | Dr.fone
- In 2024, Fake Android Location without Rooting For Your Itel S23 | Dr.fone
- Simplified Cross-Platform Listening Top 5 Playlist Conversion Resources
- The Science of Captivating Audience with Mukbang Videos
- Ultimate Cinematic Trailer Collection
- Update Patch Successfully Resolves Rainbow Six Siege Boot-Up Problems
- Title: Seamless Screen Stretch Cycle YouTube on Television Display
- Author: Brian
- Created at : 2024-10-17 18:18:08
- Updated at : 2024-10-18 16:37:42
- Link: https://youtube-video-recordings.techidaily.com/seamless-screen-stretch-cycle-youtube-on-television-display/
- License: This work is licensed under CC BY-NC-SA 4.0.