
"Reversing a YouTube Strike A Guide"

Reversing a YouTube Strike: A Guide
How to Avoid and Reverse Strikes on Your YouTube Channel

Richard Bennett
Oct 26, 2023• Proven solutions
Do you monetize your videos? Or, do you like to Livestream? These are two perks of having a YouTube account in good standing. You can lose these privileges, have your ability to post videos frozen, and even have your account terminated if you start accumulating strikes.
If you receive a strike, you will usually be able to get rid of it. This article will show you how.
Table of Content:
3. Community Guidelines Strikes

There are two types of strikes: Community Guideline Strikes and Copyright Strikes. Your account and all your videos will be deleted if you get three of either one of these types of strikes, but YouTube is fair about how these strikes are given out and how you can reverse them.
1. Copyright Strikes
You get a copyright strike when you use media in your video which someone else owns the copyrights to. Music, clips, photographs, and sound effects are examples of the kinds of media you may use that could be owned by someone else.
The most obvious way to earn a copyright strike is to repost content which you did not create, i.e. clips from a television show or a popular song. If you know that the content you got a strike for was not yours and did not fall under ‘fair use ’, then there are two ways you can resolve it.
1. You can complete YouTube’s simple course on copyright infringement (Copyright School ) and wait three months. Copyright strikes expire in three months so long as you complete the course (they will not expire if you don’t take the course).
2. you can contact the holder of the copyright and ask them to retract their claim. You will probably have to offer to delete your video. Keep in mind that it is completely up to the rights holder whether you deleting your video is enough for them to retract their claim. They are allowed to say ‘no’.
Deleting your video, especially if you do so without contacting the rights holder, will not automatically reverse your copyright strike.
The majority of copyright strikes that you as a YouTube creator receive – if you receive any – will not be as black and white as ‘someone else owns it, you shouldn’t have used it’. If you know that you have a license to use the song or other media you got the strike for, or feel like your use of a clip falls under ‘fair use’, then your path to reversing the strike will be different.
2. Wrongful Copyright Strikes
YouTube’s system for detecting copyright infringement is automated. This means that you can get a copyright strike without actually breaking any rules. These strikes are generally easy to reverse.
For creators, the most common instance of this is being flagged for using copyrighted music. When you download royalty-free music – whether you download it for free or pay for it – you might not realize that that music is still copyrighted to someone else and can still be flagged by YouTube’s system.
If this has happened to you, reversing it is simple.
1. Submit a counter-notification through the form provided and include either your licensing information or a link to where it can be found online.
2. After you submit your counter-notification, the copyright holder will have 10 business days to respond. Since in this scenario the rights holder will know they have allowed their content to be licensed out, there should be no conflict and your video will be reinstated.
‘Fair use’ is another thing YouTube’s system has no way of detecting. ‘Fair use’ means that you are using content that you do not own, and which you do not have a license to use, but that you are using it in a way that is legally protected. Satire, criticism, education, and news reporting are areas that may be protected by fair use, although every situation is different.
There is no situation in which crediting a rights holder, adding a disclaimer, or simply not monetizing your video will make it fair use.
To reverse a copyright strike where you believe your video should be protected as ‘fair use’, submit a counter-notification through the web form YouTube provides. The rights holder will have 10 business days to provide YouTube with evidence that they have initiated a court action against your content. There is a chance that they will not agree with you about the ‘fair use’ status of your video. You could be in for a bit of a fight.
If your account has been suspended for accumulating multiple strikes, you will no longer be able to access the online counter-notification form and will have to send a free-form counter-notification. Information on that can be found here .
3. Community Guidelines Strikes
Most video creators – people who post vlogs, travel videos, and various kinds of tutorials – will never receive this type of strike. Sexual content, hateful content, threats, and scams are among the things you could post which would result in a community guidelines strike. Creators, in general, are not interested in posting cruel or graphic content.
The only thing some video creators might have to be careful of is misleading metadata. You can get community guidelines to strike for intentionally using the title, tags, and description of your video to build up an expectation of the content your video does not deliver on. For example, if you post a personal vlog and title it ‘Call of Duty Review’ to try and capitalize on people who might be searching for gaming videos then you might receive a strike.
Blatantly using keywords that have nothing to do with your content is not something you can do accidentally, but it is possible to be misleading in your metadata without trying to be dishonest. YouTube is a very competitive place, and many creators are turning towards title strategies which could be considered ‘clickbait’. If you say in your title that you had a baby, but reveal in your actual video that ‘had a baby’ meant ‘wrote a new song’, will that get you a community guidelines strike? Probably not, but it can be a thin line.
In general, just don’t mention anything in your title or tags which you do not talk about in your video.
Community Guidelines strikes expire after three months. As long as you only have one strike, it will not affect your channel or what you can do on YouTube. If you receive a second strike within the three months of your first strike, you will lose the ability to post videos for two weeks. If you receive a third strike before either of your previous strikes has expired, your account will be terminated.
Have you experienced a copyright strike against your YouTube channel? Let us know what happened in the comments.
Create Original Videos with Excellent Video Editor

Richard Bennett
Richard Bennett is a writer and a lover of all things video.
Follow @Richard Bennett
Richard Bennett
Oct 26, 2023• Proven solutions
Do you monetize your videos? Or, do you like to Livestream? These are two perks of having a YouTube account in good standing. You can lose these privileges, have your ability to post videos frozen, and even have your account terminated if you start accumulating strikes.
If you receive a strike, you will usually be able to get rid of it. This article will show you how.
Table of Content:
3. Community Guidelines Strikes

There are two types of strikes: Community Guideline Strikes and Copyright Strikes. Your account and all your videos will be deleted if you get three of either one of these types of strikes, but YouTube is fair about how these strikes are given out and how you can reverse them.
1. Copyright Strikes
You get a copyright strike when you use media in your video which someone else owns the copyrights to. Music, clips, photographs, and sound effects are examples of the kinds of media you may use that could be owned by someone else.
The most obvious way to earn a copyright strike is to repost content which you did not create, i.e. clips from a television show or a popular song. If you know that the content you got a strike for was not yours and did not fall under ‘fair use ’, then there are two ways you can resolve it.
1. You can complete YouTube’s simple course on copyright infringement (Copyright School ) and wait three months. Copyright strikes expire in three months so long as you complete the course (they will not expire if you don’t take the course).
2. you can contact the holder of the copyright and ask them to retract their claim. You will probably have to offer to delete your video. Keep in mind that it is completely up to the rights holder whether you deleting your video is enough for them to retract their claim. They are allowed to say ‘no’.
Deleting your video, especially if you do so without contacting the rights holder, will not automatically reverse your copyright strike.
The majority of copyright strikes that you as a YouTube creator receive – if you receive any – will not be as black and white as ‘someone else owns it, you shouldn’t have used it’. If you know that you have a license to use the song or other media you got the strike for, or feel like your use of a clip falls under ‘fair use’, then your path to reversing the strike will be different.
2. Wrongful Copyright Strikes
YouTube’s system for detecting copyright infringement is automated. This means that you can get a copyright strike without actually breaking any rules. These strikes are generally easy to reverse.
For creators, the most common instance of this is being flagged for using copyrighted music. When you download royalty-free music – whether you download it for free or pay for it – you might not realize that that music is still copyrighted to someone else and can still be flagged by YouTube’s system.
If this has happened to you, reversing it is simple.
1. Submit a counter-notification through the form provided and include either your licensing information or a link to where it can be found online.
2. After you submit your counter-notification, the copyright holder will have 10 business days to respond. Since in this scenario the rights holder will know they have allowed their content to be licensed out, there should be no conflict and your video will be reinstated.
‘Fair use’ is another thing YouTube’s system has no way of detecting. ‘Fair use’ means that you are using content that you do not own, and which you do not have a license to use, but that you are using it in a way that is legally protected. Satire, criticism, education, and news reporting are areas that may be protected by fair use, although every situation is different.
There is no situation in which crediting a rights holder, adding a disclaimer, or simply not monetizing your video will make it fair use.
To reverse a copyright strike where you believe your video should be protected as ‘fair use’, submit a counter-notification through the web form YouTube provides. The rights holder will have 10 business days to provide YouTube with evidence that they have initiated a court action against your content. There is a chance that they will not agree with you about the ‘fair use’ status of your video. You could be in for a bit of a fight.
If your account has been suspended for accumulating multiple strikes, you will no longer be able to access the online counter-notification form and will have to send a free-form counter-notification. Information on that can be found here .
3. Community Guidelines Strikes
Most video creators – people who post vlogs, travel videos, and various kinds of tutorials – will never receive this type of strike. Sexual content, hateful content, threats, and scams are among the things you could post which would result in a community guidelines strike. Creators, in general, are not interested in posting cruel or graphic content.
The only thing some video creators might have to be careful of is misleading metadata. You can get community guidelines to strike for intentionally using the title, tags, and description of your video to build up an expectation of the content your video does not deliver on. For example, if you post a personal vlog and title it ‘Call of Duty Review’ to try and capitalize on people who might be searching for gaming videos then you might receive a strike.
Blatantly using keywords that have nothing to do with your content is not something you can do accidentally, but it is possible to be misleading in your metadata without trying to be dishonest. YouTube is a very competitive place, and many creators are turning towards title strategies which could be considered ‘clickbait’. If you say in your title that you had a baby, but reveal in your actual video that ‘had a baby’ meant ‘wrote a new song’, will that get you a community guidelines strike? Probably not, but it can be a thin line.
In general, just don’t mention anything in your title or tags which you do not talk about in your video.
Community Guidelines strikes expire after three months. As long as you only have one strike, it will not affect your channel or what you can do on YouTube. If you receive a second strike within the three months of your first strike, you will lose the ability to post videos for two weeks. If you receive a third strike before either of your previous strikes has expired, your account will be terminated.
Have you experienced a copyright strike against your YouTube channel? Let us know what happened in the comments.
Create Original Videos with Excellent Video Editor

Richard Bennett
Richard Bennett is a writer and a lover of all things video.
Follow @Richard Bennett
Richard Bennett
Oct 26, 2023• Proven solutions
Do you monetize your videos? Or, do you like to Livestream? These are two perks of having a YouTube account in good standing. You can lose these privileges, have your ability to post videos frozen, and even have your account terminated if you start accumulating strikes.
If you receive a strike, you will usually be able to get rid of it. This article will show you how.
Table of Content:
3. Community Guidelines Strikes

There are two types of strikes: Community Guideline Strikes and Copyright Strikes. Your account and all your videos will be deleted if you get three of either one of these types of strikes, but YouTube is fair about how these strikes are given out and how you can reverse them.
1. Copyright Strikes
You get a copyright strike when you use media in your video which someone else owns the copyrights to. Music, clips, photographs, and sound effects are examples of the kinds of media you may use that could be owned by someone else.
The most obvious way to earn a copyright strike is to repost content which you did not create, i.e. clips from a television show or a popular song. If you know that the content you got a strike for was not yours and did not fall under ‘fair use ’, then there are two ways you can resolve it.
1. You can complete YouTube’s simple course on copyright infringement (Copyright School ) and wait three months. Copyright strikes expire in three months so long as you complete the course (they will not expire if you don’t take the course).
2. you can contact the holder of the copyright and ask them to retract their claim. You will probably have to offer to delete your video. Keep in mind that it is completely up to the rights holder whether you deleting your video is enough for them to retract their claim. They are allowed to say ‘no’.
Deleting your video, especially if you do so without contacting the rights holder, will not automatically reverse your copyright strike.
The majority of copyright strikes that you as a YouTube creator receive – if you receive any – will not be as black and white as ‘someone else owns it, you shouldn’t have used it’. If you know that you have a license to use the song or other media you got the strike for, or feel like your use of a clip falls under ‘fair use’, then your path to reversing the strike will be different.
2. Wrongful Copyright Strikes
YouTube’s system for detecting copyright infringement is automated. This means that you can get a copyright strike without actually breaking any rules. These strikes are generally easy to reverse.
For creators, the most common instance of this is being flagged for using copyrighted music. When you download royalty-free music – whether you download it for free or pay for it – you might not realize that that music is still copyrighted to someone else and can still be flagged by YouTube’s system.
If this has happened to you, reversing it is simple.
1. Submit a counter-notification through the form provided and include either your licensing information or a link to where it can be found online.
2. After you submit your counter-notification, the copyright holder will have 10 business days to respond. Since in this scenario the rights holder will know they have allowed their content to be licensed out, there should be no conflict and your video will be reinstated.
‘Fair use’ is another thing YouTube’s system has no way of detecting. ‘Fair use’ means that you are using content that you do not own, and which you do not have a license to use, but that you are using it in a way that is legally protected. Satire, criticism, education, and news reporting are areas that may be protected by fair use, although every situation is different.
There is no situation in which crediting a rights holder, adding a disclaimer, or simply not monetizing your video will make it fair use.
To reverse a copyright strike where you believe your video should be protected as ‘fair use’, submit a counter-notification through the web form YouTube provides. The rights holder will have 10 business days to provide YouTube with evidence that they have initiated a court action against your content. There is a chance that they will not agree with you about the ‘fair use’ status of your video. You could be in for a bit of a fight.
If your account has been suspended for accumulating multiple strikes, you will no longer be able to access the online counter-notification form and will have to send a free-form counter-notification. Information on that can be found here .
3. Community Guidelines Strikes
Most video creators – people who post vlogs, travel videos, and various kinds of tutorials – will never receive this type of strike. Sexual content, hateful content, threats, and scams are among the things you could post which would result in a community guidelines strike. Creators, in general, are not interested in posting cruel or graphic content.
The only thing some video creators might have to be careful of is misleading metadata. You can get community guidelines to strike for intentionally using the title, tags, and description of your video to build up an expectation of the content your video does not deliver on. For example, if you post a personal vlog and title it ‘Call of Duty Review’ to try and capitalize on people who might be searching for gaming videos then you might receive a strike.
Blatantly using keywords that have nothing to do with your content is not something you can do accidentally, but it is possible to be misleading in your metadata without trying to be dishonest. YouTube is a very competitive place, and many creators are turning towards title strategies which could be considered ‘clickbait’. If you say in your title that you had a baby, but reveal in your actual video that ‘had a baby’ meant ‘wrote a new song’, will that get you a community guidelines strike? Probably not, but it can be a thin line.
In general, just don’t mention anything in your title or tags which you do not talk about in your video.
Community Guidelines strikes expire after three months. As long as you only have one strike, it will not affect your channel or what you can do on YouTube. If you receive a second strike within the three months of your first strike, you will lose the ability to post videos for two weeks. If you receive a third strike before either of your previous strikes has expired, your account will be terminated.
Have you experienced a copyright strike against your YouTube channel? Let us know what happened in the comments.
Create Original Videos with Excellent Video Editor

Richard Bennett
Richard Bennett is a writer and a lover of all things video.
Follow @Richard Bennett
Richard Bennett
Oct 26, 2023• Proven solutions
Do you monetize your videos? Or, do you like to Livestream? These are two perks of having a YouTube account in good standing. You can lose these privileges, have your ability to post videos frozen, and even have your account terminated if you start accumulating strikes.
If you receive a strike, you will usually be able to get rid of it. This article will show you how.
Table of Content:
3. Community Guidelines Strikes

There are two types of strikes: Community Guideline Strikes and Copyright Strikes. Your account and all your videos will be deleted if you get three of either one of these types of strikes, but YouTube is fair about how these strikes are given out and how you can reverse them.
1. Copyright Strikes
You get a copyright strike when you use media in your video which someone else owns the copyrights to. Music, clips, photographs, and sound effects are examples of the kinds of media you may use that could be owned by someone else.
The most obvious way to earn a copyright strike is to repost content which you did not create, i.e. clips from a television show or a popular song. If you know that the content you got a strike for was not yours and did not fall under ‘fair use ’, then there are two ways you can resolve it.
1. You can complete YouTube’s simple course on copyright infringement (Copyright School ) and wait three months. Copyright strikes expire in three months so long as you complete the course (they will not expire if you don’t take the course).
2. you can contact the holder of the copyright and ask them to retract their claim. You will probably have to offer to delete your video. Keep in mind that it is completely up to the rights holder whether you deleting your video is enough for them to retract their claim. They are allowed to say ‘no’.
Deleting your video, especially if you do so without contacting the rights holder, will not automatically reverse your copyright strike.
The majority of copyright strikes that you as a YouTube creator receive – if you receive any – will not be as black and white as ‘someone else owns it, you shouldn’t have used it’. If you know that you have a license to use the song or other media you got the strike for, or feel like your use of a clip falls under ‘fair use’, then your path to reversing the strike will be different.
2. Wrongful Copyright Strikes
YouTube’s system for detecting copyright infringement is automated. This means that you can get a copyright strike without actually breaking any rules. These strikes are generally easy to reverse.
For creators, the most common instance of this is being flagged for using copyrighted music. When you download royalty-free music – whether you download it for free or pay for it – you might not realize that that music is still copyrighted to someone else and can still be flagged by YouTube’s system.
If this has happened to you, reversing it is simple.
1. Submit a counter-notification through the form provided and include either your licensing information or a link to where it can be found online.
2. After you submit your counter-notification, the copyright holder will have 10 business days to respond. Since in this scenario the rights holder will know they have allowed their content to be licensed out, there should be no conflict and your video will be reinstated.
‘Fair use’ is another thing YouTube’s system has no way of detecting. ‘Fair use’ means that you are using content that you do not own, and which you do not have a license to use, but that you are using it in a way that is legally protected. Satire, criticism, education, and news reporting are areas that may be protected by fair use, although every situation is different.
There is no situation in which crediting a rights holder, adding a disclaimer, or simply not monetizing your video will make it fair use.
To reverse a copyright strike where you believe your video should be protected as ‘fair use’, submit a counter-notification through the web form YouTube provides. The rights holder will have 10 business days to provide YouTube with evidence that they have initiated a court action against your content. There is a chance that they will not agree with you about the ‘fair use’ status of your video. You could be in for a bit of a fight.
If your account has been suspended for accumulating multiple strikes, you will no longer be able to access the online counter-notification form and will have to send a free-form counter-notification. Information on that can be found here .
3. Community Guidelines Strikes
Most video creators – people who post vlogs, travel videos, and various kinds of tutorials – will never receive this type of strike. Sexual content, hateful content, threats, and scams are among the things you could post which would result in a community guidelines strike. Creators, in general, are not interested in posting cruel or graphic content.
The only thing some video creators might have to be careful of is misleading metadata. You can get community guidelines to strike for intentionally using the title, tags, and description of your video to build up an expectation of the content your video does not deliver on. For example, if you post a personal vlog and title it ‘Call of Duty Review’ to try and capitalize on people who might be searching for gaming videos then you might receive a strike.
Blatantly using keywords that have nothing to do with your content is not something you can do accidentally, but it is possible to be misleading in your metadata without trying to be dishonest. YouTube is a very competitive place, and many creators are turning towards title strategies which could be considered ‘clickbait’. If you say in your title that you had a baby, but reveal in your actual video that ‘had a baby’ meant ‘wrote a new song’, will that get you a community guidelines strike? Probably not, but it can be a thin line.
In general, just don’t mention anything in your title or tags which you do not talk about in your video.
Community Guidelines strikes expire after three months. As long as you only have one strike, it will not affect your channel or what you can do on YouTube. If you receive a second strike within the three months of your first strike, you will lose the ability to post videos for two weeks. If you receive a third strike before either of your previous strikes has expired, your account will be terminated.
Have you experienced a copyright strike against your YouTube channel? Let us know what happened in the comments.
Create Original Videos with Excellent Video Editor

Richard Bennett
Richard Bennett is a writer and a lover of all things video.
Follow @Richard Bennett
Hasty Thumbnail Crafting for Fortnite Gameplay
How to Make Fortnite Thumbnail for Free and Easy in 2024

Ollie Mattison
Mar 27, 2024• Proven solutions
To grow a Youtube channel, you need to focus on several different factors and elements. Having an attractive and eye-catching thumbnail is one of those top factors that contribute to the growth of your channel. No matter how good your content is, if you cannot attract users to click on your videos, it will not benefit your channel. In this article, we are going to show you how you can make a Fortnite thumbnail in few simple steps using Filmora X. If you are a content creator and love to make Fortnite videos, then this article will be very helpful for you.
Filmora has recently introduced a new feature named AI Portrait that uses Artificial Intelligence to remove the background from a portrait or image. This feature doesn’t require any green screen to do that. Filmora also contains a wide range of elements and titles that help you enhance the Thumbnail and make look stunning and eye-catching.
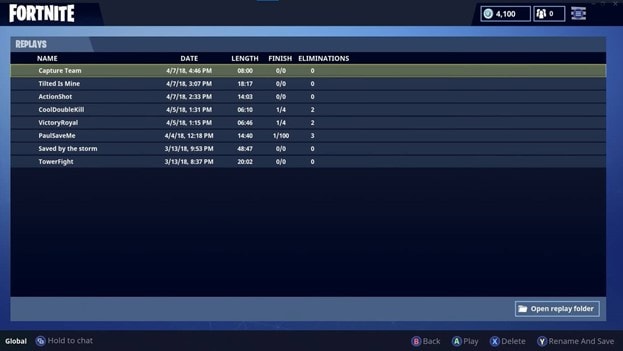
Step 01: To start making a Fortnite thumbnail, it is important to have a screenshot of your gameplay. We can make a perfect screenshot using Fortnite Replay Mode. If you have recently played a Fortnite match, you can access its replay under the Career tab. Under the Career tab select Replays.

Step 02: If you are using a console, the game will only store 10 recent gameplays, but if you are using a PC, it will store 100 recent gameplays in this section. From all these gameplays, select the one that you want to use for the Thumbnail. Once you choose gameplay, you can control everything in it. The angle, speed, and camera mode.
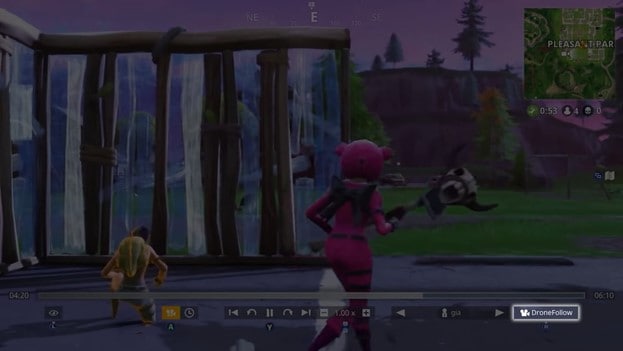
Step 03: For creating a perfect thumbnail, select “Drone Free Camera” mode from the camera mode located on the bottom right corner of the screen. It will allow us to change the angle the way we want. Choose an angle of your choice and take the screenshot.
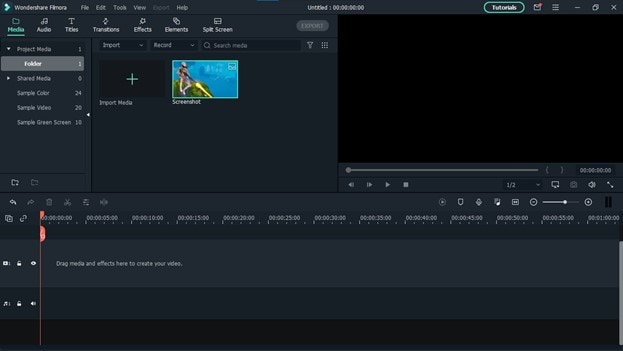
Step 04: Open Filmora X, make sure to select the 16:9 screen ratio. Import the screenshot using the import button.
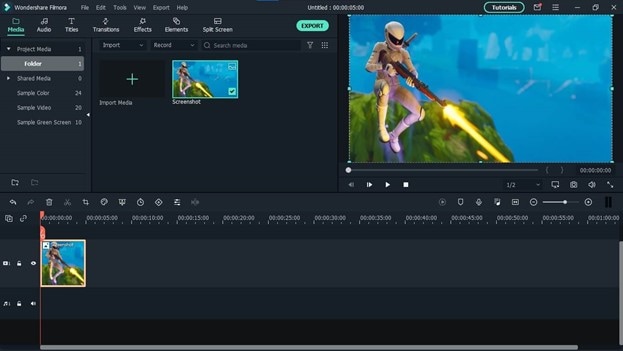
Step 05: Drag and drop the screenshot into the timeline.
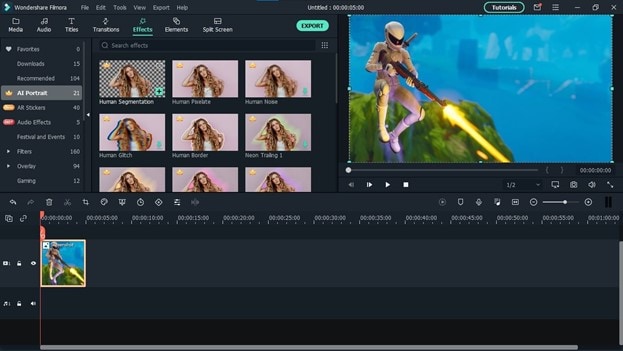
Step 06: Now, let’s separate the background and character. Go to the Effects, then AI Portrait, select Human Segmentation, and drop it into the screenshot.
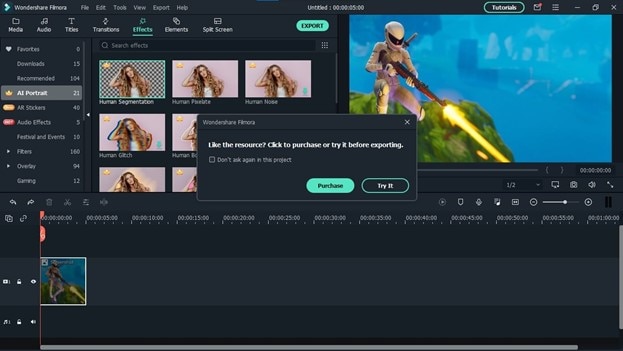
Step 07: Filmora will ask you to purchase it, but you can now hit “Try it” to use it.
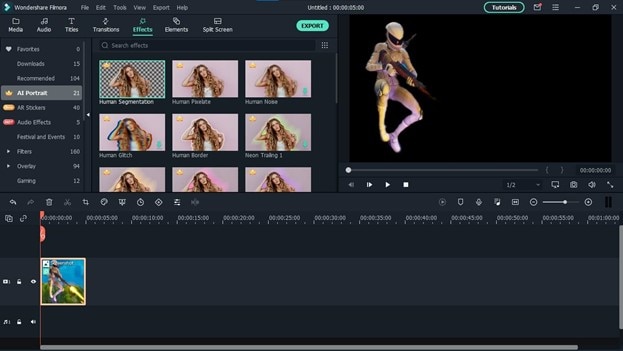
Step 08: It will remove the background of the screenshot.
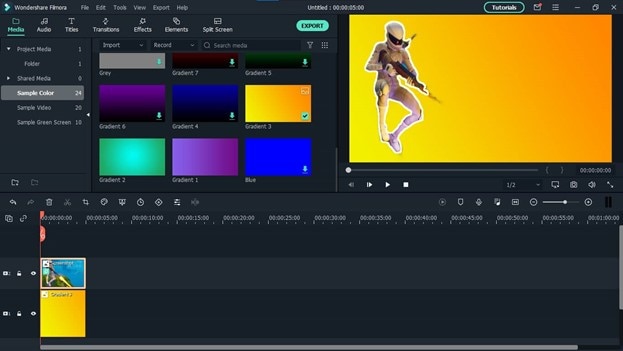
Step 09: To add a background, go to the media and navigate to “Sample Color.” Drag a color of your choice and drop it below the screenshot.
Step 10: To add titles in the Thumbnail, go to the Titles tab. Here you can find several categories of titles. Find your preferred title and drop it above all the layers. You can choose titles, lower thirds, and other texts depending upon your need and requirement.
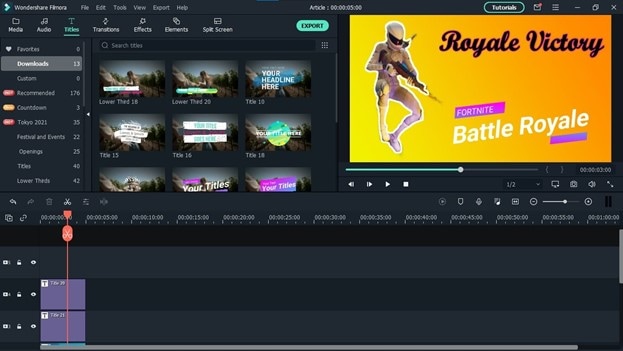
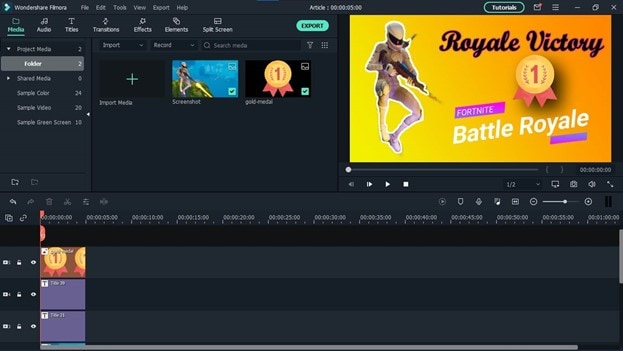
Step 11: We can make this Fortnite Thumbnail look more attractive by adding elements such as stickers and icons. Filmora contains a wide range of stickers. To access them, navigate to the Elements tab. Here you can find so many categories of elements. Choose any elements according to your need and drop them in the timeline above all other layers. If you cannot find a suitable sticker, you can download one from the internet and use it by importing it into Filmora.
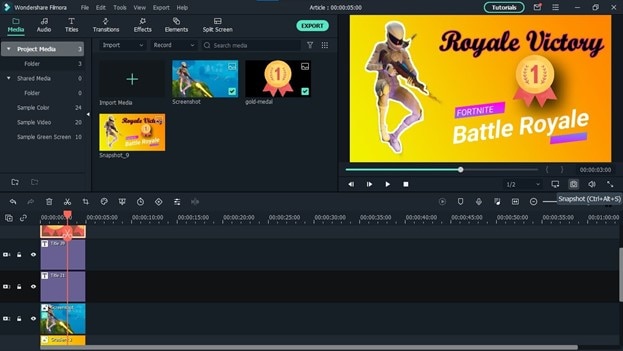
Step 12: Once you are satisfied with the final results, you can take the screenshot of the Thumbnail using the Snapshot icon located below the preview panel. It will create a screenshot in the media panel of Filmora.
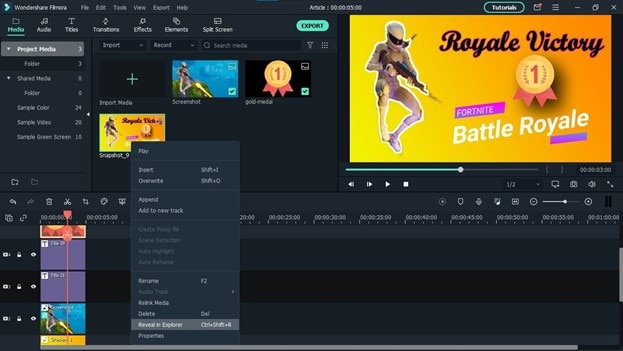
Step 13: To access the directory where this screenshot is saved, right-click on the screenshot and click on “Reveal in Explorer.” It will open the folder that contains all the screenshots you take through Filmora. Your Fortnite Thumbnail is ready to be used on your Youtube videos.
Conclusion
With Filmora, there are no limits. You can use your imagination to create amazing Fortnite thumbnails or thumbnails for other purposes. This article is just a demo teaching you how you use Filmora X to develop free and astounding thumbnails. Explore other options and elements of Filmora to take your thumbnails to another level.

Ollie Mattison
Ollie Mattison is a writer and a lover of all things video.
Follow @Ollie Mattison
Ollie Mattison
Mar 27, 2024• Proven solutions
To grow a Youtube channel, you need to focus on several different factors and elements. Having an attractive and eye-catching thumbnail is one of those top factors that contribute to the growth of your channel. No matter how good your content is, if you cannot attract users to click on your videos, it will not benefit your channel. In this article, we are going to show you how you can make a Fortnite thumbnail in few simple steps using Filmora X. If you are a content creator and love to make Fortnite videos, then this article will be very helpful for you.
Filmora has recently introduced a new feature named AI Portrait that uses Artificial Intelligence to remove the background from a portrait or image. This feature doesn’t require any green screen to do that. Filmora also contains a wide range of elements and titles that help you enhance the Thumbnail and make look stunning and eye-catching.
Step 01: To start making a Fortnite thumbnail, it is important to have a screenshot of your gameplay. We can make a perfect screenshot using Fortnite Replay Mode. If you have recently played a Fortnite match, you can access its replay under the Career tab. Under the Career tab select Replays.

Step 02: If you are using a console, the game will only store 10 recent gameplays, but if you are using a PC, it will store 100 recent gameplays in this section. From all these gameplays, select the one that you want to use for the Thumbnail. Once you choose gameplay, you can control everything in it. The angle, speed, and camera mode.

Step 03: For creating a perfect thumbnail, select “Drone Free Camera” mode from the camera mode located on the bottom right corner of the screen. It will allow us to change the angle the way we want. Choose an angle of your choice and take the screenshot.

Step 04: Open Filmora X, make sure to select the 16:9 screen ratio. Import the screenshot using the import button.

Step 05: Drag and drop the screenshot into the timeline.

Step 06: Now, let’s separate the background and character. Go to the Effects, then AI Portrait, select Human Segmentation, and drop it into the screenshot.

Step 07: Filmora will ask you to purchase it, but you can now hit “Try it” to use it.

Step 08: It will remove the background of the screenshot.

Step 09: To add a background, go to the media and navigate to “Sample Color.” Drag a color of your choice and drop it below the screenshot.

Step 10: To add titles in the Thumbnail, go to the Titles tab. Here you can find several categories of titles. Find your preferred title and drop it above all the layers. You can choose titles, lower thirds, and other texts depending upon your need and requirement.

Step 11: We can make this Fortnite Thumbnail look more attractive by adding elements such as stickers and icons. Filmora contains a wide range of stickers. To access them, navigate to the Elements tab. Here you can find so many categories of elements. Choose any elements according to your need and drop them in the timeline above all other layers. If you cannot find a suitable sticker, you can download one from the internet and use it by importing it into Filmora.

Step 12: Once you are satisfied with the final results, you can take the screenshot of the Thumbnail using the Snapshot icon located below the preview panel. It will create a screenshot in the media panel of Filmora.

Step 13: To access the directory where this screenshot is saved, right-click on the screenshot and click on “Reveal in Explorer.” It will open the folder that contains all the screenshots you take through Filmora. Your Fortnite Thumbnail is ready to be used on your Youtube videos.

Conclusion
With Filmora, there are no limits. You can use your imagination to create amazing Fortnite thumbnails or thumbnails for other purposes. This article is just a demo teaching you how you use Filmora X to develop free and astounding thumbnails. Explore other options and elements of Filmora to take your thumbnails to another level.

Ollie Mattison
Ollie Mattison is a writer and a lover of all things video.
Follow @Ollie Mattison
Ollie Mattison
Mar 27, 2024• Proven solutions
To grow a Youtube channel, you need to focus on several different factors and elements. Having an attractive and eye-catching thumbnail is one of those top factors that contribute to the growth of your channel. No matter how good your content is, if you cannot attract users to click on your videos, it will not benefit your channel. In this article, we are going to show you how you can make a Fortnite thumbnail in few simple steps using Filmora X. If you are a content creator and love to make Fortnite videos, then this article will be very helpful for you.
Filmora has recently introduced a new feature named AI Portrait that uses Artificial Intelligence to remove the background from a portrait or image. This feature doesn’t require any green screen to do that. Filmora also contains a wide range of elements and titles that help you enhance the Thumbnail and make look stunning and eye-catching.
Step 01: To start making a Fortnite thumbnail, it is important to have a screenshot of your gameplay. We can make a perfect screenshot using Fortnite Replay Mode. If you have recently played a Fortnite match, you can access its replay under the Career tab. Under the Career tab select Replays.

Step 02: If you are using a console, the game will only store 10 recent gameplays, but if you are using a PC, it will store 100 recent gameplays in this section. From all these gameplays, select the one that you want to use for the Thumbnail. Once you choose gameplay, you can control everything in it. The angle, speed, and camera mode.

Step 03: For creating a perfect thumbnail, select “Drone Free Camera” mode from the camera mode located on the bottom right corner of the screen. It will allow us to change the angle the way we want. Choose an angle of your choice and take the screenshot.

Step 04: Open Filmora X, make sure to select the 16:9 screen ratio. Import the screenshot using the import button.

Step 05: Drag and drop the screenshot into the timeline.

Step 06: Now, let’s separate the background and character. Go to the Effects, then AI Portrait, select Human Segmentation, and drop it into the screenshot.

Step 07: Filmora will ask you to purchase it, but you can now hit “Try it” to use it.

Step 08: It will remove the background of the screenshot.

Step 09: To add a background, go to the media and navigate to “Sample Color.” Drag a color of your choice and drop it below the screenshot.

Step 10: To add titles in the Thumbnail, go to the Titles tab. Here you can find several categories of titles. Find your preferred title and drop it above all the layers. You can choose titles, lower thirds, and other texts depending upon your need and requirement.

Step 11: We can make this Fortnite Thumbnail look more attractive by adding elements such as stickers and icons. Filmora contains a wide range of stickers. To access them, navigate to the Elements tab. Here you can find so many categories of elements. Choose any elements according to your need and drop them in the timeline above all other layers. If you cannot find a suitable sticker, you can download one from the internet and use it by importing it into Filmora.

Step 12: Once you are satisfied with the final results, you can take the screenshot of the Thumbnail using the Snapshot icon located below the preview panel. It will create a screenshot in the media panel of Filmora.

Step 13: To access the directory where this screenshot is saved, right-click on the screenshot and click on “Reveal in Explorer.” It will open the folder that contains all the screenshots you take through Filmora. Your Fortnite Thumbnail is ready to be used on your Youtube videos.

Conclusion
With Filmora, there are no limits. You can use your imagination to create amazing Fortnite thumbnails or thumbnails for other purposes. This article is just a demo teaching you how you use Filmora X to develop free and astounding thumbnails. Explore other options and elements of Filmora to take your thumbnails to another level.

Ollie Mattison
Ollie Mattison is a writer and a lover of all things video.
Follow @Ollie Mattison
Ollie Mattison
Mar 27, 2024• Proven solutions
To grow a Youtube channel, you need to focus on several different factors and elements. Having an attractive and eye-catching thumbnail is one of those top factors that contribute to the growth of your channel. No matter how good your content is, if you cannot attract users to click on your videos, it will not benefit your channel. In this article, we are going to show you how you can make a Fortnite thumbnail in few simple steps using Filmora X. If you are a content creator and love to make Fortnite videos, then this article will be very helpful for you.
Filmora has recently introduced a new feature named AI Portrait that uses Artificial Intelligence to remove the background from a portrait or image. This feature doesn’t require any green screen to do that. Filmora also contains a wide range of elements and titles that help you enhance the Thumbnail and make look stunning and eye-catching.
Step 01: To start making a Fortnite thumbnail, it is important to have a screenshot of your gameplay. We can make a perfect screenshot using Fortnite Replay Mode. If you have recently played a Fortnite match, you can access its replay under the Career tab. Under the Career tab select Replays.

Step 02: If you are using a console, the game will only store 10 recent gameplays, but if you are using a PC, it will store 100 recent gameplays in this section. From all these gameplays, select the one that you want to use for the Thumbnail. Once you choose gameplay, you can control everything in it. The angle, speed, and camera mode.

Step 03: For creating a perfect thumbnail, select “Drone Free Camera” mode from the camera mode located on the bottom right corner of the screen. It will allow us to change the angle the way we want. Choose an angle of your choice and take the screenshot.

Step 04: Open Filmora X, make sure to select the 16:9 screen ratio. Import the screenshot using the import button.

Step 05: Drag and drop the screenshot into the timeline.

Step 06: Now, let’s separate the background and character. Go to the Effects, then AI Portrait, select Human Segmentation, and drop it into the screenshot.

Step 07: Filmora will ask you to purchase it, but you can now hit “Try it” to use it.

Step 08: It will remove the background of the screenshot.

Step 09: To add a background, go to the media and navigate to “Sample Color.” Drag a color of your choice and drop it below the screenshot.

Step 10: To add titles in the Thumbnail, go to the Titles tab. Here you can find several categories of titles. Find your preferred title and drop it above all the layers. You can choose titles, lower thirds, and other texts depending upon your need and requirement.

Step 11: We can make this Fortnite Thumbnail look more attractive by adding elements such as stickers and icons. Filmora contains a wide range of stickers. To access them, navigate to the Elements tab. Here you can find so many categories of elements. Choose any elements according to your need and drop them in the timeline above all other layers. If you cannot find a suitable sticker, you can download one from the internet and use it by importing it into Filmora.

Step 12: Once you are satisfied with the final results, you can take the screenshot of the Thumbnail using the Snapshot icon located below the preview panel. It will create a screenshot in the media panel of Filmora.

Step 13: To access the directory where this screenshot is saved, right-click on the screenshot and click on “Reveal in Explorer.” It will open the folder that contains all the screenshots you take through Filmora. Your Fortnite Thumbnail is ready to be used on your Youtube videos.

Conclusion
With Filmora, there are no limits. You can use your imagination to create amazing Fortnite thumbnails or thumbnails for other purposes. This article is just a demo teaching you how you use Filmora X to develop free and astounding thumbnails. Explore other options and elements of Filmora to take your thumbnails to another level.

Ollie Mattison
Ollie Mattison is a writer and a lover of all things video.
Follow @Ollie Mattison
Also read:
- [New] 2024 Approved Clip Perfection Achieved Through Blended Methodologies
- [New] Audience Wave Top Hash Tags to Swell Youtube Views
- [New] Audio Recording 101 From YouTube Playback To Files
- [New] Skyrocket Your Video Speed Expert Tips for Faster Render & Upload for 2024
- [New] Starry Secrets A Guide to Capturing the Perfect Night Portraits for 2024
- [Updated] Creating Captivating YouTube Thumbnails for Mac Users
- [Updated] Cut Down, Catch More The Best URL Reducers for YouTube for 2024
- [Updated] Optimal Mobile Photography and Videography on iOS & Android
- [Updated] QuipQuill Memes & More at Your Fingertips
- 2024 Approved Digital Text Generator for Videos
- Express Thumbnails for Epic Battle Royale for 2024
- FB Share Strategies for Your YouTube Content
- In 2024, The Top 5 Android Apps That Use Fingerprint Sensor to Lock Your Apps On Lava Yuva 2 Pro
- Love in Full Bloom Top 7 Premium Marriage Films From YouTube and Vimeo
- Mastering Channels on the Fly - TubeBuddy Essentials
- Tormented Souls Game Continuously Fails to Load on Windows - Troubleshooting Tips
- Title: Reversing a YouTube Strike A Guide
- Author: Brian
- Created at : 2024-10-12 17:27:14
- Updated at : 2024-10-18 17:18:34
- Link: https://youtube-video-recordings.techidaily.com/reversing-a-youtube-strike-a-guide/
- License: This work is licensed under CC BY-NC-SA 4.0.

