
:max_bytes(150000):strip_icc()/smartphone_laptop_mouse-5a4d80e37bb2830037db9ce7.jpg)
"Rediscover Film Noir Creating Vintage Scenes"
Rediscover Film Noir: Creating Vintage Scenes
How to Create Vintage Videos: A Comprehensive Tutorial

Richard Bennett
Mar 27, 2024• Proven solutions
“Every accomplishment starts with a decision to try.” – A Vintage Thought

Vintage videos are ultimately the retro videos you have ever imagined. The look is highly inspirational in itself. The vintage effect in photography and videos results in a must-see look that everyone wants to capture all day long. The meaning of vintage is ‘the time when something of quality was produced.’ When something is called retro, it means old, recognized, and essential. Vintage also resembles love apart from videos and photos. All in all, it’s a positive and result-oriented thing to carry on in your videos. And this is what we want to mention in this post relating to the creation of vintage videos.
Here are some vintage-style video ideas for you to have a look at.
- Part 1: What to Consider When Shooting a Vintage Video?
- Part 2: How to Create a Stunning Vintage Video?
- Part 3: Tips to Make Your Vintage Videos Stand Out
What to Consider When Shooting a Vintage Video?
Vintage videos are kind of old school vibes and must be shooting accordingly by keeping in mind the following points. These are a sort of expert tips given by photographers based on their practical experience. First of all, you have to understand that a video can be made vintage, but you can’t change the actual environment of shooting. Some editing always involves there in every project out there. Still, the tips given below will help you a lot in creating a retro look.
Use Vintage Lenses
The very first helpful tip is to use a vintage lens. They allow chromatic aberration by distorting colors around the frame. Furthermore, you can find various kinds of lenses in terms of a vintage effect.
Decrease Contrast
Do the correct color grading by reducing the contrast a little bit. You must not level the retro videos in black or white or like-new videos. You can simply add a contrasting effect and then reduce it to have that vintage look.
Keep it a little soft
If you have ever noticed, the vintage videos are a little soft and look like degraded with time. It’s a result of decreased sharpness in the camera’s menu settings. You can even add a slight blur to the final video or simply use recognized software made for video editing .
Brighten up the black levels
Lots of black points in the video are not ideal for a vintage effect. The suitable approach is to bring up black levels and make it dark gray instead of inky black. This look can be achieved either by levels effect or curves effect in your editing software.
Reduce Saturation levels
Bringing down the saturation levels is another tip to create a vintage effect. The old videos are also absent in bright colors. Don’t go too crazy about reduction as 20%-30% saturation level is more than enough.
How to Create a Stunning Vintage Video?
What you need to get started as both beginner and professional is Wondershare Filmora Video Editor. It is a highly recommended software to create vintage videos. The intuitive user interface and lots of editing functions are helpful for a video editor. It has both primary as well as advanced editing programs to check. It has various advanced color tuning tools to promote the making of original videos. It features tint, temperature, Vignette, 3D Luts, Lights, and so on.


Steps for the vintage effect to videos on Wondershare Filmora Video Editor
Step 1: Upload video & make specific changes

The very step is to add the video by clicking the + icon. We have added the three sample videos from the library of Wondershare Filmora itself. Adjust them in the timeline as per your requirements.
After doing all the essential editing functions, click on the Effects tab given at the upper-left corner. Simply type the word Old in the Search tab.
The Old Video filter will immediately appear in the list of filters. Tap the “+” icon in Old Video filter to add to the timeline. Drag its ends right or left to adjust the duration.
Step 2: Apply White & Black Filters

The second step is to apply the Black & White filters. Go to the Effects tab and explore five Black & White filters available. Each of these filters is quite different and must be applied accordingly. Check the aesthetic of your video clip before any filter application to retro videos.
Step 3: Add the Sun Kissed or Sepia Tone Rise Filters to the video clip

There are various other categories of filters you can apply, such as Retro, Sun Kissed, and Sepia Tone, etc. The features of Filmora also present several subcategories such as Faux Film or Shake.

On the other hand, the subcategory of Sepia Tone features Sun-Kissed & Rise Filters to stimulate sepia-tinted texture and recreate the old visual style. The Sun Kissed filter presents brown and red colors to give that warm image atmosphere.
Step 4: Desaturate Video Clip

Now, you need to desaturate the video clip with Ash & Willow filters. We have typed Ash in the Search bar, and you can see the filter below. These filters are essential to desaturate the video with preset contrast, brightness, or exposure values.

Then, we have combined the black & white filter with an overlay of Film Reel Horizontal. It will help you sell the effect and make the video look more authentic. However, the only application of Black & White or Ash & Willow filters is not going to make any creative thing in terms of vintage videos. You have to mix overlays with features such as Random Dust or Film Reel Horizontal.
Step 5: Apply Black & White and Old Film Color Correction Presets to the video
You can also access the Advanced color correction Tab of Filmora from the Color button. It also features Preset and Adjusts Tabs to desaturate footage. The Preset presents a variety of options, including Black & White and Old Film. You just need to right-click the particular preset and select the Apply option.

Tips to Make Your Vintage Videos Stand Out
Following the helpful tips would assist you in creating awesome retro videos.
- You can use various vintage apps such as Retro VHS, RTRO Camera, 8mm, Camcorder, VSCO, etc. Or, despite using these limited apps, you can directly use our preferred video editing software called Wondershare Filmora.
- If you use a specific vintage camera, keep it on low highlights and low contrasts. Use color grading, as we have discussed above. They help to provide the ultimate old-school effect.
- Always keep low saturation settings for shooting vintage videos. Take control over Saturation, Hue, and Luminance of video.
- Add overlays and respective filters to recreate a required vintage look. You must add things that dust, scratch, and grain the heck out from the video that you have created.
- Lower the frame rate or FPS to create an excellent vintage look. You can make it to 18 or 14 FPS depending upon the aesthetic requirements.
- Keep an eye on black and white filters you have used. It’s because more of a black and white can ruin the actual vintage experience.
Conclusion
So, this is an ultimate tutorial on the creation of vintage videos. We Hope you have admired the steps and our recommended video editing software. Vintage means grand, and thus you should make it amazing as well. It is the reason we have stated all facts regarding the vintage effect in our post above. Wondering how to add such effect in FCPX? check this article:How to Create a Vignette in Final Cut Pro X?
Surely give a read and thank us later!
Richard Bennett
Richard Bennett is a writer and a lover of all things video.
Follow @Richard Bennett
Richard Bennett
Mar 27, 2024• Proven solutions
“Every accomplishment starts with a decision to try.” – A Vintage Thought
Vintage videos are ultimately the retro videos you have ever imagined. The look is highly inspirational in itself. The vintage effect in photography and videos results in a must-see look that everyone wants to capture all day long. The meaning of vintage is ‘the time when something of quality was produced.’ When something is called retro, it means old, recognized, and essential. Vintage also resembles love apart from videos and photos. All in all, it’s a positive and result-oriented thing to carry on in your videos. And this is what we want to mention in this post relating to the creation of vintage videos.
Here are some vintage-style video ideas for you to have a look at.
- Part 1: What to Consider When Shooting a Vintage Video?
- Part 2: How to Create a Stunning Vintage Video?
- Part 3: Tips to Make Your Vintage Videos Stand Out
What to Consider When Shooting a Vintage Video?
Vintage videos are kind of old school vibes and must be shooting accordingly by keeping in mind the following points. These are a sort of expert tips given by photographers based on their practical experience. First of all, you have to understand that a video can be made vintage, but you can’t change the actual environment of shooting. Some editing always involves there in every project out there. Still, the tips given below will help you a lot in creating a retro look.
Use Vintage Lenses
The very first helpful tip is to use a vintage lens. They allow chromatic aberration by distorting colors around the frame. Furthermore, you can find various kinds of lenses in terms of a vintage effect.
Decrease Contrast
Do the correct color grading by reducing the contrast a little bit. You must not level the retro videos in black or white or like-new videos. You can simply add a contrasting effect and then reduce it to have that vintage look.
Keep it a little soft
If you have ever noticed, the vintage videos are a little soft and look like degraded with time. It’s a result of decreased sharpness in the camera’s menu settings. You can even add a slight blur to the final video or simply use recognized software made for video editing .
Brighten up the black levels
Lots of black points in the video are not ideal for a vintage effect. The suitable approach is to bring up black levels and make it dark gray instead of inky black. This look can be achieved either by levels effect or curves effect in your editing software.
Reduce Saturation levels
Bringing down the saturation levels is another tip to create a vintage effect. The old videos are also absent in bright colors. Don’t go too crazy about reduction as 20%-30% saturation level is more than enough.
How to Create a Stunning Vintage Video?
What you need to get started as both beginner and professional is Wondershare Filmora Video Editor. It is a highly recommended software to create vintage videos. The intuitive user interface and lots of editing functions are helpful for a video editor. It has both primary as well as advanced editing programs to check. It has various advanced color tuning tools to promote the making of original videos. It features tint, temperature, Vignette, 3D Luts, Lights, and so on.
Steps for the vintage effect to videos on Wondershare Filmora Video Editor
Step 1: Upload video & make specific changes
The very step is to add the video by clicking the + icon. We have added the three sample videos from the library of Wondershare Filmora itself. Adjust them in the timeline as per your requirements.
After doing all the essential editing functions, click on the Effects tab given at the upper-left corner. Simply type the word Old in the Search tab.
The Old Video filter will immediately appear in the list of filters. Tap the “+” icon in Old Video filter to add to the timeline. Drag its ends right or left to adjust the duration.
Step 2: Apply White & Black Filters
The second step is to apply the Black & White filters. Go to the Effects tab and explore five Black & White filters available. Each of these filters is quite different and must be applied accordingly. Check the aesthetic of your video clip before any filter application to retro videos.
Step 3: Add the Sun Kissed or Sepia Tone Rise Filters to the video clip
There are various other categories of filters you can apply, such as Retro, Sun Kissed, and Sepia Tone, etc. The features of Filmora also present several subcategories such as Faux Film or Shake.
On the other hand, the subcategory of Sepia Tone features Sun-Kissed & Rise Filters to stimulate sepia-tinted texture and recreate the old visual style. The Sun Kissed filter presents brown and red colors to give that warm image atmosphere.
Step 4: Desaturate Video Clip
Now, you need to desaturate the video clip with Ash & Willow filters. We have typed Ash in the Search bar, and you can see the filter below. These filters are essential to desaturate the video with preset contrast, brightness, or exposure values.
Then, we have combined the black & white filter with an overlay of Film Reel Horizontal. It will help you sell the effect and make the video look more authentic. However, the only application of Black & White or Ash & Willow filters is not going to make any creative thing in terms of vintage videos. You have to mix overlays with features such as Random Dust or Film Reel Horizontal.
Step 5: Apply Black & White and Old Film Color Correction Presets to the video
You can also access the Advanced color correction Tab of Filmora from the Color button. It also features Preset and Adjusts Tabs to desaturate footage. The Preset presents a variety of options, including Black & White and Old Film. You just need to right-click the particular preset and select the Apply option.
Tips to Make Your Vintage Videos Stand Out
Following the helpful tips would assist you in creating awesome retro videos.
- You can use various vintage apps such as Retro VHS, RTRO Camera, 8mm, Camcorder, VSCO, etc. Or, despite using these limited apps, you can directly use our preferred video editing software called Wondershare Filmora.
- If you use a specific vintage camera, keep it on low highlights and low contrasts. Use color grading, as we have discussed above. They help to provide the ultimate old-school effect.
- Always keep low saturation settings for shooting vintage videos. Take control over Saturation, Hue, and Luminance of video.
- Add overlays and respective filters to recreate a required vintage look. You must add things that dust, scratch, and grain the heck out from the video that you have created.
- Lower the frame rate or FPS to create an excellent vintage look. You can make it to 18 or 14 FPS depending upon the aesthetic requirements.
- Keep an eye on black and white filters you have used. It’s because more of a black and white can ruin the actual vintage experience.
Conclusion
So, this is an ultimate tutorial on the creation of vintage videos. We Hope you have admired the steps and our recommended video editing software. Vintage means grand, and thus you should make it amazing as well. It is the reason we have stated all facts regarding the vintage effect in our post above. Wondering how to add such effect in FCPX? check this article:How to Create a Vignette in Final Cut Pro X?
Surely give a read and thank us later!
Richard Bennett
Richard Bennett is a writer and a lover of all things video.
Follow @Richard Bennett
First Steps Toward Monetary Success on YouTube
Hello, I’m looking to start my journey as a YouTuber, but I do not know how the process works. Please, can you share with me how I can create a YouTube channel and make money from it? Kindly, help.
Starting a successful YouTube channel is very tricky. So, if you’re wondering how to create a YouTube channel and make money, worry less, we understand your struggle, and that is why we’ve created this YouTube beginners guide.
Regardless of whether you’re looking to start a tech YouTube channel, a money-making online YouTube channel, a lifestyle YouTube channel, or other topics, this guide will walk you through the simple process of how to create a YouTube channel and make money from it.
Part 1: Why choose YouTube to make money?
Boasting over 2 billion active users globally, YouTube remains the most used video-playing platform on the internet with all kinds of videos.
Today, many folks use YouTube as a means of generating income because it offers users more opportunities to reach a wide range of audiences, and the means of generating income via YouTube easily. As of when this article is written, research shows that an average YouTuber could earn up to $10,000 yearly.
Also, YouTube is a free marketing platform. So, if you have a website, you can add links to your website in the video description, thus enabling you to boost your website traffic via the platform. And it’ll allow you to advertise your product or services 100% free.
Part 2: 5-Step Formula to Start a YouTube Channel
Now you understand why you should choose YouTube to make money, the following steps will teach you how to create a YouTube channel within a few clicks. So, read on.
Step1 Create a google account
To get started, you need to create a google account. But if you already have a Google account you can skip this step.
Head to Google Account and click Create Account at the top right corner.

On the new screen, enter the necessary details and click Next.

Provide your phone number and other required details. Then, click Next.

On the new page, click I Agree to accept Google’s terms and conditions. Then finish the Google Account setup.

Step2 Create a YouTube account
Once you’ve successfully created a Google account, the next thing is to create your YouTube account. You just have to do the following to carry out the operation;
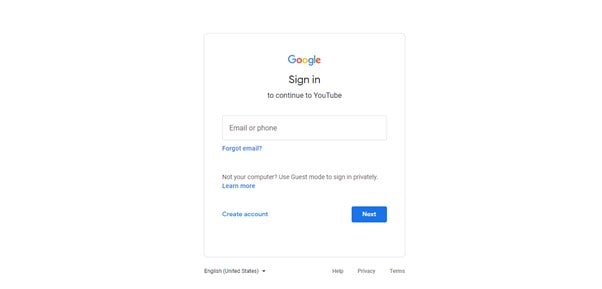
Open YouTube’s official website in your browser and click Sign in from the top right corner.

On the new page, sign in to the Google account that you want to use in creating your YouTube channel.
After you sign in to your Google account, you’ll be prompted back to the YouTube home interface. Click on your profile icon from the top right corner and select Create A Channel from the drop-down list.

Choose the Name you want to appear on your YouTube channel profile and upload a preferred Picture. Then, click Create Channel to proceed.

Step3 Customize your YouTube channel
After you’ve successfully created the channel, the next thing is to customize the channel as per requirement. Click Customise Channel from the left-hand side.

You’ll be prompted to the YouTube creator studio. There, you’ll find Layout, Branding, and Basic Info options displayed at the top of the page.
In the Layout section, you’ll be allowed to apply customization of how you want your YouTube channel homepage to look.

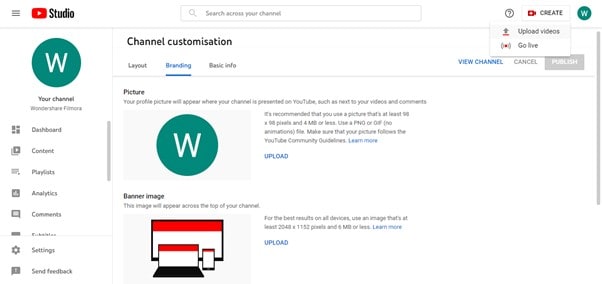
Under Branding, you can upload your brand logo as a profile photo, upload a banner image, and add the video watermark that you want to appear on all videos you upload on YouTube.

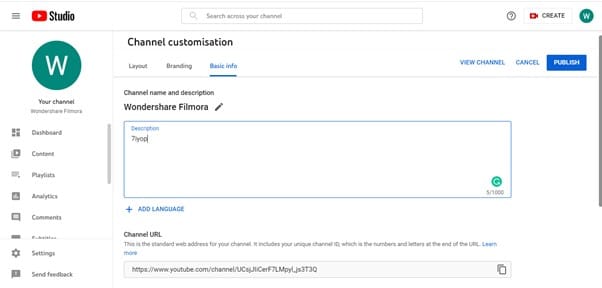
Under Basic Info, you’ll be able to enter a description for your YouTube channel, edit your channel URL, and do lots more. However, remember to always use the PUBLISH button to save customization.
Step4 Upload your first YouTube video
Now, it’s to upload your first YouTube video. To do so, navigate to the top-right corner of the page and click Create New. Select Upload Video.
If you have a video ready, click Select Files and upload the video you want to post.

Complete the required editing/settings after the video is uploaded.

Speaking of videos, you upload on YouTube, there are certain types of videos that can make you popular within a short time. Such YouTube video category includes;
- Singing
- Teaching
- Fashion Advice
- Cooking Tutorial
- Make-Up Tutorial
Step5 Make your YouTube channel discoverable
It’s time to start making your YouTube channel discoverable online. You need the subscribers, views, and all that a creator like you is worth having. However, to make this possible, you need to do the following;
Optimize Video Titles
Using Google-friendly titles for your videos is vital to allow them to rank well on Google search ranking. It should be catchy and compelling that users will be prompted to want to know what the video is about. Make sure it contains keywords too.

Optimize Video Description
Adding descriptions to your video is as important as the title. This will help search engines understand what your video is all about. So, make sure you add rich keywords to your video description and keep it concise.

Promote Your Channel on Other Social Media Platforms
You shouldn’t limit yourself to just creating videos and uploading them on YouTube. Make sure you always make it a priority to promote your YouTube videos on other platforms like Facebook, Twitter, or Instagram. This will help you give your existing fans a heads-up that you’re starting a YouTube channel.

Add Tags to your videos
When we say add tags to your videos, it does not mean you should add any tag to any video you upload on YouTube. Only add tags that’s relating to the theme of your video.
Tags will help YouTube understand the kind of video you’re uploading, and it’ll help you maintain the quality of not just your videos but your YouTube channel.

Use Keywords in Your Videos
Using rich keywords in your YouTube videos is a great way to increase the chances of your videos being seen online. Make sure you use the right keyword in the video title, as it’ll help guide viewers to your video when they search for similar words or phrases online.

Part 3: YouTube Must-Have Tools: What Are They?
Congratulations on creating your YouTube channel. But, before you get over-excited, there are essential tools you need as a YouTuber to help you stand out in the industry. These tools include the following;
1. Video Editor – Wondershare Filmora
As a YouTuber, regardless of your niche of expertise, you need an efficient video editing tool like Wondershare Filmora to create quality videos. Filmora is different from the regular video editor you find online, and it offers a plethora of video editing features that you can rely on to edit your videos and spice them up without requiring any kind of video editing knowledge.
See how you can use Filmora video editor on your YouTube videos;
Free Download For Win 7 or later(64-bit)
Free Download For macOS 10.14 or later
Step1 Go to the official website and install the Filmora video editing software on your computer. Then, launch the tool and import the video you want to edit using the Import button.

Drag-n-drop the video to the timeline.

Step2 Click Effects from the top of the screen. Select AI Portrait from the left-hand side and find a preferred AI Portrait effect. Then, click on it and drag-n-drop the effect to the Timeline.

Adjust the effect starting and ending point of where you want the AI Portrait effect to be displayed.
Step3 Again, adjust the AI Portrait effect settings by double-clicking on it, then, from the pop-up, apply the preferred settings.

Step4 You can also add a “Subscribe” watermark to your YouTube video. To do so, just click the >> icon next to Export at the top of the screen, then select Element.

Select the ‘Social Media Show Element 07’ Effects. Then, drag-n-drop it to the Timeline.

Step5 Lastly, preview the edited video, and if you’re okay with it, click Export from the top bar and select Burn DVD from the drop-down list.
From the pop-up window that appears on your PC screen, select the Folder Path and give the video file a preferred name. Then, click Export to complete the operation.

2. Google Keyword Planner
The Google keyword planner is vital to help you do keyword research and see the trends of how a particular keyword is searched in a particular month, within a given year, or more. It’ll help you understand how people are searching for a particular keyword and what time of the year it usually has more searches from folks.
By using Google Keyword planner, you’ll put yourself ahead of your competitors by using the right keyword that you need for your SEO and PPC strategies at the right time. From search volume to trends, CPC, competition scores, and more, it’s crucial you have this tool at your fingertips. Besides, it’s 100% free to use.
3. YouTube Studio
YouTube Studio is a crucial analytic tool that can come in handy to help you improve your video as you grow your YouTube channel. It is like Google Analytics in a way. It’ll allow you to track the analytics of how people view your videos, comment on your video, and more. YouTube Studio is available for free. You can use it through the Android App, on your PC or online from YouTube itself.

4. VidIQ
Are you looking for a tool to grow your YouTube channel efficiently? Then VidIQ is the ideal tool for you. Yes, with VidIQ, you’ll get access to essential tools to grow your YouTube audience faster than you can think. It’s just a scorecard that offers you in-depth analytics of how your YouTube videos are performing compared to your competitors, thus allowing you to get helpful info on how you can get ahead of them and stand out in the industry.
With VidIQ, you’ll get access to a checklist that will highlight titles, descriptions, cards, end screens, closed captions, and lots more in your videos. And of all, it’ll suggest tags that you can use in your videos to get more traffic and improve SEO.

Part 4: Tips & Tricks to Make your YouTube Grow Faster
Stay Consistent
There’s no doubt that the key to succeeding in whatever you do is to stay consistent. It can be quite hard for anyone, especially newbies to keep up with different difficulties encountered in the pursuit to create a successful YouTube channel.
So, for you to achieve your dreams of being a popular YouTuber, you must keep up with the consistency of creating quality videos, promoting your videos, and doing the right thing that’s needed for your YouTube channel to stand out online.
Collaborate With Other YouTubers
Don’t be shy to reach out to your fellow YouTubers for collaboration. Yes, by collaborating with popular YouTubers, you get to enhance your online presence, thereby increasing your subscriber base and increasing your video views.
YouTube SEO Is Crucial
You might have heard of SEO (Search Engine Optimization) being crucial for websites to rank well, but the truth is it also applies to YouTube channels. YouTube SEO is a great way to optimize your YouTube channel and video to make it rank well on online search results.
It’s important you understand how YouTube SEO works and implement it in your YouTube channel, as it’ll increase your chances of more viewers visiting your channel and watching your videos.
Final Words
That’s all you need to know about creating a successful YouTube channel. If you fancy creating videos, the above tips will teach you how to create a YouTube channel and make money. Also, if you read the article to this point, we believe you’ve understood different ways you can make your YouTube channel stand out and enhance your chances of making more money on YouTube. Don’t hesitate to start your journey now!
Free Download For Win 7 or later(64-bit)
Free Download For macOS 10.14 or later
Part 1: Why choose YouTube to make money?
Boasting over 2 billion active users globally, YouTube remains the most used video-playing platform on the internet with all kinds of videos.
Today, many folks use YouTube as a means of generating income because it offers users more opportunities to reach a wide range of audiences, and the means of generating income via YouTube easily. As of when this article is written, research shows that an average YouTuber could earn up to $10,000 yearly.
Also, YouTube is a free marketing platform. So, if you have a website, you can add links to your website in the video description, thus enabling you to boost your website traffic via the platform. And it’ll allow you to advertise your product or services 100% free.
Part 2: 5-Step Formula to Start a YouTube Channel
Now you understand why you should choose YouTube to make money, the following steps will teach you how to create a YouTube channel within a few clicks. So, read on.
Step1 Create a google account
To get started, you need to create a google account. But if you already have a Google account you can skip this step.
Head to Google Account and click Create Account at the top right corner.
On the new screen, enter the necessary details and click Next.
Provide your phone number and other required details. Then, click Next.
On the new page, click I Agree to accept Google’s terms and conditions. Then finish the Google Account setup.
Step2 Create a YouTube account
Once you’ve successfully created a Google account, the next thing is to create your YouTube account. You just have to do the following to carry out the operation;
Open YouTube’s official website in your browser and click Sign in from the top right corner.
On the new page, sign in to the Google account that you want to use in creating your YouTube channel.
After you sign in to your Google account, you’ll be prompted back to the YouTube home interface. Click on your profile icon from the top right corner and select Create A Channel from the drop-down list.
Choose the Name you want to appear on your YouTube channel profile and upload a preferred Picture. Then, click Create Channel to proceed.
Step3 Customize your YouTube channel
After you’ve successfully created the channel, the next thing is to customize the channel as per requirement. Click Customise Channel from the left-hand side.
You’ll be prompted to the YouTube creator studio. There, you’ll find Layout, Branding, and Basic Info options displayed at the top of the page.
In the Layout section, you’ll be allowed to apply customization of how you want your YouTube channel homepage to look.
Under Branding, you can upload your brand logo as a profile photo, upload a banner image, and add the video watermark that you want to appear on all videos you upload on YouTube.
Under Basic Info, you’ll be able to enter a description for your YouTube channel, edit your channel URL, and do lots more. However, remember to always use the PUBLISH button to save customization.
Step4 Upload your first YouTube video
Now, it’s to upload your first YouTube video. To do so, navigate to the top-right corner of the page and click Create New. Select Upload Video.
If you have a video ready, click Select Files and upload the video you want to post.
Complete the required editing/settings after the video is uploaded.
Speaking of videos, you upload on YouTube, there are certain types of videos that can make you popular within a short time. Such YouTube video category includes;
- Singing
- Teaching
- Fashion Advice
- Cooking Tutorial
- Make-Up Tutorial
Step5 Make your YouTube channel discoverable
It’s time to start making your YouTube channel discoverable online. You need the subscribers, views, and all that a creator like you is worth having. However, to make this possible, you need to do the following;
Optimize Video Titles
Using Google-friendly titles for your videos is vital to allow them to rank well on Google search ranking. It should be catchy and compelling that users will be prompted to want to know what the video is about. Make sure it contains keywords too.
Optimize Video Description
Adding descriptions to your video is as important as the title. This will help search engines understand what your video is all about. So, make sure you add rich keywords to your video description and keep it concise.
Promote Your Channel on Other Social Media Platforms
You shouldn’t limit yourself to just creating videos and uploading them on YouTube. Make sure you always make it a priority to promote your YouTube videos on other platforms like Facebook, Twitter, or Instagram. This will help you give your existing fans a heads-up that you’re starting a YouTube channel.
Add Tags to your videos
When we say add tags to your videos, it does not mean you should add any tag to any video you upload on YouTube. Only add tags that’s relating to the theme of your video.
Tags will help YouTube understand the kind of video you’re uploading, and it’ll help you maintain the quality of not just your videos but your YouTube channel.
Use Keywords in Your Videos
Using rich keywords in your YouTube videos is a great way to increase the chances of your videos being seen online. Make sure you use the right keyword in the video title, as it’ll help guide viewers to your video when they search for similar words or phrases online.
Part 3: YouTube Must-Have Tools: What Are They?
Congratulations on creating your YouTube channel. But, before you get over-excited, there are essential tools you need as a YouTuber to help you stand out in the industry. These tools include the following;
1. Video Editor – Wondershare Filmora
As a YouTuber, regardless of your niche of expertise, you need an efficient video editing tool like Wondershare Filmora to create quality videos. Filmora is different from the regular video editor you find online, and it offers a plethora of video editing features that you can rely on to edit your videos and spice them up without requiring any kind of video editing knowledge.
See how you can use Filmora video editor on your YouTube videos;
Free Download For Win 7 or later(64-bit)
Free Download For macOS 10.14 or later
Step1 Go to the official website and install the Filmora video editing software on your computer. Then, launch the tool and import the video you want to edit using the Import button.
Drag-n-drop the video to the timeline.
Step2 Click Effects from the top of the screen. Select AI Portrait from the left-hand side and find a preferred AI Portrait effect. Then, click on it and drag-n-drop the effect to the Timeline.
Adjust the effect starting and ending point of where you want the AI Portrait effect to be displayed.
Step3 Again, adjust the AI Portrait effect settings by double-clicking on it, then, from the pop-up, apply the preferred settings.
Step4 You can also add a “Subscribe” watermark to your YouTube video. To do so, just click the >> icon next to Export at the top of the screen, then select Element.
Select the ‘Social Media Show Element 07’ Effects. Then, drag-n-drop it to the Timeline.
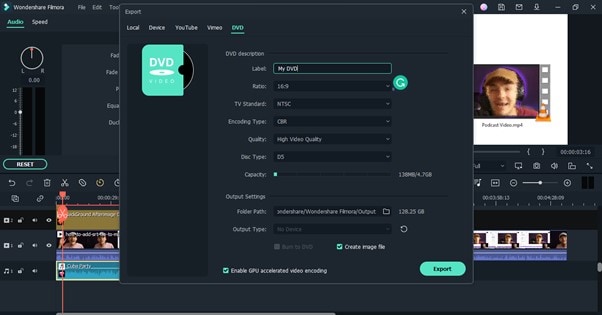
Step5 Lastly, preview the edited video, and if you’re okay with it, click Export from the top bar and select Burn DVD from the drop-down list.
From the pop-up window that appears on your PC screen, select the Folder Path and give the video file a preferred name. Then, click Export to complete the operation.
2. Google Keyword Planner
The Google keyword planner is vital to help you do keyword research and see the trends of how a particular keyword is searched in a particular month, within a given year, or more. It’ll help you understand how people are searching for a particular keyword and what time of the year it usually has more searches from folks.
By using Google Keyword planner, you’ll put yourself ahead of your competitors by using the right keyword that you need for your SEO and PPC strategies at the right time. From search volume to trends, CPC, competition scores, and more, it’s crucial you have this tool at your fingertips. Besides, it’s 100% free to use.
3. YouTube Studio
YouTube Studio is a crucial analytic tool that can come in handy to help you improve your video as you grow your YouTube channel. It is like Google Analytics in a way. It’ll allow you to track the analytics of how people view your videos, comment on your video, and more. YouTube Studio is available for free. You can use it through the Android App, on your PC or online from YouTube itself.
4. VidIQ
Are you looking for a tool to grow your YouTube channel efficiently? Then VidIQ is the ideal tool for you. Yes, with VidIQ, you’ll get access to essential tools to grow your YouTube audience faster than you can think. It’s just a scorecard that offers you in-depth analytics of how your YouTube videos are performing compared to your competitors, thus allowing you to get helpful info on how you can get ahead of them and stand out in the industry.
With VidIQ, you’ll get access to a checklist that will highlight titles, descriptions, cards, end screens, closed captions, and lots more in your videos. And of all, it’ll suggest tags that you can use in your videos to get more traffic and improve SEO.
Part 4: Tips & Tricks to Make your YouTube Grow Faster
Stay Consistent
There’s no doubt that the key to succeeding in whatever you do is to stay consistent. It can be quite hard for anyone, especially newbies to keep up with different difficulties encountered in the pursuit to create a successful YouTube channel.
So, for you to achieve your dreams of being a popular YouTuber, you must keep up with the consistency of creating quality videos, promoting your videos, and doing the right thing that’s needed for your YouTube channel to stand out online.
Collaborate With Other YouTubers
Don’t be shy to reach out to your fellow YouTubers for collaboration. Yes, by collaborating with popular YouTubers, you get to enhance your online presence, thereby increasing your subscriber base and increasing your video views.
YouTube SEO Is Crucial
You might have heard of SEO (Search Engine Optimization) being crucial for websites to rank well, but the truth is it also applies to YouTube channels. YouTube SEO is a great way to optimize your YouTube channel and video to make it rank well on online search results.
It’s important you understand how YouTube SEO works and implement it in your YouTube channel, as it’ll increase your chances of more viewers visiting your channel and watching your videos.
Final Words
That’s all you need to know about creating a successful YouTube channel. If you fancy creating videos, the above tips will teach you how to create a YouTube channel and make money. Also, if you read the article to this point, we believe you’ve understood different ways you can make your YouTube channel stand out and enhance your chances of making more money on YouTube. Don’t hesitate to start your journey now!
Free Download For Win 7 or later(64-bit)
Free Download For macOS 10.14 or later
Also read:
- 2024 Approved Audio Visual Transcript Maker
- Love in Action Top 9 Premium Wedding Films on YouTube and Vimeo
- In 2024, 3 Innovative Ways to Neon-Border YouTube Thumbnails
- [Updated] Earning Potential in Gaming Videos
- IOS & Android Tips for Silent YouTube Viewing
- YouTube Mogul with Maximum Gross Income
- [New] Enhance Video Storytelling with Smart Chapter Insertion Techniques on YouTube
- Strengthen Your Content Identity Inserting Watermark/Logo in Videos
- [New] Comparing Social Platforms Facebook LIVE Vs. YouTube Live & Twitter Periscope
- The Essential List of YouTube Editors Ranked #1-10
- 2024 Approved Directing Twitch Viewers Seamlessly to YouTube Channel
- 2024 Approved Evasion Techniques for YouTube Bans
- Crafting a Journalistic Closing Statement
- 2024 Approved Are There Legal Constraints in Capturing Online Video Screenshots?
- In 2024, Charting a Course to Success Understanding YouTube Income
- Discovering Your YouTube Unique Slot for 2024
- [Updated] Beginner’s Blueprint for YouTube Success Setting Up & Making Money
- Mastering Video Thumbnail Personalization on YouTube
- Go Backwards A Step-by-Step for Reversing YouTube Videos
- In 2024, Channel Transformation From Zero to Thousand Followers
- In 2024, A Compreehensive Guide to YouTube Thumbnail Creation (Mac)
- Elevate Your Traffic Ethically YouTube's Best Practices for 2024
- [New] Becoming a Lyric Video Pro A Lyric Video Maker's Journey
- The Essential List 6 Diverse Websites for YouTube Visuals
- Optimal Screen Recorder Selection for YouTube Professionals
- Revenue Riches Masterful Methods for Monetizing on Mobile YouTube
- The Monetary Map Mr. Beast’s Financials Uncovered
- [Updated] Beyond BingeWatching The Best Non-YouTube Platforms for Videos
- The Art of YouTube Editing A Compreenasive Guidebook
- [Updated] Addressed Discrepancy in Shorts Showcase
- [New] Enchanting Music Visuals Using the Lyric Video Maker Toolkit
- Unlocking YouTube's Subscriber Potential in 30 Days
- Updated 2024 Approved The Sound Engineers Toolkit Removing High-Pitched Rattling From Audio Files
- [New] Nifty Steps to Generate Timely Captions and Text for FB Video Uploads for 2024
- In 2024, How To Unlock iPhone 15 Pro Max Without Swiping Up? 6 Ways | Dr.fone
- 3 Ways to Change Location on Facebook Marketplace for Honor X7b | Dr.fone
- [Updated] In 2024, Staying Pure-Hearted Amidst the Ruse of Ratings and Likes
- [New] Expert Tips on Producing High-Quality Facebook Video
- [Updated] Endless Video Recording Program for 2024
- 2024 Approved Reaction Video Essentials Top Mobile Apps You Need to Know
- New In 2024, The Ultimate Hack Filmora Coupon Codes Without Reddit
- Updated 2024 Approved Slow Down or Speed Up Top Video Editing Software with Speed Adjustment
- Updated In 2024, Easily Resize Images Online Top Tools and Resources
- Text-To-Speech Excellence on Discord - Your Ultimate Manual for 2024
- Breathe Life Into Photos Using Blur Effects in Illustrator
- How to Successfully Bypass iCloud Activation Lock on Apple iPhone 12 Pro Max
- In 2024, Complete Guide For Apple iPhone SE (2022) Lock Screen
- Updated Flawless Audio Engineering Choosing Your Customized EQ Pathways for 2024
- [New] Top 10 Shoutouts TikTok's Favorite Video Responses for 2024
- 2024 Approved From Silence to Symphony The Complete Process of Adding Music to KineMaster
- 15 Iconic Cartoon Characters of All Time for 2024
- 2024 Approved A Review Best Text Plugins For Your After Effects Projects
- Title: "Rediscover Film Noir Creating Vintage Scenes"
- Author: Brian
- Created at : 2024-05-25 12:47:13
- Updated at : 2024-05-26 12:47:13
- Link: https://youtube-video-recordings.techidaily.com/rediscover-film-noir-creating-vintage-scenes/
- License: This work is licensed under CC BY-NC-SA 4.0.
