:max_bytes(150000):strip_icc()/high-angle-view-of-man-holding-camera-at-table-877994880-5b1e840e3037130036d9bc07-ad7221e1c34b4f9db5991a98ddc0a775.jpg)
"Quick Fortnite Tile Sketch A 30-Second Guide"
Quick Fortnite Tile Sketch: A 30-Second Guide
How to Make Fortnite Thumbnail for Free and Easy in 2024

Ollie Mattison
Mar 27, 2024• Proven solutions
To grow a Youtube channel, you need to focus on several different factors and elements. Having an attractive and eye-catching thumbnail is one of those top factors that contribute to the growth of your channel. No matter how good your content is, if you cannot attract users to click on your videos, it will not benefit your channel. In this article, we are going to show you how you can make a Fortnite thumbnail in few simple steps using Filmora X. If you are a content creator and love to make Fortnite videos, then this article will be very helpful for you.
Filmora has recently introduced a new feature named AI Portrait that uses Artificial Intelligence to remove the background from a portrait or image. This feature doesn’t require any green screen to do that. Filmora also contains a wide range of elements and titles that help you enhance the Thumbnail and make look stunning and eye-catching.
Step 01: To start making a Fortnite thumbnail, it is important to have a screenshot of your gameplay. We can make a perfect screenshot using Fortnite Replay Mode. If you have recently played a Fortnite match, you can access its replay under the Career tab. Under the Career tab select Replays.

Step 02: If you are using a console, the game will only store 10 recent gameplays, but if you are using a PC, it will store 100 recent gameplays in this section. From all these gameplays, select the one that you want to use for the Thumbnail. Once you choose gameplay, you can control everything in it. The angle, speed, and camera mode.

Step 03: For creating a perfect thumbnail, select “Drone Free Camera” mode from the camera mode located on the bottom right corner of the screen. It will allow us to change the angle the way we want. Choose an angle of your choice and take the screenshot.

Step 04: Open Filmora X, make sure to select the 16:9 screen ratio. Import the screenshot using the import button.

Step 05: Drag and drop the screenshot into the timeline.

Step 06: Now, let’s separate the background and character. Go to the Effects, then AI Portrait, select Human Segmentation, and drop it into the screenshot.

Step 07: Filmora will ask you to purchase it, but you can now hit “Try it” to use it.

Step 08: It will remove the background of the screenshot.

Step 09: To add a background, go to the media and navigate to “Sample Color.” Drag a color of your choice and drop it below the screenshot.

Step 10: To add titles in the Thumbnail, go to the Titles tab. Here you can find several categories of titles. Find your preferred title and drop it above all the layers. You can choose titles, lower thirds, and other texts depending upon your need and requirement.

Step 11: We can make this Fortnite Thumbnail look more attractive by adding elements such as stickers and icons. Filmora contains a wide range of stickers. To access them, navigate to the Elements tab. Here you can find so many categories of elements. Choose any elements according to your need and drop them in the timeline above all other layers. If you cannot find a suitable sticker, you can download one from the internet and use it by importing it into Filmora.

Step 12: Once you are satisfied with the final results, you can take the screenshot of the Thumbnail using the Snapshot icon located below the preview panel. It will create a screenshot in the media panel of Filmora.

Step 13: To access the directory where this screenshot is saved, right-click on the screenshot and click on “Reveal in Explorer.” It will open the folder that contains all the screenshots you take through Filmora. Your Fortnite Thumbnail is ready to be used on your Youtube videos.

Conclusion
With Filmora, there are no limits. You can use your imagination to create amazing Fortnite thumbnails or thumbnails for other purposes. This article is just a demo teaching you how you use Filmora X to develop free and astounding thumbnails. Explore other options and elements of Filmora to take your thumbnails to another level.
Ollie Mattison
Ollie Mattison is a writer and a lover of all things video.
Follow @Ollie Mattison
Ollie Mattison
Mar 27, 2024• Proven solutions
To grow a Youtube channel, you need to focus on several different factors and elements. Having an attractive and eye-catching thumbnail is one of those top factors that contribute to the growth of your channel. No matter how good your content is, if you cannot attract users to click on your videos, it will not benefit your channel. In this article, we are going to show you how you can make a Fortnite thumbnail in few simple steps using Filmora X. If you are a content creator and love to make Fortnite videos, then this article will be very helpful for you.
Filmora has recently introduced a new feature named AI Portrait that uses Artificial Intelligence to remove the background from a portrait or image. This feature doesn’t require any green screen to do that. Filmora also contains a wide range of elements and titles that help you enhance the Thumbnail and make look stunning and eye-catching.
Step 01: To start making a Fortnite thumbnail, it is important to have a screenshot of your gameplay. We can make a perfect screenshot using Fortnite Replay Mode. If you have recently played a Fortnite match, you can access its replay under the Career tab. Under the Career tab select Replays.
Step 02: If you are using a console, the game will only store 10 recent gameplays, but if you are using a PC, it will store 100 recent gameplays in this section. From all these gameplays, select the one that you want to use for the Thumbnail. Once you choose gameplay, you can control everything in it. The angle, speed, and camera mode.
Step 03: For creating a perfect thumbnail, select “Drone Free Camera” mode from the camera mode located on the bottom right corner of the screen. It will allow us to change the angle the way we want. Choose an angle of your choice and take the screenshot.
Step 04: Open Filmora X, make sure to select the 16:9 screen ratio. Import the screenshot using the import button.
Step 05: Drag and drop the screenshot into the timeline.
Step 06: Now, let’s separate the background and character. Go to the Effects, then AI Portrait, select Human Segmentation, and drop it into the screenshot.
Step 07: Filmora will ask you to purchase it, but you can now hit “Try it” to use it.
Step 08: It will remove the background of the screenshot.
Step 09: To add a background, go to the media and navigate to “Sample Color.” Drag a color of your choice and drop it below the screenshot.
Step 10: To add titles in the Thumbnail, go to the Titles tab. Here you can find several categories of titles. Find your preferred title and drop it above all the layers. You can choose titles, lower thirds, and other texts depending upon your need and requirement.
Step 11: We can make this Fortnite Thumbnail look more attractive by adding elements such as stickers and icons. Filmora contains a wide range of stickers. To access them, navigate to the Elements tab. Here you can find so many categories of elements. Choose any elements according to your need and drop them in the timeline above all other layers. If you cannot find a suitable sticker, you can download one from the internet and use it by importing it into Filmora.
Step 12: Once you are satisfied with the final results, you can take the screenshot of the Thumbnail using the Snapshot icon located below the preview panel. It will create a screenshot in the media panel of Filmora.
Step 13: To access the directory where this screenshot is saved, right-click on the screenshot and click on “Reveal in Explorer.” It will open the folder that contains all the screenshots you take through Filmora. Your Fortnite Thumbnail is ready to be used on your Youtube videos.
Conclusion
With Filmora, there are no limits. You can use your imagination to create amazing Fortnite thumbnails or thumbnails for other purposes. This article is just a demo teaching you how you use Filmora X to develop free and astounding thumbnails. Explore other options and elements of Filmora to take your thumbnails to another level.
Ollie Mattison
Ollie Mattison is a writer and a lover of all things video.
Follow @Ollie Mattison
Mastering Media with Top 5 Photo & Video Apps on iOS/Android Devices
Best Camera Apps to Shoot and Record Videos on iPhone and Andriod Phones

Richard Bennett
Oct 26, 2023• Proven solutions
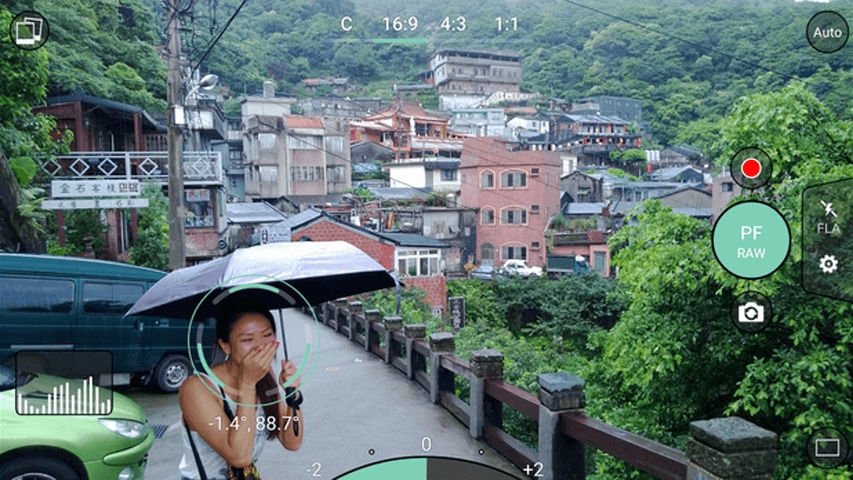
Smartphone cameras, especially the newest models, are capable of recording great videos. Depending on what kind of videos you make, you might not actually need a separate camera.
The majority of phone cameras record in full HD now, and some can even manage 4K. Where things get tricky is shooting in less than ideal conditions, i.e low light. You cannot make the same adjustments and customizations to your settings with a smartphone camera as you can with a DSLR.
You don’t have the same level of control.
But don’t worry – there are 5 camera apps that will allow you to record videos and get even more creative with how you use your phone’s camera.
- Part 1: Bonus Tip-Make Your Own Video with Wondershare Filmora
- Part 2: Best 5 Camera Apps to Record Videos on iPhone and Android
Part 1: Bonus Tip-Make Your Own Video with Wondershare Filmora
Wondershare Filmora is an amazing video editor for both professional staff and beginners. Its intuitive interface, fast timeline rendering, advanced color tuning, and surprising video effects, etc will make your video stand out! Just download it and edit your smartphone videos with Wondershare Filmora!


Part 2: Best 5 Camera Apps to Record Videos on iPhone and Android
Let’s dive!
1. Open Camera – Free, Android Only

This camera app gives you control over your exposure, flash, focus, ISO, shutter speed, torch, and white balance. How much control you have is up to you. If managing all these things manually is a hassle for you, you can use its automatic or semi-manual modes instead of manual mode.
This is a great camera app to record time-lapses. It is simplistic compared to some of the other apps on this list, but it is also extremely easy to use.
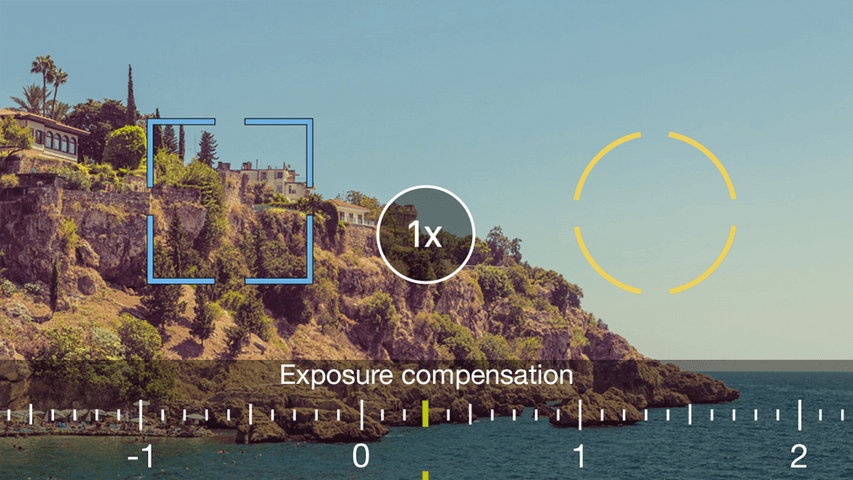
2. ProShot - $4, iOS or Android
ProShot lets you adjust your frame rate, which is important if you want to shoot slow motion or time-lapse videos. You can also adjust your brightness while filming. One of the most useful features of this camera app is that it provides a real-time audio level meter, so you won’t be surprised by a poor sound recording when you watch your videos back.
3. ProCamera - $5, iOS Only
This is one of the most frequently recommended camera apps for iPhones. It makes it easy for you to adjust your focus, iOS, and exposure. You can also play with different filters and effects right in the app. One of the only downsides of this app is that some of its most useful features, like Lowlight Plus, are in-app purchases.
4. Sun Seeker - $10, iOS or Android

A lot of the time when you’re shooting with your phone, you’re shooting outside. When you’re shooting outside, the most important thing you need to keep track of is the sun. Sun Seeker is the perfect app for figuring out where the sun will be in the sky at any given time, which will tell you the best time to go out and make your video.
For more information on making videos with natural light, check out Indoor Natural Lighting Tips .
Besides just keeping track of the sun, Sun Seeker provides an augmented reality view of its path and how it will affect specific locations.
5. FiLMiC Pro - $10, iOS or Android
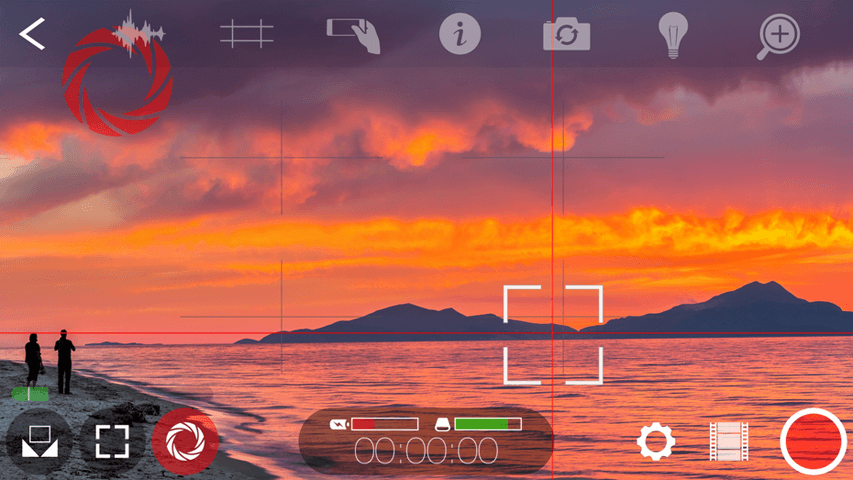
This is probably the best all-purpose camera app available. It gives you exactly the same kind of control over your smartphone camera as you would have over a DSLR. You can manually adjust your focus, exposure, ISO, shutter speed, tint, and color temperature. There are even voice processing audio filters, so you can capture better audio while you’re shooting and have less to fix in post.
Final Words
Because mobile cameras already perform so well, it can be easy to think to have more to adjust would only make things more complicated. However, there are occasions where you need to be able to make these adjustments. Are the videos you take inside at night at a lower quality than the ones you record during the day, for example? If you could set a higher ISO, you would be able to fix that.
Another example: just the other day, there was a question here about shooting green screen videos on a mobile device. One of our community members, Vivekpanwar, was having an issue with motion blur. Motion blur isn’t always distracting in normal videos, but it becomes a huge issue when you apply a Chroma key effect. The best way to avoid motion blur is to set a high shutter speed, which you can do if you download a quality camera app.
Richard Bennett
Richard Bennett is a writer and a lover of all things video.
Follow @Richard Bennett
Richard Bennett
Oct 26, 2023• Proven solutions
Smartphone cameras, especially the newest models, are capable of recording great videos. Depending on what kind of videos you make, you might not actually need a separate camera.
The majority of phone cameras record in full HD now, and some can even manage 4K. Where things get tricky is shooting in less than ideal conditions, i.e low light. You cannot make the same adjustments and customizations to your settings with a smartphone camera as you can with a DSLR.
You don’t have the same level of control.
But don’t worry – there are 5 camera apps that will allow you to record videos and get even more creative with how you use your phone’s camera.
- Part 1: Bonus Tip-Make Your Own Video with Wondershare Filmora
- Part 2: Best 5 Camera Apps to Record Videos on iPhone and Android
Part 1: Bonus Tip-Make Your Own Video with Wondershare Filmora
Wondershare Filmora is an amazing video editor for both professional staff and beginners. Its intuitive interface, fast timeline rendering, advanced color tuning, and surprising video effects, etc will make your video stand out! Just download it and edit your smartphone videos with Wondershare Filmora!

Part 2: Best 5 Camera Apps to Record Videos on iPhone and Android
Let’s dive!
1. Open Camera – Free, Android Only
This camera app gives you control over your exposure, flash, focus, ISO, shutter speed, torch, and white balance. How much control you have is up to you. If managing all these things manually is a hassle for you, you can use its automatic or semi-manual modes instead of manual mode.
This is a great camera app to record time-lapses. It is simplistic compared to some of the other apps on this list, but it is also extremely easy to use.
2. ProShot - $4, iOS or Android
ProShot lets you adjust your frame rate, which is important if you want to shoot slow motion or time-lapse videos. You can also adjust your brightness while filming. One of the most useful features of this camera app is that it provides a real-time audio level meter, so you won’t be surprised by a poor sound recording when you watch your videos back.
3. ProCamera - $5, iOS Only
This is one of the most frequently recommended camera apps for iPhones. It makes it easy for you to adjust your focus, iOS, and exposure. You can also play with different filters and effects right in the app. One of the only downsides of this app is that some of its most useful features, like Lowlight Plus, are in-app purchases.
4. Sun Seeker - $10, iOS or Android
A lot of the time when you’re shooting with your phone, you’re shooting outside. When you’re shooting outside, the most important thing you need to keep track of is the sun. Sun Seeker is the perfect app for figuring out where the sun will be in the sky at any given time, which will tell you the best time to go out and make your video.
For more information on making videos with natural light, check out Indoor Natural Lighting Tips .
Besides just keeping track of the sun, Sun Seeker provides an augmented reality view of its path and how it will affect specific locations.
5. FiLMiC Pro - $10, iOS or Android
This is probably the best all-purpose camera app available. It gives you exactly the same kind of control over your smartphone camera as you would have over a DSLR. You can manually adjust your focus, exposure, ISO, shutter speed, tint, and color temperature. There are even voice processing audio filters, so you can capture better audio while you’re shooting and have less to fix in post.
Final Words
Because mobile cameras already perform so well, it can be easy to think to have more to adjust would only make things more complicated. However, there are occasions where you need to be able to make these adjustments. Are the videos you take inside at night at a lower quality than the ones you record during the day, for example? If you could set a higher ISO, you would be able to fix that.
Another example: just the other day, there was a question here about shooting green screen videos on a mobile device. One of our community members, Vivekpanwar, was having an issue with motion blur. Motion blur isn’t always distracting in normal videos, but it becomes a huge issue when you apply a Chroma key effect. The best way to avoid motion blur is to set a high shutter speed, which you can do if you download a quality camera app.
Richard Bennett
Richard Bennett is a writer and a lover of all things video.
Follow @Richard Bennett
Richard Bennett
Oct 26, 2023• Proven solutions
Smartphone cameras, especially the newest models, are capable of recording great videos. Depending on what kind of videos you make, you might not actually need a separate camera.
The majority of phone cameras record in full HD now, and some can even manage 4K. Where things get tricky is shooting in less than ideal conditions, i.e low light. You cannot make the same adjustments and customizations to your settings with a smartphone camera as you can with a DSLR.
You don’t have the same level of control.
But don’t worry – there are 5 camera apps that will allow you to record videos and get even more creative with how you use your phone’s camera.
- Part 1: Bonus Tip-Make Your Own Video with Wondershare Filmora
- Part 2: Best 5 Camera Apps to Record Videos on iPhone and Android
Part 1: Bonus Tip-Make Your Own Video with Wondershare Filmora
Wondershare Filmora is an amazing video editor for both professional staff and beginners. Its intuitive interface, fast timeline rendering, advanced color tuning, and surprising video effects, etc will make your video stand out! Just download it and edit your smartphone videos with Wondershare Filmora!
Part 2: Best 5 Camera Apps to Record Videos on iPhone and Android
Let’s dive!
1. Open Camera – Free, Android Only
This camera app gives you control over your exposure, flash, focus, ISO, shutter speed, torch, and white balance. How much control you have is up to you. If managing all these things manually is a hassle for you, you can use its automatic or semi-manual modes instead of manual mode.
This is a great camera app to record time-lapses. It is simplistic compared to some of the other apps on this list, but it is also extremely easy to use.
2. ProShot - $4, iOS or Android
ProShot lets you adjust your frame rate, which is important if you want to shoot slow motion or time-lapse videos. You can also adjust your brightness while filming. One of the most useful features of this camera app is that it provides a real-time audio level meter, so you won’t be surprised by a poor sound recording when you watch your videos back.
3. ProCamera - $5, iOS Only
This is one of the most frequently recommended camera apps for iPhones. It makes it easy for you to adjust your focus, iOS, and exposure. You can also play with different filters and effects right in the app. One of the only downsides of this app is that some of its most useful features, like Lowlight Plus, are in-app purchases.
4. Sun Seeker - $10, iOS or Android
A lot of the time when you’re shooting with your phone, you’re shooting outside. When you’re shooting outside, the most important thing you need to keep track of is the sun. Sun Seeker is the perfect app for figuring out where the sun will be in the sky at any given time, which will tell you the best time to go out and make your video.
For more information on making videos with natural light, check out Indoor Natural Lighting Tips .
Besides just keeping track of the sun, Sun Seeker provides an augmented reality view of its path and how it will affect specific locations.
5. FiLMiC Pro - $10, iOS or Android
This is probably the best all-purpose camera app available. It gives you exactly the same kind of control over your smartphone camera as you would have over a DSLR. You can manually adjust your focus, exposure, ISO, shutter speed, tint, and color temperature. There are even voice processing audio filters, so you can capture better audio while you’re shooting and have less to fix in post.
Final Words
Because mobile cameras already perform so well, it can be easy to think to have more to adjust would only make things more complicated. However, there are occasions where you need to be able to make these adjustments. Are the videos you take inside at night at a lower quality than the ones you record during the day, for example? If you could set a higher ISO, you would be able to fix that.
Another example: just the other day, there was a question here about shooting green screen videos on a mobile device. One of our community members, Vivekpanwar, was having an issue with motion blur. Motion blur isn’t always distracting in normal videos, but it becomes a huge issue when you apply a Chroma key effect. The best way to avoid motion blur is to set a high shutter speed, which you can do if you download a quality camera app.
Richard Bennett
Richard Bennett is a writer and a lover of all things video.
Follow @Richard Bennett
Also read:
- [New] Evaluating Earnings The Effective 3-Step Process for YouTube Financial Analysis
- [New] In 2024, Clarity in Cinema - In-Depth Review of LG's Digital Display, The 4K Monitor 31MU97-B
- [New] In 2024, Spoof Spectacle Steps to Create a Parody
- [New] Unleashing the Power of PIP Videos with Sierra's OS Advantages
- [Updated] 2024 Approved FlameGrab Firefox Add-Ons
- [Updated] Ensuring Your Shorts Video's Thumbnail Shows Up
- [Updated] Non-Vimeo Powerhouses for Video Content Creation
- 2024 Approved Accelerated Steps to Rearrange YouTube Music Ordering
- Audiovisual Rhythm Optimal DJ Content for Gatherings for 2024
- How to Transform Your YouTube Videos Into High-Quality Audio Files Using the Top MP3 Converter
- How to Upload Videos to IGTV, In 2024
- In 2024, Creatives Making Marvel Virtual Worlds Vivid
- In 2024, Elevate Your Live Streaming with Phone Webcams and Filming Hacks
- Navigate the Melody Maze Crafting a Personalized YouTube Playlist
- Pro Streaming Setup Leading Livestream Hardware and Software
- Remove Inconvenient Black Edges From YouTube Videos
- Title: Quick Fortnite Tile Sketch A 30-Second Guide
- Author: Brian
- Created at : 2024-10-17 16:29:17
- Updated at : 2024-10-18 17:43:04
- Link: https://youtube-video-recordings.techidaily.com/quick-fortnite-tile-sketch-a-30-second-guide/
- License: This work is licensed under CC BY-NC-SA 4.0.