
:max_bytes(150000):strip_icc()/mahdis-mousavi-hJ5uMIRNg5k-unsplashcopy-dba942f7103a4791bd746ba0ff5334c0.jpg)
"Prime Tools Turning YouTube Videos Into Text"
Prime Tools: Turning YouTube Videos Into Text
Have you ever wondered why there is a need to transcribe YouTube videos? Well, let us enlighten you! Turning content from YouTube to text is essential for numerous content creators as it allows them to gain more views. Recent studies have shown that around 33% of the audience watching YouTube videos do not necessarily watch them in English. So, by converting them to text, translation becomes a whole lot easier and subtitles can be generated more efficiently.
In this article, we will explore the procedure through how one can convert a YouTube video to text, and learn about numerous effective online YouTube video to text software.
In this article
01 How to Convert YouTube Video to Texts by Copy/Paste YouTube Transcript
02 Best YouTube Video to Text Converters Online
Part 1: How to Convert YouTube Video to Texts by Copy/Paste YouTube Transcript
When people think “Get the transcript from YouTube” they believe it is going to be a daunting and lengthy procedure. Well, let us tell you that it is certainly not! All you have to do is follow the steps outlined below to transcribe YouTube video to text - that too through the YouTube player itself.
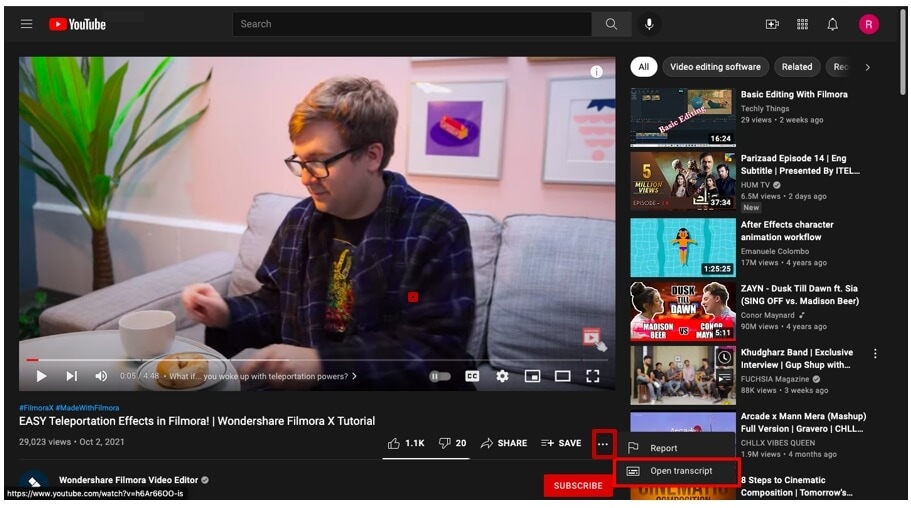
First what you have to do is open YouTube and select any video for which you require the transcript. Once you have selected the video, wait for it to load and then click the three dots located beneath the video, as shown in the image below.
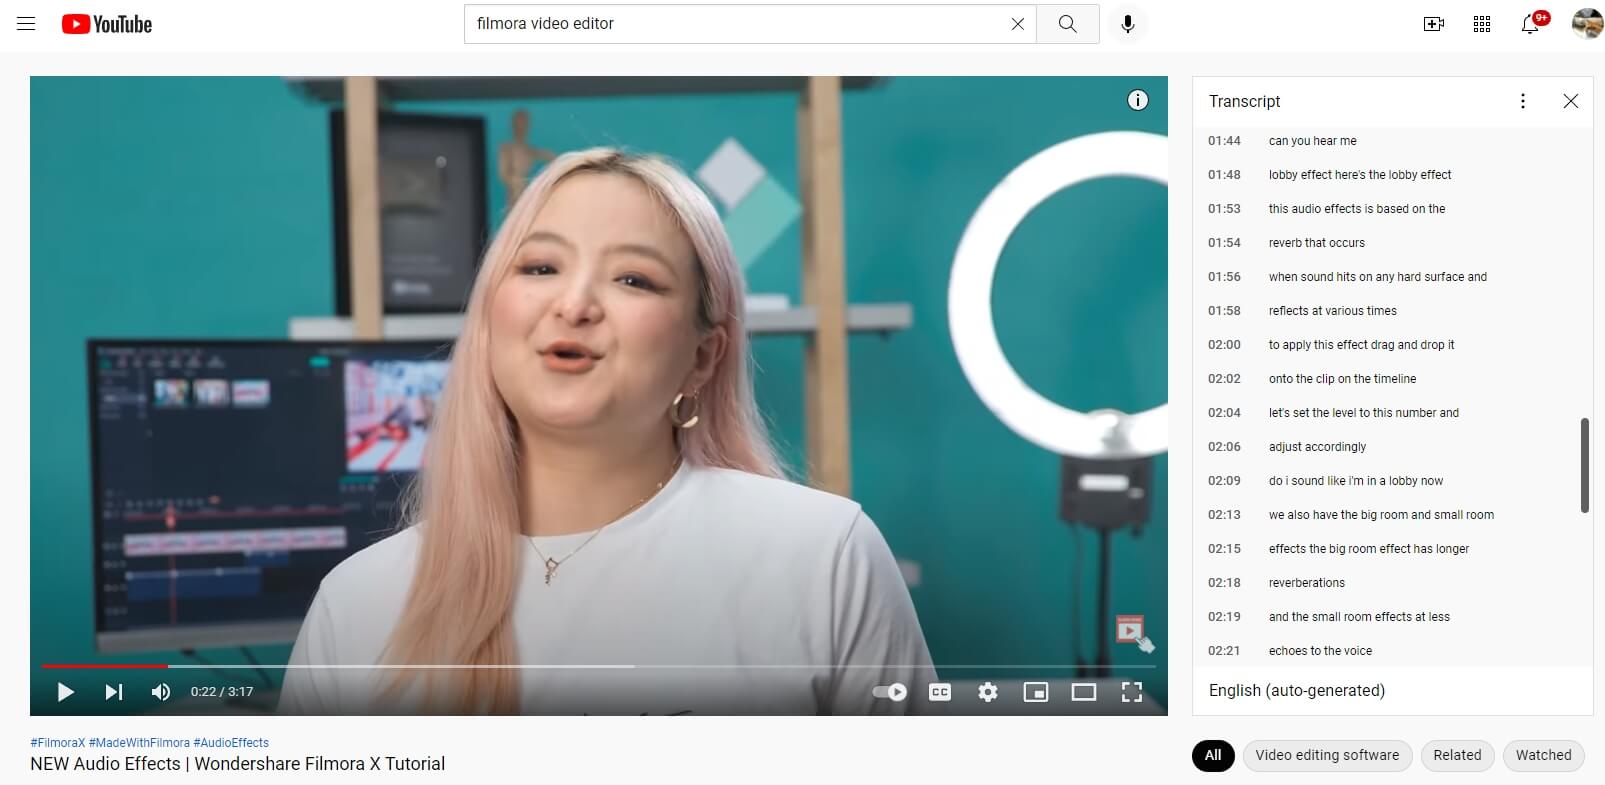
Following that, a menu will appear, just select the “Open Transcript” option and the transcription will open on the top right side of your screen.
Simply select the entire transcript using your mouse, then copy and paste it into a new Word Document or Google Document. If you don’t need the timestamps, you can click the three-dot icon to toggle timestamps off.

By following the steps outlined above, you can convert a YouTube video to text in less than five seconds!
Part 2: Best YouTube Video to Text Converters Online
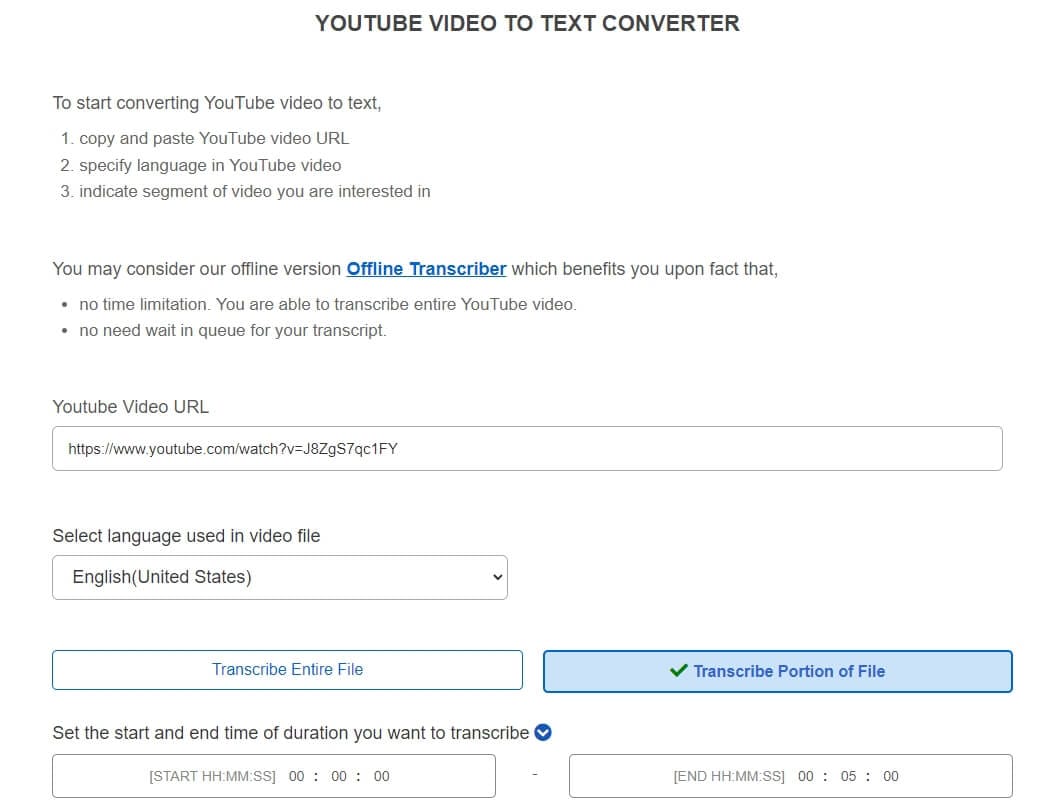
Aside from the basic method of getting the transcription from YouTube itself, many individuals make use of effective YouTube video to text converter online free. This allows them to get the complete video into text, small parts of the video to text, as well as options to convert the text into multiple languages. Below are some of the best software to convert YouTube video to text online.
1. Inqscribe
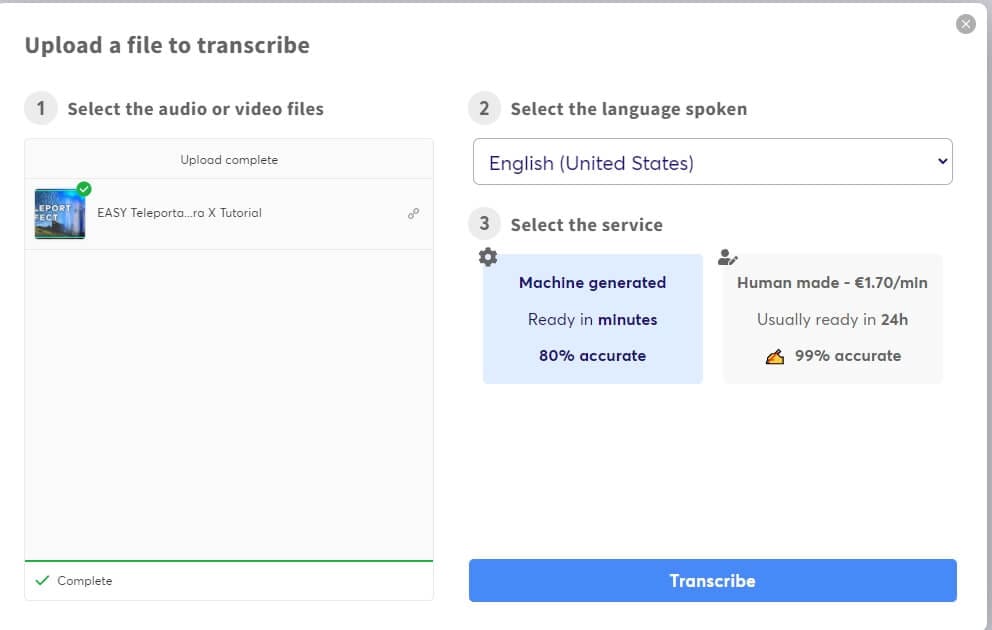
This high-quality cross-platform tool allows users to transcribe audio and video files into text . Whether it is a meeting recording or a YouTube video - you can convert them all to text. Making use of this free online software is extremely easy, all one has to do is just upload their file and click the process. Then the system will automatically transcribe the video into a text document for you. The software is uni code so all file formats are supported such as txt, XML, HTML, WebVTT, and more. The only drawback of this online software is that video files that are larger than a certain limit cannot be accepted.
2. Sonix
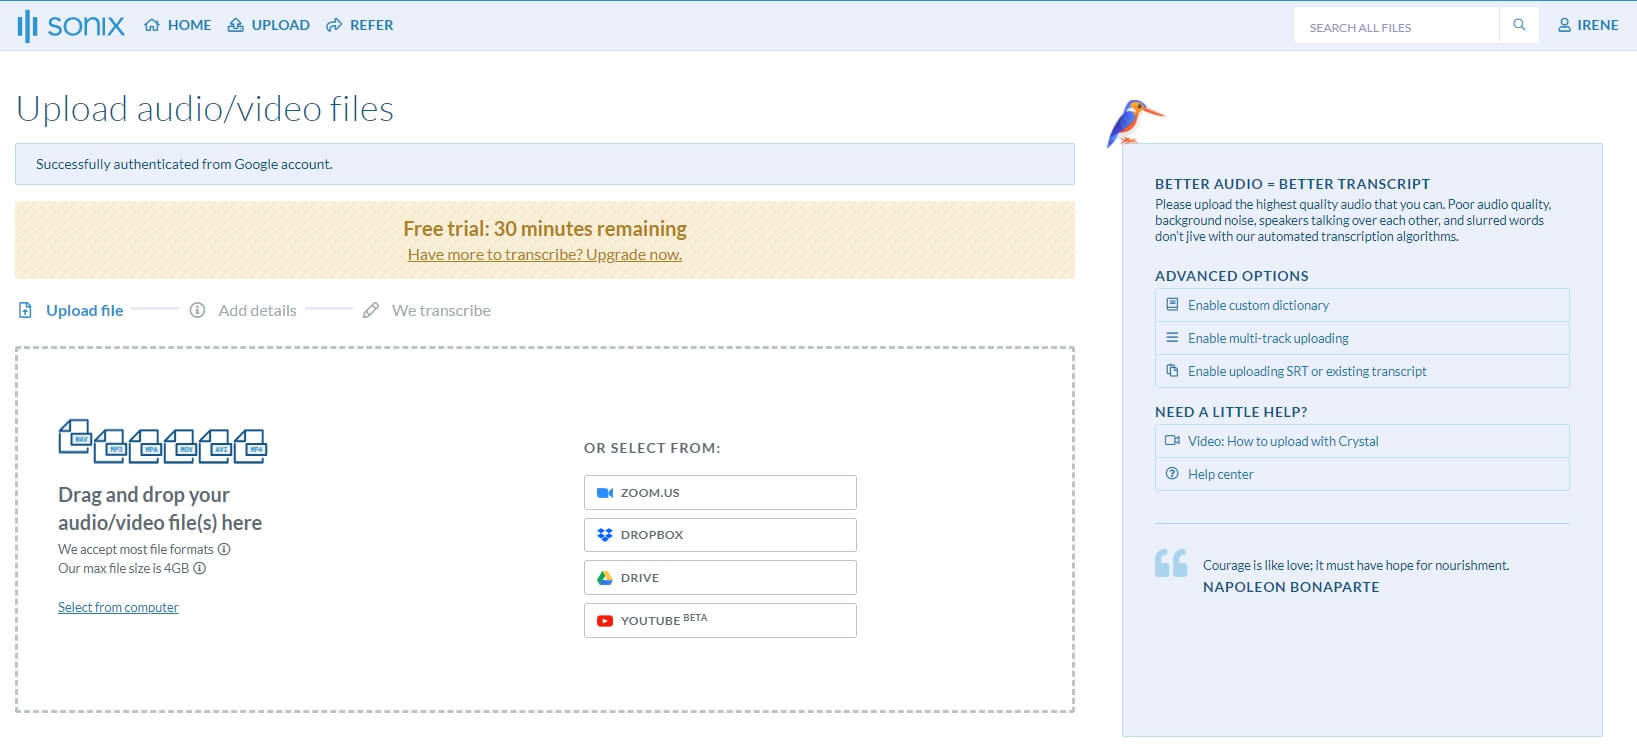
For individuals who have premium quality audio transcription, a tool by the name of Sonix is the right choice for you. This tool enables users to turn all types of YouTube videos into text. All they have to do is simply download the YouTube video they need to transcribe and then upload it to the online interface. From there, this software uses its comprehensive text reader to convert the video to text. This platform supports more than 40 different language choice inputs and outputs. Users are allowed to transcribe up to five videos for free, then they must pay a subscription fee.
3. Otter
This video-to-text converter works best in real-time. Simply play the audio of a YouTube video and let Otter do its magic. In real-time it will convert audio into text. Moreover, if you would like to only convert some parts of the audio to text, that is possible with this tool as well.
All you need to do is play the audio accordingly and the text will automatically generate itself. The AVI (Ambient Voice Intelligence) of this tool allows it to accurately understand what the audio is saying to transcribe the video. While many do find this tool handy, learning how to use it can be a tiny bit tedious and confusing.
Note: Currently, Otter doesn’t support uploading YouTube video link, you may need to download the YouTube video first and then upload it from desktop.
4. oTranscribe
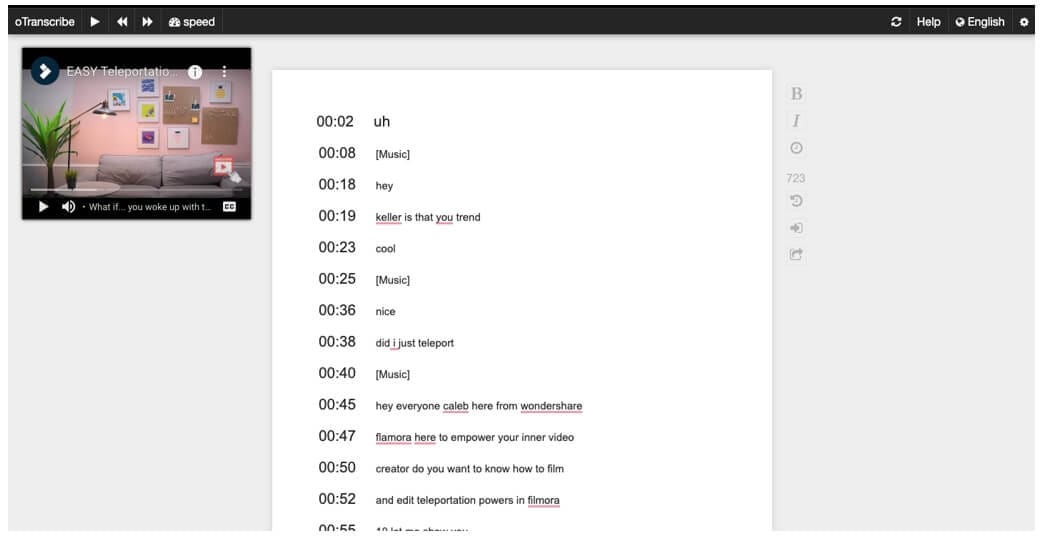
This online transcription tool is extremely easy and convenient to use - and it is entirely free! All you need to do is head on over to its homepage and drop a link to the YouTube video that you would like to transcribe. Then from there, you can access the video and text all at the same time, without having to switch between videos.
The best part is that you can record and translate text according to your need, cut and miss parts that you do not require. This tool supports all file formats which just adds to convince. The only challenge is that it will only accept videos and translate them into English.
5. Go Transcribe
If you are looking to convert any sort of video format to text, then Go Transcribe might just be the tool that you require. This tool makes use of the latest voice technology to convert videos to text - and gives you the output in the form of an SRT, PDF, or DOC, which are all editable. All you need to do is upload the video in one of the formats below,
- 3PG
- FLV
- AVI
- MOV
- MPG
- MPEG
Then simply click the processing options and your video will be generated into a text file within minutes. However, this software may require a subscription fee.
files. Moreover, the output format is PDF which individuals cannot edit unless they convert the PDF to a TXT file online using different software.
6. Trint
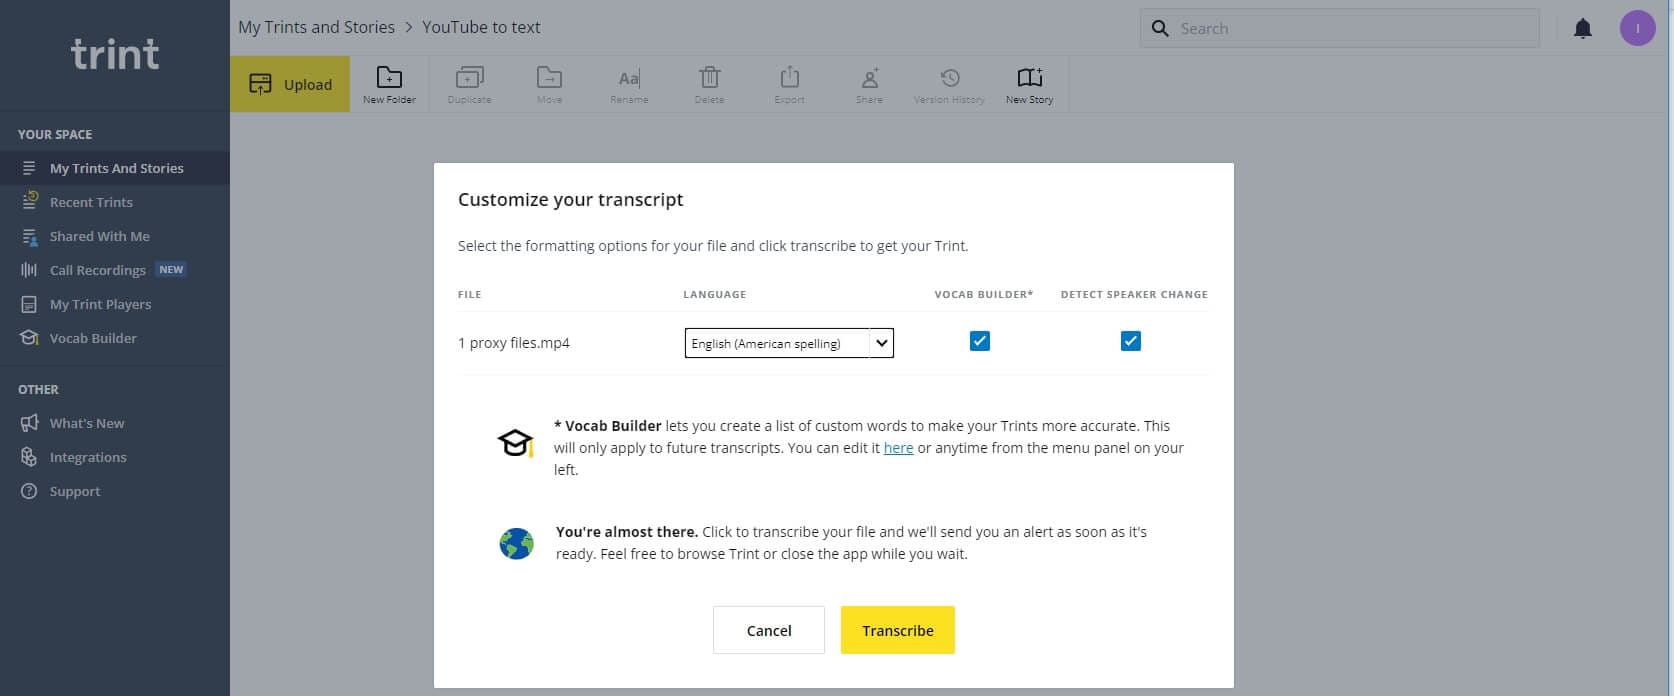
Turn your speech to text through magic - or in other words, through state-of-the-art technology. Trint is an online transcription tool that allows individuals to turn video files into text. People can download and upload numerous video files at once and turn them into text documents.
This is an extremely handy tool to have considering it comes with numerous options such as editing the text, only inducing certain parts of the video in the text, and so much more. This tool only has one shortcoming, it only accepts English language videos.
7. Happy Scribe
If you are wondering how, you will convert YouTube video to text, then we have just the answer for you. Make use of Happy Scribe to automatically transcribe all sorts of audio and video into comprehensive and readable text. You can get numerous features and options in this tool such as advanced grammatical functions as well as timestamps.
If your videos are in different languages, do not worry because Happy Scribe has more than 60 language formats. However, to make use of added features, individuals will need to pay for the tool and upgrade to the pro version.
8. 360Converter
360Converter, as its name suggests is a video to text converter which individuals can use online and offline. All you need to do is download and then upload the YouTube video that you would like to transcribe and the tool will automatically generate the text for you. The supported video formats include 3GP, MP4, MOV, AVI, and many more. This tool uses advanced technology to get accurate language and grammatical transcriptions, so everything is word to word - the exact same as the video. While this tool is extremely user-friendly, many state that it takes a while to process videos to text.
Key Takeaways!
Technology has come a long way which is why we now have numerous options available online to help us convert YouTube videos to text in less than 5-10 minutes. All you have to do is upload the file and let the tool do its magic! You can transcribe in different languages, segments, and so much more now!
Transform Long Videos into Short Ones Instantly
Turn long videos into viral clips. Effortlessly transform lengthy videos into engaging, shareable clips.

02 Best YouTube Video to Text Converters Online
Part 1: How to Convert YouTube Video to Texts by Copy/Paste YouTube Transcript
When people think “Get the transcript from YouTube” they believe it is going to be a daunting and lengthy procedure. Well, let us tell you that it is certainly not! All you have to do is follow the steps outlined below to transcribe YouTube video to text - that too through the YouTube player itself.
First what you have to do is open YouTube and select any video for which you require the transcript. Once you have selected the video, wait for it to load and then click the three dots located beneath the video, as shown in the image below.
Following that, a menu will appear, just select the “Open Transcript” option and the transcription will open on the top right side of your screen.
Simply select the entire transcript using your mouse, then copy and paste it into a new Word Document or Google Document. If you don’t need the timestamps, you can click the three-dot icon to toggle timestamps off.
By following the steps outlined above, you can convert a YouTube video to text in less than five seconds!
Part 2: Best YouTube Video to Text Converters Online
Aside from the basic method of getting the transcription from YouTube itself, many individuals make use of effective YouTube video to text converter online free. This allows them to get the complete video into text, small parts of the video to text, as well as options to convert the text into multiple languages. Below are some of the best software to convert YouTube video to text online.
1. Inqscribe
This high-quality cross-platform tool allows users to transcribe audio and video files into text . Whether it is a meeting recording or a YouTube video - you can convert them all to text. Making use of this free online software is extremely easy, all one has to do is just upload their file and click the process. Then the system will automatically transcribe the video into a text document for you. The software is uni code so all file formats are supported such as txt, XML, HTML, WebVTT, and more. The only drawback of this online software is that video files that are larger than a certain limit cannot be accepted.
2. Sonix
For individuals who have premium quality audio transcription, a tool by the name of Sonix is the right choice for you. This tool enables users to turn all types of YouTube videos into text. All they have to do is simply download the YouTube video they need to transcribe and then upload it to the online interface. From there, this software uses its comprehensive text reader to convert the video to text. This platform supports more than 40 different language choice inputs and outputs. Users are allowed to transcribe up to five videos for free, then they must pay a subscription fee.
3. Otter
This video-to-text converter works best in real-time. Simply play the audio of a YouTube video and let Otter do its magic. In real-time it will convert audio into text. Moreover, if you would like to only convert some parts of the audio to text, that is possible with this tool as well.
All you need to do is play the audio accordingly and the text will automatically generate itself. The AVI (Ambient Voice Intelligence) of this tool allows it to accurately understand what the audio is saying to transcribe the video. While many do find this tool handy, learning how to use it can be a tiny bit tedious and confusing.
Note: Currently, Otter doesn’t support uploading YouTube video link, you may need to download the YouTube video first and then upload it from desktop.
4. oTranscribe
This online transcription tool is extremely easy and convenient to use - and it is entirely free! All you need to do is head on over to its homepage and drop a link to the YouTube video that you would like to transcribe. Then from there, you can access the video and text all at the same time, without having to switch between videos.
The best part is that you can record and translate text according to your need, cut and miss parts that you do not require. This tool supports all file formats which just adds to convince. The only challenge is that it will only accept videos and translate them into English.
5. Go Transcribe
If you are looking to convert any sort of video format to text, then Go Transcribe might just be the tool that you require. This tool makes use of the latest voice technology to convert videos to text - and gives you the output in the form of an SRT, PDF, or DOC, which are all editable. All you need to do is upload the video in one of the formats below,
- 3PG
- FLV
- AVI
- MOV
- MPG
- MPEG
Then simply click the processing options and your video will be generated into a text file within minutes. However, this software may require a subscription fee.
files. Moreover, the output format is PDF which individuals cannot edit unless they convert the PDF to a TXT file online using different software.
6. Trint
Turn your speech to text through magic - or in other words, through state-of-the-art technology. Trint is an online transcription tool that allows individuals to turn video files into text. People can download and upload numerous video files at once and turn them into text documents.
This is an extremely handy tool to have considering it comes with numerous options such as editing the text, only inducing certain parts of the video in the text, and so much more. This tool only has one shortcoming, it only accepts English language videos.
7. Happy Scribe
If you are wondering how, you will convert YouTube video to text, then we have just the answer for you. Make use of Happy Scribe to automatically transcribe all sorts of audio and video into comprehensive and readable text. You can get numerous features and options in this tool such as advanced grammatical functions as well as timestamps.
If your videos are in different languages, do not worry because Happy Scribe has more than 60 language formats. However, to make use of added features, individuals will need to pay for the tool and upgrade to the pro version.
8. 360Converter
360Converter, as its name suggests is a video to text converter which individuals can use online and offline. All you need to do is download and then upload the YouTube video that you would like to transcribe and the tool will automatically generate the text for you. The supported video formats include 3GP, MP4, MOV, AVI, and many more. This tool uses advanced technology to get accurate language and grammatical transcriptions, so everything is word to word - the exact same as the video. While this tool is extremely user-friendly, many state that it takes a while to process videos to text.
Key Takeaways!
Technology has come a long way which is why we now have numerous options available online to help us convert YouTube videos to text in less than 5-10 minutes. All you have to do is upload the file and let the tool do its magic! You can transcribe in different languages, segments, and so much more now!
Transform Long Videos into Short Ones Instantly
Turn long videos into viral clips. Effortlessly transform lengthy videos into engaging, shareable clips.
Quick Thumbnail Tips for YouTube Success
How to Make a Thumbnail for Your YouTube Free Easily

Shanoon Cox
Mar 27, 2024• Proven solutions
Youtube is one of the widely and most used video-sharing platforms all around the world. Being such a huge platform, billions of users upload different videos every second, making it a very competitive platform. Getting your videos noticed and clicked by others requires so many factors to be considered. One of the main factors that increase the chances of your videos being connected and seen by others is an attractive thumbnail. It is the first and the most important factor that helps the viewers decide what to watch and ignore. According to an estimate, among all the best-performing videos on Youtube, 90% have custom thumbnails. So, if you are looking forward to increasing the number of clicks on your videos, having a custom thumbnail is one of the most important things to consider. There are multiple ways to make a thumbnail for Youtube, but most are paid and difficult to use. In this article, we will discuss a hack to make a thumbnail for your Youtube free.
You might be interested in:
How to make a thumbnail for Youtube using AI Portrait
With time, Filmora brings new and advanced features for its users to equip them with all the necessary tools required for effective and efficient video editing. One of its latest features is AI Portrait. This feature has several uses and benefits. This feature is designed for Gamers, Vlogger, and other related genres to help them make their videos stand out from the crowd and gain more clicks and views. AI Portrait contains several effects that help you make the human element of the video separate from the background and make it more obvious. We can also use the AI Portrait effects to make beautiful and attractive thumbnails for your Youtube. Follow these steps to create a stunning thumbnail for your Youtube videos.
Step 01: Open Filmora X. If it is not already installed on your computer, download and install its latest version from here .

Step 02: Make sure that the aspect ratio of your project is 16:9. To do that, click on a screen-shaped icon below the preview screen and select “Change Project Aspect Ratio.”

Step 03: Change the Aspect Ratio to 16:9 if it is not set to it already. 16:9 aspect ratio is the standard size of Youtube thumbnails that represents the best possible results.

Step 04: Choose a background of your choice for your thumbnail. You can choose a background from the sample colors provided by Filmora.
Step 05: If you want to use your custom background, you can import it into the Filmora by clicking import or dragging and dropping it in the media section.

Step 06: Import your video the same way into the media folder of Filmora and drag it into the timeline and place it above your background.

Step 07: Select your footage, go to the Effects tab and click on AI Portraits. It will open up all the effects related to AI Portraits. These AI Portrait features help you separate the human from a background without using a green screen or anything else.

Step 08: Double click on any of these effects to see how they will look like on your footage.

Step 09: To make a thumbnail for your Youtube, we have to remove the background of your footage first. To do that we have to apply Human Segmentation to the footage first. It will separate the human from the footage. Drag and drop the Human Segmentation effect into the footage in the timeline. Once you drop it into the footage, it will ask you to purchase this feature to export the footage. Since we are not trying to export the footage, we are only creating a thumbnail, click on “Try It”. Once the background is removed, you can add other effects as well. Drag and drop the “Human Border” into the footage. It creates an outline around the human in your footage.

Step 10: The effect will be applied to the footage. Now the background has been removed from the footage and ready to be used on your custom background. You can adjust the human accordingly where it looks perfect.

Step 11: Now it is time to add a title into your thumbnail to highlight what the video is all about. Go to the Titles, and select lower thirds. You can also select any of the titles types which best suits your needs. Drop the title into the timeline above the footage and adjust it accordingly. Now double click on the header to edit and rename it.
Step 12: Once you are satisfied with the final results, click on the Camera icon below the preview screen or press “Ctrl+Alt+S” to take the screenshot.

Conclusion
This is how your Youtube thumbnail will look like after applying all the above-mentioned effects and settings.
This article on making a thumbnail for your Youtube is just an idea for you, and you can use your creativity to create amazing thumbnails using other features of Filmora. These cool thumbnails will help you attract more viewers and click, which will ultimately help you grow your Youtube Channel. Unlike all other articles and tutorials that show you how to make a thumbnail for Youtube, this method is free and doesn’t need any technical skills to be implemented.


Shanoon Cox
Shanoon Cox is a writer and a lover of all things video.
Follow @Shanoon Cox
Shanoon Cox
Mar 27, 2024• Proven solutions
Youtube is one of the widely and most used video-sharing platforms all around the world. Being such a huge platform, billions of users upload different videos every second, making it a very competitive platform. Getting your videos noticed and clicked by others requires so many factors to be considered. One of the main factors that increase the chances of your videos being connected and seen by others is an attractive thumbnail. It is the first and the most important factor that helps the viewers decide what to watch and ignore. According to an estimate, among all the best-performing videos on Youtube, 90% have custom thumbnails. So, if you are looking forward to increasing the number of clicks on your videos, having a custom thumbnail is one of the most important things to consider. There are multiple ways to make a thumbnail for Youtube, but most are paid and difficult to use. In this article, we will discuss a hack to make a thumbnail for your Youtube free.
You might be interested in:
How to make a thumbnail for Youtube using AI Portrait
With time, Filmora brings new and advanced features for its users to equip them with all the necessary tools required for effective and efficient video editing. One of its latest features is AI Portrait. This feature has several uses and benefits. This feature is designed for Gamers, Vlogger, and other related genres to help them make their videos stand out from the crowd and gain more clicks and views. AI Portrait contains several effects that help you make the human element of the video separate from the background and make it more obvious. We can also use the AI Portrait effects to make beautiful and attractive thumbnails for your Youtube. Follow these steps to create a stunning thumbnail for your Youtube videos.
Step 01: Open Filmora X. If it is not already installed on your computer, download and install its latest version from here .
Step 02: Make sure that the aspect ratio of your project is 16:9. To do that, click on a screen-shaped icon below the preview screen and select “Change Project Aspect Ratio.”
Step 03: Change the Aspect Ratio to 16:9 if it is not set to it already. 16:9 aspect ratio is the standard size of Youtube thumbnails that represents the best possible results.
Step 04: Choose a background of your choice for your thumbnail. You can choose a background from the sample colors provided by Filmora.
Step 05: If you want to use your custom background, you can import it into the Filmora by clicking import or dragging and dropping it in the media section.
Step 06: Import your video the same way into the media folder of Filmora and drag it into the timeline and place it above your background.
Step 07: Select your footage, go to the Effects tab and click on AI Portraits. It will open up all the effects related to AI Portraits. These AI Portrait features help you separate the human from a background without using a green screen or anything else.
Step 08: Double click on any of these effects to see how they will look like on your footage.
Step 09: To make a thumbnail for your Youtube, we have to remove the background of your footage first. To do that we have to apply Human Segmentation to the footage first. It will separate the human from the footage. Drag and drop the Human Segmentation effect into the footage in the timeline. Once you drop it into the footage, it will ask you to purchase this feature to export the footage. Since we are not trying to export the footage, we are only creating a thumbnail, click on “Try It”. Once the background is removed, you can add other effects as well. Drag and drop the “Human Border” into the footage. It creates an outline around the human in your footage.
Step 10: The effect will be applied to the footage. Now the background has been removed from the footage and ready to be used on your custom background. You can adjust the human accordingly where it looks perfect.
Step 11: Now it is time to add a title into your thumbnail to highlight what the video is all about. Go to the Titles, and select lower thirds. You can also select any of the titles types which best suits your needs. Drop the title into the timeline above the footage and adjust it accordingly. Now double click on the header to edit and rename it.
Step 12: Once you are satisfied with the final results, click on the Camera icon below the preview screen or press “Ctrl+Alt+S” to take the screenshot.
Conclusion
This is how your Youtube thumbnail will look like after applying all the above-mentioned effects and settings.
This article on making a thumbnail for your Youtube is just an idea for you, and you can use your creativity to create amazing thumbnails using other features of Filmora. These cool thumbnails will help you attract more viewers and click, which will ultimately help you grow your Youtube Channel. Unlike all other articles and tutorials that show you how to make a thumbnail for Youtube, this method is free and doesn’t need any technical skills to be implemented.
Shanoon Cox
Shanoon Cox is a writer and a lover of all things video.
Follow @Shanoon Cox
Also read:
- Unleash Creativity in YouTube Short Video Production
- From Static to Sprightly Bouncing Text Animations
- 2024 Approved A Beginner's Roadmap to Professional Sports Edits
- Understanding and Proficiently Implementing CC Copyrights
- [New] 10+ Incredible Free YouTube Intro Makers
- [Updated] Elevating YouTube Live with High-Quality Webcam Cameras
- [Updated] Crafting an Efficient YouTube Subscription Path
- [Updated] A World Beyond Men Top 10 Inspirational YouTube Stars
- The Ultimate List Best Video-Making For iOS, Android Users
- In 2024, Crafting the Perfect Pitch Inviting Listeners to Join Us
- Attract More Viewers Crafting Impressive Youtube Description with Custom Templates
- [New] Cultivating a Community Building Followers on YouTube Without Spending
- Unlock YouTube Power with Insights From Creator Studio
- In 2024, Code Commanders Elite Females on YT
- [Updated] Boosting Earning Potential on YouTube Shorts
- Charting the Course of Knowledge Best History YT Channels for Students
- Best Live Stream Screen Recorders for YouTube
- Elite 5 Earbuds YouTube's Best Companions
- Earn Extra Bucks Maximizing YouTube's Mobile Revenue Opportunities for 2024
- Unlocking Video Content Potential Integrating Interactive Features in Youtube Cards
- 2024 Approved Engage, Enchant Elevate Your Unboxing Content
- [Updated] Enriching Slides Video Incorporation From YouTube
- [Updated] Creating a Link-Building Foundation for Video Marketers
- Beyond YouTube 3 Pioneering Online Video Platforms
- Discover These 10 Non-YouTube Video Sites for iPhone & Android Users
- [New] Best Practices The 8 Truly Effective Promotion Techniques
- Top 15 Virtual Classrooms YouTube Channels Pushing Scientific Boundaries
- Achieve Stellar Clickthrough Rates via Thumbnail Enlargement on YouTube for 2024
- Discovering the Power Behind YouTube Statistics Interpretation
- In 2024, A Step-by-Step Guide to Seeing Who's Watching
- Discover 12 Cutting-Edge Flip-Screen Cams for Video Content for 2024
- 2024 Approved Engaging Listeners Respectfully for Increased Sign-Ups
- [New] Blueprint Producing Purposeful Life Exploration Broadcasts
- Leading Websites for Extracting YouTube Intros
- In 2024, Artisans Crafting Marvel Fantasy Landscapes
- Top 15 YouTube Channels for Stock Market to Follow
- In 2024, Composing News Wrap-Up Scripts
- In 2024, Comprehensively Understanding YouTube's Aspect Ratio Ecosystem
- In 2024, 10 Budget-Friendly Platforms for YouTube Branding Mastery
- Unveiling the Most Innovative Free Video Editors for iDevices
- The Insider's Method for Youtube Livestreaming in Full Circle
- In 2024, Elevating Your YouTube Presence with Longer Video Formats
- Capturing Attention Striking Shots for YouTube Success
- Best YouTube Video Ideas to Spark Inspiration for 2024
- 2024 Approved Becoming a Wealthy Beauty Channel Host
- [New] Top 8 Instagram Story Filters
- In 2024, 9 Mind-Blowing Tricks to Hatch Eggs in Pokemon Go Without Walking On Poco C55 | Dr.fone
- [New] 2024 Approved SnapQuarter Testimony
- 2024 Approved Unveiling the Finest No-Cost Recording Software Today
- New Make Your Moments Shine Top Photo Music Video Software
- New AVS Video Editor Review
- New 2024 Approved Step-by-Step Adjusting the Tone of Apples Personal Assistant (Siri)
- Updated In 2024, The Ultimate List of Sony Vegas Alternatives for Windows Users
- [Updated] Escaping the Shadowban Grip on TikTok for 2024
- [Updated] 2024 Approved Top 8 Android Multi-User Video Chat Tools
- In 2024, How to Remove Apple iPhone 12 Device from iCloud
- Updated Glitch Your Way to Creativity Top Video Editors for Windows and Mac for 2024
- How to Rescue Lost Contacts from Oppo A58 4G?
- [Updated] Direct-to-Streamer Duel OBS Vs. ShadowToolkit for 2024
- [New] Uncluttering Chats How to Erase Thousands of Discord Messages at Once
- Updated In 2024, Unlock the Power of WhatsApp Status Best Apps for Creators
- [New] In 2024, Fine-Tuning Your Videos for Viral Instagram Moments
- How to Mirror Samsung Galaxy XCover 7 to Mac? | Dr.fone
- How To Restore Missing Messages Files from Asus ROG Phone 8
- Updated In 2024, Audiocraft Unveiled Understanding Key Traits, Gathered Opinions & Looking Beyond AVS for Sound Mastery
- The Visual Blueprint Understanding Social Media Aspect Ratios for Success
- [New] 2024 Approved 15 Best Tools to Capture Classroom Learning Moments
- Title: "Prime Tools Turning YouTube Videos Into Text"
- Author: Brian
- Created at : 2024-05-25 12:45:35
- Updated at : 2024-05-26 12:45:35
- Link: https://youtube-video-recordings.techidaily.com/prime-tools-turning-youtube-videos-into-text/
- License: This work is licensed under CC BY-NC-SA 4.0.
