
![[New] How to Easily Add Subtitles and Closed Captions to YouTube Video](https://www.lifewire.com/thmb/cVhsk1KZzN-XhDKwUIawjXmHYNA=/400x300/filters:no_upscale():max_bytes(150000):strip_icc()/GettyImages-1136013780-d3927e7c6e964d4ca357aae0781afb99.jpg)
[New] How to Easily Add Subtitles and Closed Captions to YouTube Video
Enhancing User Experience: A Quick How-To for YouTube CC & Subtitles
How to Easily Add Subtitles and Closed Captions to YouTube Video

Richard Bennett
Mar 27, 2024• Proven solutions
In this article, we are going to show you how important it is to add subtitle and closed captions in your YouTube video, and how to add them.
The best video editor for YouTubers - Wondershare Filmora , not only allows you to cut, crop, rotate, reverse videos, but also offers your advanced features like PIP, Green Screen, or audio mixing. What’s more, you can find lots of effects for Fashion, gaming, education, tutorial, sports, etc. Check this article to know more.


Why subtitle and closed captions are important for YouTube videos?
- Forced closed captions and subtitles actually help the viewers to understand the content in your video if the audio quality of your video is bad, muffled or barely audible. Reading makes it easier for them to understand.
- This also helps people with hearing impairments. People with troubled ears can still watch and understand your content.
- It’s a great aid to such videos which have been recorded in other foreign languages that you don’t understand. Hence it will increase the number of viewers all around the world.
- They both are generally added for easy accessibility to the viewers who wish to watch in sound sensitive environments.
So, here we are going to show you two ways to add subtittles to video: directly or uploading caption or transcript files
Adding subtitles and closed captions manually
To add subtitles and closed captions to your YouTube video, fisrt, you should sign in to your YouTube account. On left right below ‘Home’ you will find ‘My Channel’. It will direct you to your personal YouTube page. On the top, right next to your subscribers lays the ‘Video manager’, giving you the list of your uploaded videos.
Select the video and click on edit to get a drop down menu. Click on subtitles and CC. This will take you to the subtitling interface. To the right of video select ‘add new subtitles’ and then ‘create new subtitles’. Select the subtitle language. Play the video to listen to the content and type down in the box. Click on ‘+’ button once you are done.
This will create a subtitle timeline right beneath the video. You can manage by dragging and expanding the subtitle duration according to the audio of the video. The subtitle will appear at the bottom of the video screen. Click ‘publish’ once done.
An interruption might occur with appearing of subtitles in accordance with video. Hence a lot precision is required while doing so.
Uploading Caption or Transcript Files automatically
To upload Caption or Transcript Files to YouTube Videos you first need to create a format on a text editor. For windows use Notepad and for Mac you may use TextEdit. Create a format of putting the number of subtitle first, time stamp and then text of the subtitle. For example
1\
00:02:34:12 using a format of (hour : minute : second : millisecond)
2. *text*
This is the sample text for first subtitle at zero hours, two minutes, thirty four seconds and twelve milliseconds. Once done with this. Go to file, select ‘save as’. Write the file name with an extension of .srt and select ‘All files’ for type of file. Click encoding menu and select UTF-8. Once saved, sign in to your YouTube account.
On left right below ‘Home’ you will find ‘My Channel’. It will direct you to your personal YouTube page. On the top, right next to your subscribers lays the ‘Video manager’, giving you the list of your uploaded videos.
Select the video and click on edit to get a drop down menu. Click on subtitles and CC. Go to ‘add subtitles’ and then ‘upload a file’. A pop-up menu will appear select ‘subtitles file’. Click upload. The file will send subtitles to your video.
This will create a subtitle timeline right beneath the video. You can manage by dragging and expanding the subtitle duration according to the audio of the video. The subtitle will appear at the bottom of the video screen. Click ‘publish’ once done.
3 Best Tools for add/managing video Subtitles/CC
1. Amara
Amara is a smart video editor which helps insert captions and subtitles to videos. It also helps in transcribing the videos. It takes help of crowd sourcing to subtitle any YouTube video. They take help from viewers to subtitle the videos. By making crowd subtitling available for any YouTube creator, they are allowing them to reach more viewers in more languages
2. DIY Captions
DIY captions help you to transcribe the YouTube videos, if not in most accurate manner, then in a little easier way. All you have to do is just paste the URL of the YouTube video and it will provide you all the subtitles. These may not be accurate but will provide you major base material which can be tweaked a bit here and there and is far better than making all the subtitles starting from scratch.
3 Subtitles for YouTube
Subtitles for YouTube is a Google Chrome extension which provides subtitles for YouTube videos. For this you will have to provide a subtitle file with .srt extension. The attractive feature of this is that you won’t have to download the video and still run the subtitles on it. This is very much helpful for people who work on YouTube or watch movies without subtitles.
Richard Bennett
Richard Bennett is a writer and a lover of all things video.
Follow @Richard Bennett
Richard Bennett
Mar 27, 2024• Proven solutions
In this article, we are going to show you how important it is to add subtitle and closed captions in your YouTube video, and how to add them.
The best video editor for YouTubers - Wondershare Filmora , not only allows you to cut, crop, rotate, reverse videos, but also offers your advanced features like PIP, Green Screen, or audio mixing. What’s more, you can find lots of effects for Fashion, gaming, education, tutorial, sports, etc. Check this article to know more.
Why subtitle and closed captions are important for YouTube videos?
- Forced closed captions and subtitles actually help the viewers to understand the content in your video if the audio quality of your video is bad, muffled or barely audible. Reading makes it easier for them to understand.
- This also helps people with hearing impairments. People with troubled ears can still watch and understand your content.
- It’s a great aid to such videos which have been recorded in other foreign languages that you don’t understand. Hence it will increase the number of viewers all around the world.
- They both are generally added for easy accessibility to the viewers who wish to watch in sound sensitive environments.
So, here we are going to show you two ways to add subtittles to video: directly or uploading caption or transcript files
Adding subtitles and closed captions manually
To add subtitles and closed captions to your YouTube video, fisrt, you should sign in to your YouTube account. On left right below ‘Home’ you will find ‘My Channel’. It will direct you to your personal YouTube page. On the top, right next to your subscribers lays the ‘Video manager’, giving you the list of your uploaded videos.
Select the video and click on edit to get a drop down menu. Click on subtitles and CC. This will take you to the subtitling interface. To the right of video select ‘add new subtitles’ and then ‘create new subtitles’. Select the subtitle language. Play the video to listen to the content and type down in the box. Click on ‘+’ button once you are done.
This will create a subtitle timeline right beneath the video. You can manage by dragging and expanding the subtitle duration according to the audio of the video. The subtitle will appear at the bottom of the video screen. Click ‘publish’ once done.
An interruption might occur with appearing of subtitles in accordance with video. Hence a lot precision is required while doing so.
Uploading Caption or Transcript Files automatically
To upload Caption or Transcript Files to YouTube Videos you first need to create a format on a text editor. For windows use Notepad and for Mac you may use TextEdit. Create a format of putting the number of subtitle first, time stamp and then text of the subtitle. For example
1\
00:02:34:12 using a format of (hour : minute : second : millisecond)
2. *text*
This is the sample text for first subtitle at zero hours, two minutes, thirty four seconds and twelve milliseconds. Once done with this. Go to file, select ‘save as’. Write the file name with an extension of .srt and select ‘All files’ for type of file. Click encoding menu and select UTF-8. Once saved, sign in to your YouTube account.
On left right below ‘Home’ you will find ‘My Channel’. It will direct you to your personal YouTube page. On the top, right next to your subscribers lays the ‘Video manager’, giving you the list of your uploaded videos.
Select the video and click on edit to get a drop down menu. Click on subtitles and CC. Go to ‘add subtitles’ and then ‘upload a file’. A pop-up menu will appear select ‘subtitles file’. Click upload. The file will send subtitles to your video.
This will create a subtitle timeline right beneath the video. You can manage by dragging and expanding the subtitle duration according to the audio of the video. The subtitle will appear at the bottom of the video screen. Click ‘publish’ once done.
3 Best Tools for add/managing video Subtitles/CC
1. Amara
Amara is a smart video editor which helps insert captions and subtitles to videos. It also helps in transcribing the videos. It takes help of crowd sourcing to subtitle any YouTube video. They take help from viewers to subtitle the videos. By making crowd subtitling available for any YouTube creator, they are allowing them to reach more viewers in more languages
2. DIY Captions
DIY captions help you to transcribe the YouTube videos, if not in most accurate manner, then in a little easier way. All you have to do is just paste the URL of the YouTube video and it will provide you all the subtitles. These may not be accurate but will provide you major base material which can be tweaked a bit here and there and is far better than making all the subtitles starting from scratch.
3 Subtitles for YouTube
Subtitles for YouTube is a Google Chrome extension which provides subtitles for YouTube videos. For this you will have to provide a subtitle file with .srt extension. The attractive feature of this is that you won’t have to download the video and still run the subtitles on it. This is very much helpful for people who work on YouTube or watch movies without subtitles.
Richard Bennett
Richard Bennett is a writer and a lover of all things video.
Follow @Richard Bennett
Navigating Online Public Opinion for Video Content Concepts
How to Use Google Trends to Come up with Video Ideas [Easy Guide]
Richard Bennett
Oct 26, 2023• Proven solutions
There is always something to make a video about. It’s a big world where new things happen every day, in every YouTube niche . One of the best ways to climb to the top of YouTube’s search engine results is to be among the first creators to make a video about a trending topic.
But how do you know what’s trending? If you’re in a huge genre like beauty or technology then it’s not impossible to keep track of the latest news and trends, but you probably hear about things as other people start making videos and as websites start publishing articles. How do you get on top of trends just as they’re becoming trends?
Google Trends, of course!
Google Trends is a completely free tool you can use to determine what’s trending on YouTube or in Google’s search engine. Here’s how you can use Google Trends to figure out what’s trending in your niche and make a video before there’s tons of competition.
Part 1: Seeing The Big Picture
You’ll need to be signed into your Google account to use Google Trends.
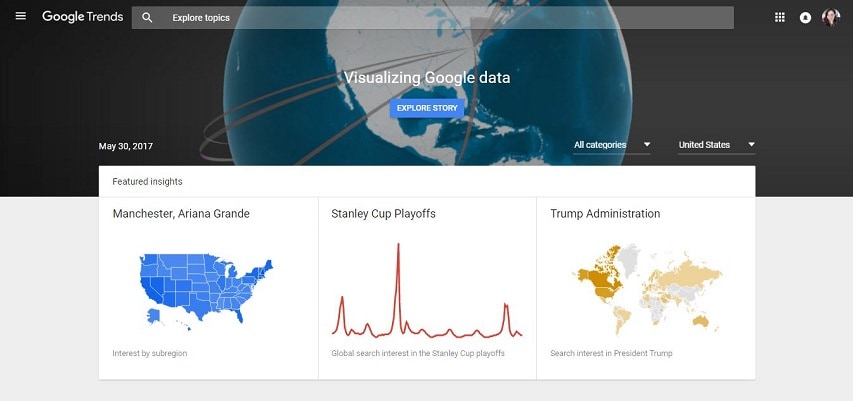
Start off at trends.google.com and you’ll see what’s trending in general – usually big news stories or things like sports finals. The data is laid out like this: at the top there are three ‘Featured Insights’. These are three of the most popular trending topics paired with graphs of their recent search traffic. Underneath these there will be a list of stories that are currently trending. You can click on them to see charts of their search data and links to where the stories are being covered online.
Unless you do news or political commentary on your channel these probably aren’t topics you want to cover, but if you like to insert some topical references into your other videos then it’s still good to be aware of these things.
To get information more relevant to your channel you’re going to have to do some filtering.
Part 2: Getting Results That Matter to You
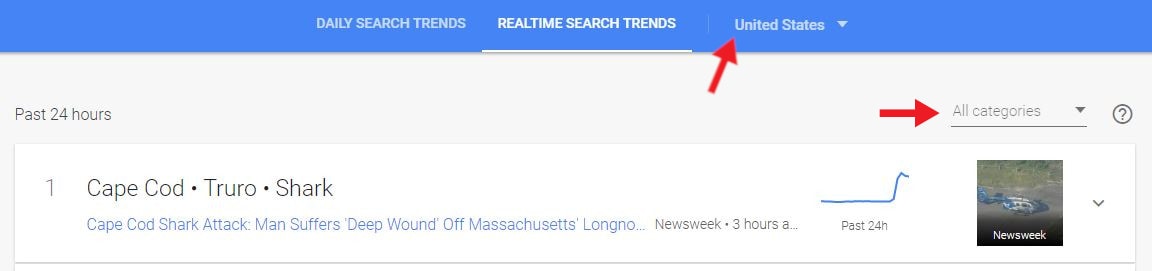
In the Google Trend home page, scroll down to the ‘Recently Trending’ section and click on ‘More Trending Searches’.
Then click from ‘Daily Search Trends’ to ‘Realtime Search Trends’.
On top you will see two drop-down menus, one is for the category and one is for location.
Under All categories select the general theme your channel falls under.
Your options are business, entertainment, health, Sci/Tech, sports, and top stories.
It might be the case that your channel doesn’t fall under any of these themes, but there could still be related stories for you in other categories. For example, if you have a beauty channel then there could be something that’d interest you under health, entertainment, or even business.
Under the location menu choose the region most of your viewers are from. This might not be the same as where you are from – you could be in Australia and most of your viewers could be in the U.S. If you’re not sure where your viewers are from you can find out in your Creator Studio under Analytics > Demographics.
Once you have narrowed down your results you can just scroll through and pick out a topic related to your channel’s theme that you have something to say about.
For example, if you have a gaming channel and you’re looking for a non-gameplay topic to make a video on, you would look under Sci/Tech. If I look under that category today (May 29, 2017) and specify that I want topics trending in the United States then these are my top 5 results:
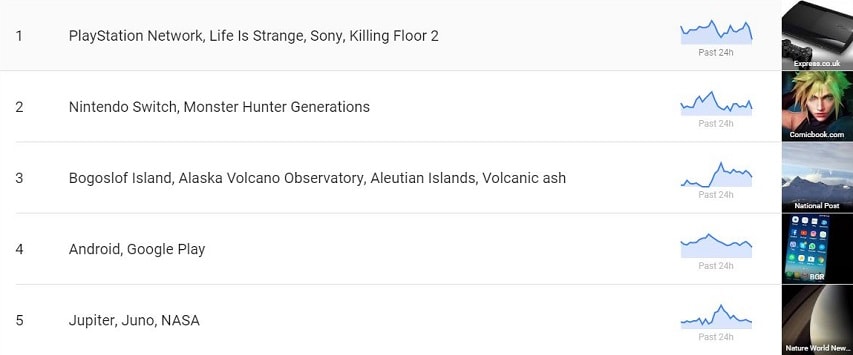
The first two happen to be about gaming. If you, as a gamer, had any strong reaction to either of these topics – whether it’s that you feel like you’re knowledgeable about them, or that you’re excited by something that’s coming up, or that something made you groan – then that would be a sign that you should make a video. Capitalizing on a trend while also covering a topic you have a lot to say about is always a good move.
Having something to say doesn’t have to mean having a strong opinion. If you just find something interesting and want to pass the information along to your viewers then that’s great too.
Clicking on these results will give you more specific data including how often the topic has been searched recently and links to recent news articles. These can give you a better idea of why it is trending and help you come up with what you want to say.
Part 3: Battle of the Keywords
Once you have a topic in mind for your next video – whether it came from Google Trends or your own noggin – think about what the most important keyword for that topic might be.
A keyword is a word or short phrase that people type into a search engine like Google or YouTube. In order for people to find your videos, you’ll have to include a keyword in your video’s title.
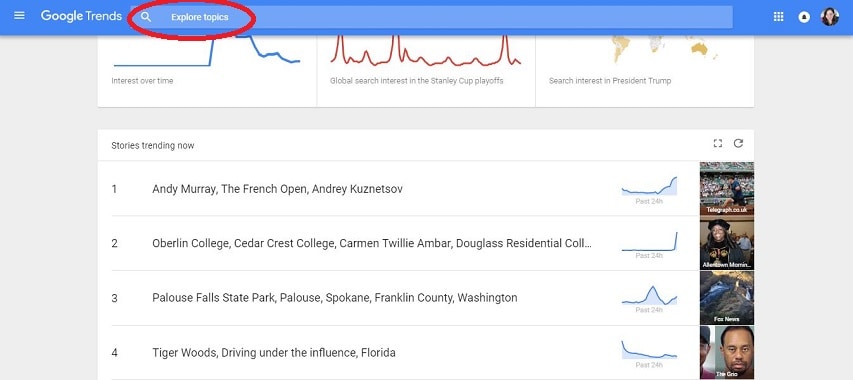
Once you have a keyword in mind, type it into the Explore bar at the top of your page in Google Trends.
What happens after you click enter is pretty much magic. Say I want to make a video on how to use Filmora. The first thing I’ll type into that Explore bar is ‘Filmora’.
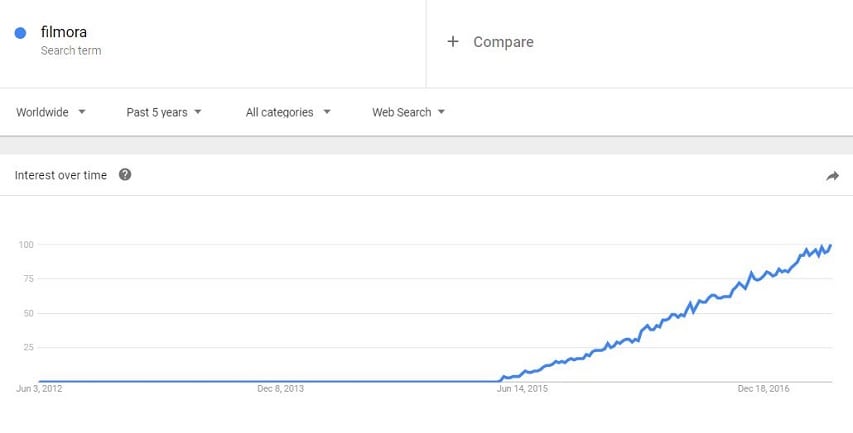
You can see near the top that this chart represents searches for the topic over the last 5 years, which isn’t necessarily useful (although it is sort of cool that you can see when Filmora was ‘born’). I’m going to narrow that down to results from the U.S in the last week.
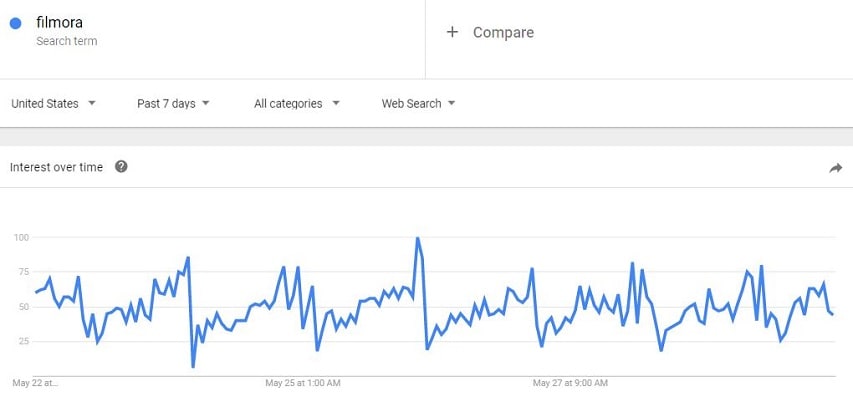
There, now I can see how the popularity of Filmora as a search term has spiked on specific days and times (if you hover over a spike it tells you the time and day) and plan to post my video at a time that capitalizes on these trends.
Next, what other words do I want to include in my video title? Is this a review, a tutorial, or a how-to? By clicking on my search term Filmora, I can edit it to read ‘filmora review’. Then I can click + Compare and type in ‘filmora tutorial’ and ‘how to use Filmora’. Google Trends will create a chart comparing the popularity of those 3 terms.
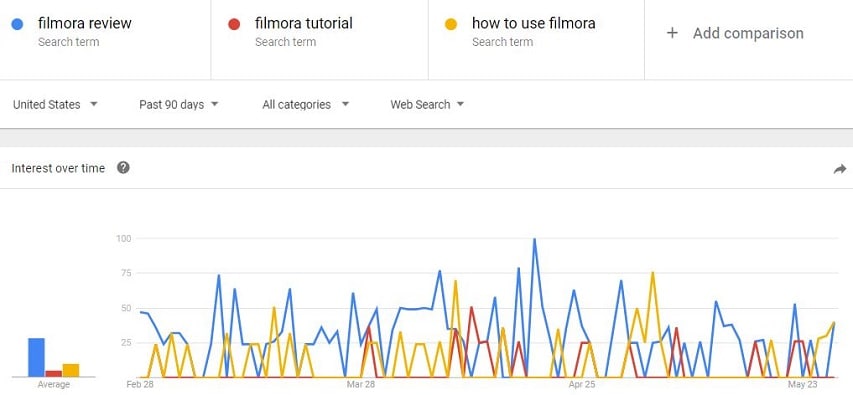
I also ‘zoomed out’ to 90 days – if I’d only looked at how they compared over the last week my results could have been skewed.
It’s pretty clear from the chart that ‘filmora review’ is the strongest of those 3 search terms. The title of my video should definitely start with the words Filmora Review because that is what most people are searching for when they want information about Filmora. Putting your most important keyword/search term first in your video titles will help them rank better in the viewer’s search results.
Although, when you do a comparison like this you should also go to YouTube and search for each potential keyword/phrase individually. It might turn out that there is a ton of strong competition for the most popular search term, and not as much for the second or third most popular. Here’s a search for ‘Filmora Review’ on YouTube:
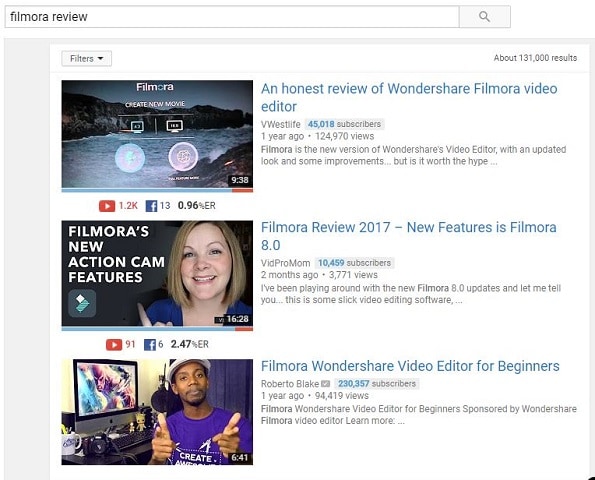
If my view of YouTube looks different from yours it’s because I’m using the VidIQ plugin for Chrome . It’s free and it gives you all kinds of extra info about videos and channels.
The second-highest ranked result is only 2 months old and isn’t from a huge channel. Although there is competition for this keyword, ranking for it is not impossible. It also helps that software reviews are a topic where people will always be looking for the latest information/newest videos.
If the search results for your keyword are dominated by monster channels with millions of subs, and you can’t think of an angle you can use to crack into those top results (i.e. having newer information people will be looking for, which the more established videos are lacking), then maybe try the search with your second best keyword and see if there’s a better opportunity for you to rank there.
One of the biggest benefits of identifying trends and making videos about them quickly is that you can get in before there’s a lot of competition for the first few pages of search results on YouTube or Google, and before larger channels start making videos of their own on the same topic.
Want to make coming up with YouTube video ideas a habit? This post here will help you develop a process to generate more ideas and properly evaluate them.
Making Better YouTube Videos with Filmora
As one of the most widely used video editing software among YouTubers, Filmora provides plentiful editing tools, such as cut, trim, video stabilization , noise removal , chroma key compositing , and color grading. Besides, there are royalty-free music track and sound effects available in the built-in Audio library, and title templates and presets, as well as elements and effects. Download the free trial version below and get started now.
Richard Bennett
Richard Bennett is a writer and a lover of all things video.
Follow @Richard Bennett
Richard Bennett
Oct 26, 2023• Proven solutions
There is always something to make a video about. It’s a big world where new things happen every day, in every YouTube niche . One of the best ways to climb to the top of YouTube’s search engine results is to be among the first creators to make a video about a trending topic.
But how do you know what’s trending? If you’re in a huge genre like beauty or technology then it’s not impossible to keep track of the latest news and trends, but you probably hear about things as other people start making videos and as websites start publishing articles. How do you get on top of trends just as they’re becoming trends?
Google Trends, of course!
Google Trends is a completely free tool you can use to determine what’s trending on YouTube or in Google’s search engine. Here’s how you can use Google Trends to figure out what’s trending in your niche and make a video before there’s tons of competition.
Part 1: Seeing The Big Picture
You’ll need to be signed into your Google account to use Google Trends.
Start off at trends.google.com and you’ll see what’s trending in general – usually big news stories or things like sports finals. The data is laid out like this: at the top there are three ‘Featured Insights’. These are three of the most popular trending topics paired with graphs of their recent search traffic. Underneath these there will be a list of stories that are currently trending. You can click on them to see charts of their search data and links to where the stories are being covered online.
Unless you do news or political commentary on your channel these probably aren’t topics you want to cover, but if you like to insert some topical references into your other videos then it’s still good to be aware of these things.
To get information more relevant to your channel you’re going to have to do some filtering.
Part 2: Getting Results That Matter to You
In the Google Trend home page, scroll down to the ‘Recently Trending’ section and click on ‘More Trending Searches’.
Then click from ‘Daily Search Trends’ to ‘Realtime Search Trends’.
On top you will see two drop-down menus, one is for the category and one is for location.
Under All categories select the general theme your channel falls under.
Your options are business, entertainment, health, Sci/Tech, sports, and top stories.
It might be the case that your channel doesn’t fall under any of these themes, but there could still be related stories for you in other categories. For example, if you have a beauty channel then there could be something that’d interest you under health, entertainment, or even business.
Under the location menu choose the region most of your viewers are from. This might not be the same as where you are from – you could be in Australia and most of your viewers could be in the U.S. If you’re not sure where your viewers are from you can find out in your Creator Studio under Analytics > Demographics.
Once you have narrowed down your results you can just scroll through and pick out a topic related to your channel’s theme that you have something to say about.
For example, if you have a gaming channel and you’re looking for a non-gameplay topic to make a video on, you would look under Sci/Tech. If I look under that category today (May 29, 2017) and specify that I want topics trending in the United States then these are my top 5 results:
The first two happen to be about gaming. If you, as a gamer, had any strong reaction to either of these topics – whether it’s that you feel like you’re knowledgeable about them, or that you’re excited by something that’s coming up, or that something made you groan – then that would be a sign that you should make a video. Capitalizing on a trend while also covering a topic you have a lot to say about is always a good move.
Having something to say doesn’t have to mean having a strong opinion. If you just find something interesting and want to pass the information along to your viewers then that’s great too.
Clicking on these results will give you more specific data including how often the topic has been searched recently and links to recent news articles. These can give you a better idea of why it is trending and help you come up with what you want to say.
Part 3: Battle of the Keywords
Once you have a topic in mind for your next video – whether it came from Google Trends or your own noggin – think about what the most important keyword for that topic might be.
A keyword is a word or short phrase that people type into a search engine like Google or YouTube. In order for people to find your videos, you’ll have to include a keyword in your video’s title.
Once you have a keyword in mind, type it into the Explore bar at the top of your page in Google Trends.
What happens after you click enter is pretty much magic. Say I want to make a video on how to use Filmora. The first thing I’ll type into that Explore bar is ‘Filmora’.
You can see near the top that this chart represents searches for the topic over the last 5 years, which isn’t necessarily useful (although it is sort of cool that you can see when Filmora was ‘born’). I’m going to narrow that down to results from the U.S in the last week.
There, now I can see how the popularity of Filmora as a search term has spiked on specific days and times (if you hover over a spike it tells you the time and day) and plan to post my video at a time that capitalizes on these trends.
Next, what other words do I want to include in my video title? Is this a review, a tutorial, or a how-to? By clicking on my search term Filmora, I can edit it to read ‘filmora review’. Then I can click + Compare and type in ‘filmora tutorial’ and ‘how to use Filmora’. Google Trends will create a chart comparing the popularity of those 3 terms.
I also ‘zoomed out’ to 90 days – if I’d only looked at how they compared over the last week my results could have been skewed.
It’s pretty clear from the chart that ‘filmora review’ is the strongest of those 3 search terms. The title of my video should definitely start with the words Filmora Review because that is what most people are searching for when they want information about Filmora. Putting your most important keyword/search term first in your video titles will help them rank better in the viewer’s search results.
Although, when you do a comparison like this you should also go to YouTube and search for each potential keyword/phrase individually. It might turn out that there is a ton of strong competition for the most popular search term, and not as much for the second or third most popular. Here’s a search for ‘Filmora Review’ on YouTube:
If my view of YouTube looks different from yours it’s because I’m using the VidIQ plugin for Chrome . It’s free and it gives you all kinds of extra info about videos and channels.
The second-highest ranked result is only 2 months old and isn’t from a huge channel. Although there is competition for this keyword, ranking for it is not impossible. It also helps that software reviews are a topic where people will always be looking for the latest information/newest videos.
If the search results for your keyword are dominated by monster channels with millions of subs, and you can’t think of an angle you can use to crack into those top results (i.e. having newer information people will be looking for, which the more established videos are lacking), then maybe try the search with your second best keyword and see if there’s a better opportunity for you to rank there.
One of the biggest benefits of identifying trends and making videos about them quickly is that you can get in before there’s a lot of competition for the first few pages of search results on YouTube or Google, and before larger channels start making videos of their own on the same topic.
Want to make coming up with YouTube video ideas a habit? This post here will help you develop a process to generate more ideas and properly evaluate them.
Making Better YouTube Videos with Filmora
As one of the most widely used video editing software among YouTubers, Filmora provides plentiful editing tools, such as cut, trim, video stabilization , noise removal , chroma key compositing , and color grading. Besides, there are royalty-free music track and sound effects available in the built-in Audio library, and title templates and presets, as well as elements and effects. Download the free trial version below and get started now.
Richard Bennett
Richard Bennett is a writer and a lover of all things video.
Follow @Richard Bennett
Also read:
- [New] Efficiently Add YouTube Playlists to Your Website Interface
- In 2024, Disabling YouTube Shorts for Good A Simple Approach
- In 2024, Channel Charisma Strategies to Skyrocket Your YouTube Visibility
- [New] Are Scalping Subscribers a Viable Strategy?
- [Updated] Brief Video Joust The Showdown Between YouTubes Shorts and TikTok's Flavor
- Elevate Your Video Game Top 10 Keyword Strategy Resources for 2024
- [Updated] 8 Unbeatable Zero-Price Software Choices For Online Media Makers
- In 2024, Clear YouTube Watch Later Playlist - [Step-by-Step]
- Master Class in Music Production DJ Video Samples Galore
- [Updated] Download Playback Streaming Youtube Videos on iOS Securely and Smoothly
- [New] Cutting-Edge Camera Technology For YouTube Stars
- Streamline Visual Marking in Youtube Posts with Watermarks & Logos
- In 2024, A Compreehensive Guide to YouTube Thumbnail Creation (Mac)
- [Updated] Elevate Your Day Discovering Youtube's Prime Anime Sources
- Engaging Viewers First Impressions The Art of Backdrop Selection in Thumbnails
- 2024 Approved Comedic Content Concepts 7 Hilarious Vlog Ideas for Laughter Lovers
- [New] End Screen Creation Made Simple - Free Templates & Guides
- Angles of Perspective YouTube's Path to Dynamic Video Editing
- 2024 Approved Add a Pop of Color to Your Videos Implementing Neons in YouTubes
- 2024 Approved Boosting Your Channels Free Tips for YouTube Video Popularity
- [New] Creating Captivating YouTube Openers - Two Ways
- Navigating Through the Top 10 Making Magic on YouTube
- [New] Deciphering the Best YouTube Video Trackers for Success
- [Updated] EditMaster Suite
- Cutting-Edge Guide to YouTube Audio Editing for 2024
- Maximize Your YouTube Reach Key Tips for Enhancing Video SEO
- [New] Essential Knowledge for Aspiring YouTube Subscribers
- [Updated] Channel Labeling 101 How to Make Yourself Hard to Ignore
- Turbocharge YouTube Videos Efficient Rendering, Fast Transfer
- [New] Accelerate Video Processing for YouTube Uploads
- In 2024, Essential 3D Toolkit Creating Engaging Video Beginnings
- Unlock the Value of Viewership A Clear, Concise Guide to Evaluating YouTube Earnings
- Mastery of YouTube Policy for Successful Channels
- In 2024, Antique Cinematography in the Digital Realm
- 10 YouTube Tips for Teachers for 2024
- Updated Leading Edge Free Online Platforms for Seamless Audio Trimming for 2024
- [Updated] Social Media Impact TikTok's Viral Tweets at the Forefront
- 2024 Approved Locating Chilling Sonic Elements for Films
- How to share/fake gps on Uber for Vivo T2x 5G | Dr.fone
- New 2024 Approved Introduction of Virbo Online | Wondershare Virbo
- [New] In 2024, Exploring the Functionalities in Free2X Cam Tech
- In 2024, How Can I Screen Mirroring Apple iPhone 8 to TV/Laptop? | Dr.fone
- How to Recover Deleted Photos from Android Gallery App on A79 5G
- How Do I Stop Someone From Tracking My Oppo Reno 11 Pro 5G? | Dr.fone
- [New] Discounted Artisan Logos Best Free Emblem Tools for 2024
- How to Transfer Data from Samsung Galaxy A05 to BlackBerry | Dr.fone
- Compact, Powerful & Stylish #8 Top 5K Monitors for 2024
- [Updated] 2024 Approved 2023'S Largest Threaded Video Compilation
- 2024 Approved Best Webcams Elevating Podcast Aesthetics
- [Updated] Premier 5 Time-Lapse Camera Apps
- [Updated] EasyCapture Pro - Free for Windows 10 for 2024
- Updated In 2024, Top-Rated Gaming Intro Creators to Watch
- 2024 Approved Reliving Retro Fun with Top 5 Emulated Game Boy Advance Games on Desktop Systems
- Reducing Recording Ambiance Free Methods and Pros for 2024
- In 2024, The Beginners Guide Simplifying Chromebook Audio Recording
- [New] Is Vidma the Ultimate Screen Recording Tool, In 2024
- Best 10 Mock Location Apps Worth Trying On Realme GT Neo 5 SE | Dr.fone
- Title: [New] How to Easily Add Subtitles and Closed Captions to YouTube Video
- Author: Brian
- Created at : 2024-05-25 12:42:31
- Updated at : 2024-05-26 12:42:31
- Link: https://youtube-video-recordings.techidaily.com/new-how-to-easily-add-subtitles-and-closed-captions-to-youtube-video/
- License: This work is licensed under CC BY-NC-SA 4.0.
