
![[New] Essential Steps to Add Custom Imagery in YouTube Videos](https://www.lifewire.com/thmb/Cf134RZWfKPf0IK4nvJEe0UWK6M=/540x405/filters:no_upscale():max_bytes(150000):strip_icc()/buy-used-iphone-5717c2523df78c3fa23ddc70.jpg)
[New] Essential Steps to Add Custom Imagery in YouTube Videos
Essential Steps to Add Custom Imagery in YouTube Videos
How To Add Custom Thumbnails to Your YouTube Videos

Richard Bennett
Mar 27, 2024• Proven solutions
YouTube custom thumbnails are a great way to get people’s attention to your YouTube video. It’s a pretty simple process but if you are wondering how to create a thumbnail and add the thumbnail to YouTube video and customize it with the correct size. You have come to the right place. While in this article, I will show you how to create and add a thumbnail to a YouTube video and how to customize the YouTube video thumbnail. Follow these easy steps below and add eyecatching customed thumbnails to your YouTube videos in no time.
- Part 1: Create and Add Custom Thumbnails to YouTube
- Part 2: Tools to Create Custom YouTube Video Thumbnails
- Part 3: How to Change A Thumbnail On YouTube
- Part 4: Things You Need to Know Before Making a YouTube Custom Thumbnail
- Part 5: Tips on How to Make Good YouTube Thumbnails to Get More Clicks
- Part 6: YouTube Thumbnail FAQs
How To Add Custom Thumbnails to Your YouTube Videos [Steps, Tools and Tips]
We have just made a video tutorial about how to make a YouTube video thumbnail, check it below to find out the tips and tricks of making customized YouTube thumbnail.


Part 1: How to Make a Thumbnail for YouTube and Add Custom Thumbnails to YouTube
After you’ve verified your account and made your thumbnail, it’s finally time to upload it to your video and make a custom thumbnail. To do this, go to Creator Studio and then Video Manager. You’ll see a button labeled “Edit” next to each video, and an arrow pointing down. Click Thumbnail Editor.
In Thumbnail Editor, you can use the still images in the video as a thumbnail, choose a solid background color for the thumbnail, or add other images from your computer. I will show you the steps of how to customize the video still as a video thumbnail.
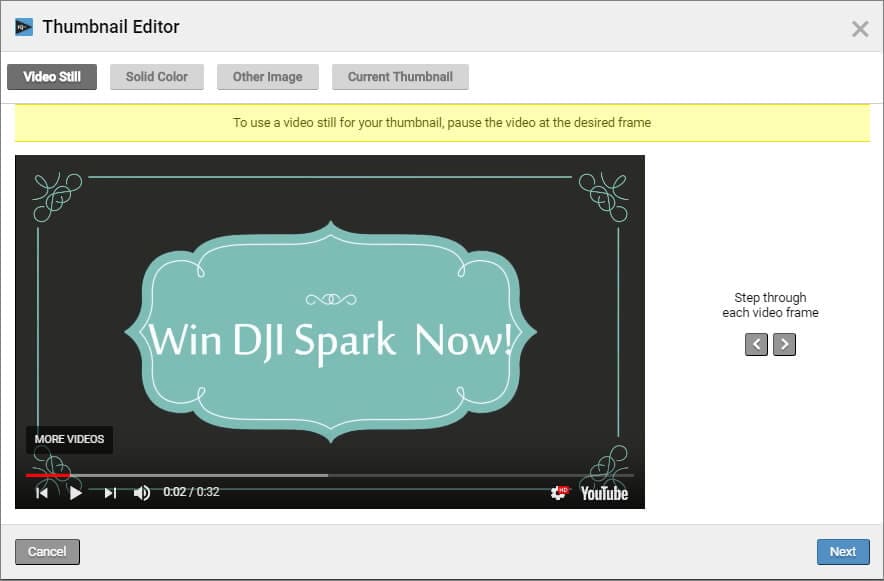
1. Preview the video and choose the target video still. You can click the Playback button and check the video and pause it at the desired frame. Or, you can step through each frame by clicking the Preview Frame button and Next Frame icon. Click Next to continue.
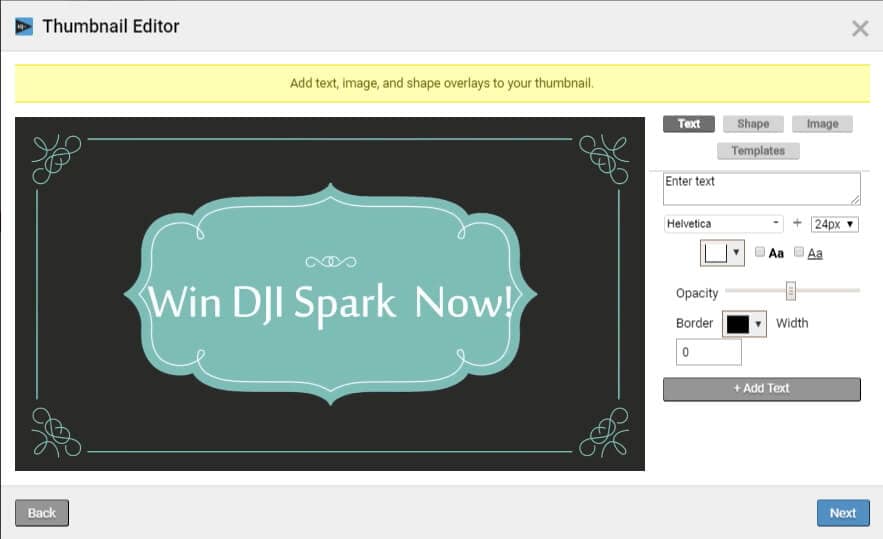
2. And now, you can add text, image and shape overlays to the thumbnail. You can change the text font, size, opacity and more.
3. Click Next to save the thumbnail and you will see how the thumbnail displays on different platforms such as YouTube, Facebook and Twitter. Click Save to save the video thumbnail.
In this way, you can add a custom thumbnail to the new videos and change the video thumbnail of the previously uploaded videos.
Part 2: Thumbnail Makers to Create Custom YouTube Thumbnails
Of course, you can use some of the best tools to make a YouTube video thumbnail. In this part, we will show you some of the best tools to create custom YouTube thumbnails.
Download Mac Version ](https://tools.techidaily.com/wondershare/filmora/download/ )
1. Create YouTube Thumbnail with Online solution - Canva
Canva is a free, powerful online image editing program with tons of great templates to get you started. One of their templates just happens to be YouTube thumbnails. Open Canva and select the “YouTube Thumbnail” design type. Use your own photo or choose from a huge library, then add text and effects to really make it stand out. Save and share — easy as that.
Check this video tutorial to see how to Make a Youtube Thumbnail using Canva.
You may also like: Best online Photo Editor
2. Design YouTube thumbnail with a Desktop solution - Gimp
Gimp is one of the most popular image editing programs around for one very simple reason: it’s powerful and free! Where Canva uses a lot of templates, Gimp gives you absolute, full control over how you want your image to look. Make a 1280x720 image and start putting together your eye-catching thumbnail exactly how you want to.
Check this video tutorial to see how to make professional Thumbnails for YouTube Videos with Gimp:
Part 3: How to Change A Thumbnail On YouTube
Note: YouTube allows verified YouTube accounts (accounts that provided YouTube with a working phone number) to upload custom thumbnail images and change them accordingly.
In this part, we’ll be going over how to change a thumbnail image on YouTube. There are pictures to make it easy to follow along.
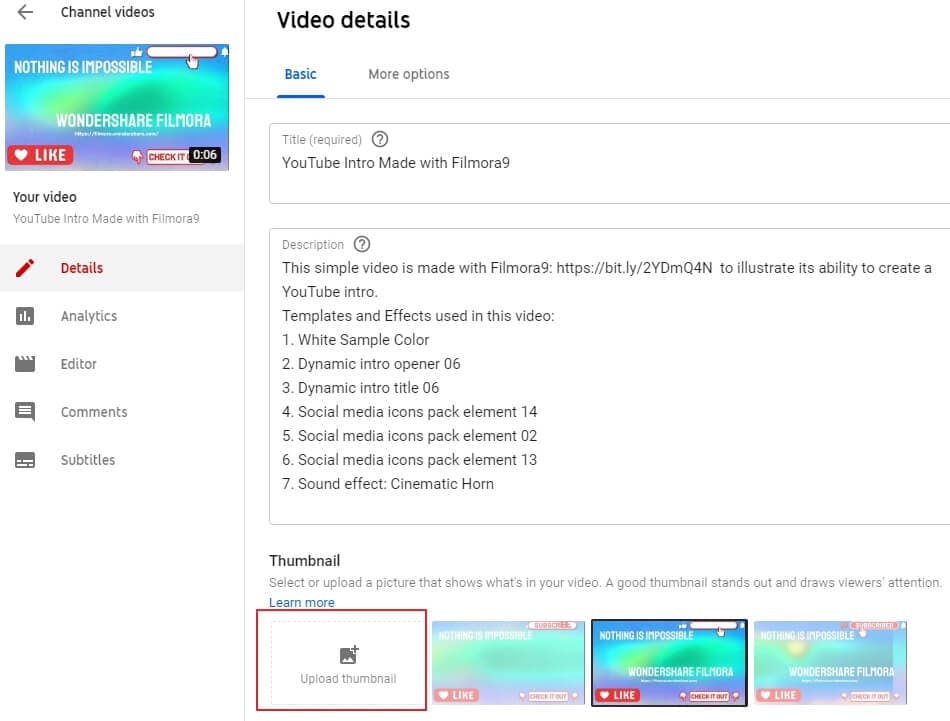
- After signing into YouTube with your Google account, click on your profile on the top right corner. Click on YouTube Studio from the drop-down menu.
- On the left side of the page, click on Videos and then find your video and click on the details button.
- Find the Thumbnail section in the basic video details tab, and then click the Upload thumbnail to select the image that you want to upload.
- Finally, click on the Save button on the right upper corner. And just like that, in seven easy steps, we’re done changing the thumbnail of a YouTube video.
If you don’t have an image to upload but you want to check out some online resources to make your own, check out our Top YouTube Thumbnail Makers .
Part 4: Things You Need to Know Before Making a Custom Thumbnail
- About the proper YouTube video thumbnail size: Your thumbnail should be 1280x720 pixels in size and be less than 2MB. The minimum width of the image is 640 pixels.
- About the YouTube Image thumbnail format: Use .JPG, .PNG, .GIF or .BMP files for your thumbnail image.
- You’ll want your thumbnails to stand out. Bright colored text is a simple, easy way to draw people’s attention. Red, white, yellow, or orange are all popular choices.
- You can even do a little homework to see what colors others are using for similar videos to yours, and then choose different colors to stand out.
One word of warning: your thumbnail should be related to the content of your video. Misleading thumbnail images, if reported, will reflect poorly on your channel. You’ll get a negative rating in the community status part of your channel. This can actually remove your ability to use custom thumbnails, so keep it honest!
You may also like: How to Make YouTube Channel Art
To make a creative YouTube video, you may also need a powerful video editing software. Check how to edit a YouTube video in Filmora video editor and download it to try.
You may also like: Best video editing software for YouTube
Part 5: Tips on How to Make Good YouTube Thumbnails - Get More Clicks
The thumbnails of your videos play a huge role in convincing people to watch them; a good YouTube thumbnail will get you more views and more potential subscribers. This part will give you 6 tips on creating thumbnails that help grow your channel. Now let’s learn how to make thumbnails using Wondershare PixStudio.
1. Stay On Topic
Your thumbnail should tell a story; it should be clear from looking at it what viewers will get out of watching the video, be it knowledge or entertainment. If your thumbnail sets expectations that your video doesn’t deliver on, people will click away quickly. You may get views quickly, but you won’t get much watch time. That will tell YouTube’s search algorithm ‘people aren’t getting what they want from this, rank it lower’. That leads to fewer views over time, and gives the people who do manage to find your video a negative opinion of your channel.
Very few people intentionally use thumbnails that have nothing to do with the content of their videos – i.e, most people understand not to use a picture of a kitten in the thumbnail for their tech review, unless maybe their kitten is the one doing the review (which would be adorable, someone should do that). People who want serious advice won’t click, and people who click to see a kitten will click away fast.

This thumbnail had better be for a kitten’s iPhone review video or people will click away. Fast.
A mistake a lot of creators do make is creating a thumbnail that is meant to evoke an emotion which the video itself does not justify. For example, if you see a picture of a YouTuber looking nervous alongside text that reads ‘My Secret’, you will think they are going to share something deeply personal. You will be curious, and you may even be worried about them. You’ll probably click. Then, if their secret is that they don’t like pineapple on pizza, you’ll probably be angry. This technique gets clicks, but not a lot of watch time and it will lose you subs in the long run.
2. Don’t Be Mysterious
A good thumbnail doesn’t make people guess. Your thumbnail should tell people what’s in your video, not make them wonder about it. People want to know what they’re being asked to spend time watching.
Often, they will be looking for the answer to a specific question and will completely ignore anything that doesn’t show – in the thumbnail – that it has their answer.
Sometimes big channels can get away with stuff like this, because large portions of their audiences are interested in them as people and will already be curious about anything they post. This technique will not bring in new viewers, though.
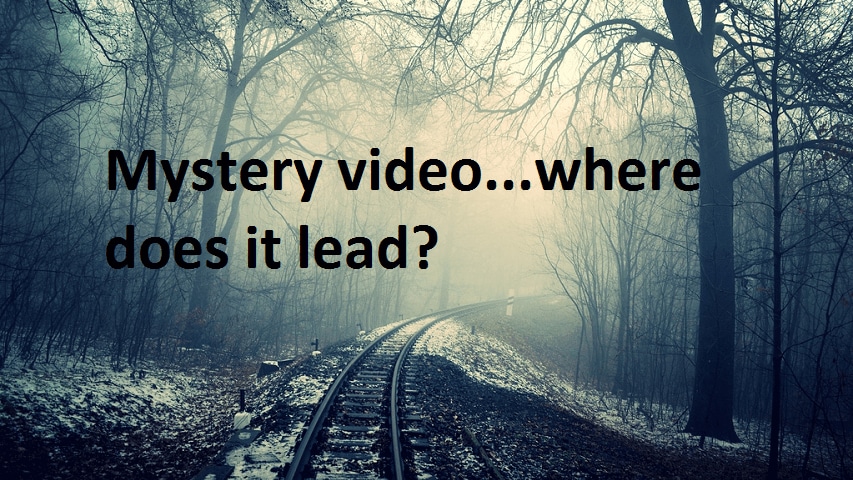
If this came up in a search for ‘smoky eye tutorial’, would you click it?
When people want answers, they want to feel confident that they video they click on will have those answers. If you have great content, then let people know it!
3. People Like People
Viewers are more likely to click on a thumbnail if they feel a connection when they look at it. One of the best ways to create a feeling of connection is through eye contact, and you can apply that principle to your YouTube thumbnails easily.
Just make sure you’re in them.
You can either compose a photo to use as your thumbnail, or use a screenshot from your video. Ideally, the image of you will convey the emotional tone of the video and tell potential viewers what it is about, besides you.
So, if you want to post a funny video that is also about making brownies, maybe a picture of you smiling while holding up a tray of brownies would be a better direction than just showing the brownies?
4. Check Out The Competition
Before you post your video, type your topic into YouTube’s search engine and see what comes up. This will give you insight into what kinds of thumbnails are performing well for other people, as well as what you can do to stand out in comparison.
Phil starts talking about thumbnails at 6:09, and he has great tips on checking out your competition!
For example, if all five of the top-ranked videos for the search ‘how to build a cabinet’ show images of the YouTuber smiling while holding a power tool, then your thumbnail for a video on the same topic should also be a picture of you smiling and holding a power tool. You know that works, so why not do it?
5. Use Color in Interesting Ways
You want to use colors that will help you stand out from the other search results. While checking out your competition if you notice that all the people in the other thumbnails are wearing black or navy blue, it will be a good idea for you to wear a brighter color for your shoot to grab a bit more attention.
Beyond simply using colors that are different from other people’s colors, you should consider the emotions different colors trigger.
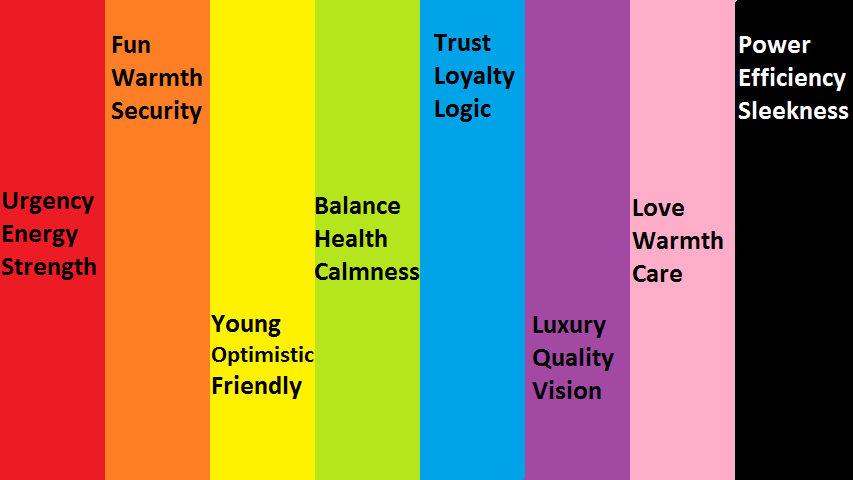
Maybe don’t use a lot of green and yellow in the thumbnail for your angry video rant?
6. Make Your Text Huge
Usually, you’ll want to use a bit of text in your thumbnail. It might be the full title of your video, or just a keyword or phrase. You don’t want to use a full sentence because you won’t have room for it if you’re using huge text.
The reason you should use huge text is so that people can read it. Remember that when people see your thumbnail in their search results, it will be much smaller than it will look while you are creating it. Text that looks big enough while you are creating your thumbnail will be much smaller when people are actually trying to read it, and that goes double for viewers watching on their small smartphone screens.
Frequently Asked Questions about YouTube Thumbnail
1. What is YouTube Thumbnail?
When you upload a video on YouTube, YouTube gives you three images to choose from in the selection of your video’s thumbnail image. These three images are just freeze-frame snapshots from different parts of your video, which may not tell your viewers what your video is really all about.
2. Can You Change YouTube Thumbnail After Publishing?
Yes, you can replace the auto-generated thumbnail with the customized thumbnail you like. But YouTube only allows verified YouTube accounts to upload custom thumbnail images.
3. How Long Does It Take for a Thumbnail to Change on YouTube?
Normally, if you have a good internet connection, you can see the thumbnail is changed within 10 seconds.
4. Why YouTube Thumbnail is Important?
When you get more people watching your video for longer, it increases your watch time and tells YouTube’s search algorithm ‘people like this, rank it higher’. Being ranked higher gets you more views, and even more watch time. It’s a wonderful cycle that all begins with a great thumbnail (paired with a good title and the right tags).
Richard Bennett
Richard Bennett is a writer and a lover of all things video.
Follow @Richard Bennett
Richard Bennett
Mar 27, 2024• Proven solutions
YouTube custom thumbnails are a great way to get people’s attention to your YouTube video. It’s a pretty simple process but if you are wondering how to create a thumbnail and add the thumbnail to YouTube video and customize it with the correct size. You have come to the right place. While in this article, I will show you how to create and add a thumbnail to a YouTube video and how to customize the YouTube video thumbnail. Follow these easy steps below and add eyecatching customed thumbnails to your YouTube videos in no time.
- Part 1: Create and Add Custom Thumbnails to YouTube
- Part 2: Tools to Create Custom YouTube Video Thumbnails
- Part 3: How to Change A Thumbnail On YouTube
- Part 4: Things You Need to Know Before Making a YouTube Custom Thumbnail
- Part 5: Tips on How to Make Good YouTube Thumbnails to Get More Clicks
- Part 6: YouTube Thumbnail FAQs
How To Add Custom Thumbnails to Your YouTube Videos [Steps, Tools and Tips]
We have just made a video tutorial about how to make a YouTube video thumbnail, check it below to find out the tips and tricks of making customized YouTube thumbnail.
Part 1: How to Make a Thumbnail for YouTube and Add Custom Thumbnails to YouTube
After you’ve verified your account and made your thumbnail, it’s finally time to upload it to your video and make a custom thumbnail. To do this, go to Creator Studio and then Video Manager. You’ll see a button labeled “Edit” next to each video, and an arrow pointing down. Click Thumbnail Editor.
In Thumbnail Editor, you can use the still images in the video as a thumbnail, choose a solid background color for the thumbnail, or add other images from your computer. I will show you the steps of how to customize the video still as a video thumbnail.
1. Preview the video and choose the target video still. You can click the Playback button and check the video and pause it at the desired frame. Or, you can step through each frame by clicking the Preview Frame button and Next Frame icon. Click Next to continue.
2. And now, you can add text, image and shape overlays to the thumbnail. You can change the text font, size, opacity and more.
3. Click Next to save the thumbnail and you will see how the thumbnail displays on different platforms such as YouTube, Facebook and Twitter. Click Save to save the video thumbnail.
In this way, you can add a custom thumbnail to the new videos and change the video thumbnail of the previously uploaded videos.
Part 2: Thumbnail Makers to Create Custom YouTube Thumbnails
Of course, you can use some of the best tools to make a YouTube video thumbnail. In this part, we will show you some of the best tools to create custom YouTube thumbnails.
Download Mac Version ](https://tools.techidaily.com/wondershare/filmora/download/ )
1. Create YouTube Thumbnail with Online solution - Canva
Canva is a free, powerful online image editing program with tons of great templates to get you started. One of their templates just happens to be YouTube thumbnails. Open Canva and select the “YouTube Thumbnail” design type. Use your own photo or choose from a huge library, then add text and effects to really make it stand out. Save and share — easy as that.
Check this video tutorial to see how to Make a Youtube Thumbnail using Canva.
You may also like: Best online Photo Editor
2. Design YouTube thumbnail with a Desktop solution - Gimp
Gimp is one of the most popular image editing programs around for one very simple reason: it’s powerful and free! Where Canva uses a lot of templates, Gimp gives you absolute, full control over how you want your image to look. Make a 1280x720 image and start putting together your eye-catching thumbnail exactly how you want to.
Check this video tutorial to see how to make professional Thumbnails for YouTube Videos with Gimp:
Part 3: How to Change A Thumbnail On YouTube
Note: YouTube allows verified YouTube accounts (accounts that provided YouTube with a working phone number) to upload custom thumbnail images and change them accordingly.
In this part, we’ll be going over how to change a thumbnail image on YouTube. There are pictures to make it easy to follow along.
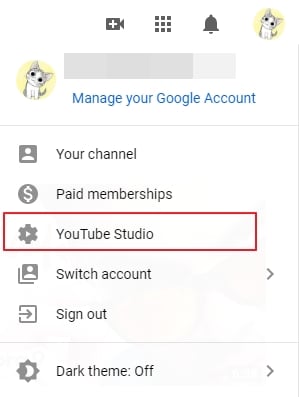
- After signing into YouTube with your Google account, click on your profile on the top right corner. Click on YouTube Studio from the drop-down menu.
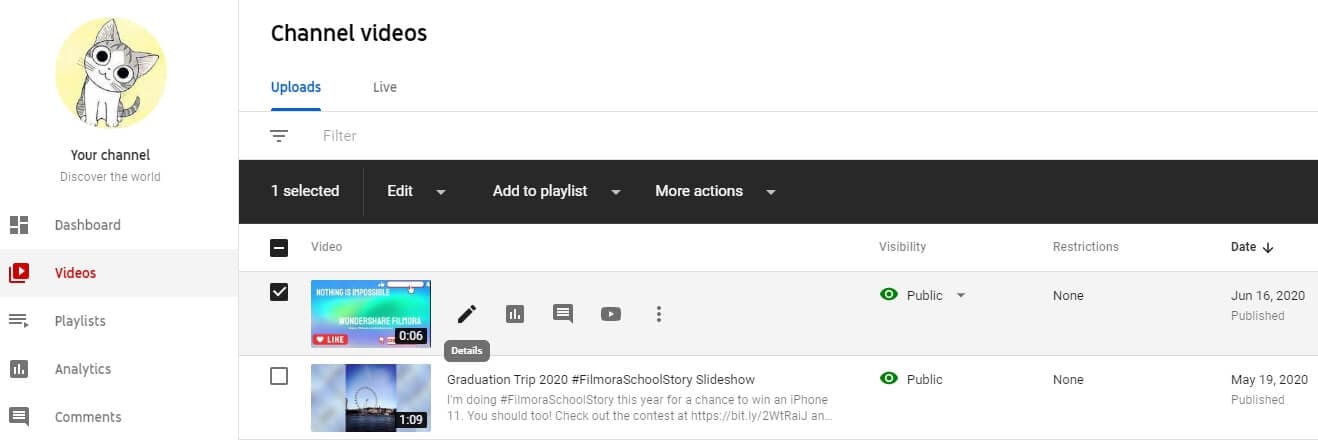
- On the left side of the page, click on Videos and then find your video and click on the details button.
- Find the Thumbnail section in the basic video details tab, and then click the Upload thumbnail to select the image that you want to upload.
- Finally, click on the Save button on the right upper corner. And just like that, in seven easy steps, we’re done changing the thumbnail of a YouTube video.
If you don’t have an image to upload but you want to check out some online resources to make your own, check out our Top YouTube Thumbnail Makers .
Part 4: Things You Need to Know Before Making a Custom Thumbnail
- About the proper YouTube video thumbnail size: Your thumbnail should be 1280x720 pixels in size and be less than 2MB. The minimum width of the image is 640 pixels.
- About the YouTube Image thumbnail format: Use .JPG, .PNG, .GIF or .BMP files for your thumbnail image.
- You’ll want your thumbnails to stand out. Bright colored text is a simple, easy way to draw people’s attention. Red, white, yellow, or orange are all popular choices.
- You can even do a little homework to see what colors others are using for similar videos to yours, and then choose different colors to stand out.
One word of warning: your thumbnail should be related to the content of your video. Misleading thumbnail images, if reported, will reflect poorly on your channel. You’ll get a negative rating in the community status part of your channel. This can actually remove your ability to use custom thumbnails, so keep it honest!
You may also like: How to Make YouTube Channel Art
To make a creative YouTube video, you may also need a powerful video editing software. Check how to edit a YouTube video in Filmora video editor and download it to try.
You may also like: Best video editing software for YouTube
Part 5: Tips on How to Make Good YouTube Thumbnails - Get More Clicks
The thumbnails of your videos play a huge role in convincing people to watch them; a good YouTube thumbnail will get you more views and more potential subscribers. This part will give you 6 tips on creating thumbnails that help grow your channel. Now let’s learn how to make thumbnails using Wondershare PixStudio.
1. Stay On Topic
Your thumbnail should tell a story; it should be clear from looking at it what viewers will get out of watching the video, be it knowledge or entertainment. If your thumbnail sets expectations that your video doesn’t deliver on, people will click away quickly. You may get views quickly, but you won’t get much watch time. That will tell YouTube’s search algorithm ‘people aren’t getting what they want from this, rank it lower’. That leads to fewer views over time, and gives the people who do manage to find your video a negative opinion of your channel.
Very few people intentionally use thumbnails that have nothing to do with the content of their videos – i.e, most people understand not to use a picture of a kitten in the thumbnail for their tech review, unless maybe their kitten is the one doing the review (which would be adorable, someone should do that). People who want serious advice won’t click, and people who click to see a kitten will click away fast.
This thumbnail had better be for a kitten’s iPhone review video or people will click away. Fast.
A mistake a lot of creators do make is creating a thumbnail that is meant to evoke an emotion which the video itself does not justify. For example, if you see a picture of a YouTuber looking nervous alongside text that reads ‘My Secret’, you will think they are going to share something deeply personal. You will be curious, and you may even be worried about them. You’ll probably click. Then, if their secret is that they don’t like pineapple on pizza, you’ll probably be angry. This technique gets clicks, but not a lot of watch time and it will lose you subs in the long run.
2. Don’t Be Mysterious
A good thumbnail doesn’t make people guess. Your thumbnail should tell people what’s in your video, not make them wonder about it. People want to know what they’re being asked to spend time watching.
Often, they will be looking for the answer to a specific question and will completely ignore anything that doesn’t show – in the thumbnail – that it has their answer.
Sometimes big channels can get away with stuff like this, because large portions of their audiences are interested in them as people and will already be curious about anything they post. This technique will not bring in new viewers, though.
If this came up in a search for ‘smoky eye tutorial’, would you click it?
When people want answers, they want to feel confident that they video they click on will have those answers. If you have great content, then let people know it!
3. People Like People
Viewers are more likely to click on a thumbnail if they feel a connection when they look at it. One of the best ways to create a feeling of connection is through eye contact, and you can apply that principle to your YouTube thumbnails easily.
Just make sure you’re in them.
You can either compose a photo to use as your thumbnail, or use a screenshot from your video. Ideally, the image of you will convey the emotional tone of the video and tell potential viewers what it is about, besides you.
So, if you want to post a funny video that is also about making brownies, maybe a picture of you smiling while holding up a tray of brownies would be a better direction than just showing the brownies?
4. Check Out The Competition
Before you post your video, type your topic into YouTube’s search engine and see what comes up. This will give you insight into what kinds of thumbnails are performing well for other people, as well as what you can do to stand out in comparison.
Phil starts talking about thumbnails at 6:09, and he has great tips on checking out your competition!
For example, if all five of the top-ranked videos for the search ‘how to build a cabinet’ show images of the YouTuber smiling while holding a power tool, then your thumbnail for a video on the same topic should also be a picture of you smiling and holding a power tool. You know that works, so why not do it?
5. Use Color in Interesting Ways
You want to use colors that will help you stand out from the other search results. While checking out your competition if you notice that all the people in the other thumbnails are wearing black or navy blue, it will be a good idea for you to wear a brighter color for your shoot to grab a bit more attention.
Beyond simply using colors that are different from other people’s colors, you should consider the emotions different colors trigger.
Maybe don’t use a lot of green and yellow in the thumbnail for your angry video rant?
6. Make Your Text Huge
Usually, you’ll want to use a bit of text in your thumbnail. It might be the full title of your video, or just a keyword or phrase. You don’t want to use a full sentence because you won’t have room for it if you’re using huge text.
The reason you should use huge text is so that people can read it. Remember that when people see your thumbnail in their search results, it will be much smaller than it will look while you are creating it. Text that looks big enough while you are creating your thumbnail will be much smaller when people are actually trying to read it, and that goes double for viewers watching on their small smartphone screens.
Frequently Asked Questions about YouTube Thumbnail
1. What is YouTube Thumbnail?
When you upload a video on YouTube, YouTube gives you three images to choose from in the selection of your video’s thumbnail image. These three images are just freeze-frame snapshots from different parts of your video, which may not tell your viewers what your video is really all about.
2. Can You Change YouTube Thumbnail After Publishing?
Yes, you can replace the auto-generated thumbnail with the customized thumbnail you like. But YouTube only allows verified YouTube accounts to upload custom thumbnail images.
3. How Long Does It Take for a Thumbnail to Change on YouTube?
Normally, if you have a good internet connection, you can see the thumbnail is changed within 10 seconds.
4. Why YouTube Thumbnail is Important?
When you get more people watching your video for longer, it increases your watch time and tells YouTube’s search algorithm ‘people like this, rank it higher’. Being ranked higher gets you more views, and even more watch time. It’s a wonderful cycle that all begins with a great thumbnail (paired with a good title and the right tags).
Richard Bennett
Richard Bennett is a writer and a lover of all things video.
Follow @Richard Bennett
Richard Bennett
Mar 27, 2024• Proven solutions
YouTube custom thumbnails are a great way to get people’s attention to your YouTube video. It’s a pretty simple process but if you are wondering how to create a thumbnail and add the thumbnail to YouTube video and customize it with the correct size. You have come to the right place. While in this article, I will show you how to create and add a thumbnail to a YouTube video and how to customize the YouTube video thumbnail. Follow these easy steps below and add eyecatching customed thumbnails to your YouTube videos in no time.
- Part 1: Create and Add Custom Thumbnails to YouTube
- Part 2: Tools to Create Custom YouTube Video Thumbnails
- Part 3: How to Change A Thumbnail On YouTube
- Part 4: Things You Need to Know Before Making a YouTube Custom Thumbnail
- Part 5: Tips on How to Make Good YouTube Thumbnails to Get More Clicks
- Part 6: YouTube Thumbnail FAQs
How To Add Custom Thumbnails to Your YouTube Videos [Steps, Tools and Tips]
We have just made a video tutorial about how to make a YouTube video thumbnail, check it below to find out the tips and tricks of making customized YouTube thumbnail.
Part 1: How to Make a Thumbnail for YouTube and Add Custom Thumbnails to YouTube
After you’ve verified your account and made your thumbnail, it’s finally time to upload it to your video and make a custom thumbnail. To do this, go to Creator Studio and then Video Manager. You’ll see a button labeled “Edit” next to each video, and an arrow pointing down. Click Thumbnail Editor.
In Thumbnail Editor, you can use the still images in the video as a thumbnail, choose a solid background color for the thumbnail, or add other images from your computer. I will show you the steps of how to customize the video still as a video thumbnail.
1. Preview the video and choose the target video still. You can click the Playback button and check the video and pause it at the desired frame. Or, you can step through each frame by clicking the Preview Frame button and Next Frame icon. Click Next to continue.
2. And now, you can add text, image and shape overlays to the thumbnail. You can change the text font, size, opacity and more.
3. Click Next to save the thumbnail and you will see how the thumbnail displays on different platforms such as YouTube, Facebook and Twitter. Click Save to save the video thumbnail.
In this way, you can add a custom thumbnail to the new videos and change the video thumbnail of the previously uploaded videos.
Part 2: Thumbnail Makers to Create Custom YouTube Thumbnails
Of course, you can use some of the best tools to make a YouTube video thumbnail. In this part, we will show you some of the best tools to create custom YouTube thumbnails.
Download Mac Version ](https://tools.techidaily.com/wondershare/filmora/download/ )
1. Create YouTube Thumbnail with Online solution - Canva
Canva is a free, powerful online image editing program with tons of great templates to get you started. One of their templates just happens to be YouTube thumbnails. Open Canva and select the “YouTube Thumbnail” design type. Use your own photo or choose from a huge library, then add text and effects to really make it stand out. Save and share — easy as that.
Check this video tutorial to see how to Make a Youtube Thumbnail using Canva.
You may also like: Best online Photo Editor
2. Design YouTube thumbnail with a Desktop solution - Gimp
Gimp is one of the most popular image editing programs around for one very simple reason: it’s powerful and free! Where Canva uses a lot of templates, Gimp gives you absolute, full control over how you want your image to look. Make a 1280x720 image and start putting together your eye-catching thumbnail exactly how you want to.
Check this video tutorial to see how to make professional Thumbnails for YouTube Videos with Gimp:
Part 3: How to Change A Thumbnail On YouTube
Note: YouTube allows verified YouTube accounts (accounts that provided YouTube with a working phone number) to upload custom thumbnail images and change them accordingly.
In this part, we’ll be going over how to change a thumbnail image on YouTube. There are pictures to make it easy to follow along.
- After signing into YouTube with your Google account, click on your profile on the top right corner. Click on YouTube Studio from the drop-down menu.
- On the left side of the page, click on Videos and then find your video and click on the details button.
- Find the Thumbnail section in the basic video details tab, and then click the Upload thumbnail to select the image that you want to upload.
- Finally, click on the Save button on the right upper corner. And just like that, in seven easy steps, we’re done changing the thumbnail of a YouTube video.
If you don’t have an image to upload but you want to check out some online resources to make your own, check out our Top YouTube Thumbnail Makers .
Part 4: Things You Need to Know Before Making a Custom Thumbnail
- About the proper YouTube video thumbnail size: Your thumbnail should be 1280x720 pixels in size and be less than 2MB. The minimum width of the image is 640 pixels.
- About the YouTube Image thumbnail format: Use .JPG, .PNG, .GIF or .BMP files for your thumbnail image.
- You’ll want your thumbnails to stand out. Bright colored text is a simple, easy way to draw people’s attention. Red, white, yellow, or orange are all popular choices.
- You can even do a little homework to see what colors others are using for similar videos to yours, and then choose different colors to stand out.
One word of warning: your thumbnail should be related to the content of your video. Misleading thumbnail images, if reported, will reflect poorly on your channel. You’ll get a negative rating in the community status part of your channel. This can actually remove your ability to use custom thumbnails, so keep it honest!
You may also like: How to Make YouTube Channel Art
To make a creative YouTube video, you may also need a powerful video editing software. Check how to edit a YouTube video in Filmora video editor and download it to try.
You may also like: Best video editing software for YouTube
Part 5: Tips on How to Make Good YouTube Thumbnails - Get More Clicks
The thumbnails of your videos play a huge role in convincing people to watch them; a good YouTube thumbnail will get you more views and more potential subscribers. This part will give you 6 tips on creating thumbnails that help grow your channel. Now let’s learn how to make thumbnails using Wondershare PixStudio.
1. Stay On Topic
Your thumbnail should tell a story; it should be clear from looking at it what viewers will get out of watching the video, be it knowledge or entertainment. If your thumbnail sets expectations that your video doesn’t deliver on, people will click away quickly. You may get views quickly, but you won’t get much watch time. That will tell YouTube’s search algorithm ‘people aren’t getting what they want from this, rank it lower’. That leads to fewer views over time, and gives the people who do manage to find your video a negative opinion of your channel.
Very few people intentionally use thumbnails that have nothing to do with the content of their videos – i.e, most people understand not to use a picture of a kitten in the thumbnail for their tech review, unless maybe their kitten is the one doing the review (which would be adorable, someone should do that). People who want serious advice won’t click, and people who click to see a kitten will click away fast.
This thumbnail had better be for a kitten’s iPhone review video or people will click away. Fast.
A mistake a lot of creators do make is creating a thumbnail that is meant to evoke an emotion which the video itself does not justify. For example, if you see a picture of a YouTuber looking nervous alongside text that reads ‘My Secret’, you will think they are going to share something deeply personal. You will be curious, and you may even be worried about them. You’ll probably click. Then, if their secret is that they don’t like pineapple on pizza, you’ll probably be angry. This technique gets clicks, but not a lot of watch time and it will lose you subs in the long run.
2. Don’t Be Mysterious
A good thumbnail doesn’t make people guess. Your thumbnail should tell people what’s in your video, not make them wonder about it. People want to know what they’re being asked to spend time watching.
Often, they will be looking for the answer to a specific question and will completely ignore anything that doesn’t show – in the thumbnail – that it has their answer.
Sometimes big channels can get away with stuff like this, because large portions of their audiences are interested in them as people and will already be curious about anything they post. This technique will not bring in new viewers, though.
If this came up in a search for ‘smoky eye tutorial’, would you click it?
When people want answers, they want to feel confident that they video they click on will have those answers. If you have great content, then let people know it!
3. People Like People
Viewers are more likely to click on a thumbnail if they feel a connection when they look at it. One of the best ways to create a feeling of connection is through eye contact, and you can apply that principle to your YouTube thumbnails easily.
Just make sure you’re in them.
You can either compose a photo to use as your thumbnail, or use a screenshot from your video. Ideally, the image of you will convey the emotional tone of the video and tell potential viewers what it is about, besides you.
So, if you want to post a funny video that is also about making brownies, maybe a picture of you smiling while holding up a tray of brownies would be a better direction than just showing the brownies?
4. Check Out The Competition
Before you post your video, type your topic into YouTube’s search engine and see what comes up. This will give you insight into what kinds of thumbnails are performing well for other people, as well as what you can do to stand out in comparison.
Phil starts talking about thumbnails at 6:09, and he has great tips on checking out your competition!
For example, if all five of the top-ranked videos for the search ‘how to build a cabinet’ show images of the YouTuber smiling while holding a power tool, then your thumbnail for a video on the same topic should also be a picture of you smiling and holding a power tool. You know that works, so why not do it?
5. Use Color in Interesting Ways
You want to use colors that will help you stand out from the other search results. While checking out your competition if you notice that all the people in the other thumbnails are wearing black or navy blue, it will be a good idea for you to wear a brighter color for your shoot to grab a bit more attention.
Beyond simply using colors that are different from other people’s colors, you should consider the emotions different colors trigger.
Maybe don’t use a lot of green and yellow in the thumbnail for your angry video rant?
6. Make Your Text Huge
Usually, you’ll want to use a bit of text in your thumbnail. It might be the full title of your video, or just a keyword or phrase. You don’t want to use a full sentence because you won’t have room for it if you’re using huge text.
The reason you should use huge text is so that people can read it. Remember that when people see your thumbnail in their search results, it will be much smaller than it will look while you are creating it. Text that looks big enough while you are creating your thumbnail will be much smaller when people are actually trying to read it, and that goes double for viewers watching on their small smartphone screens.
Frequently Asked Questions about YouTube Thumbnail
1. What is YouTube Thumbnail?
When you upload a video on YouTube, YouTube gives you three images to choose from in the selection of your video’s thumbnail image. These three images are just freeze-frame snapshots from different parts of your video, which may not tell your viewers what your video is really all about.
2. Can You Change YouTube Thumbnail After Publishing?
Yes, you can replace the auto-generated thumbnail with the customized thumbnail you like. But YouTube only allows verified YouTube accounts to upload custom thumbnail images.
3. How Long Does It Take for a Thumbnail to Change on YouTube?
Normally, if you have a good internet connection, you can see the thumbnail is changed within 10 seconds.
4. Why YouTube Thumbnail is Important?
When you get more people watching your video for longer, it increases your watch time and tells YouTube’s search algorithm ‘people like this, rank it higher’. Being ranked higher gets you more views, and even more watch time. It’s a wonderful cycle that all begins with a great thumbnail (paired with a good title and the right tags).
Richard Bennett
Richard Bennett is a writer and a lover of all things video.
Follow @Richard Bennett
Streamline Your Creation Process with This YouTube Shorts Guide
YouTube Shorts Ultimate Guide in 2024
Richard Bennett
Mar 27, 2024• Proven solutions
Since smartphones are cheap and easily available in the market today, and there is also a huge range of contents to view online, a majority of users prefer watching videos that are both short enough to convey the message within a few seconds, and can be seen on your phone’s screen with decent picture quality. Considering this, Google lately came up with a Tik Tok-style app calledYouTube shorts that can be accessed right from your Android or iPhone as long as you are using the YouTube app, and are signed in to your Google account.
That said, in the following sections you will learn everything about the YouTube Shorts app, and how it could help you gain more viewers for your YouTube channel.
- Part 1: What Is YouTube Shorts?
- Part 2: How to Make and Upload a YouTube Shorts Video with Shorts App?
- Part 3: Creating Vertical YouTube Shorts Video in Filmora [Step by Step Tutorial]
Part 1: What Is YouTube Shorts?
A short and quick answer to the question is, YouTube Shorts is a Tik Tok competitor developed by Google and can be accessed via the YouTube app on an Android or iOS device. In order to use the YouTube Shorts app, all you need to do is, sign in to your YouTube account on the YouTube app, and you are good to go.
1. YouTube Shorts Release History
At the time of this writing, YouTube Shorts is still in the Beta phase, and there is a lot more that the developers at Google have yet to explore and discover. However, for now, the fully functional variant of the program is available only for users in India on Android and iOS platforms.
2. YouTube Shorts Target Audience
A majority of people who can be called the target audience for YouTube Shorts are the artists and creators looking forward to getting noticed. Some of them could also be among those who wish to become an influencer, or get their YouTube channel more subscribers to be able to become eligible for YouTube Partnership Program.
And of course, the viewers and subscribers cannot be left alone when talking about the target audiences of YouTube Shorts as without them, there’s no point in creating short videos in the first place.
The type of contents that the viewers expect to see as YouTube Shorts could include:
- Entertainment – While movies are of longer duration, roasting the characters in it, or explaining some other stuff to the subscribers could be one of the things that could keep the viewers engaged
- Gaming – Some extraordinary gaming tips, tricks, and skills can be demonstrated in a short video
- How-To – A couple of brief how-to illustrations can yet be another attraction for DIY-loving viewers
- Science and Technology – A short introduction of upcoming gadgets or applications along with their usability can be explained within the timeframe of 60 seconds as well
In addition to the above, a few other categories could be People and Places, Music, Domestic and Wild Animals, Education, etc.
3. YouTube Shorts Content Requirements
While creating YouTube Shorts, there are certain guidelines that must be followed. These points include:
- YouTube Shorts videos must not be more than 60 seconds long
- The videos must be vertically shot, and must not be in the landscape orientation
- You can have multiple short videos clubbed together. However, the total length of the final video must not exceed 60 seconds in duration
- While posting YouTube Shorts videos, the title or the description must contain ‘#shorts’ in it
Certain things that you must keep in mind while creating YouTube Shorts include:
- YouTube Shorts cannot be monetized. However, they can serve as a good medium to attract and redirect the audiences to your main YouTube channel which may contain several videos that are eligible for monetization.
- The number of views and the total playtime of the YouTube Shorts videos DO affect your YouTube channel statistics
4. Where People Can Find YouTube Shorts
As mentioned earlier, YouTube Shorts can be accessed by launching the YouTube app on your Android or iOS device. You can use YouTube Shorts by clicking the + (Add) icon present at the bottom. Once the YouTube Shorts app is initialized, you can easily create and publish short videos by following the simple on-screen instructions.
Part 2: How to Make and Upload a YouTube Shorts Video with Shorts App?
You can follow the instructions given below to make and upload a YouTube Shorts video using the YouTube Shorts app:
Step 1: Record a Video with YouTube Shorts

Launch the YouTube app on your Android or iOS smart device (Samsung Galaxy Note 10+ is used here for demonstration), make sure that you are signed in to your Google account, tap the + (Add) button present at the bottom of the screen, tap Create a Short on the popup box that appears next, tap the Record button on the next window to start the recording. Once you are done, tap the Stop button to stop the recording.
Step 2: Edit the Video
Tap Music from the bottom of the screen to add background music to the video. The music that you can use in your short videos must be either created by you, or you should have permission to use them. However, the audio files that the Music library contains is made available by Google, is royalty-free, and can be used throughout the platform.

Likewise, you can tap Text to add captions as well. As for the text type, the app offers various formatting options such as alignment (left, center, and right), text highlighter, font changer, and even color selector. Further, the Speed and Timer icons at the top-right area allow you to manage the playback speed anywhere between 0.3x to 3x, and automatically stop the recording after the set time limit respectively. Once everything is set up, tap NEXT from the top-right corner to proceed to the next step.
Step 3: Pick Target Audience Type
On the Add details window, tap Select audience, and on the Select audience window, tap to select the appropriate radio button to define whether the video is suitable for kids. Tap the Back button once the target audience is selected.

Step 4: Add Details and Upload the Video
Enter a title for the video in the Title field. Make sure to include #shorts to help YouTube understand that you are preparing a YouTube Shorts video. Next, tap UPLOAD from the upper-right corner of the screen to submit the video for review. Once YouTube reviews the recording and finds it appropriate, it will be published on the portal, and will be visible throughout and even under the Shorts category of the main page.

Part 3: How to Create a Vertical YouTube Shorts Video in Filmora?
The YouTube Shorts app is pretty convenient to access and use alright. However, it doesn’t allow you to fine edit the videos. The app doesn’t even have many filtering options such as Effects, Elements, etc. to make your videos more engaging.
With that said, you can always use an efficient third-party program like Wondershare Filmora to create professionally-looking YouTube Shorts videos to attract your viewers.
When talking about Wondershare Filmora, it is a production and post-production app available for both Windows and Mac computers, and gives tough competition to some of the globally accepted similar programs like Adobe Premiere Pro, Final Cut Pro X, etc. Furthermore, Filmora has its own built-in screen, webcam, and voice recording features that can be used to prepare interactive videos, game walkthroughs, and voiceovers as needed.
For Win 7 or later (64-bit)
 Secure Download
For macOS 10.12 or later
Secure Download
The following step-by-step guide teaches you how to use Wondershare Filmora to create a vertical YouTube Shorts video:
Note: Before proceeding to the instructions, make sure that you have already recorded a vertical video using your cellphone, and that it has been transferred to your PC.
Step 1: Add the Video to Timeline
Launch Wondershare Filmora on your Windows or Mac PC (a Windows 10 computer is used here for demonstration), go to File > New Project, and click 9:16 (Portrait). Click anywhere inside the Media box, and select and import the source vertical video from your PC to Filmora.
Next, hover the mouse over the clip in the Media box, click the + button that appears at the bottom-right corner of the thumbnail, and in the resolution confirmation box that comes up next, click the button under the Match to Media section to add the video in the correct orientation to the Timeline at the bottom.
Step 2: Edit the Video
Select the clip in the Timeline, and use the Split, Crop, Speed, etc. buttons above the Timeline itself to remove the unwanted portions from the clip, manage its playback speed, and do other fine-tuning tasks.

You can even click the Edit button, and use the available editing features like Motion Tracking and Stabilization to add text or objects to a moving body in the video and stabilize the clip if the camera shook during the recording session respectively. Click OK to save the changes when done.

Note: To be able to remain compliant with the YouTube Shorts policies, make sure that the video length is no longer than 60 seconds.
Step 3: Beautify the Video

Click Titles from the standard toolbox at the top, choose your preferred text category from the list in the left, hover the mouse over a decent preset in the right window, and click the + button at the bottom-right corner of the thumbnail to add the preset on top of the media track in the Timeline. Next, you can double-click the preset track in the Timeline to modify the text and make granular modifications to it as needed. Click OK to save the changes.
Similarly, you can select the Effects and Elements tools to add effects and elements to the video as needed. To add background music, you can go to the Audio tool, and pick your preferred preset from the available options. A custom music can be added by going to the Media tool, and importing an audio file from your PC using the method explained in Step 1.

After this, optionally, you can go to Split Screen from the standard toolbar at the top, and use your preferred Split Screen preset to club multiple video clips into one screen. In Filmora, you can add as many as 6 screens in a video.
For Win 7 or later (64-bit)
Secure Download
For macOS 10.12 or later
Secure Download
Step 4: Render the Final Output
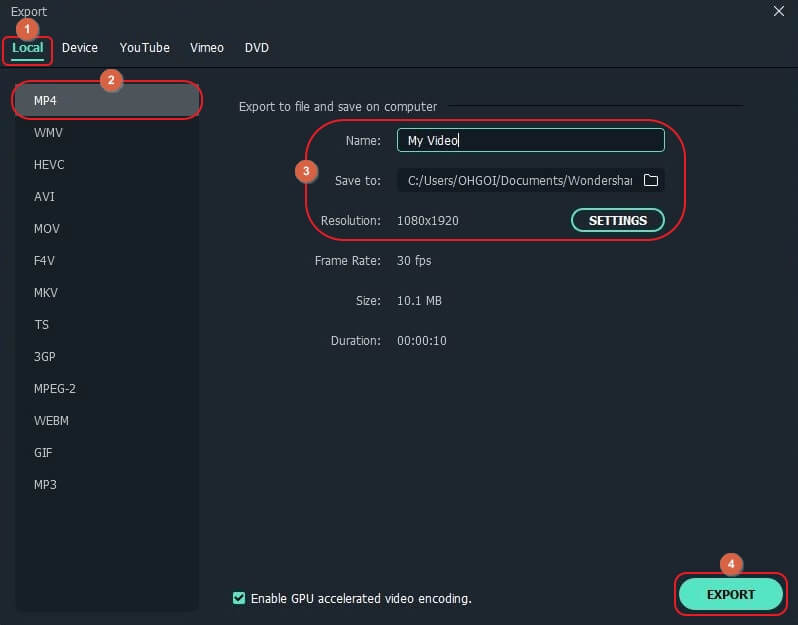
Once everything is set up, click EXPORT from the top of the window, go to the Local tab on the Export window, select MP4 from the formats list in the left, give a name and configure other settings from the available options in the right, and click EXPORT from the bottom-right corner to create a YouTube Shorts video. Once the clip is generated, you can upload the video to YouTube using #Shorts in the title or description to publish the video under the YouTube Shorts section.
FAQs About YouTube Shorts
- Where to download the YouTube Shorts app?
The YouTube Shorts app is already present in the YouTube app that your Android or iOS smartphone has. All you need to do to access it is, sign in to your Google account, tap the + button at the bottom, and tap Create a Short in the popup box that comes up.
- What if YouTube Shorts is not showing on my YouTube app?
Make sure that your YouTube app is updated to its latest version. If the app is already updated, and YouTube Shorts is still unavailable, the chances are that Google hasn’t rolled the app in your region. Since YouTube Shorts is still in its Beta phase, only the region of India can use all the functions of the app at the time of this writing. In such a case, you are suggested to wait until the YouTube Shorts app is made available for your location.
- What’s the YouTube Shorts video duration?
A YouTube Shorts video can be of only up to 60 seconds.
- What’s the YouTube Shorts size limitation?
YouTube hasn’t provided any information related to this as of now. However, you can rest assure that a 60 seconds long video file wouldn’t be too large for YouTube to handle.
- How many subs do you need to access Shorts?
YouTube Shorts is available for everyone regardless of the number of subscribers the channel has.
- Can you make money on Shorts?
Unfortunately, NO. Although you cannot monetize the recordings published as YouTube Shorts, they can be a good source to drive subscribers to your main YouTube channel that may have the videos that can be monetized.
Richard Bennett
Richard Bennett is a writer and a lover of all things video.
Follow @Richard Bennett
Richard Bennett
Mar 27, 2024• Proven solutions
Since smartphones are cheap and easily available in the market today, and there is also a huge range of contents to view online, a majority of users prefer watching videos that are both short enough to convey the message within a few seconds, and can be seen on your phone’s screen with decent picture quality. Considering this, Google lately came up with a Tik Tok-style app calledYouTube shorts that can be accessed right from your Android or iPhone as long as you are using the YouTube app, and are signed in to your Google account.
That said, in the following sections you will learn everything about the YouTube Shorts app, and how it could help you gain more viewers for your YouTube channel.
- Part 1: What Is YouTube Shorts?
- Part 2: How to Make and Upload a YouTube Shorts Video with Shorts App?
- Part 3: Creating Vertical YouTube Shorts Video in Filmora [Step by Step Tutorial]
Part 1: What Is YouTube Shorts?
A short and quick answer to the question is, YouTube Shorts is a Tik Tok competitor developed by Google and can be accessed via the YouTube app on an Android or iOS device. In order to use the YouTube Shorts app, all you need to do is, sign in to your YouTube account on the YouTube app, and you are good to go.
1. YouTube Shorts Release History
At the time of this writing, YouTube Shorts is still in the Beta phase, and there is a lot more that the developers at Google have yet to explore and discover. However, for now, the fully functional variant of the program is available only for users in India on Android and iOS platforms.
2. YouTube Shorts Target Audience
A majority of people who can be called the target audience for YouTube Shorts are the artists and creators looking forward to getting noticed. Some of them could also be among those who wish to become an influencer, or get their YouTube channel more subscribers to be able to become eligible for YouTube Partnership Program.
And of course, the viewers and subscribers cannot be left alone when talking about the target audiences of YouTube Shorts as without them, there’s no point in creating short videos in the first place.
The type of contents that the viewers expect to see as YouTube Shorts could include:
- Entertainment – While movies are of longer duration, roasting the characters in it, or explaining some other stuff to the subscribers could be one of the things that could keep the viewers engaged
- Gaming – Some extraordinary gaming tips, tricks, and skills can be demonstrated in a short video
- How-To – A couple of brief how-to illustrations can yet be another attraction for DIY-loving viewers
- Science and Technology – A short introduction of upcoming gadgets or applications along with their usability can be explained within the timeframe of 60 seconds as well
In addition to the above, a few other categories could be People and Places, Music, Domestic and Wild Animals, Education, etc.
3. YouTube Shorts Content Requirements
While creating YouTube Shorts, there are certain guidelines that must be followed. These points include:
- YouTube Shorts videos must not be more than 60 seconds long
- The videos must be vertically shot, and must not be in the landscape orientation
- You can have multiple short videos clubbed together. However, the total length of the final video must not exceed 60 seconds in duration
- While posting YouTube Shorts videos, the title or the description must contain ‘#shorts’ in it
Certain things that you must keep in mind while creating YouTube Shorts include:
- YouTube Shorts cannot be monetized. However, they can serve as a good medium to attract and redirect the audiences to your main YouTube channel which may contain several videos that are eligible for monetization.
- The number of views and the total playtime of the YouTube Shorts videos DO affect your YouTube channel statistics
4. Where People Can Find YouTube Shorts
As mentioned earlier, YouTube Shorts can be accessed by launching the YouTube app on your Android or iOS device. You can use YouTube Shorts by clicking the + (Add) icon present at the bottom. Once the YouTube Shorts app is initialized, you can easily create and publish short videos by following the simple on-screen instructions.
Part 2: How to Make and Upload a YouTube Shorts Video with Shorts App?
You can follow the instructions given below to make and upload a YouTube Shorts video using the YouTube Shorts app:
Step 1: Record a Video with YouTube Shorts
Launch the YouTube app on your Android or iOS smart device (Samsung Galaxy Note 10+ is used here for demonstration), make sure that you are signed in to your Google account, tap the + (Add) button present at the bottom of the screen, tap Create a Short on the popup box that appears next, tap the Record button on the next window to start the recording. Once you are done, tap the Stop button to stop the recording.
Step 2: Edit the Video
Tap Music from the bottom of the screen to add background music to the video. The music that you can use in your short videos must be either created by you, or you should have permission to use them. However, the audio files that the Music library contains is made available by Google, is royalty-free, and can be used throughout the platform.
Likewise, you can tap Text to add captions as well. As for the text type, the app offers various formatting options such as alignment (left, center, and right), text highlighter, font changer, and even color selector. Further, the Speed and Timer icons at the top-right area allow you to manage the playback speed anywhere between 0.3x to 3x, and automatically stop the recording after the set time limit respectively. Once everything is set up, tap NEXT from the top-right corner to proceed to the next step.
Step 3: Pick Target Audience Type
On the Add details window, tap Select audience, and on the Select audience window, tap to select the appropriate radio button to define whether the video is suitable for kids. Tap the Back button once the target audience is selected.
Step 4: Add Details and Upload the Video
Enter a title for the video in the Title field. Make sure to include #shorts to help YouTube understand that you are preparing a YouTube Shorts video. Next, tap UPLOAD from the upper-right corner of the screen to submit the video for review. Once YouTube reviews the recording and finds it appropriate, it will be published on the portal, and will be visible throughout and even under the Shorts category of the main page.
Part 3: How to Create a Vertical YouTube Shorts Video in Filmora?
The YouTube Shorts app is pretty convenient to access and use alright. However, it doesn’t allow you to fine edit the videos. The app doesn’t even have many filtering options such as Effects, Elements, etc. to make your videos more engaging.
With that said, you can always use an efficient third-party program like Wondershare Filmora to create professionally-looking YouTube Shorts videos to attract your viewers.
When talking about Wondershare Filmora, it is a production and post-production app available for both Windows and Mac computers, and gives tough competition to some of the globally accepted similar programs like Adobe Premiere Pro, Final Cut Pro X, etc. Furthermore, Filmora has its own built-in screen, webcam, and voice recording features that can be used to prepare interactive videos, game walkthroughs, and voiceovers as needed.
For Win 7 or later (64-bit)
Secure Download
For macOS 10.12 or later
Secure Download
The following step-by-step guide teaches you how to use Wondershare Filmora to create a vertical YouTube Shorts video:
Note: Before proceeding to the instructions, make sure that you have already recorded a vertical video using your cellphone, and that it has been transferred to your PC.
Step 1: Add the Video to Timeline
Launch Wondershare Filmora on your Windows or Mac PC (a Windows 10 computer is used here for demonstration), go to File > New Project, and click 9:16 (Portrait). Click anywhere inside the Media box, and select and import the source vertical video from your PC to Filmora.
Next, hover the mouse over the clip in the Media box, click the + button that appears at the bottom-right corner of the thumbnail, and in the resolution confirmation box that comes up next, click the button under the Match to Media section to add the video in the correct orientation to the Timeline at the bottom.
Step 2: Edit the Video
Select the clip in the Timeline, and use the Split, Crop, Speed, etc. buttons above the Timeline itself to remove the unwanted portions from the clip, manage its playback speed, and do other fine-tuning tasks.
You can even click the Edit button, and use the available editing features like Motion Tracking and Stabilization to add text or objects to a moving body in the video and stabilize the clip if the camera shook during the recording session respectively. Click OK to save the changes when done.
Note: To be able to remain compliant with the YouTube Shorts policies, make sure that the video length is no longer than 60 seconds.
Step 3: Beautify the Video
Click Titles from the standard toolbox at the top, choose your preferred text category from the list in the left, hover the mouse over a decent preset in the right window, and click the + button at the bottom-right corner of the thumbnail to add the preset on top of the media track in the Timeline. Next, you can double-click the preset track in the Timeline to modify the text and make granular modifications to it as needed. Click OK to save the changes.
Similarly, you can select the Effects and Elements tools to add effects and elements to the video as needed. To add background music, you can go to the Audio tool, and pick your preferred preset from the available options. A custom music can be added by going to the Media tool, and importing an audio file from your PC using the method explained in Step 1.
After this, optionally, you can go to Split Screen from the standard toolbar at the top, and use your preferred Split Screen preset to club multiple video clips into one screen. In Filmora, you can add as many as 6 screens in a video.
For Win 7 or later (64-bit)
Secure Download
For macOS 10.12 or later
Secure Download
Step 4: Render the Final Output
Once everything is set up, click EXPORT from the top of the window, go to the Local tab on the Export window, select MP4 from the formats list in the left, give a name and configure other settings from the available options in the right, and click EXPORT from the bottom-right corner to create a YouTube Shorts video. Once the clip is generated, you can upload the video to YouTube using #Shorts in the title or description to publish the video under the YouTube Shorts section.
FAQs About YouTube Shorts
- Where to download the YouTube Shorts app?
The YouTube Shorts app is already present in the YouTube app that your Android or iOS smartphone has. All you need to do to access it is, sign in to your Google account, tap the + button at the bottom, and tap Create a Short in the popup box that comes up.
- What if YouTube Shorts is not showing on my YouTube app?
Make sure that your YouTube app is updated to its latest version. If the app is already updated, and YouTube Shorts is still unavailable, the chances are that Google hasn’t rolled the app in your region. Since YouTube Shorts is still in its Beta phase, only the region of India can use all the functions of the app at the time of this writing. In such a case, you are suggested to wait until the YouTube Shorts app is made available for your location.
- What’s the YouTube Shorts video duration?
A YouTube Shorts video can be of only up to 60 seconds.
- What’s the YouTube Shorts size limitation?
YouTube hasn’t provided any information related to this as of now. However, you can rest assure that a 60 seconds long video file wouldn’t be too large for YouTube to handle.
- How many subs do you need to access Shorts?
YouTube Shorts is available for everyone regardless of the number of subscribers the channel has.
- Can you make money on Shorts?
Unfortunately, NO. Although you cannot monetize the recordings published as YouTube Shorts, they can be a good source to drive subscribers to your main YouTube channel that may have the videos that can be monetized.
Richard Bennett
Richard Bennett is a writer and a lover of all things video.
Follow @Richard Bennett
Also read:
- In 2024, Download All YouTube Images for Free
- In 2024, Crafting Compelling YouTube Narratives with Chapters and Subsections
- Enhance Content Categorization Top Picks for the 7 Cheapest Youtube Taggification Apps
- [Updated] Capture the Best Moments Select 6 Top-Ranked Short Video Download Tools
- Youtubian Beginnings Unveiled Building a Business and Bringing Big Bucks
- [New] Delving Into YouTube's Complex Calculation of Viewer Stats
- In 2024, Boost Your Visual Storytelling Key Strategies for Solo Videos
- Charting Your Path to Success in YouTube's Earnings System for 2024
- [Updated] Elevating Video Branding The Art and Science of Youtube Image Designs
- Top 10 Tools for YouTube to WebM Conversion
- 2024 Approved Elevate Your Content PC Video Editing for Effective YouTube Presentations
- Direct From Spotify to YouTube Best Apps for Streaming Conversions
- Transforming Viewership Into Income YouTube's Advertising Guide
- Youthful Wealth Wonders A Look at Ryan's Online Riches
- [New] Animated Text That Jumps Master Class with Easy Steps
- 2024 Approved Audiovisual Attraction 3 Approaches to Neon-Bordered YouTubes
- [New] Enriching Slides Video Incorporation From YouTube
- [Updated] Elite Video Influencers
- [Updated] Directly Stream Google Meet - YouTube Edition Steps
- In 2024, Create Identity A Quick Walkthrough of Customizing Your YouTube Url
- 2024 Approved Boost Your Video Impact Expert Tips on Using WM Maker
- 2024 Approved Ace the Art of YouTube Reactions - 3 Innovative Approaches Unveiled
- Digital Deities Ranking Creators by Subscriber Growth
- Prime Your Vlogging Game Top-Tier Mac MP4 Editors Reviewed
- In 2024, Decoding the Undisclosed World of YouTube Videos
- In 2024, Captivate Audiences with Effective and Appealing Video Previews
- Multitasking in Broadcast Captivate Viewers Across YT+TW
- [Updated] How to Change YouTube Video Playback Speed [Desktop/Mobile]
- [Updated] Analyzing TSeries Earnings via YouTube Engagement
- 2024 Approved ClipCraft Designer
- [New] Elite 7 Cameras Elevating Interactive Learning Vlogs & Tutorials
- YouTube Thumbnail Makeover 3 Striking Methods of Neon Borders
- Channel Identity Constructing Memorable Templates for Gamers
- 2024 Approved Chrome to iPhone A Guide to Stripping YouTube Ads
- In 2024, Conquer YouTube's Copy-Paste Loop Mastery Essentials
- [New] Calculating Youtube's AdSense Gains Per Thousand Viewer Income
- [Updated] Discover Ultimate ASMR Microphones for Clear Sounds
- [Updated] Enhancing Video Content Top Formats on YouTube
- Decoding YouTube Income How Much Does Each 1,000 Viewer Earn, In 2024
- [New] Eliminate Your Streaming Darkness on YouTube
- [Updated] Boosting YouTube Income Using Studio Anywhere, Anyhow
- How To Unbrick a Dead Motorola Moto G14 | Dr.fone
- In 2024, The Future of Advertising on TikTok Trends to Watch and Examples
- [New] In 2024, The Art of Recording Flawless Podcasts via Zoom
- Step-by-Step Guide to Joining & Earning as a TikTok Star for 2024
- Windows 10'S Complete Guide to Saving .mov Content with Ease for 2024
- How To Transfer WhatsApp From Apple iPhone 12 Pro Max to Android? | Dr.fone
- New 2024 Approved The Elite Selection Best-Selling Mac Audio Editing Tools, Ranked
- In 2024, How to Mirror PC Screen to Xiaomi 14 Ultra Phones? | Dr.fone
- 2024 Approved Premiere or After Effects Choosing the Right Tool for Your Video Project
- Say Goodbye to Boring Photos – Addons for iPhones and Android Screenshots
- In 2024, How to Transfer Contacts from Itel S23+ to Other Android Devices Using Bluetooth? | Dr.fone
- In 2024, Win10 Screen Grabbing - Top Quality Captures
- 2024 Approved Free Animated Imagery Galore Locate Your Next Set at These Portals
- [Updated] 2024 Approved Social Media to Mp3 Converter
- Photoshop's Quick Guide to Color Perfection
- In 2024, Easy Guide to Samsung Galaxy S23 Ultra FRP Bypass With Best Methods
- Aggregated Insights on 10 Superior Video Call Apps
- New Budget-Friendly Filmmaking Essentials 8 Must-Know Software
- [Updated] Top-Rated Screen Recorders on Windows & macOS Unveiled for 2024
- Fusion of Visuals and Sound Photo to Video Journey
- Cutting-Edge Gear for VR Enthusiasts
- Updated Premium 10 Voice Changer Programs for Males Desiring Female Characterization
- Top 10 Speedy Gaming Apps for Mobile and Desktop
- [Updated] Properly Merging Webcam Feed with Desktop Screen for 2024
- How to Fix Unfortunately, Contacts Has Stopped Error on Honor Magic 6 Pro | Dr.fone
- 2024 Approved Cut, Trim, and Edit The Top 10 Free and Paid Android Video Editing Apps
- [Updated] In 2024, 7 Critical Practices for Controlling Instagram TV Videosize
- [New] Correcting Time Jumps Fixing OBS Studio Problems
- Updated In 2024, Best Voice Over Generators
- Updated 2024 Approved How to Make Creative Animation Videos
- Sky Sprinting Guide + Mastering the Art of FPV Drone Racing
- [Updated] Exploring the Full Potential of OBS Screen Capture for 2024
- 2024 Approved Creating Stunning Videos on Mac A Beginners Guide to Movie Maker Software
- Updated In 2024, Expert Tips on Isolating Soundtracks in Adobe Premiere Projects
- Honesty in High-Definition Reviewing RecordCast's Efficacy
- [Updated] Disclosing the Top 10 Hidden Story Enthusiasts for 2024
- Updated In 2024, Cut, Trim, and Share Best Free Video Editors for Chromebook
- [Updated] 2024 Approved ScreenSnapper Pro 2023 Apowersoft's Latest for PCs
- Will the iPogo Get You Banned and How to Solve It On Oppo A38 | Dr.fone
- 2024 Approved Best Microphone Combinations for Superior 4K Audio and Visuals
- 7 Solutions to Fix Error Code 963 on Google Play Of Meizu 21 | Dr.fone
- Title: [New] Essential Steps to Add Custom Imagery in YouTube Videos
- Author: Brian
- Created at : 2024-05-25 12:42:07
- Updated at : 2024-05-26 12:42:07
- Link: https://youtube-video-recordings.techidaily.com/new-essential-steps-to-add-custom-imagery-in-youtube-videos/
- License: This work is licensed under CC BY-NC-SA 4.0.
