
!["[New] Epicurean Epiphanies Filming Feast Creation"](https://www.lifewire.com/thmb/xDM-B4zVSXt5n027L2C5oNwTDN8=/400x300/filters:no_upscale():max_bytes(150000):strip_icc():format(webp)/AIrendering_CROPPED_Guillaume_GettyImages-1418477818-d0a9c5ce09584a1099f21a5f1f690a88.jpg)
"[New] Epicurean Epiphanies Filming Feast Creation"
Epicurean Epiphanies: Filming Feast Creation
How to Make a Cooking Video in Steps - an Ultimate Guide

Richard Bennett
Mar 27, 2024• Proven solutions
Cooking and food-oriented videos are among the most outreaching and popular categories of content to publish online, notably, on YouTube, Facebook, or Instagram. So if you are a cooking aficionado, you have excellent potential to gain positive attention and a loyal audience. But to create engaging videos, you’d need a lot more than excellent culinary skills. This article aims to enlighten aspiring food and recipe vloggers about the essentials of video making straight out of the oven, to create enriched content that’s professional, neat, and viral-worthy.
- Part 1: What to Prepare Before Making a Recipe Video?
- Part 2: Make a Cooking Video with Filmora: a Step-by-Step Guide
- Part 3: Tips to Make Your Cooking Videos Stand Out
- Part 4: How to Promote Your Cooking Channel on YouTube?
What to Prepare Before Making a Recipe Video
While you would know best about the prep work needed for the recipes, the prep work for making a video starts with a plan. What goes into the plan?
Brainstorm this equation - Main Content + Duration + Light + Sound + Camera + Camera Angle, Shots & Transition.
The main content is how you picture the finished video. Ask yourself - Do you want an intro gig? Are you going to talk in the video or show only hands and the cooking with a piece of background music? How do you wish to present the ingredients? Would there be additional tips? At what platform are you going to publish your content? How long should be your clippings? Consider all these questions to chalk out a basic framework of your video
The camera is a pivotal element. Whether it is a smartphone or a hi-fidelity digital camera, it is worthwhile to familiarise the best positions and light orientations and the capacity of the device to produce the best quality picture.
How is your sound going to be like? If you are going to talk in the video, it is recommended that you use a microphone. Or else, you can also use background sound. But to mix sound with the video, you’d need an excellent sound editing tool.
Finally, comes the editing and finishing part. Eventually, you’ll need purposive video-editing software to help you work out the video transitions, sound, and visual effects.Choose a toolkit that is easy to learn and that you can get comfortable with so that the job of video editing doesn’t take the focus away from the main task of cooking.

Now, once you have all the essential ingredients to create your video, start practicing. Remember that it is the most natural thing for the first videos to appear amateurish or inept. And that is part of the plan. Don’t be disheartened and keep going.
Make a Cooking Video with Filmora: a Step-by-Step Guide
As one of the easiest-to-use video editing tools, the full-featured Filmora is the right choice considering it can fit most of your needs. Moreover, you’d be delighted to know that the software also has a series of features and functions and even tutorial videos dedicated to cooking videos.


Step 1: Filming the Video
Whether you are going to present a traditional cook-with-me style video or feature the contemporary “jump-cut” style focusing on speedy short videos, you need to prepare all the equipment and ingredients to suit the frame by frame shots. Consider spills, drops, overcooking, etc. as part of the process, so keep adequate substitutes to continue with your project unwaveringly. If you are using a phone, keep it fully charged up. And have a plan beforehand about what you should do when you get an urgent call while shooting. Also, consider doing a site investigation of the shooting spot for any fragile items, pointy corners, slippery areas, curious pets, etc. to avoid trips and falls in the middle of the filming, especially when working with a cameraman who’s following your movement. If you are using a tripod, and floor-standing lights, remember to secure the equipment with plenty of adhesive tapes, lest they bump into an expensive trip or fall.
Step 2: mport Your Video In Filmora
You need to sync the device that you used to film the video with the computer that has Filmora installed. It may be a phone or a camcorder. Once the devices are synced, you should launch the Filmora software and go the “Media” button at the top right toolbar. There you will find the “Import” button. You will get a pop-up message asking you to choose the type of device. Select the right one, and your video will be imported in the Filmora interface.
Step 3: Edit Video Pace: Time-Lapse, Jump Cut, Slow Motion
To create crisp, fast-paced videos, you don’t have to gobble up the content eyeing at the duration. Think smart when you have the resources of a tool like Filmora. Here are the three best features that help you create fast-paced yet well-defined recipes.
Time-Lapse: The time-lapse feature allows you to adjust the speed of the video from slow-motion to 10x faster. To use this, double click on a specific clip in your imported video and open the custom speed settings. Use the adjusting meter beside speed to make your clip as fast or slow as you want. You may use the same feature to introduce the slow-motion effects in certain areas of the video.
Now, when you are using either the fast-forward or slow-motion effects, it is best to have stable video footage with consistent lighting and a static background. There are also the options of Reverse Speed that can play the clip backward, as in flash-back. The Ripple edit feature allows you to cut short a long clip seamlessly.
Jump Cut: The Jump Cut is about snipping unwanted areas in the clip. It may sound like the Ripple edit mentioned above, but the ripple edit is more functional for cutting short a continuous video so that the viewer won’t realize the snip. For the Jump Cut, it doesn’t have to be a constant clip. You can get to the next frame or scene with an abracadabra move.
To use Jump Cut, place the cursor over the starting of the clip that you want to cut, and right-click on it and select “Split” (the “scissors” feature on the toolbar does the same thing). To make this look neat, preview the portion of the clip once again and delete the cuts between two clips with the same right-click.
Step 4: Understanding Transitions on Filmora
Transitions make your video more interactive and help you segregate the video from frame-to-frame with effects like dissolve, fade, flash, etc. there are numerous transition options available within the Filmora suit.
The best way to do this drag and drop the clips on the timeline is to trim parts of the clip to shorten it. Once you have all the clips in place, go to the “Transitions” options at the top toolbar to apply it on the end or start of each clip.
Step 5: Audio, Playback & Sound Edits
There are plenty of options that you can remove background noise, add voiceover, add music, and detach audio from video. Refer to the Audios section from your toolbar.
Step 6: Save to Drive/ Emport/ Publish
Once you are satisfied with your content, then go to Export. Choose the format of the video, MOV, MP4, MPG, etc. and whether you wish to publish directly or save to drive.
Tips to Make Your Cooking Videos Stand Out
- Lighting is your best friend. Invest in some quality spotlights or use the best of daylight.
- Mind your video duration. Short and Simple videos get the most views, but your content should not look incomplete. It is not a fact that long and elaborate videos do not get a place on the table; it is all about the relevance of your content. So don’t stop till you get enough.
- If you appear in the video, keep yourself always look good.
- Keep your video titles relevant and prominent, so that people looking for it can readily find it.
- Have a scrumptious custom thumbnail.
How to Promote Your Cooking Channel on YouTube
- Create an inventory before publishing videos. YouTube vlogging is valued for consistency. If you have a list of 10, 15, 20 videos, then you can have enough time in hand to film your next videos.
- Have a consistent style to create brand recognition. Do you think branding is not for Vlogs? Well, I suppose you might be wrong. Branding is for anyone who uses it.
- Share the link of your YouTube videos on other platforms like Twitter and Facebook.
- Encourage your viewers to comment on the video.
- Explore the different YouTube SEO strategies and use the accurate keywords in your video descriptions with hashtags.
With prior planning and practicing, you are bent on developing more confident moves and camera angles. Once you have that, follow this step by step guide to gain speed and prowess and also enjoy the whole adventure.
Richard Bennett
Richard Bennett is a writer and a lover of all things video.
Follow @Richard Bennett
Richard Bennett
Mar 27, 2024• Proven solutions
Cooking and food-oriented videos are among the most outreaching and popular categories of content to publish online, notably, on YouTube, Facebook, or Instagram. So if you are a cooking aficionado, you have excellent potential to gain positive attention and a loyal audience. But to create engaging videos, you’d need a lot more than excellent culinary skills. This article aims to enlighten aspiring food and recipe vloggers about the essentials of video making straight out of the oven, to create enriched content that’s professional, neat, and viral-worthy.
- Part 1: What to Prepare Before Making a Recipe Video?
- Part 2: Make a Cooking Video with Filmora: a Step-by-Step Guide
- Part 3: Tips to Make Your Cooking Videos Stand Out
- Part 4: How to Promote Your Cooking Channel on YouTube?
What to Prepare Before Making a Recipe Video
While you would know best about the prep work needed for the recipes, the prep work for making a video starts with a plan. What goes into the plan?
Brainstorm this equation - Main Content + Duration + Light + Sound + Camera + Camera Angle, Shots & Transition.
The main content is how you picture the finished video. Ask yourself - Do you want an intro gig? Are you going to talk in the video or show only hands and the cooking with a piece of background music? How do you wish to present the ingredients? Would there be additional tips? At what platform are you going to publish your content? How long should be your clippings? Consider all these questions to chalk out a basic framework of your video
The camera is a pivotal element. Whether it is a smartphone or a hi-fidelity digital camera, it is worthwhile to familiarise the best positions and light orientations and the capacity of the device to produce the best quality picture.
How is your sound going to be like? If you are going to talk in the video, it is recommended that you use a microphone. Or else, you can also use background sound. But to mix sound with the video, you’d need an excellent sound editing tool.
Finally, comes the editing and finishing part. Eventually, you’ll need purposive video-editing software to help you work out the video transitions, sound, and visual effects.Choose a toolkit that is easy to learn and that you can get comfortable with so that the job of video editing doesn’t take the focus away from the main task of cooking.
Now, once you have all the essential ingredients to create your video, start practicing. Remember that it is the most natural thing for the first videos to appear amateurish or inept. And that is part of the plan. Don’t be disheartened and keep going.
Make a Cooking Video with Filmora: a Step-by-Step Guide
As one of the easiest-to-use video editing tools, the full-featured Filmora is the right choice considering it can fit most of your needs. Moreover, you’d be delighted to know that the software also has a series of features and functions and even tutorial videos dedicated to cooking videos.
Step 1: Filming the Video
Whether you are going to present a traditional cook-with-me style video or feature the contemporary “jump-cut” style focusing on speedy short videos, you need to prepare all the equipment and ingredients to suit the frame by frame shots. Consider spills, drops, overcooking, etc. as part of the process, so keep adequate substitutes to continue with your project unwaveringly. If you are using a phone, keep it fully charged up. And have a plan beforehand about what you should do when you get an urgent call while shooting. Also, consider doing a site investigation of the shooting spot for any fragile items, pointy corners, slippery areas, curious pets, etc. to avoid trips and falls in the middle of the filming, especially when working with a cameraman who’s following your movement. If you are using a tripod, and floor-standing lights, remember to secure the equipment with plenty of adhesive tapes, lest they bump into an expensive trip or fall.
Step 2: mport Your Video In Filmora
You need to sync the device that you used to film the video with the computer that has Filmora installed. It may be a phone or a camcorder. Once the devices are synced, you should launch the Filmora software and go the “Media” button at the top right toolbar. There you will find the “Import” button. You will get a pop-up message asking you to choose the type of device. Select the right one, and your video will be imported in the Filmora interface.
Step 3: Edit Video Pace: Time-Lapse, Jump Cut, Slow Motion
To create crisp, fast-paced videos, you don’t have to gobble up the content eyeing at the duration. Think smart when you have the resources of a tool like Filmora. Here are the three best features that help you create fast-paced yet well-defined recipes.
Time-Lapse: The time-lapse feature allows you to adjust the speed of the video from slow-motion to 10x faster. To use this, double click on a specific clip in your imported video and open the custom speed settings. Use the adjusting meter beside speed to make your clip as fast or slow as you want. You may use the same feature to introduce the slow-motion effects in certain areas of the video.
Now, when you are using either the fast-forward or slow-motion effects, it is best to have stable video footage with consistent lighting and a static background. There are also the options of Reverse Speed that can play the clip backward, as in flash-back. The Ripple edit feature allows you to cut short a long clip seamlessly.
Jump Cut: The Jump Cut is about snipping unwanted areas in the clip. It may sound like the Ripple edit mentioned above, but the ripple edit is more functional for cutting short a continuous video so that the viewer won’t realize the snip. For the Jump Cut, it doesn’t have to be a constant clip. You can get to the next frame or scene with an abracadabra move.
To use Jump Cut, place the cursor over the starting of the clip that you want to cut, and right-click on it and select “Split” (the “scissors” feature on the toolbar does the same thing). To make this look neat, preview the portion of the clip once again and delete the cuts between two clips with the same right-click.
Step 4: Understanding Transitions on Filmora
Transitions make your video more interactive and help you segregate the video from frame-to-frame with effects like dissolve, fade, flash, etc. there are numerous transition options available within the Filmora suit.
The best way to do this drag and drop the clips on the timeline is to trim parts of the clip to shorten it. Once you have all the clips in place, go to the “Transitions” options at the top toolbar to apply it on the end or start of each clip.
Step 5: Audio, Playback & Sound Edits
There are plenty of options that you can remove background noise, add voiceover, add music, and detach audio from video. Refer to the Audios section from your toolbar.
Step 6: Save to Drive/ Emport/ Publish
Once you are satisfied with your content, then go to Export. Choose the format of the video, MOV, MP4, MPG, etc. and whether you wish to publish directly or save to drive.
Tips to Make Your Cooking Videos Stand Out
- Lighting is your best friend. Invest in some quality spotlights or use the best of daylight.
- Mind your video duration. Short and Simple videos get the most views, but your content should not look incomplete. It is not a fact that long and elaborate videos do not get a place on the table; it is all about the relevance of your content. So don’t stop till you get enough.
- If you appear in the video, keep yourself always look good.
- Keep your video titles relevant and prominent, so that people looking for it can readily find it.
- Have a scrumptious custom thumbnail.
How to Promote Your Cooking Channel on YouTube
- Create an inventory before publishing videos. YouTube vlogging is valued for consistency. If you have a list of 10, 15, 20 videos, then you can have enough time in hand to film your next videos.
- Have a consistent style to create brand recognition. Do you think branding is not for Vlogs? Well, I suppose you might be wrong. Branding is for anyone who uses it.
- Share the link of your YouTube videos on other platforms like Twitter and Facebook.
- Encourage your viewers to comment on the video.
- Explore the different YouTube SEO strategies and use the accurate keywords in your video descriptions with hashtags.
With prior planning and practicing, you are bent on developing more confident moves and camera angles. Once you have that, follow this step by step guide to gain speed and prowess and also enjoy the whole adventure.
Richard Bennett
Richard Bennett is a writer and a lover of all things video.
Follow @Richard Bennett
Beat Drops in Seconds: A Beginner’s Guide to Music Videos
Create High Quality YouTube Video - Wondershare Filmora
An easy and powerful YouTube video editor
Numerous video and audio effects to choose from
Detailed tutorials provided by the official channel
The entertainment industry is continually taking the world by storm. Lots of improvements are on the rise, especially online. Several apps are now at your fingertip, and you can access lots of videos and music right from your mobile phone. The social media platform has made it easy for millions of users to access information from other creators and editors. From Facebook, Instagram, WhatsApp, and the new kid in the block YouTube Shorts. And being that YouTube streaming service already harbors many users, Shorts has just come at the right time, with ready users at hand. Additionally, YouTube shorts music will spice up your listening experience like never before.
In this article
02 Which role does music play in YouTube Shorts?
03 YouTube Shorts Music - Things You Need to Know
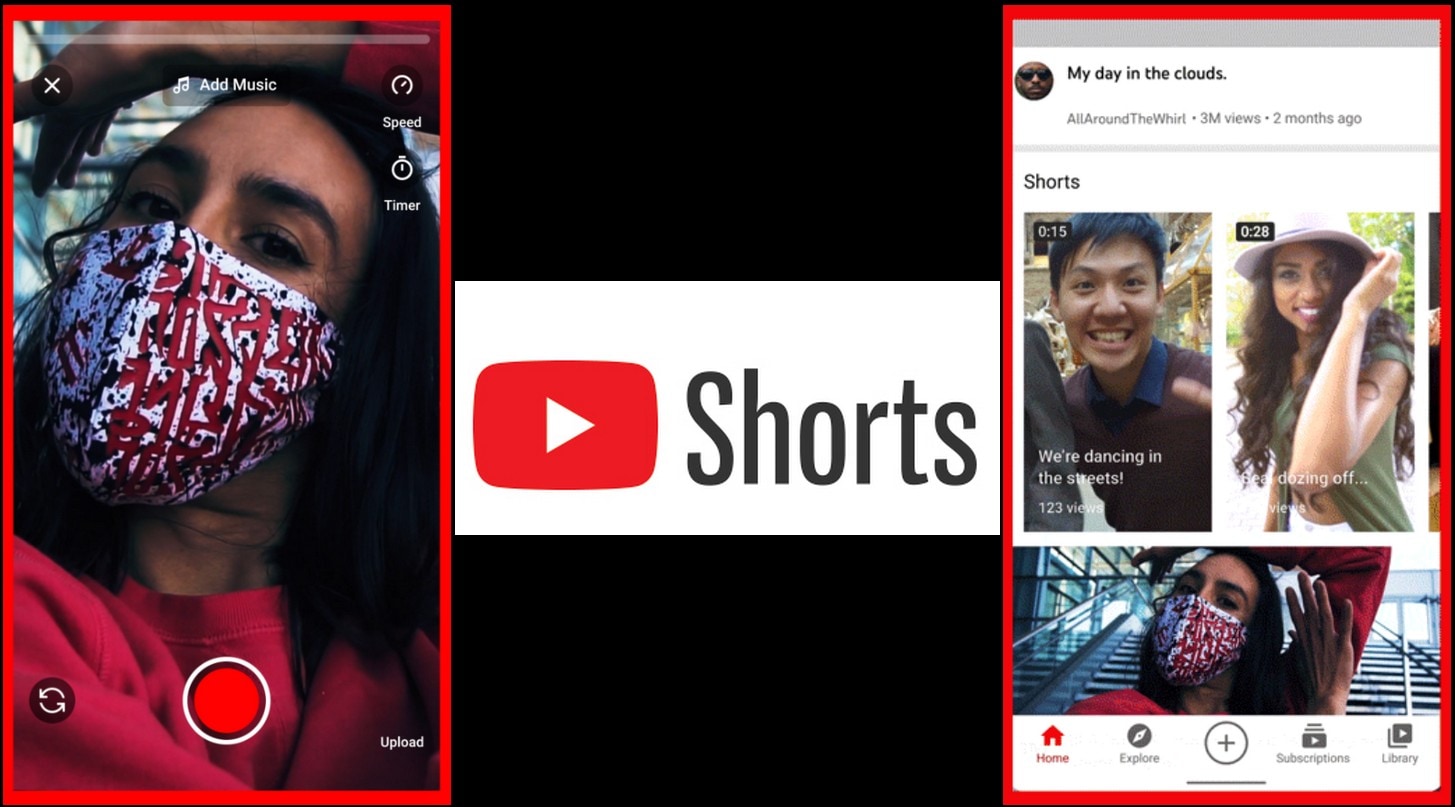
What are YouTube Shorts?
YouTube Shorts is an app feature in YouTube that was introduced in 2020. It has so far rolled out in more than 100 countries. It enables both artists and creators to compose short videos to express any feeling. It could be for entertainment or educational purposes. However, the videos are short, not exceeding 60 seconds, with a default length of 15 seconds. You also have the option to record your videos with music to add value to your video.
YouTube Shorts has two main features; a platform to watch short videos and a tool you can use to compose your own short-form videos. To watch the clip, just go to the “Homepage” and find several thumbnails for popular Shorts. Then click on a video and land on the vertical video player to watch the video. Likewise, you can use the thumbs up or down to like or dislike the video. Additionally, you can pause the video and post a comment or share the Shorts with other fans.
Which role does music play in YouTube Shorts?
Music is always soothing to the soul. And using YouTube shorts music is a quick way to boost your video performance. Check below the importance of using music in your Shorts.
- Generates important emotions
Music creates a good mood, giving your audience a positive feeling towards your YouTube Shorts. Any sound will touch the listener, making the videos more interesting and beautiful.
- Music is memorable
If you use a particular tune, then there is a way your listeners will think directly of you when they hear the tune. It gives more value to the Shorts. Choosing the right music for your Shorts video is also important .
- Music represents who you are
You may put across your message via Shorts but adding some music will help the viewer directly imagine your identity.
- For effective message
Music can stimulate actions, causing immediate attraction to the listener. Use YouTube Shorts music to emphasize the overall story.
YouTube Shorts Music - Things You Need to Know
1. How to add music to your YouTube Shorts video?
As a creator, it is ideal to know how to add music to your YouTube Shorts video. Follow these steps to add music using the YouTube Shorts creator tool camera.
Step 1. First, select the Shorts video that you want to add music to.
Step 2. Then click on the “YouTube Shorts creator camera” tool.
Step 3. You’ll then be directed to your camera where you’ll find the “Add Music” option.
Step 4. Then find a “Library of songs” from popular artists that you can use. Select the song you wish to use.
Step 5. Finally, tap the “Use This Sound” option found at the bottom of the screen. Then just cue up what part of the song to use on your Shorts and go-ahead to record and upload the video.
2. The sources of music for YouTube Shorts?
You can use any music clip as long as it is not a copyrighted piece of music. Bellow are common sources where to find background music for YouTube Shorts video.
YouTube Audio Library: This is the first place to source YouTube Shorts music. YouTube is free and contains tons of free songs. You can sort your selection by duration, genre, instrument, mood, etc. To access music, go to the “Creator Studio” > “Create” > “Audio Library” and select which music to use.
Free Music Archive: This is another free site where you can discover an array of curated background music for any type of content. You’ll get more than 1,500 tracks at the tap of a button.
SoundCloud: SoundCloud streaming music service lets you use its “Creative Commons” music as long as you follow the guidelines that are laid down by the artist.
Converted music from your computer: You can also download and convert available songs from Spotify, Amazon Music, Tidal, among other streaming services. Just get a music converter tool that will remove encryption from the tracks to make it free for use forever.
3. How to extend music on YouTube Shorts?
Even though the typical duration for YouTube Shorts music is 15 seconds, you can make them longer up to 60 seconds. Just record multiple clips at 15 seconds intervals that add up to 60 seconds.
4. Can I use my own audio in YouTube Shorts?
Yes, you can use your audio in YouTube Shorts. Several converter apps are available for downloading and converting music to playable formats. Filmora is one available tool that will provide free music and let you edit your videos with minimal effort. More so, you can import and export your music in any format to make stunning YouTube Shorts videos.
Key Features of Filmora
- Edit and export your videos at a high resolution of up to 4K
- Use it to add animated messages from the titles and text library
- Easily adjust the audio of each music track on your timeline
- Add any mood with its royalty-free songs and sound effects to YouTube Shorts videos
How to add a music track to your video with Filmora
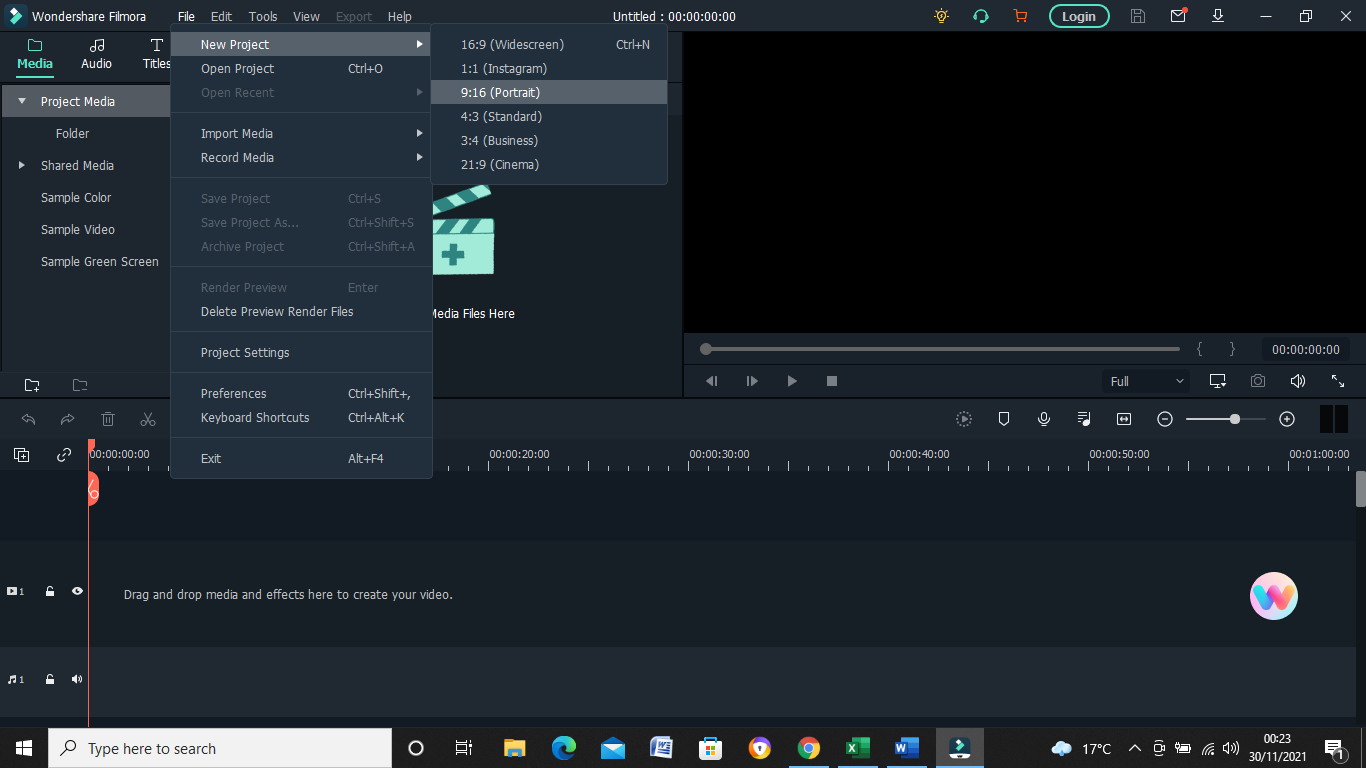
1. First, open up Filmora and go to “Project Settings” and select the “Change project aspect ratio” option.
2. From the aspect ratio, select “9:16” portrait.
3. Then set the resolution according to your preference.
4. Next, select the “Frame rate” according to your existing video that you wish to convert into Shorts. Hit the “OK” button to save the settings.
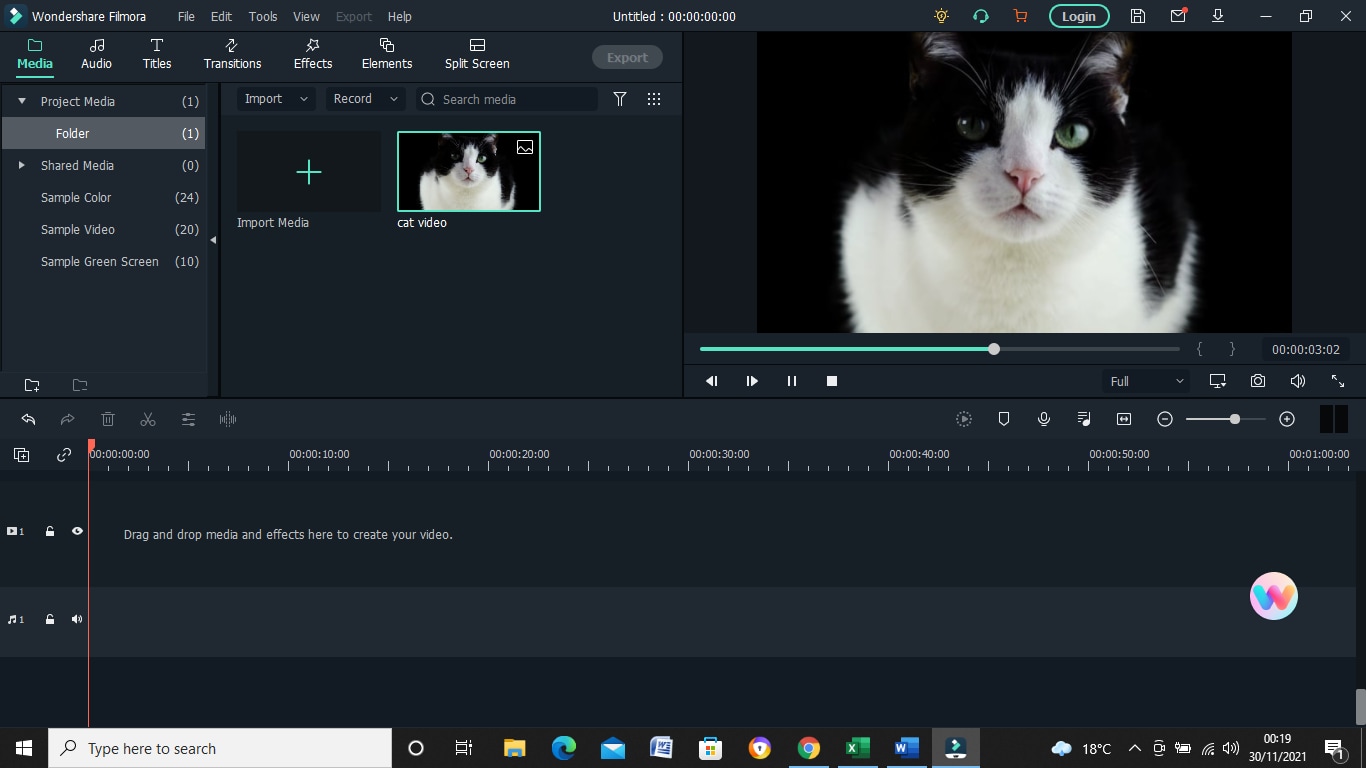
5. Drag and drop your footage onto the timeline. Ensure you keep the project settings.
6. You can add text or music to your footage. To add music, first, download music from YouTube or other sources into your computer.
7. Then click on the “Audio” option from the “Menu” bar and choose music that’s already available on your PC.
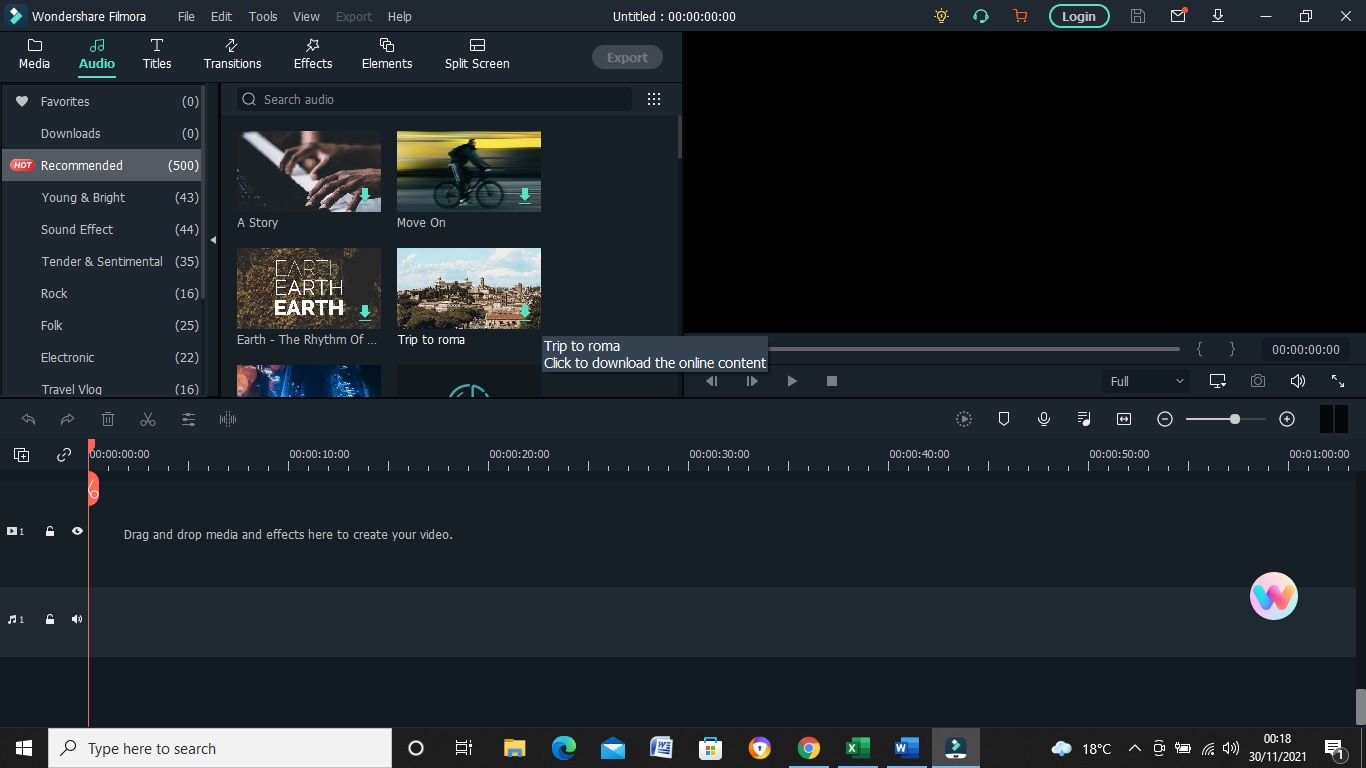
8. Next, import the music to the video. Just click on the “File” > “Import File” > “Import Video Files” option.
9. Click on the “+” icon to add the music to your video.
10. You’ll then have the song onto your project.
For Win 7 or later (64-bit)
For macOS 10.12 or later
5. Do artists earn royalties from Shorts?
Yes. Artists do receive some revenue from their music if creators use their songs in YouTube Short videos. Royalties come from ad revenue but it will depend on the type of ad on the video. So, more popular videos get higher rates than non-popular ones.
6. What to post on YouTube Shorts?
You can post several videos to YouTube Shorts which include:
- Tutorials: teach your viewers via YouTube Shorts.
- Confessional videos: This is when you speak to your viewers about what you are passionate about.
- Entertainment videos: You can also entertain your viewers with funny videos.
7. Can I promote my music on YouTube Shorts?
YouTube Shorts is a perfect platform to promote your music if you are an artist. You can either hire an influencer or do it yourself as an artist. These tips will help you to successfully promote your brand.
Be precise: Condense all the important details in your video and ensure the background music aligns with the theme.
Think widely: Check at what others are adding to their Shorts. You can include memes and other entertaining clips.
Post videos more often: Since YouTube Shorts are short videos that can’t accommodate so much information, try to post your videos more often so that your viewers follow up closely on what you are putting across.
Use catchy music: It doesn’t mean that the latest singles are more catchy or viral. Songs from a few years ago can also be equally catchy.
8. How are YouTube Shorts different from other short-form videos?
YouTube streaming service is already a popular platform that provides tones of music and video clips. Encompassing Shorts just pushed it at the forefront. The userbase is readily available and any Shorts you post will be widely viewed in over 100 countries. More so, you can extract music from the platform for use on your Shorts videos.
Conclusion
You can make a great milestone with YouTube Shorts music than if you didn’t use any. Music makes your videos catchy and interesting to viewers. Several platforms are available for sourcing music to use on your Shorts. More so, you can use the recommended app, Filmora, to add free music to your videos.
The entertainment industry is continually taking the world by storm. Lots of improvements are on the rise, especially online. Several apps are now at your fingertip, and you can access lots of videos and music right from your mobile phone. The social media platform has made it easy for millions of users to access information from other creators and editors. From Facebook, Instagram, WhatsApp, and the new kid in the block YouTube Shorts. And being that YouTube streaming service already harbors many users, Shorts has just come at the right time, with ready users at hand. Additionally, YouTube shorts music will spice up your listening experience like never before.
In this article
02 Which role does music play in YouTube Shorts?
03 YouTube Shorts Music - Things You Need to Know
What are YouTube Shorts?
YouTube Shorts is an app feature in YouTube that was introduced in 2020. It has so far rolled out in more than 100 countries. It enables both artists and creators to compose short videos to express any feeling. It could be for entertainment or educational purposes. However, the videos are short, not exceeding 60 seconds, with a default length of 15 seconds. You also have the option to record your videos with music to add value to your video.
YouTube Shorts has two main features; a platform to watch short videos and a tool you can use to compose your own short-form videos. To watch the clip, just go to the “Homepage” and find several thumbnails for popular Shorts. Then click on a video and land on the vertical video player to watch the video. Likewise, you can use the thumbs up or down to like or dislike the video. Additionally, you can pause the video and post a comment or share the Shorts with other fans.
Which role does music play in YouTube Shorts?
Music is always soothing to the soul. And using YouTube shorts music is a quick way to boost your video performance. Check below the importance of using music in your Shorts.
- Generates important emotions
Music creates a good mood, giving your audience a positive feeling towards your YouTube Shorts. Any sound will touch the listener, making the videos more interesting and beautiful.
- Music is memorable
If you use a particular tune, then there is a way your listeners will think directly of you when they hear the tune. It gives more value to the Shorts. Choosing the right music for your Shorts video is also important .
- Music represents who you are
You may put across your message via Shorts but adding some music will help the viewer directly imagine your identity.
- For effective message
Music can stimulate actions, causing immediate attraction to the listener. Use YouTube Shorts music to emphasize the overall story.
YouTube Shorts Music - Things You Need to Know
1. How to add music to your YouTube Shorts video?
As a creator, it is ideal to know how to add music to your YouTube Shorts video. Follow these steps to add music using the YouTube Shorts creator tool camera.
Step 1. First, select the Shorts video that you want to add music to.
Step 2. Then click on the “YouTube Shorts creator camera” tool.
Step 3. You’ll then be directed to your camera where you’ll find the “Add Music” option.
Step 4. Then find a “Library of songs” from popular artists that you can use. Select the song you wish to use.
Step 5. Finally, tap the “Use This Sound” option found at the bottom of the screen. Then just cue up what part of the song to use on your Shorts and go-ahead to record and upload the video.
2. The sources of music for YouTube Shorts?
You can use any music clip as long as it is not a copyrighted piece of music. Bellow are common sources where to find background music for YouTube Shorts video.
YouTube Audio Library: This is the first place to source YouTube Shorts music. YouTube is free and contains tons of free songs. You can sort your selection by duration, genre, instrument, mood, etc. To access music, go to the “Creator Studio” > “Create” > “Audio Library” and select which music to use.
Free Music Archive: This is another free site where you can discover an array of curated background music for any type of content. You’ll get more than 1,500 tracks at the tap of a button.
SoundCloud: SoundCloud streaming music service lets you use its “Creative Commons” music as long as you follow the guidelines that are laid down by the artist.
Converted music from your computer: You can also download and convert available songs from Spotify, Amazon Music, Tidal, among other streaming services. Just get a music converter tool that will remove encryption from the tracks to make it free for use forever.
3. How to extend music on YouTube Shorts?
Even though the typical duration for YouTube Shorts music is 15 seconds, you can make them longer up to 60 seconds. Just record multiple clips at 15 seconds intervals that add up to 60 seconds.
4. Can I use my own audio in YouTube Shorts?
Yes, you can use your audio in YouTube Shorts. Several converter apps are available for downloading and converting music to playable formats. Filmora is one available tool that will provide free music and let you edit your videos with minimal effort. More so, you can import and export your music in any format to make stunning YouTube Shorts videos.
Key Features of Filmora
- Edit and export your videos at a high resolution of up to 4K
- Use it to add animated messages from the titles and text library
- Easily adjust the audio of each music track on your timeline
- Add any mood with its royalty-free songs and sound effects to YouTube Shorts videos
How to add a music track to your video with Filmora
1. First, open up Filmora and go to “Project Settings” and select the “Change project aspect ratio” option.
2. From the aspect ratio, select “9:16” portrait.
3. Then set the resolution according to your preference.
4. Next, select the “Frame rate” according to your existing video that you wish to convert into Shorts. Hit the “OK” button to save the settings.
5. Drag and drop your footage onto the timeline. Ensure you keep the project settings.
6. You can add text or music to your footage. To add music, first, download music from YouTube or other sources into your computer.
7. Then click on the “Audio” option from the “Menu” bar and choose music that’s already available on your PC.
8. Next, import the music to the video. Just click on the “File” > “Import File” > “Import Video Files” option.
9. Click on the “+” icon to add the music to your video.
10. You’ll then have the song onto your project.
For Win 7 or later (64-bit)
For macOS 10.12 or later
5. Do artists earn royalties from Shorts?
Yes. Artists do receive some revenue from their music if creators use their songs in YouTube Short videos. Royalties come from ad revenue but it will depend on the type of ad on the video. So, more popular videos get higher rates than non-popular ones.
6. What to post on YouTube Shorts?
You can post several videos to YouTube Shorts which include:
- Tutorials: teach your viewers via YouTube Shorts.
- Confessional videos: This is when you speak to your viewers about what you are passionate about.
- Entertainment videos: You can also entertain your viewers with funny videos.
7. Can I promote my music on YouTube Shorts?
YouTube Shorts is a perfect platform to promote your music if you are an artist. You can either hire an influencer or do it yourself as an artist. These tips will help you to successfully promote your brand.
Be precise: Condense all the important details in your video and ensure the background music aligns with the theme.
Think widely: Check at what others are adding to their Shorts. You can include memes and other entertaining clips.
Post videos more often: Since YouTube Shorts are short videos that can’t accommodate so much information, try to post your videos more often so that your viewers follow up closely on what you are putting across.
Use catchy music: It doesn’t mean that the latest singles are more catchy or viral. Songs from a few years ago can also be equally catchy.
8. How are YouTube Shorts different from other short-form videos?
YouTube streaming service is already a popular platform that provides tones of music and video clips. Encompassing Shorts just pushed it at the forefront. The userbase is readily available and any Shorts you post will be widely viewed in over 100 countries. More so, you can extract music from the platform for use on your Shorts videos.
Conclusion
You can make a great milestone with YouTube Shorts music than if you didn’t use any. Music makes your videos catchy and interesting to viewers. Several platforms are available for sourcing music to use on your Shorts. More so, you can use the recommended app, Filmora, to add free music to your videos.
Also read:
- Earnings Epicenter Tech Gaming on YouTube for 2024
- Screenplay Grooves Best Background Tunes For YT Shorts
- Quick & Easy Guide to Turn Videos Into Animated GIF Delights
- [Updated] Eclipsing Fears in Your First 10 Videos
- 2024 Approved Becoming a Confident Content Creator YouTube's Top Tips
- [Updated] Capturing the Unseen 9 Must-Have CamGear for Aspiring Vloggers
- Love's Cinematic Journey YouTube & Vimeo's Top Premium Marriage Videos
- A Step-by-Step Approach to Discard YouTube Watch Later Items
- Eliminate Your Streaming Darkness on YouTube for 2024
- Comedic Counterpoints Funny Song Flips
- Financial Gains The Youtube Money Flow From 1M Views
- [New] A Compreenas Guide to Choosing Ideal Lenses for Filmmaking
- [New] Effective Approach to Swiftly Eliminate Video Comments
- [Updated] Editing Savvy Streamlining Your YouTube Video Lengths
- [New] 10 Fastest Growing YouTube Channels to Light Up Your Mind
- [Updated] Avoiding Files, Enjoying Animated GIFs YouTube Video Mastery
- In 2024, Evolving Tactics for Crafting Immersive Mukbang Sessions
- Comprehensive Assessment of Digital Entertainers for 2024
- The Art & Science Behind Effective YouTube Shorts Templates
- Cultivating Your Persona in the World of Gamers
- A Compreayer's Guide to Growth Updating YouTube Metadata for 2024
- [Updated] 8 Essential Tools for Your YouTube-to-AVI Needs
- Charting a Course to Your Signature Sphere for 2024
- [Updated] Efficiently Edit Your YouTube Videos Using Sony Vegas
- [Updated] Elevating Your Streaming Experience Switching Between Spotify & YouTube Music
- Profit in the Space-Time Continuum The Art of Creating Earning-Rich Content
- Resetting Your YouTube Reputation
- Explore 10 Premium YouTube-to-WebM Converter Tools
- Conquer the Blackened Canvas of YouTube
- [New] Audiences Delighted Best Editors to Transform Youtube Shorts
- New Exploring Androids Premier Sound Editing Tools A Top-10 List that Doesnt Feature Audacity for 2024
- [New] 2024 Approved The Art of Retention Capturing GIFs From Social Media
- Updated Proving Ground The Six Finest Voice Alteration Applications on Chromebooks to Test Out - PhotoShopProX
- How to Transfer Data After Switching From Infinix Zero 30 5G to Latest Samsung | Dr.fone
- These Titles Emphasize the Process or Techniques Involved in Removing or Isolating Audio From Video Content, Maintaining a Similar Meaning and Focus as How to Remove Audio From Video.
- In 2024, Is Your iPhone 6 in Security Lockout? Proper Ways To Unlock
- New Say Goodbye to Camera Shake After Effects Stabilization Techniques for 2024
- Updated 2024 Approved Best iPhone and iPad Apps for Movie Trailers
- How to Transfer from Apple iPhone 15 to iPhone 8/11/11 Pro | Dr.fone
- 5 Ways to Track Vivo Y100A without App | Dr.fone
- Flashback Flair Top 80S Video Tricks for a Contemporary Edge
- How to Change GPS Location on Sony Xperia 1 V Easily & Safely | Dr.fone
- Top 8 Stop Motion Animation Software for Mac and PC
- [New] A Jargon Primer for Virtual Experiences
- [Updated] 2024 Approved Streamlining the Process of Saving PS3 Gaming Moments
- Updated Unveiling the Sound of Distress in Dogs The Yelps and Barks
- Title: "[New] Epicurean Epiphanies Filming Feast Creation"
- Author: Brian
- Created at : 2024-05-25 12:41:29
- Updated at : 2024-05-26 12:41:29
- Link: https://youtube-video-recordings.techidaily.com/new-epicurean-epiphanies-filming-feast-creation/
- License: This work is licensed under CC BY-NC-SA 4.0.
