
!["[New] Enhancing Visuals The Role of a Tripod in Video Content"](https://www.lifewire.com/thmb/oHTufqCy4m-EAi0EdF8K11jJiKY=/400x300/filters:no_upscale():max_bytes(150000):strip_icc()/Robot-Painting-b5663366b8394cc8b8d8a0f4b3cec51d.jpg)
"[New] Enhancing Visuals The Role of a Tripod in Video Content"
Enhancing Visuals: The Role of a Tripod in Video Content
How To Use a Tripod for Vlogging

Richard Bennett
Mar 27, 2024• Proven solutions
As you grow into a serious vlogger, a tripod will become an essential piece of equipment. You can get by for a long time setting your camera up on a stack of books, or an upside-down laundry hamper, but not forever. While these setups are great for a beginner, an intermediate vlogger will start to find them limiting. Even if you are an amazingly creative person who can create any camera setup without a tripod there will come a point where you will decide your creative energy is better spent on your video content.
This article will explain how to use a tripod and then introduce you to four different types.
Part 1: How To Set a Tripod for Vlogging
1. Setting Up Your Tripod
Step 1 – Pull out all three legs of your tripod and make sure it is standing stably. There will be tensioners on the legs which you can release in order to adjust your height. Once your legs are extended to the height you want continue adjusting them until your tripod is level. Some tripods have a built in bubble level, but if yours does not you can use a separate bubble level or make a guestimate.
Make sure when you are setting up your tripod that you point one of its legs towards your subject. This will give you room to stand behind your camera, in-between the other two legs. If you have one leg pointed directly behind your camera then you may trip over it. Or, you may knock over and damage your camera.
Step 2 – On the top of your tripod there will be a plate with a small hole and a screw. Remove this plate using either a clip or lever, depending on your tripod. Once your plate is detached screw it into the bottom of your camera. It should be tight, but not too tight or you risk damaging your camera.
Step 3 – Attach your plate, which now has your camera mounted to it, back onto your tripod.
Your tripod comes with a ‘head’. Your tripod’s head is what your camera is mounted on top of. There are several different types of tripod heads and mounts which are all useful for different things.
Ball Heads and Pan/Tilt Heads are the two most common types of tripod heads. Ball Heads allow you to adjust your camera’s position quite a bit before you start shooting. They are not good for adding in camera movements while you are filming, however, because you need to lock them in place. Pan/Tilt heads are great for creating camera movement. Most Pan/Tilt heads have a handle which you can use to make a smooth panning motion.
Part 2: Why Do You Need a Tripod: Benefits of Using Tripod
Why can’t you just hold a camera in your hand while shooting vlog entries for your YouTube channel? Honestly, you can, but the camera may shake a lot and your footage might end up being unusable. Putting a camera on a tripod reduces the probability of camera shake to the minimum and that is just the tip of the iceberg.
A huge amount of vlogs can be described as sit down videos, in which the host of the video sits in front of a camera and talks to the audience. Holding a camera while talking or trying to present a product to the viewers is next to impossible, so in order to avoid having to deal with a camera, you can simply put it on a tripod, find the best angle, and push the record button.
On the go videos, are recorded at exterior locations, and a lot of YouTubers choose to shoot these types of videos handheld, but this approach makes it difficult to maintain the same shot composition for long. A Monopod, Gorillapod or just a simple selfie stick can make your job much easier because they stabilize the camera. In addition, shooting smooth panning shots without a tripod is as difficult as it sounds.
Part 3: A Few Things You’ll Need to Consider Before You Buy a Tripod
There are thousands of different tripod models you can use for vlogging, but which model you’re going to choose depends mostly on the type of vlog you want to make. If you are planning on shooting all of your videos in the studio-like conditions, then portability isn’t such an important feature, while quite the opposite is true if you intend on filming all of your footage on outdoor locations.
However, there are certain traits you have to consider when choosing a tripod you’re going to use while recording your vlog entries.
Sturdiness: There is absolutely no point in spending money on a tripod that breaks easily. Although if your plan is to shoot vlogs at home or in a studio, then buying a cheaper plastic tripod isn’t such a bad option, since the clamps and joints won’t have to endure a lot of wear and tear. Consider buying a more durable tripod if you are going to be traveling a lot while working on your vlogs.
The Type of Camera: A number of factors can contribute to the weight of a camera, including battery grips or lenses, so before you buy a tripod make sure that it can support the weight of the camera you want to use to record your videos.
The Maximum Height: Most vloggers don’t really have to worry about how tall their tripod is, because they are not on their feet in any of the shots featured in the video. Vloggers working on DIY videos, cooking tutorials or any other type of vlog that involves movement and action should pay attention to this trait.
Photo or Video Tripods: Do you want to take beautiful panning shots? If the answer is yes then you should get a video tripod that enables you to move the camera smoothly in any direction. Photo tripods are a great option for static shots that don’t involve a lot of camera movement.
Mobility: The heavier a tripod is, the more stability it can provide, but carrying a tripod that weighs over 10 pounds to shoot sports or adventure vlogs can be a tiring endeavor. Although portability is a factor, it shouldn’t prevent you from buying a high-quality tripod that will ensure your footage is perfectly smooth and stable.
Part 4: 4 Types of Tripods
Full-Sized Tripods: are very sturdy, and as a result can be fairly heavy. Although you can take them a lot of places they are not convenient to carry for extended periods of time. They are the most reliable way to ensure you have absolutely no camera shake.
Compact Tripods: appear to be the same size as Full-Sized tripods, but they are actually much lighter. You can get the same height with a Compact Tripod as a Full-Sized tripod and it will be much easier to travel with. However, Compact Tripods are not as stable. If you are shooting for an extended period of time you may need to weigh your Compact Tripod down with sandbags to keep it steady.
Gorillapods: have flexible legs which can be wrapped around posts, fences, or anything else you may want to mount your camera on. They are also lightweight enough that you can carry them around while you shoot. If you bend it right you can essentially use your Gorillapod as a heavy-duty selfie-stick for your camera.
Table-Top Tripods: are very small and easy to travel with. You can leave one in your camera bag or your glove box. Table-Top Tripods are meant to be set up on top of desks or other stable surfaces and may not be ideal for heavier cameras.
Part 5: The 5 Best Tripods For YouTube Vlogging
Even if you know everything there is to know about tripods, the selection process can be daunting. That’s why we’ve shortlisted the top 5 tripods on the market, in an effort to make finding the right tripod for your vlog videos as quick an easy as it can possibly be. Let’s have a look.
1. CamRah Smartphone Tripod
Price: $24.99

An increasing number of Smartphones features powerful cameras that can record videos at high resolutions. Unfortunately, most iPhones and Android devices are lightweight, which makes it difficult to hold them perfectly still while shooting a video. CamRah Smartphone Tripod offers a perfect solution to this problem because it is easy to pack and you can carry it wherever you go, without needing the extra space.
It weighs just 0.6lbs and it is 10.8 inches tall. The tripod has a maximum load of 11lbs which means that besides Smartphones, you can also mount action cameras, webcams, or even smaller DSLR cameras onto it. The flexible legs made from high-density foam offer stability even when the CamRah Tripod is placed on an uneven surface.
Pros:
- Easily portable
- Affordable
- Jaws technology provides an extra strong grip of the camera
Cons:
- The tripod’s legs can’t be extended
- Can’t be used with professional cameras
2. Manfrotto Mini Travel Tripod
Price: $34.99

Yet another great option for shooting vlogs with a Smartphone. The Manfrotto Mini Travel Tripod kit is also an excellent choice for all vloggers who shoot their videos with compact cameras. The tripod weighs just 0.51lbs and it is 5.31 inches tall, which makes it a perfect travel companion. However, it can’t support cameras heavier than 2.2lbs, so you have to carefully choose the camera you want to put on this tripod.
The tripod’s rotatable head features a lock button that enables you to fix the camera at a certain position and to shoot a video from an angle you selected. You can’t extend the legs on this tripod so shooting high angle shots is not an option.
Pros:
- Small and durable
- Allows you to mount almost any Smartphone model
- Compatible with compact cameras
Cons:
- Limits your shot selection
- Tripod’s legs can’t be extended
3. Joby Gorilla Pod
Price: $22.50

This tripod is a superstar in the vlogging community because it is flexible, easy to set up and it fits into a pocket. Joby Gorilla Pod’s legs are segmented, so you can freely choose an angle from which you want to shoot, without having to worry about the camera’s stability. You can use this tripod on flat and uneven surfaces equally effectively.
Joby Gorilla weighs just 1lbs and its maximum height 11.6 inches, which makes it perfectly suited for talking heads videos. Using this tripod while you are on the go is also an option if you have a camera that weighs less than 3lbs.
Pros:
- Highly adjustable
- Sturdy and Lightweight
- Made from stainless steel
Cons:
- Can’t be used for panning shots
- Legs can be extended for just one inch
4. Manfrotto Compact Action Tripod
Price: $64.49
If you love shooting your vlogs at night or if you simply want a tripod you can use in the studio an outdoor conditions, then Manfrotto’s Compact Action Tripod is one the best options you have at your disposal. The ergonomic head features a mounting plate that is easy to use and which provides a perfect grip of a camera.
This tripod is designed to be used with consumer-level DSLR cameras, but you can use it to shoot videos with almost all types of cameras. The Compact Action Tripod has a maximum height of 51.57 inches, and it can’t hold cameras heavier than 3.30lbs.
Pros:
- Suitable for both photography and video
- Great for outdoor use
- Allows you to take a wide variety of shots
Cons:
- Can’t support a lot of weight
- Not perfectly suited for professional-level cameras
5. Magnus VT-4000 Fluid Head Tripod
Price: $159.95
Experienced vloggers who record their videos with professional cameras, will enjoy using the Magnus VT-4000 Fluid Head Tripod. The 59-inch tall tripod can support as much as 8.8lbs of weight, and it is designed to help you create perfectly stable shots. The superb panning and tilting option enable you to move your camera freely while recording smooth shots, free of camera shakes.
The quick release mounting plate is compatible with a wide range of cameras, so you can experiment and work with several different cameras while using the same tripod. You can hardly make a mistake if you choose to buy this tripod because you’ll be able to use it to record vlogs at interior and exterior locations.
Pros:
- Easily adjustable to any surface
- Perfect for high angle shots
- Heavy-duty locks
Cons:
- Weighs 7.9lbs
- Not the best choice for action and adventure vlogs
Richard Bennett
Richard Bennett is a writer and a lover of all things video.
Follow @Richard Bennett
Richard Bennett
Mar 27, 2024• Proven solutions
As you grow into a serious vlogger, a tripod will become an essential piece of equipment. You can get by for a long time setting your camera up on a stack of books, or an upside-down laundry hamper, but not forever. While these setups are great for a beginner, an intermediate vlogger will start to find them limiting. Even if you are an amazingly creative person who can create any camera setup without a tripod there will come a point where you will decide your creative energy is better spent on your video content.
This article will explain how to use a tripod and then introduce you to four different types.
Part 1: How To Set a Tripod for Vlogging
1. Setting Up Your Tripod
Step 1 – Pull out all three legs of your tripod and make sure it is standing stably. There will be tensioners on the legs which you can release in order to adjust your height. Once your legs are extended to the height you want continue adjusting them until your tripod is level. Some tripods have a built in bubble level, but if yours does not you can use a separate bubble level or make a guestimate.
Make sure when you are setting up your tripod that you point one of its legs towards your subject. This will give you room to stand behind your camera, in-between the other two legs. If you have one leg pointed directly behind your camera then you may trip over it. Or, you may knock over and damage your camera.
Step 2 – On the top of your tripod there will be a plate with a small hole and a screw. Remove this plate using either a clip or lever, depending on your tripod. Once your plate is detached screw it into the bottom of your camera. It should be tight, but not too tight or you risk damaging your camera.
Step 3 – Attach your plate, which now has your camera mounted to it, back onto your tripod.
Your tripod comes with a ‘head’. Your tripod’s head is what your camera is mounted on top of. There are several different types of tripod heads and mounts which are all useful for different things.
Ball Heads and Pan/Tilt Heads are the two most common types of tripod heads. Ball Heads allow you to adjust your camera’s position quite a bit before you start shooting. They are not good for adding in camera movements while you are filming, however, because you need to lock them in place. Pan/Tilt heads are great for creating camera movement. Most Pan/Tilt heads have a handle which you can use to make a smooth panning motion.
Part 2: Why Do You Need a Tripod: Benefits of Using Tripod
Why can’t you just hold a camera in your hand while shooting vlog entries for your YouTube channel? Honestly, you can, but the camera may shake a lot and your footage might end up being unusable. Putting a camera on a tripod reduces the probability of camera shake to the minimum and that is just the tip of the iceberg.
A huge amount of vlogs can be described as sit down videos, in which the host of the video sits in front of a camera and talks to the audience. Holding a camera while talking or trying to present a product to the viewers is next to impossible, so in order to avoid having to deal with a camera, you can simply put it on a tripod, find the best angle, and push the record button.
On the go videos, are recorded at exterior locations, and a lot of YouTubers choose to shoot these types of videos handheld, but this approach makes it difficult to maintain the same shot composition for long. A Monopod, Gorillapod or just a simple selfie stick can make your job much easier because they stabilize the camera. In addition, shooting smooth panning shots without a tripod is as difficult as it sounds.
Part 3: A Few Things You’ll Need to Consider Before You Buy a Tripod
There are thousands of different tripod models you can use for vlogging, but which model you’re going to choose depends mostly on the type of vlog you want to make. If you are planning on shooting all of your videos in the studio-like conditions, then portability isn’t such an important feature, while quite the opposite is true if you intend on filming all of your footage on outdoor locations.
However, there are certain traits you have to consider when choosing a tripod you’re going to use while recording your vlog entries.
Sturdiness: There is absolutely no point in spending money on a tripod that breaks easily. Although if your plan is to shoot vlogs at home or in a studio, then buying a cheaper plastic tripod isn’t such a bad option, since the clamps and joints won’t have to endure a lot of wear and tear. Consider buying a more durable tripod if you are going to be traveling a lot while working on your vlogs.
The Type of Camera: A number of factors can contribute to the weight of a camera, including battery grips or lenses, so before you buy a tripod make sure that it can support the weight of the camera you want to use to record your videos.
The Maximum Height: Most vloggers don’t really have to worry about how tall their tripod is, because they are not on their feet in any of the shots featured in the video. Vloggers working on DIY videos, cooking tutorials or any other type of vlog that involves movement and action should pay attention to this trait.
Photo or Video Tripods: Do you want to take beautiful panning shots? If the answer is yes then you should get a video tripod that enables you to move the camera smoothly in any direction. Photo tripods are a great option for static shots that don’t involve a lot of camera movement.
Mobility: The heavier a tripod is, the more stability it can provide, but carrying a tripod that weighs over 10 pounds to shoot sports or adventure vlogs can be a tiring endeavor. Although portability is a factor, it shouldn’t prevent you from buying a high-quality tripod that will ensure your footage is perfectly smooth and stable.
Part 4: 4 Types of Tripods
Full-Sized Tripods: are very sturdy, and as a result can be fairly heavy. Although you can take them a lot of places they are not convenient to carry for extended periods of time. They are the most reliable way to ensure you have absolutely no camera shake.
Compact Tripods: appear to be the same size as Full-Sized tripods, but they are actually much lighter. You can get the same height with a Compact Tripod as a Full-Sized tripod and it will be much easier to travel with. However, Compact Tripods are not as stable. If you are shooting for an extended period of time you may need to weigh your Compact Tripod down with sandbags to keep it steady.
Gorillapods: have flexible legs which can be wrapped around posts, fences, or anything else you may want to mount your camera on. They are also lightweight enough that you can carry them around while you shoot. If you bend it right you can essentially use your Gorillapod as a heavy-duty selfie-stick for your camera.
Table-Top Tripods: are very small and easy to travel with. You can leave one in your camera bag or your glove box. Table-Top Tripods are meant to be set up on top of desks or other stable surfaces and may not be ideal for heavier cameras.
Part 5: The 5 Best Tripods For YouTube Vlogging
Even if you know everything there is to know about tripods, the selection process can be daunting. That’s why we’ve shortlisted the top 5 tripods on the market, in an effort to make finding the right tripod for your vlog videos as quick an easy as it can possibly be. Let’s have a look.
1. CamRah Smartphone Tripod
Price: $24.99
An increasing number of Smartphones features powerful cameras that can record videos at high resolutions. Unfortunately, most iPhones and Android devices are lightweight, which makes it difficult to hold them perfectly still while shooting a video. CamRah Smartphone Tripod offers a perfect solution to this problem because it is easy to pack and you can carry it wherever you go, without needing the extra space.
It weighs just 0.6lbs and it is 10.8 inches tall. The tripod has a maximum load of 11lbs which means that besides Smartphones, you can also mount action cameras, webcams, or even smaller DSLR cameras onto it. The flexible legs made from high-density foam offer stability even when the CamRah Tripod is placed on an uneven surface.
Pros:
- Easily portable
- Affordable
- Jaws technology provides an extra strong grip of the camera
Cons:
- The tripod’s legs can’t be extended
- Can’t be used with professional cameras
2. Manfrotto Mini Travel Tripod
Price: $34.99
Yet another great option for shooting vlogs with a Smartphone. The Manfrotto Mini Travel Tripod kit is also an excellent choice for all vloggers who shoot their videos with compact cameras. The tripod weighs just 0.51lbs and it is 5.31 inches tall, which makes it a perfect travel companion. However, it can’t support cameras heavier than 2.2lbs, so you have to carefully choose the camera you want to put on this tripod.
The tripod’s rotatable head features a lock button that enables you to fix the camera at a certain position and to shoot a video from an angle you selected. You can’t extend the legs on this tripod so shooting high angle shots is not an option.
Pros:
- Small and durable
- Allows you to mount almost any Smartphone model
- Compatible with compact cameras
Cons:
- Limits your shot selection
- Tripod’s legs can’t be extended
3. Joby Gorilla Pod
Price: $22.50
This tripod is a superstar in the vlogging community because it is flexible, easy to set up and it fits into a pocket. Joby Gorilla Pod’s legs are segmented, so you can freely choose an angle from which you want to shoot, without having to worry about the camera’s stability. You can use this tripod on flat and uneven surfaces equally effectively.
Joby Gorilla weighs just 1lbs and its maximum height 11.6 inches, which makes it perfectly suited for talking heads videos. Using this tripod while you are on the go is also an option if you have a camera that weighs less than 3lbs.
Pros:
- Highly adjustable
- Sturdy and Lightweight
- Made from stainless steel
Cons:
- Can’t be used for panning shots
- Legs can be extended for just one inch
4. Manfrotto Compact Action Tripod
Price: $64.49
If you love shooting your vlogs at night or if you simply want a tripod you can use in the studio an outdoor conditions, then Manfrotto’s Compact Action Tripod is one the best options you have at your disposal. The ergonomic head features a mounting plate that is easy to use and which provides a perfect grip of a camera.
This tripod is designed to be used with consumer-level DSLR cameras, but you can use it to shoot videos with almost all types of cameras. The Compact Action Tripod has a maximum height of 51.57 inches, and it can’t hold cameras heavier than 3.30lbs.
Pros:
- Suitable for both photography and video
- Great for outdoor use
- Allows you to take a wide variety of shots
Cons:
- Can’t support a lot of weight
- Not perfectly suited for professional-level cameras
5. Magnus VT-4000 Fluid Head Tripod
Price: $159.95
Experienced vloggers who record their videos with professional cameras, will enjoy using the Magnus VT-4000 Fluid Head Tripod. The 59-inch tall tripod can support as much as 8.8lbs of weight, and it is designed to help you create perfectly stable shots. The superb panning and tilting option enable you to move your camera freely while recording smooth shots, free of camera shakes.
The quick release mounting plate is compatible with a wide range of cameras, so you can experiment and work with several different cameras while using the same tripod. You can hardly make a mistake if you choose to buy this tripod because you’ll be able to use it to record vlogs at interior and exterior locations.
Pros:
- Easily adjustable to any surface
- Perfect for high angle shots
- Heavy-duty locks
Cons:
- Weighs 7.9lbs
- Not the best choice for action and adventure vlogs
Richard Bennett
Richard Bennett is a writer and a lover of all things video.
Follow @Richard Bennett
Font Powerhouses for Captivating YouTube Thumbnails
YouTube has grown in popularity since it was developed and launched. You can watch YouTube videos for educational purposes, entertainment, or catch up with your favorite content creators. Thumbnails are a massive element of what makes a YouTube video successful. You can incorporate numerous fonts into your thumbnails, leaving you feeling stuck on which is the best option.
This article will discuss the 20 best YouTube thumbnail fonts to make your videos amazing.

- Bebas Neue - Popular YouTube Thumbnail Font
- Impact - YouTube Thumbnail Font for Strong Sense
- Montserrat - Good Font for YouTube Thumbnail
- Alfa Slab - YouTube Thumbnail Text Font With a Futuristic Vibe
- Againts - Best Font for YouTube Thumbnail
- Dancing Script - YouTube Thumbnail Font With a Sweat Vibe
- Oswald
- Arial Negrata - Print Font for YouTube Thumbnails
- BlackOpsOne - Best YouTube Thumbnail Font for Gaming Videos
- Beauty and the Beast
- Chucklesome
- Caribold
- Bernhard - Serious YouTube Thumbnail Font
- Dustin Font Quartet
- The Tide - Chunky-Letter Font for YouTube Thumbnails
- Badaboom BB
- River Drive
- Traveler Note
- Free Love Script
- Config Rounded
20 Best Fonts for YouTube Thumbnails To Bring Traffic to Your Videos
Your thumbnail is the first thing your audience will see as they browse on YouTube. Since you only have a few seconds to make a good first impression, it would be wise to make the most out of it.
YouTube thumbnails capture the viewer’s attention and spark their interest. The more eye-catching your thumbnail is, the more likely they will click on your video. If you take your time to make good thumbnails for your YouTube videos, you will undoubtedly increase your channel’s traffic and expand your reach.
Recent research reveals that YouTube thumbnails with text and numbers get more clicks than thumbnails with plain images. Therefore, choosing a great font to accompany your thumbnail would be wise and make it more visually appealing. Stick around for the fun part of the article, where we discuss twenty best fonts for your YouTube thumbnails.
1. Bebas Neue - Popular YouTube Thumbnail Font
The first YouTube thumbnail font on our list is a popular one known as Bebas Neue. You can use this font for your videos and thumbnails regardless of what content you post. The elegant yet sublime design makes it a perfect choice for you if you are just starting out or have yet to explore other options.

2. Impact - YouTube Thumbnail Font for Strong Sense
If you want a straightforward font for your thumbnail, look no further than Impact. Its strong sense makes it the best font for YouTube thumbnails. Even though it is versatile for any content, it is most frequently used on reaction videos, pranks, or reviews.

3. Montserrat - Good Font for YouTube Thumbnail
The letters in the Montserrat video are very simple, with the slightest shadowing and outline. This font is pretty versatile, and you can use it to make thumbnails for laid-back content or more serious and factual videos.

4. Alfa Slab - YouTube Thumbnail Text Font With a Futuristic Vibe
The Alfa slab font has a futuristic vibe to it, making it the perfect choice for content about new innovations or the future of technology. The blocky yet simple letters are easy to read and don’t take away from the main message or the background.

5. Againts - Best Font for YouTube Thumbnail
Suppose you post lots of travel content, share videos of you lounging on the best, or sample a new restaurant. The Againts font has a unique outdoor vibe that makes your videos pop and makes your audience anticipate where you will travel next.

6. Dancing Script - YouTube Thumbnail Font With a Sweat Vibe
The Dancing Script font is a must-have in your arsenal if you wouldn’t want your videos to be too serious. The slanted letters also give your thumbnail a feminine touch, making it great for fashion vlogs or videos about life hacks for ladies.

7. Oswald
The letters in this Oswald font are encapsulated in a dark grey rectangle, making them stand out and easy to read. You could use this font with other backgrounds in your thumbnail to highlight keywords you wouldn’t want your audience to miss as they scroll through YouTube.

8. Arial Negrata - Print Font for YouTube Thumbnails
We couldn’t forget to mention Arial Negrata, which has a beautiful print font and complementary sub-fonts. You can easily vary the fonts’ sizes for emphasis and to capture the interest of your audience.

9. BlackOpsOne - Best YouTube Thumbnail Font for Gaming Videos
Are you tired of the boring print fonts and girly cursive text? If you answer yes, you should check out the BlackOpsOne font, which is unlike anything you have ever seen. This font is perfect for gaming videos or content that involves long streams.

10. Beauty and the Beast
If you are a streamer, gamer, or like to post life hack videos on YouTube, you are probably looking for some good fonts for YouTube thumbnails to make your video less serious. The Beauty and the Beast font is very whimsical, giving your thumbnail a playful feel.

11. Chucklesome
You will immediately recognize this font if you grew up watching many cartoons and reading comic books. Chucklesome is another font with the best font color for YouTube thumbnails, making it an excellent choice if your YouTube channel is about games, movies, or comic books. The artsy typeface, bold letters, and bright colors can capture your audience’s attention from a mile away.

12. Caribold
As the name suggests, the Caribold font for YouTube thumbnails is very bold, and the letters almost jump out of the screen at you. The borders, outline, and shadows emphasize the font, making it hard to miss. You can use this font to create thumbnails for “How To” videos.

13. Bernhard - Serious YouTube Thumbnail Font
Depending on the content you post, you might want to discard the whimsical feel and give your thumbnail a more serious vibe. The Bernhard font is technically an enlarged script font that makes your videos and thumbnails look fresh and elegant. You can use this font for historical or factual videos.

14. Dustin Font Quartet
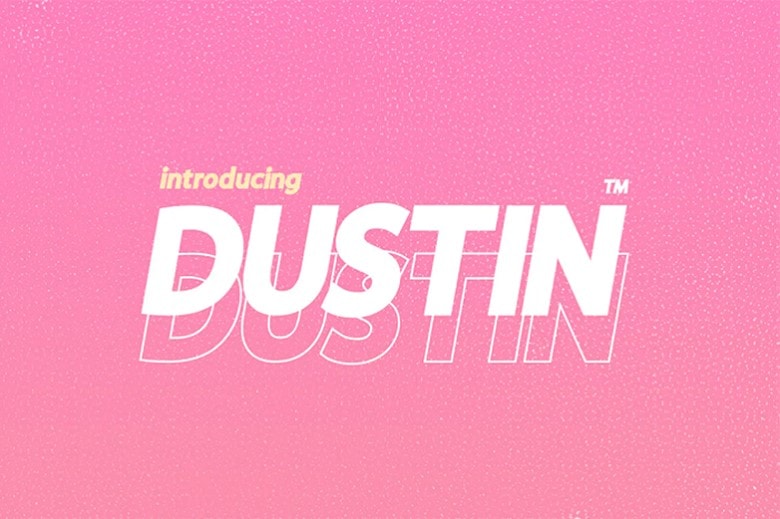
It is not uncommon for thumbnails to draw inspiration from other brands. The Dustin font is an excellent example of such a font, which is similar to the Supreme brand logo. This font is pretty versatile as it comes in a pack of four fonts, making you spoilt for choice!
15. The Tide - Chunky-Letter Font for YouTube Thumbnails
The Tide thumbnail font gives a relaxing beach vibe that would be great if you love posting laid-back content. This font also comes with chunky letters, which are easy to read and grab the attention of anyone scrolling through the platform.

16. Badaboom BB
The best font for YouTube thumbnail is Badaboom BB font, which has vibrant colors and unique letters. The red and yellow colors are an absolute showstopper and a must-have if you want your audience to notice you. This font style is excellent for gaming and streaming YouTube videos, where you just want your audience to have a good time.

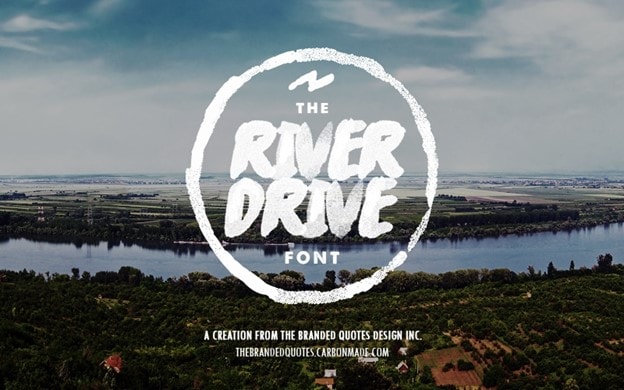
17. River Drive
When inserting text into a thumbnail, you must balance the visual elements to ensure the letters don’t overshadow the image. The River Drive font allows you to create bold yet legible text without removing the stunning photo in the background.
18. Traveler Note
Adventure and travel channels help us know what it’s like to visit a place, even though we haven’t left our couches. The Traveler Note font brings life and cheer to your travel vlogs as you continue introducing us to different parts of the world.

19. Free Love Script
Perhaps your YouTube is missing that feminine touch to tie everything together. The curvy lettering in the Free Love Script is perfect for lifestyle videos or fashion vlogs, which could use a bit of femininity to drive the message home.

20. Config Rounded
If your channel is professional or you post informative content about finances, business, and other important topics, the best YouTube thumbnail font for you is the Config rounded font. It looks pretty modern and works well with any background.

Generate Cool YouTube Thumbnail Texts With Wondershare Filmora
If you have been making YouTube videos for a while now, then you must be familiar with Wondershare Filmora , a top-tier video editing tool. If not, we will discuss some of the features that make it a great editing tool in a short while. You can also use this platform to create and design the perfect thumbnail for your YouTube video.
Free Download For Win 7 or later(64-bit)
Free Download For macOS 10.14 or later

The title editing feature on this platform allows you to add creative text to your video and customize it as you see fit. You can also use Wondershare Filmora to make a title with customizable parameters. For instance, you can edit the text titles using three different fill types: color fill, gradient fill, and image fill.
Wondershare Filmora is an excellent tool to help bring your thumbnails alive and reel the masses in to view more videos from your channel. You cannot possibly exhaust the 107 animation styles, 12 types of shadow effects, and more than ten borders that make your text stand out from the rest. If you are unhappy with your current font, you can choose from over 30 categories of titles till you find one that tickles your fancy.
We couldn’t forget to mention the 3D titles feature with Wondershare Filmora. Gone are the days when creators would use 2D titles to introduce their videos to their audience. Even though not many content creators use 3D titles, you can be among the few that do and gain a competitive advantage. Ensure you peruse through the various categories and find one that speaks to you and fits the kind of content you create.
Below is a step-by-step guide on how to edit YouTube thumbnail text fonts.
Step1 Launch Wondershare Filmora on your device and select “New Project.”

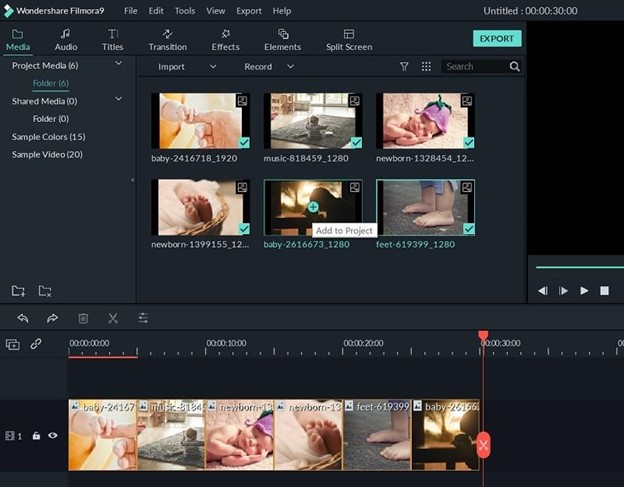
Step2 Click on the icon shown below to import media from your device.

Step3 Drag and drop your photos as shown below to create your YouTube Thumbnail on the platform.
Step4 Add titles to customize the texts in your Thumbnail.

Step5 In the Titles panel, you can customize the font. Filmora offers hundreds of fonts for your choosing.

Step6 Select a still frame to be your thumbnail. Click the camera icon on the right side to take a snapshot.

Step7 The snapshot will appear on the Media panel. Right click the snapshot, and select “Reveal in Explorer” to locate it in your local drive. Then you can use it as your YouTube Thumbnail.

You don’t need to search for fonts on the Internet when Wondershare Filmora offers downloadable fonts. If you are interested in installing fonts in Filmora, watch this video to learn how.
Conclusion
As you generate thumbnails for your YouTube videos, it would be wise to ensure you make them full-sized. The ideal dimension for a YouTube thumbnail should be 1280*720. Since most of your viewers use their mobile phones to watch YouTube videos, it would help to ensure the thumbnail looks the same on your laptop and your mobile device.
A hazy or pixelated thumbnail could discourage the viewer from clicking on your video. We hope you have found a font you like and will incorporate it into your next YouTube video.
20 Best Fonts for YouTube Thumbnails To Bring Traffic to Your Videos
Your thumbnail is the first thing your audience will see as they browse on YouTube. Since you only have a few seconds to make a good first impression, it would be wise to make the most out of it.
YouTube thumbnails capture the viewer’s attention and spark their interest. The more eye-catching your thumbnail is, the more likely they will click on your video. If you take your time to make good thumbnails for your YouTube videos, you will undoubtedly increase your channel’s traffic and expand your reach.
Recent research reveals that YouTube thumbnails with text and numbers get more clicks than thumbnails with plain images. Therefore, choosing a great font to accompany your thumbnail would be wise and make it more visually appealing. Stick around for the fun part of the article, where we discuss twenty best fonts for your YouTube thumbnails.
1. Bebas Neue - Popular YouTube Thumbnail Font
The first YouTube thumbnail font on our list is a popular one known as Bebas Neue. You can use this font for your videos and thumbnails regardless of what content you post. The elegant yet sublime design makes it a perfect choice for you if you are just starting out or have yet to explore other options.
2. Impact - YouTube Thumbnail Font for Strong Sense
If you want a straightforward font for your thumbnail, look no further than Impact. Its strong sense makes it the best font for YouTube thumbnails. Even though it is versatile for any content, it is most frequently used on reaction videos, pranks, or reviews.
3. Montserrat - Good Font for YouTube Thumbnail
The letters in the Montserrat video are very simple, with the slightest shadowing and outline. This font is pretty versatile, and you can use it to make thumbnails for laid-back content or more serious and factual videos.
4. Alfa Slab - YouTube Thumbnail Text Font With a Futuristic Vibe
The Alfa slab font has a futuristic vibe to it, making it the perfect choice for content about new innovations or the future of technology. The blocky yet simple letters are easy to read and don’t take away from the main message or the background.
5. Againts - Best Font for YouTube Thumbnail
Suppose you post lots of travel content, share videos of you lounging on the best, or sample a new restaurant. The Againts font has a unique outdoor vibe that makes your videos pop and makes your audience anticipate where you will travel next.
6. Dancing Script - YouTube Thumbnail Font With a Sweat Vibe
The Dancing Script font is a must-have in your arsenal if you wouldn’t want your videos to be too serious. The slanted letters also give your thumbnail a feminine touch, making it great for fashion vlogs or videos about life hacks for ladies.
7. Oswald
The letters in this Oswald font are encapsulated in a dark grey rectangle, making them stand out and easy to read. You could use this font with other backgrounds in your thumbnail to highlight keywords you wouldn’t want your audience to miss as they scroll through YouTube.
8. Arial Negrata - Print Font for YouTube Thumbnails
We couldn’t forget to mention Arial Negrata, which has a beautiful print font and complementary sub-fonts. You can easily vary the fonts’ sizes for emphasis and to capture the interest of your audience.
9. BlackOpsOne - Best YouTube Thumbnail Font for Gaming Videos
Are you tired of the boring print fonts and girly cursive text? If you answer yes, you should check out the BlackOpsOne font, which is unlike anything you have ever seen. This font is perfect for gaming videos or content that involves long streams.
10. Beauty and the Beast
If you are a streamer, gamer, or like to post life hack videos on YouTube, you are probably looking for some good fonts for YouTube thumbnails to make your video less serious. The Beauty and the Beast font is very whimsical, giving your thumbnail a playful feel.
11. Chucklesome
You will immediately recognize this font if you grew up watching many cartoons and reading comic books. Chucklesome is another font with the best font color for YouTube thumbnails, making it an excellent choice if your YouTube channel is about games, movies, or comic books. The artsy typeface, bold letters, and bright colors can capture your audience’s attention from a mile away.
12. Caribold
As the name suggests, the Caribold font for YouTube thumbnails is very bold, and the letters almost jump out of the screen at you. The borders, outline, and shadows emphasize the font, making it hard to miss. You can use this font to create thumbnails for “How To” videos.
13. Bernhard - Serious YouTube Thumbnail Font
Depending on the content you post, you might want to discard the whimsical feel and give your thumbnail a more serious vibe. The Bernhard font is technically an enlarged script font that makes your videos and thumbnails look fresh and elegant. You can use this font for historical or factual videos.
14. Dustin Font Quartet
It is not uncommon for thumbnails to draw inspiration from other brands. The Dustin font is an excellent example of such a font, which is similar to the Supreme brand logo. This font is pretty versatile as it comes in a pack of four fonts, making you spoilt for choice!
15. The Tide - Chunky-Letter Font for YouTube Thumbnails
The Tide thumbnail font gives a relaxing beach vibe that would be great if you love posting laid-back content. This font also comes with chunky letters, which are easy to read and grab the attention of anyone scrolling through the platform.
16. Badaboom BB
The best font for YouTube thumbnail is Badaboom BB font, which has vibrant colors and unique letters. The red and yellow colors are an absolute showstopper and a must-have if you want your audience to notice you. This font style is excellent for gaming and streaming YouTube videos, where you just want your audience to have a good time.
17. River Drive
When inserting text into a thumbnail, you must balance the visual elements to ensure the letters don’t overshadow the image. The River Drive font allows you to create bold yet legible text without removing the stunning photo in the background.
18. Traveler Note
Adventure and travel channels help us know what it’s like to visit a place, even though we haven’t left our couches. The Traveler Note font brings life and cheer to your travel vlogs as you continue introducing us to different parts of the world.
19. Free Love Script
Perhaps your YouTube is missing that feminine touch to tie everything together. The curvy lettering in the Free Love Script is perfect for lifestyle videos or fashion vlogs, which could use a bit of femininity to drive the message home.
20. Config Rounded
If your channel is professional or you post informative content about finances, business, and other important topics, the best YouTube thumbnail font for you is the Config rounded font. It looks pretty modern and works well with any background.
Generate Cool YouTube Thumbnail Texts With Wondershare Filmora
If you have been making YouTube videos for a while now, then you must be familiar with Wondershare Filmora , a top-tier video editing tool. If not, we will discuss some of the features that make it a great editing tool in a short while. You can also use this platform to create and design the perfect thumbnail for your YouTube video.
Free Download For Win 7 or later(64-bit)
Free Download For macOS 10.14 or later
The title editing feature on this platform allows you to add creative text to your video and customize it as you see fit. You can also use Wondershare Filmora to make a title with customizable parameters. For instance, you can edit the text titles using three different fill types: color fill, gradient fill, and image fill.
Wondershare Filmora is an excellent tool to help bring your thumbnails alive and reel the masses in to view more videos from your channel. You cannot possibly exhaust the 107 animation styles, 12 types of shadow effects, and more than ten borders that make your text stand out from the rest. If you are unhappy with your current font, you can choose from over 30 categories of titles till you find one that tickles your fancy.
We couldn’t forget to mention the 3D titles feature with Wondershare Filmora. Gone are the days when creators would use 2D titles to introduce their videos to their audience. Even though not many content creators use 3D titles, you can be among the few that do and gain a competitive advantage. Ensure you peruse through the various categories and find one that speaks to you and fits the kind of content you create.
Below is a step-by-step guide on how to edit YouTube thumbnail text fonts.
Step1 Launch Wondershare Filmora on your device and select “New Project.”
Step2 Click on the icon shown below to import media from your device.
Step3 Drag and drop your photos as shown below to create your YouTube Thumbnail on the platform.
Step4 Add titles to customize the texts in your Thumbnail.
Step5 In the Titles panel, you can customize the font. Filmora offers hundreds of fonts for your choosing.
Step6 Select a still frame to be your thumbnail. Click the camera icon on the right side to take a snapshot.
Step7 The snapshot will appear on the Media panel. Right click the snapshot, and select “Reveal in Explorer” to locate it in your local drive. Then you can use it as your YouTube Thumbnail.
You don’t need to search for fonts on the Internet when Wondershare Filmora offers downloadable fonts. If you are interested in installing fonts in Filmora, watch this video to learn how.
Conclusion
As you generate thumbnails for your YouTube videos, it would be wise to ensure you make them full-sized. The ideal dimension for a YouTube thumbnail should be 1280*720. Since most of your viewers use their mobile phones to watch YouTube videos, it would help to ensure the thumbnail looks the same on your laptop and your mobile device.
A hazy or pixelated thumbnail could discourage the viewer from clicking on your video. We hope you have found a font you like and will incorporate it into your next YouTube video.
Also read:
- Elevating Video Discoverability with Strategic Tagging on Youtube for 2024
- Automating the Creation of YouTube Subscriber Links
- How to Start a Successful YouTube Gaming Channel
- In 2024, Build Your Brand with Dynamic Haul Videography
- In 2024, Essential Tips for Locating YouTube's Content Creation Hub
- Daily Vlogging Ideas What to Talk About While Vlogging for 2024
- [Updated] Cutting-Edge Techniques Top Lenses for YouTube Stars
- Musical Mosaics 15 Video Tutorials on Collaborative Projects
- Infographics Leveraging Social Media Videos
- [Updated] Automate Playlist Retrieval From YouTube Directly
- The Art of Viewing Several Youtube Videos Concurrently
- [Updated] Boost Your Video's Popularity on YouTube
- Get YouTube Posters at Zero Price - Top Free Downloading Tool
- In 2024, Creating a Clickable Thumbnail Enhancing Video Visibility without Costs
- Secrets to Sustainable Earning with Online Videos
- In 2024, Alternative Cinema Choices for Every Fan
- The Epic Creator's Colloquium
- 5 Top 3D Design Apps for Engaging YouTube Beginnings for 2024
- 2024 Approved Crafting Impactful YouTube Channel Logo Tips
- Dissecting YouTube Copyright Vs. Creative Commons Ethos for 2024
- [Updated] Disciplined Device Use Effective Ways to Remove Youtube Channels
- [New] Everlasting Deactivation Tactics Against YouTube's Sneaky Snack
- Streamlined Sharing The Best Shortened Link Apps for Youtubers
- 2024 Approved Effortless YouTube File Extraction
- [New] Economical Microphones Catered to Vloggers
- Channeling Success Navigating the New YouTube Membership Model
- [Updated] Break Down Long-Form Videos The Insider's Guide to YouTube Chapter Inclusion
- Crafting Impactful Try-On Hauls for Maximum Views
- [Updated] Comprehensive Directory Extracting YT Template Videos Online
- In 2024, Epic Battle Royale Thumbnails, Done Fast
- Boosting Your YT Subs A Complete Strategy Guide
- Unveiling the Mysteries of Video Monetization
- The Snapshot Solution Effortless iPhone/iPad Video Production
- [Updated] Techniques for Flawless Live Broadcasting of RL Games for 2024
- [Updated] In 2024, Unmatched Gaming Broadcasts - Set Up with OBS
- 2024 Approved 95 Sharp Humor in TikTok's Best Joke Threads
- New Top Aspect Ratio Tools Calculate Perfect Proportions
- Fixed Microsoft Excel Cannot Access the File Error | Stellar
- 7 Ways to Unlock a Locked Poco M6 Pro 4G Phone
- New Thunderous Acclaim Synthesizer
- [New] 2024 Approved Mastering the Art of Valheim Gardening
- Best Desktop Computers
- [Updated] In 2024, Enhancing Slideshow Impact with Webcam Integration
- New In 2024, Winning List of Popular Windows and Mac Music Recording Apps
- New In 2024, The Latest Evolution Whats Changed in Nero WaveEdit for 2 Writers and Editors
- In 2024, Silence Is Golden Removing Background Noise in Final Cut Pro X Made Easy
- Possible solutions to restore deleted music from Oppo Reno 11 Pro 5G
- Boost Sound Level for Twitter's Quiet Vids for 2024
- Discover Popular Sad Background Music for 2024
- [New] 2024 Approved Perfect Your Sound Game with These Step-by-Step TikTok Tips
- In 2024, Quick Tutorial Get Snapchat Running on macOS
- How to Unlock Apple iPhone 14 Pro With an Apple Watch & What to Do if It Doesnt Work
- [New] 2024 Approved Rapid Growth on Instagram The Like-Video Duo Power
- Updated How Does the YouTube AI Algorithm Work for 2024
- In 2024, Top 7 Phone Number Locators To Track Samsung Galaxy F04 Location | Dr.fone
- How to Transfer Data from Motorola Razr 40 to Any iOS Devices | Dr.fone
- In 2024, How to Fix iPad or iPhone 8 Stuck On Activation Lock?
- How to Make Discord GIF PFP for 2024
- [New] 100%% Secure & Ethical Actions for TikTok Success
- Burst Life Into Slow Motion with Top Android Apps
- In 2024, Techniques You Never Heard of for Learning YouTube AI Marketing
- Title: "[New] Enhancing Visuals The Role of a Tripod in Video Content"
- Author: Brian
- Created at : 2024-05-25 12:41:06
- Updated at : 2024-05-26 12:41:06
- Link: https://youtube-video-recordings.techidaily.com/new-enhancing-visuals-the-role-of-a-tripod-in-video-content/
- License: This work is licensed under CC BY-NC-SA 4.0.
