
!["[New] Elite Tech for Saving Your On-Camera Video Memories"](https://www.lifewire.com/thmb/Wk0sCaqIKiS3xsggdQ99H21o1LU=/400x300/filters:no_upscale():max_bytes(150000):strip_icc()/LG-ESPN-Plus2-5a613f28564249e38ef803888f21e257.jpg)
"[New] Elite Tech for Saving Your On-Camera Video Memories"
Elite Tech for Saving Your On-Camera Video Memories
Best YouTube Livestreaming Screen Recorders

Richard Bennett
Oct 26, 2023• Proven solutions
The global pandemic has changed the way we live for the time being, and right now, we cannot attend events in the same way we did at the beginning of the year.
A growing number of cultural organizations, businesses, and influential YouTubers are turning towards YouTube’s Live feature because it provides a simple way of broadcasting different types of content in real-time. YouTube Live is by no means a new option, since the platform first introduced live streaming features in 2008, and some twelve years later, the feature has never been more popular.
However, the live streams you broadcast on YouTube are stored for just a brief period of time, which means you have to search for alternative methods of saving them. That’s why in this article we are going to take you through the best YouTube Live screen recorders you can use to capture the video content you are sharing with your followers.
Note: We resolutely oppose all forms of copyright-infringing downloads. This tutorial is only for downloading YouTube videos/audio materials from your own channel.
Top 10+ YouTube Live Screen Recorders
The maximum resolution in which you can record computer screen , audio recording options, or customization of the recording area are some of the most important features you need to consider while choosing a YouTube Live screen recorder.
We have selected some of the best YouTube Live screen recorders that enable you to do much more than just record live streams. So, let’s take a look at what they have to offer.
1. OBS Studio
Price: Free
Compatibility: Windows, Linux, macOS
The vast majority of live streams you can find on Twitch and YouTube are made with OBS Studio, but besides broadcasting videos, the software also gives you access to screencasting tools. This means that you can specify the area of the screen you want to record, choose the recording’s resolution and frame rate, or adjust the audio recording options.
OBS Studio is the best free, open-source screen recording program you can download. You shouldn’t use a software just because it’s free, but OBS Studio is also an extremely versatile tool. You can both record and stream in high definition and it comes with the ability to record either through your webcam or through your screen. It records directly through the graphics card , which means it can capture games even when in full-screen mode whereas a lot of other screen-recording software forces you to play games in windowed mode. The high quality can be seen easily in whatever you choose to broadcast.
OBS Studio allows you to record videos from a variety of sources, which makes it a perfect option for capturing the content you share through YouTube Live since you can select a browser window you want to capture in just a few clicks. What’s more, this open-source software is equipped with basic video editing tools, which enables you to preview the video you recorded before publishing it, apply transitions between cuts, or perform basic color correction.
Check the detailed guide to How to Record with OBS .
2. XSplit
Price: $24.95 for a three-month license
Compatibility: Windows
This is yet another broadcasting software that is equipped with powerful screen recording tools. Setting up a new screencasting session with XSplit is a simple and intuitive process that is not going to take much more than a few moments of your time.
All you need to do is define a workspace, then pick the preferred resolution and frame rate. The software allows you to capture screens in 4K resolution and at 60 fps, but it also offers a variety of resolution and frame rate options so that you can choose the one that best fits your needs. Furthermore, you can record the computer audio, which enables you to capture the live stream’s audio in excellent quality. Besides YouTube Live, XSplit can be used with Zoom , Skype, Google Hangouts, and numerous other live streaming and video calling apps.
3. Filmora
Price: Free, pricing plans start at $49.99/year
Compatibility: macOS, Windows


If you are looking for a screen recorder that is stacked with powerful video editing features, then Filmora is a great option for you. Customizing a YouTube Live or any other screencasting session with this video editing software is easy, and you can choose the resolution, frame rate, or even if you want to show mouse clicks in the recording.
Capturing the webcam feed and the computer’s screen simultaneously is also an option, while you can also decide whether or not you want to record audio from a microphone, computer audio, or both at the same time.
What’s more Filmora lets you set up the maximum duration of a screen recording and you start, pause, resume or stop a screen recording session by using hotkeys. Once you are done recording the live stream you shared on YouTube, you can edit the footage you created before uploading it to your YouTube channel.
4. Wondershare DemoCreator
Compatibility: Windows
Price: Start from $9.99
DemoCreator is a recorder that focuses its overall user experience. It is able to easily record high-quality videos at up to 120 FPS (60 FPS for Mac) and allows you to simultaneously record both your screen and webcam. This software is incredibly user friendly and makes for an easy experience for new streamers. The dual recording makes it great for gamers who are also looking to film their reactions.
5. CloudApp
Price: Free, $10 per month for an individual user
Compatibility: Windows, macOS, Linux, Chrome
Starting a new screen capturing session with the CloudApp requires you to just specify the portion of the screen you want to capture and hit the record button. Moreover, you can choose if you want to record with or without a webcam and you have the option to enable or disable the audio recording option.
However, you can only create 90-second screen recordings with the free version of the CloudApp and you cannot set resolution or frame rate of the recording. That’s why you need to upgrade to the Pro version if you want to use it to record live streams on YouTube. The Pro subscription model also grants you access to basic video editing tools and a variety of file sharing options. In addition, CloudApp lets you create and annotate still images and GIFs, which makes it a great option for digital marketers.
6. Techsmith Camtasia
Price: Free trial, $269.05 one-time fee
Compatibility: Windows, macOS
You don’t need years of video editing experience to start a new screen recording session in Camtasia. In fact, you just have to click on the Record button that is located in the software’s tool panel and then customize the settings.
Camtasia lets you choose if you want to record the full screen or just a selected portion of the screen or decide if you want to switch the webcam or the microphone off. You should make sure that the System Audio feature is enabled in order to record the sound of the live stream you’re sharing on YouTube. Pausing or stopping a screencasting session requires you to either click on the appropriate buttons or use the keyboard-based hotkeys. After you are done recording a live stream you can edit the footage using Camtasia’s video editing tools.
7. ScreenRec
Price: Free
Compatibility: Windows, macOS, Linux
Recording any live stream or TV show you play on your computer with ScreenRec is a straightforward process that can be completed in just a few clicks. Simply drag the mouse cursor over the area you want to record, then hit the Record button when you are ready and ScreenRec will start capturing the computer screen.
Once the screencasting session is completed you will get a sharable link that can be embedded to a website or used to save an MP4 file on your hard drive. Furthermore, ScreenRec is equipped with analytics tools that show you how many views your videos attracted or for how long each visitor watched them. All of these features make ScreenRec an excellent option for anyone who wants to record a live stream on YouTube or any other on-screen activity.
8. Flashback Express
Price: Free
Compatibility: Windows
Flashback Express is a simple screen recorder that lets you create high-res videos effortlessly. Setting up a new screencasting session requires you to just specify the area of the screen you want to record, choose whether or not you want to record the webcam feed and hit the Record button.
There are no restrictions in terms of the duration of screen recordings you can make with Flashback Express and the software doesn’t watermark the video you create.
However, you can only save the files in MP4, AVI, or WMW formats and you cannot adjust the video’s frame rate or resolution. What’s more, editing videos or applying effects with Flashback Express isn’t possible and you must upgrade to FlashBack Pro if you want to edit the live streams you broadcast on YouTube.
This piece of software is user friendly, but it doesn’t have as many features as other products on the market. Having said that, it is still an excellent tool that will help you live stream gameplay easily. Although it doesn’t come with built-in video editing software, it is possible to download another program to do this for you (i.e. Filmora). Flashback Express has the ability to record through your headset or microphone as well.
9. VLC
Price: Free
Compatibility: macOS, Linux, Windows
This is an iconic media player that became famous for its versatility and support for nearly all video file formats. Besides being one of the best media players ever created, VLC is also equipped with screen recording and video editing tools.
In order to start a new screencasting session, you will have to go to the Media menu and then select the Open Capture Device option. Once the new window pops up on the screen you should change the Capture Mode to Desktop and then adjust the frame rate in accordance with your needs.
Click on the Play button, and then hit the Record button after the screen recording window appears on the screen. You can only record the entire screen with VLC, since customizing the recording area isn’t an option, and all your files will be captured in the RAW format which means that you may have to resize them before you upload them to YouTube.
10. Screencast-o-matic
Price: Free, pricing options start at $1.65 per month
Compatibility: macOS, Windows
As its name suggests, this software product makes the screen recording process almost automatic. You can choose if you want to record an entire screen or just a window you selected. In addition, Screencast-o-matic lets you record the desktop and webcam footage at the same time, and you can even zoom in while the screencasting session is still in progress.
The free version of the software offers only a basic set of features that doesn’t include the option to record system audio. This means that you have to opt for one of the available subscription models if you want to record your live streams on YouTube with Screencast-o-matic. What’s more, you will be to create videos that are longer than 15 minutes, create recordings without watermarks or add music to your recordings if you opt for Deluxe or Premiere pricing options.
11. QuickTime Player
Price: Free
Compatibility: macOS, Windows
Mac users who want to record content that is broadcasted via YouTube Live can do so without having to install a third-party app. Apple ceased the support for the Windows-based version of QuickTime Player in 2016 and PC users can only capture their screens with this software if they have some of its earlier versions.
In order to start a new screen recording session in QuickTime Player, you just have to go to the File menu and select the New Screen Recording option. The Screen Recording window where you can choose if you want to record audio or show mouse click in the recording will pop up on the screen. QuickTime Player lets you choose if you want to capture the entire screen or just a portion of it, and you can click on the Record button to start a new screencasting session. In order to save a video file you created, you just have to go to the File menu and pick the Save option.
How to Record a YouTube Live Stream with Filmora
Recording a YouTube Live stream with Filmora is easy even if you never went through this process before. You can set up a new screencasting session in just a few easy steps that won’t take more than a few moments to complete. Here’s what you need to do:
Step 1: Launch Filmora and create a new project. Go to the Media tab once the video editor’s main window loads and click on the Record drop-down menu that is located next to the Import drop-down menu.
Choose the Record PC Screen option and then proceed to customize the settings for your screencasting session.

Step 2: Click on the Rectangular icon in the upper left corner of the Wondershare Filmora Scrn window and choose either Full Screen, Custom, or Target Window option, depending on how you want to record a YouTube Live stream to define the area of the screen that is going to be recorded.
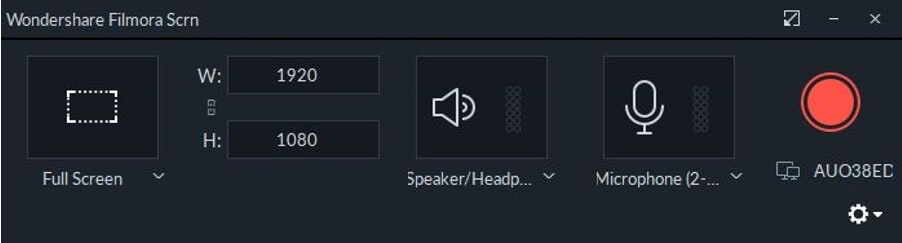
You can then proceed to insert the resolution your screen recording is going to have, and choose if you want to record system audio and sound from an external microphone.
Step 3: Click on the Gear icon below the Record button to gain access to additional settings, and then proceed to set the frame rate, adjust the video’s quality or activate the Show Mouse Clicks in Recording option.
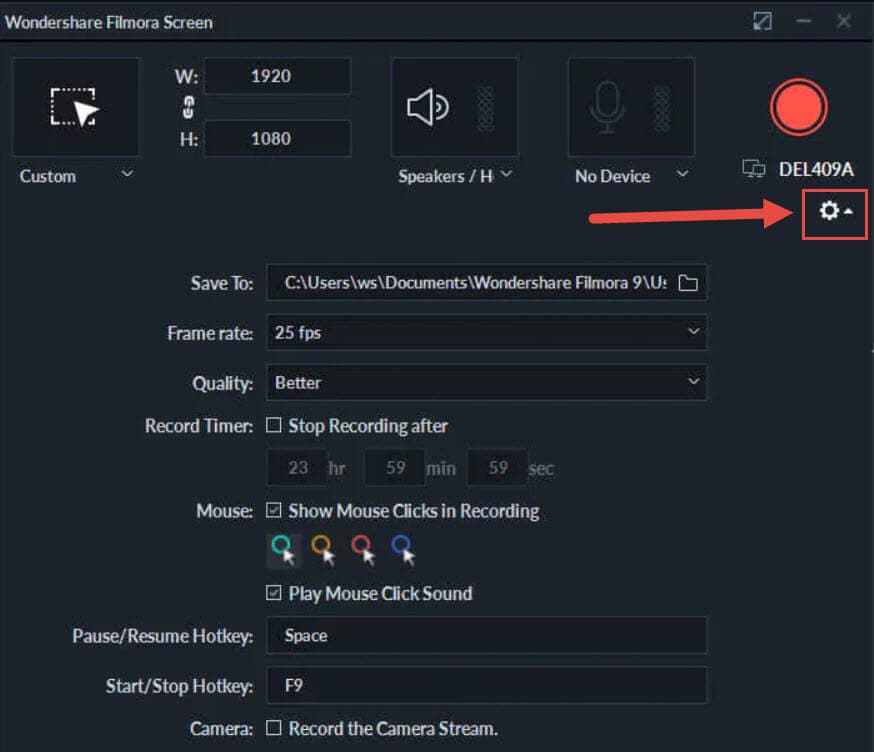
Make sure that the checkbox next to the Record the Camera Stream is marked if you want to record webcam feed and computer desktop at the same time.
Step 4: Press the red Record button in the upper right corner of the window and jump to the live stream. Once the broadcast is completed, you should click on the Stop button and use Filmora’s editing tools to remove all imperfections from the recording.
Filmora allows you to export all of your projects directly to your YouTube channel immediately after the rendering process is completed.
Frequently Asked Questions about YouTube Live Screen Recorders
1. Does YouTube Save Live Videos?
Stream Now, Mobile, Webcam, and Events streams can be stored automatically for 12 hours after they end. You can access all of your live streams by clicking on the Videos menu in the YouTube Studio and selecting the Live option and then change the Privacy setting in the Visibility menu.
2. How to use YouTube to Archive a Live Stream?
Once the live stream ends, you should go to the Dashboard and click on the Live feature, and then choose the Stream option. Check the Make Archive Unlisted When Complete checkbox and the live stream video will be saved accordingly.
Richard Bennett
Richard Bennett is a writer and a lover of all things video.
Follow @Richard Bennett
Richard Bennett
Oct 26, 2023• Proven solutions
The global pandemic has changed the way we live for the time being, and right now, we cannot attend events in the same way we did at the beginning of the year.
A growing number of cultural organizations, businesses, and influential YouTubers are turning towards YouTube’s Live feature because it provides a simple way of broadcasting different types of content in real-time. YouTube Live is by no means a new option, since the platform first introduced live streaming features in 2008, and some twelve years later, the feature has never been more popular.
However, the live streams you broadcast on YouTube are stored for just a brief period of time, which means you have to search for alternative methods of saving them. That’s why in this article we are going to take you through the best YouTube Live screen recorders you can use to capture the video content you are sharing with your followers.
Note: We resolutely oppose all forms of copyright-infringing downloads. This tutorial is only for downloading YouTube videos/audio materials from your own channel.
Top 10+ YouTube Live Screen Recorders
The maximum resolution in which you can record computer screen , audio recording options, or customization of the recording area are some of the most important features you need to consider while choosing a YouTube Live screen recorder.
We have selected some of the best YouTube Live screen recorders that enable you to do much more than just record live streams. So, let’s take a look at what they have to offer.
1. OBS Studio
Price: Free
Compatibility: Windows, Linux, macOS
The vast majority of live streams you can find on Twitch and YouTube are made with OBS Studio, but besides broadcasting videos, the software also gives you access to screencasting tools. This means that you can specify the area of the screen you want to record, choose the recording’s resolution and frame rate, or adjust the audio recording options.
OBS Studio is the best free, open-source screen recording program you can download. You shouldn’t use a software just because it’s free, but OBS Studio is also an extremely versatile tool. You can both record and stream in high definition and it comes with the ability to record either through your webcam or through your screen. It records directly through the graphics card , which means it can capture games even when in full-screen mode whereas a lot of other screen-recording software forces you to play games in windowed mode. The high quality can be seen easily in whatever you choose to broadcast.
OBS Studio allows you to record videos from a variety of sources, which makes it a perfect option for capturing the content you share through YouTube Live since you can select a browser window you want to capture in just a few clicks. What’s more, this open-source software is equipped with basic video editing tools, which enables you to preview the video you recorded before publishing it, apply transitions between cuts, or perform basic color correction.
Check the detailed guide to How to Record with OBS .
2. XSplit
Price: $24.95 for a three-month license
Compatibility: Windows
This is yet another broadcasting software that is equipped with powerful screen recording tools. Setting up a new screencasting session with XSplit is a simple and intuitive process that is not going to take much more than a few moments of your time.
All you need to do is define a workspace, then pick the preferred resolution and frame rate. The software allows you to capture screens in 4K resolution and at 60 fps, but it also offers a variety of resolution and frame rate options so that you can choose the one that best fits your needs. Furthermore, you can record the computer audio, which enables you to capture the live stream’s audio in excellent quality. Besides YouTube Live, XSplit can be used with Zoom , Skype, Google Hangouts, and numerous other live streaming and video calling apps.
3. Filmora
Price: Free, pricing plans start at $49.99/year
Compatibility: macOS, Windows
If you are looking for a screen recorder that is stacked with powerful video editing features, then Filmora is a great option for you. Customizing a YouTube Live or any other screencasting session with this video editing software is easy, and you can choose the resolution, frame rate, or even if you want to show mouse clicks in the recording.
Capturing the webcam feed and the computer’s screen simultaneously is also an option, while you can also decide whether or not you want to record audio from a microphone, computer audio, or both at the same time.
What’s more Filmora lets you set up the maximum duration of a screen recording and you start, pause, resume or stop a screen recording session by using hotkeys. Once you are done recording the live stream you shared on YouTube, you can edit the footage you created before uploading it to your YouTube channel.
4. Wondershare DemoCreator
Compatibility: Windows
Price: Start from $9.99
DemoCreator is a recorder that focuses its overall user experience. It is able to easily record high-quality videos at up to 120 FPS (60 FPS for Mac) and allows you to simultaneously record both your screen and webcam. This software is incredibly user friendly and makes for an easy experience for new streamers. The dual recording makes it great for gamers who are also looking to film their reactions.
5. CloudApp
Price: Free, $10 per month for an individual user
Compatibility: Windows, macOS, Linux, Chrome
Starting a new screen capturing session with the CloudApp requires you to just specify the portion of the screen you want to capture and hit the record button. Moreover, you can choose if you want to record with or without a webcam and you have the option to enable or disable the audio recording option.
However, you can only create 90-second screen recordings with the free version of the CloudApp and you cannot set resolution or frame rate of the recording. That’s why you need to upgrade to the Pro version if you want to use it to record live streams on YouTube. The Pro subscription model also grants you access to basic video editing tools and a variety of file sharing options. In addition, CloudApp lets you create and annotate still images and GIFs, which makes it a great option for digital marketers.
6. Techsmith Camtasia
Price: Free trial, $269.05 one-time fee
Compatibility: Windows, macOS
You don’t need years of video editing experience to start a new screen recording session in Camtasia. In fact, you just have to click on the Record button that is located in the software’s tool panel and then customize the settings.
Camtasia lets you choose if you want to record the full screen or just a selected portion of the screen or decide if you want to switch the webcam or the microphone off. You should make sure that the System Audio feature is enabled in order to record the sound of the live stream you’re sharing on YouTube. Pausing or stopping a screencasting session requires you to either click on the appropriate buttons or use the keyboard-based hotkeys. After you are done recording a live stream you can edit the footage using Camtasia’s video editing tools.
7. ScreenRec
Price: Free
Compatibility: Windows, macOS, Linux
Recording any live stream or TV show you play on your computer with ScreenRec is a straightforward process that can be completed in just a few clicks. Simply drag the mouse cursor over the area you want to record, then hit the Record button when you are ready and ScreenRec will start capturing the computer screen.
Once the screencasting session is completed you will get a sharable link that can be embedded to a website or used to save an MP4 file on your hard drive. Furthermore, ScreenRec is equipped with analytics tools that show you how many views your videos attracted or for how long each visitor watched them. All of these features make ScreenRec an excellent option for anyone who wants to record a live stream on YouTube or any other on-screen activity.
8. Flashback Express
Price: Free
Compatibility: Windows
Flashback Express is a simple screen recorder that lets you create high-res videos effortlessly. Setting up a new screencasting session requires you to just specify the area of the screen you want to record, choose whether or not you want to record the webcam feed and hit the Record button.
There are no restrictions in terms of the duration of screen recordings you can make with Flashback Express and the software doesn’t watermark the video you create.
However, you can only save the files in MP4, AVI, or WMW formats and you cannot adjust the video’s frame rate or resolution. What’s more, editing videos or applying effects with Flashback Express isn’t possible and you must upgrade to FlashBack Pro if you want to edit the live streams you broadcast on YouTube.
This piece of software is user friendly, but it doesn’t have as many features as other products on the market. Having said that, it is still an excellent tool that will help you live stream gameplay easily. Although it doesn’t come with built-in video editing software, it is possible to download another program to do this for you (i.e. Filmora). Flashback Express has the ability to record through your headset or microphone as well.
9. VLC
Price: Free
Compatibility: macOS, Linux, Windows
This is an iconic media player that became famous for its versatility and support for nearly all video file formats. Besides being one of the best media players ever created, VLC is also equipped with screen recording and video editing tools.
In order to start a new screencasting session, you will have to go to the Media menu and then select the Open Capture Device option. Once the new window pops up on the screen you should change the Capture Mode to Desktop and then adjust the frame rate in accordance with your needs.
Click on the Play button, and then hit the Record button after the screen recording window appears on the screen. You can only record the entire screen with VLC, since customizing the recording area isn’t an option, and all your files will be captured in the RAW format which means that you may have to resize them before you upload them to YouTube.
10. Screencast-o-matic
Price: Free, pricing options start at $1.65 per month
Compatibility: macOS, Windows
As its name suggests, this software product makes the screen recording process almost automatic. You can choose if you want to record an entire screen or just a window you selected. In addition, Screencast-o-matic lets you record the desktop and webcam footage at the same time, and you can even zoom in while the screencasting session is still in progress.
The free version of the software offers only a basic set of features that doesn’t include the option to record system audio. This means that you have to opt for one of the available subscription models if you want to record your live streams on YouTube with Screencast-o-matic. What’s more, you will be to create videos that are longer than 15 minutes, create recordings without watermarks or add music to your recordings if you opt for Deluxe or Premiere pricing options.
11. QuickTime Player
Price: Free
Compatibility: macOS, Windows
Mac users who want to record content that is broadcasted via YouTube Live can do so without having to install a third-party app. Apple ceased the support for the Windows-based version of QuickTime Player in 2016 and PC users can only capture their screens with this software if they have some of its earlier versions.
In order to start a new screen recording session in QuickTime Player, you just have to go to the File menu and select the New Screen Recording option. The Screen Recording window where you can choose if you want to record audio or show mouse click in the recording will pop up on the screen. QuickTime Player lets you choose if you want to capture the entire screen or just a portion of it, and you can click on the Record button to start a new screencasting session. In order to save a video file you created, you just have to go to the File menu and pick the Save option.
How to Record a YouTube Live Stream with Filmora
Recording a YouTube Live stream with Filmora is easy even if you never went through this process before. You can set up a new screencasting session in just a few easy steps that won’t take more than a few moments to complete. Here’s what you need to do:
Step 1: Launch Filmora and create a new project. Go to the Media tab once the video editor’s main window loads and click on the Record drop-down menu that is located next to the Import drop-down menu.
Choose the Record PC Screen option and then proceed to customize the settings for your screencasting session.
Step 2: Click on the Rectangular icon in the upper left corner of the Wondershare Filmora Scrn window and choose either Full Screen, Custom, or Target Window option, depending on how you want to record a YouTube Live stream to define the area of the screen that is going to be recorded.
You can then proceed to insert the resolution your screen recording is going to have, and choose if you want to record system audio and sound from an external microphone.
Step 3: Click on the Gear icon below the Record button to gain access to additional settings, and then proceed to set the frame rate, adjust the video’s quality or activate the Show Mouse Clicks in Recording option.
Make sure that the checkbox next to the Record the Camera Stream is marked if you want to record webcam feed and computer desktop at the same time.
Step 4: Press the red Record button in the upper right corner of the window and jump to the live stream. Once the broadcast is completed, you should click on the Stop button and use Filmora’s editing tools to remove all imperfections from the recording.
Filmora allows you to export all of your projects directly to your YouTube channel immediately after the rendering process is completed.
Frequently Asked Questions about YouTube Live Screen Recorders
1. Does YouTube Save Live Videos?
Stream Now, Mobile, Webcam, and Events streams can be stored automatically for 12 hours after they end. You can access all of your live streams by clicking on the Videos menu in the YouTube Studio and selecting the Live option and then change the Privacy setting in the Visibility menu.
2. How to use YouTube to Archive a Live Stream?
Once the live stream ends, you should go to the Dashboard and click on the Live feature, and then choose the Stream option. Check the Make Archive Unlisted When Complete checkbox and the live stream video will be saved accordingly.
Richard Bennett
Richard Bennett is a writer and a lover of all things video.
Follow @Richard Bennett
First Offset Guide: Affordable Channel Buys to Monetize
Building a following on a YouTube channel to monetize it can be difficult. It is even more difficult to turn it into a full-time occupation, especially if you are a beginner. So, it makes sense buying monetized YouTube channel. When you buy a monetized YouTube channel, it relieves you of the struggle of churning out high-quality content that connects with an audience. You also get a fully functional stream of generating additional income. In this article, we explore the top sites that offer monetized YouTube channel for sale, giving you an easier start on the platform.
YouTube Monetization Editor A cross-platform for editing any kind of videos and add creative effects to make them more attarctive!
Free Download Free Download Learn More

Part 1. Top 10 Sites to Buy Monetized YouTube Channels
Investing in a pre-existing, monetized YouTube channel is a great idea. It saves you time, allowing you to focus on creating quality content. However, make sure you buy a monetized YouTube channel from a reliable seller. Let’s have a look at the top sites to buy monetized YouTube channels:
1. UseViral
This is one of the best options available to buy monetize YouTube channel. They offer precious monetized YouTube channel packages. Your new channel will be ready for monetization with more than 4,000 watch time hours and a 1,000+ subscriber base.
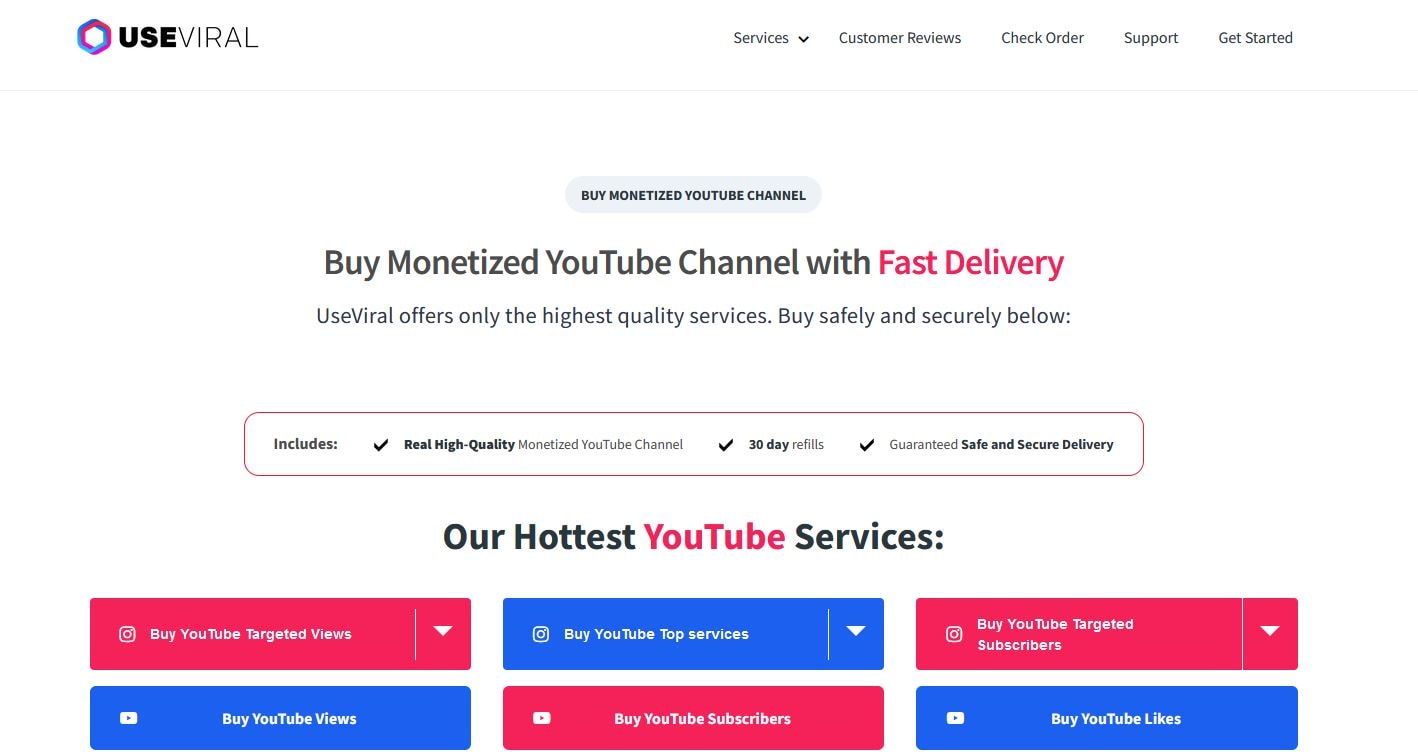
To get your monetized channel, you will be required to fill out a brief questionnaire. Explain your ideal market and video production needs to allow the UseViral team to understand what you are looking for. They let you know what you are paying for any extras.
Price: $599
Customer Rating: 9.5/10
2. SlidesMedia
This is a well-known social media growth strategist that allows you to buy a monetized YouTube channel. The site stands out for offering assistance with growing the YouTube channel and other social media platforms.

SlidesMedia promises to use only human editors on your YouTube channel. They give you a channel with genuine content. You also get the assurance that the content is not bot-generated..
Price: $529 - $2400.
Customer Rating: 9.3/10
3. AudienceGain
AudienceGain is a popular social media marketing platform. They offer a wide range of services, including selling monetized YouTube channels.
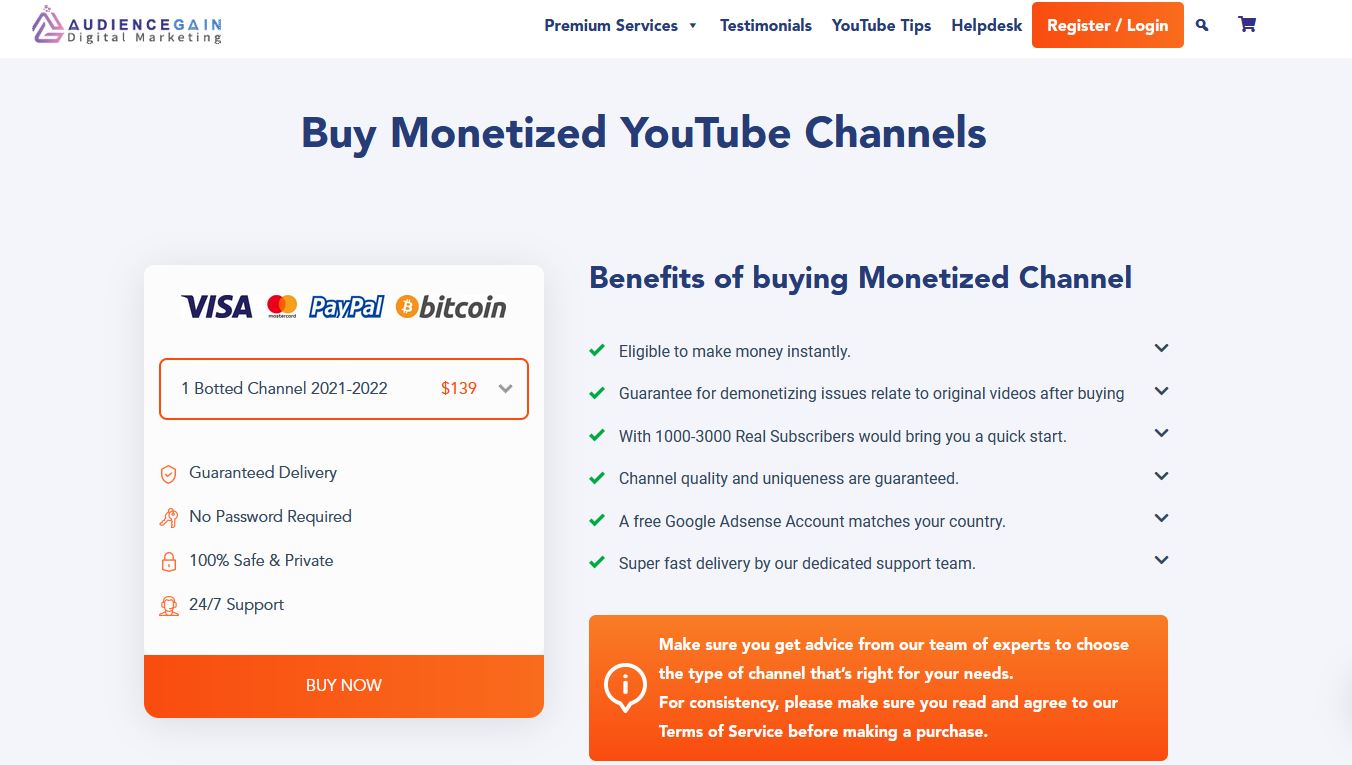
With a proven track record, AudienceGain stands out for offering quality customer service. They support you before, during, and after the purchase. They also provide organically grown channels to make sure you are not demonetized.
Price: $ 129 - $390
Customer Rating: 9.5/10
4. Fameswap
This is a flexible marketplace for selling and buying monetized YouTube channels. The site stands out for being selective in the kind of channels it features.
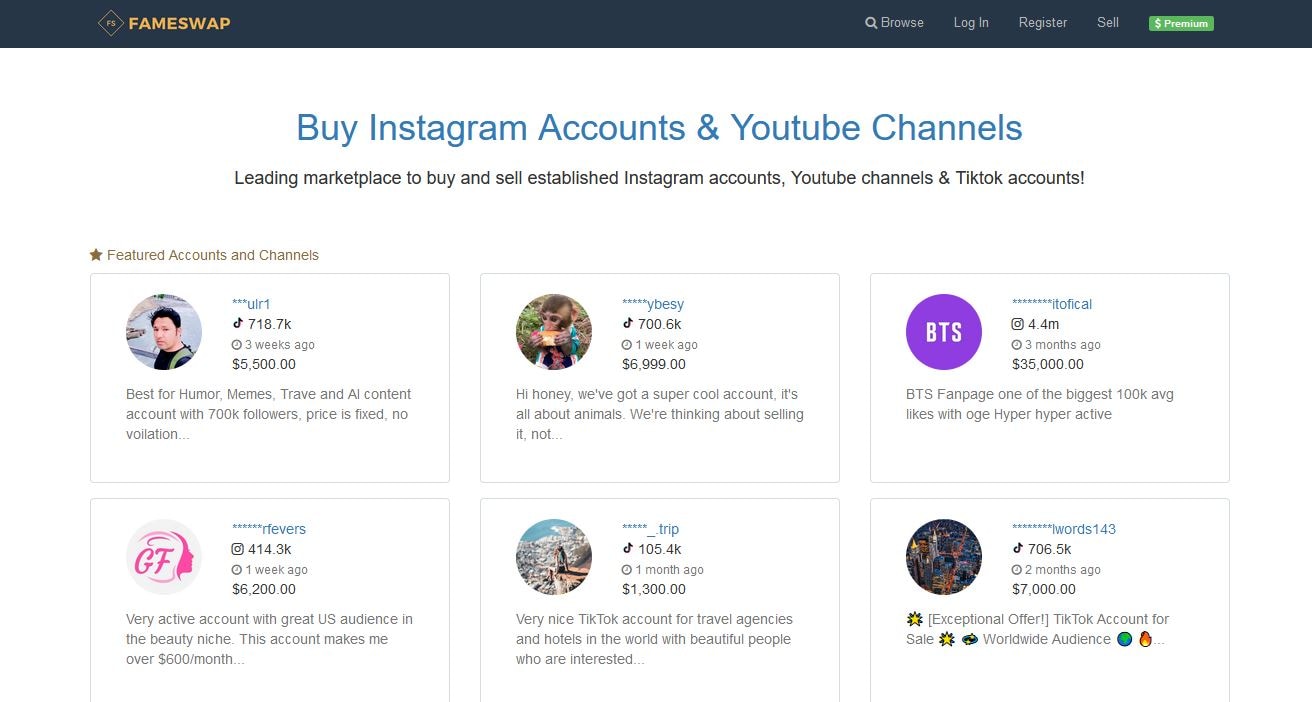
Fameswap offers a safe method of communication between vendors and buyers through an internal messaging system. You can invest in a channel that you are interested in, ranging from topics like fashion and beauty to entertainment and sports.
Price: Customized pricing
Customer Rating: 8.5/10
5. Eazy Viral
Another excellent choice is to buy a monetized YouTube channel. It allows you to choose from numerous channel types. Users also specify the number of subscribers and watch times they want.
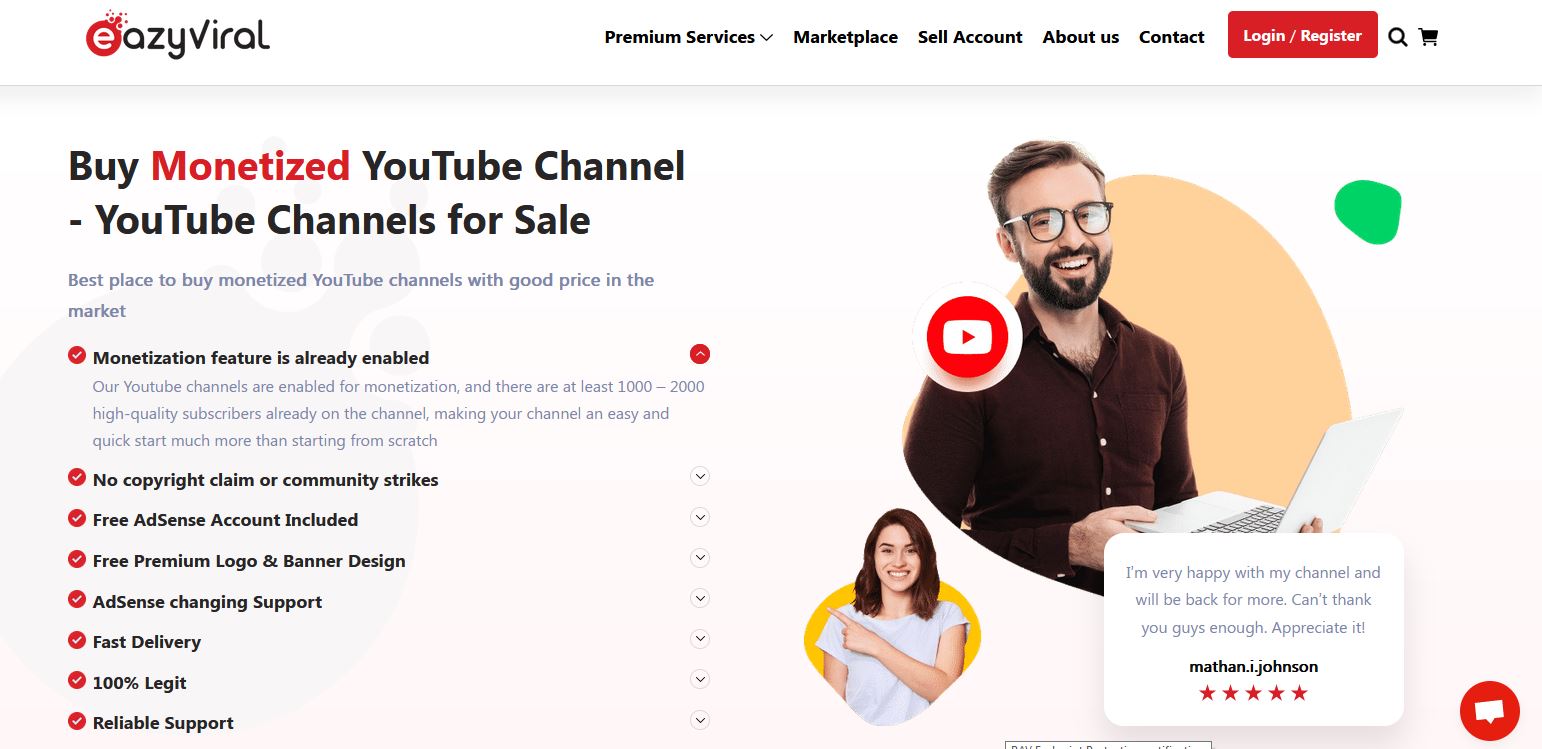
Eazy Viral promises quality content that will not infringe on the rights of others. They also make it simple to monetize your videos and safeguard your AdSense account.
Price: $249 - $1100
Customer Rating: 9/10
6. EazySMM
With EazySMM, you get a unique starting point on your YouTube journey. Choose a YouTube monetized channel for sale on a niche you are interested in at a low price to get started.
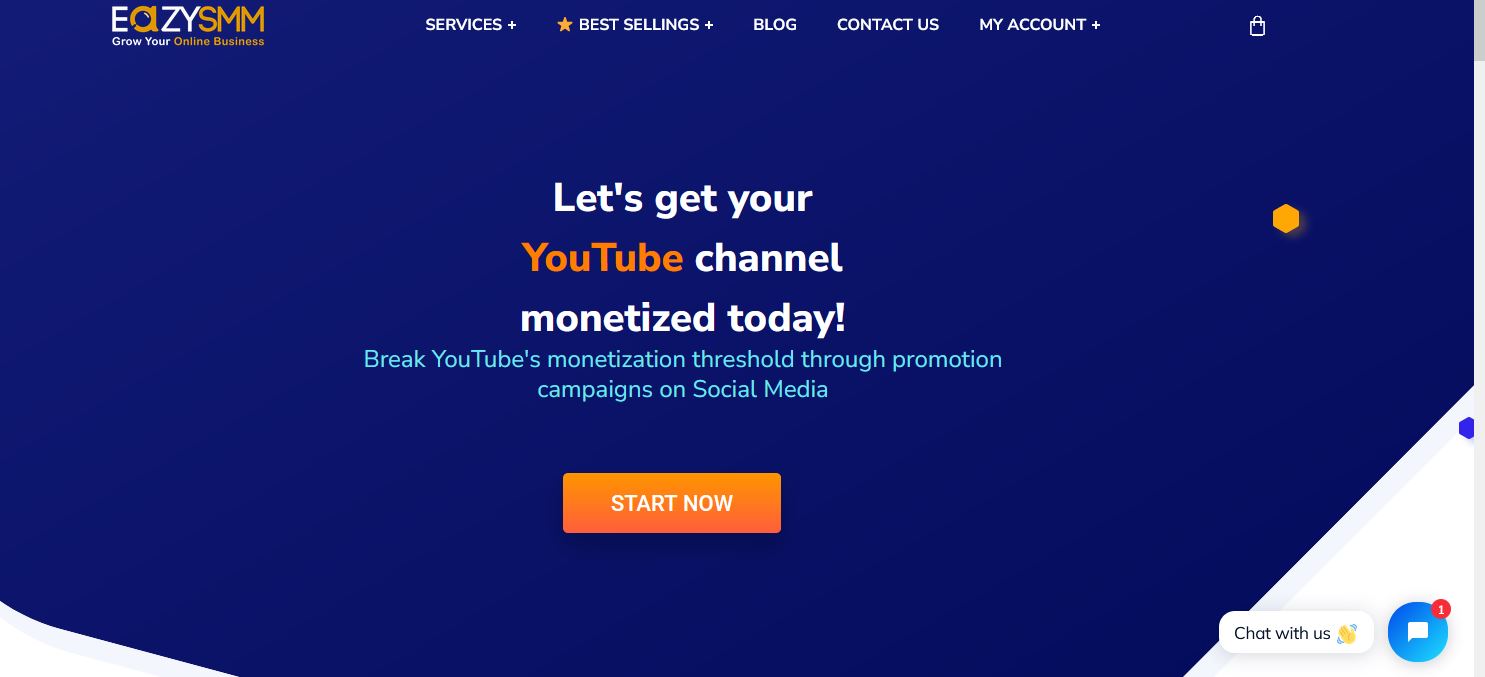
EazySMM watches over its clients to make sure they are growing organically. They promise genuine channel views and subscriptions. Their services are also quick, delivering monetized channels within 12 to 48 hours of the purchase.
Price: Custom Pricing
Customer Rating: 8/10
7. 123accs
This platform allows you to buy YouTube channels that have not yet made money. You can then monetize the channel since it has already met the YouTube Partner Program eligibility criteria.
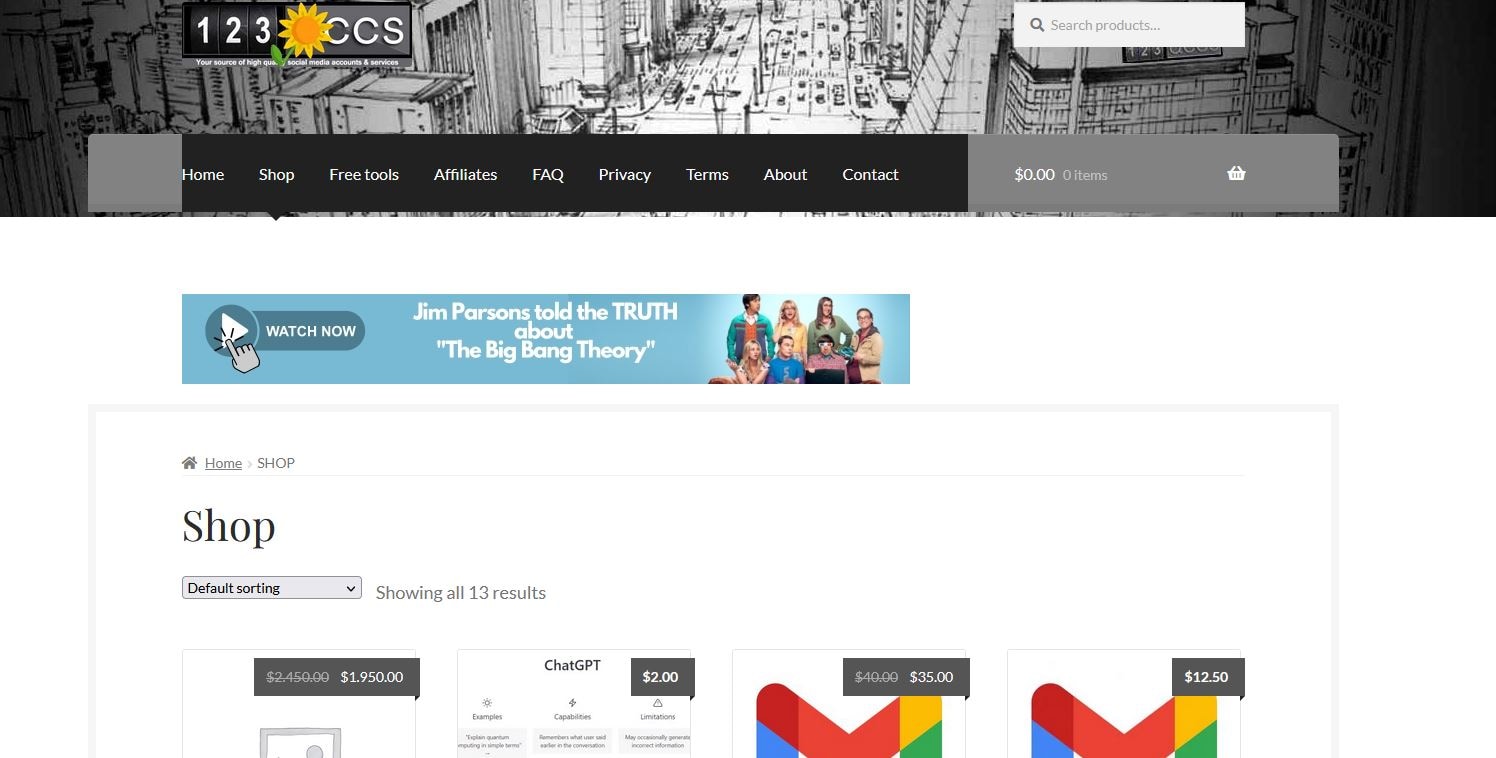
123accs offers new and affordable PVA accounts. Therefore, you can use the service to buy a monetized YouTube channel. Available options include 5 PVA accounts, 25 UK followers, 10 US follower accounts, and more.
Price: Custom Pricing
Customer Rating: 8/10
8. PlayerUp
PlayerUp offers monetized YouTube channels for sale in its marketplace. The platform offers authentic and affordable channels that users can rely on.
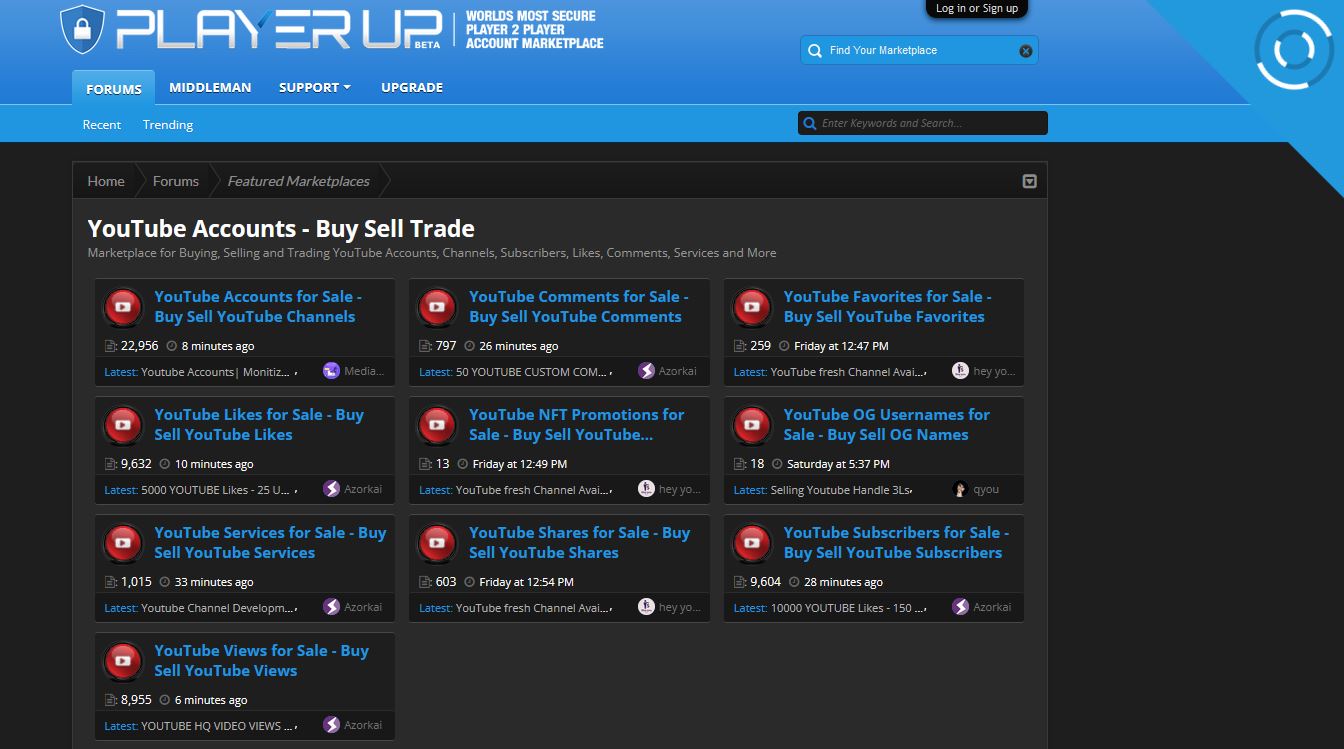
The high quality of the videos posted in the channels under sale will make them stand out in marketing campaigns. This is also a great platform for buying branded content and advanced filters.
Price: Custom Pricing
Customer Rating: 7.5/10
9. Trustiu
This is a great choice for for satisfying shopping experience. The platform makes it easy to purchase YouTube channels almost instantly.

Trustiu stands out for its affordable prices and a wide selection of choices. Users also have the freedom to choose the language they want for their channels.
Price: Custom Pricing
Customer Rating: 7.5/10
10. Accs Market
This social media marketplace allows you to buy monetized YouTube channels in a matter of few steps. Choose channels in entertainment of lifestyle niches.
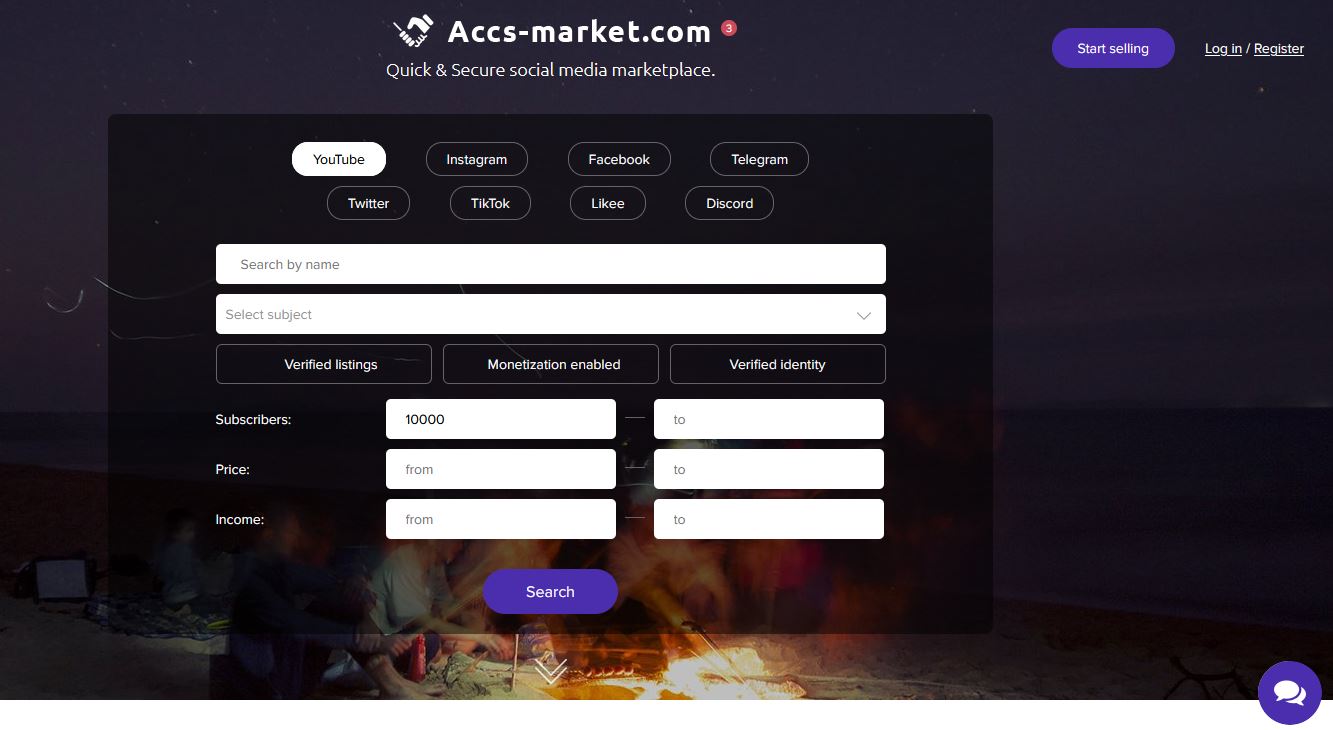
Accs market offers an affordable option for any type of video genre for sellers. From TV shows to movies, Accs Market has something for you.
Part 2. Editing YouTube Videos for Monetization with Wondershare Filmora
In addition to buying a monetized YouTube channel, you will need to create quality videos to remain relevant. This requires good video editing software. With Wondershare Filmora, you can edit any kind of video and add creative effects to make it more interesting. With the option to edit on your desktop or phone on the go, the software gives you more versatility.
Free Download For Win 7 or later(64-bit)
Free Download For macOS 10.14 or later
Wondershare offers a wide range of features that make video editing fun and easy. From automation tools to video enhancement, you can do a lot to your video on the same platform. The most useful features for YouTube monetization include:
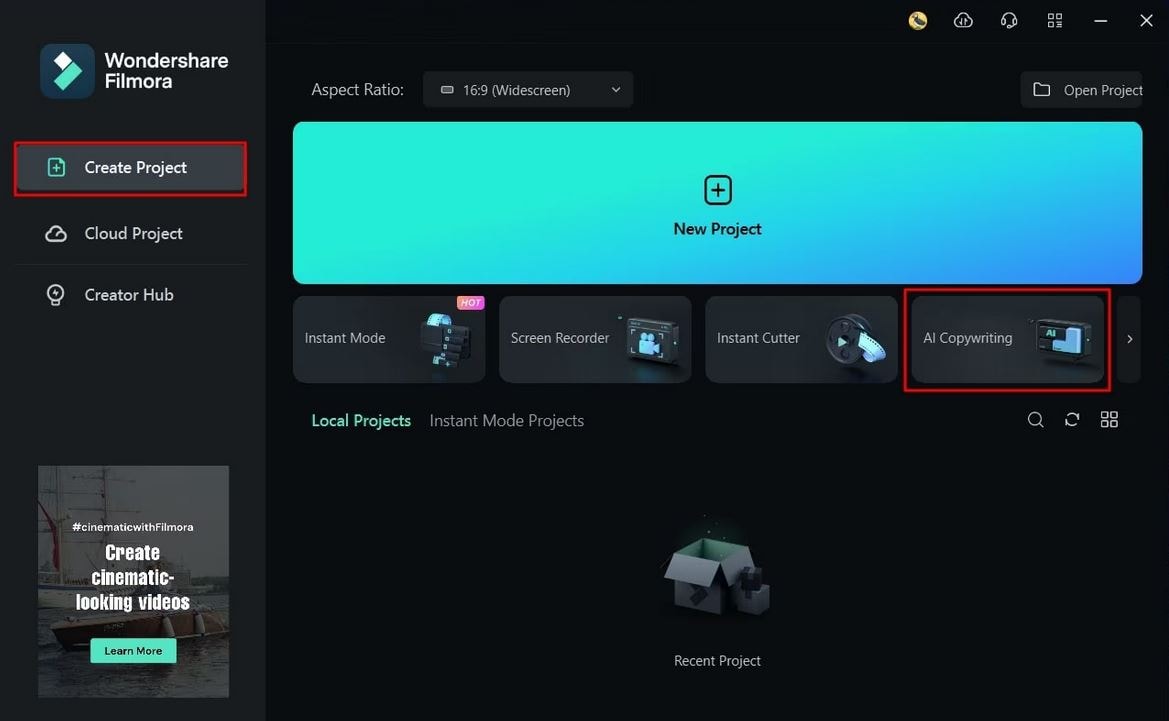
1. AI Copywriting
This feature integrates the ChatGPT API, allowing you to get inspiration through AI-generating scripts. You can also generate text during video editing, as well as YouTube Titles and Descriptions.
2. Auto Synchronization
The auto-synchronization feature allows you to effortlessly match your audio with the video. This makes it sound more clear and gives your audience a better watching experience.

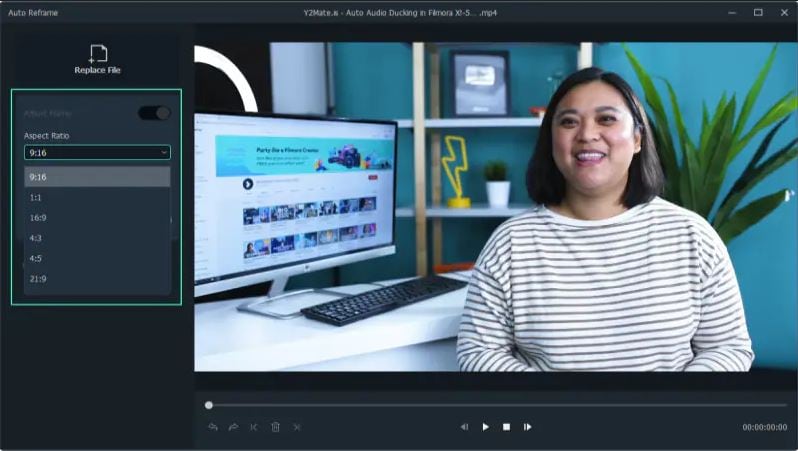
3. Auto Reframe
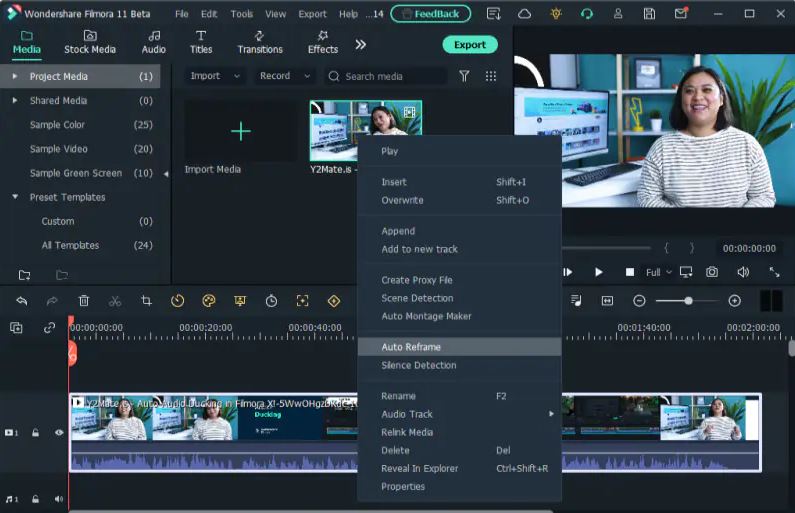
With the rise of YouTube Shorts, reframing your videos is now more of a necessity than an option. You need to appeal to both YouTube viewers and those who consume content in the vertical orientation. The Filmora Auto Reframe feature allows you to automatically resize your videos with no editing skills needed. To use this feature:
Step 1Start the Auto Reframe Feature
One of the ways is by clicking on the Auto Reframe option when you launch Filmora. The other option is to import the media and right-click on it to find the Auto Reframe feature.
Step 2Adjust the Aspect Ratio and Motion Speed
Define the aspect ratio in the dialogue box that opens. A widescreen has an aspect ratio of 16:9 while a vertical one is 9:16.
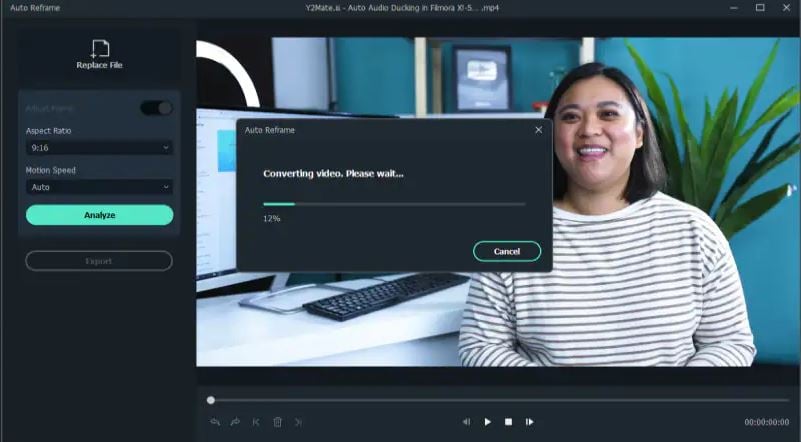
Step 3Analyze and Auto Reframe the Video
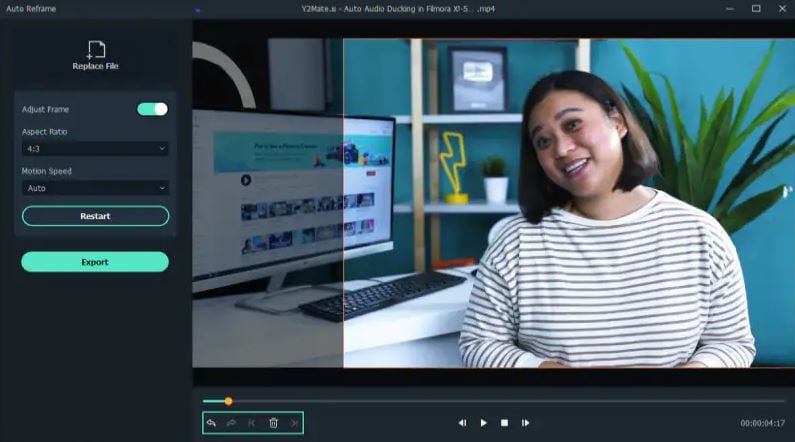
After adjusting the settings, tap on the Analysis option. This will prompt Filmora to analyze your video for completion. The video will be automatically reframed to your specified aspect ratio and speed.
Step 4Preview and Export the Reframed Video
You can now preview the final video to make sure it runs as desired. Make any changes if necessary, and export the reframed video in MP4 format, ready for uploading to YouTube.
Conclusion
The first step to running a successful channel is to be accepted into the YouTube Partner Program. However, building a YouTube Channel from 0 views to meet the eligibility status can be difficult. That’s why buying a monetized YouTube channel is a great place to start. You will only need to focus on creating highly engaging content to continue earning and growing your channel. To ensure that the content you create is of high quality, we recommend using Wondershare Filmora. The video editing software comes with fantastic features that help you create great videos for your channel.
Free Download Free Download Learn More
Part 1. Top 10 Sites to Buy Monetized YouTube Channels
Investing in a pre-existing, monetized YouTube channel is a great idea. It saves you time, allowing you to focus on creating quality content. However, make sure you buy a monetized YouTube channel from a reliable seller. Let’s have a look at the top sites to buy monetized YouTube channels:
1. UseViral
This is one of the best options available to buy monetize YouTube channel. They offer precious monetized YouTube channel packages. Your new channel will be ready for monetization with more than 4,000 watch time hours and a 1,000+ subscriber base.
To get your monetized channel, you will be required to fill out a brief questionnaire. Explain your ideal market and video production needs to allow the UseViral team to understand what you are looking for. They let you know what you are paying for any extras.
Price: $599
Customer Rating: 9.5/10
2. SlidesMedia
This is a well-known social media growth strategist that allows you to buy a monetized YouTube channel. The site stands out for offering assistance with growing the YouTube channel and other social media platforms.
SlidesMedia promises to use only human editors on your YouTube channel. They give you a channel with genuine content. You also get the assurance that the content is not bot-generated..
Price: $529 - $2400.
Customer Rating: 9.3/10
3. AudienceGain
AudienceGain is a popular social media marketing platform. They offer a wide range of services, including selling monetized YouTube channels.
With a proven track record, AudienceGain stands out for offering quality customer service. They support you before, during, and after the purchase. They also provide organically grown channels to make sure you are not demonetized.
Price: $ 129 - $390
Customer Rating: 9.5/10
4. Fameswap
This is a flexible marketplace for selling and buying monetized YouTube channels. The site stands out for being selective in the kind of channels it features.
Fameswap offers a safe method of communication between vendors and buyers through an internal messaging system. You can invest in a channel that you are interested in, ranging from topics like fashion and beauty to entertainment and sports.
Price: Customized pricing
Customer Rating: 8.5/10
5. Eazy Viral
Another excellent choice is to buy a monetized YouTube channel. It allows you to choose from numerous channel types. Users also specify the number of subscribers and watch times they want.
Eazy Viral promises quality content that will not infringe on the rights of others. They also make it simple to monetize your videos and safeguard your AdSense account.
Price: $249 - $1100
Customer Rating: 9/10
6. EazySMM
With EazySMM, you get a unique starting point on your YouTube journey. Choose a YouTube monetized channel for sale on a niche you are interested in at a low price to get started.
EazySMM watches over its clients to make sure they are growing organically. They promise genuine channel views and subscriptions. Their services are also quick, delivering monetized channels within 12 to 48 hours of the purchase.
Price: Custom Pricing
Customer Rating: 8/10
7. 123accs
This platform allows you to buy YouTube channels that have not yet made money. You can then monetize the channel since it has already met the YouTube Partner Program eligibility criteria.
123accs offers new and affordable PVA accounts. Therefore, you can use the service to buy a monetized YouTube channel. Available options include 5 PVA accounts, 25 UK followers, 10 US follower accounts, and more.
Price: Custom Pricing
Customer Rating: 8/10
8. PlayerUp
PlayerUp offers monetized YouTube channels for sale in its marketplace. The platform offers authentic and affordable channels that users can rely on.
The high quality of the videos posted in the channels under sale will make them stand out in marketing campaigns. This is also a great platform for buying branded content and advanced filters.
Price: Custom Pricing
Customer Rating: 7.5/10
9. Trustiu
This is a great choice for for satisfying shopping experience. The platform makes it easy to purchase YouTube channels almost instantly.
Trustiu stands out for its affordable prices and a wide selection of choices. Users also have the freedom to choose the language they want for their channels.
Price: Custom Pricing
Customer Rating: 7.5/10
10. Accs Market
This social media marketplace allows you to buy monetized YouTube channels in a matter of few steps. Choose channels in entertainment of lifestyle niches.
Accs market offers an affordable option for any type of video genre for sellers. From TV shows to movies, Accs Market has something for you.
Part 2. Editing YouTube Videos for Monetization with Wondershare Filmora
In addition to buying a monetized YouTube channel, you will need to create quality videos to remain relevant. This requires good video editing software. With Wondershare Filmora, you can edit any kind of video and add creative effects to make it more interesting. With the option to edit on your desktop or phone on the go, the software gives you more versatility.
Free Download For Win 7 or later(64-bit)
Free Download For macOS 10.14 or later
Wondershare offers a wide range of features that make video editing fun and easy. From automation tools to video enhancement, you can do a lot to your video on the same platform. The most useful features for YouTube monetization include:
1. AI Copywriting
This feature integrates the ChatGPT API, allowing you to get inspiration through AI-generating scripts. You can also generate text during video editing, as well as YouTube Titles and Descriptions.
2. Auto Synchronization
The auto-synchronization feature allows you to effortlessly match your audio with the video. This makes it sound more clear and gives your audience a better watching experience.
3. Auto Reframe
With the rise of YouTube Shorts, reframing your videos is now more of a necessity than an option. You need to appeal to both YouTube viewers and those who consume content in the vertical orientation. The Filmora Auto Reframe feature allows you to automatically resize your videos with no editing skills needed. To use this feature:
Step 1Start the Auto Reframe Feature
One of the ways is by clicking on the Auto Reframe option when you launch Filmora. The other option is to import the media and right-click on it to find the Auto Reframe feature.
Step 2Adjust the Aspect Ratio and Motion Speed
Define the aspect ratio in the dialogue box that opens. A widescreen has an aspect ratio of 16:9 while a vertical one is 9:16.
Step 3Analyze and Auto Reframe the Video
After adjusting the settings, tap on the Analysis option. This will prompt Filmora to analyze your video for completion. The video will be automatically reframed to your specified aspect ratio and speed.
Step 4Preview and Export the Reframed Video
You can now preview the final video to make sure it runs as desired. Make any changes if necessary, and export the reframed video in MP4 format, ready for uploading to YouTube.
Conclusion
The first step to running a successful channel is to be accepted into the YouTube Partner Program. However, building a YouTube Channel from 0 views to meet the eligibility status can be difficult. That’s why buying a monetized YouTube channel is a great place to start. You will only need to focus on creating highly engaging content to continue earning and growing your channel. To ensure that the content you create is of high quality, we recommend using Wondershare Filmora. The video editing software comes with fantastic features that help you create great videos for your channel.
Also read:
- Efficient Ways to Delete Previewed Content From YouTube's Queue for 2024
- [New] Choosing the Right Lights & Cameras for YouTube Videos
- Content Kings & Queens 8 YT's Booming Stars for 2024
- Automated Generation of YouTube's Subscribe Page
- Halt YouTube Suggested Content Now
- Unleash Your YouTube Earnings A Triad Approach to Financial Examination and Analysis
- Haul Vlogging 101 A Step-by-Step Guide
- Bridging Streaming Realms Twitch to YouTube Conversion Strategies
- Best Mac MP4 Cutter Apps Enhance Video Editing
- Can Affordable View Count Gains Be Achieved Naturally for 2024
- Unravel the Revenue Riddle Google's Guided Triple Steps to YouTube Income Analysis
- Bridging Soundscapes & Visuals – Essentials for Innovative ASMR Videos for 2024
- Youtube's Short-Form Videos - 10 Tactics for Dominance in Views
- 2024 Approved Conquer Profits On-the-Go YouTube Studio Monetization Explained
- Discover the Ideal 10 Online Yoga Classrooms for Fitness Growth
- 2024 Approved A Comprehensive Guide to Making GIFs From YouTube Tracks
- Essential Media Makers' Software Linux Edition for 2024
- Secrets Unveiled? Learn to Hide Oneself on Video
- [New] Convert with Precision 10 Leading Tools From Flv to YouTube Platforms
- The Art & Science Behind Effective YouTube Shorts Templates
- Best Practices for YouTube Video Marketing
- [Updated] Demystifying Payment Systems in Shortform Creator Ecosystem
- From Interest to Action Formulating Video Topics with Google Trends
- 2024 Approved Crafting Professional Content on YouTube via Enhancements
- Organize and Share Music How to Make YouTube Playlists Easier
- 2024 Approved Beam Your Content Upward Perfecting YouTube SEO Techniques
- 12 Top-Tier Cameras That Will Transform Your Vlogging Experience
- [New] Elevate Your Viewing Game with Concurrent Channel Watches
- Dominate the Digital Arena Audience Expansion on Youtube
- Ranked The Best 7 Android AdBlockers for Screen Freedom
- In 2024, Bite-Sized Video Lessons, Clearly
- Uploading Mastery with Premiere Pro for Online Platforms
- Access Free Photographic Treasures Through Favored 4 Youtube Clips
- Analyzing Why YouTube Features Specific Comments for 2024
- Top 15 YouTube Portals on Stocks & Trades
- [Updated] Efficiently Isolate Key Moments in YouTube Footage
- 2024 Approved Amassing Audiences and Assets Launching a Livestream Business
- Streamline Your YouTube Watch with No Black or White Edges
- Elevating YouTube Live with High-Quality Webcam Cameras
- 2024 Approved Debating Platform Preferences IGTV Versus YouTube Video Sharing
- Crafting Engaging YouTube Beginnings Two Methods for 2024
- Endless Creativity FREE YouTube Art Resources for 2024
- Understanding Light Settings in YouTube Video Editing
- Updated 2024 Approved How to Choose the Best FLAC Audio Converter for Your Needs
- [New] Step-by-Step Guide to Initiating a TikTok Stream From Desktop for 2024
- How To Restore Missing Contacts Files from Vivo .
- From Static to Dynamic Making Text Pop on Instagram Stories
- [Updated] In 2024, Crafting Dynamic Web Pages with PHP and HTML
- How to Get and Use Pokemon Go Promo Codes On Realme V30 | Dr.fone
- In 2024, How to Erase an iPhone 14 Plus without Apple ID?
- Fake the Location to Get Around the MLB Blackouts on Motorola Moto G 5G (2023) | Dr.fone
- Updated In 2024, Final Cut Pro Mastery Top Tutorials and Beyond
- In 2024, How To Create an Apple Developer Account On iPhone 6 Plus
- Complete Review & Guide to Techeligible FRP Bypass and More For Tecno Spark Go (2024)
- [Updated] In 2024, Strategic Hashtag Usage for Enhanced Visibility on TikTok
- [New] Mastering Multilingual Subtitling A Comprehensive Approach (Vimeo)
- New From Sketch to Screen Mastering Animation Drawing with the Top 7 Software
- How to Screen Mirroring Nokia 105 Classic to PC? | Dr.fone
- Updated Top 15 LUTS to Buy
- Updated Utilizing the Clownfish Vocal Alteration Feature in Online Gaming Platforms and Video Conferencing Apps for 2024
- Crafting Captivating Unboxing Content Top Tips
- Title: "[New] Elite Tech for Saving Your On-Camera Video Memories"
- Author: Brian
- Created at : 2024-05-25 12:40:21
- Updated at : 2024-05-26 12:40:21
- Link: https://youtube-video-recordings.techidaily.com/new-elite-tech-for-saving-your-on-camera-video-memories/
- License: This work is licensed under CC BY-NC-SA 4.0.
