
!["[New] Elevating Your Look Expert Tutorials for Everyone"](https://www.lifewire.com/thmb/ahjGgPBNVXhPGoYIxS7OxgZ4vuE=/400x300/filters:no_upscale():max_bytes(150000):strip_icc()/GettyImages-200544475-001-a23be5e7b0f24905873ef477e09dbbd3.jpg)
"[New] Elevating Your Look Expert Tutorials for Everyone"
Elevating Your Look: Expert Tutorials for Everyone
Ultimate Guide to Beauty on YouTube - Gear, Makeup Tutorials, and More

Richard Bennett
Oct 26, 2023• Proven solutions
Beauty and lifestyle are two of the most popular categories on YouTube, and they might also be the categories most associated with brand deals. Whether you’re hoping to earn revenue as a beauty influencer, or just want to post some fun makeup tutorials, this guide is for you!
We’ll walk you through deciding on a theme for your channel, setting up your equipment, and give you tips for actually recording your videos.
1. **[Finding Your Niche in Beauty or Lifestyle](#niche)**
- Types of Beauty Videos – Your Content Strategy
- How to Get Products to Review
- Simple Camera Setup for Beauty Vloggers
- Lighting for Beauty
- Top Ring Lights for YouTube
- Build Your Own Diva Ring Light
- How to Make a Makeup Tutorial – Before You Start
- How to Make a Makeup Tutorial – Recording
- How to Make a Makeup Tutorial – After Shooting
Best YouTube Video Editor- Wondershare Filmora
Wondershare Filmora is specifically made keeping quality on priority and to make sure all the videos are edited well with the highest accuracy. You can trim, merge, crop, add background music, rotate videos as well as add motion elements, animated texts, overlays, and filters, etc. to your makeup video, and the video can also be uploaded to YouTube or burned to DVD directly.


Finding Your Niche in Beauty or Lifestyle
As a new makeup, beauty, or lifestyle YouTuber you’ll be jumping into a category that’s already packed with thousands of channels. In order to gain any momentum, you’ll have to decide on a particular thing you want to be known for. That’s your niche.
People looking for beauty tutorials are often looking for someone who has something in particular in common with them. Hairstyling for a specific ethnicity, for example, is a potential niche because people want to learn how to style their own hair, not a hair in general.
Another way you could find a niche is by taking on a specific area of interest, like a skincare channel with a focus on coping with acne or a makeup channel with a focus on natural products.
SunKissAlba has a lifestyle channel that focuses on a ‘natural’ niche. She posts videos about every aspect of her lifestyle from putting on makeup to cooking, but natural/non-toxic products are a constant theme through everything she does. By niching her channel she hasn’t limited what kinds of videos she can do at all - she posts a huge variety of different types of videos. What she has done is to make her channel particularly valuable to audiences interested in things that are natural or organic.
Types of Beauty Videos – Your Content Strategy
It’s a lot easier to come up with weekly video ideas when you have an overarching strategy.
The easiest way to figure out what kinds of videos you should make (and this can also help determine your niche!) is to think about what you already do and enjoy. If skincare is particularly important to you, for example, then you could build a content strategy that includes things like your favorite sunscreen, what different ingredients in skincare products are for, or even how to make a DIY face mask.
The same thing goes if you love doing big glamourous makeups for going out. Think about what you like, and that will determine what you should talk about in your videos.
Instead of buying new products to use in videos, try to use and showcase what you already have.
Here are some common types of beauty and lifestyle videos:
Get Ready With Me: a video where you put your makeup on which helps your audience get to know you better.
Monthly Favorites: showcases your favorite products from the last month.
Makeup Collection: viewers will want to see what you have.
DIY: create something, like a homemade moisturizer, and show your viewers how to make their own.
Makeup Hauls: show off what you’ve bought recently.
Lookbooks: put together a few looks based on a theme, like a specific color or event.
First Impressions: show yourself using a new product for the first time.
Makeup Tutorials: teach your viewers how to achieve a particular look, like a smokey eye.
What’s In My Bag: empty your handbag to show viewers what you carry around with you, particularly your most essential makeup.
My Routine: show viewers your morning skincare routine, or how you usually take your makeup off before bed. Any of your beauty-related routines will be interesting to your followers.
You should also be ready to jump on trends as they jump up. You can get a bump in viewership from people searching for a particular trend. Here are a couple of examples of past trends:
- Boyfriend Does My Makeup
- Kid’s Makeup Challenge
- No Mirror Makeup Challenge
How to Get Products to Review
You probably already know that a lot of the products popular beauty YouTubers review in their videos were sent to them for free. Brands want to get their products into the hands of creators who have ‘influence’ both in the hopes that their audiences will decide to buy them and as part of generating buzz – getting more people talking about their products so more people become interested.
In order for a brand to consider sending you a free product to review or feature in a video, you will first have to have a large enough following.
What is ‘large enough’? There’s no magic number of YouTube subscribers or Instagram followers. How large your following needs to be will depend on what brands you want to work with, as well as whether your channel has a specific niche.
Large brands will want to work with larger creators. Smaller brands that are still trying to build notoriety may be more open to working with creators whose followings are not as large.
If you have a very specific niche then that could create more opportunities for you as a mid-sized YouTuber. If you specialize in styling curly black hair, and a brand is marketing a product made specifically for styling curly black hair, then your smaller following will be more valuable to that brand than the larger audience of a more general channel.
Here are 4 tips for getting free products for review:
- Follow your favorite brands on Instagram and subscribe to their YouTube channels. Make sure to take them when you feature their products in your posts or videos.
- Focus on growing your community/audience. As you start getting more subscribers and building up momentum for your channel, brands might start reaching out to you. We’ve got some tips on growing your YouTube channel here .
- Make a pitch to a brand. The first step in this is figuring out who to pitch to. You can send smaller brands DMs via Instagram or Twitter and politely ask for contact info for a PR person. Never ask for free product or sponsorship at this point, just information you can use to contact PR.
- Send an email with your pitch to the brand’s PR person. Your email should introduce yourself, describe your content, and talk about what type of audience you have (how many subscribers, where are they located, how old are they, etc. This information is all available in your Creator Studio analytics).
Make sure to link to your channel so they can verify what you say (do not hide your subscriber count).
Emphasize what value you could provide the brand with (i.e. ‘I’ve had a lot of success with videos on managing acne and I’m sure my subscribers would love to see a review of your cream’) and outline what kind of video you’d like to make (i.e. a five-minute review focusing on the product, or a short feature in a longer makeup tutorial).
Simple Camera Setup for Beauty Vloggers
There are a lot of different ways to set up your camera for a ‘talking head’ video (anything that is primarily you talking to the camera). Keep reading to learn about a popular ring-light setup for beauty videos, or click here to learn 4 different camera setups .
In an ideal situation, this is what you’ll build your setup out of:
- Camera with a flip-out screen
- Ring light
- Camera-mounted shotgun mic
- Tripod (unless you can mount your camera inside your ring light)
If you don’t have access to all of the equipment above, try some of these:
- Smartphone camera
- DIY ring light
- Smartphone shotgun mic or LAV
Step 1: Set your camera and ring light (your camera should be sitting directly behind your ring light, or mounted inside of it) up about 3 feet away from your subject (yourself).
You might want to experiment with sitting at different distances to see how the lighting looks on your face.
Step 2: Set your camera up a bit higher than your face and tilt it down towards yourself (shooting from slightly above is always more flattering). It should be set up at about a 15° angle to you.
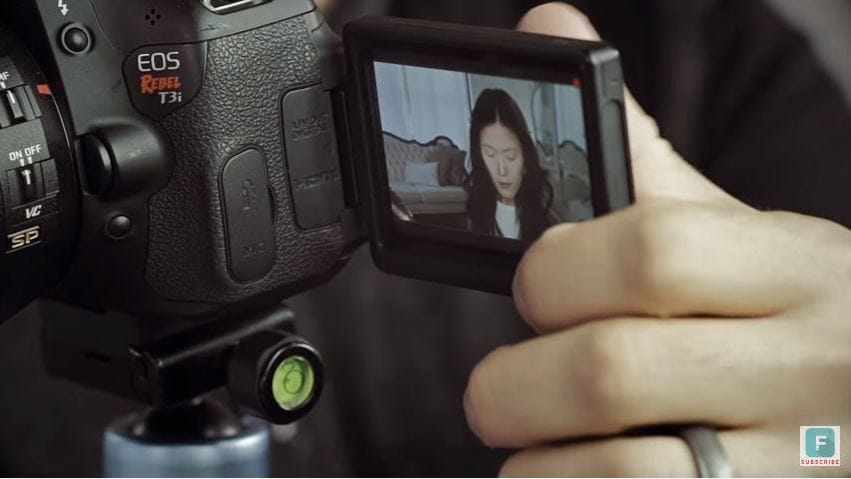
Step 3: Check your frame (this is easiest if your camera has a screen that flips out) to make sure there’s not too much empty space in your shot.
Step 4: Adjust your camera’s focus so your picture is clear. You may need to set up a lamp, chair, or stuffed animal as a stand-in for yourself while you stand behind the camera adjusting the focus.
Turn off autofocus and adjust your focus manually by turning the focus ring on your lens, if you’re using a DSLR or mirrorless camera.
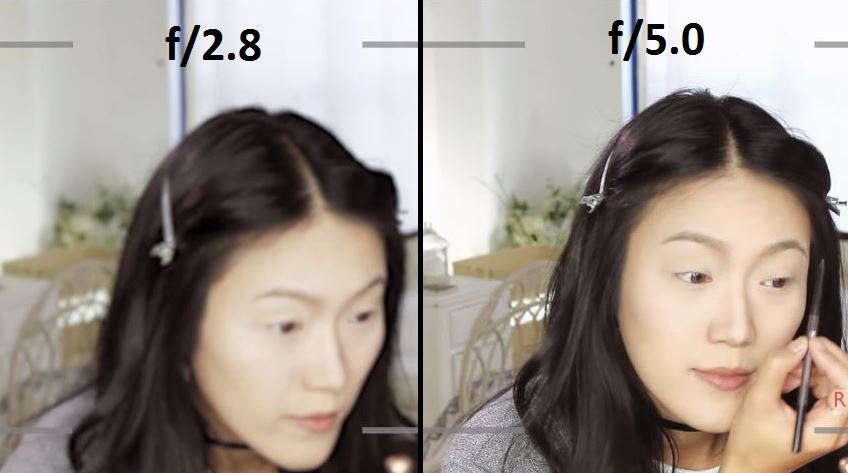
Step 5: Set your f-stop (aperture) so that your depth of field is deep enough for you to lean forwards or backward without becoming blurry.
An aperture of f/5.0 is good if you’re going to be moving around a lot, but if you’re not going to be moving much and want a blurry background you might want to go with f/2.8 or lower.
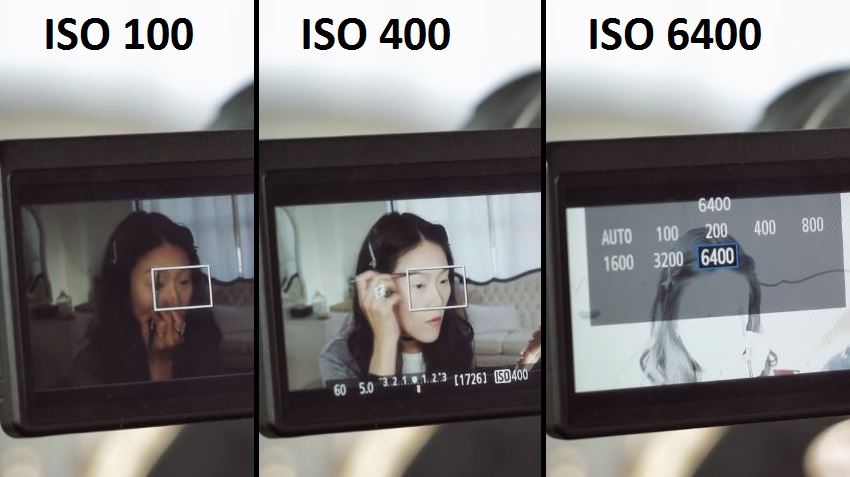
Step 6: Set your ISO (film speed). A lower ISO will give you a darker, but higher quality, image. A higher ISO will lower your quality and give you a brighter image.
ISO 400 should be a happy medium for shooting inside with your ring light, but you may need to try out a couple of settings to find one perfect for your situation.
For more info on camera settings for beauty videos, click here .
Lighting for Beauty
The key to achieving a high-quality picture for your beauty video is having a lot of light.
A ring light (whether it’s one you purchase or one you make) will give you even light over your whole face, and that may be enough. Ring lights are considered one of the biggest ‘secrets’ to beauty on YouTube (as explained in this Racked article ).
There are, however, some reasons you might want additional light:
To Light your Background/Space
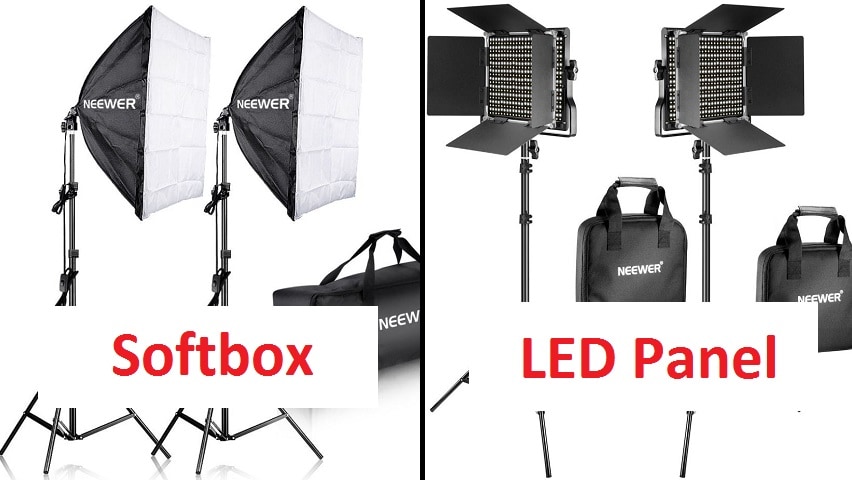
If you only have a ring light/front light then you may end up looking like you’re surrounded by shadows. If you want more light for your space you can use windows, household lamps, or professional video lights like softboxes or LED panels.
To Stand Out Against your Background (‘Backlighting’)
A front light that’s lighting you evenly is also lighting whatever’s behind you evenly, which can make your overall picture look flat.
Setting up a light to shine up at you from behind will help you pop out from your background by creating a silhouette.
You can use an LED panel or a household lamp as a backlight.
To Add Dimension to Your Face (Side Lights/ Fill Lights)
Setting up lights to hit you from the sides will help you look more three dimensional. It can also give your video a general quality boost because the picture quality is always better when there’s tons of light.
You can use softboxes, LED panels, clamp lights, household lamps, or any other light source you can think of.
Lighting Tips!
* **_Use ‘daylight’ bulbs in any household lighting/clamp lights you use._ This way, your light will all be the same color and you won’t have to do a lot of color correction (the more yellow-colored light most indoor lights give off will make you look orange).**
You can buy daylight-colored bulbs for about $5.
- Clamp lights ($10 each) and paper lanterns ($10 each) provide great lighting and are much more affordable than professional lighting kits. The paper lanterns will provide even, diffused, light and the clamp lights will be easy to set up wherever you need them.
- Check out these DIY tips for creating your own reflectors and diffusers .
Top Ring Lights for YouTube
1. Neewer Dimmable Fluorescent Ring Light - $110
One cool feature of the Neewer Ring Light is that you can choose between daylight and a more orange-tinted light depending on which of the included filters you use. In almost all situations you’ll want to use white light/daylight because the orange light will make you look orange, but if you ever wanted to create a warmer image to achieve a particular effect you’d have that option with this light.
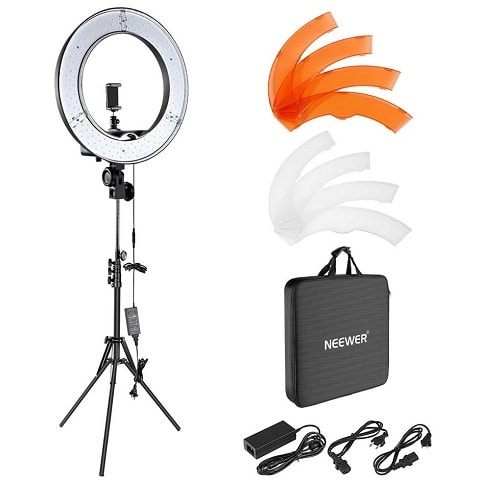
This light is dimmable and can be adjusted to the angle that suits your shot. That’s true of our number 2 pick too, and the second place light actually has a slight edge over the Neewer light because its color temperature is 5400K which is slightly closer to daylight than Neewer’s 5500K, but that’s honestly not super important for YouTube. They’re close enough that you won’t be able to tell the difference, and this light is over $100 more affordable.
2. Prismatic Halo Ring Light - $260
This lightweight ring light is easy to transport, set up, and mount your phone or camera to. It’s a fluorescent ‘daylight’ (5400K) light, so the colors in your videos will look natural.
This light is dimmable, so you can turn it down if it’s too bright, and the Prismatic Light Stand will allow you to tilt your light to the perfect angle. This will be handy if you’re mounting your camera inside the ring but want to place it slightly above your face instead of having it look at you head on.
Build Your Own Diva Ring Light
A ring light is an important tool for a lot of beauty YouTubers, but it doesn’t fit into everyone’s budget. Here’s one popular way to create your own ring light for about $20.
A lot of people have done this DIY, but we’re using Kevin’s video because we love how he added the stand.
What you need:
- A wire wreath frame
- Zip ties
- LED rope light (16 ft, daylight)
- Tinfoil
- Metal paper towel stand
- Scissors
Step 1: Wrap your wreath frame in tinfoil. Make sure the tinfoil is shaped to the wreath so that there is a curve on the inside where your rope light can sit.
Step 2: Place your rope light inside the curve of your frame. Wind it around for 3 loops so you have 2 rows of lighting tube sitting next to each other.
Step 3: Use the zip ties to fasten in the rope light. Wrap them tightly around your frame and lights in several (6-8) places.
Step 4: Cut off the tails of the zip ties.
This is your ring light. Continue to step 5 if you want it to have a stand (you might just want to clip it up somewhere).
Step 5: Fasten your ring light tightly to your paper towel stand securely with several zip ties. Make sure to fasten it at the bottom (where the excess rope light is coming out of your ring light). Cut off the tails of the zip ties.
How to Make a Makeup Tutorial – Before You Start
Before you start recording your makeup tutorial there are a few things you should do.
- Write an outline. You might even want to write yourself a transcript. Having a concrete plan before you start recording will help ensure your tutorial is useful for viewers. You’ll realize where you might need to slow down and show a particular step in more detail, or where your viewers might find a particular step tricky, in a way you want if you just jump into a makeup routine you know perfectly.
- Layout your supplies. Make sure everything you need for your tutorial is laid out neatly in front of you so you can access it all easily. Try to use clean brushes – it just looks nicer.
- Tidy up. If you want your viewers to trust you when it comes to aesthetics, it’s important that your studio area is clean and tidy. You may even want to use a backdrop.
- Do a video test. Before you start your video for real, start recording and shoot some test footage. Watch that back to make sure you like the look of your frame, your face is never blurry, and you’re happy with the overall look of things.
- Do an audio test. If you’re going to be talking in your video instead of recording a voiceover after, do an audio test to make sure your audience will be able to hear you clearly.
How to Make a Makeup Tutorial – Recording
Here are some things to keep in mind while you record your makeup tutorial:
- Show what you’re using. When you use a product, brush, or any other beauty supply make sure to let your audience know what you’re using and why you chose it. This isn’t about promoting brands, it’s about making it easy for viewers to duplicate your results.
If you’re using autofocus, you can hold products up to the screen and wait for it to kick in. If you’re not using autofocus, just hold them up next to you for a moment. You can also shoot separate closeups of each product and cut them into your main tutorial video. - Highlight small details. Describe what you’re doing in a lot of detail and don’t gloss over anything. Assume the person watching your tutorial doesn’t know anything about putting on makeup.
- Take stills for your thumbnail. Remember to take some still photos of your finished makeup to use in your YouTube thumbnail.
How to Make a Makeup Tutorial – After Shooting
Once you’ve finished recording and put away all your camera gear, there’s still work to do. You still need to edit your video and post it on YouTube. Here are some tips for that:
- Add transitions and effects. If you have several clips or even just distinct sections of your main clip, then adding transitions can be a great way to hold your viewers’ attention.
If you spend a lot of time on a repetitive step, you may want to speed that part up and make it a time-lapse. - Add your intro. Having a short (usually around 5 seconds) intro sequence is a great way to strengthen your personal lifestyle brand. You can download free intros right here on filmora.io .
- Title your video. Make sure your most important keyword – the type of look you’re creating, or a product you’re reviewing – is near the beginning of your video’s title. Searching for the topic of your video and writing a title similar to the highest-ranking results is a good way to start.
Remember to include what type of video you made, i.e. ‘tutorial’, ‘review’, or ‘get ready with me’, in your title. People might include these kinds of words in their search queries and, even if they find your video another way, they’ll probably want to know what they’re clicking on before they click. - Customize your thumbnail. Again, search for your video’s topic and see what comes up. You want your thumbnail to look related to the top results, but you also want it to jump out at potential viewers. There may be something you can add to the thumbnail photos you took that will help you stand out, like a bright border, an emoji, or a closeup of a product you feature in the video.
- Write a detailed description. Putting the products you use in your video description will help your viewers, and it’s a great place to include affiliate links if you ever join an affiliate program (like Amazon’s) to generate some revenue.
Are you already making beauty videos? If so, let us know if you have any of your own tips!
Richard Bennett
Richard Bennett is a writer and a lover of all things video.
Follow @Richard Bennett
Richard Bennett
Oct 26, 2023• Proven solutions
Beauty and lifestyle are two of the most popular categories on YouTube, and they might also be the categories most associated with brand deals. Whether you’re hoping to earn revenue as a beauty influencer, or just want to post some fun makeup tutorials, this guide is for you!
We’ll walk you through deciding on a theme for your channel, setting up your equipment, and give you tips for actually recording your videos.
1. **[Finding Your Niche in Beauty or Lifestyle](#niche)**
- Types of Beauty Videos – Your Content Strategy
- How to Get Products to Review
- Simple Camera Setup for Beauty Vloggers
- Lighting for Beauty
- Top Ring Lights for YouTube
- Build Your Own Diva Ring Light
- How to Make a Makeup Tutorial – Before You Start
- How to Make a Makeup Tutorial – Recording
- How to Make a Makeup Tutorial – After Shooting
Best YouTube Video Editor- Wondershare Filmora
Wondershare Filmora is specifically made keeping quality on priority and to make sure all the videos are edited well with the highest accuracy. You can trim, merge, crop, add background music, rotate videos as well as add motion elements, animated texts, overlays, and filters, etc. to your makeup video, and the video can also be uploaded to YouTube or burned to DVD directly.
Finding Your Niche in Beauty or Lifestyle
As a new makeup, beauty, or lifestyle YouTuber you’ll be jumping into a category that’s already packed with thousands of channels. In order to gain any momentum, you’ll have to decide on a particular thing you want to be known for. That’s your niche.
People looking for beauty tutorials are often looking for someone who has something in particular in common with them. Hairstyling for a specific ethnicity, for example, is a potential niche because people want to learn how to style their own hair, not a hair in general.
Another way you could find a niche is by taking on a specific area of interest, like a skincare channel with a focus on coping with acne or a makeup channel with a focus on natural products.
SunKissAlba has a lifestyle channel that focuses on a ‘natural’ niche. She posts videos about every aspect of her lifestyle from putting on makeup to cooking, but natural/non-toxic products are a constant theme through everything she does. By niching her channel she hasn’t limited what kinds of videos she can do at all - she posts a huge variety of different types of videos. What she has done is to make her channel particularly valuable to audiences interested in things that are natural or organic.
Types of Beauty Videos – Your Content Strategy
It’s a lot easier to come up with weekly video ideas when you have an overarching strategy.
The easiest way to figure out what kinds of videos you should make (and this can also help determine your niche!) is to think about what you already do and enjoy. If skincare is particularly important to you, for example, then you could build a content strategy that includes things like your favorite sunscreen, what different ingredients in skincare products are for, or even how to make a DIY face mask.
The same thing goes if you love doing big glamourous makeups for going out. Think about what you like, and that will determine what you should talk about in your videos.
Instead of buying new products to use in videos, try to use and showcase what you already have.
Here are some common types of beauty and lifestyle videos:
Get Ready With Me: a video where you put your makeup on which helps your audience get to know you better.
Monthly Favorites: showcases your favorite products from the last month.
Makeup Collection: viewers will want to see what you have.
DIY: create something, like a homemade moisturizer, and show your viewers how to make their own.
Makeup Hauls: show off what you’ve bought recently.
Lookbooks: put together a few looks based on a theme, like a specific color or event.
First Impressions: show yourself using a new product for the first time.
Makeup Tutorials: teach your viewers how to achieve a particular look, like a smokey eye.
What’s In My Bag: empty your handbag to show viewers what you carry around with you, particularly your most essential makeup.
My Routine: show viewers your morning skincare routine, or how you usually take your makeup off before bed. Any of your beauty-related routines will be interesting to your followers.
You should also be ready to jump on trends as they jump up. You can get a bump in viewership from people searching for a particular trend. Here are a couple of examples of past trends:
- Boyfriend Does My Makeup
- Kid’s Makeup Challenge
- No Mirror Makeup Challenge
How to Get Products to Review
You probably already know that a lot of the products popular beauty YouTubers review in their videos were sent to them for free. Brands want to get their products into the hands of creators who have ‘influence’ both in the hopes that their audiences will decide to buy them and as part of generating buzz – getting more people talking about their products so more people become interested.
In order for a brand to consider sending you a free product to review or feature in a video, you will first have to have a large enough following.
What is ‘large enough’? There’s no magic number of YouTube subscribers or Instagram followers. How large your following needs to be will depend on what brands you want to work with, as well as whether your channel has a specific niche.
Large brands will want to work with larger creators. Smaller brands that are still trying to build notoriety may be more open to working with creators whose followings are not as large.
If you have a very specific niche then that could create more opportunities for you as a mid-sized YouTuber. If you specialize in styling curly black hair, and a brand is marketing a product made specifically for styling curly black hair, then your smaller following will be more valuable to that brand than the larger audience of a more general channel.
Here are 4 tips for getting free products for review:
- Follow your favorite brands on Instagram and subscribe to their YouTube channels. Make sure to take them when you feature their products in your posts or videos.
- Focus on growing your community/audience. As you start getting more subscribers and building up momentum for your channel, brands might start reaching out to you. We’ve got some tips on growing your YouTube channel here .
- Make a pitch to a brand. The first step in this is figuring out who to pitch to. You can send smaller brands DMs via Instagram or Twitter and politely ask for contact info for a PR person. Never ask for free product or sponsorship at this point, just information you can use to contact PR.
- Send an email with your pitch to the brand’s PR person. Your email should introduce yourself, describe your content, and talk about what type of audience you have (how many subscribers, where are they located, how old are they, etc. This information is all available in your Creator Studio analytics).
Make sure to link to your channel so they can verify what you say (do not hide your subscriber count).
Emphasize what value you could provide the brand with (i.e. ‘I’ve had a lot of success with videos on managing acne and I’m sure my subscribers would love to see a review of your cream’) and outline what kind of video you’d like to make (i.e. a five-minute review focusing on the product, or a short feature in a longer makeup tutorial).
Simple Camera Setup for Beauty Vloggers
There are a lot of different ways to set up your camera for a ‘talking head’ video (anything that is primarily you talking to the camera). Keep reading to learn about a popular ring-light setup for beauty videos, or click here to learn 4 different camera setups .
In an ideal situation, this is what you’ll build your setup out of:
- Camera with a flip-out screen
- Ring light
- Camera-mounted shotgun mic
- Tripod (unless you can mount your camera inside your ring light)
If you don’t have access to all of the equipment above, try some of these:
- Smartphone camera
- DIY ring light
- Smartphone shotgun mic or LAV
Step 1: Set your camera and ring light (your camera should be sitting directly behind your ring light, or mounted inside of it) up about 3 feet away from your subject (yourself).
You might want to experiment with sitting at different distances to see how the lighting looks on your face.
Step 2: Set your camera up a bit higher than your face and tilt it down towards yourself (shooting from slightly above is always more flattering). It should be set up at about a 15° angle to you.
Step 3: Check your frame (this is easiest if your camera has a screen that flips out) to make sure there’s not too much empty space in your shot.
Step 4: Adjust your camera’s focus so your picture is clear. You may need to set up a lamp, chair, or stuffed animal as a stand-in for yourself while you stand behind the camera adjusting the focus.
Turn off autofocus and adjust your focus manually by turning the focus ring on your lens, if you’re using a DSLR or mirrorless camera.
Step 5: Set your f-stop (aperture) so that your depth of field is deep enough for you to lean forwards or backward without becoming blurry.
An aperture of f/5.0 is good if you’re going to be moving around a lot, but if you’re not going to be moving much and want a blurry background you might want to go with f/2.8 or lower.
Step 6: Set your ISO (film speed). A lower ISO will give you a darker, but higher quality, image. A higher ISO will lower your quality and give you a brighter image.
ISO 400 should be a happy medium for shooting inside with your ring light, but you may need to try out a couple of settings to find one perfect for your situation.
For more info on camera settings for beauty videos, click here .
Lighting for Beauty
The key to achieving a high-quality picture for your beauty video is having a lot of light.
A ring light (whether it’s one you purchase or one you make) will give you even light over your whole face, and that may be enough. Ring lights are considered one of the biggest ‘secrets’ to beauty on YouTube (as explained in this Racked article ).
There are, however, some reasons you might want additional light:
To Light your Background/Space
If you only have a ring light/front light then you may end up looking like you’re surrounded by shadows. If you want more light for your space you can use windows, household lamps, or professional video lights like softboxes or LED panels.
To Stand Out Against your Background (‘Backlighting’)
A front light that’s lighting you evenly is also lighting whatever’s behind you evenly, which can make your overall picture look flat.
Setting up a light to shine up at you from behind will help you pop out from your background by creating a silhouette.
You can use an LED panel or a household lamp as a backlight.
To Add Dimension to Your Face (Side Lights/ Fill Lights)
Setting up lights to hit you from the sides will help you look more three dimensional. It can also give your video a general quality boost because the picture quality is always better when there’s tons of light.
You can use softboxes, LED panels, clamp lights, household lamps, or any other light source you can think of.
Lighting Tips!
* **_Use ‘daylight’ bulbs in any household lighting/clamp lights you use._ This way, your light will all be the same color and you won’t have to do a lot of color correction (the more yellow-colored light most indoor lights give off will make you look orange).**
You can buy daylight-colored bulbs for about $5.
- Clamp lights ($10 each) and paper lanterns ($10 each) provide great lighting and are much more affordable than professional lighting kits. The paper lanterns will provide even, diffused, light and the clamp lights will be easy to set up wherever you need them.
- Check out these DIY tips for creating your own reflectors and diffusers .
Top Ring Lights for YouTube
1. Neewer Dimmable Fluorescent Ring Light - $110
One cool feature of the Neewer Ring Light is that you can choose between daylight and a more orange-tinted light depending on which of the included filters you use. In almost all situations you’ll want to use white light/daylight because the orange light will make you look orange, but if you ever wanted to create a warmer image to achieve a particular effect you’d have that option with this light.
This light is dimmable and can be adjusted to the angle that suits your shot. That’s true of our number 2 pick too, and the second place light actually has a slight edge over the Neewer light because its color temperature is 5400K which is slightly closer to daylight than Neewer’s 5500K, but that’s honestly not super important for YouTube. They’re close enough that you won’t be able to tell the difference, and this light is over $100 more affordable.
2. Prismatic Halo Ring Light - $260
This lightweight ring light is easy to transport, set up, and mount your phone or camera to. It’s a fluorescent ‘daylight’ (5400K) light, so the colors in your videos will look natural.
This light is dimmable, so you can turn it down if it’s too bright, and the Prismatic Light Stand will allow you to tilt your light to the perfect angle. This will be handy if you’re mounting your camera inside the ring but want to place it slightly above your face instead of having it look at you head on.
Build Your Own Diva Ring Light
A ring light is an important tool for a lot of beauty YouTubers, but it doesn’t fit into everyone’s budget. Here’s one popular way to create your own ring light for about $20.
A lot of people have done this DIY, but we’re using Kevin’s video because we love how he added the stand.
What you need:
- A wire wreath frame
- Zip ties
- LED rope light (16 ft, daylight)
- Tinfoil
- Metal paper towel stand
- Scissors
Step 1: Wrap your wreath frame in tinfoil. Make sure the tinfoil is shaped to the wreath so that there is a curve on the inside where your rope light can sit.
Step 2: Place your rope light inside the curve of your frame. Wind it around for 3 loops so you have 2 rows of lighting tube sitting next to each other.
Step 3: Use the zip ties to fasten in the rope light. Wrap them tightly around your frame and lights in several (6-8) places.
Step 4: Cut off the tails of the zip ties.
This is your ring light. Continue to step 5 if you want it to have a stand (you might just want to clip it up somewhere).
Step 5: Fasten your ring light tightly to your paper towel stand securely with several zip ties. Make sure to fasten it at the bottom (where the excess rope light is coming out of your ring light). Cut off the tails of the zip ties.
How to Make a Makeup Tutorial – Before You Start
Before you start recording your makeup tutorial there are a few things you should do.
- Write an outline. You might even want to write yourself a transcript. Having a concrete plan before you start recording will help ensure your tutorial is useful for viewers. You’ll realize where you might need to slow down and show a particular step in more detail, or where your viewers might find a particular step tricky, in a way you want if you just jump into a makeup routine you know perfectly.
- Layout your supplies. Make sure everything you need for your tutorial is laid out neatly in front of you so you can access it all easily. Try to use clean brushes – it just looks nicer.
- Tidy up. If you want your viewers to trust you when it comes to aesthetics, it’s important that your studio area is clean and tidy. You may even want to use a backdrop.
- Do a video test. Before you start your video for real, start recording and shoot some test footage. Watch that back to make sure you like the look of your frame, your face is never blurry, and you’re happy with the overall look of things.
- Do an audio test. If you’re going to be talking in your video instead of recording a voiceover after, do an audio test to make sure your audience will be able to hear you clearly.
How to Make a Makeup Tutorial – Recording
Here are some things to keep in mind while you record your makeup tutorial:
- Show what you’re using. When you use a product, brush, or any other beauty supply make sure to let your audience know what you’re using and why you chose it. This isn’t about promoting brands, it’s about making it easy for viewers to duplicate your results.
If you’re using autofocus, you can hold products up to the screen and wait for it to kick in. If you’re not using autofocus, just hold them up next to you for a moment. You can also shoot separate closeups of each product and cut them into your main tutorial video. - Highlight small details. Describe what you’re doing in a lot of detail and don’t gloss over anything. Assume the person watching your tutorial doesn’t know anything about putting on makeup.
- Take stills for your thumbnail. Remember to take some still photos of your finished makeup to use in your YouTube thumbnail.
How to Make a Makeup Tutorial – After Shooting
Once you’ve finished recording and put away all your camera gear, there’s still work to do. You still need to edit your video and post it on YouTube. Here are some tips for that:
- Add transitions and effects. If you have several clips or even just distinct sections of your main clip, then adding transitions can be a great way to hold your viewers’ attention.
If you spend a lot of time on a repetitive step, you may want to speed that part up and make it a time-lapse. - Add your intro. Having a short (usually around 5 seconds) intro sequence is a great way to strengthen your personal lifestyle brand. You can download free intros right here on filmora.io .
- Title your video. Make sure your most important keyword – the type of look you’re creating, or a product you’re reviewing – is near the beginning of your video’s title. Searching for the topic of your video and writing a title similar to the highest-ranking results is a good way to start.
Remember to include what type of video you made, i.e. ‘tutorial’, ‘review’, or ‘get ready with me’, in your title. People might include these kinds of words in their search queries and, even if they find your video another way, they’ll probably want to know what they’re clicking on before they click. - Customize your thumbnail. Again, search for your video’s topic and see what comes up. You want your thumbnail to look related to the top results, but you also want it to jump out at potential viewers. There may be something you can add to the thumbnail photos you took that will help you stand out, like a bright border, an emoji, or a closeup of a product you feature in the video.
- Write a detailed description. Putting the products you use in your video description will help your viewers, and it’s a great place to include affiliate links if you ever join an affiliate program (like Amazon’s) to generate some revenue.
Are you already making beauty videos? If so, let us know if you have any of your own tips!
Richard Bennett
Richard Bennett is a writer and a lover of all things video.
Follow @Richard Bennett
Thrifty Approaches to YouTube Video Card Production
How to Create YouTube Intros & End Cards - Free and Easy

Shanoon Cox
Oct 26, 2023• Proven solutions
Part1: Intros
Elements of an Intro
Intros should only last about five seconds, and that can be cut down to two or three if you have a larger following.
When your intro video is longer than five seconds viewers are more likely to click away. The first 15 seconds of a video is when viewers are most likely to decide to click on one of the recommended videos, or go back to their search results and choose something else. The odds of them leaving within these first 15 seconds are greater if you do not get right to the main point of your video. That is why long intro sequences are bad for your watch time.
Whether it is better to put your intro at the very beginning of your video, or after you introduce your topic, will depend on your viewers. You may want to try it both ways and then look at your retention report (found in your YouTube Creator Studio under Analytics) to see which works best for you.
Top Intro Sites
There are a few different sites where you can download animated intros, customized to include your username or logo. Here are two of the best:
FlixPress.com
This is probably the most popular intro site. There are a lot of great animated intros available for under $5, or even for free.
IntroMaker.net
This is another site with really professional looking intros for $5. They only have two free options, though.
Creating an Intro in Filmora
You can create a simple intro card in Filmora.
- Choose your background. You may want to use a short clip as your intro, or you may just want a colored background.
- Drag your clip or background into the video track of your timeline and trim it down to five seconds.
- If you have a logo, import it into Filmora and drag it into your picture-in-picture track.
- With your logo selected, click on the Green Screen icon. In the pop-up, select the background of your logo to make it transparent. For this to work your logo cannot be the same color as its background.
- Click on the editing icon with your logo selected and choose an animation.
- Go to the Text/Titles menu and choose an animated title that suits your channel. Drag it into your text track and edit it to include your name.
- The last piece of your intro is sound. You can choose a song from Filmora’s library and cut it down to five seconds, or import your sound effect.
- Export your video and save it for use in all of your other videos.
Part 2: End Cards
When your video ends, YouTube will recommend a selection of videos users may want to watch next. Often, these recommendations will not include more of your videos.
To keep viewers on your channel, you can create your End Card which recommends other content you have created.
Elements of an End Card
An end card includes clips from two or three of your videos, muted, and shrunk down to thumbnail-size. Using spotlight annotations you can make these thumbnails click-able.
It is also important that your end card includes multiple calls to action. A call to action is meant to spur a viewer to some kind of action. Writing ‘Check out this video’ above one of your thumbnails is a call to action.
You should also have a subscribe link somewhere in your end card, ideally a very noticeable button with a proven call to action like ‘Subscribe Now!’.
Some creators will leave their end cards at that and play music overtop, but it can be even more effective to include a voiceover where you ask viewers to subscribe and watch your other videos.
How To Make an End Card
- Choose a static background. You may want to download an end card template or create one in a drawing program. If you do, make sure to include calls to action like ‘Watch more!’ and ‘Subscribe’.
- Drag your background into your timeline at the end of your video.
- Import two or three of your previous videos and drag them into your picture in picture tracks. Each clip should be on its track.
- Trim the clips in your picture in picture track down to the same length as your end card.
- Shrink your clips down to thumbnail-size by dragging their corners in the preview window.
- Position your clips so they are spaced evenly by dragging them in the preview screen.
- Mute your clips.
- If your background does not include any calls to action, choose a title from the Text/Titles menu in Filmora and create at least two – one asking viewers to subscribe, and one asking them to watch your suggested videos.
- Export your video from Filmora and upload it to YouTube.
- Go to your Video Manager and select Annotations in the drop-down menu next to your video.
- Go to your end card in the previewer, as that is where you want to add your annotations.
- Click Add Annotation and add a spotlight annotation to your video. Stretch it over one of your thumbnails and then check the Link box under your Annotation’s timing. Insert a link to the video you are previewing.
- Repeat for any other thumbnails. For your subscribe button, change where it said ‘Video’ to ‘Subscribe’ and enter your channel URL.
- Click Apply Changes.
Shanoon Cox
Shanoon Cox is a writer and a lover of all things video.
Follow @Shanoon Cox
Shanoon Cox
Oct 26, 2023• Proven solutions
Part1: Intros
Elements of an Intro
Intros should only last about five seconds, and that can be cut down to two or three if you have a larger following.
When your intro video is longer than five seconds viewers are more likely to click away. The first 15 seconds of a video is when viewers are most likely to decide to click on one of the recommended videos, or go back to their search results and choose something else. The odds of them leaving within these first 15 seconds are greater if you do not get right to the main point of your video. That is why long intro sequences are bad for your watch time.
Whether it is better to put your intro at the very beginning of your video, or after you introduce your topic, will depend on your viewers. You may want to try it both ways and then look at your retention report (found in your YouTube Creator Studio under Analytics) to see which works best for you.
Top Intro Sites
There are a few different sites where you can download animated intros, customized to include your username or logo. Here are two of the best:
FlixPress.com
This is probably the most popular intro site. There are a lot of great animated intros available for under $5, or even for free.
IntroMaker.net
This is another site with really professional looking intros for $5. They only have two free options, though.
Creating an Intro in Filmora
You can create a simple intro card in Filmora.
- Choose your background. You may want to use a short clip as your intro, or you may just want a colored background.
- Drag your clip or background into the video track of your timeline and trim it down to five seconds.
- If you have a logo, import it into Filmora and drag it into your picture-in-picture track.
- With your logo selected, click on the Green Screen icon. In the pop-up, select the background of your logo to make it transparent. For this to work your logo cannot be the same color as its background.
- Click on the editing icon with your logo selected and choose an animation.
- Go to the Text/Titles menu and choose an animated title that suits your channel. Drag it into your text track and edit it to include your name.
- The last piece of your intro is sound. You can choose a song from Filmora’s library and cut it down to five seconds, or import your sound effect.
- Export your video and save it for use in all of your other videos.
Part 2: End Cards
When your video ends, YouTube will recommend a selection of videos users may want to watch next. Often, these recommendations will not include more of your videos.
To keep viewers on your channel, you can create your End Card which recommends other content you have created.
Elements of an End Card
An end card includes clips from two or three of your videos, muted, and shrunk down to thumbnail-size. Using spotlight annotations you can make these thumbnails click-able.
It is also important that your end card includes multiple calls to action. A call to action is meant to spur a viewer to some kind of action. Writing ‘Check out this video’ above one of your thumbnails is a call to action.
You should also have a subscribe link somewhere in your end card, ideally a very noticeable button with a proven call to action like ‘Subscribe Now!’.
Some creators will leave their end cards at that and play music overtop, but it can be even more effective to include a voiceover where you ask viewers to subscribe and watch your other videos.
How To Make an End Card
- Choose a static background. You may want to download an end card template or create one in a drawing program. If you do, make sure to include calls to action like ‘Watch more!’ and ‘Subscribe’.
- Drag your background into your timeline at the end of your video.
- Import two or three of your previous videos and drag them into your picture in picture tracks. Each clip should be on its track.
- Trim the clips in your picture in picture track down to the same length as your end card.
- Shrink your clips down to thumbnail-size by dragging their corners in the preview window.
- Position your clips so they are spaced evenly by dragging them in the preview screen.
- Mute your clips.
- If your background does not include any calls to action, choose a title from the Text/Titles menu in Filmora and create at least two – one asking viewers to subscribe, and one asking them to watch your suggested videos.
- Export your video from Filmora and upload it to YouTube.
- Go to your Video Manager and select Annotations in the drop-down menu next to your video.
- Go to your end card in the previewer, as that is where you want to add your annotations.
- Click Add Annotation and add a spotlight annotation to your video. Stretch it over one of your thumbnails and then check the Link box under your Annotation’s timing. Insert a link to the video you are previewing.
- Repeat for any other thumbnails. For your subscribe button, change where it said ‘Video’ to ‘Subscribe’ and enter your channel URL.
- Click Apply Changes.
Shanoon Cox
Shanoon Cox is a writer and a lover of all things video.
Follow @Shanoon Cox
Also read:
- Quick and Free IOS Apps to Convert YouTube Videos to MP3 Files
- [New] Elevate the Visual Appeal of Your Video Credits
- 5-Top Link Minimizers Transforming YouTube Watchability for 2024
- In 2024, Decoding Veiled Content on YouTube
- Building Wealth Through Video Content Revenue for 2024
- Crafting Powerful Thumbnails with Top 20 Font Options for 2024
- 2024 Approved Boost Your YouTube Presence with Personalized Annotations and Card Integration
- Elevate Your YouTube Presence with Optimal Post Times for 2024
- [Updated] Essential Tools Ranking the Best Mobile Videography Apps
- [Updated] Essential 11 Zero-Cost YouTube Moniker Makers
- 2024 Approved Cutting Edge Top 8 Free Online Video Tools
- [New] Delving Into the World of Mukbang Videos
- Exquisite Film Series Selection - YouTube Edition
- Elevate Creations - Get FREE High-Quality Templates Today for 2024
- How To Acquire Standardized Thumbnails From Youtube Online & Desktop Options
- [Updated] Crafting a Unique Online Presence YouTube Edition
- A Filmmaker's Companion The Journey From Capturing to Post-Production of 360 Videos
- 2024 Approved Crafting Dynamic Collab Videos with Content Partners on YouTube
- Streamline Creativity with #1 to #5 Mac Editors for Sierra Users
- 2024 Approved Ace Your Messaging Must-Know Advanced Tricks and Techniques in WhatsApp
- In 2024, How To Use Special Features - Virtual Location On Xiaomi Redmi 12 5G? | Dr.fone
- [New] 2024 Approved From Celluloid to Screen Adapting Your Vids for IG
- 2024 Approved Synching Visuals and Audio Step-by-Step Process
- Navigating Social Media Landscape Facebook Daily Use
- [New] Enhancing Audience Connection Through Android & iOS Streams
- [Updated] In 2024, Unveiling 8 Top Choices Your Go-To Templates on IG
- Reinstall drivers with Device Manager in Windows 11 & 10
- Capture the Moment IDevice Screenshots & Playback for 2024
- Title: "[New] Elevating Your Look Expert Tutorials for Everyone"
- Author: Brian
- Created at : 2024-05-25 12:40:05
- Updated at : 2024-05-26 12:40:05
- Link: https://youtube-video-recordings.techidaily.com/new-elevating-your-look-expert-tutorials-for-everyone/
- License: This work is licensed under CC BY-NC-SA 4.0.
