
!["[New] Elevating Your Footage IMovie Videos for YouTube Enthusiasts"](https://thmb.techidaily.com/8952485f60295f3d1e3d2e7fb384d7f4849fc0ba1ac13c5b58f754ed696cbd0a.jpg)
"[New] Elevating Your Footage IMovie Videos for YouTube Enthusiasts"
Elevating Your Footage: IMovie Videos for YouTube Enthusiasts
How to Upload a Video from iMovie to YouTube?

Liza Brown
Aug 18, 2022• Proven solutions
“Is iMovie good for YouTube?”
The iMovie is not only good for YouTube but various other social media platforms. The thing is, you have to compromise with the quality offered by Apple’s video editor iMovie. Well, iMovie is perfect for getting started for beginners. But, the professionals and ones who want a bit high features than basic ones should look elsewhere. Thus, we always recommend alternatives to a particular software for our audience. In this article, there is a mention of Wondershare Filmora to overcome the drawbacks of iMovie.
Without further ado, let’s begin with how to upload a video from iMovie to YouTube. We want to lead with the best iMovie export settings, specific troubleshooting issues, and our alternative intro section to overcome iMovie’s limitations.
Part 1: How to Upload a Video from iMovie to YouTube?
iMovie is ideal for making YouTube videos if you are too basic and are not looking for advanced features. Remember that professionalism pays in these platforms and helps you stand better among others. If you’re still interested in making introductory videos, here is a step-by-step guide on uploading a video to YouTube from iMovie on Mac first and leading with iPhone.
Step-by-Step Tutorial on how to upload a video from iMovie to YouTube on Mac
Step 1: Create a Project
On the first step, go to iMovie on Mac and click the Create New tab below.
Step 2: Import Media
Click the Import Media button and browse the files on your computer, as shown below.
Step 3: Edit Clips
It’s time to edit video footage. Drag your video to the timeline, as shown below.
Then, you can trim and drag the edges of video clips to allow editing.
Step 4: Add Titles
You can add titles by clicking the Title tab and further drag the Title’s template into the timeline.
Step 5: Export the Video
Click the Export button as follows after editing is over.
Select YouTube to upload your video over the platform directly.
Step 6: Save
After selecting the desired platform, click the Next tab to proceed with saving the file.
At last, save your video as shown below.
Step-by-Step Tutorial on how to upload iMovie to YouTube from iPhone
Step 1: Share the iMovie Project
Go to iMovie on your iPhone. Open the iMovie project on your iPhone and tap the Share button to select YouTube. Enter the information of Title, Description, Size, Tags, Privacy, and Location (optional).
Step 2: Upload iMovie Files
For ease of use, you can upload saved videos in Photo Library on your iPhone. Then, you can upload iMovie videos via the YouTube iOS app. Sign In to YouTube and click the Camera icon at the top of the Home page. Select your iPhone Photo Library file and set the video Title, Description, Size, Tags, and Privacy. Then, hit the Upload button to confirm.
Part 2: The Best iMovie Export Settings for YouTube Videos
As we all know that iMovie consists of a bit long procedure to export projects. Here are some tips on the best iMovie export settings to avoid an unnecessary headache.
- Set small resolution: Small resolution plays a more significant role, especially while uploading. Thus, you can set the smallest resolution in the Email tab of the Export button.
2. Change Export settings in the File tab: There is a File tab under the Export button. Click it and find various settings that you need to change to get the best export settings for YouTube 2021. Make the Title of the video as small as possible. Set the resolution at 1080P than 4K.
However, it isn’t going to upgrade the resolution if your video is already in the 1080P definition. Now, the last setting that will crazily offer you the best quality and lots of space-saving. You have to select Best (ProRes) in quality settings for this purpose. These settings also take less time to upload to YouTube.
3. Compress is not for speed: Various options you see in the Compresstab are not for speed. They are for how you save the video on a desktop. Thus, always choose the Better Quality tab than Faster.
- Do not export directly to YouTube: iMovie is pretty basic and doesn’t offer great settings to upload your video instantly. You may have to make changes to the uploaded video even if you do this as per our step-by-step guide mentioned above.
Part 3: How to fix the “Failed to Upload to YouTube” Error on iMovie?
The “iMovie to YouTube failed” problem occurs when you directly upload a YouTube video from iMovie. The issue will result if you upload from any third-party uploader. That is why the direct upload doesn’t work, especially in iMovie. You can opt to share your video to the desktop first and then drag it to upload to the YouTube platform.
Part 4: Upload Videos to YouTube with the Best Alternative to iMovie - Wondershare Filmora
“What can I use instead of iMovie to overcome its limitations?”
When you see that iMovie is not uploading to YouTube or iMovie upload to YouTube got stuck, go for a better alternative. In this section, we’d like to recommend Wondershare Filmora that offers the best export settings compared to iMovie. It is the go-to solution if you can’t upload video from iMovie to YouTube directly. Filmora further provides intuitive editing tools that professionally make your YouTube video projects.
Export Key Aspects of Wondershare Filmora in comparison to iMovie:
- It offers a long list of export resolutions to choose from.
- You get separate video and audio settings such as Encoder, Channel, Frame Rate, Bit Rate, Resolution, etc.
- It is further compatible with export to various devices including the iPhone, Samsung, iPod, Apple TV, iPad, Google Pixel, PSP, Smart TV, etc.
Step-by-Step Guide on how to upload a video from iMovie to YouTube via Wondershare Filmora
Step 1: Click the Export button and select resolution
After your project in Wondershare Filmora is over, click the Export tab and select video resolution from the Local tab, as shown below.
It has a list of formats. You can also edit the Name and saving location here.
Step 2: Select Quality
Select the Settings button and choose from three quality levels of Best, Better, and Good. You can also adjust video and audio parameters, including the Encoder, Frame Rate, Resolution, Bit Rate, etc.
Step 3: Select platform
Select the YouTube tab, Sign In to your YouTube account, and hit the Export button after modifying the Title and Quality if needed. Also, make sure to check the Enable GPU accelerated video encoding tab.
Select Wondershare Filmora as the ultimate solution even if iMovie upload to YouTube not showing up.
Conclusion
Hopefully, we’ve informed you of the relevant facts on how to upload a video from iMovie to YouTube. We have also examined the number of troubleshooting issues involved in the iMovie video editor. Well, you will get to face similar kinds of export difficulties in the iMovie editor. Also, the entire procedure to end the exporting task is a bit long in iMovie compared to any other video editing software. Thus, it’s crucial to check out what other alternatives the technological world has today. We can’t state to you a better beginner-friendly yet advanced editing option than Wondershare Filmora that rightly outtakes the iMovie video editor in all aspects.
Liza Brown
Liza Brown is a writer and a lover of all things video.
Follow @Liza Brown
Liza Brown
Aug 18, 2022• Proven solutions
“Is iMovie good for YouTube?”
The iMovie is not only good for YouTube but various other social media platforms. The thing is, you have to compromise with the quality offered by Apple’s video editor iMovie. Well, iMovie is perfect for getting started for beginners. But, the professionals and ones who want a bit high features than basic ones should look elsewhere. Thus, we always recommend alternatives to a particular software for our audience. In this article, there is a mention of Wondershare Filmora to overcome the drawbacks of iMovie.
Without further ado, let’s begin with how to upload a video from iMovie to YouTube. We want to lead with the best iMovie export settings, specific troubleshooting issues, and our alternative intro section to overcome iMovie’s limitations.
Part 1: How to Upload a Video from iMovie to YouTube?
iMovie is ideal for making YouTube videos if you are too basic and are not looking for advanced features. Remember that professionalism pays in these platforms and helps you stand better among others. If you’re still interested in making introductory videos, here is a step-by-step guide on uploading a video to YouTube from iMovie on Mac first and leading with iPhone.
Step-by-Step Tutorial on how to upload a video from iMovie to YouTube on Mac
Step 1: Create a Project
On the first step, go to iMovie on Mac and click the Create New tab below.
Step 2: Import Media
Click the Import Media button and browse the files on your computer, as shown below.
Step 3: Edit Clips
It’s time to edit video footage. Drag your video to the timeline, as shown below.
Then, you can trim and drag the edges of video clips to allow editing.
Step 4: Add Titles
You can add titles by clicking the Title tab and further drag the Title’s template into the timeline.
Step 5: Export the Video
Click the Export button as follows after editing is over.
Select YouTube to upload your video over the platform directly.
Step 6: Save
After selecting the desired platform, click the Next tab to proceed with saving the file.
At last, save your video as shown below.
Step-by-Step Tutorial on how to upload iMovie to YouTube from iPhone
Step 1: Share the iMovie Project
Go to iMovie on your iPhone. Open the iMovie project on your iPhone and tap the Share button to select YouTube. Enter the information of Title, Description, Size, Tags, Privacy, and Location (optional).
Step 2: Upload iMovie Files
For ease of use, you can upload saved videos in Photo Library on your iPhone. Then, you can upload iMovie videos via the YouTube iOS app. Sign In to YouTube and click the Camera icon at the top of the Home page. Select your iPhone Photo Library file and set the video Title, Description, Size, Tags, and Privacy. Then, hit the Upload button to confirm.
Part 2: The Best iMovie Export Settings for YouTube Videos
As we all know that iMovie consists of a bit long procedure to export projects. Here are some tips on the best iMovie export settings to avoid an unnecessary headache.
- Set small resolution: Small resolution plays a more significant role, especially while uploading. Thus, you can set the smallest resolution in the Email tab of the Export button.
2. Change Export settings in the File tab: There is a File tab under the Export button. Click it and find various settings that you need to change to get the best export settings for YouTube 2021. Make the Title of the video as small as possible. Set the resolution at 1080P than 4K.
However, it isn’t going to upgrade the resolution if your video is already in the 1080P definition. Now, the last setting that will crazily offer you the best quality and lots of space-saving. You have to select Best (ProRes) in quality settings for this purpose. These settings also take less time to upload to YouTube.
3. Compress is not for speed: Various options you see in the Compresstab are not for speed. They are for how you save the video on a desktop. Thus, always choose the Better Quality tab than Faster.
- Do not export directly to YouTube: iMovie is pretty basic and doesn’t offer great settings to upload your video instantly. You may have to make changes to the uploaded video even if you do this as per our step-by-step guide mentioned above.
Part 3: How to fix the “Failed to Upload to YouTube” Error on iMovie?
The “iMovie to YouTube failed” problem occurs when you directly upload a YouTube video from iMovie. The issue will result if you upload from any third-party uploader. That is why the direct upload doesn’t work, especially in iMovie. You can opt to share your video to the desktop first and then drag it to upload to the YouTube platform.
Part 4: Upload Videos to YouTube with the Best Alternative to iMovie - Wondershare Filmora
“What can I use instead of iMovie to overcome its limitations?”
When you see that iMovie is not uploading to YouTube or iMovie upload to YouTube got stuck, go for a better alternative. In this section, we’d like to recommend Wondershare Filmora that offers the best export settings compared to iMovie. It is the go-to solution if you can’t upload video from iMovie to YouTube directly. Filmora further provides intuitive editing tools that professionally make your YouTube video projects.
Export Key Aspects of Wondershare Filmora in comparison to iMovie:
- It offers a long list of export resolutions to choose from.
- You get separate video and audio settings such as Encoder, Channel, Frame Rate, Bit Rate, Resolution, etc.
- It is further compatible with export to various devices including the iPhone, Samsung, iPod, Apple TV, iPad, Google Pixel, PSP, Smart TV, etc.
Step-by-Step Guide on how to upload a video from iMovie to YouTube via Wondershare Filmora
Step 1: Click the Export button and select resolution
After your project in Wondershare Filmora is over, click the Export tab and select video resolution from the Local tab, as shown below.
It has a list of formats. You can also edit the Name and saving location here.
Step 2: Select Quality
Select the Settings button and choose from three quality levels of Best, Better, and Good. You can also adjust video and audio parameters, including the Encoder, Frame Rate, Resolution, Bit Rate, etc.
Step 3: Select platform
Select the YouTube tab, Sign In to your YouTube account, and hit the Export button after modifying the Title and Quality if needed. Also, make sure to check the Enable GPU accelerated video encoding tab.
Select Wondershare Filmora as the ultimate solution even if iMovie upload to YouTube not showing up.
Conclusion
Hopefully, we’ve informed you of the relevant facts on how to upload a video from iMovie to YouTube. We have also examined the number of troubleshooting issues involved in the iMovie video editor. Well, you will get to face similar kinds of export difficulties in the iMovie editor. Also, the entire procedure to end the exporting task is a bit long in iMovie compared to any other video editing software. Thus, it’s crucial to check out what other alternatives the technological world has today. We can’t state to you a better beginner-friendly yet advanced editing option than Wondershare Filmora that rightly outtakes the iMovie video editor in all aspects.
Liza Brown
Liza Brown is a writer and a lover of all things video.
Follow @Liza Brown
Effective YouTube Banners: Pros and Cons to Avoid
How To Make Good YouTube Banner - Dos and Don’ts

Richard Bennett
Oct 26, 2023• Proven solutions
It’s important to learn how to make a good YouTube banner because, when you click into a channel, the first thing you usually see and pay attention to is the channel art.
Channel art gives viewers a first impression of who you are and allows viewers to know what your channel is all about. Channel art can be a great way to show creativity, and there are also ways you can design your banner to help your channel grow.
Here are the Dos and Don’ts of YouTube Channel Art.
- What Kind of Background Should I Use?
- Should I Use My Face?
- What Should I Write on Banner?
- How Can I Make My Channel Art Look Good?


Part 1: What Kind of Background Should I Use?
DO: High-Quality Photos
It’s easy to take pictures with our phones, but not all of these pictures will look great blown up for channel art.
When choosing great photos for your background, pick ones that are high quality and don’t become pixelated once they are blown up. There are tons of free stock photo websites out there to help you find a high-quality picture that’s perfect for your channel.
DON’T: Use Chaotic Patterns
Using patterns for the background of your channel banner can help your channel look super creative and stand out from others. However, if you use a pattern that is chaotic and hard on the eyes, you may not attract many subscribers. When using patterns, choose patterns that are not heavy in color and have too many lines or shapes. There should be an evenness to the shapes and negative space within the pattern itself. Try to stay away from patterns that are 3D which can conflict with the viewer’s eyesight and make them dizzy.
Part 2: Should I Use My Face?
Whether you should use your face on your channel banner depends on what your channel is about. If you have a channel focused on beauty, fashion, fitness, or family vlogs then it’s a good idea to include your face. It comes off personable and helps viewers relate to you. If you have a channel that is about something like gaming, tech reviews, or book reviews then it isn’t necessary to include your face because the focus of your content isn’t you as a personality.
If you do include pictures, here are some tips:
Don’t: Use Blurry Photos
If your photos are blurry, pixilated, or poor quality then don’t use them. Using blurry pictures comes off as unprofessional.
That doesn’t mean you have to hire a photographer to take pictures for your channel. The average smartphone takes really great pictures, so long as you have enough light. If you need a great picture, use a high-quality selfie or ask a friend to take a nice picture of you.
Don’t: Use Outdated Pictures
It is always best to use a current photo of yourself. Many times viewers will go and follow you on social media as well. If they see that you have current photos on your social media but not on your channel, they are become confused and perhaps lose interest.
Part 3: What Should I Write on My Banner?

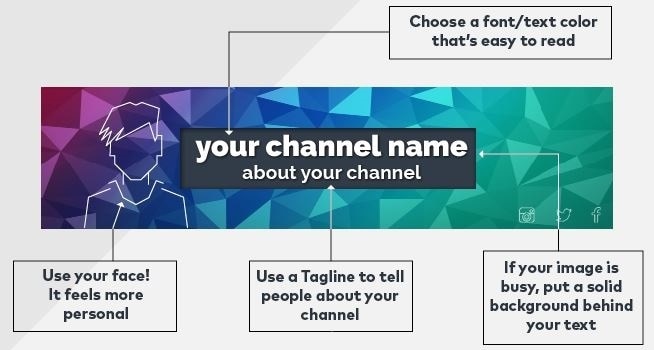
Do: Include Your Channel Name
While including your channel name in your banner seems like a no brainer, it is often left out by aspiring YouTubers. Displaying your channel name in a large font allows it to be more visible for viewers - your channel name is already on the page, but it is underneath your channel art and doesn’t stand out.
Seeing your channel name included in your banner also helps viewers to know they are on the right page, if there are YouTubers out there with similar names to yours.
Do: Include Upload Days
Consistent upload days are highly important for gaining more views and subscribers. Including your exact upload days helps viewers know when they should expect new videos from you. I made the mistake of not including upload days when I first started my channel 3 years ago. I had drops in views because my subscribers didn’t know when I would upload videos.
If you find that you cannot stick to a certain upload day, try to include how often you will post instead. For example, you can say, “New Videos Posted Weekly.” Viewers will respect you more and even be more likely to subscribe when you tell them your upload days. They want a guarantee that you’re going to post again in the near future.
Do: Include Social Media
Social media accounts are important to include in your channel art because we live in a social media generation. People are on social media every second of the day. If you are looking to take your YouTube channel seriously, it is good practice to ask viewers to follow you on your social media.
Including social media icons in your channel art lets people know where they can find you. Another good reason to include your current social media in your banner is that sometimes you might join a new platform or quit an old one. You may be using Twitter for months and then decide that you like Facebook better. Your current social media handles keep subscribers from having to guess which one to follow you on.
Make sure everything important fits in the safe area!
Do: Include Brief Channel Description or Tag Line
Aside from your channel name, you should also include a brief channel description or tag line to tell your viewers what your channel is all about. If you’re an aspiring beauty guru, you may include something like Makeup Tutorials, Product Reviews, or Mommy Makeovers. Or, you may include a cool tag line that describes the goal of your channel, like “Empowering Mother’s Through Makeup.”
I’ve noticed that YouTubers that use 2-3 descriptive words in their channel art make many different types of videos on their channel but they all full under those categories.
YouTubers that use tag lines are using their channel as a platform to carry out a specific mission on giving help or educating others.
Whether you decide to use descriptive words or a tag line, they will help your channel tremendously by setting expectations for your viewers.
Part 4: How Can I Make My Channel Art Look Good?
Do: Create Consistent Branding
Since becoming a YouTuber myself, I’ve come to learn that paying attention to your branding is very important. Focus attention to what colors and fonts you use. The colors you use for your channel can influence your audience to feel a certain way. For example, using yellow can show that you’re happy and upbeat while using blue can show you’re more calm and relaxed. Whatever color you choose, make sure it’s a true representation of who you are.
Using the right font can also be important to your channel. There are many different fonts available now. When choosing a font, choose one that goes with your channel that is easy to read. You might choose a very pretty cursive font, but if your viewers can’t read it, it can be useless.
Don’t: Include Images That Have Nothing to Do with Your Channel
This simple mistake can cost you many subscribers. For example, if your channel is about Beauty videos, then your channel art shouldn’t include pictures of food or you eating a burger. Your channel art is the first thing that viewers see when clicking on your page. You want them to instantly know what your channel is all about without having to find it in the description box. If your channel is about a few different things, then include all of those images in the channel art so they still know what your channel about. Just don’t confuse your viewers as to what your channel is really about.
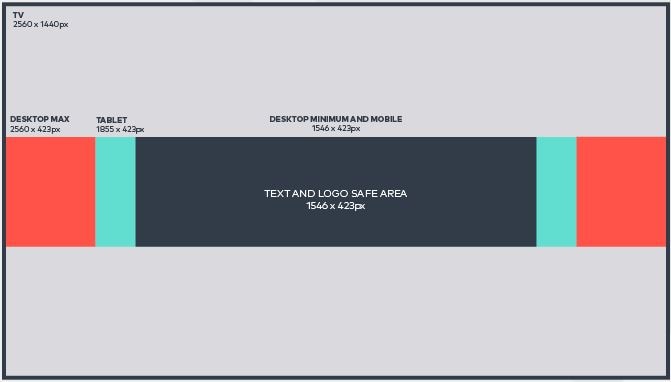
Don’t: Have Images and Text That Cut Off
YouTube helps YouTubers by giving them a free channel art template to use as a guide when creating channel art. The template includes 3 different perspectives on how your channel art will be viewed by people looking at mobile devices, computer screens, and TVs. Many people make the mistake of creating art on the TV perspective which then cuts off images and text for the mobile and computer views. To save you the trouble of having images that cut off, it’s best to create your channel in the mobile dimensions that way it will be seen in the computer and TV dimensions with no problem.
Joshelle is a YouTuber from Atlanta, GA. She has a YouTube channel called ElleToshea where she shows viewers how to improve their homes and spaces on an affordable budget through DIY home decor. ElleToshea features minimalist home decor styles based off popular stores such as Anthropologie and Urban Outfitters.
Now that you know how to make a good YouTube banner, what will you do next?
Touch Up YouTube Videos with Filmora
Wondershare Filmora features lots of utilities for both video and audio editing. You can change the video speed or change the aspect ratio easily. Besides, there are plentiful filters, elements, effects and overlays built, so you can use them without costing any extra fee.
Richard Bennett
Richard Bennett is a writer and a lover of all things video.
Follow @Richard Bennett
Richard Bennett
Oct 26, 2023• Proven solutions
It’s important to learn how to make a good YouTube banner because, when you click into a channel, the first thing you usually see and pay attention to is the channel art.
Channel art gives viewers a first impression of who you are and allows viewers to know what your channel is all about. Channel art can be a great way to show creativity, and there are also ways you can design your banner to help your channel grow.
Here are the Dos and Don’ts of YouTube Channel Art.
- What Kind of Background Should I Use?
- Should I Use My Face?
- What Should I Write on Banner?
- How Can I Make My Channel Art Look Good?
Part 1: What Kind of Background Should I Use?
DO: High-Quality Photos
It’s easy to take pictures with our phones, but not all of these pictures will look great blown up for channel art.
When choosing great photos for your background, pick ones that are high quality and don’t become pixelated once they are blown up. There are tons of free stock photo websites out there to help you find a high-quality picture that’s perfect for your channel.
DON’T: Use Chaotic Patterns
Using patterns for the background of your channel banner can help your channel look super creative and stand out from others. However, if you use a pattern that is chaotic and hard on the eyes, you may not attract many subscribers. When using patterns, choose patterns that are not heavy in color and have too many lines or shapes. There should be an evenness to the shapes and negative space within the pattern itself. Try to stay away from patterns that are 3D which can conflict with the viewer’s eyesight and make them dizzy.
Part 2: Should I Use My Face?
Whether you should use your face on your channel banner depends on what your channel is about. If you have a channel focused on beauty, fashion, fitness, or family vlogs then it’s a good idea to include your face. It comes off personable and helps viewers relate to you. If you have a channel that is about something like gaming, tech reviews, or book reviews then it isn’t necessary to include your face because the focus of your content isn’t you as a personality.
If you do include pictures, here are some tips:
Don’t: Use Blurry Photos
If your photos are blurry, pixilated, or poor quality then don’t use them. Using blurry pictures comes off as unprofessional.
That doesn’t mean you have to hire a photographer to take pictures for your channel. The average smartphone takes really great pictures, so long as you have enough light. If you need a great picture, use a high-quality selfie or ask a friend to take a nice picture of you.
Don’t: Use Outdated Pictures
It is always best to use a current photo of yourself. Many times viewers will go and follow you on social media as well. If they see that you have current photos on your social media but not on your channel, they are become confused and perhaps lose interest.
Part 3: What Should I Write on My Banner?
Do: Include Your Channel Name
While including your channel name in your banner seems like a no brainer, it is often left out by aspiring YouTubers. Displaying your channel name in a large font allows it to be more visible for viewers - your channel name is already on the page, but it is underneath your channel art and doesn’t stand out.
Seeing your channel name included in your banner also helps viewers to know they are on the right page, if there are YouTubers out there with similar names to yours.
Do: Include Upload Days
Consistent upload days are highly important for gaining more views and subscribers. Including your exact upload days helps viewers know when they should expect new videos from you. I made the mistake of not including upload days when I first started my channel 3 years ago. I had drops in views because my subscribers didn’t know when I would upload videos.
If you find that you cannot stick to a certain upload day, try to include how often you will post instead. For example, you can say, “New Videos Posted Weekly.” Viewers will respect you more and even be more likely to subscribe when you tell them your upload days. They want a guarantee that you’re going to post again in the near future.
Do: Include Social Media
Social media accounts are important to include in your channel art because we live in a social media generation. People are on social media every second of the day. If you are looking to take your YouTube channel seriously, it is good practice to ask viewers to follow you on your social media.
Including social media icons in your channel art lets people know where they can find you. Another good reason to include your current social media in your banner is that sometimes you might join a new platform or quit an old one. You may be using Twitter for months and then decide that you like Facebook better. Your current social media handles keep subscribers from having to guess which one to follow you on.
Make sure everything important fits in the safe area!
Do: Include Brief Channel Description or Tag Line
Aside from your channel name, you should also include a brief channel description or tag line to tell your viewers what your channel is all about. If you’re an aspiring beauty guru, you may include something like Makeup Tutorials, Product Reviews, or Mommy Makeovers. Or, you may include a cool tag line that describes the goal of your channel, like “Empowering Mother’s Through Makeup.”
I’ve noticed that YouTubers that use 2-3 descriptive words in their channel art make many different types of videos on their channel but they all full under those categories.
YouTubers that use tag lines are using their channel as a platform to carry out a specific mission on giving help or educating others.
Whether you decide to use descriptive words or a tag line, they will help your channel tremendously by setting expectations for your viewers.
Part 4: How Can I Make My Channel Art Look Good?
Do: Create Consistent Branding
Since becoming a YouTuber myself, I’ve come to learn that paying attention to your branding is very important. Focus attention to what colors and fonts you use. The colors you use for your channel can influence your audience to feel a certain way. For example, using yellow can show that you’re happy and upbeat while using blue can show you’re more calm and relaxed. Whatever color you choose, make sure it’s a true representation of who you are.
Using the right font can also be important to your channel. There are many different fonts available now. When choosing a font, choose one that goes with your channel that is easy to read. You might choose a very pretty cursive font, but if your viewers can’t read it, it can be useless.
Don’t: Include Images That Have Nothing to Do with Your Channel
This simple mistake can cost you many subscribers. For example, if your channel is about Beauty videos, then your channel art shouldn’t include pictures of food or you eating a burger. Your channel art is the first thing that viewers see when clicking on your page. You want them to instantly know what your channel is all about without having to find it in the description box. If your channel is about a few different things, then include all of those images in the channel art so they still know what your channel about. Just don’t confuse your viewers as to what your channel is really about.
Don’t: Have Images and Text That Cut Off
YouTube helps YouTubers by giving them a free channel art template to use as a guide when creating channel art. The template includes 3 different perspectives on how your channel art will be viewed by people looking at mobile devices, computer screens, and TVs. Many people make the mistake of creating art on the TV perspective which then cuts off images and text for the mobile and computer views. To save you the trouble of having images that cut off, it’s best to create your channel in the mobile dimensions that way it will be seen in the computer and TV dimensions with no problem.
Joshelle is a YouTuber from Atlanta, GA. She has a YouTube channel called ElleToshea where she shows viewers how to improve their homes and spaces on an affordable budget through DIY home decor. ElleToshea features minimalist home decor styles based off popular stores such as Anthropologie and Urban Outfitters.
Now that you know how to make a good YouTube banner, what will you do next?
Touch Up YouTube Videos with Filmora
Wondershare Filmora features lots of utilities for both video and audio editing. You can change the video speed or change the aspect ratio easily. Besides, there are plentiful filters, elements, effects and overlays built, so you can use them without costing any extra fee.
Richard Bennett
Richard Bennett is a writer and a lover of all things video.
Follow @Richard Bennett
Also read:
- [Updated] Buzzing Beats Essential Background Scores for Viral Video Shorts
- 2024 Approved 15 Favorite Online Anime Video Platforms
- Flex Your Viewing Muscles Handling Multiple YouTube Videos
- In 2024, Boosting Income Smart Strategies for Profit From YouTube Mobile Content
- In 2024, Download YouTube Tunes with These 10+ No-Cost Audio Crackers
- Characters That Captivate Key Growth Strategies
- 2024 Approved Enhancing Quality without the Mic A Practical Guide
- In 2024, A Bright Idea Boost Your Video's Impact on YouTube
- In 2024, Elite Content Makers Top Paid Online Stars
- Decoding the Revised YouTube Earnings Criteria
- Digital Dominance Highest Viewed YouTube Videos Today for 2024
- Master the Art of Attraction & Retention on YouTube with Our Top 6 Tips
- Trustworthy Tactics for Multiplying a Million Views on YouTube
- Immerse in Virtual Reality Top 10 YouTube Videos
- In 2024, Best Tales for YouTube Triumph Top 3 Strategies
- Comparative Study of YouTubes and DailyMentions
- The Ultimate Tutorial on YouTube Data Analysis
- 2024 Approved Elevate Your Content Strategy Prime Video Rank Monitors
- Your Youtubian Beginnings Establishing Your Channel, Earning Earnings
- [New] Boosting Your Short-Form Video Content on Youtube
- Selecting Android's Best YouTube Video Extractors
- [Updated] Engaging Emojis Boost Your Video's Appeal Without Payments
- Charting Success Navigating a 3-Step Strategy for Tracking YouTube Income
- Acquire No-Cost Sounds for Videos & Podcasts!
- [New] Content Makers' Compensation Breakdown for YouTube Shorts
- [New] Enhancing Engagement Essential Video Formats for YouTube Viewers
- Streamlining Your YouTube Content with FinalCut Pro Expertise
- Understanding How YouTube Manages Post-Upload Content
- Boost Your YouTube Presence with Personalized Annotations and Card Integration for 2024
- Techniques for Successfully Incorporating a Streaming YouTube Playlist
- 2024 Approved Enhancing Visibility and Discoverability via Targeted Tags
- [New] 10 Must-See FREE Film Picks for YouTube Viewers
- [Updated] Enhancing Viewer Engagement with Smart End Screen Techniques
- 2024 Approved Elevate Video Content with Proven Strategies for YouTube Shorts Growth
- 2024 Approved Charting the Course From Scale to Submillions in Youtube
- In 2024, 4 Secrets for Adding Online Vids Seamlessly in PPT
- Blurring Identity Erasing Faces From Video Content
- 2024 Approved Crafting Effective Teacher Videos on YouTube – Top 10 Strategies
- Halt YouTube Suggested Content Now
- In 2024, Charting Your Way to Frequent Payments From YouTube
- In 2024, Clearing Up Confusion A Guide to Understanding YouTube Strikes
- The Best Budget-Friendly Closer Tutorials Top 6 Edition
- [Updated] Crafting a Simple Subscription Web Address for YT
- Revolutionizing Storytelling Free Online/Offline Animations
- Updated 2024 Approved FCPX Captioning 101 How to Add Subtitles to Your Videos
- In 2024, How to Track Vivo G2 by Phone Number | Dr.fone
- The Complete Pathway to Success with Your First Facebook Live for 2024
- Fix Cant Take Screenshot Due to Security Policy on Tecno Pova 5 | Dr.fone
- In 2024, Access All Matches Free World Cup Live Streaming Options
- Best Mac Alternatives for Expert Screen Recording & Playback
- How to Do Velocity Edits on PC
- Transform Imagination to Reality Top 10 Graphic Designers on Android
- In 2024, How to Remove iPhone 6 Plus Activation Lock
- Updated 2024 Approved Find The Best LUTs for Lightroom
- Updated In 2024, Top 10 Male to Female Voice Changer Apps
- Will iSpoofer update On Poco X6 | Dr.fone
- Transforming Social Media Traffic Into Revenue
- Boost Your Cinematography Game Essential iPhone Gear
- 8 Frame Rate Video Converters for a Professional Finish
- In 2024, Using the Best Templates to Create Slow Motion Videos on CapCut
- Elite Windows Melody Makers
- [New] 2024 Approved Facebook Verification How to Get the Blue Verified Badge (Easily)
- [New] Skype Recording Top 10 Picks for Optimal Audio
- [New] 2024 Approved Virtual Adrenaline Rushes - Top 10 Without GTA
- [New] In 2024, Exceptional Top Ten Nintendo Switch Combat Games (Max 156)
- [New] 2024 Approved Interactive Features
- New Color Lut in Video -How to Color Grade Your Video
- [New] The 8 Most Reliable and Free Open Source Video Chat Options for 2024
- Title: "[New] Elevating Your Footage IMovie Videos for YouTube Enthusiasts"
- Author: Brian
- Created at : 2024-06-09 08:54:51
- Updated at : 2024-06-10 08:54:51
- Link: https://youtube-video-recordings.techidaily.com/new-elevating-your-footage-imovie-videos-for-youtube-enthusiasts/
- License: This work is licensed under CC BY-NC-SA 4.0.
